{"value":"因为写文章我经常会需要做一些 GIF。但是网上的各种 GIF 服务不太好,\n所以我想着是不是要自己可以做一个。所以我做了这样一个服务。\n那么我来讲一下,我今天我到底是怎么做的?\n### **一 业务需求。**\n首先第一步我要去实现合成 GIF 这个功能。\n然后我们要实现多文件上传。\n再然后进行 GIF 的合成。\n最后保存到本地。然后返回给前端一个下载链接。\n最后就是服务部署到云服务器上。\n### **二 技术要求。**\nPython (3.6),Flask,Image\nPython的安装就不赘述了,使用下面的语句安装第三方包,或者直接的pycharm中安装,总之安装上就行\nJava\n```\npip install flask\npip install Image\n```\n### **三 技术实现**\n##### **看一下项目结构**\n\n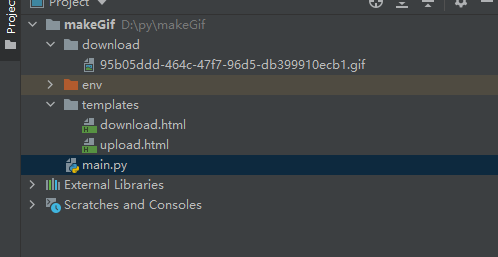\n\n#### **先看代码再进行分析**\nJava\n```\nimport os\nimport uuid\n\nfrom PIL import Image\nfrom flask import Flask, render_template, request, send_from_directory\n\nframe = 10\nsleepTime = 1.0 / frame\napp = Flask(__name__)\nBASE_PATH = os.path.dirname(os.path.abspath(__file__)) +\"/download\"\ndef makeGif(imgList,uid):\n im = imgList[0]\n file_name = BASE_PATH +\"/\"+uid +\".gif\"\n im.save(file_name, save_all=True, append_images=imgList[1:], loop=0, duration=sleepTime)\n\n@app.route('/')\ndef hello_world():\n return render_template('upload.html')\n\n@app.route('/gif',methods=['POST'])\ndef save_file():\n uploaded_files = request.files.getlist(\"photo\")\n uid = str(uuid.uuid4())\n imgList = []\n for file in uploaded_files: # 这里改动以存储多份文件\n img = Image.open(file)\n imgList.append(img)\n makeGif(imgList,uid)\n download_url = \"/download/\"+uid+\".gif\"\n return render_template(\"download.html\",download_url = download_url)\n\n@app.route(\"/download/<filename>\", methods=[\"GET\"])\ndef download_file(filename):\n return send_from_directory(BASE_PATH, filename, as_attachment=True)\n\nif __name__ == '__main__':\n app.run()\n```\n#### **技术点:**\n1. uid的使用\n作为一个网站,有可能会同时有很多人使用所以我这里使用了uid作为唯一的标识。\n2. Image的使用\nImage主要是用来合成GIF的主要功能,图片的变换时间duration是控制每一张图片的展示时间,你可以自己设置。\n3. Flask的使用\n之前没有使用过flask。所以对网页的一些渲染不是很明白,但是也很简单。作为一个占位符然后传递参数。\n完整代码下载地址:[https://download.csdn.net/download/perfect2011/85078659](https://download.csdn.net/download/perfect2011/85078659)\n### **四、服务部署**\n在 Amazon 选了一个免费的服务器。可以免费使用十二个月的时间。这时间。。。不就是让我白嫖吗\n传送地址:[aws服务器免费地址](https://aws.amazon.com/cn/free/?all-free-tier.sort-by=item.additionalFields.SortRank&all-free-tier.sort-order=asc&awsf.Free+Tier+Categories=%2Aall&awsf.Free+Tier+Types=%2Aall&sc_channel=ba&trk=92861c17-b0b0-4e0a-9f78-8d60bc5e2fe2&awsf.Free%20Tier%20Types=*all&awsf.Free%20Tier%20Categories=*all)\n\n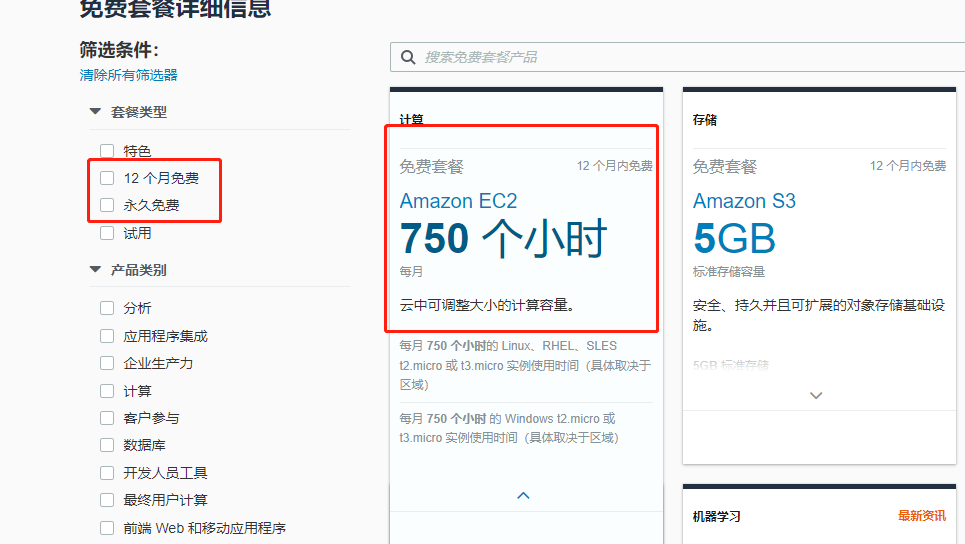\n\nAmazon Elastic Compute Cloud(Amazon EC2 云服务器)是一种 Web 云服务,能在云中提供安全且可调整大小的计算能力,说人话就是一台放在远程的机器,配置可以根据需求调整。官方说还支持 mac 系统,这还真是独一份,哈哈,不过我用不到。\n#### **第一步, 搞个服务器**\n亚马逊云科技提供了100余种产品免费套餐。其中,计算资源Amazon EC2首年12个月免费,750小时/月;存储资源 Amazon S3 首年12个月免费,5GB标准存储容量。\n[https://aws.amazon.com/cn/free/?nc2=h_ql_pr_ft&all-free-tier.sort-by=item.additionalFields.SortRank&all-free-tier.sort-order=asc&awsf.Free%20Tier%20Types=*all&awsf.Free%20Tier%20Categories=*all&trk=e0213267-9c8c-4534-bf9b-ecb1c06e4ac6&sc_channel=el](https://aws.amazon.com/cn/free/?nc2=h_ql_pr_ft&all-free-tier.sort-by=item.additionalFields.SortRank&all-free-tier.sort-order=asc&awsf.Free%20Tier%20Types=*all&awsf.Free%20Tier%20Categories=*all&trk=e0213267-9c8c-4534-bf9b-ecb1c06e4ac6&sc_channel=el)\n和本地不同,在云服务器,需要先增加一步云服务器实例的创建,可以理解为买一台机器,装上操作系统。\n##### **1、选择配置**\nEC2系统提供以下的虚拟机实例类型\n微型实例:默认配置了613MB的存储器,一个虚拟核心上运行两个 ECU 单位,免费试用一年;\n小型实例:默认配置了1.7 GB的存储器,一个虚拟核心上运行一个 ECU 单位;\n大型实例:默认配置了7.5GB的存储器,两个虚拟核心上各运行两个 ECU 单位;\n极大实例:默认配置了15GB的存储器,四个虚拟核心上各运行两个 ECU 单位;\n根据自己的需求,选择一个配置就行,不过反正我是选择免费的,谁能拒绝不花钱白嫖呐。\n##### **2、选择地区**\n最好选择离自己最近的节点创建实例,因为越近的话网络就越好,响应速度也越快。这里我选择香港的节点。\n\n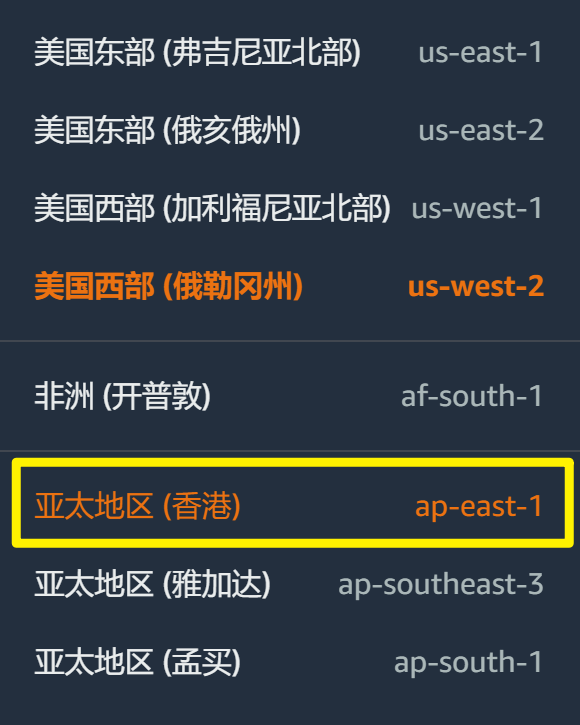\n\n##### **3、选择操作系统**\n根据自己的习惯选择,大家都知道常规的服务器都是 linux,这里我也选择了一个 Ubuntu,如果你喜欢 windows,也没有问题。\n\n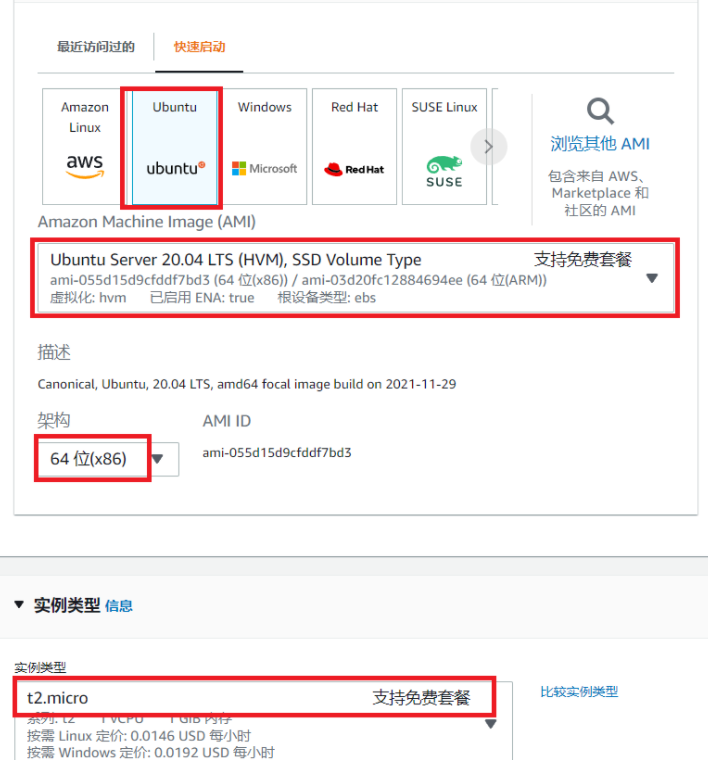\n\n重要的配置都已经搞定了,下面的就不一一截图了,总之就是选择服务器配置,搞个操作系统,买完之后的样子,可以进入到左边导航栏的实例中,看到服务器正在启动/启动完成,开始登陆部署服务。\n\n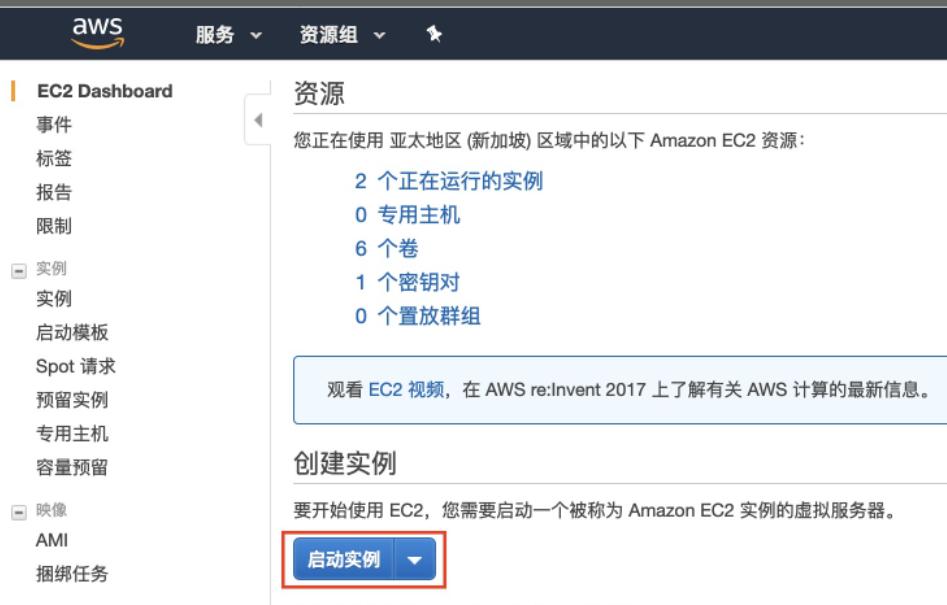\n\n#### **第二步,部署环境**\n安装 Python,创建 Python 环境,这一步也是常规操作,根据你自己的操作系统安装环境。\n安装第三方包,使用上面同样的命令。\n#### **第三步,启动服务器**\n使用下面的命令\nJava\n```\npython main.py &\n```\n将服务放在后台,要不然你关了控制台服务就关了。\n\n#### **第四步,开启端口,开启ip** \n使用云服务器和本地开发的不同就是这一步\n因为我们本地的端口是没有限制的,但是在云服务器上如果开启过多的端口无异于裸奔,所以云服务器的端口一般需要手动开启,\n同时因为公网 ip 的稀缺性,所以在创建对外服务的时候一般都要申请分配一个公网 ip,这一步跟着手册完成即可,\n打开安全组,在列表钩选一个安全组,选择编辑入站规则,添加规则增加8888端口即可:\nSecurity Group 其实定义的是防火墙相关的端口开关,这个在后面会用到。\n\n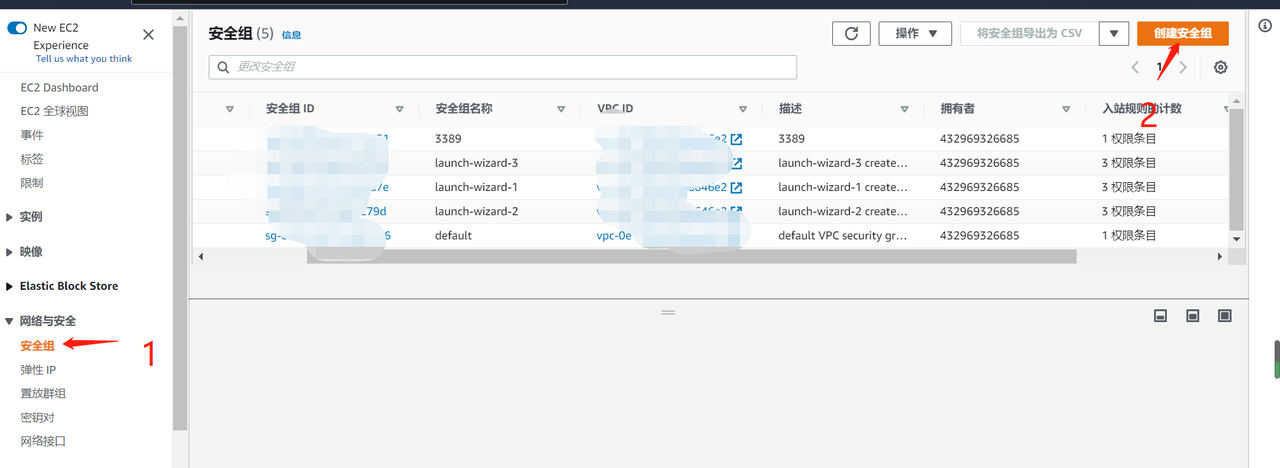\n\n#### **第五步 开始访问**\n输入到浏览器 [http://ip:port/](http://127.0.0.1:5000/),ip就是公网ip,port 就是你刚刚打开的那个对外的端口\n替换你本地的 ip 和端口,将会出现下面的画面,选择文件后,点击创建 GIF。\n注意:要多选几张图片,要不然 gif 怎么动\n\n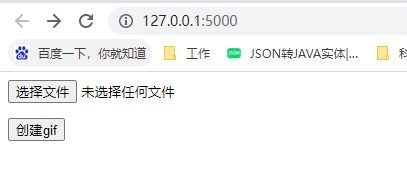\n\n点击返回的界面,就会出现下载链接。点击下载就可以了,就会得到下面的。图片\n\n\n\n#### **五、可以优化的点**\n##### **1、异常检查**\n比如合成,保存异常,增加异常的处理使程序更健壮。\n##### **2、定期文件的清理**\n当前合成的 gif 是没有进行清理的,在服务器上会一直存储,所以要做一个自动清理的计划任务,防止硬盘给撑爆。\n##### **3、对 HTML 的页面进行优化**。\n现在的界面太丑了,可以对界面进行一些美化,让用户看起来更舒服,这个我有点无能为力\n##### **4、更改部署的方式**\n现在是使用的 flask 默认的服务器。不建议在线上使用。流量高的时候会出现不稳定现象。可以替换成生产模式下的部署方案,不过现在自己玩玩也够了,毕竟也不是服务全人类。\n##### **5、可以对合成的一些参数进行开放**\n现在的合成是写死的参数,可以将参数打开由用户控制,比如每个图片变幻的时间,生成的图片循环效果等等,这样更灵活。\n##### **6、图片的格式化**\n现在图片的大小是没有进行格式化的,后面可以根据需求把图片进行统一大小,然后进行合成。\n### **六,总结**\n这次主要是做一个 GIF 的功能。\n使用了 Python 的 image 库。\n然后还要使用了 flask 的 web 功能。\n很简单,都是基础功能的组装。\n总之:你可以更好的。\n最后福利来了。\n亚马逊云科技专为开发者们打造了多种学习平台:\n1. 入门资源中心:从0到1 轻松上手云服务,内容涵盖:成本管理,上手训练,开发资源。[https://aws.amazon.com/cn/getting-started/?nc1=h_ls&trk=32540c74-46f0-46dc-940d-621a1efeedd0&sc_channel=el](https://aws.amazon.com/cn/getting-started/?nc1=h_ls&trk=32540c74-46f0-46dc-940d-621a1efeedd0&sc_channel=el)\n2. 架构中心:亚马逊云科技架构中心提供了云平台参考架构图表、经过审查的架构解决方案、Well-Architected 最佳实践、模式、图标等。[https://aws.amazon.com/cn/architecture/?intClick=dev-center-2021_main&trk=3fa608de-d954-4355-a20a-324daa58bbeb&sc_channel=el](https://aws.amazon.com/cn/architecture/?intClick=dev-center-2021_main&trk=3fa608de-d954-4355-a20a-324daa58bbeb&sc_channel=el)\n3. 构建者库:了解亚马逊云科技如何构建和运营软件。[https://aws.amazon.com/cn/builders-library/?cards-body.sort-by=item.additionalFields.sortDate&cards-body.sort-order=desc&awsf.filter-content-category=*all&awsf.filter-content-type=*all&awsf.filter-content-level=*all&trk=835e6894-d909-4691-aee1-3831428c04bd&sc_channel=el](https://aws.amazon.com/cn/builders-library/?cards-body.sort-by=item.additionalFields.sortDate&cards-body.sort-order=desc&awsf.filter-content-category=*all&awsf.filter-content-type=*all&awsf.filter-content-level=*all&trk=835e6894-d909-4691-aee1-3831428c04bd&sc_channel=el)\n4. 用于在亚马逊云科技平台上开发和管理应用程序的工具包:[https://aws.amazon.com/cn/tools/?intClick=dev-center-2021_main&trk=972c69e1-55ec-43af-a503-d458708bb645&sc_channel=el](https://aws.amazon.com/cn/tools/?intClick=dev-center-2021_main&trk=972c69e1-55ec-43af-a503-d458708bb645&sc_channel=el)\n\n\n【专属福利】\n 福利一:100余种产品免费套餐。其中,计算资源 Amazon EC2首年12个月免费,750小时/月;存储资源 Amazon S3 首年12个月免费,5GB标准存储容量。\n[https://aws.amazon.com/cn/free/?nc2=h_ql_pr_ft&all-free-tier.sort-by=item.additionalFields.SortRank&all-free-tier.sort-order=asc&awsf.Free%20Tier%20Types=*all&awsf.Free%20Tier%20Categories=*all&trk=e0213267-9c8c-4534-bf9b-ecb1c06e4ac6&sc_channel=el](https://aws.amazon.com/cn/free/?nc2=h_ql_pr_ft&all-free-tier.sort-by=item.additionalFields.SortRank&all-free-tier.sort-order=asc&awsf.Free%20Tier%20Types=*all&awsf.Free%20Tier%20Categories=*all&trk=e0213267-9c8c-4534-bf9b-ecb1c06e4ac6&sc_channel=el)\n 福利二:最新优惠大礼包,200$数据与分析抵扣券,200$机器学习抵扣券,200$微服务与应用开发抵扣券。[https://www.amazonaws.cn/campaign/?sc_channel=el&sc_campaign=credit-acts-ldr&sc_country=cn&sc_geo=chna&sc_category=mult&sc_outcome=field&trkCampaign=request-credit-glb-ldr&trk=f45email&trk=02faebcb-3f61-4bcb-b68e-c63f3ae33c99&sc_channel=el](https://www.amazonaws.cn/campaign/?sc_channel=el&sc_campaign=credit-acts-ldr&sc_country=cn&sc_geo=chna&sc_category=mult&sc_outcome=field&trkCampaign=request-credit-glb-ldr&trk=f45email&trk=02faebcb-3f61-4bcb-b68e-c63f3ae33c99&sc_channel=el)\n福利三:解决方案 CloudFormation 一键部署模版库\n[https://aws.amazon.com/cn/quickstart/?solutions-all.sort-by=item.additionalFields.sortDate&solutions-all.sort-order=desc&awsf.filter-tech-category=*all&awsf.filter-industry=*all&awsf.filter-content-type=*all&trk=afdbbdf0-610b-4421-ac0c-a6b31f902e4b&sc_channel=el](https://aws.amazon.com/cn/quickstart/?solutions-all.sort-by=item.additionalFields.sortDate&solutions-all.sort-order=desc&awsf.filter-tech-category=*all&awsf.filter-industry=*all&awsf.filter-content-type=*all&trk=afdbbdf0-610b-4421-ac0c-a6b31f902e4b&sc_channel=el)\n","render":"<p>因为写文章我经常会需要做一些 GIF。但是网上的各种 GIF 服务不太好,<br />\n所以我想着是不是要自己可以做一个。所以我做了这样一个服务。<br />\n那么我来讲一下,我今天我到底是怎么做的?</p>\n<h3><a id=\"__3\"></a><strong>一 业务需求。</strong></h3>\n<p>首先第一步我要去实现合成 GIF 这个功能。<br />\n然后我们要实现多文件上传。<br />\n再然后进行 GIF 的合成。<br />\n最后保存到本地。然后返回给前端一个下载链接。<br />\n最后就是服务部署到云服务器上。</p>\n<h3><a id=\"__9\"></a><strong>二 技术要求。</strong></h3>\n<p>Python (3.6),Flask,Image<br />\nPython的安装就不赘述了,使用下面的语句安装第三方包,或者直接的pycharm中安装,总之安装上就行<br />\nJava</p>\n<pre><code class=\"lang-\">pip install flask\npip install Image\n</code></pre>\n<h3><a id=\"__17\"></a><strong>三 技术实现</strong></h3>\n<h5><a id=\"_18\"></a><strong>看一下项目结构</strong></h5>\n<p><img src=\"https://dev-media.amazoncloud.cn/e4e2c9160d364768b19b75d5853a3db0_image.png\" alt=\"image.png\" /></p>\n<h4><a id=\"_22\"></a><strong>先看代码再进行分析</strong></h4>\n<p>Java</p>\n<pre><code class=\"lang-\">import os\nimport uuid\n\nfrom PIL import Image\nfrom flask import Flask, render_template, request, send_from_directory\n\nframe = 10\nsleepTime = 1.0 / frame\napp = Flask(__name__)\nBASE_PATH = os.path.dirname(os.path.abspath(__file__)) +"/download"\ndef makeGif(imgList,uid):\n im = imgList[0]\n file_name = BASE_PATH +"/"+uid +".gif"\n im.save(file_name, save_all=True, append_images=imgList[1:], loop=0, duration=sleepTime)\n\n@app.route('/')\ndef hello_world():\n return render_template('upload.html')\n\n@app.route('/gif',methods=['POST'])\ndef save_file():\n uploaded_files = request.files.getlist("photo")\n uid = str(uuid.uuid4())\n imgList = []\n for file in uploaded_files: # 这里改动以存储多份文件\n img = Image.open(file)\n imgList.append(img)\n makeGif(imgList,uid)\n download_url = "/download/"+uid+".gif"\n return render_template("download.html",download_url = download_url)\n\n@app.route("/download/<filename>", methods=["GET"])\ndef download_file(filename):\n return send_from_directory(BASE_PATH, filename, as_attachment=True)\n\nif __name__ == '__main__':\n app.run()\n</code></pre>\n<h4><a id=\"_63\"></a><strong>技术点:</strong></h4>\n<ol>\n<li>uid的使用<br />\n作为一个网站,有可能会同时有很多人使用所以我这里使用了uid作为唯一的标识。</li>\n<li>Image的使用<br />\nImage主要是用来合成GIF的主要功能,图片的变换时间duration是控制每一张图片的展示时间,你可以自己设置。</li>\n<li>Flask的使用<br />\n之前没有使用过flask。所以对网页的一些渲染不是很明白,但是也很简单。作为一个占位符然后传递参数。<br />\n完整代码下载地址:<a href=\"https://download.csdn.net/download/perfect2011/85078659\" target=\"_blank\">https://download.csdn.net/download/perfect2011/85078659</a></li>\n</ol>\n<h3><a id=\"_71\"></a><strong>四、服务部署</strong></h3>\n<p>在 Amazon 选了一个免费的服务器。可以免费使用十二个月的时间。这时间。。。不就是让我白嫖吗<br />\n传送地址:<a href=\"https://aws.amazon.com/cn/free/?all-free-tier.sort-by=item.additionalFields.SortRank&all-free-tier.sort-order=asc&awsf.Free+Tier+Categories=%2Aall&awsf.Free+Tier+Types=%2Aall&sc_channel=ba&trk=92861c17-b0b0-4e0a-9f78-8d60bc5e2fe2&awsf.Free%20Tier%20Types=*all&awsf.Free%20Tier%20Categories=*all\" target=\"_blank\">aws服务器免费地址</a></p>\n<p><img src=\"https://dev-media.amazoncloud.cn/5a12df9f61954623bebce339ae21c81b_image.png\" alt=\"image.png\" /></p>\n<p>Amazon Elastic Compute Cloud(Amazon EC2 云服务器)是一种 Web 云服务,能在云中提供安全且可调整大小的计算能力,说人话就是一台放在远程的机器,配置可以根据需求调整。官方说还支持 mac 系统,这还真是独一份,哈哈,不过我用不到。</p>\n<h4><a id=\"__78\"></a><strong>第一步, 搞个服务器</strong></h4>\n<p>亚马逊云科技提供了100余种产品免费套餐。其中,计算资源Amazon EC2首年12个月免费,750小时/月;存储资源 Amazon S3 首年12个月免费,5GB标准存储容量。<br />\n<a href=\"https://aws.amazon.com/cn/free/?nc2=h_ql_pr_ft&all-free-tier.sort-by=item.additionalFields.SortRank&all-free-tier.sort-order=asc&awsf.Free%20Tier%20Types=*all&awsf.Free%20Tier%20Categories=*all&trk=e0213267-9c8c-4534-bf9b-ecb1c06e4ac6&sc_channel=el\" target=\"_blank\">https://aws.amazon.com/cn/free/?nc2=h_ql_pr_ft&all-free-tier.sort-by=item.additionalFields.SortRank&all-free-tier.sort-order=asc&awsf.Free%20Tier%20Types=*all&awsf.Free%20Tier%20Categories=*all&trk=e0213267-9c8c-4534-bf9b-ecb1c06e4ac6&sc_channel=el</a><br />\n和本地不同,在云服务器,需要先增加一步云服务器实例的创建,可以理解为买一台机器,装上操作系统。</p>\n<h5><a id=\"1_82\"></a><strong>1、选择配置</strong></h5>\n<p>EC2系统提供以下的虚拟机实例类型<br />\n微型实例:默认配置了613MB的存储器,一个虚拟核心上运行两个 ECU 单位,免费试用一年;<br />\n小型实例:默认配置了1.7 GB的存储器,一个虚拟核心上运行一个 ECU 单位;<br />\n大型实例:默认配置了7.5GB的存储器,两个虚拟核心上各运行两个 ECU 单位;<br />\n极大实例:默认配置了15GB的存储器,四个虚拟核心上各运行两个 ECU 单位;<br />\n根据自己的需求,选择一个配置就行,不过反正我是选择免费的,谁能拒绝不花钱白嫖呐。</p>\n<h5><a id=\"2_89\"></a><strong>2、选择地区</strong></h5>\n<p>最好选择离自己最近的节点创建实例,因为越近的话网络就越好,响应速度也越快。这里我选择香港的节点。</p>\n<p><img src=\"https://dev-media.amazoncloud.cn/6029a282bbdc4a43a27b27e095735ef7_image.png\" alt=\"image.png\" /></p>\n<h5><a id=\"3_94\"></a><strong>3、选择操作系统</strong></h5>\n<p>根据自己的习惯选择,大家都知道常规的服务器都是 linux,这里我也选择了一个 Ubuntu,如果你喜欢 windows,也没有问题。</p>\n<p><img src=\"https://dev-media.amazoncloud.cn/aa7df5e5cf034d158e22df722dbbdefc_image.png\" alt=\"image.png\" /></p>\n<p>重要的配置都已经搞定了,下面的就不一一截图了,总之就是选择服务器配置,搞个操作系统,买完之后的样子,可以进入到左边导航栏的实例中,看到服务器正在启动/启动完成,开始登陆部署服务。</p>\n<p><img src=\"https://dev-media.amazoncloud.cn/6a579876fb9449b79e2a4978f15db6ff_image.png\" alt=\"image.png\" /></p>\n<h4><a id=\"_103\"></a><strong>第二步,部署环境</strong></h4>\n<p>安装 Python,创建 Python 环境,这一步也是常规操作,根据你自己的操作系统安装环境。<br />\n安装第三方包,使用上面同样的命令。</p>\n<h4><a id=\"_106\"></a><strong>第三步,启动服务器</strong></h4>\n<p>使用下面的命令<br />\nJava</p>\n<pre><code class=\"lang-\">python main.py &\n</code></pre>\n<p>将服务放在后台,要不然你关了控制台服务就关了。</p>\n<h4><a id=\"ip_114\"></a><strong>第四步,开启端口,开启ip</strong></h4>\n<p>使用云服务器和本地开发的不同就是这一步<br />\n因为我们本地的端口是没有限制的,但是在云服务器上如果开启过多的端口无异于裸奔,所以云服务器的端口一般需要手动开启,<br />\n同时因为公网 ip 的稀缺性,所以在创建对外服务的时候一般都要申请分配一个公网 ip,这一步跟着手册完成即可,<br />\n打开安全组,在列表钩选一个安全组,选择编辑入站规则,添加规则增加8888端口即可:<br />\nSecurity Group 其实定义的是防火墙相关的端口开关,这个在后面会用到。</p>\n<p><img src=\"https://dev-media.amazoncloud.cn/7439bde96bf348e099b8f5ff76dbc690_image.png\" alt=\"image.png\" /></p>\n<h4><a id=\"__123\"></a><strong>第五步 开始访问</strong></h4>\n<p>输入到浏览器 <a href=\"http://127.0.0.1:5000/\" target=\"_blank\">http://ip:port/</a>,ip就是公网ip,port 就是你刚刚打开的那个对外的端口<br />\n替换你本地的 ip 和端口,将会出现下面的画面,选择文件后,点击创建 GIF。<br />\n注意:要多选几张图片,要不然 gif 怎么动</p>\n<p><img src=\"https://dev-media.amazoncloud.cn/e369efc14cca46fea075a05808d3d9a9_image.png\" alt=\"image.png\" /></p>\n<p>点击返回的界面,就会出现下载链接。点击下载就可以了,就会得到下面的。图片</p>\n<p><img src=\"https://dev-media.amazoncloud.cn/ce81106da6cc414e8bb4be4e779ad922_a7202708-744f-472c-936e-7b5c4b6b9498.gif\" alt=\"a7202708744f472c936e7b5c4b6b9498.gif\" /></p>\n<h4><a id=\"_134\"></a><strong>五、可以优化的点</strong></h4>\n<h5><a id=\"1_135\"></a><strong>1、异常检查</strong></h5>\n<p>比如合成,保存异常,增加异常的处理使程序更健壮。</p>\n<h5><a id=\"2_137\"></a><strong>2、定期文件的清理</strong></h5>\n<p>当前合成的 gif 是没有进行清理的,在服务器上会一直存储,所以要做一个自动清理的计划任务,防止硬盘给撑爆。</p>\n<h5><a id=\"3_HTML__139\"></a><strong>3、对 HTML 的页面进行优化</strong>。</h5>\n<p>现在的界面太丑了,可以对界面进行一些美化,让用户看起来更舒服,这个我有点无能为力</p>\n<h5><a id=\"4_141\"></a><strong>4、更改部署的方式</strong></h5>\n<p>现在是使用的 flask 默认的服务器。不建议在线上使用。流量高的时候会出现不稳定现象。可以替换成生产模式下的部署方案,不过现在自己玩玩也够了,毕竟也不是服务全人类。</p>\n<h5><a id=\"5_143\"></a><strong>5、可以对合成的一些参数进行开放</strong></h5>\n<p>现在的合成是写死的参数,可以将参数打开由用户控制,比如每个图片变幻的时间,生成的图片循环效果等等,这样更灵活。</p>\n<h5><a id=\"6_145\"></a><strong>6、图片的格式化</strong></h5>\n<p>现在图片的大小是没有进行格式化的,后面可以根据需求把图片进行统一大小,然后进行合成。</p>\n<h3><a id=\"_147\"></a><strong>六,总结</strong></h3>\n<p>这次主要是做一个 GIF 的功能。<br />\n使用了 Python 的 image 库。<br />\n然后还要使用了 flask 的 web 功能。<br />\n很简单,都是基础功能的组装。<br />\n总之:你可以更好的。<br />\n最后福利来了。<br />\n亚马逊云科技专为开发者们打造了多种学习平台:</p>\n<ol>\n<li>入门资源中心:从0到1 轻松上手云服务,内容涵盖:成本管理,上手训练,开发资源。<a href=\"https://aws.amazon.com/cn/getting-started/?nc1=h_ls&trk=32540c74-46f0-46dc-940d-621a1efeedd0&sc_channel=el\" target=\"_blank\">https://aws.amazon.com/cn/getting-started/?nc1=h_ls&trk=32540c74-46f0-46dc-940d-621a1efeedd0&sc_channel=el</a></li>\n<li>架构中心:亚马逊云科技架构中心提供了云平台参考架构图表、经过审查的架构解决方案、Well-Architected 最佳实践、模式、图标等。<a href=\"https://aws.amazon.com/cn/architecture/?intClick=dev-center-2021_main&trk=3fa608de-d954-4355-a20a-324daa58bbeb&sc_channel=el\" target=\"_blank\">https://aws.amazon.com/cn/architecture/?intClick=dev-center-2021_main&trk=3fa608de-d954-4355-a20a-324daa58bbeb&sc_channel=el</a></li>\n<li>构建者库:了解亚马逊云科技如何构建和运营软件。<a href=\"https://aws.amazon.com/cn/builders-library/?cards-body.sort-by=item.additionalFields.sortDate&cards-body.sort-order=desc&awsf.filter-content-category=*all&awsf.filter-content-type=*all&awsf.filter-content-level=*all&trk=835e6894-d909-4691-aee1-3831428c04bd&sc_channel=el\" target=\"_blank\">https://aws.amazon.com/cn/builders-library/?cards-body.sort-by=item.additionalFields.sortDate&cards-body.sort-order=desc&awsf.filter-content-category=*all&awsf.filter-content-type=*all&awsf.filter-content-level=*all&trk=835e6894-d909-4691-aee1-3831428c04bd&sc_channel=el</a></li>\n<li>用于在亚马逊云科技平台上开发和管理应用程序的工具包:<a href=\"https://aws.amazon.com/cn/tools/?intClick=dev-center-2021_main&trk=972c69e1-55ec-43af-a503-d458708bb645&sc_channel=el\" target=\"_blank\">https://aws.amazon.com/cn/tools/?intClick=dev-center-2021_main&trk=972c69e1-55ec-43af-a503-d458708bb645&sc_channel=el</a></li>\n</ol>\n<p>【专属福利】<br />\n福利一:100余种产品免费套餐。其中,计算资源 Amazon EC2首年12个月免费,750小时/月;存储资源 Amazon S3 首年12个月免费,5GB标准存储容量。<br />\n<a href=\"https://aws.amazon.com/cn/free/?nc2=h_ql_pr_ft&all-free-tier.sort-by=item.additionalFields.SortRank&all-free-tier.sort-order=asc&awsf.Free%20Tier%20Types=*all&awsf.Free%20Tier%20Categories=*all&trk=e0213267-9c8c-4534-bf9b-ecb1c06e4ac6&sc_channel=el\" target=\"_blank\">https://aws.amazon.com/cn/free/?nc2=h_ql_pr_ft&all-free-tier.sort-by=item.additionalFields.SortRank&all-free-tier.sort-order=asc&awsf.Free%20Tier%20Types=*all&awsf.Free%20Tier%20Categories=*all&trk=e0213267-9c8c-4534-bf9b-ecb1c06e4ac6&sc_channel=el</a><br />\n福利二:最新优惠大礼包,200$数据与分析抵扣券,200$机器学习抵扣券,200$微服务与应用开发抵扣券。<a href=\"https://www.amazonaws.cn/campaign/?sc_channel=el&sc_campaign=credit-acts-ldr&sc_country=cn&sc_geo=chna&sc_category=mult&sc_outcome=field&trkCampaign=request-credit-glb-ldr&trk=f45email&trk=02faebcb-3f61-4bcb-b68e-c63f3ae33c99&sc_channel=el\" target=\"_blank\">https://www.amazonaws.cn/campaign/?sc_channel=el&sc_campaign=credit-acts-ldr&sc_country=cn&sc_geo=chna&sc_category=mult&sc_outcome=field&trkCampaign=request-credit-glb-ldr&trk=f45email&trk=02faebcb-3f61-4bcb-b68e-c63f3ae33c99&sc_channel=el</a><br />\n福利三:解决方案 CloudFormation 一键部署模版库<br />\n<a href=\"https://aws.amazon.com/cn/quickstart/?solutions-all.sort-by=item.additionalFields.sortDate&solutions-all.sort-order=desc&awsf.filter-tech-category=*all&awsf.filter-industry=*all&awsf.filter-content-type=*all&trk=afdbbdf0-610b-4421-ac0c-a6b31f902e4b&sc_channel=el\" target=\"_blank\">https://aws.amazon.com/cn/quickstart/?solutions-all.sort-by=item.additionalFields.sortDate&solutions-all.sort-order=desc&awsf.filter-tech-category=*all&awsf.filter-industry=*all&awsf.filter-content-type=*all&trk=afdbbdf0-610b-4421-ac0c-a6b31f902e4b&sc_channel=el</a></p>\n"}
不花一分钱做个在线的 gif 合成服务
Python
Flask

 0
0 0
0 相关产品
相关产品
 相关产品
相关产品亚马逊云科技解决方案 基于行业客户应用场景及技术领域的解决方案
联系亚马逊云科技专家
亚马逊云科技解决方案
基于行业客户应用场景及技术领域的解决方案
联系专家

0
目录

 分享
分享 点赞
点赞 收藏
收藏 目录
目录立即注册,开启您的免费套餐
立即关注

亚马逊云开发者
公众号

User Group
公众号

亚马逊云科技
官方小程序
“AWS” 是 “Amazon Web Services” 的缩写,在此网站不作为商标展示。
立即关注
亚马逊云开发者
公众号
User Group
公众号
亚马逊云科技
官方小程序
“AWS” 是 “Amazon Web Services” 的缩写,在此网站不作为商标展示。
关于我们 
更多资源
开发者工具
更多支持
立即关注
亚马逊云开发者
公众号
User Group
公众号
亚马逊云科技
官方小程序
“AWS” 是 “Amazon Web Services” 的缩写,在此网站不作为商标展示。
