{"value":"### **摘要**\nAmazon Amplify 是一组位于云端的工具和无服务器服务。本文的主要是介绍如何基于 Amazon Amplify 构建自己的首个 iOS 应用程序。首先,我们将构建一个简单的 iOS 应用程序。然后,使用 Amplify 命令行接口 (Amplify CLI) 初始化一个本地应用程序,同时添加用户身份验证、添加GraphQL API 和数据库以存储我们的数据,最后,更新我们的应用程序来存储图像文件。亚马逊云科技提供了100余种产品免费套餐。其中,计算资源Amazon EC2首年12个月免费,750小时/月;存储资源 Amazon S3 首年12个月免费,5GB标准存储容量。\n[https://aws.amazon.com/cn/free/?nc2=h_ql_pr_ft&all-free-tier.sort-by=item.additionalFields.SortRank&all-free-tier.sort-order=asc&awsf.Free%20Tier%20Types=*all&awsf.Free%20Tier%20Categories=*all&trk=e0213267-9c8c-4534-bf9b-ecb1c06e4ac6&sc_channel=el](https://aws.amazon.com/cn/free/?nc2=h_ql_pr_ft&all-free-tier.sort-by=item.additionalFields.SortRank&all-free-tier.sort-order=asc&awsf.Free%20Tier%20Types=*all&awsf.Free%20Tier%20Categories=*all&trk=e0213267-9c8c-4534-bf9b-ecb1c06e4ac6&sc_channel=el)\n### **正文**\nAmazon Amplify 是一组专门构建的工具和功能,使前端 Web 和移动开发人员可以快速、轻松地在 Amazon 上构建全堆栈应用程序,随着使用案例的发展,可以灵活地利用广泛的 Amazon 服务。借助 Amplify,您可以在几分钟内配置 web 或移动应用程序后端并连接应用程序,可视化地构建 web 前端 UI,并在 Amazon 控制台外轻松管理应用程序内容。无需云专业知识,就可更快发布和扩展。\n现在很多技术方案都在上云,仿佛一切都可以云原生化。那么 iOS 应用程序开发是不是也可以在云端开发呢?今天就有机会体验了一把使用亚马逊的 Amazon Amplify 创建了一个 iOS 应用程序,实现了添加用户身份验证、添加 GraphQL API 和操作数据库等功能。接下来,我们就详细了解一下整个构建过程。\n#### **一、创建 iOS 应用程序**\nAmazon Amplify 提供基于 Git 的工作流,用于创建、管理、集成和部署 Web 和移动应用程序的无服务器后端。Amplify CLI 提供了一个简单的基于文本的用户界面,用于预置和管理后端服务,比如用于应用程序的用户身份验证或 REST 或 GraphQL API。使用 Amplify 库可以轻松地将这些后端服务与应用程序中的几行代码集成。\n首先,我们创建一个新的 iOS 应用程序来记录旅行备注。其中,备注由标题、描述和图片组成。\n##### **1.1 创建 iOS 应用程序**\n启动 Xcode 并选择创建新的 Xcode 项目,具体操作如下图所示:\n\n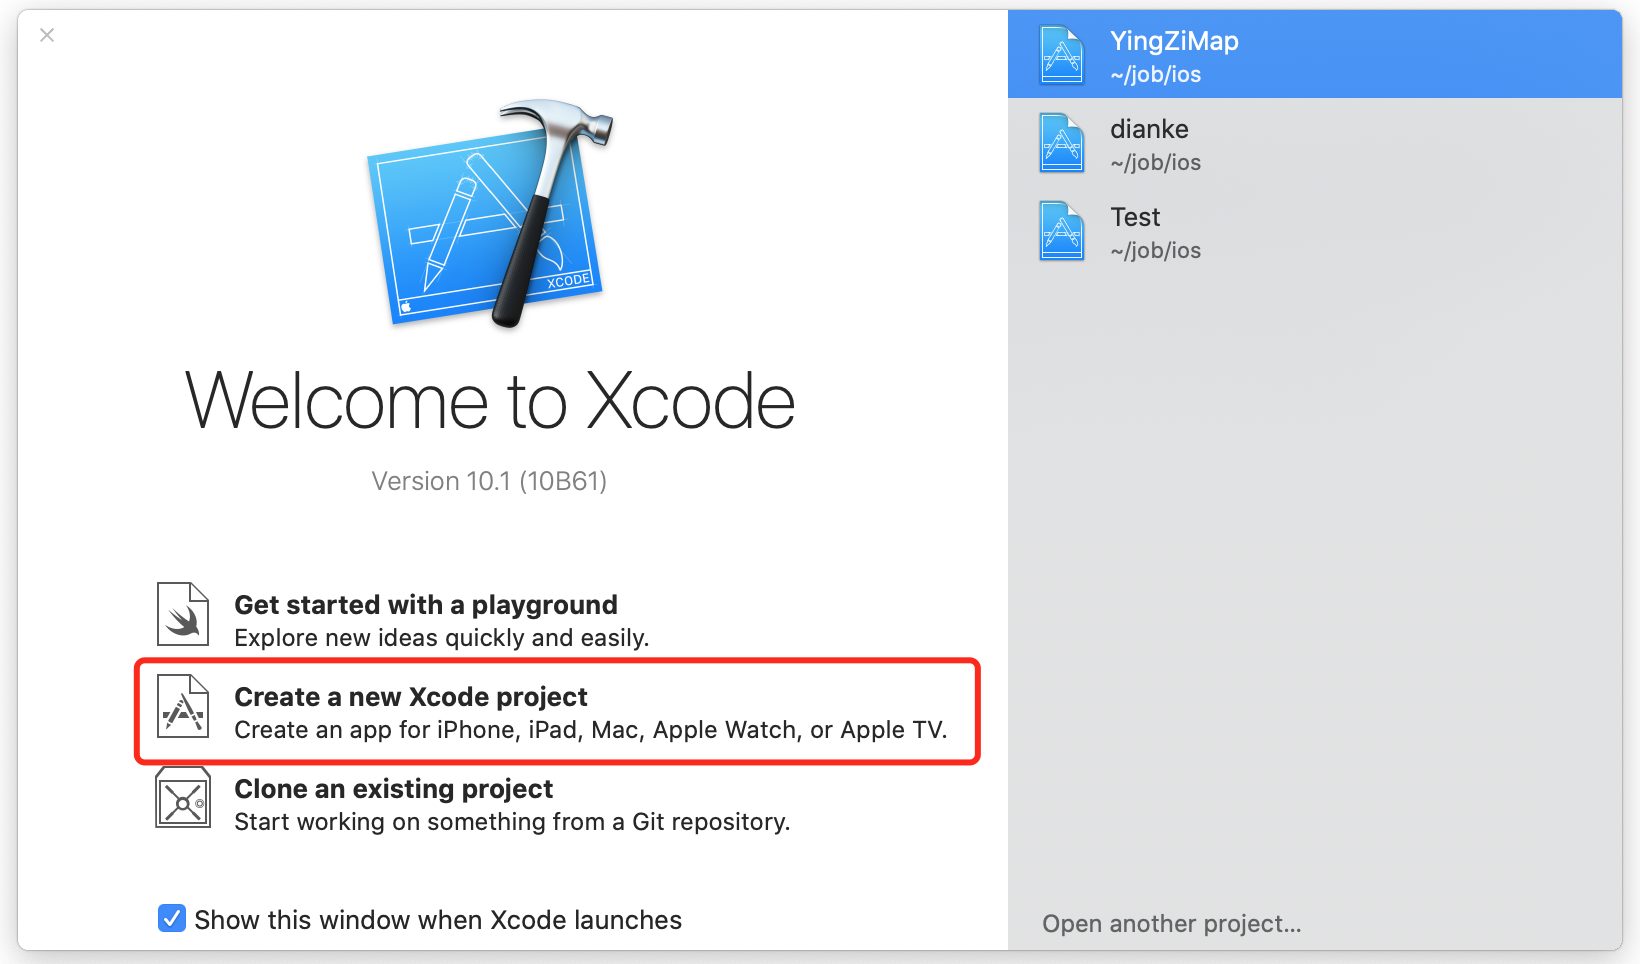\n\n在 iOS 应用程序下,选择“单一视图应用程序”,然后单击“下一步”,具体操作如下图所示:\n\n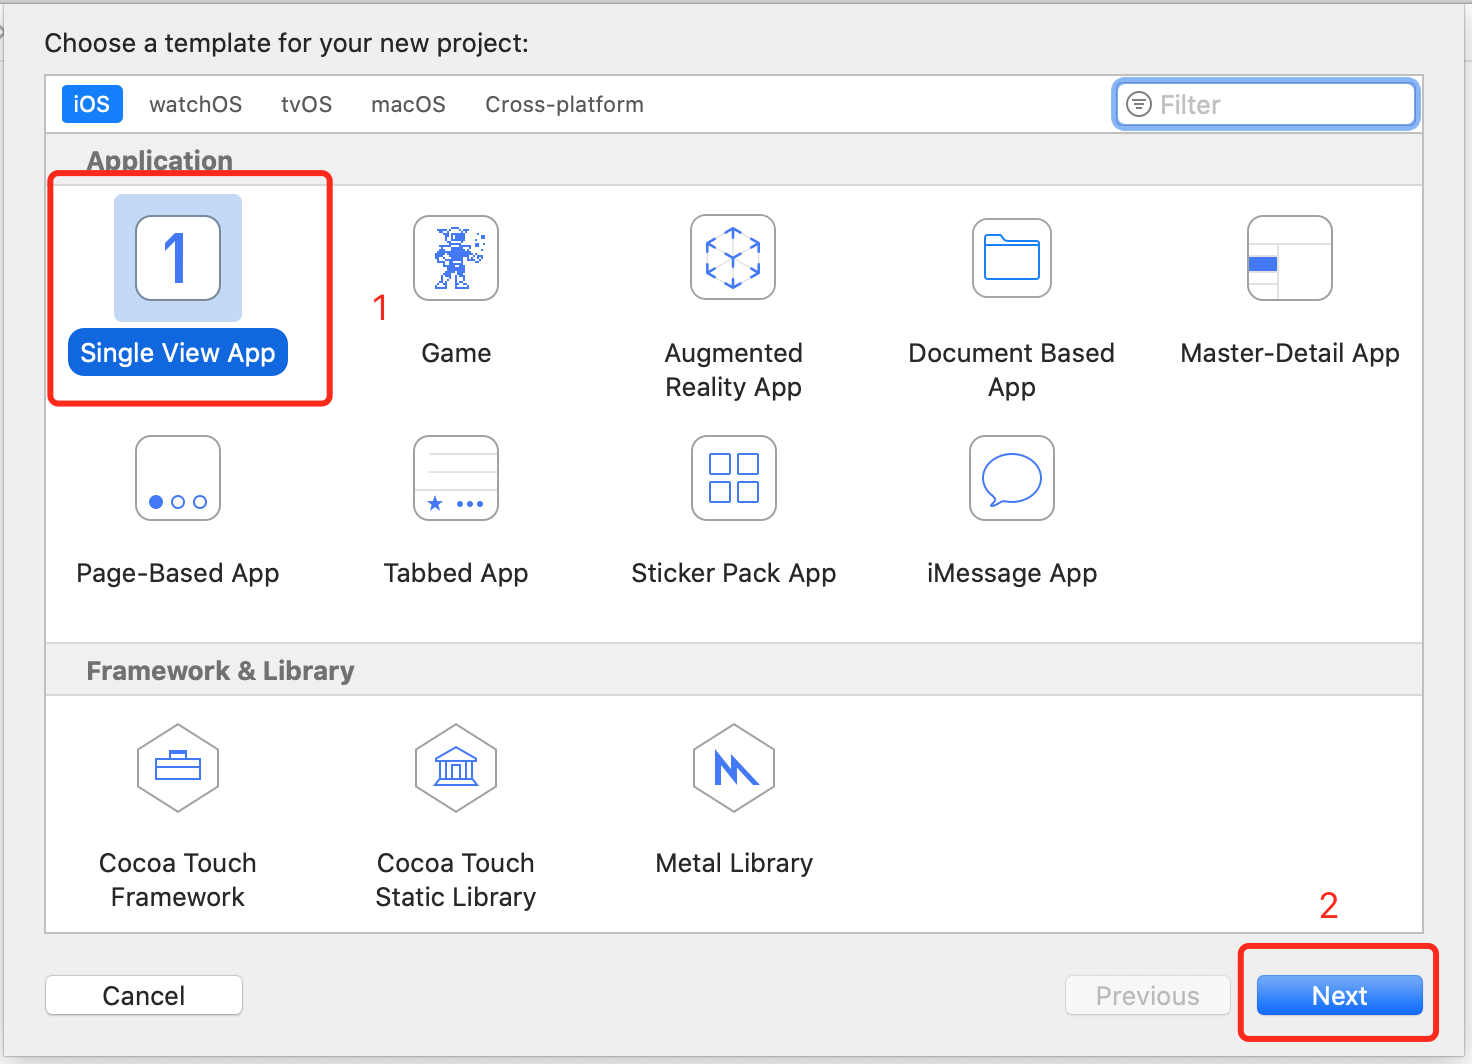\n\n键入项目的名称,例如 iOS Getting Started。确保将语言设置为“Swift”,如果可以设置用户界面的话,那就使用“SwiftUI”。其实,SwiftUI 是一种通过 Swift 编程语言在所有 Apple 平台上构建用户界面的简单方法。但是,本文使用的 XCode 版本没有该设置项,因此可以跳过,单击“下一步”,具体如下图所示:\n\n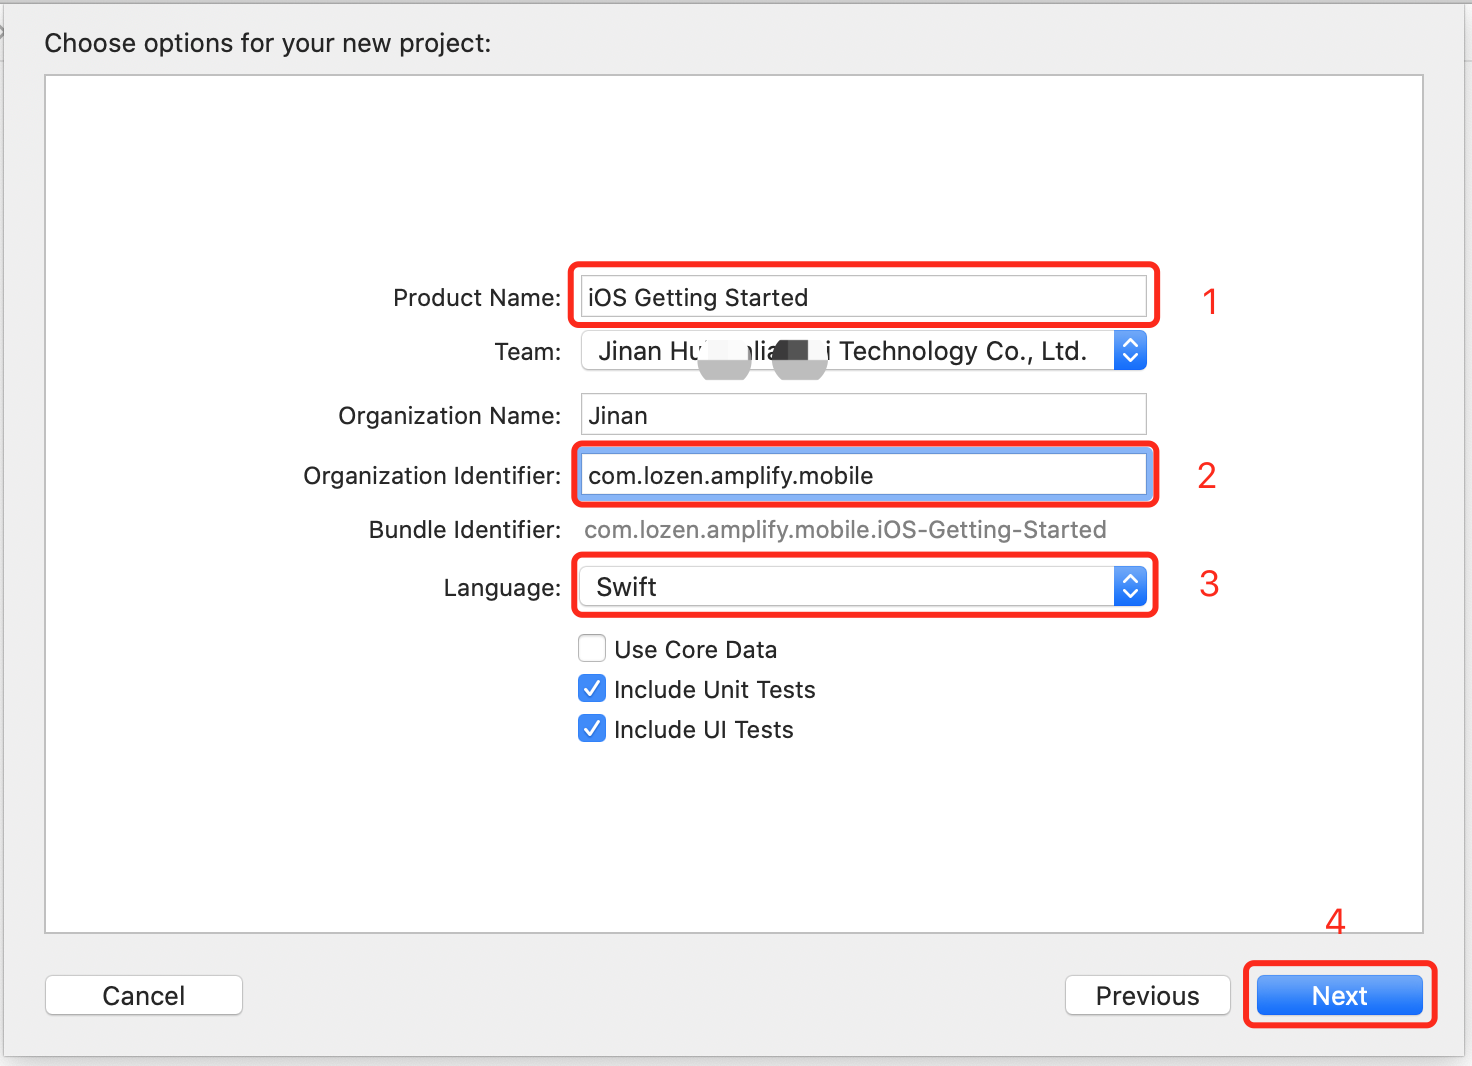\n\n最后,选择一个保存目录,然后单击“创建”,以创建项目,呈现效果如下图所示:\n\n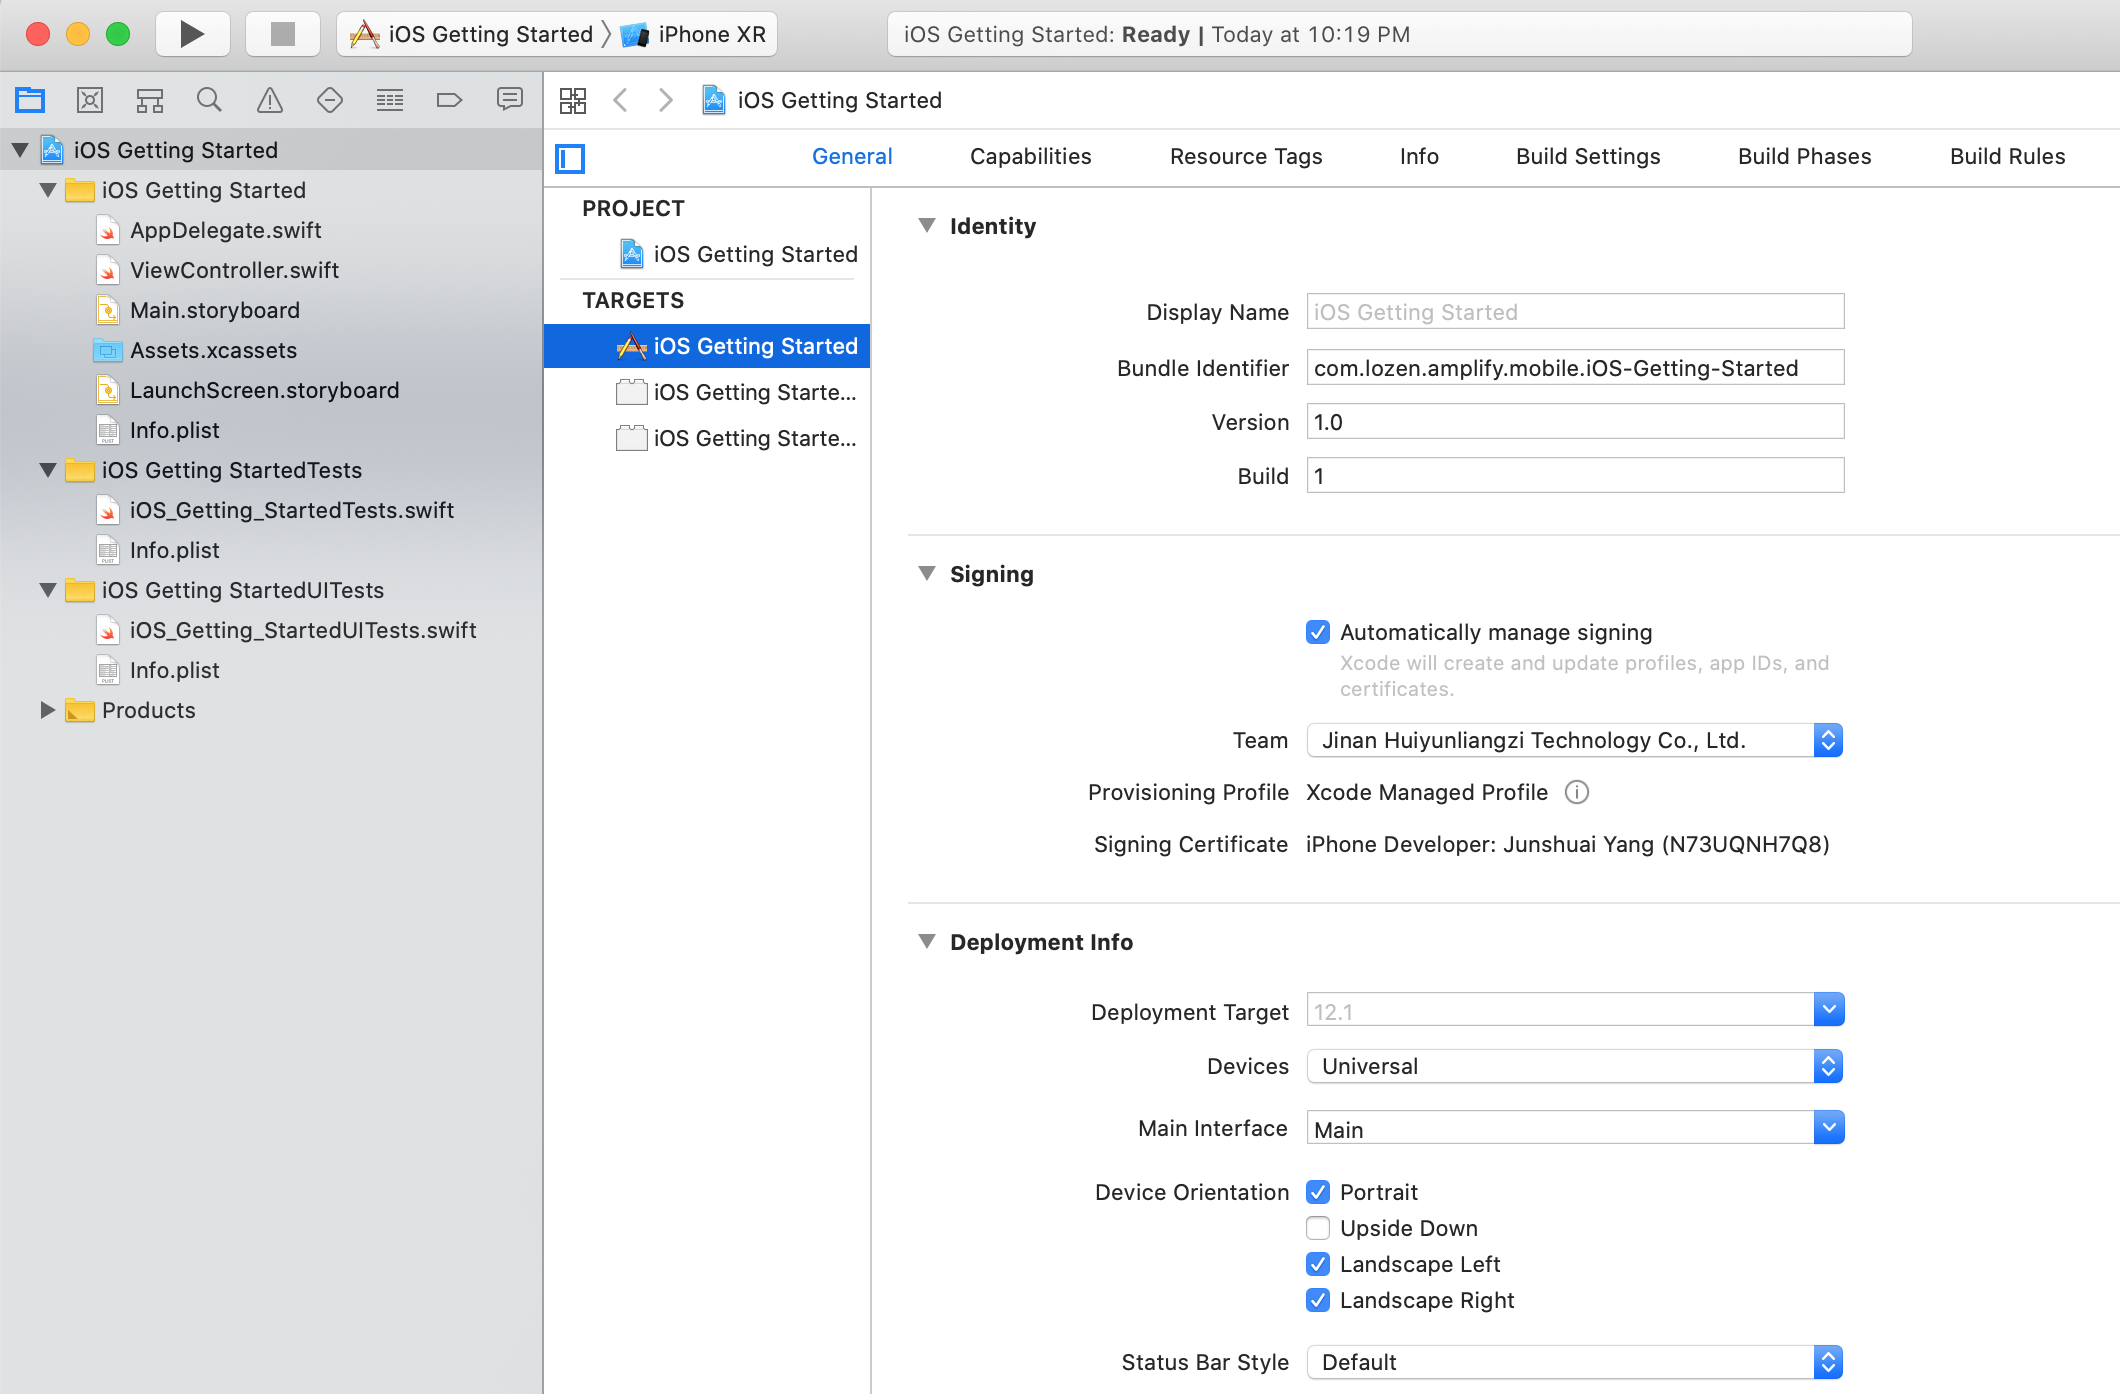\n\n##### **1.2 更新主视图**\n从 Xcode 左侧的文件列表中,打开 ContentView.swift,然后将代码替换为以下内容:\nObjective-C\n```\n//\n// ContentView.swift\n// iOS Getting Started\n//\n// Created by lz on 2022/3/28.\n// Copyright © 2022 lozen. All rights reserved.\n//\n\nimport SwiftUI\n\n// singleton object to store user data\nclass UserData : ObservableObject {\n private init() {}\n static let shared = UserData()\n\n @Published var notes : [Note] = []\n @Published var isSignedIn : Bool = false\n}\n\n// the data class to represents Notes\nclass Note : Identifiable, ObservableObject {\n var id : String\n var name : String\n var description : String?\n var imageName : String?\n @Published var image : Image?\n\n init(id: String, name: String, description: String? = nil, image: String? = nil ) {\n self.id = id\n self.name = name\n self.description = description\n self.imageName = image\n }\n}\n\n// a view to represent a single list item\nstruct ListRow: View {\n @ObservedObject var note : Note\n var body: some View {\n\n return HStack(alignment: .center, spacing: 5.0) {\n\n // if there is an image, display it on the left\n if (note.image != nil) {\n note.image!\n .resizable()\n .frame(width: 50, height: 50)\n }\n\n // the right part is a vertical stack with the title and description\n VStack(alignment: .leading, spacing: 5.0) {\n Text(note.name)\n .bold()\n\n if ((note.description) != nil) {\n Text(note.description!)\n }\n }\n }\n }\n}\n\n// this is the main view of our app,\n// it is made of a Table with one line per Note\nstruct ContentView: View {\n @ObservedObject private var userData: UserData = .shared\n\n var body: some View {\n List {\n ForEach(userData.notes) { note in\n ListRow(note: note)\n }\n }\n }\n}\n\n// this is use to preview the UI in Xcode\nstruct ContentView_Previews: PreviewProvider {\n static var previews: some View {\n\n let _ = prepareTestData()\n\n return ContentView()\n }\n}\n\n// this is a test data set to preview the UI in Xcode\nfunc prepareTestData() -> UserData {\n let userData = UserData.shared\n userData.isSignedIn = true\n let desc = \"this is a very long description that should fit on multiiple lines.\\nit even has a line break\\nor two.\"\n\n let n1 = Note(id: \"01\", name: \"Hello world\", description: desc, image: \"mic\")\n let n2 = Note(id: \"02\", name: \"A new note\", description: desc, image: \"phone\")\n\n n1.image = Image(systemName: n1.imageName!)\n n2.image = Image(systemName: n2.imageName!)\n\n userData.notes = [ n1, n2 ]\n\n return userData\n}\n```\n上述代码都完成了如下工作:\n- 创建了一个备注类来存储备注的数据。针对 ImageName 和 Image 使用了两个不同的属性。稍后,我们将在“添加存储”部分中处理图像。\n- 创建了一个 UserData 类来保存特定用户的数据,在此阶段,只保存一个备注对象列表。\n- 主视图 ContentView 包含 ListRow 的列表\n- 每行都由 ListRow 呈现:包含图像和文本的水平堆栈。文本垂直堆栈备注名称和备注说明,以粗体显示。\n- 最后,调整了 ContentView_Previews 并添加了 prepareTestData() 以允许在画布中进行预览渲染。\n##### **1.3 构建和测试**\n检查画布以验证布局是否满足需要。如果看不到画布,可以使用编辑器菜单启用画布,然后单击画布。您可能还需要单击画布中的恢复按钮以生成布局预览。\n\n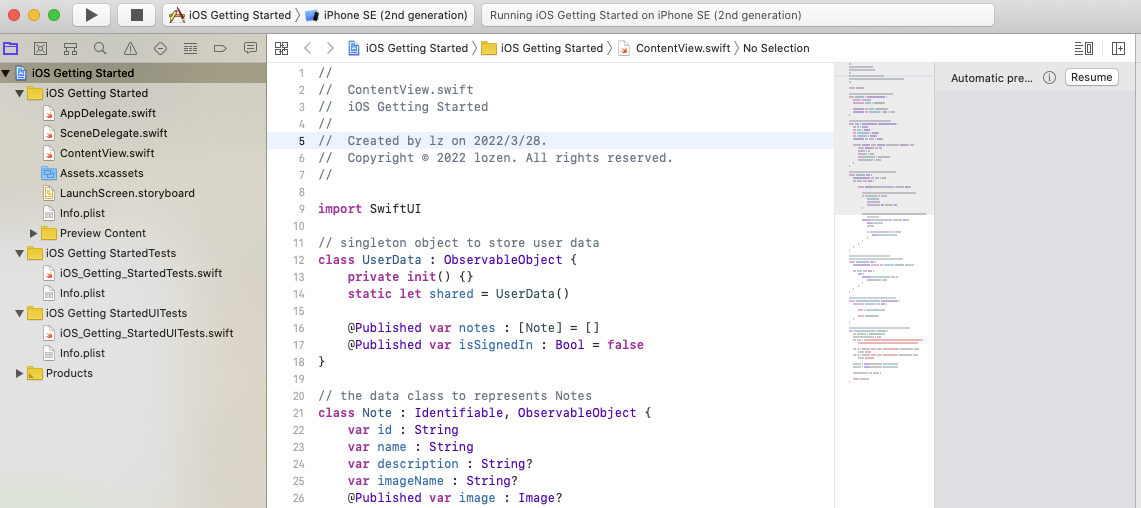\n\n请注意,预览数据是在代码中生成的,数据不会在运行时显示。如果一切正常,请在模拟器中构建并启动应用程序。单击产品菜单,然后选择运行或键入 。或者,您也可以单击工具栏中的播放 ▶️ 按钮。\n一段时间后,应用程序会在 iOS 模拟器中启动,初始屏幕为空。 预览数据不会在运行时呈现,它们仅用于 Xcode 内的预览,具体效果如下图所示:\n\n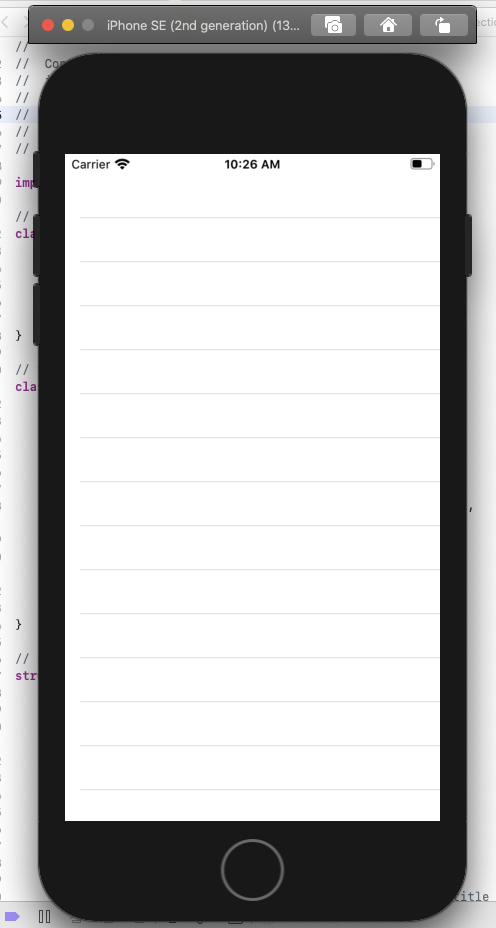\n\n但是,这个过程中有个小插曲,由于我本机的XCode版本过低,导致代码编译不同,后来自己升级到11.5才解决。\n\n\n\n#### **二、初始化 Amplify**\n上一步,我们已创建一个 iOS 应用程序,接下来继续开发并添加新功能。在应用程序中使用 Amazon Amplify,必须安装 Amplify 命令行,初始化 Amplify 项目目录,将项目配置为使用 Amplify 库,并在运行时初始化 Amplify 库。\n在正式开始前,我们先介绍两个概念。Amplify CLI – Amplify CLI 可使您直接从您的终端创建、管理和删除 Amazon 服务。Amplify 库 – 您可以使用 Amplify 库通过 Web 应用程序或移动应用程序使用 Amazon 服务。\n##### **2.1 安装 Amplify CLI**\nAmazon Amplify CLI 取决于 Node.js,要安装 Amazon Amplify CLI,请打开一个终端,然后输入以下命令:\nShell\n```\n## Install Amplify CLI\nnpm install -g @aws-amplify/cli\n\n## Verify installation and version\namplify --version\n##Scanning for plugins...\n##Plugin scan successful\n##4.27.2\n```\n##### **2.2 初始化 Amplify 后端**\n在初始化 Amplify 后端模块之前,我们需要先创建对应的用户信息,在亚马逊服务管理后台添加对应的用户,并添加权限类型,具体如下图所示:\n\n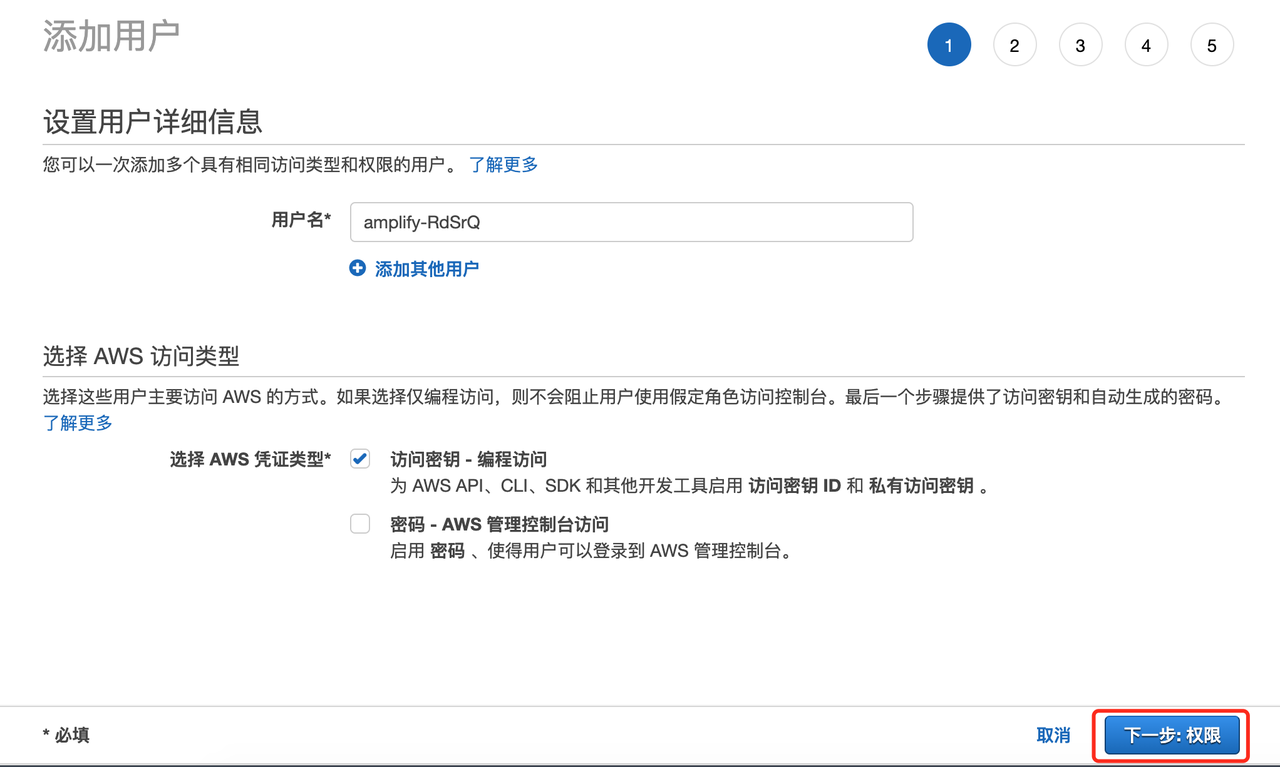\n\n用户名一般会默认生成,也可以自己修改并指定。另外,还要选择访问凭证类型,一种是访问密钥,为 API、CLI、SDK 和其他开发工具启用访问密钥 ID 和私有访问密钥;另一种是密码,启用密码,使得用户可以登录到亚马逊服务管理控制台。\n创建好用户后,点击“下一步”,选择“直接附加现有策略”,一直“下一步”,最后会提示创建用户成功。\n\n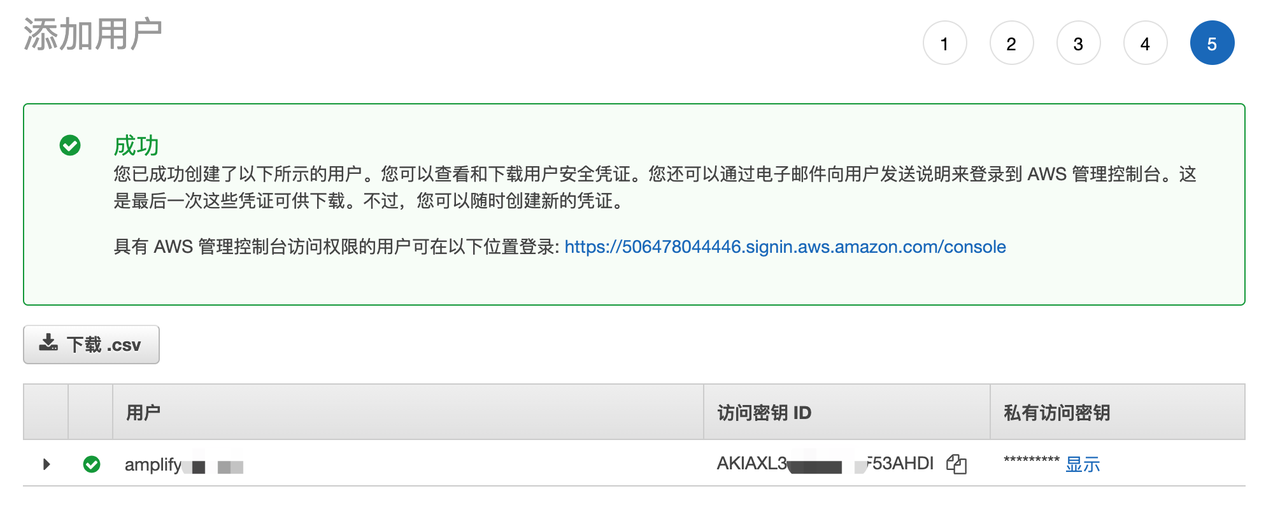\n\n在执行过程中,可能会遇到如下报错:\nGroovy\n```\n⠦ Initializing project in the cloud...An error occurred when creating the CloudFormation stack\n✖ Root stack creation failed\ninit failed\nOptInRequired: The AWS Access Key Id needs a subscription for the service\n at Request.extractError (/usr/local/lib/node_modules/@aws-amplify/cli/node_modules/aws-sdk/lib/protocol/query.js:50:29)\n at Request.callListeners (/usr/local/lib/node_modules/@aws-amplify/cli/node_modules/aws-sdk/lib/sequential_executor.js:106:20)\n at Request.emit (/usr/local/lib/node_modules/@aws-amplify/cli/node_modules/aws-sdk/lib/sequential_executor.js:78:10)\n at Request.emit (/usr/local/lib/node_modules/@aws-amplify/cli/node_modules/aws-sdk/lib/request.js:686:14)\n at Request.transition (/usr/local/lib/node_modules/@aws-amplify/cli/node_modules/aws-sdk/lib/request.js:22:10)\n at AcceptorStateMachine.runTo (/usr/local/lib/node_modules/@aws-amplify/cli/node_modules/aws-sdk/lib/state_machine.js:14:12)\n at /usr/local/lib/node_modules/@aws-amplify/cli/node_modules/aws-sdk/lib/state_machine.js:26:10\n at Request.<anonymous> (/usr/local/lib/node_modules/@aws-amplify/cli/node_modules/aws-sdk/lib/request.js:38:9)\n at Request.<anonymous> (/usr/local/lib/node_modules/@aws-amplify/cli/node_modules/aws-sdk/lib/request.js:688:12)\n at Request.callListeners (/usr/local/lib/node_modules/@aws-amplify/cli/node_modules/aws-sdk/lib/sequential_executor.js:116:18) {\n code: 'OptInRequired',\n time: 2022-03-28T16:20:47.649Z,\n requestId: '39858f24-3c22-4eaa-9a0e-398095a8ebc9',\n statusCode: 403,\n retryable: false,\n retryDelay: 93.04199180846567\n}\n```\n很可能的原因就是信用卡信息错误,最常见的就是信用卡有效期填写有误,而我就是这个问题。\n接下来,我们开始正式创建后端基本结构,首先需要初始化 Amplify 项目目录并创建云后端。打开一个终端并将目录更改为第一步中的 iOS 项目。例如,如果您在文件夹 ~/job/ios/ 中创建项目,则可以键入:\nGroovy\n```\ncd ~/job/ios/iOS Getting Started\n```\n验证一下是否在正确的目录中,它应该如下所示:\nAssembly language\n```\nliuzhen-40:iOS Getting Started lz$ ls -al\ntotal 16\ndrwxr-xr-x 7 lz staff 224 Mar 28 11:06 .\ndrwxr-xr-x 7 lz staff 224 Mar 28 10:05 ..\n-rw-r--r--@ 1 lz staff 6148 Mar 28 22:09 .DS_Store\ndrwxr-xr-x 9 lz staff 288 Mar 28 10:06 iOS Getting Started\ndrwxr-xr-x@ 5 lz staff 160 Mar 28 10:05 iOS Getting Started.xcodeproj\ndrwxr-xr-x 4 lz staff 128 Mar 28 10:05 iOS Getting StartedTests\ndrwxr-xr-x 4 lz staff 128 Mar 28 10:05 iOS Getting StartedUITests\n```\n初始化 Amplify 项目结构和配置文件,运行以下命令:\nSQL\n```\nliuzhen-40:iOS Getting Started lz$ amplify init\nNote: It is recommended to run this command from the root of your app directory\n? Enter a name for the project iOSGettingStarted\n? Enter a name for the environment dev\n? Choose your default editor: Visual Studio Code\n? Choose the type of app that you're building ios\nUsing default provider awscloudformation\n\nFor more information on AWS Profiles, see:\nhttps://docs.aws.amazon.com/cli/latest/userguide/cli-multiple-profiles.html\n\n? Do you want to use an AWS profile? Yes\n? Please choose the profile you want to use default\nAdding backend environment dev to AWS Amplify Console app: dj56g6ku6ef6p\n```\n##### **2.3 将 Amplify 库添加到项目中**\n在开始此步骤之前,请确保关闭 Xcode。然后命令行进入工程目录,使用 CocoaPods 软件包管理器初始化项目,请执行以下命令:\nNginx\n```\n## Initialize the Amplify Project\npod init\n```\n完成此操作后,您应该看到一个名为 Podfile 的新建文件,此文件用于描述我们的项目所依赖的软件包。然后,更新 Podfile 以包含以下 Pod 并更新平台:\nBash\n```\n# you need at least version 13.0 for this tutorial, more recent versions are valid too\n\nplatform :ios,'13.0'\n\ntarget 'iOS Getting Started' do\n # Comment the next line if you don't want to use dynamic frameworks\n use_frameworks!\n # Pods for getting started\n pod 'Amplify', '~> 1.0' # required amplify dependency\n pod 'Amplify/Tools', '~> 1.0' # allows to call amplify CLI from within Xcode\n\nend\n```\n将 Amplify 库下载并安装到您的项目中,执行如下命令:\nBash\n```\npod install --repo-update\n```\n完成此操作后,我们会发现生成了一个名为 iOS Getting Started.xcworkspace 的文件。之后,我们就需要使用这个文件,而不是 iOS Getting Started.xcodeproj 文件了。然后,在 Xcode 中打开工作区,并执行如下命令:\nBash\n```\nxed .\n```\n##### **2.4 在运行时初始化 Amplify**\n在运行时,Amplify 库需要由 CLI 生成的 Amplify 配置文件。将 Amplify 配置文件添加到项目中,使用 Finder 在项目目录的根目录下找到 awsconfiguration.json 和 amplifyconfiguration.json,并将其拖放到 Xcode 项目中。\n接下来,新建一个 swift 文本文件 Backend.swift,将其添加到我们的 Xcode 项目 (CTRL-N) 并添加以下代码:\nSwift\n```\nimport UIKit\nimport Amplify\n\nclass Backend {\n static let shared = Backend()\n static func initialize() -> Backend {\n return .shared\n }\n private init() {\n // initialize amplify\n do {\n try Amplify.configure()\n print(\"Initialized Amplify\");\n } catch {\n print(\"Could not initialize Amplify: \\(error)\")\n }\n }\n}\n```\n应用程序启动后,初始化单例 Backend 对象。打开 AppDelegate.swift 文件并在 application(:didFinishLaunchingWithOptions:) 方法中添加 Backend.initialize();,如下所示:\nSwift\n```\n应用程序启动后,初始化单例 Backend 对象。打开 AppDelegate.swift 文件并在 application(:didFinishLaunchingWithOptions:) 方法中添加 Backend.initialize();,如下所示:\n```\n##### **2.5 验证设置**\n要验证一切是否都按预期运行,构建项目,单击 Product 菜单,然后选择 Build,或按 ⌘B。不出现错误即可。\n#### **三、添加身份验证**\n接下来,我们了解如何使用 Amplify CLI 和库对用户进行身份验证,以利用托管用户身份提供商 Amazon Cognito。另外,知道如何使用 Cognito 托管用户界面展示整个用户身份验证流,从而使用户只需几行代码即可注册、登录和重置密码。使用“托管用户界面”意味着应用程序利用 Cognito 网页登录和注册用户界面流。应用程序的用户将重定向到 Cognito 托管的网页,并在登录后重定向回应用程序。当然,Cognito 和 Amplify 也支持本机 UI。\n##### **3.1 创建身份验证服务**\n创建身份验证服务,打开一个命令行终端,然后执行如下命令:\nBash\n```\namplify add auth\n```\n输出结果出现 successful 字样表示创建成功。\n##### **3.2 部署身份验证服务**\n现在,我们已在本地配置身份验证服务,我们可以将它部署到云。在终端中,在项目目录中执行以下命令:\nBash\n```\namplify push\n```\n##### **3.3 向项目添加 Amplify 身份验证库**\n在转至代码之前,将 Amplify 身份验证库添加到项目的依赖项中。打开 Podfile 文件,然后使用 AmplifyPlugins/AWSCognitoAuthPlugin 添加行,或者复制并粘贴以下整个文件。\nBash\n```\n# you need at least version 13.0 for this tutorial, more recent versions are valid too\nplatform :ios, '13.0'\n\ntarget 'getting started' do\n # Comment the next line if you don't want to use dynamic frameworks\n use_frameworks!\n\n # Pods for getting started\n pod 'Amplify', '~> 1.0' # required amplify dependency\n pod 'Amplify/Tools', '~> 1.0' # allows to call amplify CLI from within Xcode\n\n pod 'AmplifyPlugins/AWSCognitoAuthPlugin', '~> 1.0' # support for Cognito user authentication\n\nend\n```\n在终端中执行以下命令:\nBash\n```\npod install\n```\n##### **3.4 在运行时配置 Amplify 身份验证库**\n返回到 Xcode,打开 Backend.swift 文件,其完整代码如下所示:\nSwift\n```\n// at the top of the file\nimport AmplifyPlugins\n\nprivate init () {\n // initialize amplify\n do {\n try Amplify.add(plugin: AWSCognitoAuthPlugin())\n try Amplify.configure()\n print(\"Initialized Amplify\")\n } catch {\n print(\"Could not initialize Amplify: \\(error)\")\n }\n}\n```\n构建项目,保证不报错即可。\n##### **3.5 在运行时触发身份验证**\n其余代码更改会跟踪用户的状态,并在用户未登录时触发登录/注册用户界面。 添加登录和注销代码,在后端类中的任意位置,添加以下三种方法:\nSwift\n```\n// signin with Cognito web user interface\npublic func signIn() {\n\n _ = Amplify.Auth.signInWithWebUI(presentationAnchor: UIApplication.shared.windows.first!) { result in\n switch result {\n case .success(_):\n print(\"Sign in succeeded\")\n case .failure(let error):\n print(\"Sign in failed \\(error)\")\n }\n }\n}\n\n// signout\npublic func signOut() {\n\n _ = Amplify.Auth.signOut() { (result) in\n switch result {\n case .success:\n print(\"Successfully signed out\")\n case .failure(let error):\n print(\"Sign out failed with error \\(error)\")\n }\n }\n}\n\n// change our internal state, this triggers an UI update on the main thread\nfunc updateUserData(withSignInStatus status : Bool) {\n DispatchQueue.main.async() {\n let userData : UserData = .shared\n userData.isSignedIn = status\n }\n}\n```\n为了跟踪身份验证状态的变化,我们添加了代码以订阅由 Amplify 发送的身份验证事件。我们在 Backend.init() 方法中初始化该中心。在收到身份验证事件时,我们将调用 updateUserData() 方法。此方法可使 UserData 对象保持同步。UserData.isSignedIn 属性为 @Published,这意味着当值更改时,用户界面会自动刷新。 我们可以添加代码以在应用程序启动时检查以前的身份验证状态。当应用程序启动时,它会检查 Cognito 会话是否已存在,并相应地更新 UI。\n在 Backend.init() 中,请在 Amplify 初始化后添加以下代码:\nSwift\n```\n// in private init() function\n// listen to auth events.\n// see https://github.com/aws-amplify/amplify-ios/blob/master/Amplify/Categories/Auth/Models/AuthEventName.swift\n_ = Amplify.Hub.listen(to: .auth) { (payload) in\n\n switch payload.eventName {\n\n case HubPayload.EventName.Auth.signedIn:\n print(\"==HUB== User signed In, update UI\")\n self.updateUserData(withSignInStatus: true)\n\n case HubPayload.EventName.Auth.signedOut:\n print(\"==HUB== User signed Out, update UI\")\n self.updateUserData(withSignInStatus: false)\n\n case HubPayload.EventName.Auth.sessionExpired:\n print(\"==HUB== Session expired, show sign in UI\")\n self.updateUserData(withSignInStatus: false)\n\n default:\n //print(\"==HUB== \\(payload)\")\n break\n }\n}\n \n// let's check if user is signedIn or not\n _ = Amplify.Auth.fetchAuthSession { (result) in\n do {\n let session = try result.get()\n \n// let's update UserData and the UI\n self.updateUserData(withSignInStatus: session.isSignedIn)\n \n } catch {\n print(\"Fetch auth session failed with error - \\(error)\")\n }\n} \n```\n代码中的最后一个更改与用户界面相关,我们将 ZStack 添加到 ContentView。根据UserData.isSignedIn 的值,UI 将显示 SigninButton 或主列表视图。打开 ContentView.swift 并替换 ContentView 结构中的正文:\nSwift\n```\nvar body: some View {\n\n ZStack {\n if (userData.isSignedIn) {\n NavigationView {\n List {\n ForEach(userData.notes) { note in\n ListRow(note: note)\n }\n }\n .navigationBarTitle(Text(\"Notes\"))\n .navigationBarItems(leading: SignOutButton())\n }\n } else {\n SignInButton()\n }\n }\n}\n```\n在同一文件中,添加 SignInButton 和 SignOutButton 视图:\nJavaScript\n```\nstruct SignInButton: View {\n var body: some View {\n Button(action: { Backend.shared.signIn() }){\n HStack {\n Image(systemName: \"person.fill\")\n .scaleEffect(1.5)\n .padding()\n Text(\"Sign In\")\n .font(.largeTitle)\n }\n .padding()\n .foregroundColor(.white)\n .background(Color.green)\n .cornerRadius(30)\n }\n }\n}\n\nstruct SignOutButton : View {\n var body: some View {\n Button(action: { Backend.shared.signOut() }) {\n Text(\"Sign Out\")\n }\n }\n}\n```\n最后,我们必须确保在 Cognito 托管用户界面提供的 Web 身份验证序列结束时启动我们的应用程序。我们将 gettingstarted URI 方案添加到应用程序的 Info.plist 文件中。在 Xcode 中,选择 Info.plist 文件,右键单击该文件,然后选择“打开为源代码”。\n另外,在顶部 <dict> 元素内添加以下 <key> 和 <array> 元素。\nXML\n```\n<plist version=\"1.0\">\n\n <dict>\n <!-- YOUR OTHER PLIST ENTRIES HERE -->\n\n <!-- ADD AN ENTRY TO CFBundleURLTypes for Cognito Auth -->\n <!-- IF YOU DO NOT HAVE CFBundleURLTypes, YOU CAN COPY THE WHOLE BLOCK BELOW -->\n <key>CFBundleURLTypes</key>\n <array>\n <dict>\n <key>CFBundleURLSchemes</key>\n <array>\n <string>gettingstarted</string>\n </array>\n </dict>\n </array>\n\n <!-- ... -->\n </dict>\n```\n然后,运行程序看看效果,整个注册流程如下图所示:\n\n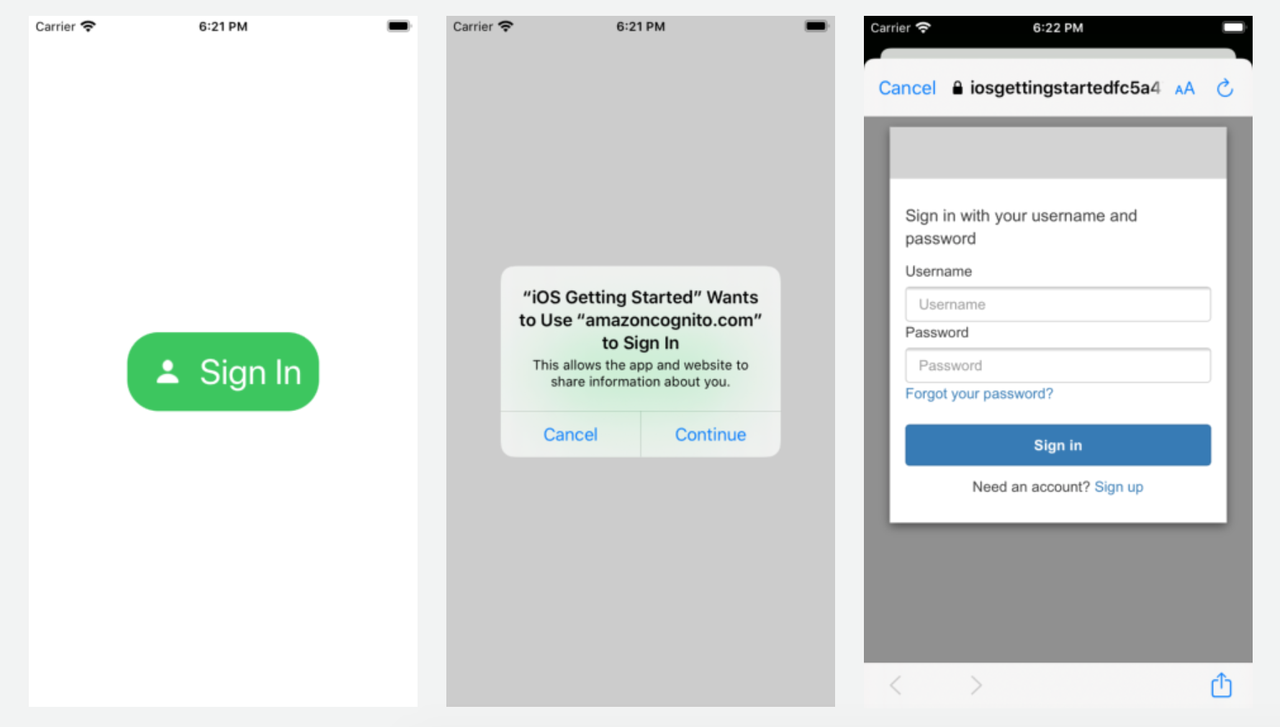\n\n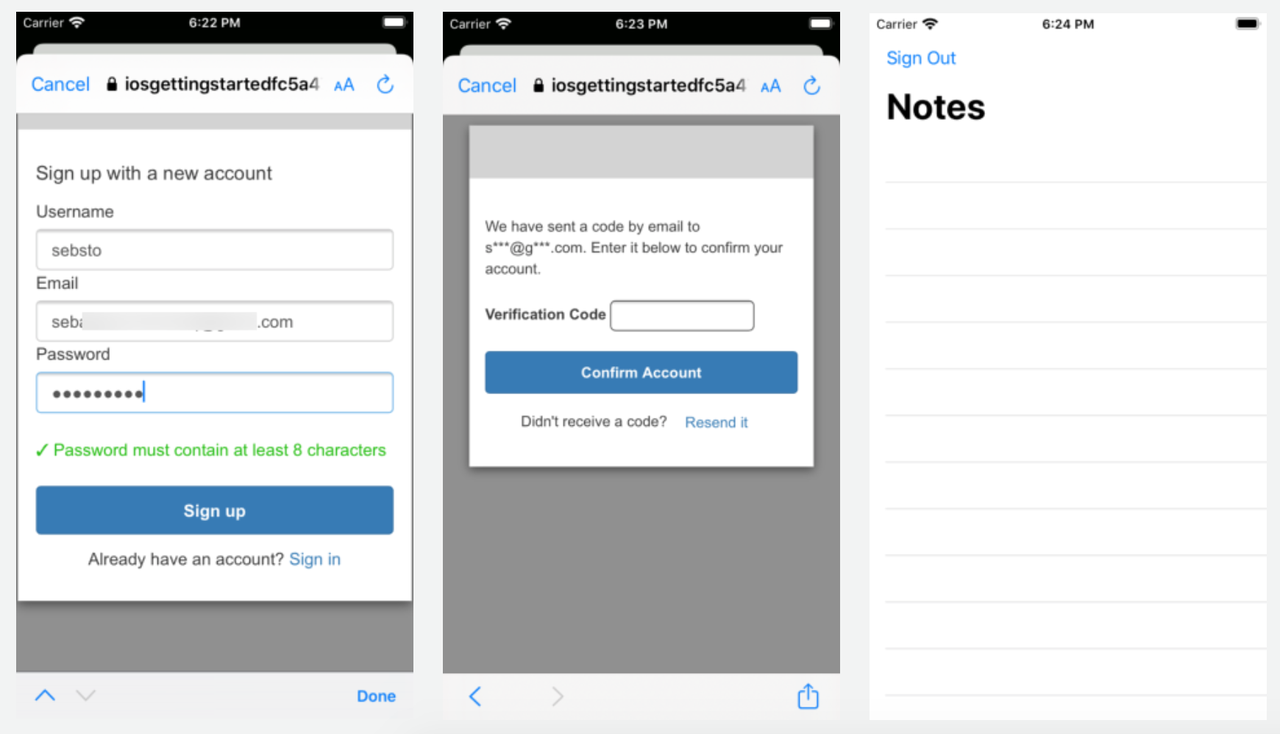\n\n#### **四、添加 API 和数据库**\n现在,我们已经创建并配置了带用户身份验证功能的应用程序。接下来,我们要在数据库中添加 API 以及“创建”、“读取”、“更新”、“删除”(CRUD) 操作\n##### **4.1 创建 GraphQL API 及数据库**\n要创建 GraphQL API 及其数据库,打开一个命令行终端,然后从项目目录中执行如下命令:\nBash\n```\namplify add api\n```\n初始化项目时选择的默认文本编辑器 (amplify init) 将使用预构建数据 schema 打开。删除此 schema,并使用我们的应用程序 GraphQL schema 替换:\nBash\n```\ntype NoteData\n@model\n@auth (rules: [ { allow: owner } ]) {\n id: ID!\n name: String!\n description: String\n image: String\n}\n```\n##### **4.2 生成客户端代码**\n根据我们刚刚创建的 GraphQL 数据模型定义,Amplify 会生成客户端代码(即 Swift 代码)以代表我们应用程序中的数据。要生成代码,在终端执行以下命令:\nBash\n```\namplify codegen models\n```\n在 Finder 中找到新生成的文件,然后将其拖放到 Xcode 的项目中。\n##### **4.3 部署 API 服务和数据库**\n要部署我们刚刚创建的后端 API 和数据库,打开终端,然后执行如下命令:\nBash\n```\namplify push\n```\n##### **4.4 将 API 客户端库添加到 Xcode 项目中**\n在转至代码之前,将 Amplify API 库添加到项目的依赖项中。打开 Podfile 文件,然后使用 AmplifyPlugins/AWSAPIPlugin 添加行,或者复制并粘贴以下整个文件。\nBash\n```\n# you need at least version 13.0 for this tutorial, more recent versions are valid too\nplatform :ios, '13.0'\n\ntarget 'getting started' do\n # Comment the next line if you don't want to use dynamic frameworks\n use_frameworks!\n\n # Pods for getting started\n pod 'Amplify', '~> 1.0' # required amplify dependency\n pod 'Amplify/Tools', '~> 1.0' # allows to call amplify CLI from within Xcode\n\n pod 'AmplifyPlugins/AWSCognitoAuthPlugin', '~> 1.0' # support for Cognito user authentication\n pod 'AmplifyPlugins/AWSAPIPlugin', '~> 1.0' # support for GraphQL API\n\nend\n```\n然后,执行如下命令:\nBash\n```\npod install\n```\n##### **4.5 在运行时初始化 Amplify 库**\n返回到 Xcode,打开 Backend.swift,然后在私有 init() 方法的 Amplify 初始化序列中添加一行。完整代码块应如下所示:\nSwift\n```\n// initialize amplify\ndo {\n try Amplify.add(plugin: AWSCognitoAuthPlugin())\n try Amplify.add(plugin: AWSAPIPlugin(modelRegistration: AmplifyModels()))\n try Amplify.configure()\n print(\"Initialized Amplify\")\n} catch {\n print(\"Could not initialize Amplify: \\(error)\")\n}\n```\n##### **4.6 在 GraphQL 数据模型和应用程序模型之间添加桥接**\n我们的项目已经有一个数据模型来表示备注。因此,可以继续使用该模型,并提供一种将 NoteData 转换为备注的简单方法。打开 ContentView.swift 并将此初始化程序添加到备注类中。\nSwift\n```\nconvenience init(from data: NoteData) {\n self.init(id: data.id, name: data.name, description: data.description, image: data.image)\n \n // store API object for easy retrieval later\n self._data = data\n}\n\nfileprivate var _data : NoteData?\n\n// access the privately stored NoteData or build one if we don't have one.\nvar data : NoteData {\n\n if (_data == nil) {\n _data = NoteData(id: self.id,\n name: self.name,\n description: self.description,\n image: self.imageName)\n }\n\n return _data!\n}\n```\n##### **4.7 将 API CRUD 方法添加到后端类中**\n我们添加 3 种方法来调用 API:一种查询 Note 的方法,一种创建新 Note 的方法,以及一种删除 Note 的方法。请注意,这些方法适用于应用程序数据模型(备注),以便从用户界面轻松交互。这些方法可透明地将 Note 转换为 GraphQL 的 NoteData 对象。\n打开 Backend.swift 文件,然后在后端类末尾添加以下 snipet:\nSwift\n```\n// MARK: API Access\n\n func queryNotes() {\n\n _ = Amplify.API.query(request: .list(NoteData.self)) { event in\n switch event {\n case .success(let result):\n switch result {\n case .success(let notesData):\n print(\"Successfully retrieved list of Notes\")\n\n // convert an array of NoteData to an array of Note class instances\n for n in notesData {\n let note = Note.init(from: n)\n DispatchQueue.main.async() {\n UserData.shared.notes.append(note)\n }\n }\n\n case .failure(let error):\n print(\"Can not retrieve result : error \\(error.errorDescription)\")\n }\n case .failure(let error):\n print(\"Can not retrieve Notes : error \\(error)\")\n }\n }\n }\n\n func createNote(note: Note) {\n\n // use note.data to access the NoteData instance\n _ = Amplify.API.mutate(request: .create(note.data)) { event in\n switch event {\n case .success(let result):\n switch result {\n case .success(let data):\n print(\"Successfully created note: \\(data)\")\n case .failure(let error):\n print(\"Got failed result with \\(error.errorDescription)\")\n }\n case .failure(let error):\n print(\"Got failed event with error \\(error)\")\n }\n }\n }\n\n func deleteNote(note: Note) {\n\n // use note.data to access the NoteData instance\n _ = Amplify.API.mutate(request: .delete(note.data)) { event in\n switch event {\n case .success(let result):\n switch result {\n case .success(let data):\n print(\"Successfully deleted note: \\(data)\")\n case .failure(let error):\n print(\"Got failed result with \\(error.errorDescription)\")\n }\n case .failure(let error):\n print(\"Got failed event with error \\(error)\")\n }\n }\n }\n```\n在同一 Backend.swift 文件中,更新 updateUserData(withSignInStatus:) 方法如下所示:\nSwift\n```\n// change our internal state, this triggers an UI update on the main thread\nfunc updateUserData(withSignInStatus status : Bool) {\n DispatchQueue.main.async() {\n let userData : UserData = .shared\n userData.isSignedIn = status\n\n // when user is signed in, query the database, otherwise empty our model\n if status {\n self.queryNotes()\n } else {\n userData.notes = []\n }\n }\n}\n```\n现在,只需创建一个用户界面即可创建新 Note 和从列表中删除 Note。\n##### **4.8 添加“Edit”按钮以添加备注**\n现在,后端和数据模型已到位,最后一步是让用户创建新的 Note 然后将其删除。在 Xcode 中,打开 ContentView.swift,在 ContentView 结构中,添加绑定到用户界面的状态变量。\nSwift\n```\n// add at the begining of ContentView class\n@State var showCreateNote = false\n\n@State var name : String = \"New Note\"\n@State var description : String = \"This is a new note\"\n@State var image : String = \"image\"\n```\n在文件中的任何位置,添加视图结构,以允许用户创建新的备注:\nSwift\n```struct AddNoteView: View {\n @Binding var isPresented: Bool\n var userData: UserData\n\n @State var name : String = \"New Note\"\n @State var description : String = \"This is a new note\"\n @State var image : String = \"image\"\n var body: some View {\n Form {\n\n Section(header: Text(\"TEXT\")) {\n TextField(\"Name\", text: $name)\n TextField(\"Name\", text: $description)\n }\n\n Section(header: Text(\"PICTURE\")) {\n TextField(\"Name\", text: $image)\n }\n\n Section {\n Button(action: {\n self.isPresented = false\n let noteData = NoteData(id : UUID().uuidString,\n name: self.$name.wrappedValue,\n description: self.$description.wrappedValue)\n let note = Note(from: noteData)\n\n // asynchronously store the note (and assume it will succeed)\n Backend.shared.createNote(note: note)\n\n // add the new note in our userdata, this will refresh UI\n self.userData.notes.append(note)\n }) {\n Text(\"Create this note\")\n }\n }\n }\n }\n}\n```\n在导航栏上添加“+”按钮演示数据表以创建备注,返回 ContentView 结构,将 navigationBarItems(leading SignOutButton()) 替换为:\nSwift\n```\n.navigationBarItems(leading: SignOutButton(),\n trailing: Button(action: {\n self.showCreateNote.toggle()\n }) {\n Image(systemName: \"plus\")\n })\n}.sheet(isPresented: $showCreateNote) {\n AddNoteView(isPresented: self.$showCreateNote, userData: self.userData)\n```\n##### **4.9 添加“滑动删除”行为**\n最后,在 ContentView 中添加“轻扫以删除”行为:将 .onDelete { } 方法添加到 ForEach 结构中:\nSwift\n```\nForEach(userData.notes) { note in\n ListRow(note: note)\n}.onDelete { indices in\n indices.forEach {\n // removing from user data will refresh UI\n let note = self.userData.notes.remove(at: $0)\n\n // asynchronously remove from database\n Backend.shared.deleteNote(note: note)\n }\n}\n```\n##### **4.10 构建和测试**\n首先,编译程序,保证不出现报错。然后,运行程序,整个完整流程如下图所示:\n\n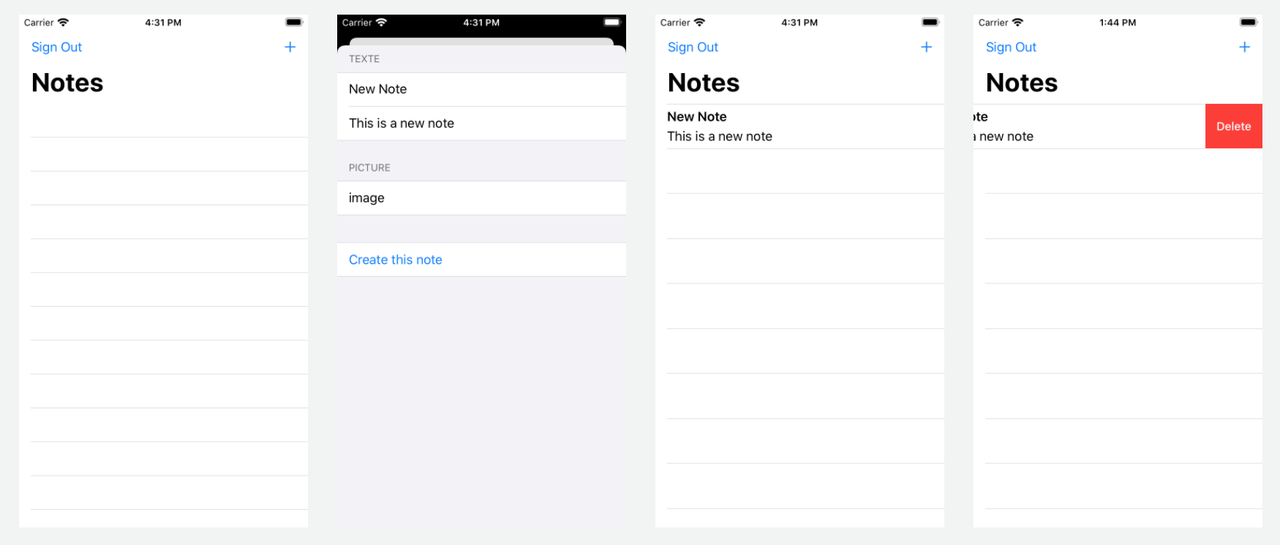\n\n#### **五、添加存储**\n现在,我们的备注应用程序已在运行,接下来添加将图像与每个备注关联的功能。在本模块中,将使用 Amplify CLI 和库来创建利用 Amazon S3 的存储服务。最后,将更新 iOS 应用程序以启用图像上传、获取和渲染。\n##### **5.1 创建存储服务**\n要添加图像存储功能,我们将使用 Amplify 存储类别,执行如下命令:\nBash\n```\namplify add storage\n```\n##### **5.2 部署存储服务**\n要部署我们刚刚创建的存储服务,打开终端,然后执行以下命令:\nBash\n```\namplify push\n```\n##### **5.3 向Xcode项目中添加 Amplify 存储库**\n在转至代码之前,将 Amplify 存储库添加到项目的依赖项中。打开 Podfile 文件,然后使用 AmplifyPlugins/AWSS3StoragePlugin 添加行,或者复制并粘贴以下整个文件。\nBash\n```\n# you need at least version 13.0 for this tutorial, more recent versions are valid too\nplatform :ios, '13.0'\n\ntarget 'getting started' do\n # Comment the next line if you don't want to use dynamic frameworks\n use_frameworks!\n\n # Pods for getting started\n pod 'Amplify', '~> 1.0' # required amplify dependency\n pod 'Amplify/Tools', '~> 1.0' # allows to call amplify CLI from within Xcode\n\n pod 'AmplifyPlugins/AWSCognitoAuthPlugin', '~> 1.0' # support for Cognito user authentication\n pod 'AmplifyPlugins/AWSAPIPlugin', '~> 1.0' # support for GraphQL API\n pod 'AmplifyPlugins/AWSS3StoragePlugin', '~> 1.0' # support for Amazon S3 storage\n\nend\n```\n然后,执行如下命令:\nBash\n```\npod install\n```\n##### **5.4 在运行时初始化 Amplify 存储插件**\n返回 Xcode,打开 Backend.swift,然后在私有 init() 方法的 Amplify 初始化序列中添加一行。完整代码块应如下所示:\nSwift\n```\n// initialize amplify\ndo {\n try Amplify.add(plugin: AWSCognitoAuthPlugin())\n try Amplify.add(plugin: AWSAPIPlugin(modelRegistration: AmplifyModels()))\n try Amplify.add(plugin: AWSS3StoragePlugin())\n try Amplify.configure()\n print(\"Initialized Amplify\");\n} catch {\n print(\"Could not initialize Amplify: \\(error)\")\n}\n```\n##### **5.5 将 Image CRUD 方法添加到后端类**\n打开 Backend.Swift。在后端类中的任意位置,添加以下方法:\nSwift\n```\nfunc storeImage(name: String, image: Data) {\n\n// let options = StorageUploadDataRequest.Options(accessLevel: .private)\n let _ = Amplify.Storage.uploadData(key: name, data: image,// options: options,\n progressListener: { progress in\n // optionlly update a progress bar here\n }, resultListener: { event in\n switch event {\n case .success(let data):\n print(\"Image upload completed: \\(data)\")\n case .failure(let storageError):\n print(\"Image upload failed: \\(storageError.errorDescription). \\(storageError.recoverySuggestion)\")\n }\n })\n}\n\nfunc retrieveImage(name: String, completed: @escaping (Data) -> Void) {\n let _ = Amplify.Storage.downloadData(key: name,\n progressListener: { progress in\n // in case you want to monitor progress\n }, resultListener: { (event) in\n switch event {\n case let .success(data):\n print(\"Image \\(name) loaded\")\n completed(data)\n case let .failure(storageError):\n print(\"Can not download image: \\(storageError.errorDescription). \\(storageError.recoverySuggestion)\")\n }\n }\n )\n}\n\nfunc deleteImage(name: String) {\n let _ = Amplify.Storage.remove(key: name,\n resultListener: { (event) in\n switch event {\n case let .success(data):\n print(\"Image \\(data) deleted\")\n case let .failure(storageError):\n print(\"Can not delete image: \\(storageError.errorDescription). \\(storageError.recoverySuggestion)\")\n }\n }\n )\n}\n```\n##### **5.6 API 检索数据时加载图像**\n现在,后端函数已经可用,我们接下来在 API 调用返回结果时加载图像。添加此行为的中心位置是,应用程序通过 API 返回的 NoteData 构造备注 UI 时。打开 ContentView.swift 并更新备注的初始化程序(添加第 8 行至第 17 行):\nSwift\n```\n// add a publishable's object property\n@Published var image : Image?\n\n// update init's code\nconvenience init(from data: NoteData) {\n self.init(id: data.id, name: data.name, description: data.description, image: data.image)\n\n if let name = self.imageName {\n // asynchronously download the image\n Backend.shared.retrieveImage(name: name) { (data) in\n // update the UI on the main thread\n DispatchQueue.main.async() {\n let uim = UIImage(data: data)\n self.image = Image(uiImage: uim!)\n }\n }\n }\n // store API object for easy retrieval later\n self._data = data\n```\n当备注实例中存在图像名称时,代码将调用 retrieveImage,它是一个异步函数。下载图像时需要调用一个函数,该函数创建一个图像 UI 对象并将其分配给备注实例。请注意,此分配会触发用户界面更新,因此会在应用程序的主线程中使用 DispatchQueue.main.async 进行更新。\n##### **5.7 添加 UI 代码以捕获图像**\n首先,我们添加通用代码以支持图像捕获。此代码可在许多应用程序中重复使用;它显示了一个图像选择器,允许用户从其图像库中选择图像。在 Xcode 中,创建新的 Swift 文件(⌘N,然后选择 Swift)。命名 CaptureImageView.swift 文件,然后添加此代码:\nSwift\n```\nimport Foundation\nimport UIKit\nimport SwiftUI\n\nstruct CaptureImageView {\n\n /// MARK: - Properties\n @Binding var isShown: Bool\n @Binding var image: UIImage?\n\n func makeCoordinator() -> Coordinator {\n return Coordinator(isShown: $isShown, image: $image)\n }\n}\n\nclass Coordinator: NSObject, UINavigationControllerDelegate, UIImagePickerControllerDelegate {\n @Binding var isCoordinatorShown: Bool\n @Binding var imageInCoordinator: UIImage?\n init(isShown: Binding<Bool>, image: Binding<UIImage?>) {\n _isCoordinatorShown = isShown\n _imageInCoordinator = image\n }\n func imagePickerController(_ picker: UIImagePickerController,\n didFinishPickingMediaWithInfo info: [UIImagePickerController.InfoKey : Any]) {\n guard let unwrapImage = info[UIImagePickerController.InfoKey.originalImage] as? UIImage else { return }\n imageInCoordinator = unwrapImage\n isCoordinatorShown = false\n }\n func imagePickerControllerDidCancel(_ picker: UIImagePickerController) {\n isCoordinatorShown = false\n }\n}\n\nextension CaptureImageView: UIViewControllerRepresentable {\n func makeUIViewController(context: UIViewControllerRepresentableContext<CaptureImageView>) -> UIImagePickerController {\n let picker = UIImagePickerController()\n picker.delegate = context.coordinator\n\n // picker.sourceType = .camera // on real devices, you can capture image from the camera\n // see https://medium.com/better-programming/how-to-pick-an-image-from-camera-or-photo-library-in-swiftui-a596a0a2ece\n\n return picker\n }\n\n func updateUIViewController(_ uiViewController: UIImagePickerController,\n context: UIViewControllerRepresentableContext<CaptureImageView>) {\n\n }\n}\n```\n##### **5.8 创建备注时存储图像**\n创建备注时,我们从后端调用存储方法。打开 ContentView.swift 并修改 AddNoteView 以添加 ImagePicker 组件:\nSwift\n```\n// at the start of the Content View struct \n@State var image : UIImage? // replace the previous declaration of image\n@State var showCaptureImageView = false\n\n// in the view, replace the existing PICTURE section\nSection(header: Text(\"PICTURE\")) {\n VStack {\n Button(action: {\n self.showCaptureImageView.toggle()\n }) {\n Text(\"Choose photo\")\n }.sheet(isPresented: $showCaptureImageView) {\n CaptureImageView(isShown: self.$showCaptureImageView, image: self.$image)\n }\n if (image != nil ) {\n HStack {\n Spacer()\n Image(uiImage: image!)\n .resizable()\n .frame(width: 250, height: 200)\n .clipShape(Circle())\n .overlay(Circle().stroke(Color.white, lineWidth: 4))\n .shadow(radius: 10)\n Spacer()\n }\n }\n }\n}\n```\n修改“创建备注”部分以存储图像和备注:\nSwift\n```\nSection {\n Button(action: {\n self.isPresented = false\n\n let note = Note(id : UUID().uuidString,\n name: self.$name.wrappedValue,\n description: self.$description.wrappedValue)\n\n if let i = self.image {\n note.imageName = UUID().uuidString\n note.image = Image(uiImage: i)\n\n // asynchronously store the image (and assume it will work)\n Backend.shared.storeImage(name: note.imageName!, image: (i.pngData())!)\n }\n\n // asynchronously store the note (and assume it will succeed)\n Backend.shared.createNote(note: note)\n\n // add the new note in our userdata, this will refresh UI\n withAnimation { self.userData.notes.append(note) }\n }) {\n Text(\"Create this note\")\n }\n}\n```\n##### **5.9 构建和测试**\n首先,编译程序,保证不出现报错。然后,运行程序,整个完整流程如下图所示:\n\n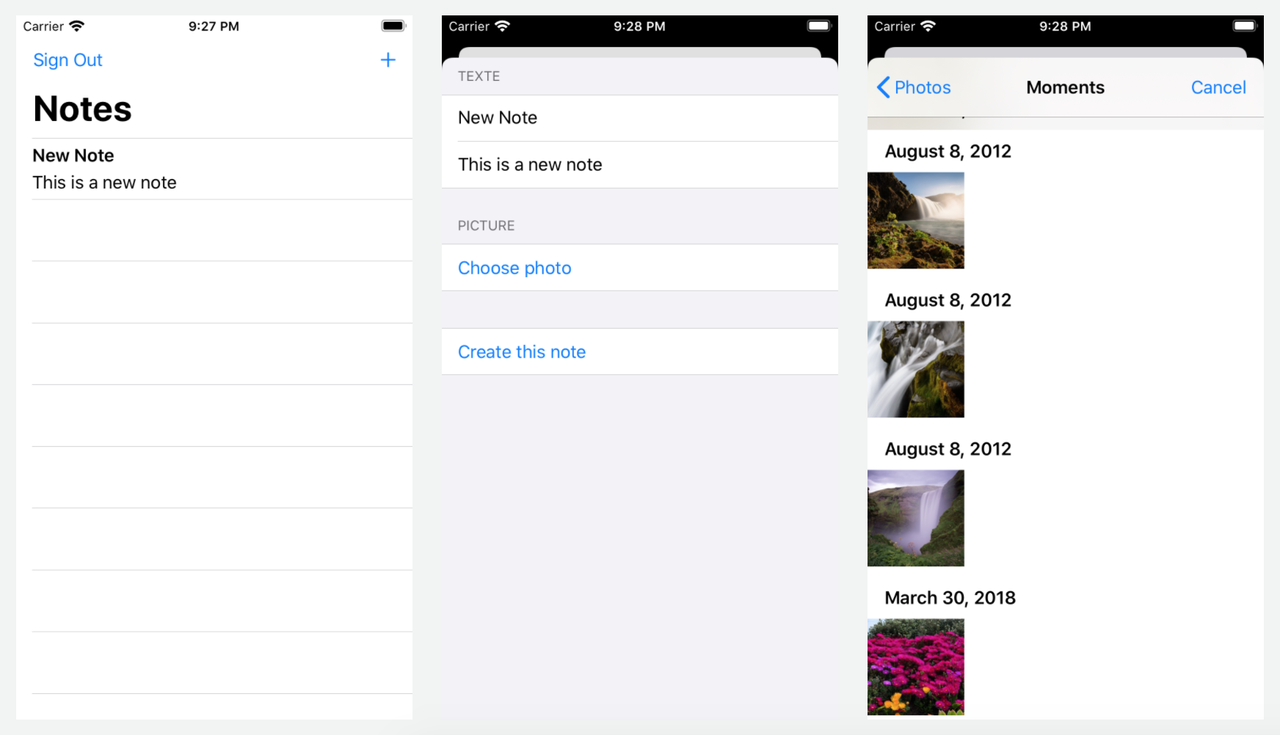\n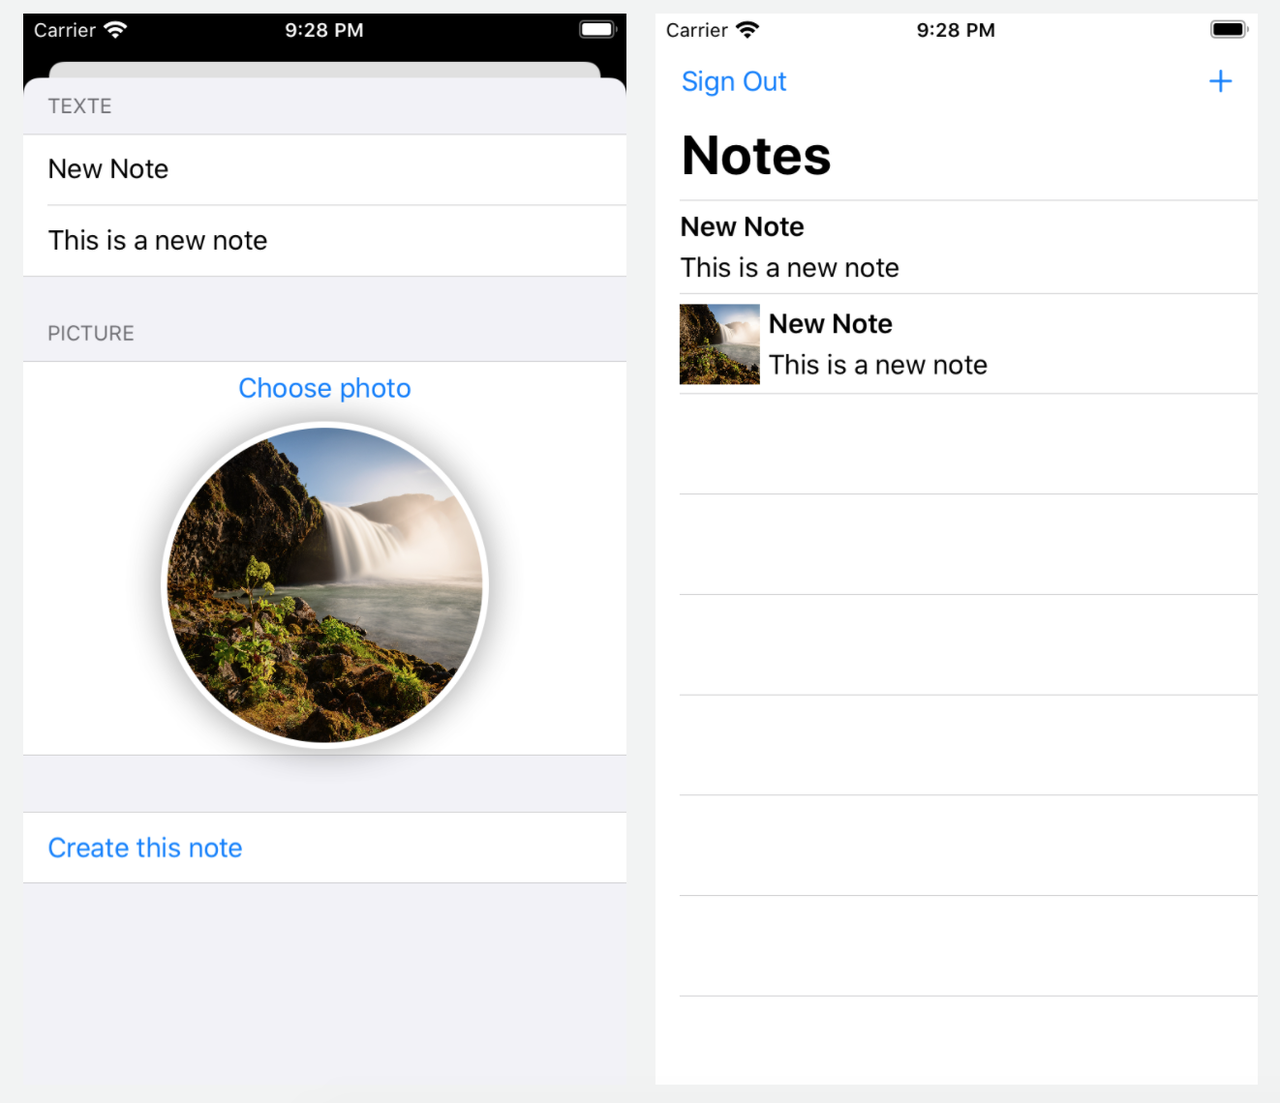\n\n### 结论\n至此,我们已经体验了使用 Amazon Amplify 构建 iOS 应用程序的过程! 在应用程序中添加了身份验证,用户可以注册、登录和管理其账户。该应用程序还使用 Amazon DynamoDB 数据库配置了一个可扩展的 GraphQL API,用户可以创建和删除备注。另外,还使用 Amazon S3 添加了文件存储,从而使用户可以上传图像并在其应用程序中查看它们。但是,使用过程中也出现了很多小插曲,非常耽误时间,由于篇幅的限制,我简单说两点:一、Xcode 版本兼容性问题。最开始我使用低于11.5的版本,遇到了很多编译错误,最后升级到11.5才解决。因此,体验时要保证一个较高的 Xcode 版本,这一点应该在官方文档中说明;二、信用卡注册问题。服务中国客户,亚马逊应该入乡随俗,提供更加人性化的注册方式,可以考虑支付宝或者微信登陆注册,这样会比较符合大家的习惯。别的方面还比较顺利,感兴趣的话,小伙伴们就自己动手尝试一下吧!另外,亚马逊云科技专为开发者们打造了多种学习平台:\n1. 入门资源中心:从0到1 轻松上手云服务,内容涵盖:成本管理,上手训练,开发资源。[https://aws.amazon.com/cn/getting-started/?nc1=h_ls&trk=32540c74-46f0-46dc-940d-621a1efeedd0&sc_channel=el](https://aws.amazon.com/cn/getting-started/?nc1=h_ls&trk=32540c74-46f0-46dc-940d-621a1efeedd0&sc_channel=el)\n2. 架构中心:亚马逊云科技架构中心提供了云平台参考架构图表、经过审查的架构解决方案、Well-Architected 最佳实践、模式、图标等。[https://aws.amazon.com/cn/architecture/?intClick=dev-center-2021_main&trk=3fa608de-d954-4355-a20a-324daa58bbeb&sc_channel=el](https://aws.amazon.com/cn/architecture/?intClick=dev-center-2021_main&trk=3fa608de-d954-4355-a20a-324daa58bbeb&sc_channel=el)\n3. 构建者库:了解亚马逊云科技如何构建和运营软件。[https://aws.amazon.com/cn/builders-library/?cards-body.sort-by=item.additionalFields.sortDate&cards-body.sort-order=desc&awsf.filter-content-category=*all&awsf.filter-content-type=*all&awsf.filter-content-level=*all&trk=835e6894-d909-4691-aee1-3831428c04bd&sc_channel=el](https://aws.amazon.com/cn/builders-library/?cards-body.sort-by=item.additionalFields.sortDate&cards-body.sort-order=desc&awsf.filter-content-category=*all&awsf.filter-content-type=*all&awsf.filter-content-level=*all&trk=835e6894-d909-4691-aee1-3831428c04bd&sc_channel=el)\n4. 用于在亚马逊云科技平台上开发和管理应用程序的工具包:[https://aws.amazon.com/cn/tools/?intClick=dev-center-2021_main&trk=972c69e1-55ec-43af-a503-d458708bb645&sc_channel=el](https://aws.amazon.com/cn/tools/?intClick=dev-center-2021_main&trk=972c69e1-55ec-43af-a503-d458708bb645&sc_channel=el)\n\n【专属福利】\n 福利一:100余种产品免费套餐。其中,计算资源 Amazon EC2首年12个月免费,750小时/月;存储资源 Amazon S3 首年12个月免费,5GB标准存储容量。\n[https://aws.amazon.com/cn/free/?nc2=h_ql_pr_ft&all-free-tier.sort-by=item.additionalFields.SortRank&all-free-tier.sort-order=asc&awsf.Free%20Tier%20Types=*all&awsf.Free%20Tier%20Categories=*all&trk=e0213267-9c8c-4534-bf9b-ecb1c06e4ac6&sc_channel=el](https://aws.amazon.com/cn/free/?nc2=h_ql_pr_ft&all-free-tier.sort-by=item.additionalFields.SortRank&all-free-tier.sort-order=asc&awsf.Free%20Tier%20Types=*all&awsf.Free%20Tier%20Categories=*all&trk=e0213267-9c8c-4534-bf9b-ecb1c06e4ac6&sc_channel=el)\n\n 福利二:最新优惠大礼包,200$数据与分析抵扣券,200$机器学习抵扣券,200$微服务与应用开发抵扣券。[https://www.amazonaws.cn/campaign/?sc_channel=el&sc_campaign=credit-acts-ldr&sc_country=cn&sc_geo=chna&sc_category=mult&sc_outcome=field&trkCampaign=request-credit-glb-ldr&trk=f45email&trk=02faebcb-3f61-4bcb-b68e-c63f3ae33c99&sc_channel=el](https://www.amazonaws.cn/campaign/?sc_channel=el&sc_campaign=credit-acts-ldr&sc_country=cn&sc_geo=chna&sc_category=mult&sc_outcome=field&trkCampaign=request-credit-glb-ldr&trk=f45email&trk=02faebcb-3f61-4bcb-b68e-c63f3ae33c99&sc_channel=el)\n\n福利三:解决方案 CloudFormation 一键部署模版库\n[https://aws.amazon.com/cn/quickstart/?solutions-all.sort-by=item.additionalFields.sortDate&solutions-all.sort-order=desc&awsf.filter-tech-category=*all&awsf.filter-industry=*all&awsf.filter-content-type=*all&trk=afdbbdf0-610b-4421-ac0c-a6b31f902e4b&sc_channel=el](https://aws.amazon.com/cn/quickstart/?solutions-all.sort-by=item.additionalFields.sortDate&solutions-all.sort-order=desc&awsf.filter-tech-category=*all&awsf.filter-industry=*all&awsf.filter-content-type=*all&trk=afdbbdf0-610b-4421-ac0c-a6b31f902e4b&sc_channel=el)","render":"<h3><a id=\"_0\"></a><strong>摘要</strong></h3>\n<p>Amazon Amplify 是一组位于云端的工具和无服务器服务。本文的主要是介绍如何基于 Amazon Amplify 构建自己的首个 iOS 应用程序。首先,我们将构建一个简单的 iOS 应用程序。然后,使用 Amplify 命令行接口 (Amplify CLI) 初始化一个本地应用程序,同时添加用户身份验证、添加GraphQL API 和数据库以存储我们的数据,最后,更新我们的应用程序来存储图像文件。亚马逊云科技提供了100余种产品免费套餐。其中,计算资源Amazon EC2首年12个月免费,750小时/月;存储资源 Amazon S3 首年12个月免费,5GB标准存储容量。<br />\n<a href=\"https://aws.amazon.com/cn/free/?nc2=h_ql_pr_ft&all-free-tier.sort-by=item.additionalFields.SortRank&all-free-tier.sort-order=asc&awsf.Free%20Tier%20Types=*all&awsf.Free%20Tier%20Categories=*all&trk=e0213267-9c8c-4534-bf9b-ecb1c06e4ac6&sc_channel=el\" target=\"_blank\">https://aws.amazon.com/cn/free/?nc2=h_ql_pr_ft&all-free-tier.sort-by=item.additionalFields.SortRank&all-free-tier.sort-order=asc&awsf.Free%20Tier%20Types=*all&awsf.Free%20Tier%20Categories=*all&trk=e0213267-9c8c-4534-bf9b-ecb1c06e4ac6&sc_channel=el</a></p>\n<h3><a id=\"_3\"></a><strong>正文</strong></h3>\n<p>Amazon Amplify 是一组专门构建的工具和功能,使前端 Web 和移动开发人员可以快速、轻松地在 Amazon 上构建全堆栈应用程序,随着使用案例的发展,可以灵活地利用广泛的 Amazon 服务。借助 Amplify,您可以在几分钟内配置 web 或移动应用程序后端并连接应用程序,可视化地构建 web 前端 UI,并在 Amazon 控制台外轻松管理应用程序内容。无需云专业知识,就可更快发布和扩展。<br />\n现在很多技术方案都在上云,仿佛一切都可以云原生化。那么 iOS 应用程序开发是不是也可以在云端开发呢?今天就有机会体验了一把使用亚马逊的 Amazon Amplify 创建了一个 iOS 应用程序,实现了添加用户身份验证、添加 GraphQL API 和操作数据库等功能。接下来,我们就详细了解一下整个构建过程。</p>\n<h4><a id=\"_iOS__6\"></a><strong>一、创建 iOS 应用程序</strong></h4>\n<p>Amazon Amplify 提供基于 Git 的工作流,用于创建、管理、集成和部署 Web 和移动应用程序的无服务器后端。Amplify CLI 提供了一个简单的基于文本的用户界面,用于预置和管理后端服务,比如用于应用程序的用户身份验证或 REST 或 GraphQL API。使用 Amplify 库可以轻松地将这些后端服务与应用程序中的几行代码集成。<br />\n首先,我们创建一个新的 iOS 应用程序来记录旅行备注。其中,备注由标题、描述和图片组成。</p>\n<h5><a id=\"11__iOS__9\"></a><strong>1.1 创建 iOS 应用程序</strong></h5>\n<p>启动 Xcode 并选择创建新的 Xcode 项目,具体操作如下图所示:</p>\n<p><img src=\"https://dev-media.amazoncloud.cn/d7f1c591b7eb4583a79d73d6648fed99_image.png\" alt=\"image.png\" /></p>\n<p>在 iOS 应用程序下,选择“单一视图应用程序”,然后单击“下一步”,具体操作如下图所示:</p>\n<p><img src=\"https://dev-media.amazoncloud.cn/cee3c047f0824df8a9a25956580414ef_image.png\" alt=\"image.png\" /></p>\n<p>键入项目的名称,例如 iOS Getting Started。确保将语言设置为“Swift”,如果可以设置用户界面的话,那就使用“SwiftUI”。其实,SwiftUI 是一种通过 Swift 编程语言在所有 Apple 平台上构建用户界面的简单方法。但是,本文使用的 XCode 版本没有该设置项,因此可以跳过,单击“下一步”,具体如下图所示:</p>\n<p><img src=\"https://dev-media.amazoncloud.cn/169b87badfb743e2b125e8060ebcfb43_image.png\" alt=\"image.png\" /></p>\n<p>最后,选择一个保存目录,然后单击“创建”,以创建项目,呈现效果如下图所示:</p>\n<p><img src=\"https://dev-media.amazoncloud.cn/53ea17a74f7249cbb3529ba4d7e59a60_image.png\" alt=\"image.png\" /></p>\n<h5><a id=\"12__26\"></a><strong>1.2 更新主视图</strong></h5>\n<p>从 Xcode 左侧的文件列表中,打开 ContentView.swift,然后将代码替换为以下内容:<br />\nObjective-C</p>\n<pre><code class=\"lang-\">//\n// ContentView.swift\n// iOS Getting Started\n//\n// Created by lz on 2022/3/28.\n// Copyright © 2022 lozen. All rights reserved.\n//\n\nimport SwiftUI\n\n// singleton object to store user data\nclass UserData : ObservableObject {\n private init() {}\n static let shared = UserData()\n\n @Published var notes : [Note] = []\n @Published var isSignedIn : Bool = false\n}\n\n// the data class to represents Notes\nclass Note : Identifiable, ObservableObject {\n var id : String\n var name : String\n var description : String?\n var imageName : String?\n @Published var image : Image?\n\n init(id: String, name: String, description: String? = nil, image: String? = nil ) {\n self.id = id\n self.name = name\n self.description = description\n self.imageName = image\n }\n}\n\n// a view to represent a single list item\nstruct ListRow: View {\n @ObservedObject var note : Note\n var body: some View {\n\n return HStack(alignment: .center, spacing: 5.0) {\n\n // if there is an image, display it on the left\n if (note.image != nil) {\n note.image!\n .resizable()\n .frame(width: 50, height: 50)\n }\n\n // the right part is a vertical stack with the title and description\n VStack(alignment: .leading, spacing: 5.0) {\n Text(note.name)\n .bold()\n\n if ((note.description) != nil) {\n Text(note.description!)\n }\n }\n }\n }\n}\n\n// this is the main view of our app,\n// it is made of a Table with one line per Note\nstruct ContentView: View {\n @ObservedObject private var userData: UserData = .shared\n\n var body: some View {\n List {\n ForEach(userData.notes) { note in\n ListRow(note: note)\n }\n }\n }\n}\n\n// this is use to preview the UI in Xcode\nstruct ContentView_Previews: PreviewProvider {\n static var previews: some View {\n\n let _ = prepareTestData()\n\n return ContentView()\n }\n}\n\n// this is a test data set to preview the UI in Xcode\nfunc prepareTestData() -> UserData {\n let userData = UserData.shared\n userData.isSignedIn = true\n let desc = "this is a very long description that should fit on multiiple lines.\\nit even has a line break\\nor two."\n\n let n1 = Note(id: "01", name: "Hello world", description: desc, image: "mic")\n let n2 = Note(id: "02", name: "A new note", description: desc, image: "phone")\n\n n1.image = Image(systemName: n1.imageName!)\n n2.image = Image(systemName: n2.imageName!)\n\n userData.notes = [ n1, n2 ]\n\n return userData\n}\n</code></pre>\n<p>上述代码都完成了如下工作:</p>\n<ul>\n<li>创建了一个备注类来存储备注的数据。针对 ImageName 和 Image 使用了两个不同的属性。稍后,我们将在“添加存储”部分中处理图像。</li>\n<li>创建了一个 UserData 类来保存特定用户的数据,在此阶段,只保存一个备注对象列表。</li>\n<li>主视图 ContentView 包含 ListRow 的列表</li>\n<li>每行都由 ListRow 呈现:包含图像和文本的水平堆栈。文本垂直堆栈备注名称和备注说明,以粗体显示。</li>\n<li>最后,调整了 ContentView_Previews 并添加了 prepareTestData() 以允许在画布中进行预览渲染。</li>\n</ul>\n<h5><a id=\"13__139\"></a><strong>1.3 构建和测试</strong></h5>\n<p>检查画布以验证布局是否满足需要。如果看不到画布,可以使用编辑器菜单启用画布,然后单击画布。您可能还需要单击画布中的恢复按钮以生成布局预览。</p>\n<p><img src=\"https://dev-media.amazoncloud.cn/1d81d24b44224dc0b03c600265a454c2_image.png\" alt=\"image.png\" /></p>\n<p>请注意,预览数据是在代码中生成的,数据不会在运行时显示。如果一切正常,请在模拟器中构建并启动应用程序。单击产品菜单,然后选择运行或键入 。或者,您也可以单击工具栏中的播放 ▶️ 按钮。<br />\n一段时间后,应用程序会在 iOS 模拟器中启动,初始屏幕为空。 预览数据不会在运行时呈现,它们仅用于 Xcode 内的预览,具体效果如下图所示:</p>\n<p><img src=\"https://dev-media.amazoncloud.cn/c9fc4ed182124d87961eedfdee8b138b_image.png\" alt=\"image.png\" /></p>\n<p>但是,这个过程中有个小插曲,由于我本机的XCode版本过低,导致代码编译不同,后来自己升级到11.5才解决。</p>\n<p><img src=\"https://dev-media.amazoncloud.cn/50bc85ba7ed146a7a232871883eb3cf9_image.png\" alt=\"image.png\" /></p>\n<h4><a id=\"_Amplify_153\"></a><strong>二、初始化 Amplify</strong></h4>\n<p>上一步,我们已创建一个 iOS 应用程序,接下来继续开发并添加新功能。在应用程序中使用 Amazon Amplify,必须安装 Amplify 命令行,初始化 Amplify 项目目录,将项目配置为使用 Amplify 库,并在运行时初始化 Amplify 库。<br />\n在正式开始前,我们先介绍两个概念。Amplify CLI – Amplify CLI 可使您直接从您的终端创建、管理和删除 Amazon 服务。Amplify 库 – 您可以使用 Amplify 库通过 Web 应用程序或移动应用程序使用 Amazon 服务。</p>\n<h5><a id=\"21__Amplify_CLI_156\"></a><strong>2.1 安装 Amplify CLI</strong></h5>\n<p>Amazon Amplify CLI 取决于 Node.js,要安装 Amazon Amplify CLI,请打开一个终端,然后输入以下命令:<br />\nShell</p>\n<pre><code class=\"lang-\">## Install Amplify CLI\nnpm install -g @aws-amplify/cli\n\n## Verify installation and version\namplify --version\n##Scanning for plugins...\n##Plugin scan successful\n##4.27.2\n</code></pre>\n<h5><a id=\"22__Amplify__169\"></a><strong>2.2 初始化 Amplify 后端</strong></h5>\n<p>在初始化 Amplify 后端模块之前,我们需要先创建对应的用户信息,在亚马逊服务管理后台添加对应的用户,并添加权限类型,具体如下图所示:</p>\n<p><img src=\"https://dev-media.amazoncloud.cn/32db4ab441594c5ba0496cd98562ddbe_image.png\" alt=\"image.png\" /></p>\n<p>用户名一般会默认生成,也可以自己修改并指定。另外,还要选择访问凭证类型,一种是访问密钥,为 API、CLI、SDK 和其他开发工具启用访问密钥 ID 和私有访问密钥;另一种是密码,启用密码,使得用户可以登录到亚马逊服务管理控制台。<br />\n创建好用户后,点击“下一步”,选择“直接附加现有策略”,一直“下一步”,最后会提示创建用户成功。</p>\n<p><img src=\"https://dev-media.amazoncloud.cn/cfc30af72203473a869ea9eb3685f971_image.png\" alt=\"image.png\" /></p>\n<p>在执行过程中,可能会遇到如下报错:<br />\nGroovy</p>\n<pre><code class=\"lang-\">⠦ Initializing project in the cloud...An error occurred when creating the CloudFormation stack\n✖ Root stack creation failed\ninit failed\nOptInRequired: The AWS Access Key Id needs a subscription for the service\n at Request.extractError (/usr/local/lib/node_modules/@aws-amplify/cli/node_modules/aws-sdk/lib/protocol/query.js:50:29)\n at Request.callListeners (/usr/local/lib/node_modules/@aws-amplify/cli/node_modules/aws-sdk/lib/sequential_executor.js:106:20)\n at Request.emit (/usr/local/lib/node_modules/@aws-amplify/cli/node_modules/aws-sdk/lib/sequential_executor.js:78:10)\n at Request.emit (/usr/local/lib/node_modules/@aws-amplify/cli/node_modules/aws-sdk/lib/request.js:686:14)\n at Request.transition (/usr/local/lib/node_modules/@aws-amplify/cli/node_modules/aws-sdk/lib/request.js:22:10)\n at AcceptorStateMachine.runTo (/usr/local/lib/node_modules/@aws-amplify/cli/node_modules/aws-sdk/lib/state_machine.js:14:12)\n at /usr/local/lib/node_modules/@aws-amplify/cli/node_modules/aws-sdk/lib/state_machine.js:26:10\n at Request.<anonymous> (/usr/local/lib/node_modules/@aws-amplify/cli/node_modules/aws-sdk/lib/request.js:38:9)\n at Request.<anonymous> (/usr/local/lib/node_modules/@aws-amplify/cli/node_modules/aws-sdk/lib/request.js:688:12)\n at Request.callListeners (/usr/local/lib/node_modules/@aws-amplify/cli/node_modules/aws-sdk/lib/sequential_executor.js:116:18) {\n code: 'OptInRequired',\n time: 2022-03-28T16:20:47.649Z,\n requestId: '39858f24-3c22-4eaa-9a0e-398095a8ebc9',\n statusCode: 403,\n retryable: false,\n retryDelay: 93.04199180846567\n}\n</code></pre>\n<p>很可能的原因就是信用卡信息错误,最常见的就是信用卡有效期填写有误,而我就是这个问题。<br />\n接下来,我们开始正式创建后端基本结构,首先需要初始化 Amplify 项目目录并创建云后端。打开一个终端并将目录更改为第一步中的 iOS 项目。例如,如果您在文件夹 ~/job/ios/ 中创建项目,则可以键入:<br />\nGroovy</p>\n<pre><code class=\"lang-\">cd ~/job/ios/iOS Getting Started\n</code></pre>\n<p>验证一下是否在正确的目录中,它应该如下所示:<br />\nAssembly language</p>\n<pre><code class=\"lang-\">liuzhen-40:iOS Getting Started lz$ ls -al\ntotal 16\ndrwxr-xr-x 7 lz staff 224 Mar 28 11:06 .\ndrwxr-xr-x 7 lz staff 224 Mar 28 10:05 ..\n-rw-r--r--@ 1 lz staff 6148 Mar 28 22:09 .DS_Store\ndrwxr-xr-x 9 lz staff 288 Mar 28 10:06 iOS Getting Started\ndrwxr-xr-x@ 5 lz staff 160 Mar 28 10:05 iOS Getting Started.xcodeproj\ndrwxr-xr-x 4 lz staff 128 Mar 28 10:05 iOS Getting StartedTests\ndrwxr-xr-x 4 lz staff 128 Mar 28 10:05 iOS Getting StartedUITests\n</code></pre>\n<p>初始化 Amplify 项目结构和配置文件,运行以下命令:<br />\nSQL</p>\n<pre><code class=\"lang-\">liuzhen-40:iOS Getting Started lz$ amplify init\nNote: It is recommended to run this command from the root of your app directory\n? Enter a name for the project iOSGettingStarted\n? Enter a name for the environment dev\n? Choose your default editor: Visual Studio Code\n? Choose the type of app that you're building ios\nUsing default provider awscloudformation\n\nFor more information on AWS Profiles, see:\nhttps://docs.aws.amazon.com/cli/latest/userguide/cli-multiple-profiles.html\n\n? Do you want to use an AWS profile? Yes\n? Please choose the profile you want to use default\nAdding backend environment dev to AWS Amplify Console app: dj56g6ku6ef6p\n</code></pre>\n<h5><a id=\"23__Amplify__241\"></a><strong>2.3 将 Amplify 库添加到项目中</strong></h5>\n<p>在开始此步骤之前,请确保关闭 Xcode。然后命令行进入工程目录,使用 CocoaPods 软件包管理器初始化项目,请执行以下命令:<br />\nNginx</p>\n<pre><code class=\"lang-\">## Initialize the Amplify Project\npod init\n</code></pre>\n<p>完成此操作后,您应该看到一个名为 Podfile 的新建文件,此文件用于描述我们的项目所依赖的软件包。然后,更新 Podfile 以包含以下 Pod 并更新平台:<br />\nBash</p>\n<pre><code class=\"lang-\"># you need at least version 13.0 for this tutorial, more recent versions are valid too\n\nplatform :ios,'13.0'\n\ntarget 'iOS Getting Started' do\n # Comment the next line if you don't want to use dynamic frameworks\n use_frameworks!\n # Pods for getting started\n pod 'Amplify', '~> 1.0' # required amplify dependency\n pod 'Amplify/Tools', '~> 1.0' # allows to call amplify CLI from within Xcode\n\nend\n</code></pre>\n<p>将 Amplify 库下载并安装到您的项目中,执行如下命令:<br />\nBash</p>\n<pre><code class=\"lang-\">pod install --repo-update\n</code></pre>\n<p>完成此操作后,我们会发现生成了一个名为 iOS Getting Started.xcworkspace 的文件。之后,我们就需要使用这个文件,而不是 iOS Getting Started.xcodeproj 文件了。然后,在 Xcode 中打开工作区,并执行如下命令:<br />\nBash</p>\n<pre><code class=\"lang-\">xed .\n</code></pre>\n<h5><a id=\"24__Amplify_274\"></a><strong>2.4 在运行时初始化 Amplify</strong></h5>\n<p>在运行时,Amplify 库需要由 CLI 生成的 Amplify 配置文件。将 Amplify 配置文件添加到项目中,使用 Finder 在项目目录的根目录下找到 awsconfiguration.json 和 amplifyconfiguration.json,并将其拖放到 Xcode 项目中。<br />\n接下来,新建一个 swift 文本文件 Backend.swift,将其添加到我们的 Xcode 项目 (CTRL-N) 并添加以下代码:<br />\nSwift</p>\n<pre><code class=\"lang-\">import UIKit\nimport Amplify\n\nclass Backend {\n static let shared = Backend()\n static func initialize() -> Backend {\n return .shared\n }\n private init() {\n // initialize amplify\n do {\n try Amplify.configure()\n print("Initialized Amplify");\n } catch {\n print("Could not initialize Amplify: \\(error)")\n }\n }\n}\n</code></pre>\n<p>应用程序启动后,初始化单例 Backend 对象。打开 AppDelegate.swift 文件并在 application(:didFinishLaunchingWithOptions:) 方法中添加 Backend.initialize();,如下所示:<br />\nSwift</p>\n<pre><code class=\"lang-\">应用程序启动后,初始化单例 Backend 对象。打开 AppDelegate.swift 文件并在 application(:didFinishLaunchingWithOptions:) 方法中添加 Backend.initialize();,如下所示:\n</code></pre>\n<h5><a id=\"25__303\"></a><strong>2.5 验证设置</strong></h5>\n<p>要验证一切是否都按预期运行,构建项目,单击 Product 菜单,然后选择 Build,或按 ⌘B。不出现错误即可。</p>\n<h4><a id=\"_305\"></a><strong>三、添加身份验证</strong></h4>\n<p>接下来,我们了解如何使用 Amplify CLI 和库对用户进行身份验证,以利用托管用户身份提供商 Amazon Cognito。另外,知道如何使用 Cognito 托管用户界面展示整个用户身份验证流,从而使用户只需几行代码即可注册、登录和重置密码。使用“托管用户界面”意味着应用程序利用 Cognito 网页登录和注册用户界面流。应用程序的用户将重定向到 Cognito 托管的网页,并在登录后重定向回应用程序。当然,Cognito 和 Amplify 也支持本机 UI。</p>\n<h5><a id=\"31__307\"></a><strong>3.1 创建身份验证服务</strong></h5>\n<p>创建身份验证服务,打开一个命令行终端,然后执行如下命令:<br />\nBash</p>\n<pre><code class=\"lang-\">amplify add auth\n</code></pre>\n<p>输出结果出现 successful 字样表示创建成功。</p>\n<h5><a id=\"32__314\"></a><strong>3.2 部署身份验证服务</strong></h5>\n<p>现在,我们已在本地配置身份验证服务,我们可以将它部署到云。在终端中,在项目目录中执行以下命令:<br />\nBash</p>\n<pre><code class=\"lang-\">amplify push\n</code></pre>\n<h5><a id=\"33__Amplify__320\"></a><strong>3.3 向项目添加 Amplify 身份验证库</strong></h5>\n<p>在转至代码之前,将 Amplify 身份验证库添加到项目的依赖项中。打开 Podfile 文件,然后使用 AmplifyPlugins/AWSCognitoAuthPlugin 添加行,或者复制并粘贴以下整个文件。<br />\nBash</p>\n<pre><code class=\"lang-\"># you need at least version 13.0 for this tutorial, more recent versions are valid too\nplatform :ios, '13.0'\n\ntarget 'getting started' do\n # Comment the next line if you don't want to use dynamic frameworks\n use_frameworks!\n\n # Pods for getting started\n pod 'Amplify', '~> 1.0' # required amplify dependency\n pod 'Amplify/Tools', '~> 1.0' # allows to call amplify CLI from within Xcode\n\n pod 'AmplifyPlugins/AWSCognitoAuthPlugin', '~> 1.0' # support for Cognito user authentication\n\nend\n</code></pre>\n<p>在终端中执行以下命令:<br />\nBash</p>\n<pre><code class=\"lang-\">pod install\n</code></pre>\n<h5><a id=\"34__Amplify__344\"></a><strong>3.4 在运行时配置 Amplify 身份验证库</strong></h5>\n<p>返回到 Xcode,打开 Backend.swift 文件,其完整代码如下所示:<br />\nSwift</p>\n<pre><code class=\"lang-\">// at the top of the file\nimport AmplifyPlugins\n\nprivate init () {\n // initialize amplify\n do {\n try Amplify.add(plugin: AWSCognitoAuthPlugin())\n try Amplify.configure()\n print("Initialized Amplify")\n } catch {\n print("Could not initialize Amplify: \\(error)")\n }\n}\n</code></pre>\n<p>构建项目,保证不报错即可。</p>\n<h5><a id=\"35__363\"></a><strong>3.5 在运行时触发身份验证</strong></h5>\n<p>其余代码更改会跟踪用户的状态,并在用户未登录时触发登录/注册用户界面。 添加登录和注销代码,在后端类中的任意位置,添加以下三种方法:<br />\nSwift</p>\n<pre><code class=\"lang-\">// signin with Cognito web user interface\npublic func signIn() {\n\n _ = Amplify.Auth.signInWithWebUI(presentationAnchor: UIApplication.shared.windows.first!) { result in\n switch result {\n case .success(_):\n print("Sign in succeeded")\n case .failure(let error):\n print("Sign in failed \\(error)")\n }\n }\n}\n\n// signout\npublic func signOut() {\n\n _ = Amplify.Auth.signOut() { (result) in\n switch result {\n case .success:\n print("Successfully signed out")\n case .failure(let error):\n print("Sign out failed with error \\(error)")\n }\n }\n}\n\n// change our internal state, this triggers an UI update on the main thread\nfunc updateUserData(withSignInStatus status : Bool) {\n DispatchQueue.main.async() {\n let userData : UserData = .shared\n userData.isSignedIn = status\n }\n}\n</code></pre>\n<p>为了跟踪身份验证状态的变化,我们添加了代码以订阅由 Amplify 发送的身份验证事件。我们在 Backend.init() 方法中初始化该中心。在收到身份验证事件时,我们将调用 updateUserData() 方法。此方法可使 UserData 对象保持同步。UserData.isSignedIn 属性为 @Published,这意味着当值更改时,用户界面会自动刷新。 我们可以添加代码以在应用程序启动时检查以前的身份验证状态。当应用程序启动时,它会检查 Cognito 会话是否已存在,并相应地更新 UI。<br />\n在 Backend.init() 中,请在 Amplify 初始化后添加以下代码:<br />\nSwift</p>\n<pre><code class=\"lang-\">// in private init() function\n// listen to auth events.\n// see https://github.com/aws-amplify/amplify-ios/blob/master/Amplify/Categories/Auth/Models/AuthEventName.swift\n_ = Amplify.Hub.listen(to: .auth) { (payload) in\n\n switch payload.eventName {\n\n case HubPayload.EventName.Auth.signedIn:\n print("==HUB== User signed In, update UI")\n self.updateUserData(withSignInStatus: true)\n\n case HubPayload.EventName.Auth.signedOut:\n print("==HUB== User signed Out, update UI")\n self.updateUserData(withSignInStatus: false)\n\n case HubPayload.EventName.Auth.sessionExpired:\n print("==HUB== Session expired, show sign in UI")\n self.updateUserData(withSignInStatus: false)\n\n default:\n //print("==HUB== \\(payload)")\n break\n }\n}\n \n// let's check if user is signedIn or not\n _ = Amplify.Auth.fetchAuthSession { (result) in\n do {\n let session = try result.get()\n \n// let's update UserData and the UI\n self.updateUserData(withSignInStatus: session.isSignedIn)\n \n } catch {\n print("Fetch auth session failed with error - \\(error)")\n }\n} \n</code></pre>\n<p>代码中的最后一个更改与用户界面相关,我们将 ZStack 添加到 ContentView。根据UserData.isSignedIn 的值,UI 将显示 SigninButton 或主列表视图。打开 ContentView.swift 并替换 ContentView 结构中的正文:<br />\nSwift</p>\n<pre><code class=\"lang-\">var body: some View {\n\n ZStack {\n if (userData.isSignedIn) {\n NavigationView {\n List {\n ForEach(userData.notes) { note in\n ListRow(note: note)\n }\n }\n .navigationBarTitle(Text("Notes"))\n .navigationBarItems(leading: SignOutButton())\n }\n } else {\n SignInButton()\n }\n }\n}\n</code></pre>\n<p>在同一文件中,添加 SignInButton 和 SignOutButton 视图:<br />\nJavaScript</p>\n<pre><code class=\"lang-\">struct SignInButton: View {\n var body: some View {\n Button(action: { Backend.shared.signIn() }){\n HStack {\n Image(systemName: "person.fill")\n .scaleEffect(1.5)\n .padding()\n Text("Sign In")\n .font(.largeTitle)\n }\n .padding()\n .foregroundColor(.white)\n .background(Color.green)\n .cornerRadius(30)\n }\n }\n}\n\nstruct SignOutButton : View {\n var body: some View {\n Button(action: { Backend.shared.signOut() }) {\n Text("Sign Out")\n }\n }\n}\n</code></pre>\n<p>最后,我们必须确保在 Cognito 托管用户界面提供的 Web 身份验证序列结束时启动我们的应用程序。我们将 gettingstarted URI 方案添加到应用程序的 Info.plist 文件中。在 Xcode 中,选择 Info.plist 文件,右键单击该文件,然后选择“打开为源代码”。<br />\n另外,在顶部 <dict> 元素内添加以下 <key> 和 <array> 元素。<br />\nXML</p>\n<pre><code class=\"lang-\"><plist version="1.0">\n\n <dict>\n <!-- YOUR OTHER PLIST ENTRIES HERE -->\n\n <!-- ADD AN ENTRY TO CFBundleURLTypes for Cognito Auth -->\n <!-- IF YOU DO NOT HAVE CFBundleURLTypes, YOU CAN COPY THE WHOLE BLOCK BELOW -->\n <key>CFBundleURLTypes</key>\n <array>\n <dict>\n <key>CFBundleURLSchemes</key>\n <array>\n <string>gettingstarted</string>\n </array>\n </dict>\n </array>\n\n <!-- ... -->\n </dict>\n</code></pre>\n<p>然后,运行程序看看效果,整个注册流程如下图所示:</p>\n<p><img src=\"https://dev-media.amazoncloud.cn/f4fd107969ba44c8b7e4fcce42f4ef5f_image.png\" alt=\"image.png\" /></p>\n<p><img src=\"https://dev-media.amazoncloud.cn/396c116709b04fbb8e1926bc331d1b5a_image.png\" alt=\"image.png\" /></p>\n<h4><a id=\"_API__524\"></a><strong>四、添加 API 和数据库</strong></h4>\n<p>现在,我们已经创建并配置了带用户身份验证功能的应用程序。接下来,我们要在数据库中添加 API 以及“创建”、“读取”、“更新”、“删除”(CRUD) 操作</p>\n<h5><a id=\"41__GraphQL_API__526\"></a><strong>4.1 创建 GraphQL API 及数据库</strong></h5>\n<p>要创建 GraphQL API 及其数据库,打开一个命令行终端,然后从项目目录中执行如下命令:<br />\nBash</p>\n<pre><code class=\"lang-\">amplify add api\n</code></pre>\n<p>初始化项目时选择的默认文本编辑器 (amplify init) 将使用预构建数据 schema 打开。删除此 schema,并使用我们的应用程序 GraphQL schema 替换:<br />\nBash</p>\n<pre><code class=\"lang-\">type NoteData\n@model\n@auth (rules: [ { allow: owner } ]) {\n id: ID!\n name: String!\n description: String\n image: String\n}\n</code></pre>\n<h5><a id=\"42__544\"></a><strong>4.2 生成客户端代码</strong></h5>\n<p>根据我们刚刚创建的 GraphQL 数据模型定义,Amplify 会生成客户端代码(即 Swift 代码)以代表我们应用程序中的数据。要生成代码,在终端执行以下命令:<br />\nBash</p>\n<pre><code class=\"lang-\">amplify codegen models\n</code></pre>\n<p>在 Finder 中找到新生成的文件,然后将其拖放到 Xcode 的项目中。</p>\n<h5><a id=\"43__API__551\"></a><strong>4.3 部署 API 服务和数据库</strong></h5>\n<p>要部署我们刚刚创建的后端 API 和数据库,打开终端,然后执行如下命令:<br />\nBash</p>\n<pre><code class=\"lang-\">amplify push\n</code></pre>\n<h5><a id=\"44__API__Xcode__557\"></a><strong>4.4 将 API 客户端库添加到 Xcode 项目中</strong></h5>\n<p>在转至代码之前,将 Amplify API 库添加到项目的依赖项中。打开 Podfile 文件,然后使用 AmplifyPlugins/AWSAPIPlugin 添加行,或者复制并粘贴以下整个文件。<br />\nBash</p>\n<pre><code class=\"lang-\"># you need at least version 13.0 for this tutorial, more recent versions are valid too\nplatform :ios, '13.0'\n\ntarget 'getting started' do\n # Comment the next line if you don't want to use dynamic frameworks\n use_frameworks!\n\n # Pods for getting started\n pod 'Amplify', '~> 1.0' # required amplify dependency\n pod 'Amplify/Tools', '~> 1.0' # allows to call amplify CLI from within Xcode\n\n pod 'AmplifyPlugins/AWSCognitoAuthPlugin', '~> 1.0' # support for Cognito user authentication\n pod 'AmplifyPlugins/AWSAPIPlugin', '~> 1.0' # support for GraphQL API\n\nend\n</code></pre>\n<p>然后,执行如下命令:<br />\nBash</p>\n<pre><code class=\"lang-\">pod install\n</code></pre>\n<h5><a id=\"45__Amplify__582\"></a><strong>4.5 在运行时初始化 Amplify 库</strong></h5>\n<p>返回到 Xcode,打开 Backend.swift,然后在私有 init() 方法的 Amplify 初始化序列中添加一行。完整代码块应如下所示:<br />\nSwift</p>\n<pre><code class=\"lang-\">// initialize amplify\ndo {\n try Amplify.add(plugin: AWSCognitoAuthPlugin())\n try Amplify.add(plugin: AWSAPIPlugin(modelRegistration: AmplifyModels()))\n try Amplify.configure()\n print("Initialized Amplify")\n} catch {\n print("Could not initialize Amplify: \\(error)")\n}\n</code></pre>\n<h5><a id=\"46__GraphQL__596\"></a><strong>4.6 在 GraphQL 数据模型和应用程序模型之间添加桥接</strong></h5>\n<p>我们的项目已经有一个数据模型来表示备注。因此,可以继续使用该模型,并提供一种将 NoteData 转换为备注的简单方法。打开 ContentView.swift 并将此初始化程序添加到备注类中。<br />\nSwift</p>\n<pre><code class=\"lang-\">convenience init(from data: NoteData) {\n self.init(id: data.id, name: data.name, description: data.description, image: data.image)\n \n // store API object for easy retrieval later\n self._data = data\n}\n\nfileprivate var _data : NoteData?\n\n// access the privately stored NoteData or build one if we don't have one.\nvar data : NoteData {\n\n if (_data == nil) {\n _data = NoteData(id: self.id,\n name: self.name,\n description: self.description,\n image: self.imageName)\n }\n\n return _data!\n}\n</code></pre>\n<h5><a id=\"47__API_CRUD__622\"></a><strong>4.7 将 API CRUD 方法添加到后端类中</strong></h5>\n<p>我们添加 3 种方法来调用 API:一种查询 Note 的方法,一种创建新 Note 的方法,以及一种删除 Note 的方法。请注意,这些方法适用于应用程序数据模型(备注),以便从用户界面轻松交互。这些方法可透明地将 Note 转换为 GraphQL 的 NoteData 对象。<br />\n打开 Backend.swift 文件,然后在后端类末尾添加以下 snipet:<br />\nSwift</p>\n<pre><code class=\"lang-\">// MARK: API Access\n\n func queryNotes() {\n\n _ = Amplify.API.query(request: .list(NoteData.self)) { event in\n switch event {\n case .success(let result):\n switch result {\n case .success(let notesData):\n print("Successfully retrieved list of Notes")\n\n // convert an array of NoteData to an array of Note class instances\n for n in notesData {\n let note = Note.init(from: n)\n DispatchQueue.main.async() {\n UserData.shared.notes.append(note)\n }\n }\n\n case .failure(let error):\n print("Can not retrieve result : error \\(error.errorDescription)")\n }\n case .failure(let error):\n print("Can not retrieve Notes : error \\(error)")\n }\n }\n }\n\n func createNote(note: Note) {\n\n // use note.data to access the NoteData instance\n _ = Amplify.API.mutate(request: .create(note.data)) { event in\n switch event {\n case .success(let result):\n switch result {\n case .success(let data):\n print("Successfully created note: \\(data)")\n case .failure(let error):\n print("Got failed result with \\(error.errorDescription)")\n }\n case .failure(let error):\n print("Got failed event with error \\(error)")\n }\n }\n }\n\n func deleteNote(note: Note) {\n\n // use note.data to access the NoteData instance\n _ = Amplify.API.mutate(request: .delete(note.data)) { event in\n switch event {\n case .success(let result):\n switch result {\n case .success(let data):\n print("Successfully deleted note: \\(data)")\n case .failure(let error):\n print("Got failed result with \\(error.errorDescription)")\n }\n case .failure(let error):\n print("Got failed event with error \\(error)")\n }\n }\n }\n</code></pre>\n<p>在同一 Backend.swift 文件中,更新 updateUserData(withSignInStatus:) 方法如下所示:<br />\nSwift</p>\n<pre><code class=\"lang-\">// change our internal state, this triggers an UI update on the main thread\nfunc updateUserData(withSignInStatus status : Bool) {\n DispatchQueue.main.async() {\n let userData : UserData = .shared\n userData.isSignedIn = status\n\n // when user is signed in, query the database, otherwise empty our model\n if status {\n self.queryNotes()\n } else {\n userData.notes = []\n }\n }\n}\n</code></pre>\n<p>现在,只需创建一个用户界面即可创建新 Note 和从列表中删除 Note。</p>\n<h5><a id=\"48_Edit_710\"></a><strong>4.8 添加“Edit”按钮以添加备注</strong></h5>\n<p>现在,后端和数据模型已到位,最后一步是让用户创建新的 Note 然后将其删除。在 Xcode 中,打开 ContentView.swift,在 ContentView 结构中,添加绑定到用户界面的状态变量。<br />\nSwift</p>\n<pre><code class=\"lang-\">// add at the begining of ContentView class\n@State var showCreateNote = false\n\n@State var name : String = "New Note"\n@State var description : String = "This is a new note"\n@State var image : String = "image"\n</code></pre>\n<p>在文件中的任何位置,添加视图结构,以允许用户创建新的备注:<br />\nSwift</p>\n<pre><code class=\"lang-struct\"> @Binding var isPresented: Bool\n var userData: UserData\n\n @State var name : String = "New Note"\n @State var description : String = "This is a new note"\n @State var image : String = "image"\n var body: some View {\n Form {\n\n Section(header: Text("TEXT")) {\n TextField("Name", text: $name)\n TextField("Name", text: $description)\n }\n\n Section(header: Text("PICTURE")) {\n TextField("Name", text: $image)\n }\n\n Section {\n Button(action: {\n self.isPresented = false\n let noteData = NoteData(id : UUID().uuidString,\n name: self.$name.wrappedValue,\n description: self.$description.wrappedValue)\n let note = Note(from: noteData)\n\n // asynchronously store the note (and assume it will succeed)\n Backend.shared.createNote(note: note)\n\n // add the new note in our userdata, this will refresh UI\n self.userData.notes.append(note)\n }) {\n Text("Create this note")\n }\n }\n }\n }\n}\n</code></pre>\n<p>在导航栏上添加“+”按钮演示数据表以创建备注,返回 ContentView 结构,将 navigationBarItems(leading SignOutButton()) 替换为:<br />\nSwift</p>\n<pre><code class=\"lang-\">.navigationBarItems(leading: SignOutButton(),\n trailing: Button(action: {\n self.showCreateNote.toggle()\n }) {\n Image(systemName: "plus")\n })\n}.sheet(isPresented: $showCreateNote) {\n AddNoteView(isPresented: self.$showCreateNote, userData: self.userData)\n</code></pre>\n<h5><a id=\"49__775\"></a><strong>4.9 添加“滑动删除”行为</strong></h5>\n<p>最后,在 ContentView 中添加“轻扫以删除”行为:将 .onDelete { } 方法添加到 ForEach 结构中:<br />\nSwift</p>\n<pre><code class=\"lang-\">ForEach(userData.notes) { note in\n ListRow(note: note)\n}.onDelete { indices in\n indices.forEach {\n // removing from user data will refresh UI\n let note = self.userData.notes.remove(at: $0)\n\n // asynchronously remove from database\n Backend.shared.deleteNote(note: note)\n }\n}\n</code></pre>\n<h5><a id=\"410__791\"></a><strong>4.10 构建和测试</strong></h5>\n<p>首先,编译程序,保证不出现报错。然后,运行程序,整个完整流程如下图所示:</p>\n<p><img src=\"https://dev-media.amazoncloud.cn/fd53a0294584413db9de334787bf0852_image.png\" alt=\"image.png\" /></p>\n<h4><a id=\"_796\"></a><strong>五、添加存储</strong></h4>\n<p>现在,我们的备注应用程序已在运行,接下来添加将图像与每个备注关联的功能。在本模块中,将使用 Amplify CLI 和库来创建利用 Amazon S3 的存储服务。最后,将更新 iOS 应用程序以启用图像上传、获取和渲染。</p>\n<h5><a id=\"51__798\"></a><strong>5.1 创建存储服务</strong></h5>\n<p>要添加图像存储功能,我们将使用 Amplify 存储类别,执行如下命令:<br />\nBash</p>\n<pre><code class=\"lang-\">amplify add storage\n</code></pre>\n<h5><a id=\"52__804\"></a><strong>5.2 部署存储服务</strong></h5>\n<p>要部署我们刚刚创建的存储服务,打开终端,然后执行以下命令:<br />\nBash</p>\n<pre><code class=\"lang-\">amplify push\n</code></pre>\n<h5><a id=\"53_Xcode_Amplify__810\"></a><strong>5.3 向Xcode项目中添加 Amplify 存储库</strong></h5>\n<p>在转至代码之前,将 Amplify 存储库添加到项目的依赖项中。打开 Podfile 文件,然后使用 AmplifyPlugins/AWSS3StoragePlugin 添加行,或者复制并粘贴以下整个文件。<br />\nBash</p>\n<pre><code class=\"lang-\"># you need at least version 13.0 for this tutorial, more recent versions are valid too\nplatform :ios, '13.0'\n\ntarget 'getting started' do\n # Comment the next line if you don't want to use dynamic frameworks\n use_frameworks!\n\n # Pods for getting started\n pod 'Amplify', '~> 1.0' # required amplify dependency\n pod 'Amplify/Tools', '~> 1.0' # allows to call amplify CLI from within Xcode\n\n pod 'AmplifyPlugins/AWSCognitoAuthPlugin', '~> 1.0' # support for Cognito user authentication\n pod 'AmplifyPlugins/AWSAPIPlugin', '~> 1.0' # support for GraphQL API\n pod 'AmplifyPlugins/AWSS3StoragePlugin', '~> 1.0' # support for Amazon S3 storage\n\nend\n</code></pre>\n<p>然后,执行如下命令:<br />\nBash</p>\n<pre><code class=\"lang-\">pod install\n</code></pre>\n<h5><a id=\"54__Amplify__836\"></a><strong>5.4 在运行时初始化 Amplify 存储插件</strong></h5>\n<p>返回 Xcode,打开 Backend.swift,然后在私有 init() 方法的 Amplify 初始化序列中添加一行。完整代码块应如下所示:<br />\nSwift</p>\n<pre><code class=\"lang-\">// initialize amplify\ndo {\n try Amplify.add(plugin: AWSCognitoAuthPlugin())\n try Amplify.add(plugin: AWSAPIPlugin(modelRegistration: AmplifyModels()))\n try Amplify.add(plugin: AWSS3StoragePlugin())\n try Amplify.configure()\n print("Initialized Amplify");\n} catch {\n print("Could not initialize Amplify: \\(error)")\n}\n</code></pre>\n<h5><a id=\"55__Image_CRUD__851\"></a><strong>5.5 将 Image CRUD 方法添加到后端类</strong></h5>\n<p>打开 Backend.Swift。在后端类中的任意位置,添加以下方法:<br />\nSwift</p>\n<pre><code class=\"lang-\">func storeImage(name: String, image: Data) {\n\n// let options = StorageUploadDataRequest.Options(accessLevel: .private)\n let _ = Amplify.Storage.uploadData(key: name, data: image,// options: options,\n progressListener: { progress in\n // optionlly update a progress bar here\n }, resultListener: { event in\n switch event {\n case .success(let data):\n print("Image upload completed: \\(data)")\n case .failure(let storageError):\n print("Image upload failed: \\(storageError.errorDescription). \\(storageError.recoverySuggestion)")\n }\n })\n}\n\nfunc retrieveImage(name: String, completed: @escaping (Data) -> Void) {\n let _ = Amplify.Storage.downloadData(key: name,\n progressListener: { progress in\n // in case you want to monitor progress\n }, resultListener: { (event) in\n switch event {\n case let .success(data):\n print("Image \\(name) loaded")\n completed(data)\n case let .failure(storageError):\n print("Can not download image: \\(storageError.errorDescription). \\(storageError.recoverySuggestion)")\n }\n }\n )\n}\n\nfunc deleteImage(name: String) {\n let _ = Amplify.Storage.remove(key: name,\n resultListener: { (event) in\n switch event {\n case let .success(data):\n print("Image \\(data) deleted")\n case let .failure(storageError):\n print("Can not delete image: \\(storageError.errorDescription). \\(storageError.recoverySuggestion)")\n }\n }\n )\n}\n</code></pre>\n<h5><a id=\"56_API__900\"></a><strong>5.6 API 检索数据时加载图像</strong></h5>\n<p>现在,后端函数已经可用,我们接下来在 API 调用返回结果时加载图像。添加此行为的中心位置是,应用程序通过 API 返回的 NoteData 构造备注 UI 时。打开 ContentView.swift 并更新备注的初始化程序(添加第 8 行至第 17 行):<br />\nSwift</p>\n<pre><code class=\"lang-\">// add a publishable's object property\n@Published var image : Image?\n\n// update init's code\nconvenience init(from data: NoteData) {\n self.init(id: data.id, name: data.name, description: data.description, image: data.image)\n\n if let name = self.imageName {\n // asynchronously download the image\n Backend.shared.retrieveImage(name: name) { (data) in\n // update the UI on the main thread\n DispatchQueue.main.async() {\n let uim = UIImage(data: data)\n self.image = Image(uiImage: uim!)\n }\n }\n }\n // store API object for easy retrieval later\n self._data = data\n</code></pre>\n<p>当备注实例中存在图像名称时,代码将调用 retrieveImage,它是一个异步函数。下载图像时需要调用一个函数,该函数创建一个图像 UI 对象并将其分配给备注实例。请注意,此分配会触发用户界面更新,因此会在应用程序的主线程中使用 DispatchQueue.main.async 进行更新。</p>\n<h5><a id=\"57__UI__925\"></a><strong>5.7 添加 UI 代码以捕获图像</strong></h5>\n<p>首先,我们添加通用代码以支持图像捕获。此代码可在许多应用程序中重复使用;它显示了一个图像选择器,允许用户从其图像库中选择图像。在 Xcode 中,创建新的 Swift 文件(⌘N,然后选择 Swift)。命名 CaptureImageView.swift 文件,然后添加此代码:<br />\nSwift</p>\n<pre><code class=\"lang-\">import Foundation\nimport UIKit\nimport SwiftUI\n\nstruct CaptureImageView {\n\n /// MARK: - Properties\n @Binding var isShown: Bool\n @Binding var image: UIImage?\n\n func makeCoordinator() -> Coordinator {\n return Coordinator(isShown: $isShown, image: $image)\n }\n}\n\nclass Coordinator: NSObject, UINavigationControllerDelegate, UIImagePickerControllerDelegate {\n @Binding var isCoordinatorShown: Bool\n @Binding var imageInCoordinator: UIImage?\n init(isShown: Binding<Bool>, image: Binding<UIImage?>) {\n _isCoordinatorShown = isShown\n _imageInCoordinator = image\n }\n func imagePickerController(_ picker: UIImagePickerController,\n didFinishPickingMediaWithInfo info: [UIImagePickerController.InfoKey : Any]) {\n guard let unwrapImage = info[UIImagePickerController.InfoKey.originalImage] as? UIImage else { return }\n imageInCoordinator = unwrapImage\n isCoordinatorShown = false\n }\n func imagePickerControllerDidCancel(_ picker: UIImagePickerController) {\n isCoordinatorShown = false\n }\n}\n\nextension CaptureImageView: UIViewControllerRepresentable {\n func makeUIViewController(context: UIViewControllerRepresentableContext<CaptureImageView>) -> UIImagePickerController {\n let picker = UIImagePickerController()\n picker.delegate = context.coordinator\n\n // picker.sourceType = .camera // on real devices, you can capture image from the camera\n // see https://medium.com/better-programming/how-to-pick-an-image-from-camera-or-photo-library-in-swiftui-a596a0a2ece\n\n return picker\n }\n\n func updateUIViewController(_ uiViewController: UIImagePickerController,\n context: UIViewControllerRepresentableContext<CaptureImageView>) {\n\n }\n}\n</code></pre>\n<h5><a id=\"58__979\"></a><strong>5.8 创建备注时存储图像</strong></h5>\n<p>创建备注时,我们从后端调用存储方法。打开 ContentView.swift 并修改 AddNoteView 以添加 ImagePicker 组件:<br />\nSwift</p>\n<pre><code class=\"lang-\">// at the start of the Content View struct \n@State var image : UIImage? // replace the previous declaration of image\n@State var showCaptureImageView = false\n\n// in the view, replace the existing PICTURE section\nSection(header: Text("PICTURE")) {\n VStack {\n Button(action: {\n self.showCaptureImageView.toggle()\n }) {\n Text("Choose photo")\n }.sheet(isPresented: $showCaptureImageView) {\n CaptureImageView(isShown: self.$showCaptureImageView, image: self.$image)\n }\n if (image != nil ) {\n HStack {\n Spacer()\n Image(uiImage: image!)\n .resizable()\n .frame(width: 250, height: 200)\n .clipShape(Circle())\n .overlay(Circle().stroke(Color.white, lineWidth: 4))\n .shadow(radius: 10)\n Spacer()\n }\n }\n }\n}\n</code></pre>\n<p>修改“创建备注”部分以存储图像和备注:<br />\nSwift</p>\n<pre><code class=\"lang-\">Section {\n Button(action: {\n self.isPresented = false\n\n let note = Note(id : UUID().uuidString,\n name: self.$name.wrappedValue,\n description: self.$description.wrappedValue)\n\n if let i = self.image {\n note.imageName = UUID().uuidString\n note.image = Image(uiImage: i)\n\n // asynchronously store the image (and assume it will work)\n Backend.shared.storeImage(name: note.imageName!, image: (i.pngData())!)\n }\n\n // asynchronously store the note (and assume it will succeed)\n Backend.shared.createNote(note: note)\n\n // add the new note in our userdata, this will refresh UI\n withAnimation { self.userData.notes.append(note) }\n }) {\n Text("Create this note")\n }\n}\n</code></pre>\n<h5><a id=\"59__1041\"></a><strong>5.9 构建和测试</strong></h5>\n<p>首先,编译程序,保证不出现报错。然后,运行程序,整个完整流程如下图所示:</p>\n<p><img src=\"https://dev-media.amazoncloud.cn/b833c3a7055b4181bd1b49920e4e29bb_image.png\" alt=\"image.png\" /><br />\n<img src=\"https://dev-media.amazoncloud.cn/dae96849b7cf421d989a7f23ae8b75a1_image.png\" alt=\"image.png\" /></p>\n<h3><a id=\"_1047\"></a>结论</h3>\n<p>至此,我们已经体验了使用 Amazon Amplify 构建 iOS 应用程序的过程! 在应用程序中添加了身份验证,用户可以注册、登录和管理其账户。该应用程序还使用 Amazon DynamoDB 数据库配置了一个可扩展的 GraphQL API,用户可以创建和删除备注。另外,还使用 Amazon S3 添加了文件存储,从而使用户可以上传图像并在其应用程序中查看它们。但是,使用过程中也出现了很多小插曲,非常耽误时间,由于篇幅的限制,我简单说两点:一、Xcode 版本兼容性问题。最开始我使用低于11.5的版本,遇到了很多编译错误,最后升级到11.5才解决。因此,体验时要保证一个较高的 Xcode 版本,这一点应该在官方文档中说明;二、信用卡注册问题。服务中国客户,亚马逊应该入乡随俗,提供更加人性化的注册方式,可以考虑支付宝或者微信登陆注册,这样会比较符合大家的习惯。别的方面还比较顺利,感兴趣的话,小伙伴们就自己动手尝试一下吧!另外,亚马逊云科技专为开发者们打造了多种学习平台:</p>\n<ol>\n<li>入门资源中心:从0到1 轻松上手云服务,内容涵盖:成本管理,上手训练,开发资源。<a href=\"https://aws.amazon.com/cn/getting-started/?nc1=h_ls&trk=32540c74-46f0-46dc-940d-621a1efeedd0&sc_channel=el\" target=\"_blank\">https://aws.amazon.com/cn/getting-started/?nc1=h_ls&trk=32540c74-46f0-46dc-940d-621a1efeedd0&sc_channel=el</a></li>\n<li>架构中心:亚马逊云科技架构中心提供了云平台参考架构图表、经过审查的架构解决方案、Well-Architected 最佳实践、模式、图标等。<a href=\"https://aws.amazon.com/cn/architecture/?intClick=dev-center-2021_main&trk=3fa608de-d954-4355-a20a-324daa58bbeb&sc_channel=el\" target=\"_blank\">https://aws.amazon.com/cn/architecture/?intClick=dev-center-2021_main&trk=3fa608de-d954-4355-a20a-324daa58bbeb&sc_channel=el</a></li>\n<li>构建者库:了解亚马逊云科技如何构建和运营软件。<a href=\"https://aws.amazon.com/cn/builders-library/?cards-body.sort-by=item.additionalFields.sortDate&cards-body.sort-order=desc&awsf.filter-content-category=*all&awsf.filter-content-type=*all&awsf.filter-content-level=*all&trk=835e6894-d909-4691-aee1-3831428c04bd&sc_channel=el\" target=\"_blank\">https://aws.amazon.com/cn/builders-library/?cards-body.sort-by=item.additionalFields.sortDate&cards-body.sort-order=desc&awsf.filter-content-category=*all&awsf.filter-content-type=*all&awsf.filter-content-level=*all&trk=835e6894-d909-4691-aee1-3831428c04bd&sc_channel=el</a></li>\n<li>用于在亚马逊云科技平台上开发和管理应用程序的工具包:<a href=\"https://aws.amazon.com/cn/tools/?intClick=dev-center-2021_main&trk=972c69e1-55ec-43af-a503-d458708bb645&sc_channel=el\" target=\"_blank\">https://aws.amazon.com/cn/tools/?intClick=dev-center-2021_main&trk=972c69e1-55ec-43af-a503-d458708bb645&sc_channel=el</a></li>\n</ol>\n<p>【专属福利】<br />\n福利一:100余种产品免费套餐。其中,计算资源 Amazon EC2首年12个月免费,750小时/月;存储资源 Amazon S3 首年12个月免费,5GB标准存储容量。<br />\n<a href=\"https://aws.amazon.com/cn/free/?nc2=h_ql_pr_ft&all-free-tier.sort-by=item.additionalFields.SortRank&all-free-tier.sort-order=asc&awsf.Free%20Tier%20Types=*all&awsf.Free%20Tier%20Categories=*all&trk=e0213267-9c8c-4534-bf9b-ecb1c06e4ac6&sc_channel=el\" target=\"_blank\">https://aws.amazon.com/cn/free/?nc2=h_ql_pr_ft&all-free-tier.sort-by=item.additionalFields.SortRank&all-free-tier.sort-order=asc&awsf.Free%20Tier%20Types=*all&awsf.Free%20Tier%20Categories=*all&trk=e0213267-9c8c-4534-bf9b-ecb1c06e4ac6&sc_channel=el</a></p>\n<p>福利二:最新优惠大礼包,200数据与分析抵扣券,200机器学习抵扣券,200$微服务与应用开发抵扣券。<a href=\"https://www.amazonaws.cn/campaign/?sc_channel=el&sc_campaign=credit-acts-ldr&sc_country=cn&sc_geo=chna&sc_category=mult&sc_outcome=field&trkCampaign=request-credit-glb-ldr&trk=f45email&trk=02faebcb-3f61-4bcb-b68e-c63f3ae33c99&sc_channel=el\" target=\"_blank\">https://www.amazonaws.cn/campaign/?sc_channel=el&sc_campaign=credit-acts-ldr&sc_country=cn&sc_geo=chna&sc_category=mult&sc_outcome=field&trkCampaign=request-credit-glb-ldr&trk=f45email&trk=02faebcb-3f61-4bcb-b68e-c63f3ae33c99&sc_channel=el</a></p>\n<p>福利三:解决方案 CloudFormation 一键部署模版库<br />\n<a href=\"https://aws.amazon.com/cn/quickstart/?solutions-all.sort-by=item.additionalFields.sortDate&solutions-all.sort-order=desc&awsf.filter-tech-category=*all&awsf.filter-industry=*all&awsf.filter-content-type=*all&trk=afdbbdf0-610b-4421-ac0c-a6b31f902e4b&sc_channel=el\" target=\"_blank\">https://aws.amazon.com/cn/quickstart/?solutions-all.sort-by=item.additionalFields.sortDate&solutions-all.sort-order=desc&awsf.filter-tech-category=*all&awsf.filter-industry=*all&awsf.filter-content-type=*all&trk=afdbbdf0-610b-4421-ac0c-a6b31f902e4b&sc_channel=el</a></p>\n"}
基于 Amazon Amplify 构建自己的首个 iOS 应用程序
亚马逊云科技
Amazon Amplify

 0
0 0
0

亚马逊云科技解决方案 基于行业客户应用场景及技术领域的解决方案
联系亚马逊云科技专家
亚马逊云科技解决方案
基于行业客户应用场景及技术领域的解决方案
联系专家

0
目录

 分享
分享 点赞
点赞 收藏
收藏 目录
目录立即注册,开启您的免费套餐
立即关注

亚马逊云开发者
公众号

User Group
公众号

亚马逊云科技
官方小程序
“AWS” 是 “Amazon Web Services” 的缩写,在此网站不作为商标展示。
立即关注
亚马逊云开发者
公众号
User Group
公众号
亚马逊云科技
官方小程序
“AWS” 是 “Amazon Web Services” 的缩写,在此网站不作为商标展示。
关于我们 
更多资源
开发者工具
更多支持
立即关注
亚马逊云开发者
公众号
User Group
公众号
亚马逊云科技
官方小程序
“AWS” 是 “Amazon Web Services” 的缩写,在此网站不作为商标展示。
