{"value":"导读:Apache Doris 使用 C++ 语言实现了执行引擎,C++ 开发过程中,影响开发效率的一个重要因素是指针的使用,包括非法访问、泄露、强制类型转换等。本文将会通过对 Sanitizer 和 Core Dump 分析工具的介绍来为大家分享:如何快速定位 Apache Doris 中的 C++ 问题,帮助开发者提升开发效率并掌握更高效的开发技巧。\n\nApache Doris 是一款高性能 MPP 分析型数据库,出于性能的考虑,Apache Doris 使用了 C++ 语言实现了执行引擎。在 C++ 开发过程中,影响开发效率的一个重要因素是指针的使用,包括非法访问、泄露、强制类型转换等。Google Sanitizer 是由 Google 设计的用于动态代码分析的工具,在 Apache Doris 开发过程中遭遇指针使用引起的内存问题时,正是因为有了 Sanitizer,使得问题解决效率可以得到数量级的提升。除此以外,当出现一些内存越界或非法访问的情况导致 BE 进程 Crash 时,Core Dump 文件是非常有效的定位和复现问题的途径,因此一款高效分析 CoreDump 的工具也会进一步帮助更加快捷定位问题。\n\n**本文将会通过对 Sanitizer 和 Core Dump 分析工具的介绍来为大家分享:如何快速定位 Apache Doris 中的 C++ 问题,帮助开发者提升开发效率并掌握更高效的开发技巧。**\n\n## Sanitizer 介绍\n\n定位 C++ 程序内存问题常用的工具有两个,Valgrind 和 Sanitizer。\n\n> 二者的对比可以参考:<https://developers.redhat.com/blog/2021/05/05/memory-error-checking-in-c-and-c-comparing-sanitizers-and-valgrind>\n\n其中 Valgrind 通过运行时软件翻译二进制指令的执行获取相关的信息,所以 Valgrind 会非常大幅度的降低程序性能,这就导致在一些大型项目比如 Apache Doris 使用 Valgrind 定位内存问题效率会很低。\n\n而 Sanitizer 则是通过编译时插入代码来捕获相关的信息,性能下降幅度比 Valgrind 小很多,使得能够在单测以及其它测试环境默认使用 Saintizer。\n\n> Sanitizer 的算法可以参考:<https://github.com/google/sanitizers/wiki/AddressSanitizerAlgorithm>\n\n\n在 Apache Doris 中,我们通常使用 Sanirizer 来定位内存问题。LLVM 以及 GNU C++ 有多个 Sanitizer:\n\n- AddressSanitizer(ASan)可以发现内存错误问题,比如 use after free,heap buffer overflow,stack buffer overflow,global buffer overflow,use after return,use after scope,memory leak,super large memory allocation;\n- AddressSanitizerLeakSanitizer (LSan)可以发现内存泄露;\n- MemorySanitizer(MSan)可以发现未初始化的内存使用;\n- UndefinedBehaviorSanitizer (UBSan)可以发现未定义的行为,比如越界数组访问、数值溢出等;\n- ThreadSanitizer (TSan)可以发现线程的竞争行为;\n\n其中 AddressSanitizer, AddressSanitizerLeakSanitizer 以及 UndefinedBehaviorSanitizer 对于解决指针相关的问题最为有效。\n\nSanitizer 不但能够发现错误,而且能够给出错误源头以及代码位置,这就使得问题的解决效率很高,通过一些例子来说明 Sanitizer 的易用程度。\n\n> 可以参考此处使用 Sanitizer:<https://github.com/apache/doris/blob/master/be/CMakeLists.txt>\n\nSanitizer 和 Core Dump 配合定位问题非常高效,默认 Sanitizer 不生成 Core Dump 文件,可以使用如下环境变量生成 Core Dump文件,建议默认打开。\n\n> 可以参考:<https://github.com/apache/doris/blob/master/bin/start_be.sh>\n\n\n```\nexport ASAN_OPTIONS=symbolize=1:abort_on_error=1:disable_coredump=0:unmap_shadow_on_exit=1\n```\n\n使用如下环境变量让 UBSan 生成代码栈,默认不生成。\n\n```\nexport UBSAN_OPTIONS=print_stacktrace=1\n```\n\n有时候需要显示指定 Symbolizer 二进制的位置,这样 Sanitizer 就能够直接生成可读的代码栈。\n\n```\nexport ASAN_SYMBOLIZER_PATH=your path of llvm-symbolizer\n```\n\n## Sanitizer 使用举例\n\n### Use after free\n\nUser after free 是指访问释放的内存,针对 use after free 错误,AddressSanitizer 能够报出使用释放地址的代码栈,地址分配的代码栈,地址释放的代码栈。比如:<https://github.com/apache/doris/issues/9525>中,使用释放地址的代码栈如下:\n\n```\n82849==ERROR: AddressSanitizer: heap-use-after-free on address 0x60300074c420 at pc 0x56510f61a4f0 bp 0x7f48079d89a0 sp 0x7f48079d8990\nREAD of size 1 at 0x60300074c420 thread T94 (MemTableFlushTh)\n #0 0x56510f61a4ef in doris::faststring::append(void const*, unsigned long) /mnt/ssd01/tjp/incubator-doris/be/src/util/faststring.h:120\n// 更详细的代码栈请前往https://github.com/apache/doris/issues/9525查看\n```\n\n此地址初次分配的代码栈如下:\n\n```\npreviously allocated by thread T94 (MemTableFlushTh) here:\n #0 0x56510e9b74b7 in __interceptor_malloc (/mnt/ssd01/tjp/regression_test/be/lib/palo_be+0x536a4b7)\n #1 0x56510ee77745 in Allocator<false, false>::alloc_no_track(unsigned long, unsigned long) /mnt/ssd01/tjp/incubator-doris/be/src/vec/common/allocator.h:223\n #2 0x56510ee68520 in Allocator<false, false>::alloc(unsigned long, unsigned long) /mnt/ssd01/tjp/incubator-doris/be/src/vec/common/allocator.h:104\n```\n\n地址释放的代码栈如下:\n\n```\n0x60300074c420 is located 16 bytes inside of 32-byte region [0x60300074c410,0x60300074c430)\nfreed by thread T94 (MemTableFlushTh) here:\n #0 0x56510e9b7868 in realloc (/mnt/ssd01/tjp/regression_test/be/lib/palo_be+0x536a868)\n #1 0x56510ee8b913 in Allocator<false, false>::realloc(void*, unsigned long, unsigned long, unsigned long) /mnt/ssd01/tjp/incubator-doris/be/src/vec/common/allocator.h:125\n #2 0x56510ee814bb in void doris::vectorized::PODArrayBase<1ul, 4096ul, Allocator<false, false>, 15ul, 16ul>::realloc<>(unsigned long) /mnt/ssd01/tjp/incubator-doris/be/src/vec/common/pod_array.h:147\n```\n\n有了详细的非法访问地址代码栈、分配代码栈、释放代码栈,问题定位就会非常容易。\n\n> 说明:限于文章篇幅,示例中的栈展示不全,完整代码栈可以前往对应 Issue 中进行查看。\n\n### heap buffer overflow\n\nAddressSanitizer 能够报出 heap buffer overflow 的代码栈。\n\n比如https://github.com/apache/doris/issues/5951 里的,结合运行时生成的 Core Dump 文件就可以快速定位问题。\n\n```\n==3930==ERROR: AddressSanitizer: heap-buffer-overflow on address 0x60c000000878 at pc 0x000000ae00ce bp 0x7ffeb16aa660 sp 0x7ffeb16aa658\nREAD of size 8 at 0x60c000000878 thread T0\n #0 0xae00cd in doris::StringFunctions::substring(doris_udf::FunctionContext*, doris_udf::StringVal const&, doris_udf::IntVal const&, doris_udf::IntVal const&) ../src/exprs/string_functions.cpp:98\n```\n\n### memory leak\n\nAddressSanitizer 能够报出哪里分配的内存没有被释放,就可以快速的分析出泄露原因。\n\n```\n==1504733==ERROR: LeakSanitizer: detected memory leaks\nDirect leak of 688128 byte(s) in 168 object(s) allocated from:\n#0 0x560d5db51aac in __interceptor_posix_memalign (/mnt/ssd01/doris-master/VEC_ASAN/be/lib/doris_be+0x9227aac)\n#1 0x560d5fbb3813 in doris::CoreDataBlock::operator new(unsigned long) /home/zcp/repo_center/doris_master/be/src/util/core_local.cpp:35\n#2 0x560d5fbb65ed in doris::CoreDataAllocatorImpl<8ul>::get_or_create(unsigned long) /home/zcp/repo_center/doris_master/be/src/util/core_local.cpp:58\n#3 0x560d5e71a28d in doris::CoreLocalValue::CoreLocalValue(long)\n```\n\n> <https://github.com/apache/doris/issues/10926>\n>\n> <https://github.com/apache/doris/pull/3326>\n\n\n## 异常分配\n\n分配过大的内存 AddressSanitizer 会报出 OOM 错误,根据栈以及 Core Dump 文件可以分析出何处分配了过大内存。栈举例如下:\n\n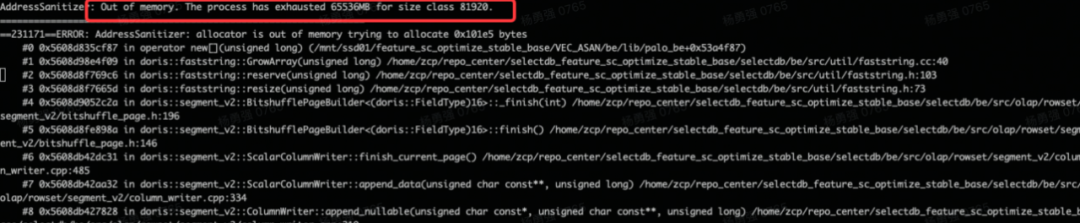\n\n\n> Fix PR 见:<https://github.com/apache/doris/pull/10289>\n\nUBSan 能够高效发现强制类型转换的错误,如下方 Issue 链接中描述,它能够精确的描述出强制类型转换带来错误的代码,如果不能在第一现场发现这种错误,后续因为指针错误使用,会比较难定位。\n\n> Issue:<https://github.com/apache/doris/issues/9105>\n\nUndefinedBehaviorSanitizer 也比 AddressSanitizer 及其它的更容易发现死锁。\n\n> 比如:<https://github.com/apache/doris/issues/10309>\n\n## 程序维护内存 Pool 时 AddressSanitizer 的使用\n\nAddressSanitizer 是编译器针对内存分配、释放、访问 生成额外代码来实现内存问题分析的,如果程序维护了自己的内存 Pool,AddressSanitizer 就不能发现 Pool 中内存非法访问的问题。这种情况下需要做一些额外的工作来使得 AddressSanitizer 尽可能工作,主要是使用 ASAN_POISON_MEMORY_REGION 和 ASAN_UNPOISON_MEMORY_REGION 管理内存是否可以访问,这种方法使用比较难,因为 AddressSanitizer 内部有地址对齐等的处理。出于性能以及内存释放等原因,Apache Doris 也维护了内存分配 Pool ,这种方法不能确保 AddressSanitizer 能够发现所有问题。\n\n> 可以参考:<https://github.com/apache/doris/pull/8148>\n\n当程序维护自己的内存池时,按照 <https://github.com/apache/dorisw/pull/8148> 中方法,use after free 错误会变成 use after poison。但是 use after poison 不能够给出地址失效的栈(<https://github.com/google/sanitizers/issues/191>),从而导致问题的定位分析仍然很困难。\n\n因此建议程序维护的内存 Pool 可以通过选项关闭,这样在测试环境就可以使用 AddressSanitizer 高效地定位内存问题。\n\n### Core dump 分析工具\n\n分析 C++ 程序生成的 Core Dump 文件经常遇到的问题就是怎么打印出 STL 容器中的值以及 Boost 中容器的值,有如下三个工具可以高效的查看 STL 和 Boost 中容器的值。\n\n### STL-View\n\n可以将此文件 <https://github.com/dataroaring/tools/blob/main/gdb/dbinit_stl_views-1.03.txt> 放置到~/.gdbinit中使用 STL-View。STL-View 输出非常友好,支持 pvector,plist,plist_member,pmap,pmap_member,pset,pdequeue,pstack,pqueue,ppqueue,pbitset,pstring,pwstring。以 Apache Doris 中使用 pvector 为例,它能够输出 vector 中的所有元素。\n\n```\n(gdb) pvector block.data\nelem[0]: $5 = {\n column = {\n <COW<doris::vectorized::IColumn>::intrusive_ptr<doris::vectorized::IColumn const>> = {\n t = 0x606000fdc820\n }, <No data fields>},\n type = {\n <std::__shared_ptr<doris::vectorized::IDataType const, (__gnu_cxx::_Lock_policy)2>> = {\n <std::__shared_ptr_access<doris::vectorized::IDataType const, (__gnu_cxx::_Lock_policy)2, false, false>> = {<No data fields>},\n members of std::__shared_ptr<doris::vectorized::IDataType const, (__gnu_cxx::_Lock_policy)2>:\n _M_ptr = 0x6030069e9780,\n _M_refcount = {\n _M_pi = 0x6030069e9770\n }\n }, <No data fields>},\n name = {\n static npos = 18446744073709551615,\n _M_dataplus = {\n <std::allocator<char>> = {\n <__gnu_cxx::new_allocator<char>> = {<No data fields>}, <No data fields>},\n members of std::__cxx11::basic_string<char, std::char_traits<char>, std::allocator<char> >::_Alloc_hider:\n _M_p = 0x61400006e068 \"n_nationkey\"\n },\n _M_string_length = 11,\n {\n _M_local_buf = \"n_nationkey\\000\\276\\276\\276\\276\",\n _M_allocated_capacity = 7957695015158701934\n }\n }\n}\nelem[1]: $6 = {\n column = {\n <COW<doris::vectorized::IColumn>::intrusive_ptr<doris::vectorized::IColumn const>> = {\n t = 0x6080001ec220\n }, <No data fields>},\n type = {\n ...\n```\n\n### Pretty-Printer\n\nGCC 7.0 开始支持了 Pretty-Printer 打印 STL 容器,可以将以下代码放置到~/.gdbinit中使 Pretty-Printer 生效。\n\n注意:/usr/share/gcc/python需要更换为本机对应的地址。\n\n```\npython\nimport sys\nsys.path.insert(0, '/usr/share/gcc/python')\nfrom libstdcxx.v6.printers import register_libstdcxx_printers\nregister_libstdcxx_printers (None)\nend\n```\n\n以 vector 为例, Pretty-Printer 能够打印出详细内容。\n\n```\n(gdb) p block.data\n$1 = std::vector of length 7, capacity 8 = {{\n column = {\n <COW<doris::vectorized::IColumn>::intrusive_ptr<doris::vectorized::IColumn const>> = {\n t = 0x606000fdc820\n }, <No data fields>},\n type = std::shared_ptr<const doris::vectorized::IDataType> (use count 1, weak count 0) = {\n get() = 0x6030069e9780\n },\n name = \"n_nationkey\"\n }, {\n column = {\n <COW<doris::vectorized::IColumn>::intrusive_ptr<doris::vectorized::IColumn const>> = {\n t = 0x6080001ec220\n }, <No data fields>},\n type = std::shared_ptr<const doris::vectorized::IDataType> (use count 1, weak count 0) = {\n get() = 0x6030069e9750\n },\n name = \"n_name\"\n }, {\n column = {\n <COW<doris::vectorized::IColumn>::intrusive_ptr<doris::vectorized::IColumn const>> = {\n t = 0x606000fd52c0\n }, <No data fields>},\n type = std::shared_ptr<const doris::vectorized::IDataType> (use count 1, weak count 0) = {\n get() = 0x6030069e9720\n },\n name = \"n_regionkey\"\n }, {\n column = {\n <COW<doris::vectorized::IColumn>::intrusive_ptr<doris::vectorized::IColumn const>> = {\n t = 0x6030069e96b0\n }, <No data fields>},\n type = std::shared_ptr<const doris::vectorized::IDataType> (use count 1, weak count 0) = {\n get() = 0x604000a66160\n },\n name = \"n_comment\"\n```\n\n### Boost Pretty Printer\n\n因为 Apache Doris 使用 Boost 不多,因此不再举例。\n\n> 可以参考:<https://github.com/ruediger/Boost-Pretty-Printer>\n\n## 总结\n\n有了 Sanitizer 能够在单测、功能、集成、压力测试环境及时发现问题,最重要的是大多数时候都可以给出程序出问题的关联现场,比如内存分配的调用栈,释放内存的调用栈,非法访问内存的调用栈,配合 Core Dump 可以查看现场状态,解决 C++ 内存问题从猜测变成了有证据的现场分析。\n\n**作者介绍:**杨勇强,SelectDB 联合创始人兼产品VP,同时也是Apache Doris Committer。曾担任百度智能云存储部总架构师,主导构建了云存储技术产品体系,是Linux内核社区贡献者。\n\n<p align=center>— End —</p>\n\n**相关链接:**\n\nSelectDB 官方网站:\n\n[https://selectdb.com](https://selectdb.com/)\n\nApache Doris 官方网站:\n\n[http://doris.apache.org](http://doris.apache.org/)\n\nApache Doris Github:\n\nhttps://github.com/apache/doris\n\nApache Doris 开发者邮件组:\n\n[dev@doris.apache.org](mailto:dev@doris.apache.org)\n\n作者:杨勇强\n\nSelectDB 联合创始人兼产品 VP,同时也是 Apache Doris Committer。曾担任百度智能云存储部总架构师,主导构建了云存储技术产品体系,是 Linux 内核社区贡献者。","render":"<p>导读:Apache Doris 使用 C++ 语言实现了执行引擎,C++ 开发过程中,影响开发效率的一个重要因素是指针的使用,包括非法访问、泄露、强制类型转换等。本文将会通过对 Sanitizer 和 Core Dump 分析工具的介绍来为大家分享:如何快速定位 Apache Doris 中的 C++ 问题,帮助开发者提升开发效率并掌握更高效的开发技巧。</p>\n<p>Apache Doris 是一款高性能 MPP 分析型数据库,出于性能的考虑,Apache Doris 使用了 C++ 语言实现了执行引擎。在 C++ 开发过程中,影响开发效率的一个重要因素是指针的使用,包括非法访问、泄露、强制类型转换等。Google Sanitizer 是由 Google 设计的用于动态代码分析的工具,在 Apache Doris 开发过程中遭遇指针使用引起的内存问题时,正是因为有了 Sanitizer,使得问题解决效率可以得到数量级的提升。除此以外,当出现一些内存越界或非法访问的情况导致 BE 进程 Crash 时,Core Dump 文件是非常有效的定位和复现问题的途径,因此一款高效分析 CoreDump 的工具也会进一步帮助更加快捷定位问题。</p>\n<p><strong>本文将会通过对 Sanitizer 和 Core Dump 分析工具的介绍来为大家分享:如何快速定位 Apache Doris 中的 C++ 问题,帮助开发者提升开发效率并掌握更高效的开发技巧。</strong></p>\n<h2><a id=\"Sanitizer__6\"></a>Sanitizer 介绍</h2>\n<p>定位 C++ 程序内存问题常用的工具有两个,Valgrind 和 Sanitizer。</p>\n<blockquote>\n<p>二者的对比可以参考:<a href=\"https://developers.redhat.com/blog/2021/05/05/memory-error-checking-in-c-and-c-comparing-sanitizers-and-valgrind\" target=\"_blank\">https://developers.redhat.com/blog/2021/05/05/memory-error-checking-in-c-and-c-comparing-sanitizers-and-valgrind</a></p>\n</blockquote>\n<p>其中 Valgrind 通过运行时软件翻译二进制指令的执行获取相关的信息,所以 Valgrind 会非常大幅度的降低程序性能,这就导致在一些大型项目比如 Apache Doris 使用 Valgrind 定位内存问题效率会很低。</p>\n<p>而 Sanitizer 则是通过编译时插入代码来捕获相关的信息,性能下降幅度比 Valgrind 小很多,使得能够在单测以及其它测试环境默认使用 Saintizer。</p>\n<blockquote>\n<p>Sanitizer 的算法可以参考:<a href=\"https://github.com/google/sanitizers/wiki/AddressSanitizerAlgorithm\" target=\"_blank\">https://github.com/google/sanitizers/wiki/AddressSanitizerAlgorithm</a></p>\n</blockquote>\n<p>在 Apache Doris 中,我们通常使用 Sanirizer 来定位内存问题。LLVM 以及 GNU C++ 有多个 Sanitizer:</p>\n<ul>\n<li>AddressSanitizer(ASan)可以发现内存错误问题,比如 use after free,heap buffer overflow,stack buffer overflow,global buffer overflow,use after return,use after scope,memory leak,super large memory allocation;</li>\n<li>AddressSanitizerLeakSanitizer (LSan)可以发现内存泄露;</li>\n<li>MemorySanitizer(MSan)可以发现未初始化的内存使用;</li>\n<li>UndefinedBehaviorSanitizer (UBSan)可以发现未定义的行为,比如越界数组访问、数值溢出等;</li>\n<li>ThreadSanitizer (TSan)可以发现线程的竞争行为;</li>\n</ul>\n<p>其中 AddressSanitizer, AddressSanitizerLeakSanitizer 以及 UndefinedBehaviorSanitizer 对于解决指针相关的问题最为有效。</p>\n<p>Sanitizer 不但能够发现错误,而且能够给出错误源头以及代码位置,这就使得问题的解决效率很高,通过一些例子来说明 Sanitizer 的易用程度。</p>\n<blockquote>\n<p>可以参考此处使用 Sanitizer:<a href=\"https://github.com/apache/doris/blob/master/be/CMakeLists.txt\" target=\"_blank\">https://github.com/apache/doris/blob/master/be/CMakeLists.txt</a></p>\n</blockquote>\n<p>Sanitizer 和 Core Dump 配合定位问题非常高效,默认 Sanitizer 不生成 Core Dump 文件,可以使用如下环境变量生成 Core Dump文件,建议默认打开。</p>\n<blockquote>\n<p>可以参考:<a href=\"https://github.com/apache/doris/blob/master/bin/start_be.sh\" target=\"_blank\">https://github.com/apache/doris/blob/master/bin/start_be.sh</a></p>\n</blockquote>\n<pre><code class=\"lang-\">export ASAN_OPTIONS=symbolize=1:abort_on_error=1:disable_coredump=0:unmap_shadow_on_exit=1\n</code></pre>\n<p>使用如下环境变量让 UBSan 生成代码栈,默认不生成。</p>\n<pre><code class=\"lang-\">export UBSAN_OPTIONS=print_stacktrace=1\n</code></pre>\n<p>有时候需要显示指定 Symbolizer 二进制的位置,这样 Sanitizer 就能够直接生成可读的代码栈。</p>\n<pre><code class=\"lang-\">export ASAN_SYMBOLIZER_PATH=your path of llvm-symbolizer\n</code></pre>\n<h2><a id=\"Sanitizer__54\"></a>Sanitizer 使用举例</h2>\n<h3><a id=\"Use_after_free_56\"></a>Use after free</h3>\n<p>User after free 是指访问释放的内存,针对 use after free 错误,AddressSanitizer 能够报出使用释放地址的代码栈,地址分配的代码栈,地址释放的代码栈。比如:<a href=\"https://github.com/apache/doris/issues/9525\" target=\"_blank\">https://github.com/apache/doris/issues/9525</a>中,使用释放地址的代码栈如下:</p>\n<pre><code class=\"lang-\">82849==ERROR: AddressSanitizer: heap-use-after-free on address 0x60300074c420 at pc 0x56510f61a4f0 bp 0x7f48079d89a0 sp 0x7f48079d8990\nREAD of size 1 at 0x60300074c420 thread T94 (MemTableFlushTh)\n #0 0x56510f61a4ef in doris::faststring::append(void const*, unsigned long) /mnt/ssd01/tjp/incubator-doris/be/src/util/faststring.h:120\n// 更详细的代码栈请前往https://github.com/apache/doris/issues/9525查看\n</code></pre>\n<p>此地址初次分配的代码栈如下:</p>\n<pre><code class=\"lang-\">previously allocated by thread T94 (MemTableFlushTh) here:\n #0 0x56510e9b74b7 in __interceptor_malloc (/mnt/ssd01/tjp/regression_test/be/lib/palo_be+0x536a4b7)\n #1 0x56510ee77745 in Allocator<false, false>::alloc_no_track(unsigned long, unsigned long) /mnt/ssd01/tjp/incubator-doris/be/src/vec/common/allocator.h:223\n #2 0x56510ee68520 in Allocator<false, false>::alloc(unsigned long, unsigned long) /mnt/ssd01/tjp/incubator-doris/be/src/vec/common/allocator.h:104\n</code></pre>\n<p>地址释放的代码栈如下:</p>\n<pre><code class=\"lang-\">0x60300074c420 is located 16 bytes inside of 32-byte region [0x60300074c410,0x60300074c430)\nfreed by thread T94 (MemTableFlushTh) here:\n #0 0x56510e9b7868 in realloc (/mnt/ssd01/tjp/regression_test/be/lib/palo_be+0x536a868)\n #1 0x56510ee8b913 in Allocator<false, false>::realloc(void*, unsigned long, unsigned long, unsigned long) /mnt/ssd01/tjp/incubator-doris/be/src/vec/common/allocator.h:125\n #2 0x56510ee814bb in void doris::vectorized::PODArrayBase<1ul, 4096ul, Allocator<false, false>, 15ul, 16ul>::realloc<>(unsigned long) /mnt/ssd01/tjp/incubator-doris/be/src/vec/common/pod_array.h:147\n</code></pre>\n<p>有了详细的非法访问地址代码栈、分配代码栈、释放代码栈,问题定位就会非常容易。</p>\n<blockquote>\n<p>说明:限于文章篇幅,示例中的栈展示不全,完整代码栈可以前往对应 Issue 中进行查看。</p>\n</blockquote>\n<h3><a id=\"heap_buffer_overflow_90\"></a>heap buffer overflow</h3>\n<p>AddressSanitizer 能够报出 heap buffer overflow 的代码栈。</p>\n<p>比如https://github.com/apache/doris/issues/5951 里的,结合运行时生成的 Core Dump 文件就可以快速定位问题。</p>\n<pre><code class=\"lang-\">==3930==ERROR: AddressSanitizer: heap-buffer-overflow on address 0x60c000000878 at pc 0x000000ae00ce bp 0x7ffeb16aa660 sp 0x7ffeb16aa658\nREAD of size 8 at 0x60c000000878 thread T0\n #0 0xae00cd in doris::StringFunctions::substring(doris_udf::FunctionContext*, doris_udf::StringVal const&, doris_udf::IntVal const&, doris_udf::IntVal const&) ../src/exprs/string_functions.cpp:98\n</code></pre>\n<h3><a id=\"memory_leak_102\"></a>memory leak</h3>\n<p>AddressSanitizer 能够报出哪里分配的内存没有被释放,就可以快速的分析出泄露原因。</p>\n<pre><code class=\"lang-\">==1504733==ERROR: LeakSanitizer: detected memory leaks\nDirect leak of 688128 byte(s) in 168 object(s) allocated from:\n#0 0x560d5db51aac in __interceptor_posix_memalign (/mnt/ssd01/doris-master/VEC_ASAN/be/lib/doris_be+0x9227aac)\n#1 0x560d5fbb3813 in doris::CoreDataBlock::operator new(unsigned long) /home/zcp/repo_center/doris_master/be/src/util/core_local.cpp:35\n#2 0x560d5fbb65ed in doris::CoreDataAllocatorImpl<8ul>::get_or_create(unsigned long) /home/zcp/repo_center/doris_master/be/src/util/core_local.cpp:58\n#3 0x560d5e71a28d in doris::CoreLocalValue::CoreLocalValue(long)\n</code></pre>\n<blockquote>\n<p><a href=\"https://github.com/apache/doris/issues/10926\" target=\"_blank\">https://github.com/apache/doris/issues/10926</a></p>\n<p><a href=\"https://github.com/apache/doris/pull/3326\" target=\"_blank\">https://github.com/apache/doris/pull/3326</a></p>\n</blockquote>\n<h2><a id=\"_120\"></a>异常分配</h2>\n<p>分配过大的内存 AddressSanitizer 会报出 OOM 错误,根据栈以及 Core Dump 文件可以分析出何处分配了过大内存。栈举例如下:</p>\n<p><img src=\"https://p3-juejin.byteimg.com/tos-cn-i-k3u1fbpfcp/06861813865e4e8d805b02a208e1ada8~tplv-k3u1fbpfcp-zoom-1.image\" alt=\"\" /></p>\n<blockquote>\n<p>Fix PR 见:<a href=\"https://github.com/apache/doris/pull/10289\" target=\"_blank\">https://github.com/apache/doris/pull/10289</a></p>\n</blockquote>\n<p>UBSan 能够高效发现强制类型转换的错误,如下方 Issue 链接中描述,它能够精确的描述出强制类型转换带来错误的代码,如果不能在第一现场发现这种错误,后续因为指针错误使用,会比较难定位。</p>\n<blockquote>\n<p>Issue:<a href=\"https://github.com/apache/doris/issues/9105\" target=\"_blank\">https://github.com/apache/doris/issues/9105</a></p>\n</blockquote>\n<p>UndefinedBehaviorSanitizer 也比 AddressSanitizer 及其它的更容易发现死锁。</p>\n<blockquote>\n<p>比如:<a href=\"https://github.com/apache/doris/issues/10309\" target=\"_blank\">https://github.com/apache/doris/issues/10309</a></p>\n</blockquote>\n<h2><a id=\"_Pool__AddressSanitizer__137\"></a>程序维护内存 Pool 时 AddressSanitizer 的使用</h2>\n<p>AddressSanitizer 是编译器针对内存分配、释放、访问 生成额外代码来实现内存问题分析的,如果程序维护了自己的内存 Pool,AddressSanitizer 就不能发现 Pool 中内存非法访问的问题。这种情况下需要做一些额外的工作来使得 AddressSanitizer 尽可能工作,主要是使用 ASAN_POISON_MEMORY_REGION 和 ASAN_UNPOISON_MEMORY_REGION 管理内存是否可以访问,这种方法使用比较难,因为 AddressSanitizer 内部有地址对齐等的处理。出于性能以及内存释放等原因,Apache Doris 也维护了内存分配 Pool ,这种方法不能确保 AddressSanitizer 能够发现所有问题。</p>\n<blockquote>\n<p>可以参考:<a href=\"https://github.com/apache/doris/pull/8148\" target=\"_blank\">https://github.com/apache/doris/pull/8148</a></p>\n</blockquote>\n<p>当程序维护自己的内存池时,按照 <a href=\"https://github.com/apache/dorisw/pull/8148\" target=\"_blank\">https://github.com/apache/dorisw/pull/8148</a> 中方法,use after free 错误会变成 use after poison。但是 use after poison 不能够给出地址失效的栈(<a href=\"https://github.com/google/sanitizers/issues/191\" target=\"_blank\">https://github.com/google/sanitizers/issues/191</a>),从而导致问题的定位分析仍然很困难。</p>\n<p>因此建议程序维护的内存 Pool 可以通过选项关闭,这样在测试环境就可以使用 AddressSanitizer 高效地定位内存问题。</p>\n<h3><a id=\"Core_dump__147\"></a>Core dump 分析工具</h3>\n<p>分析 C++ 程序生成的 Core Dump 文件经常遇到的问题就是怎么打印出 STL 容器中的值以及 Boost 中容器的值,有如下三个工具可以高效的查看 STL 和 Boost 中容器的值。</p>\n<h3><a id=\"STLView_151\"></a>STL-View</h3>\n<p>可以将此文件 <a href=\"https://github.com/dataroaring/tools/blob/main/gdb/dbinit_stl_views-1.03.txt\" target=\"_blank\">https://github.com/dataroaring/tools/blob/main/gdb/dbinit_stl_views-1.03.txt</a> 放置到~/.gdbinit中使用 STL-View。STL-View 输出非常友好,支持 pvector,plist,plist_member,pmap,pmap_member,pset,pdequeue,pstack,pqueue,ppqueue,pbitset,pstring,pwstring。以 Apache Doris 中使用 pvector 为例,它能够输出 vector 中的所有元素。</p>\n<pre><code class=\"lang-\">(gdb) pvector block.data\nelem[0]: $5 = {\n column = {\n <COW<doris::vectorized::IColumn>::intrusive_ptr<doris::vectorized::IColumn const>> = {\n t = 0x606000fdc820\n }, <No data fields>},\n type = {\n <std::__shared_ptr<doris::vectorized::IDataType const, (__gnu_cxx::_Lock_policy)2>> = {\n <std::__shared_ptr_access<doris::vectorized::IDataType const, (__gnu_cxx::_Lock_policy)2, false, false>> = {<No data fields>},\n members of std::__shared_ptr<doris::vectorized::IDataType const, (__gnu_cxx::_Lock_policy)2>:\n _M_ptr = 0x6030069e9780,\n _M_refcount = {\n _M_pi = 0x6030069e9770\n }\n }, <No data fields>},\n name = {\n static npos = 18446744073709551615,\n _M_dataplus = {\n <std::allocator<char>> = {\n <__gnu_cxx::new_allocator<char>> = {<No data fields>}, <No data fields>},\n members of std::__cxx11::basic_string<char, std::char_traits<char>, std::allocator<char> >::_Alloc_hider:\n _M_p = 0x61400006e068 "n_nationkey"\n },\n _M_string_length = 11,\n {\n _M_local_buf = "n_nationkey\\000\\276\\276\\276\\276",\n _M_allocated_capacity = 7957695015158701934\n }\n }\n}\nelem[1]: $6 = {\n column = {\n <COW<doris::vectorized::IColumn>::intrusive_ptr<doris::vectorized::IColumn const>> = {\n t = 0x6080001ec220\n }, <No data fields>},\n type = {\n ...\n</code></pre>\n<h3><a id=\"PrettyPrinter_195\"></a>Pretty-Printer</h3>\n<p>GCC 7.0 开始支持了 Pretty-Printer 打印 STL 容器,可以将以下代码放置到~/.gdbinit中使 Pretty-Printer 生效。</p>\n<p>注意:/usr/share/gcc/python需要更换为本机对应的地址。</p>\n<pre><code class=\"lang-\">python\nimport sys\nsys.path.insert(0, '/usr/share/gcc/python')\nfrom libstdcxx.v6.printers import register_libstdcxx_printers\nregister_libstdcxx_printers (None)\nend\n</code></pre>\n<p>以 vector 为例, Pretty-Printer 能够打印出详细内容。</p>\n<pre><code class=\"lang-\">(gdb) p block.data\n$1 = std::vector of length 7, capacity 8 = {{\n column = {\n <COW<doris::vectorized::IColumn>::intrusive_ptr<doris::vectorized::IColumn const>> = {\n t = 0x606000fdc820\n }, <No data fields>},\n type = std::shared_ptr<const doris::vectorized::IDataType> (use count 1, weak count 0) = {\n get() = 0x6030069e9780\n },\n name = "n_nationkey"\n }, {\n column = {\n <COW<doris::vectorized::IColumn>::intrusive_ptr<doris::vectorized::IColumn const>> = {\n t = 0x6080001ec220\n }, <No data fields>},\n type = std::shared_ptr<const doris::vectorized::IDataType> (use count 1, weak count 0) = {\n get() = 0x6030069e9750\n },\n name = "n_name"\n }, {\n column = {\n <COW<doris::vectorized::IColumn>::intrusive_ptr<doris::vectorized::IColumn const>> = {\n t = 0x606000fd52c0\n }, <No data fields>},\n type = std::shared_ptr<const doris::vectorized::IDataType> (use count 1, weak count 0) = {\n get() = 0x6030069e9720\n },\n name = "n_regionkey"\n }, {\n column = {\n <COW<doris::vectorized::IColumn>::intrusive_ptr<doris::vectorized::IColumn const>> = {\n t = 0x6030069e96b0\n }, <No data fields>},\n type = std::shared_ptr<const doris::vectorized::IDataType> (use count 1, weak count 0) = {\n get() = 0x604000a66160\n },\n name = "n_comment"\n</code></pre>\n<h3><a id=\"Boost_Pretty_Printer_252\"></a>Boost Pretty Printer</h3>\n<p>因为 Apache Doris 使用 Boost 不多,因此不再举例。</p>\n<blockquote>\n<p>可以参考:<a href=\"https://github.com/ruediger/Boost-Pretty-Printer\" target=\"_blank\">https://github.com/ruediger/Boost-Pretty-Printer</a></p>\n</blockquote>\n<h2><a id=\"_258\"></a>总结</h2>\n<p>有了 Sanitizer 能够在单测、功能、集成、压力测试环境及时发现问题,最重要的是大多数时候都可以给出程序出问题的关联现场,比如内存分配的调用栈,释放内存的调用栈,非法访问内存的调用栈,配合 Core Dump 可以查看现场状态,解决 C++ 内存问题从猜测变成了有证据的现场分析。</p>\n<p>**作者介绍:**杨勇强,SelectDB 联合创始人兼产品VP,同时也是Apache Doris Committer。曾担任百度智能云存储部总架构师,主导构建了云存储技术产品体系,是Linux内核社区贡献者。</p>\n<p>— End —</p>\n<p><strong>相关链接:</strong></p>\n<p>SelectDB 官方网站:</p>\n<p><a href=\"https://selectdb.com/\" target=\"_blank\">https://selectdb.com</a></p>\n<p>Apache Doris 官方网站:</p>\n<p><a href=\"http://doris.apache.org/\" target=\"_blank\">http://doris.apache.org</a></p>\n<p>Apache Doris Github:</p>\n<p>https://github.com/apache/doris</p>\n<p>Apache Doris 开发者邮件组:</p>\n<p><a href=\"mailto:dev@doris.apache.org\" target=\"_blank\">dev@doris.apache.org</a></p>\n<p>作者:杨勇强</p>\n<p>SelectDB 联合创始人兼产品 VP,同时也是 Apache Doris Committer。曾担任百度智能云存储部总架构师,主导构建了云存储技术产品体系,是 Linux 内核社区贡献者。</p>\n"}
如何高效解决 C++内存问题,Apache Doris 实践之路|技术解析
C++

 0
0 0
0亚马逊云科技解决方案 基于行业客户应用场景及技术领域的解决方案
联系亚马逊云科技专家
亚马逊云科技解决方案
基于行业客户应用场景及技术领域的解决方案
联系专家

0
目录

 分享
分享 点赞
点赞 收藏
收藏 目录
目录立即注册,开启您的免费套餐
立即关注

亚马逊云开发者
公众号

User Group
公众号

亚马逊云科技
官方小程序
“AWS” 是 “Amazon Web Services” 的缩写,在此网站不作为商标展示。
立即关注
亚马逊云开发者
公众号
User Group
公众号
亚马逊云科技
官方小程序
“AWS” 是 “Amazon Web Services” 的缩写,在此网站不作为商标展示。
关于我们 
更多资源
开发者工具
更多支持
立即关注
亚马逊云开发者
公众号
User Group
公众号
亚马逊云科技
官方小程序
“AWS” 是 “Amazon Web Services” 的缩写,在此网站不作为商标展示。
