{"value":"This blog post is co-written with Nick Vargas and Anna Schreiber from Accenture.\n\nScheduling customer appointments is often a manual and labor-intensive process. You can utilize advances in self-service technology to automate appointment scheduling.\n\nIn this blog post, we show you how to build a self-service appointment scheduling solution built with [Amazon Lex](https://aws.amazon.com/lex/) and [Amazon Connect](https://aws.amazon.com/connect/). This solution allows users to create appointments via Meta Messenger, and receive appointment confirmations through an SMS mobile message. It also provides a web-based dashboard so you can provide call to users with single-click button at the scheduled time.\n\nAmazon Lex integrates with Meta messenger and can be used to enable chat conversations. Lex is a fully-managed artificial intelligence (AI) service with Natural language understanding (NLU) to design, build, test, and deploy conversational interfaces in applications.\n\n#### **Solution overview**\n\nThe architecture diagram below shows a high-level overview of the interaction between different AWS components and services. The solution consists of these primary components: customer interaction using Meta messenger, appointment scheduling via SMS enabled by Lex and a customer outbound dialer from Connect. This outbound dialer makes it easy to create an outbound call to the customer from a simple UI interface.\n\n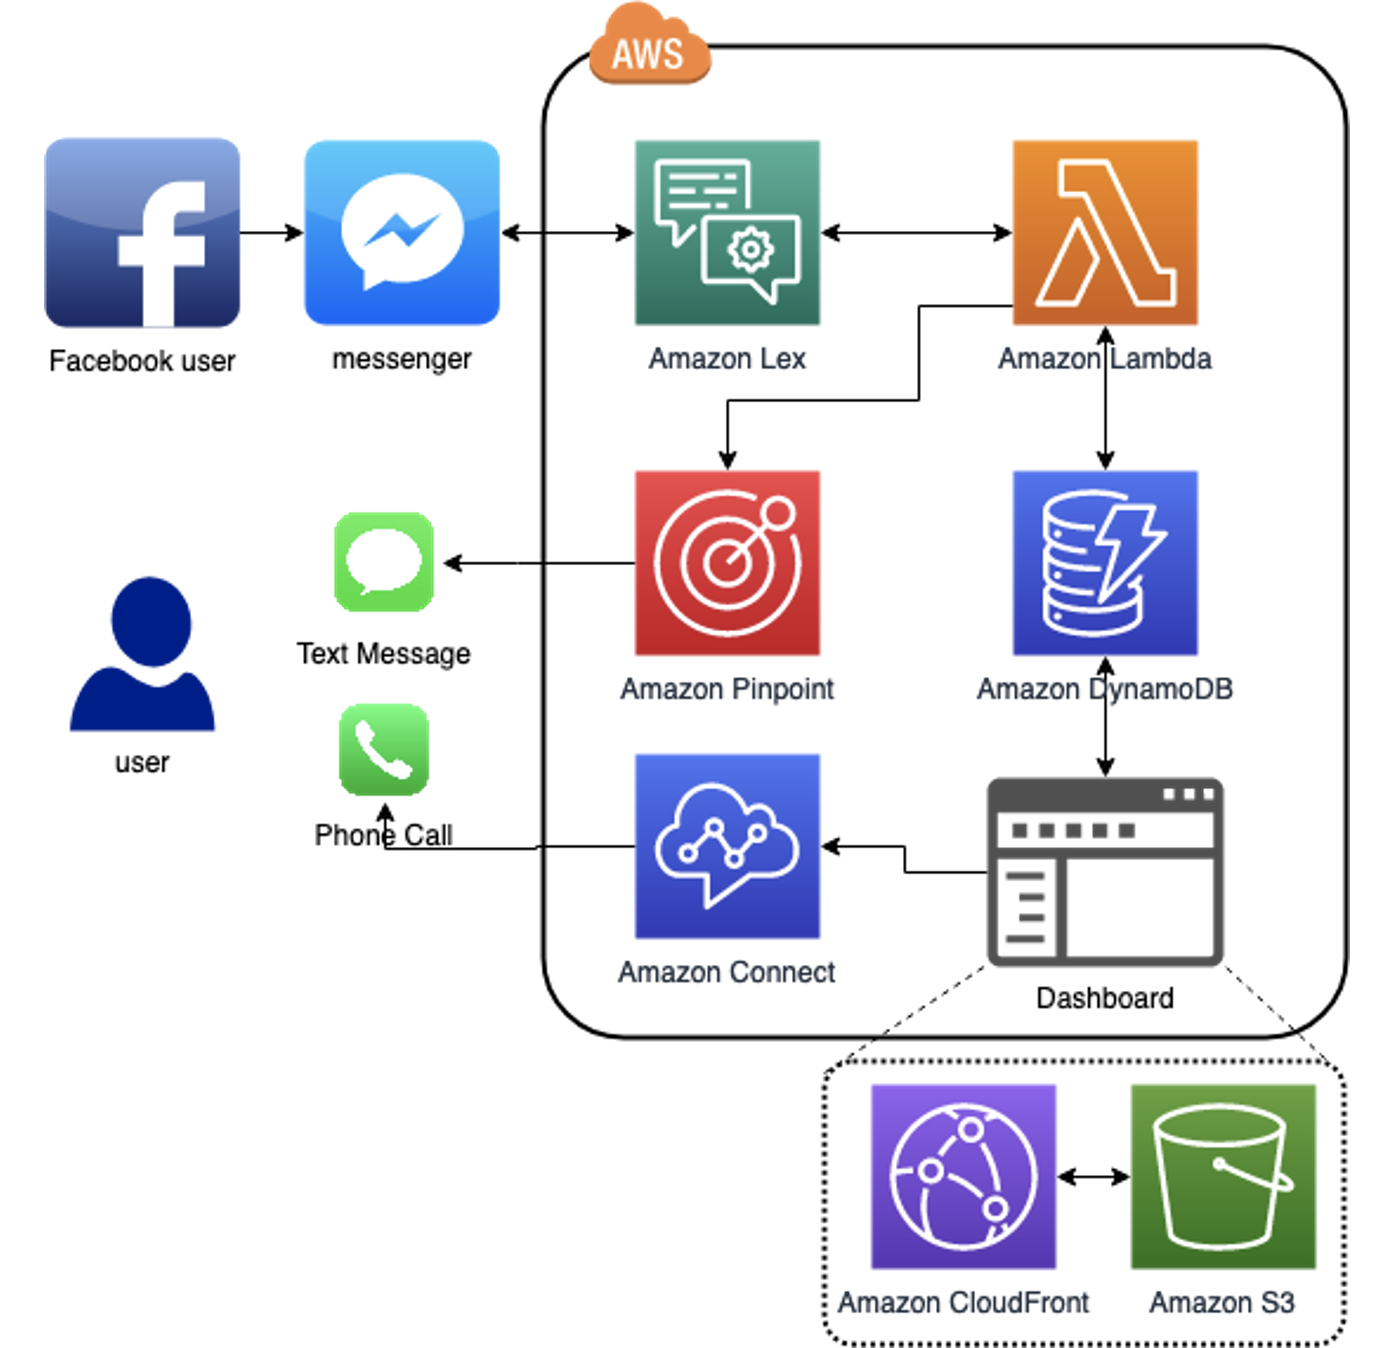\n\nThis post uses the following sample bot conversation:\n\n**User:** I would like to book an appointment.\n**Agent:** What appointment can I get you? You can say Billing, General or Offers.\n**User:** Billing\n**Agent:** What’s your first name?\n**User:** Sameer\n**Agent:** What is your phone number with country code?\n**User:** +10001234567\n**Agent:** When should I schedule your Billing appointment?\n**User:** Next week Tuesday\n**Agent:** At what time should I schedule the Billing appointment?\n**User:** 9:00 am\n**Agent:** Sameer, 09:00 is available, should I go ahead and book your appointment?\n**User:** Yes\n**Agent:** Thanks Sameer, your appointment is confirmed for 09:00, and we have texted the details to your phone number.\n\n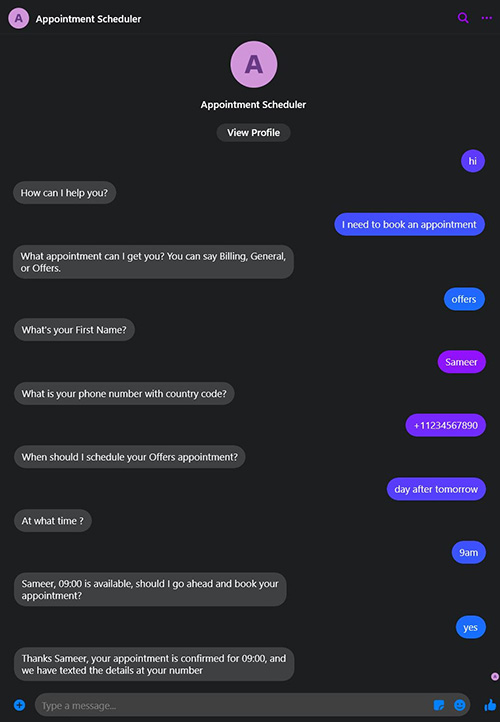\n\nFor the scheduler and customer notification component, an [AWS Lambda](https://aws.amazon.com/lambda/) handler is used to process the scheduling request. The appointment information is then saved to a [Amazon DynamoDB](https://aws.amazon.com/dynamodb/) database. When the information is saved successfully, a notification is sent to the customer confirming the appointment details via SMS using [Amazon Pinpoint](https://aws.amazon.com/pinpoint/).\n\n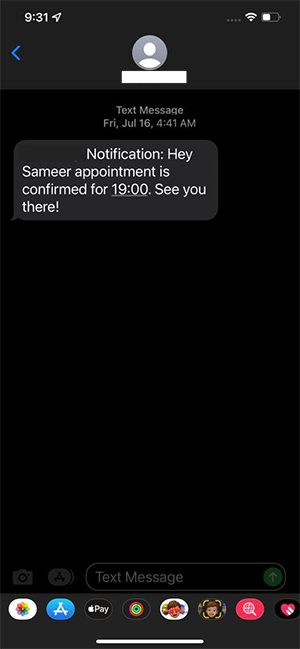\n\nA React.js application is created to display the saved customer appointments from the database in a calendar view format. This makes it easy for employees to identify the customers who need to be called. A call button from the calendar entry is clicked to initiate the call. This will immediately place an outbound call request to connect the customer with the employee using Amazon Connect.\n\n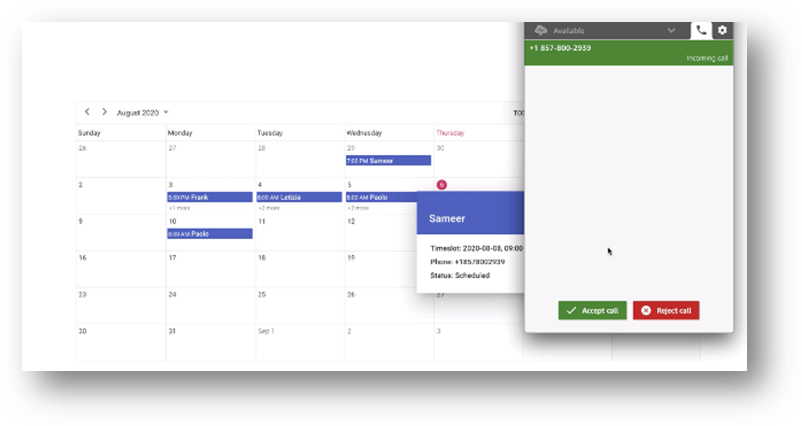\n\n#### **Prerequisites**\n\nFor this project, you should have the following prerequisites:\n\n- Downloaded the code files from the [GitHub repository](https://github.com/aws-samples/serverless-appointment-scheduler-amazon-connect).\n- The repository contains:\n- The React app files, located under the **UI**\n- The Amazon Connect Contact Flows, located under **backend/connect/contact_flows** There are four contact flows for this demo with files names ```AgentWhisper```, ```CustomerWaiting```, ```InboundCall``` and ```OutboundCall```.\n- A zip file for an Amazon Lex Bot, located in **backend/lex** directory with file name AppointmentSchedulerBot.zip.\n- npm installed on your local machine. Refer [how to install node.js and npm on your machine](https://docs.npmjs.com/downloading-and-installing-node-js-and-npm),\n\nThe deployment of this solution is automated where possible using CloudFormation, however, some configurations and steps in the deployment are manual.\n\n#### **Deploy the solution**\n\nTo set up the required infrastructure for the appointment scheduler demo app in your AWS account, complete the following steps:\n\n1. Sign in to the [AWS Management Console](http://aws.amazon.com/console).\n2. Choose **Launch Stack**:\n\n3. On the **Create Stack** page, under **Specify template**, choose **Upload a template file**.\n4. Choose the ```AppointmentsSchedulerCFTemplate``` file that you downloaded from GitHub.\n5. Choose **Next**.\n6. For **Stack name**, enter a unique name for the stack, such as ```AppointmentSchedulerDemo```.\n\n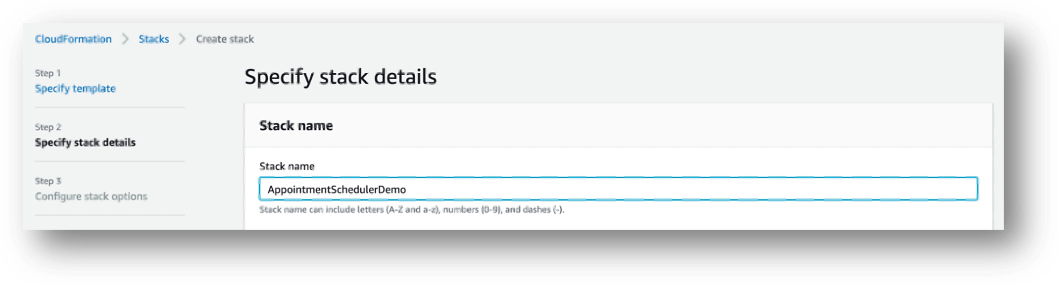\n\n7. Choose **Next**, and then choose **Next** on the **Configure stack options** page.\n8. On the **Review** page, select **I acknowledge that AWS CloudFormation might create IAM resources** and choose **Create**.\nThe stack generates the following resources:\n- The DynamoDB table ```AppointmentSchedulerTable```\n\n- The Amazon Pinpoint app ```AppointmentSchedulerPinpointApp```\n\n- Two [AWS Identity and Access Management](http://aws.amazon.com/iam) (IAM) policies:\n- ```AppointmentSchedulerPinpointPolicy```\n- ```AppointmentSchedulerDynamoApiPolicy```\n\n- Two IAM roles:\n- ```AppointmentsLambdaRole```\n\n- ```OutboundContactLambdaRole```\n\n- Two Lambda functions:\n- ```AppointmentScheduler```\n\n- ```AppointmentSchedulerOutboundContact```\n\n- The [Amazon API Gateway](https://aws.amazon.com/api-gateway) instance Appointments\n- [Amazon CloudFront](https://aws.amazon.com/cloudfront/) distribution\n- The [Amazon Simple Storage Service](http://aws.amazon.com/s3) (Amazon S3) bucket ```appointment-scheduler-website```\n\n#### **Configure the Amazon Pinpoint app**\n\nTo configure the Amazon Pinpoint app, complete the following steps:\n\n1. Go to the [Pinpoint console](https://console.aws.amazon.com/pinpoint/).\n2. Navigate to the **AppointmentSchedulerPinpointAp**p deployed in above.\n3. On the left menu under **Settings** click **SMS and Voice**.\n4. Under Number settings click **Request Phone Number**.\n5. Select your country of origin, choose **Toll-free**, and click **Next**, then **Request**.\n\n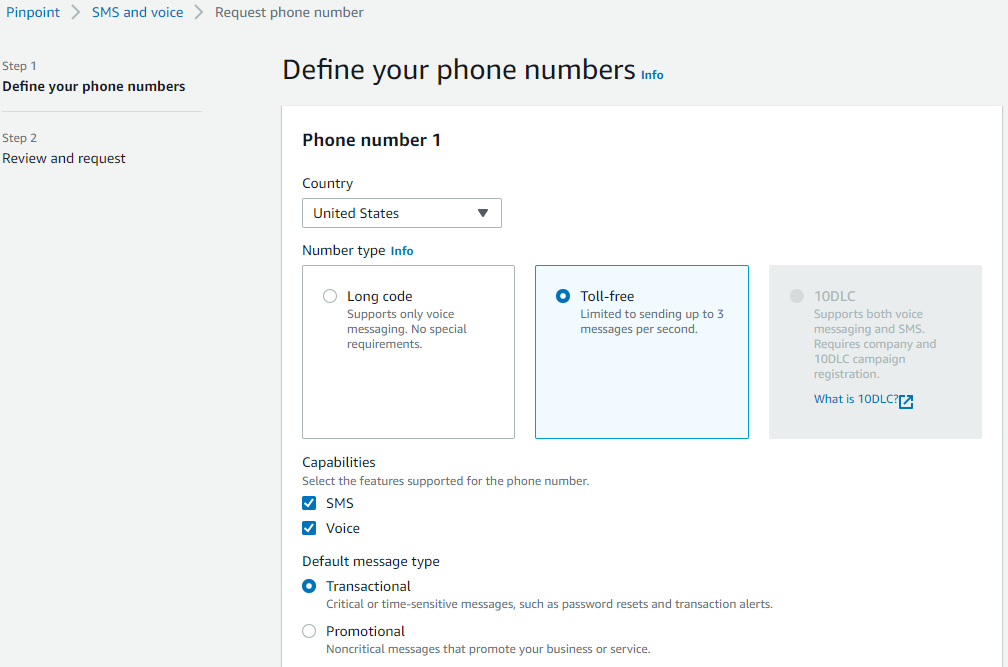\n\nThe Amazon Lex bot for this post has one intent, ```MakeAppointment```, which asks the user the series of questions in the preceding example to elicit the appointment type, date, time, name, and phone number of the customer.\n\n```AppointmentTypeValue ```is the only custom slot type for this bot and takes one of three values: Billing, General, or Offers. The Name, Phone, Date, and Time slots each use the built-in slot type provided by Amazon Lex.\n\n#### **Deploy the Amazon Lex bot**\n\nTo deploy the bot, first import the Amazon Lex bot (```AppointmentSchedulerLex.zip```) into your account.\n\n1. Sign in to the [Amazon Lex V2 console]().\n2. If this is your first time using Amazon Lex, you will be shown the Welcome page, choose **Create Bot**.\n3. When presented with the Create your bot page, scroll down to the bottom of the page, and select **Cancel. If** this is not your first-time using Amazon Lex, skip this step.\n4. Choose **Actions**, then **Import**.\n5. Enter **AppointmentSchedulerBotfor** the bot’s name then choose the .zip archive to import.\n6. Under IAM permissions, choose **Create a role with basic Amazon Lex permissions**.\n7. Under COPPA, choose **No**.\n8. Click **Import**.\n9. Open the bot by clicking on the bot’s name.\n10. Under **Deployment** on the left menu, click **Aliases**, select **TestBotAlias** and click **English (US)** under **Languages**. Choose the ```AppointmentScheduler ```Lambda function and click **Save**.\n\n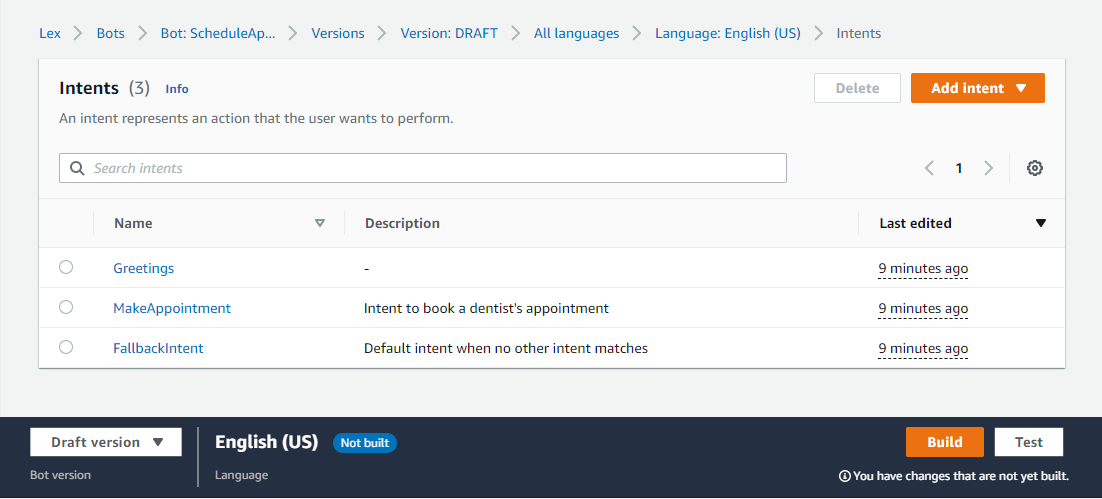\n\n11. Under Bot Versions on the left menu, select **Intents** and at the bottom right-hand side of the page, click **Build**.\n12. [Optional] Once the build has completed, click Test to **test** the bot using the window that appears on the right (click on the microphone icon to speak to your bot or type in the text box).\n\n#### **Set up an Amazon Connect Instance**\n\nTo set up your Amazon Connect instance and contact flows, you complete the following steps:\n\n1. Set up an Amazon Connect instance.\na. Go to the [Amazon Connect console](https://console.aws.amazon.com/connect/).\nb. If this is the first time you have been to the Amazon Connect console, you will see the Welcome page, choose **Get Started**.\nc. If this is not the first time you are using Amazon Connect, click **Add** an instance.\nd. For **Identity management**, select **Store users in Amazon Connect**.\ne. For **Access URL**, type a unique name for your instance, for example, ```AppointmentSchedulerDemo```, then choose **Next**.\nf. On the **Add administrator** page, add a new administrator account for Amazon Connect. Use this account to log in to your instance later using the unique access URL. Click **Next step**.\ng. On the next two pages – **Telephony Options and Data storage** – accept the default settings and choose **Next step**.\nh. On the **Review and Create** page, choose **Create instance**.\n\n2. Add the Amazon Lex bots to your newly created Amazon Connect instance.\na. Select the Instance Alias of the instance you just created.\nb. Choose **Contact flows**.\nc. Under Amazon Lex, use the drop-down to select the ```\nAppointmentSchedulerBot ```and the default alias.\n\n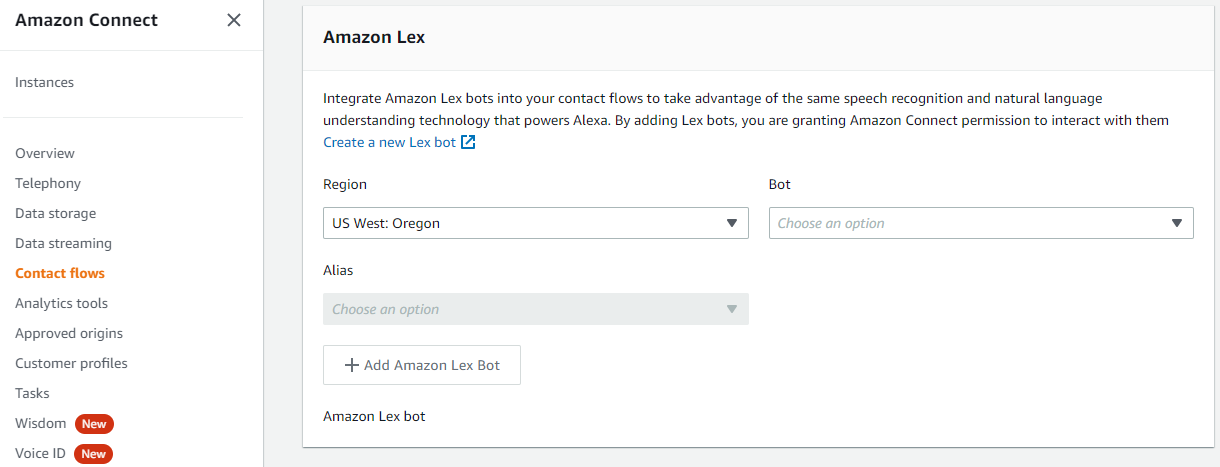\n\nd. Choose + **Add Amazon Lex Bot**. If the name of your bot does not appear in the list, reload the page.\n\n3. Log in to the instance and claim a phone number\na. Click on the Login URL for your Connect Instance.\nb. Enter the Administrator credentials you entered upon creation of the instance. This will open the Connect Console.\nc. From the Dashboard, under Explore your channels of communication select View phone numbers on the right.\nd. Click Claim a number.\ne. Choose a Country and leave the default type of DID (Direct Inward Dialing), choose a Phone Number from the dropdown list, and click Next.\n\n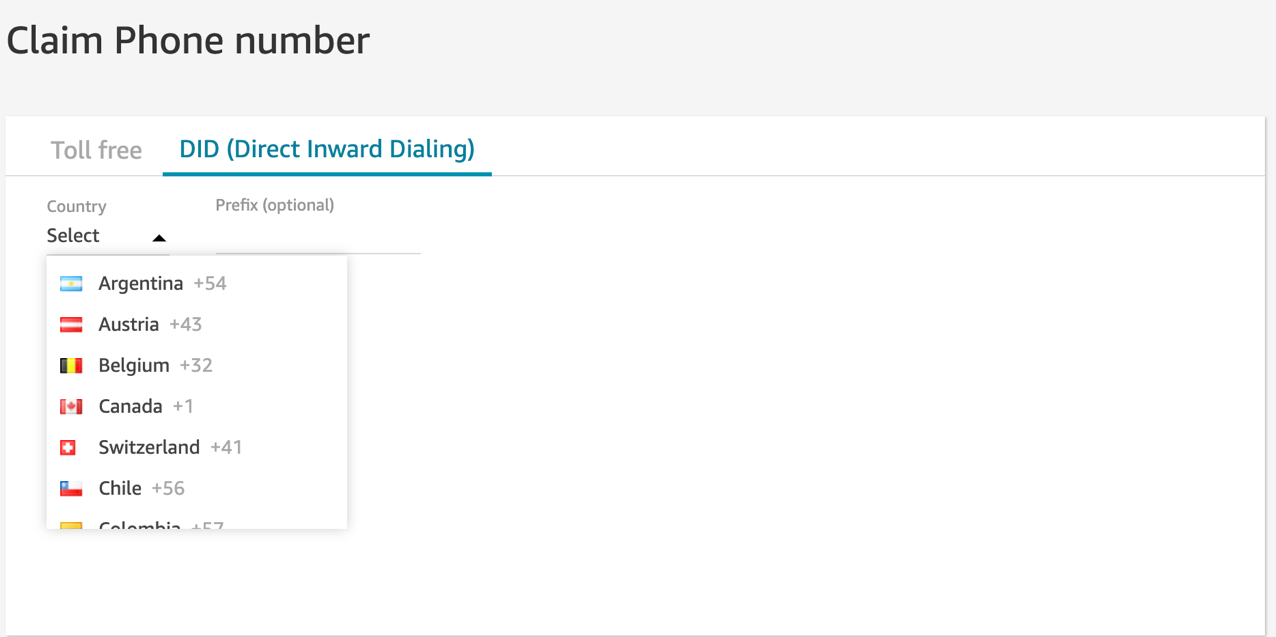\n\nf. Click **Save**.\n4. Add the ```OutboundQueue```\na. From the navigation menu on the left, choose **Queues** from the Routing menu.\nb. Click **Add New Queue**.\nc. Name the Queue ```OutboundQueue```\n, use the dropdown to set the Hours of operation to Basic Hours and use the dropdown for Outbound caller ID number to select the phone number you claimed earlier.\n\n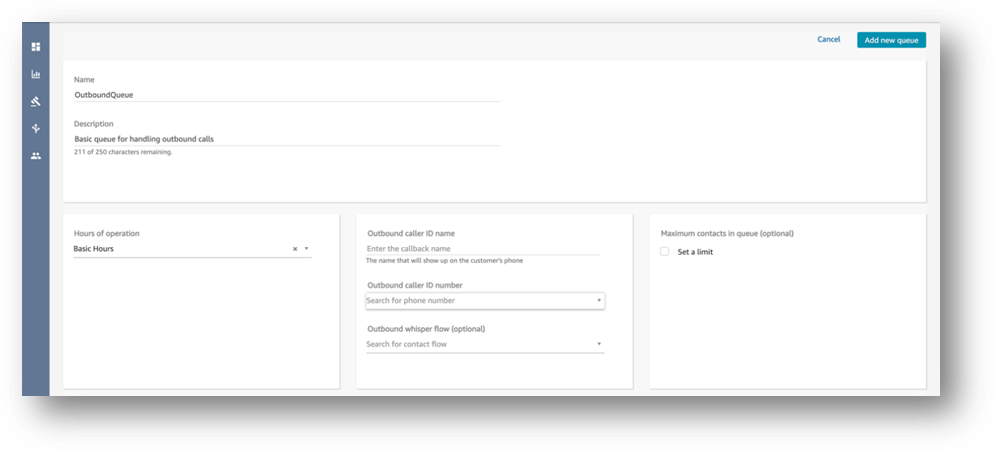\n\nd. Click **Add new queue**.\ne. From the navigation menu on the left, choose **Routing Profiles** from the **Users** menu.\nf. Click **Basic Routing Profile**. Under **Routing profile queues**, add OutboundQueue and click **Save**.\n\n5. Add the phone number to ```BasicQueue```a. From the navigation menu on the left, choose **Queues** from the Routing menu.\nb. Click on ```BasicQueue```.\nc. In the Outbound caller ID number field, add the phone number that you claimed earlier.\nd. Click **Save** on the top right corner.\n6. Import the ```InboundCall```contact flow\na. From the navigation menu on the left, choose **Contact Flows** from the Routing menu.\nb. Choose **Create contact flow**.\nc. On the right-hand side of the page, click on the **down arrow** and click **Import flow (beta)**.\nd. Find the **InboundCall **file and choose **Import**.\n\n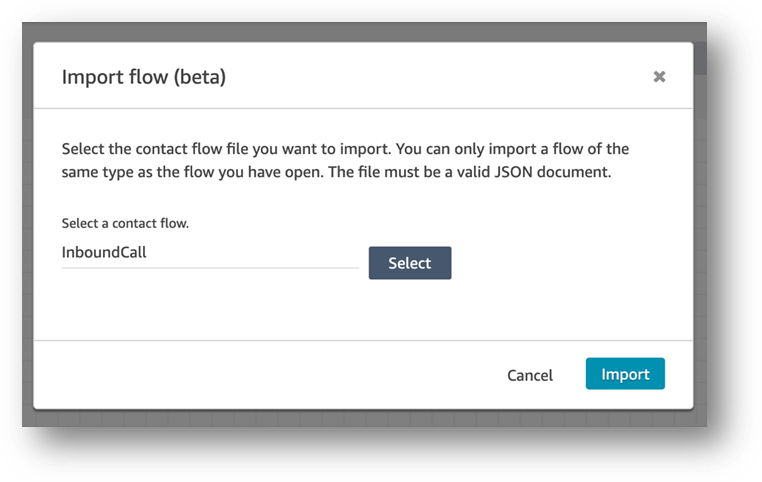\n\ne. Click **Publish**.\n7. Then, associate this flow with the phone number.\na. From the navigation menu on the left, choose Phone Numbers from the Routing menu.\nb. Choose the phone number we created earlier.\nc. Under the Contact flow/IVR section, select the InboundCall flow.\n\n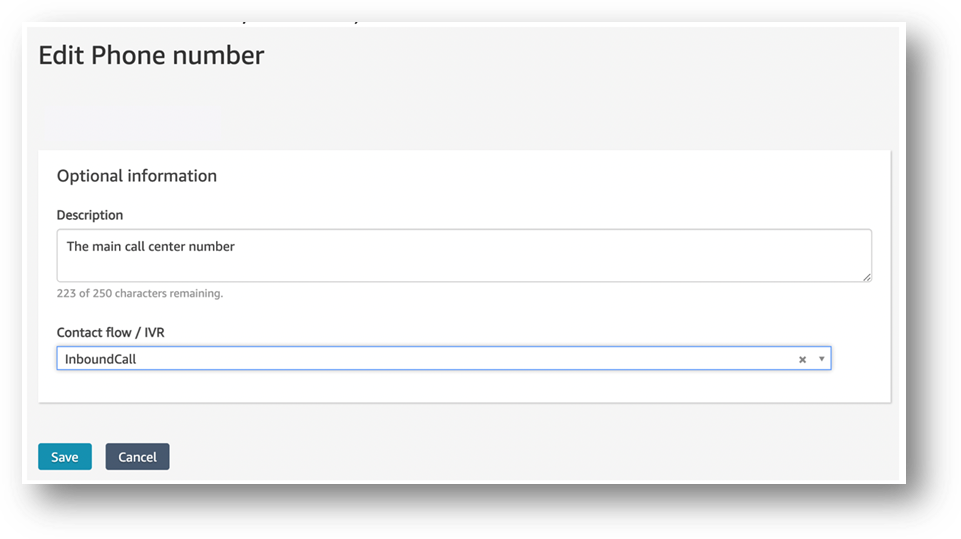\n\nd. Click **Save**.\n8. Import the ```AgentWhisper```, ```CustomerWaiting```, and ```OutboundCall ```contact flows\na. From the left navigation menu, choose **Contact Flows** under **Routing**.\nb. Click **Create Agent Whisper flow**.\n\n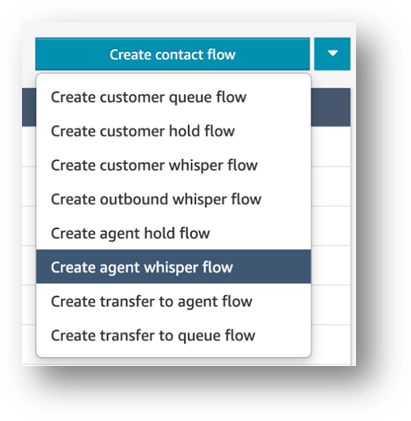\n\nc. On the right-hand side of the page, click on the down arrow and click **Import flow (beta)**.\nd. Find the AgentWhisper file and choose **Import**.\ne. Click **Publish**.\nf. Navigate back to the **Contact Flow**s list and click the down arrow next to **Create contact flow**.\ng. Click Create **Customer Queue Flow**.\n\n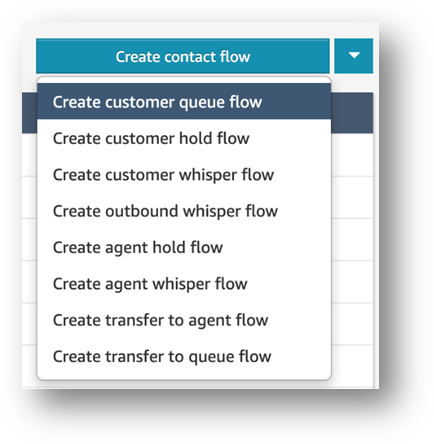\n\nh. On the right-hand side of the page, click on the down arrow and click Import flow (beta).\ni. Find the ```CustomerWaiting ```file and choose Import.\nj. Click Publish.\nk. Navigate back to the Contact Flows list and click the down arrow next to Create contact flow.\ni. Choose Create contact flow.\nm. On the right-hand side of the page, click on the down arrow and click Import flow (beta).\nn. Find the ```OutboundCall ```file from the GitHub repository you downloaded earlier and choose Import.\no. Click Publish.\n\n#### **Edit Lambda Functions:**\nGo to the [Lambda console](https://console.aws.amazon.com/lambda/).\nClick on the ```AppointmentScheduler ```function.\nClick on **Configuration** and **Environment Variables** from the left menu.\n\n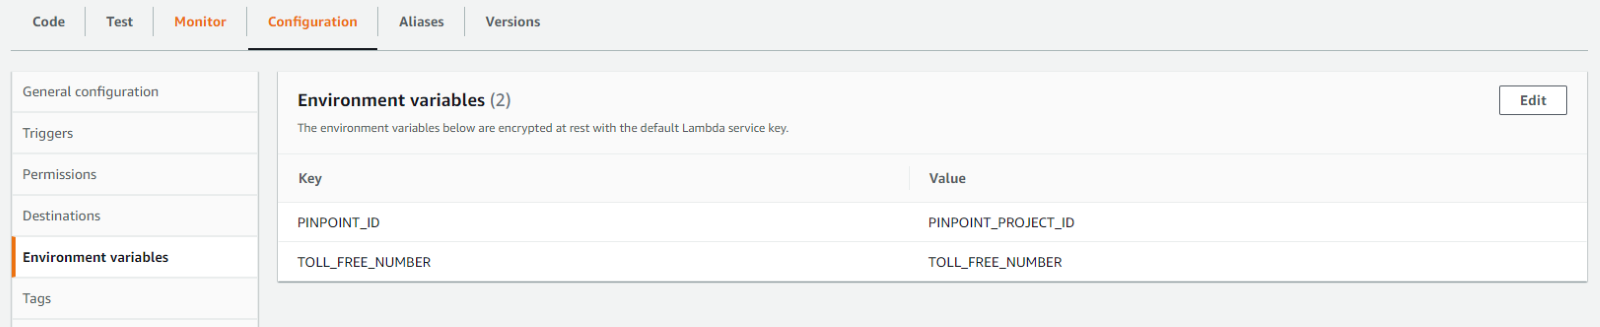\n\n4. Click **Edit**. Replace the Value with your Pinpoint **Project ID** and **Toll-free number**. Click **Save**.\n5. Return to the [Lambda console](https://console.aws.amazon.com/lambda/) and click on the ```AppointmentSchedulerOutboundContact ```function.\n6. Repeat step 3 and 4, replacing the values for ```CONTACT_FLOW```, ```INSTANCE_ID```and ```QUEUE_ID ```with the correct values. Click **Save** once done.\na. To find the contact flow ID, navigate to the ```OutboundCall```Contact Flow in the Amazon Connect Console and click on the arrow next to **Show additional flow information**. The contact flow ID is the last value after **contact-flow/**.\n\n\n\nb. To find the instance ID, navigate to the Amazon Connect Console and click on your instance Alias. The instance ID is the last value in the Instance ARN after **instance/**.\n\n\n\nc. To find the queue ID, navigate to the ```OutboundQueue ```in the Amazon Connect Console and click on the arrow next to **Show additional queue information**. The contact flow ID is the last value after **queue/**.\n\n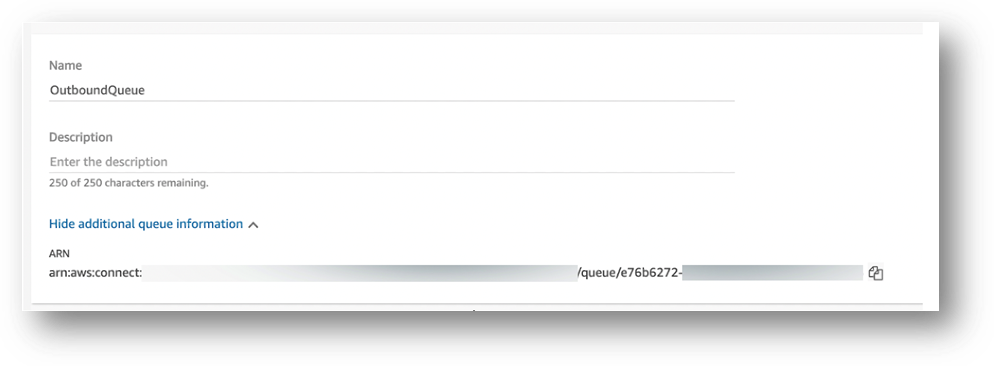\n\nThe Lex Bots and Amazon Connect Instance are now ready to go. Next, we will deploy the UI.\n\n#### **Edit API Gateway route:**\n\n1. Go to the [API Gateway console](https://console.aws.amazon.com/apigateway)\n2. Click the instance named **Appointments**\n3. Under the resources section, click the POST method belonging to the /outcall resource.\n4. Click **Integration Request**.\n5. Then click the edit icon next to the right of the Lambda Function field. Then click the checkmark icon that have appeared to the right of the text field.\n6. Click OK to add a permission to the Lambda function.\n\n#### **Deploy the UI:**\n\n1. Configure the UI before deployment\na. In your preferred code editor, open the ui folder from the downloaded code files.\nb. Replace **<your-api-ID> and <region>** with your API ID (accessible under the ID column of the [API Gateway Console](https://console.aws.amazon.com/apigateway/)) and the region of your deployed resources in the following lines: 103, 168, 310, 397, 438, 453.\n\n\n\nc. Replace **<your-instance-name**> with your Amazon Connect instance name on line 172 and 402.\n\n\n\nd. [Optional] add an app logo in the index.js file, line 331:\n\n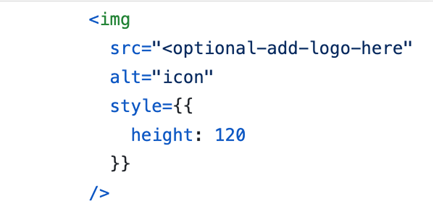\n\nIn the index.html file, line 5:\n\n\n\ne. In a terminal, navigate to the ui folder of the downloaded project.\nf. Run **npm install**. This will take a few minutes to complete.\ng. Run **npm run-script build**. This will generate a **build folder** in the ui directory.\n2. Add the code files to the S3 bucket:\na. Go to the [S3 Console](https://console.aws.amazon.com/s3/).\nb. Search for the bucket deployed with the CloudFormation Stack, **appointment-scheduler-website-<random_id>**.\nc. Drag and drop the contents of the **build folder** in the ui directory created in the last step into the bucket.\nd. Click **Upload**.\n\n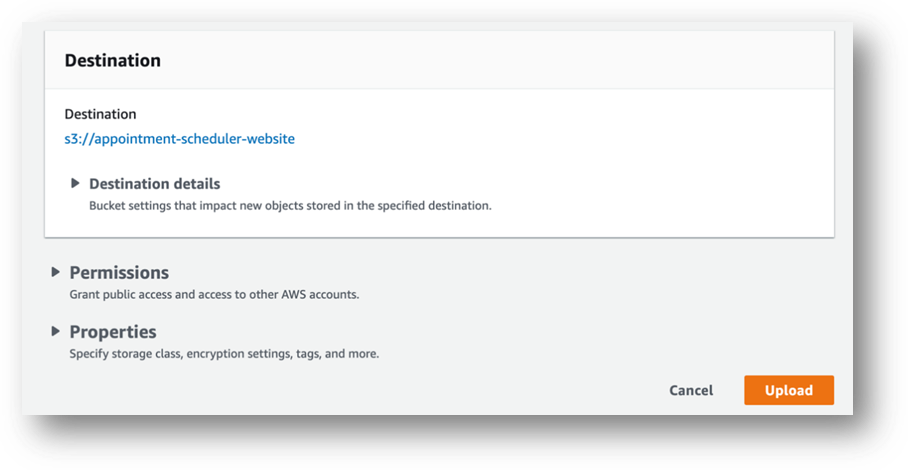\n\nYou should now be able to access the application from the CloudFront Distribution.\n\n3. Add the CloudFront Distribution as an approved origin.\na. Go to the Amazon Connect console.\nb. Select the Instance Alias of the instance to which to add the bot.\nc. Choose Approved origins.\nd. Click + Add origin and enter the URL of your CloudFront Distribution.\ne. Click Add.\n\n4. Now navigate to your CloudFront Distribution URL plus index.html. (e.g., ```https:// <DistributionDomainName>.cloudfront.net/index.html```)\n\n#### **Clean up**\n\nOne finished with this solution, make sure to clean up your AWS environment as to not incur unwanted charges.\n\n1. Go to the [S3 console](https://s3.console.aws.amazon.com/s3/home) empty your bucket created by the CloudFormation template (appointment-scheduler-website).\n2. Go to the [CloudFormation console](https://console.aws.amazon.com/cloudformation/), delete your stack. Ensure that all resources associated with this stack were deleted successfully.\n3. Go to the [Amazon Connect console](https://console.aws.amazon.com/connect/), delete your instance.\n4. Go to the [Amazon Lex console](https://console.aws.amazon.com/lex/), delete the bot you created.\n\n#### **Conclusion**\n\nFor this blog, [Accenture](https://aws.amazon.com/accentureaws/) and AWS collaborated to develop a machine learning solution that highlights the use of AWS services to build an automated appointment scheduler. This solution demonstrates how easy it is to build an appointment scheduling solution in AWS. Amazon Lex’s ability to support third-party messaging services such as Meta messenger extends the potential reach of the solution across multiple channels. Customer notification via SMS is implemented with minimal effort using Amazon Pinpoint. With Amazon Connect, an outbound dialer is seamlessly integrated with the calendar view web application enabling employees to immediately connect to customers with a simple click-to-call button.\n\nYou can accelerate innovation with the Accenture AWS Business Group (AABG). You can learn from the resources, technical expertise, and industry knowledge of two leading innovators, helping you accelerate the pace of innovation to deliver disruptive products and services. The AABG helps customers ideate and innovate cloud solutions for customers through rapid prototype development. Connect with our team a accentureaws@amazon.com to learn and accelerate how to use machine learning in your products and services.\n\n#### **About the Authors**\n\n\n\n**Sameer Goel** is a Sr. Solutions Architect in the Netherlands, who drives customer success by building prototypes on cutting-edge initiatives. Prior to joining AWS, Sameer graduated with a master’s degree from Boston, with a concentration in data science. He enjoys building and experimenting with AI/ML projects on Raspberry Pi.\n\n\n\n**Nick Vargas** is a Manager and Technology Architect at Accenture. He leads the project delivery for a rapid prototyping team within the Accenture AWS Business Group (AABG). He enjoys his morning walks with his dog Bingo, traveling, going to the beach, and hiking.\n\n\n\n**Anna Schreiber** is part of a prototyping team within Accenture’s AWS Business Group (AABG). As a Senior AWS Developer, she has worked on several high-profile proof of concepts that help bring the client’s vision to life. When not working, she enjoys cooking, crafting, and playing fetch with her corgi Gimli.\n\n\n","render":"<p>This blog post is co-written with Nick Vargas and Anna Schreiber from Accenture.</p>\n<p>Scheduling customer appointments is often a manual and labor-intensive process. You can utilize advances in self-service technology to automate appointment scheduling.</p>\n<p>In this blog post, we show you how to build a self-service appointment scheduling solution built with <a href=\"https://aws.amazon.com/lex/\" target=\"_blank\">Amazon Lex</a> and <a href=\"https://aws.amazon.com/connect/\" target=\"_blank\">Amazon Connect</a>. This solution allows users to create appointments via Meta Messenger, and receive appointment confirmations through an SMS mobile message. It also provides a web-based dashboard so you can provide call to users with single-click button at the scheduled time.</p>\n<p>Amazon Lex integrates with Meta messenger and can be used to enable chat conversations. Lex is a fully-managed artificial intelligence (AI) service with Natural language understanding (NLU) to design, build, test, and deploy conversational interfaces in applications.</p>\n<h4><a id=\"Solution_overview_8\"></a><strong>Solution overview</strong></h4>\n<p>The architecture diagram below shows a high-level overview of the interaction between different AWS components and services. The solution consists of these primary components: customer interaction using Meta messenger, appointment scheduling via SMS enabled by Lex and a customer outbound dialer from Connect. This outbound dialer makes it easy to create an outbound call to the customer from a simple UI interface.</p>\n<p><img src=\"https://dev-media.amazoncloud.cn/8192e5219ff24d3d8ea3d01611b86b2c_image.png\" alt=\"image.png\" /></p>\n<p>This post uses the following sample bot conversation:</p>\n<p><strong>User:</strong> I would like to book an appointment.<br />\n<strong>Agent:</strong> What appointment can I get you? You can say Billing, General or Offers.<br />\n<strong>User:</strong> Billing<br />\n<strong>Agent:</strong> What’s your first name?<br />\n<strong>User:</strong> Sameer<br />\n<strong>Agent:</strong> What is your phone number with country code?<br />\n<strong>User:</strong> +10001234567<br />\n<strong>Agent:</strong> When should I schedule your Billing appointment?<br />\n<strong>User:</strong> Next week Tuesday<br />\n<strong>Agent:</strong> At what time should I schedule the Billing appointment?<br />\n<strong>User:</strong> 9:00 am<br />\n<strong>Agent:</strong> Sameer, 09:00 is available, should I go ahead and book your appointment?<br />\n<strong>User:</strong> Yes<br />\n<strong>Agent:</strong> Thanks Sameer, your appointment is confirmed for 09:00, and we have texted the details to your phone number.</p>\n<p><img src=\"https://dev-media.amazoncloud.cn/ffe92bfd06f746468ae622665d812151_image.png\" alt=\"image.png\" /></p>\n<p>For the scheduler and customer notification component, an <a href=\"https://aws.amazon.com/lambda/\" target=\"_blank\">AWS Lambda</a> handler is used to process the scheduling request. The appointment information is then saved to a <a href=\"https://aws.amazon.com/dynamodb/\" target=\"_blank\">Amazon DynamoDB</a> database. When the information is saved successfully, a notification is sent to the customer confirming the appointment details via SMS using <a href=\"https://aws.amazon.com/pinpoint/\" target=\"_blank\">Amazon Pinpoint</a>.</p>\n<p><img src=\"https://dev-media.amazoncloud.cn/c002454f66a24b0693e14ca45a1d2e47_image.png\" alt=\"image.png\" /></p>\n<p>A React.js application is created to display the saved customer appointments from the database in a calendar view format. This makes it easy for employees to identify the customers who need to be called. A call button from the calendar entry is clicked to initiate the call. This will immediately place an outbound call request to connect the customer with the employee using Amazon Connect.</p>\n<p><img src=\"https://dev-media.amazoncloud.cn/1d833b37eb2c4aaba48c5dfd7f8842dc_image.png\" alt=\"image.png\" /></p>\n<h4><a id=\"Prerequisites_41\"></a><strong>Prerequisites</strong></h4>\n<p>For this project, you should have the following prerequisites:</p>\n<ul>\n<li>Downloaded the code files from the <a href=\"https://github.com/aws-samples/serverless-appointment-scheduler-amazon-connect\" target=\"_blank\">GitHub repository</a>.</li>\n<li>The repository contains:</li>\n<li>The React app files, located under the <strong>UI</strong></li>\n<li>The Amazon Connect Contact Flows, located under <strong>backend/connect/contact_flows</strong> There are four contact flows for this demo with files names <code>AgentWhisper</code>, <code>CustomerWaiting</code>, <code>InboundCall</code> and <code>OutboundCall</code>.</li>\n<li>A zip file for an Amazon Lex Bot, located in <strong>backend/lex</strong> directory with file name AppointmentSchedulerBot.zip.</li>\n<li>npm installed on your local machine. Refer <a href=\"https://docs.npmjs.com/downloading-and-installing-node-js-and-npm\" target=\"_blank\">how to install node.js and npm on your machine</a>,</li>\n</ul>\n<p>The deployment of this solution is automated where possible using CloudFormation, however, some configurations and steps in the deployment are manual.</p>\n<h4><a id=\"Deploy_the_solution_54\"></a><strong>Deploy the solution</strong></h4>\n<p>To set up the required infrastructure for the appointment scheduler demo app in your AWS account, complete the following steps:</p>\n<ol>\n<li>Sign in to the <a href=\"http://aws.amazon.com/console\" target=\"_blank\">AWS Management Console</a>.</li>\n<li>Choose <strong>Launch Stack</strong>:<br />\n<img src=\"https://dev-media.amazoncloud.cn/f4ef1a4474314bfeb8dc2998c57dfbaf_image.png\" alt=\"image.png\" /></li>\n<li>On the <strong>Create Stack</strong> page, under <strong>Specify template</strong>, choose <strong>Upload a template file</strong>.</li>\n<li>Choose the <code>AppointmentsSchedulerCFTemplate</code> file that you downloaded from GitHub.</li>\n<li>Choose <strong>Next</strong>.</li>\n<li>For <strong>Stack name</strong>, enter a unique name for the stack, such as <code>AppointmentSchedulerDemo</code>.</li>\n</ol>\n<p><img src=\"https://dev-media.amazoncloud.cn/99cead51c61046efbff27f00ecffa4e4_image.png\" alt=\"image.png\" /></p>\n<ol start=\"7\">\n<li>Choose <strong>Next</strong>, and then choose <strong>Next</strong> on the <strong>Configure stack options</strong> page.</li>\n<li>On the <strong>Review</strong> page, select <strong>I acknowledge that AWS CloudFormation might create IAM resources</strong> and choose <strong>Create</strong>.<br />\nThe stack generates the following resources:</li>\n</ol>\n<ul>\n<li>\n<p>The DynamoDB table <code>AppointmentSchedulerTable</code></p>\n</li>\n<li>\n<p>The Amazon Pinpoint app <code>AppointmentSchedulerPinpointApp</code></p>\n</li>\n<li>\n<p>Two <a href=\"http://aws.amazon.com/iam\" target=\"_blank\">AWS Identity and Access Management</a> (IAM) policies:</p>\n</li>\n<li>\n<p><code>AppointmentSchedulerPinpointPolicy</code></p>\n</li>\n<li>\n<p><code>AppointmentSchedulerDynamoApiPolicy</code></p>\n</li>\n<li>\n<p>Two IAM roles:</p>\n</li>\n<li>\n<p><code>AppointmentsLambdaRole</code></p>\n</li>\n<li>\n<p><code>OutboundContactLambdaRole</code></p>\n</li>\n<li>\n<p>Two Lambda functions:</p>\n</li>\n<li>\n<p><code>AppointmentScheduler</code></p>\n</li>\n<li>\n<p><code>AppointmentSchedulerOutboundContact</code></p>\n</li>\n<li>\n<p>The <a href=\"https://aws.amazon.com/api-gateway\" target=\"_blank\">Amazon API Gateway</a> instance Appointments</p>\n</li>\n<li>\n<p><a href=\"https://aws.amazon.com/cloudfront/\" target=\"_blank\">Amazon CloudFront</a> distribution</p>\n</li>\n<li>\n<p>The <a href=\"http://aws.amazon.com/s3\" target=\"_blank\">Amazon Simple Storage Service</a> (Amazon S3) bucket <code>appointment-scheduler-website</code></p>\n</li>\n</ul>\n<h4><a id=\"Configure_the_Amazon_Pinpoint_app_93\"></a><strong>Configure the Amazon Pinpoint app</strong></h4>\n<p>To configure the Amazon Pinpoint app, complete the following steps:</p>\n<ol>\n<li>Go to the <a href=\"https://console.aws.amazon.com/pinpoint/\" target=\"_blank\">Pinpoint console</a>.</li>\n<li>Navigate to the <strong>AppointmentSchedulerPinpointAp</strong>p deployed in above.</li>\n<li>On the left menu under <strong>Settings</strong> click <strong>SMS and Voice</strong>.</li>\n<li>Under Number settings click <strong>Request Phone Number</strong>.</li>\n<li>Select your country of origin, choose <strong>Toll-free</strong>, and click <strong>Next</strong>, then <strong>Request</strong>.</li>\n</ol>\n<p><img src=\"https://dev-media.amazoncloud.cn/ea2eff05ee94458694bcfd9716c2f68f_image.png\" alt=\"image.png\" /></p>\n<p>The Amazon Lex bot for this post has one intent, <code>MakeAppointment</code>, which asks the user the series of questions in the preceding example to elicit the appointment type, date, time, name, and phone number of the customer.</p>\n<p><code>AppointmentTypeValue </code>is the only custom slot type for this bot and takes one of three values: Billing, General, or Offers. The Name, Phone, Date, and Time slots each use the built-in slot type provided by Amazon Lex.</p>\n<h4><a id=\"Deploy_the_Amazon_Lex_bot_109\"></a><strong>Deploy the Amazon Lex bot</strong></h4>\n<p>To deploy the bot, first import the Amazon Lex bot (<code>AppointmentSchedulerLex.zip</code>) into your account.</p>\n<ol>\n<li>Sign in to the <a href=\"\" target=\"_blank\">Amazon Lex V2 console</a>.</li>\n<li>If this is your first time using Amazon Lex, you will be shown the Welcome page, choose <strong>Create Bot</strong>.</li>\n<li>When presented with the Create your bot page, scroll down to the bottom of the page, and select <strong>Cancel. If</strong> this is not your first-time using Amazon Lex, skip this step.</li>\n<li>Choose <strong>Actions</strong>, then <strong>Import</strong>.</li>\n<li>Enter <strong>AppointmentSchedulerBotfor</strong> the bot’s name then choose the .zip archive to import.</li>\n<li>Under IAM permissions, choose <strong>Create a role with basic Amazon Lex permissions</strong>.</li>\n<li>Under COPPA, choose <strong>No</strong>.</li>\n<li>Click <strong>Import</strong>.</li>\n<li>Open the bot by clicking on the bot’s name.</li>\n<li>Under <strong>Deployment</strong> on the left menu, click <strong>Aliases</strong>, select <strong>TestBotAlias</strong> and click <strong>English (US)</strong> under <strong>Languages</strong>. Choose the <code>AppointmentScheduler </code>Lambda function and click <strong>Save</strong>.</li>\n</ol>\n<p><img src=\"https://dev-media.amazoncloud.cn/1de78b208ed1406c871d6e33bb4842b4_image.png\" alt=\"image.png\" /></p>\n<ol start=\"11\">\n<li>Under Bot Versions on the left menu, select <strong>Intents</strong> and at the bottom right-hand side of the page, click <strong>Build</strong>.</li>\n<li>[Optional] Once the build has completed, click Test to <strong>test</strong> the bot using the window that appears on the right (click on the microphone icon to speak to your bot or type in the text box).</li>\n</ol>\n<h4><a id=\"Set_up_an_Amazon_Connect_Instance_129\"></a><strong>Set up an Amazon Connect Instance</strong></h4>\n<p>To set up your Amazon Connect instance and contact flows, you complete the following steps:</p>\n<ol>\n<li>\n<p>Set up an Amazon Connect instance.<br />\na. Go to the <a href=\"https://console.aws.amazon.com/connect/\" target=\"_blank\">Amazon Connect console</a>.<br />\nb. If this is the first time you have been to the Amazon Connect console, you will see the Welcome page, choose <strong>Get Started</strong>.<br />\nc. If this is not the first time you are using Amazon Connect, click <strong>Add</strong> an instance.<br />\nd. For <strong>Identity management</strong>, select <strong>Store users in Amazon Connect</strong>.<br />\ne. For <strong>Access URL</strong>, type a unique name for your instance, for example, <code>AppointmentSchedulerDemo</code>, then choose <strong>Next</strong>.<br />\nf. On the <strong>Add administrator</strong> page, add a new administrator account for Amazon Connect. Use this account to log in to your instance later using the unique access URL. Click <strong>Next step</strong>.<br />\ng. On the next two pages – <strong>Telephony Options and Data storage</strong> – accept the default settings and choose <strong>Next step</strong>.<br />\nh. On the <strong>Review and Create</strong> page, choose <strong>Create instance</strong>.</p>\n</li>\n<li>\n<p>Add the Amazon Lex bots to your newly created Amazon Connect instance.<br />\na. Select the Instance Alias of the instance you just created.<br />\nb. Choose <strong>Contact flows</strong>.<br />\nc. Under Amazon Lex, use the drop-down to select the <code>AppointmentSchedulerBot</code>and the default alias.</p>\n</li>\n</ol>\n<p><img src=\"https://dev-media.amazoncloud.cn/4da62bfae7ef44928cf15649a924a52a_image.png\" alt=\"image.png\" /></p>\n<p>d. Choose + <strong>Add Amazon Lex Bot</strong>. If the name of your bot does not appear in the list, reload the page.</p>\n<ol start=\"3\">\n<li>Log in to the instance and claim a phone number<br />\na. Click on the Login URL for your Connect Instance.<br />\nb. Enter the Administrator credentials you entered upon creation of the instance. This will open the Connect Console.<br />\nc. From the Dashboard, under Explore your channels of communication select View phone numbers on the right.<br />\nd. Click Claim a number.<br />\ne. Choose a Country and leave the default type of DID (Direct Inward Dialing), choose a Phone Number from the dropdown list, and click Next.</li>\n</ol>\n<p><img src=\"https://dev-media.amazoncloud.cn/e2d8f755b918476f8f5b4dac565c0b8a_image.png\" alt=\"image.png\" /></p>\n<p>f. Click <strong>Save</strong>.<br />\n4. Add the <code>OutboundQueue</code><br />\na. From the navigation menu on the left, choose <strong>Queues</strong> from the Routing menu.<br />\nb. Click <strong>Add New Queue</strong>.<br />\nc. Name the Queue <code>OutboundQueue</code><br />\n, use the dropdown to set the Hours of operation to Basic Hours and use the dropdown for Outbound caller ID number to select the phone number you claimed earlier.</p>\n<p><img src=\"https://dev-media.amazoncloud.cn/e3391e0b32584a6391dcf86e236d37f4_image.png\" alt=\"image.png\" /></p>\n<p>d. Click <strong>Add new queue</strong>.<br />\ne. From the navigation menu on the left, choose <strong>Routing Profiles</strong> from the <strong>Users</strong> menu.<br />\nf. Click <strong>Basic Routing Profile</strong>. Under <strong>Routing profile queues</strong>, add OutboundQueue and click <strong>Save</strong>.</p>\n<ol start=\"5\">\n<li>Add the phone number to <code>BasicQueue</code>a. From the navigation menu on the left, choose <strong>Queues</strong> from the Routing menu.<br />\nb. Click on <code>BasicQueue</code>.<br />\nc. In the Outbound caller ID number field, add the phone number that you claimed earlier.<br />\nd. Click <strong>Save</strong> on the top right corner.</li>\n<li>Import the <code>InboundCall</code>contact flow<br />\na. From the navigation menu on the left, choose <strong>Contact Flows</strong> from the Routing menu.<br />\nb. Choose <strong>Create contact flow</strong>.<br />\nc. On the right-hand side of the page, click on the <strong>down arrow</strong> and click <strong>Import flow (beta)</strong>.<br />\nd. Find the **InboundCall **file and choose <strong>Import</strong>.</li>\n</ol>\n<p><img src=\"https://dev-media.amazoncloud.cn/0b74dd518b7342ac8955868862c00a81_image.png\" alt=\"image.png\" /></p>\n<p>e. Click <strong>Publish</strong>.<br />\n7. Then, associate this flow with the phone number.<br />\na. From the navigation menu on the left, choose Phone Numbers from the Routing menu.<br />\nb. Choose the phone number we created earlier.<br />\nc. Under the Contact flow/IVR section, select the InboundCall flow.</p>\n<p><img src=\"https://dev-media.amazoncloud.cn/2229bb60eb894473a37ef786d83f985b_image.png\" alt=\"image.png\" /></p>\n<p>d. Click <strong>Save</strong>.<br />\n8. Import the <code>AgentWhisper</code>, <code>CustomerWaiting</code>, and <code>OutboundCall </code>contact flows<br />\na. From the left navigation menu, choose <strong>Contact Flows</strong> under <strong>Routing</strong>.<br />\nb. Click <strong>Create Agent Whisper flow</strong>.</p>\n<p><img src=\"https://dev-media.amazoncloud.cn/08d91d24fb2d46b099494af71b5a6f58_image.png\" alt=\"image.png\" /></p>\n<p>c. On the right-hand side of the page, click on the down arrow and click <strong>Import flow (beta)</strong>.<br />\nd. Find the AgentWhisper file and choose <strong>Import</strong>.<br />\ne. Click <strong>Publish</strong>.<br />\nf. Navigate back to the <strong>Contact Flow</strong>s list and click the down arrow next to <strong>Create contact flow</strong>.<br />\ng. Click Create <strong>Customer Queue Flow</strong>.</p>\n<p><img src=\"https://dev-media.amazoncloud.cn/99abff955ef140598e55f8a3fb95f7c2_image.png\" alt=\"image.png\" /></p>\n<p>h. On the right-hand side of the page, click on the down arrow and click Import flow (beta).<br />\ni. Find the <code>CustomerWaiting </code>file and choose Import.<br />\nj. Click Publish.<br />\nk. Navigate back to the Contact Flows list and click the down arrow next to Create contact flow.<br />\ni. Choose Create contact flow.<br />\nm. On the right-hand side of the page, click on the down arrow and click Import flow (beta).<br />\nn. Find the <code>OutboundCall </code>file from the GitHub repository you downloaded earlier and choose Import.<br />\no. Click Publish.</p>\n<h4><a id=\"Edit_Lambda_Functions_219\"></a><strong>Edit Lambda Functions:</strong></h4>\n<p>Go to the <a href=\"https://console.aws.amazon.com/lambda/\" target=\"_blank\">Lambda console</a>.<br />\nClick on the <code>AppointmentScheduler </code>function.<br />\nClick on <strong>Configuration</strong> and <strong>Environment Variables</strong> from the left menu.</p>\n<p><img src=\"https://dev-media.amazoncloud.cn/ac0b4ac1a9a34d5fa53e34d4690ffc59_image.png\" alt=\"image.png\" /></p>\n<ol start=\"4\">\n<li>Click <strong>Edit</strong>. Replace the Value with your Pinpoint <strong>Project ID</strong> and <strong>Toll-free number</strong>. Click <strong>Save</strong>.</li>\n<li>Return to the <a href=\"https://console.aws.amazon.com/lambda/\" target=\"_blank\">Lambda console</a> and click on the <code>AppointmentSchedulerOutboundContact </code>function.</li>\n<li>Repeat step 3 and 4, replacing the values for <code>CONTACT_FLOW</code>, <code>INSTANCE_ID</code>and <code>QUEUE_ID </code>with the correct values. Click <strong>Save</strong> once done.<br />\na. To find the contact flow ID, navigate to the <code>OutboundCall</code>Contact Flow in the Amazon Connect Console and click on the arrow next to <strong>Show additional flow information</strong>. The contact flow ID is the last value after <strong>contact-flow/</strong>.</li>\n</ol>\n<p><img src=\"https://dev-media.amazoncloud.cn/a481eed215804d5fb47d8e46f5227114_image.png\" alt=\"image.png\" /></p>\n<p>b. To find the instance ID, navigate to the Amazon Connect Console and click on your instance Alias. The instance ID is the last value in the Instance ARN after <strong>instance/</strong>.</p>\n<p><img src=\"https://dev-media.amazoncloud.cn/0c1e29321c384f54be59de753f2e28aa_image.png\" alt=\"image.png\" /></p>\n<p>c. To find the queue ID, navigate to the <code>OutboundQueue </code>in the Amazon Connect Console and click on the arrow next to <strong>Show additional queue information</strong>. The contact flow ID is the last value after <strong>queue/</strong>.</p>\n<p><img src=\"https://dev-media.amazoncloud.cn/367ad251fb8c473b8bf5a1ae2e7b2002_image.png\" alt=\"image.png\" /></p>\n<p>The Lex Bots and Amazon Connect Instance are now ready to go. Next, we will deploy the UI.</p>\n<h4><a id=\"Edit_API_Gateway_route_243\"></a><strong>Edit API Gateway route:</strong></h4>\n<ol>\n<li>Go to the <a href=\"https://console.aws.amazon.com/apigateway\" target=\"_blank\">API Gateway console</a></li>\n<li>Click the instance named <strong>Appointments</strong></li>\n<li>Under the resources section, click the POST method belonging to the /outcall resource.</li>\n<li>Click <strong>Integration Request</strong>.</li>\n<li>Then click the edit icon next to the right of the Lambda Function field. Then click the checkmark icon that have appeared to the right of the text field.</li>\n<li>Click OK to add a permission to the Lambda function.</li>\n</ol>\n<h4><a id=\"Deploy_the_UI_252\"></a><strong>Deploy the UI:</strong></h4>\n<ol>\n<li>Configure the UI before deployment<br />\na. In your preferred code editor, open the ui folder from the downloaded code files.<br />\nb. Replace <strong><your-api-ID> and <region></strong> with your API ID (accessible under the ID column of the <a href=\"https://console.aws.amazon.com/apigateway/\" target=\"_blank\">API Gateway Console</a>) and the region of your deployed resources in the following lines: 103, 168, 310, 397, 438, 453.</li>\n</ol>\n<p><img src=\"https://dev-media.amazoncloud.cn/27e1b96db94e4af29323892c553122d9_image.png\" alt=\"image.png\" /></p>\n<p>c. Replace <strong><your-instance-name</strong>> with your Amazon Connect instance name on line 172 and 402.</p>\n<p><img src=\"https://dev-media.amazoncloud.cn/b1d825f2aec84e8db161e1669950b900_image.png\" alt=\"image.png\" /></p>\n<p>d. [Optional] add an app logo in the index.js file, line 331:</p>\n<p><img src=\"https://dev-media.amazoncloud.cn/2f0dffd386e34d949bc849c6b527ee3f_image.png\" alt=\"image.png\" /></p>\n<p>In the index.html file, line 5:</p>\n<p><img src=\"https://dev-media.amazoncloud.cn/596edfc0648c4da8bfca39a41c8f7004_image.png\" alt=\"image.png\" /></p>\n<p>e. In a terminal, navigate to the ui folder of the downloaded project.<br />\nf. Run <strong>npm install</strong>. This will take a few minutes to complete.<br />\ng. Run <strong>npm run-script build</strong>. This will generate a <strong>build folder</strong> in the ui directory.<br />\n2. Add the code files to the S3 bucket:<br />\na. Go to the <a href=\"https://console.aws.amazon.com/s3/\" target=\"_blank\">S3 Console</a>.<br />\nb. Search for the bucket deployed with the CloudFormation Stack, <strong>appointment-scheduler-website-<random_id></strong>.<br />\nc. Drag and drop the contents of the <strong>build folder</strong> in the ui directory created in the last step into the bucket.<br />\nd. Click <strong>Upload</strong>.</p>\n<p><img src=\"https://dev-media.amazoncloud.cn/d585eba3153e443a969e0b33f5a2dbd0_image.png\" alt=\"image.png\" /></p>\n<p>You should now be able to access the application from the CloudFront Distribution.</p>\n<ol start=\"3\">\n<li>\n<p>Add the CloudFront Distribution as an approved origin.<br />\na. Go to the Amazon Connect console.<br />\nb. Select the Instance Alias of the instance to which to add the bot.<br />\nc. Choose Approved origins.<br />\nd. Click + Add origin and enter the URL of your CloudFront Distribution.<br />\ne. Click Add.</p>\n</li>\n<li>\n<p>Now navigate to your CloudFront Distribution URL plus index.html. (e.g., <code>https:// <DistributionDomainName>.cloudfront.net/index.html</code>)</p>\n</li>\n</ol>\n<h4><a id=\"Clean_up_294\"></a><strong>Clean up</strong></h4>\n<p>One finished with this solution, make sure to clean up your AWS environment as to not incur unwanted charges.</p>\n<ol>\n<li>Go to the <a href=\"https://s3.console.aws.amazon.com/s3/home\" target=\"_blank\">S3 console</a> empty your bucket created by the CloudFormation template (appointment-scheduler-website).</li>\n<li>Go to the <a href=\"https://console.aws.amazon.com/cloudformation/\" target=\"_blank\">CloudFormation console</a>, delete your stack. Ensure that all resources associated with this stack were deleted successfully.</li>\n<li>Go to the <a href=\"https://console.aws.amazon.com/connect/\" target=\"_blank\">Amazon Connect console</a>, delete your instance.</li>\n<li>Go to the <a href=\"https://console.aws.amazon.com/lex/\" target=\"_blank\">Amazon Lex console</a>, delete the bot you created.</li>\n</ol>\n<h4><a id=\"Conclusion_303\"></a><strong>Conclusion</strong></h4>\n<p>For this blog, <a href=\"https://aws.amazon.com/accentureaws/\" target=\"_blank\">Accenture</a> and AWS collaborated to develop a machine learning solution that highlights the use of AWS services to build an automated appointment scheduler. This solution demonstrates how easy it is to build an appointment scheduling solution in AWS. Amazon Lex’s ability to support third-party messaging services such as Meta messenger extends the potential reach of the solution across multiple channels. Customer notification via SMS is implemented with minimal effort using Amazon Pinpoint. With Amazon Connect, an outbound dialer is seamlessly integrated with the calendar view web application enabling employees to immediately connect to customers with a simple click-to-call button.</p>\n<p>You can accelerate innovation with the Accenture AWS Business Group (AABG). You can learn from the resources, technical expertise, and industry knowledge of two leading innovators, helping you accelerate the pace of innovation to deliver disruptive products and services. The AABG helps customers ideate and innovate cloud solutions for customers through rapid prototype development. Connect with our team a accentureaws@amazon.com to learn and accelerate how to use machine learning in your products and services.</p>\n<h4><a id=\"About_the_Authors_309\"></a><strong>About the Authors</strong></h4>\n<p><img src=\"https://dev-media.amazoncloud.cn/47d7a9d058bc4aa2b87e14a68e1c4bb3_image.png\" alt=\"image.png\" /></p>\n<p><strong>Sameer Goel</strong> is a Sr. Solutions Architect in the Netherlands, who drives customer success by building prototypes on cutting-edge initiatives. Prior to joining AWS, Sameer graduated with a master’s degree from Boston, with a concentration in data science. He enjoys building and experimenting with AI/ML projects on Raspberry Pi.</p>\n<p><img src=\"https://dev-media.amazoncloud.cn/3d09527dcec841e291001aaa6c90523c_image.png\" alt=\"image.png\" /></p>\n<p><strong>Nick Vargas</strong> is a Manager and Technology Architect at Accenture. He leads the project delivery for a rapid prototyping team within the Accenture AWS Business Group (AABG). He enjoys his morning walks with his dog Bingo, traveling, going to the beach, and hiking.</p>\n<p><img src=\"https://dev-media.amazoncloud.cn/6c1ece3eab2f470ea204e8e99736c164_image.png\" alt=\"image.png\" /></p>\n<p><strong>Anna Schreiber</strong> is part of a prototyping team within Accenture’s AWS Business Group (AABG). As a Senior AWS Developer, she has worked on several high-profile proof of concepts that help bring the client’s vision to life. When not working, she enjoys cooking, crafting, and playing fetch with her corgi Gimli.</p>\n"}
Build an appointment scheduler interface integrated with Meta using Amazon Lex and Amazon Connect
海外精选

海外精选的内容汇集了全球优质的亚马逊云科技相关技术内容。同时,内容中提到的“AWS”
是 “Amazon Web Services” 的缩写,在此网站不作为商标展示。

 0
0 0
0亚马逊云科技解决方案 基于行业客户应用场景及技术领域的解决方案
联系亚马逊云科技专家
亚马逊云科技解决方案
基于行业客户应用场景及技术领域的解决方案
联系专家

0
目录

 分享
分享 点赞
点赞 收藏
收藏 目录
目录立即注册,开启您的免费套餐
立即关注

亚马逊云开发者
公众号

User Group
公众号

亚马逊云科技
官方小程序
“AWS” 是 “Amazon Web Services” 的缩写,在此网站不作为商标展示。
立即关注
亚马逊云开发者
公众号
User Group
公众号
亚马逊云科技
官方小程序
“AWS” 是 “Amazon Web Services” 的缩写,在此网站不作为商标展示。
关于我们 
更多资源
开发者工具
更多支持
立即关注
亚马逊云开发者
公众号
User Group
公众号
亚马逊云科技
官方小程序
“AWS” 是 “Amazon Web Services” 的缩写,在此网站不作为商标展示。
