{"value":"In computer vision, semantic segmentation is the task of classifying every pixel in an image with a class from a known set of labels such that pixels with the same label share certain characteristics. It generates a segmentation mask of the input images. For example, the following images show a segmentation mask of the ```cat``` label.\n\n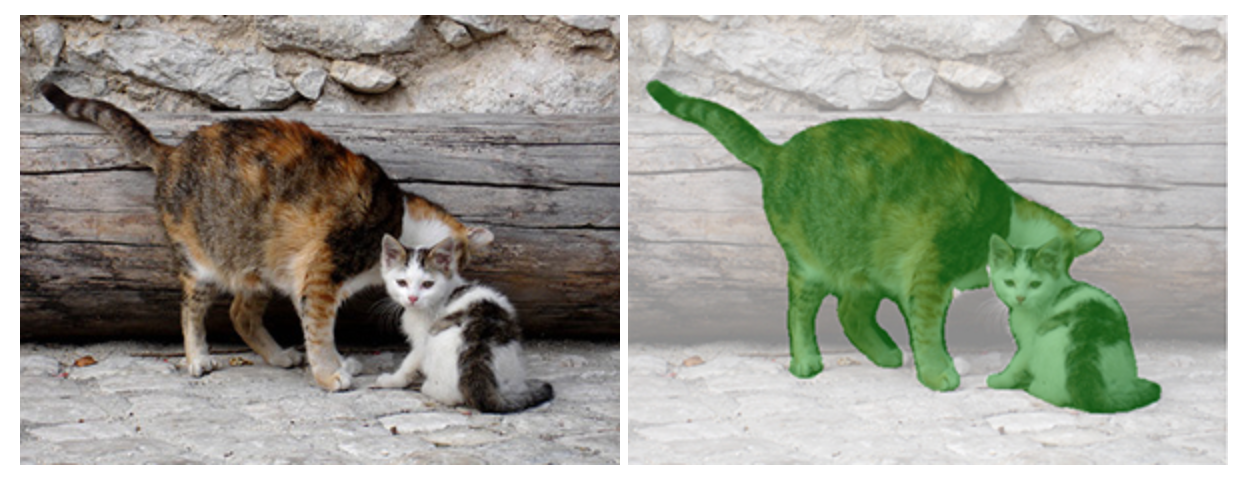\n\t\nIn November 2018, [Amazon SageMaker](https://aws.amazon.com/sagemaker/) announced the launch of the SageMaker semantic segmentation algorithm. With this algorithm, you can train your models with a public dataset or your own dataset. Popular image segmentation datasets include the Common Objects in Context (COCO) dataset and PASCAL Visual Object Classes (PASCAL VOC), but the classes of their labels are limited and you may want to train a model on target objects that aren’t included in the public datasets. In this case, you can use [Amazon SageMaker Ground Truth](https://aws.amazon.com/sagemaker/groundtruth/) to label your own dataset.\n\nIn this post, I demonstrate the following solutions:\n\n- Using Ground Truth to label a semantic segmentation dataset\n- Transforming the results from Ground Truth to the required input format for the SageMaker built-in semantic segmentation algorithm\n- Using the semantic segmentation algorithm to train a model and perform inference\n \n#### **Semantic segmentation data labeling**\n\nTo build a machine learning model for semantic segmentation, we need to label a dataset at the pixel level. Ground Truth gives you the option to use human annotators through [Amazon Mechanical Turk](https://www.mturk.com/), third-party vendors, or your own private workforce. To learn more about workforces, refer to [Create and Manage Workforces](https://docs.aws.amazon.com/sagemaker/latest/dg/sms-workforce-management.html). If you don’t want to manage the labeling workforce on your own, [Amazon SageMaker Ground Truth Plus](https://aws.amazon.com/about-aws/whats-new/2021/12/amazon-sagemaker-ground-truth-plus/) is another great option as a new turnkey data labeling service that enables you to create high-quality training datasets quickly and reduces costs by up to 40%. For this post, I show you how to manually label the dataset with the Ground Truth auto-segment feature and crowdsource labeling with a Mechanical Turk workforce.\n\n#### **Manual labeling with Ground Truth**\n\nIn December 2019, Ground Truth added an auto-segment feature to the semantic segmentation labeling user interface to increase labeling throughput and improve accuracy. For more information, refer to [Auto-segmenting objects when performing semantic segmentation labeling with Amazon SageMaker Ground Truth](https://aws.amazon.com/blogs/machine-learning/auto-segmenting-objects-when-performing-semantic-segmentation-labeling-with-amazon-sagemaker-ground-truth/). With this new feature, you can accelerate your labeling process on segmentation tasks. Instead of drawing a tightly fitting polygon or using the brush tool to capture an object in an image, you only draw four points: at the top-most, bottom-most, left-most, and right-most points of the object. Ground Truth takes these four points as input and uses the Deep Extreme Cut (DEXTR) algorithm to produce a tightly fitting mask around the object. For a tutorial using Ground Truth for [image semantic segmentation](https://docs.aws.amazon.com/sagemaker/latest/dg/sms-semantic-segmentation.html) labeling, refer to Image Semantic Segmentation. The following is an example of how the auto-segmentation tool generates a segmentation mask automatically after you choose the four extreme points of an object.\n\n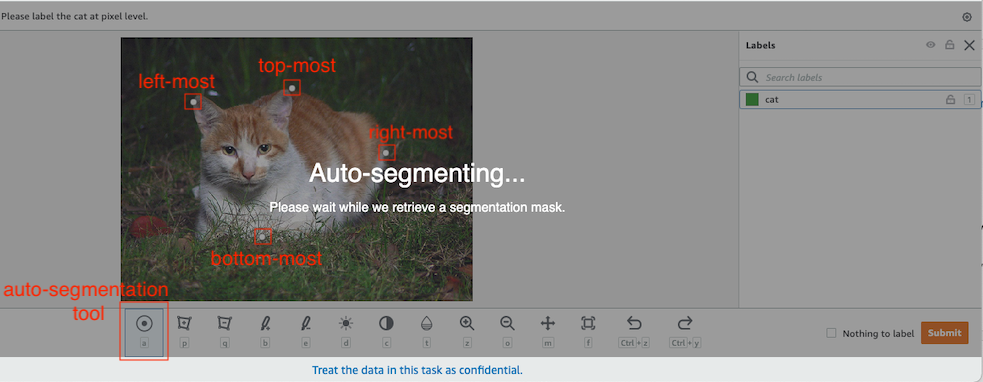\n\n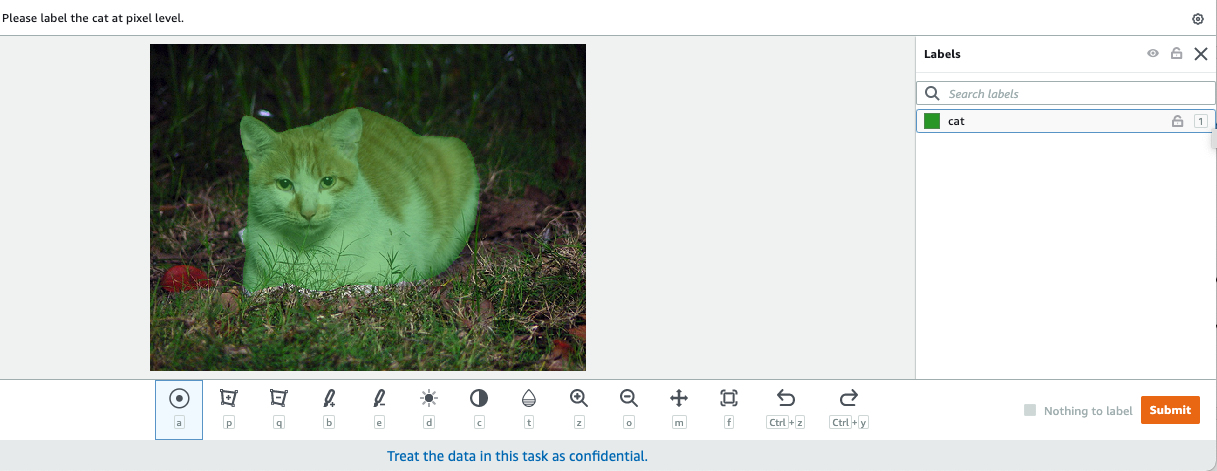\n\n#### **Crowdsourcing labeling with a Mechanical Turk workforce**\n\nIf you have a large dataset and you don’t want to manually label hundreds or thousands of images yourself, you can use Mechanical Turk, which provides an on-demand, scalable, human workforce to complete jobs that humans can do better than computers. Mechanical Turk software formalizes job offers to the thousands of workers willing to do piecemeal work at their convenience. The software also retrieves the work performed and compiles it for you, the requester, who pays the workers for satisfactory work (only). To get started with Mechanical Turk, refer to [Introduction to Amazon Mechanical Turk](https://docs.aws.amazon.com/AWSMechTurk/latest/AWSMechanicalTurkGettingStartedGuide/SvcIntro.html).\n\n#### **Create a labeling job**\n\nThe following is an example of a Mechanical Turk labeling job for a sea turtle dataset. The sea turtle dataset is from the Kaggle competition [Sea Turtle Face Detection](https://www.kaggle.com/datasets/smaranjitghose/sea-turtle-face-detection), and I selected 300 images of the dataset for demonstration purposes. Sea turtle isn’t a common class in public datasets so it can represent a situation that requires labeling a massive dataset.\n\n1. On the SageMaker console, choose **Labeling jobs** in the navigation pane.\n2. Choose **Create labeling job**.\n3. Enter a name for your job.\n4. For **Input data setup**, select **Automated data setup**.\n This generates a manifest of input data.\n5. For **S3 location for input datasets**, enter the path for the dataset.\n\n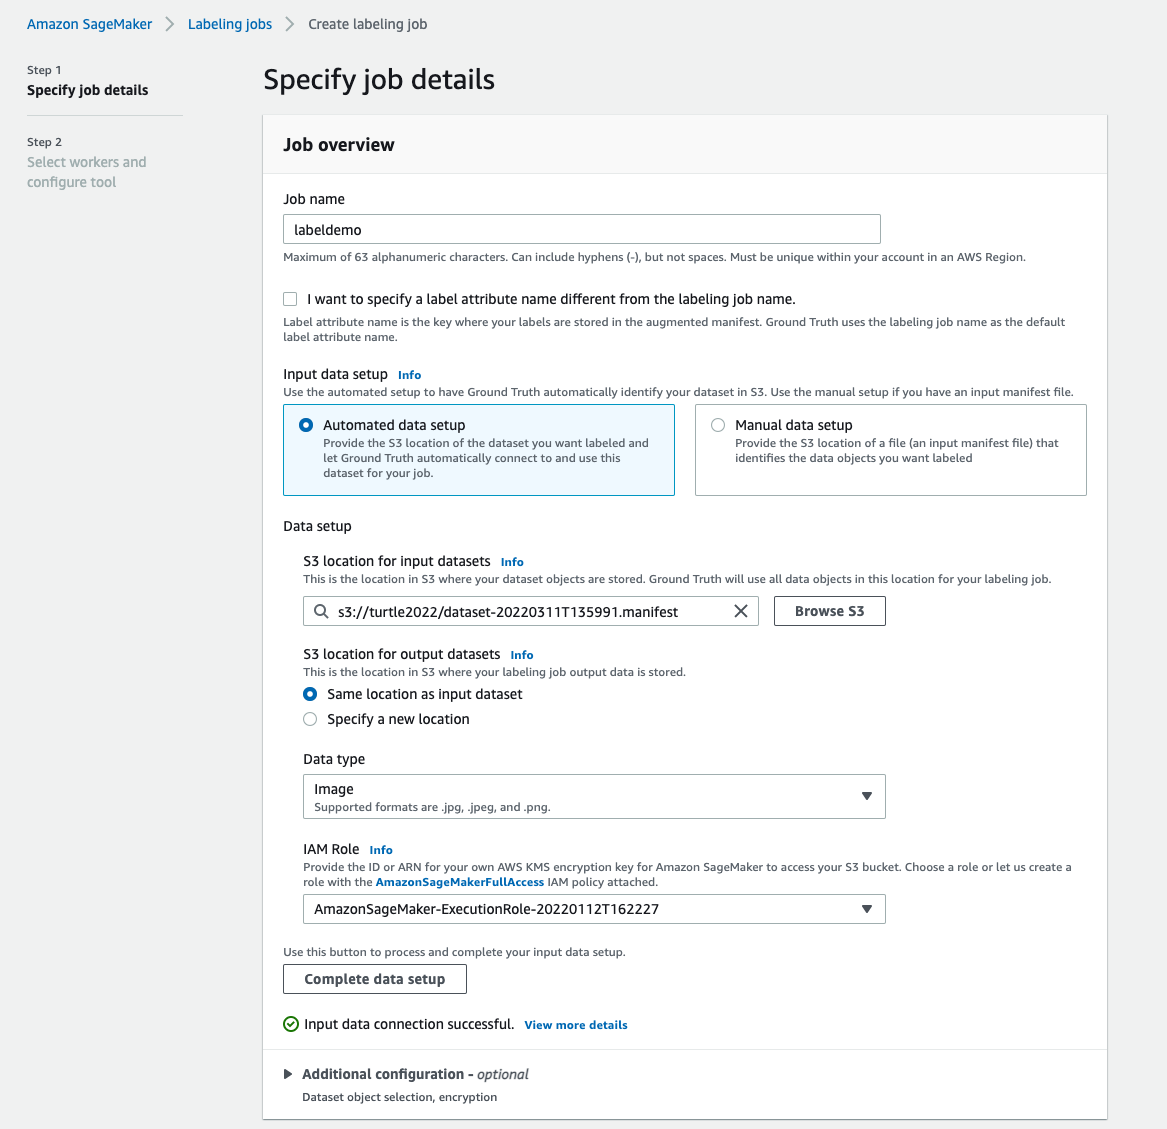\n\n6. For **Task category**, choose **Image**.\n7. For **Task selection**, select **Semantic segmentation**.\n\n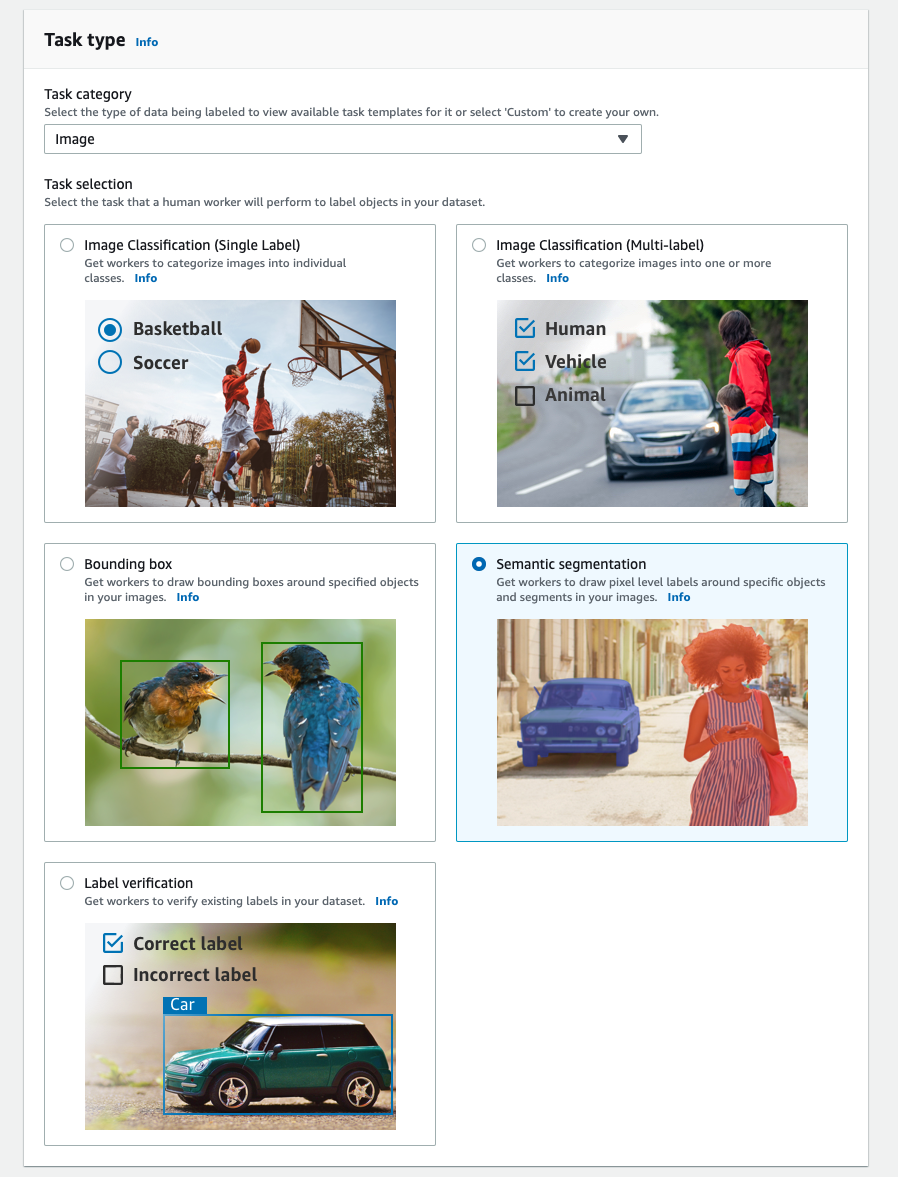\n\n8. For **Worker types**, select **Amazon Mechanical Turk**.\n9. Configure your settings for task timeout, task expiration time, and price per task.\n\n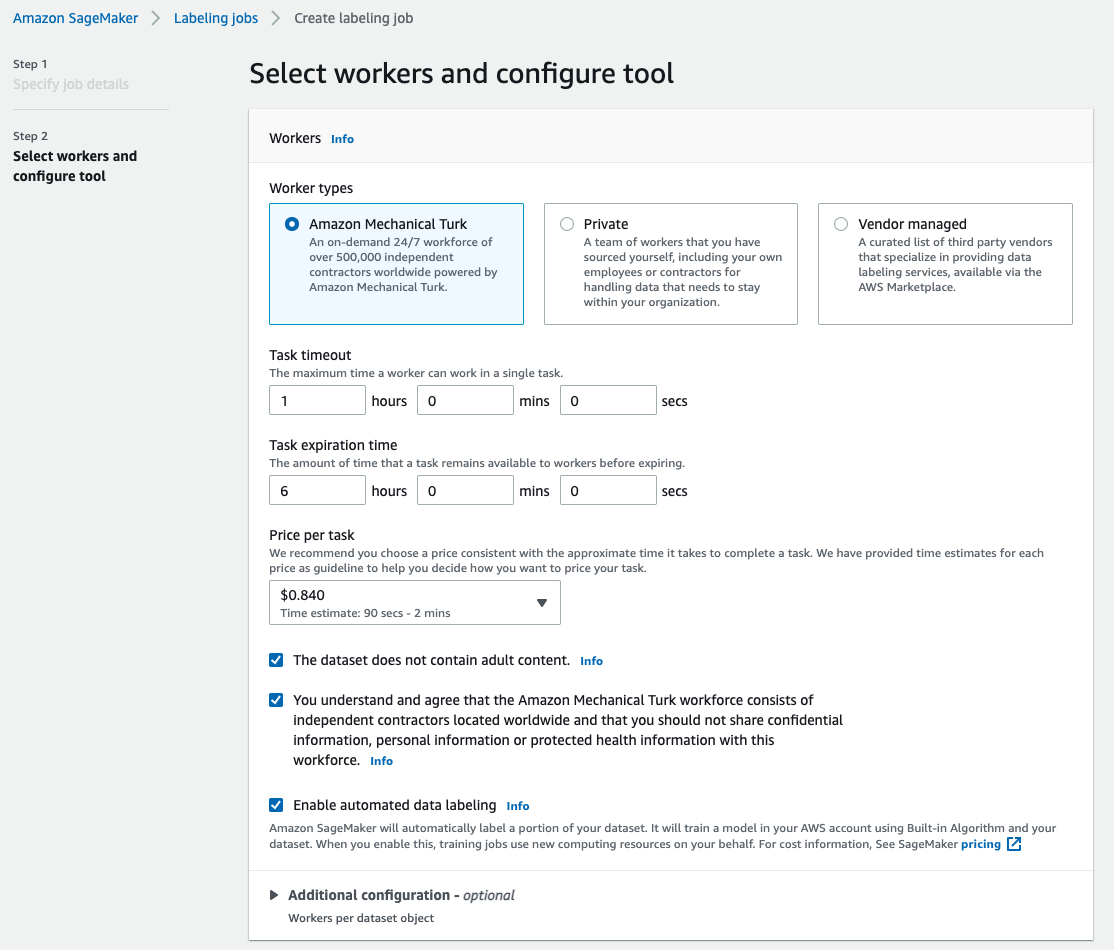\n\n10. Add a label (for this post, ```sea turtle```), and provide labeling instructions.\n11. Choose **Create**.\n\n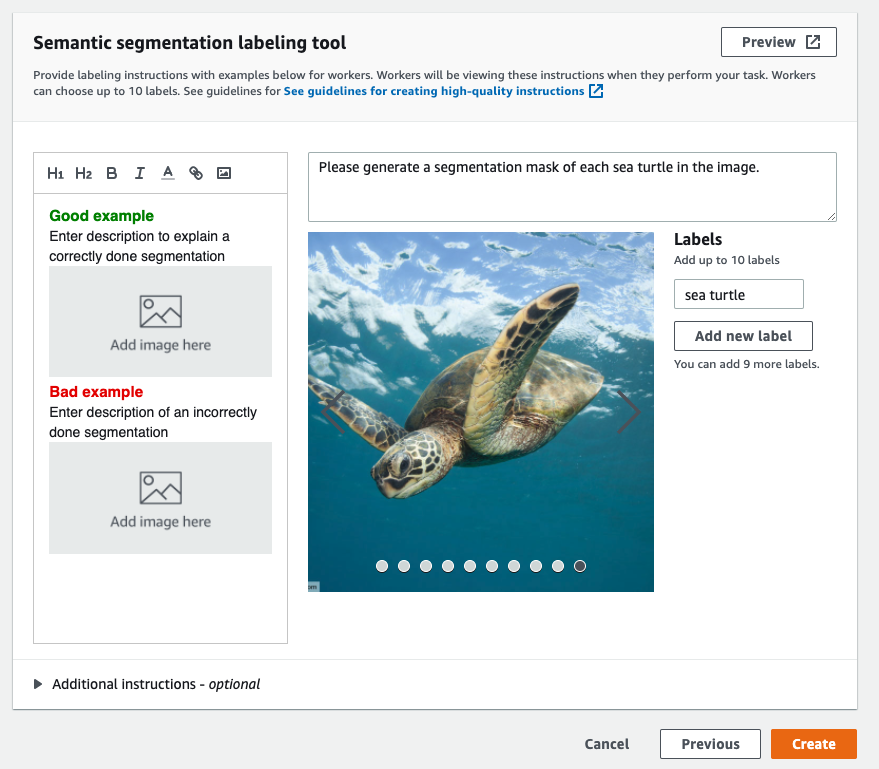\n\nAfter you set up the labeling job, you can check the labeling progress on the SageMaker console. When it’s marked as complete, you can choose the job to check the results and use them for the next steps.\n\n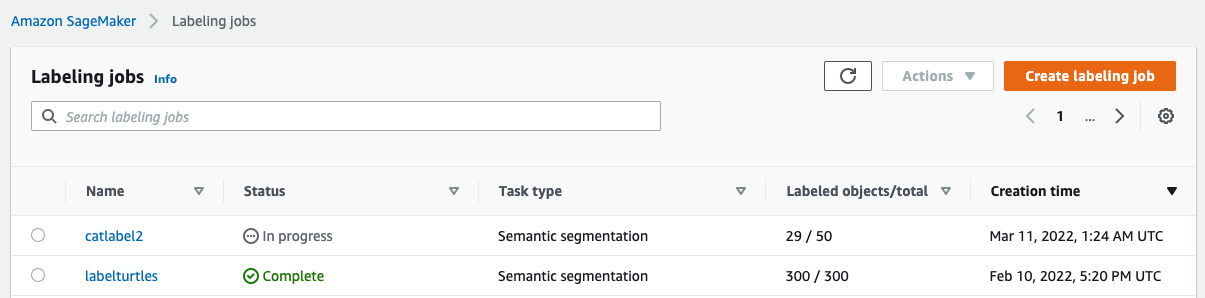\n\n#### **Dataset transformation**\n\nAfter you get the output from Ground Truth, you can use SageMaker built-in algorithms to train a model on this dataset. First, you need to prepare the labeled dataset as the requested input interface for the SageMaker semantic segmentation algorithm.\n\n#### **Requested input data channels**\n\nSageMaker semantic segmentation expects your training dataset to be stored on[ Amazon Simple Storage Service](http://aws.amazon.com/s3) (Amazon S3). The dataset in Amazon S3 is expected to be presented in two channels, one for ```train``` and one for ```validation```, using four directories, two for images and two for annotations. Annotations are expected to be uncompressed PNG images. The dataset might also have a label map that describes how the annotation mappings are established. If not, the algorithm uses a default. For inference, an endpoint accepts images with an ```image/jpeg``` content type. The following is the required structure of the data channels:\n\n```\ns3://bucket_name\n |- train\n | - image1.jpg\n | - image2.jpg\n |- validation\n | - image3.jpg\n | - image4.jpg\n |- train_annotation\n | - image1.png\n | - image2.png\n |- validation_annotation\n | - image3.png\n | - image4.png\n |- label_map\n | - train_label_map.json\n | - validation_label_map.json\n```\n\nEvery JPG image in the train and validation directories has a corresponding PNG label image with the same name in the ```train_annotation``` and ```validation_annotation``` directories. This naming convention helps the algorithm associate a label with its corresponding image during training. The train, ```train_annotation```, validation, and ```validation_annotation``` channels are mandatory. The annotations are single-channel PNG images. The format works as long as the metadata (modes) in the image helps the algorithm read the annotation images into a single-channel 8-bit unsigned integer.\n\n#### **Output from the Ground Truth labeling job**\n\nThe outputs generated from the Ground Truth labeling job have the following folder structure:\n\n```\ns3://turtle2022/labelturtles/\n |- activelearning\n |- annotation-tool\n |- annotations\n | - consolidated-annotation\n | - consolidation-request \n | - consolidation-response\n | - output\n\t\t\t | -0_2022-02-10T17:40:03.294994.png\n | -0_2022-02-10T17:41:04.530266.png\n | - intermediate\n | - worker-response\n |- intermediate\n |- manifests\n | - output\n | - output.manifest\n```\n\nThe segmentation masks are saved in ```s3://turtle2022/labelturtles/annotations/consolidated-annotation/output```. Each annotation image is a .png file named after the index of the source image and the time when this image labeling was completed. For example, the following are the source image (Image_1.jpg) and its segmentation mask generated by the Mechanical Turk workforce (0_2022-02-10T17:41:04.724225.png). Notice that the index of the mask is different than the number in the source image name.\n\n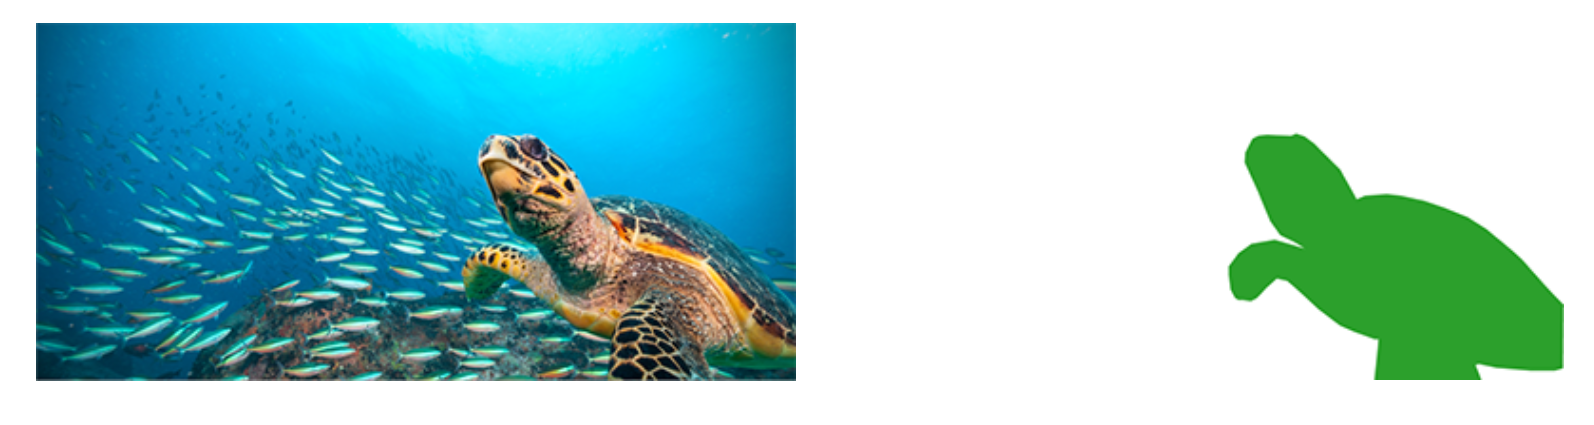\n\t\nThe output manifest from the labeling job is in the ```/manifests/output/output```.manifest file. It’s a JSON file, and each line records a mapping between the source image and its label and other metadata. The following JSON line records a mapping between the shown source image and its annotation:\n\n```\n{\"source-ref\":\"s3://turtle2022/Image_1.jpg\",\"labelturtles-ref\":\"s3://turtle2022/labelturtles/annotations/consolidated-annotation/output/0_2022-02-10T17:41:04.724225.png\",\"labelturtles-ref-metadata\":{\"internal-color-map\":{\"0\":{\"class-name\":\"BACKGROUND\",\"hex-color\":\"#ffffff\",\"confidence\":0.25988},\"1\":{\"class-name\":\"Turtle\",\"hex-color\":\"#2ca02c\",\"confidence\":0.25988}},\"type\":\"groundtruth/semantic-segmentation\",\"human-annotated\":\"yes\",\"creation-date\":\"2022-02-10T17:41:04.801793\",\"job-name\":\"labeling-job/labelturtles\"}}\n```\n\nThe source image is called Image_1.jpg, and the annotation’s name is 0_2022-02-10T17:41: 04.724225.png. To prepare the data as the required data channel formats of the SageMaker semantic segmentation algorithm, we need to change the annotation name so that it has the same name as the source JPG images. And we also need to split the dataset into ```train``` and ```validation``` directories for source images and the annotations.\n\n#### **Transform the output from a Ground Truth labeling job to the requested input format**\n\nTo transform the output, complete the following steps:\n\n1. Download all the files from the labeling job from Amazon S3 to a local directory:\n\n```\n!aws s3 cp s3://turtle2022/ Seaturtles --recursive\n```\n\n2. Read the manifest file and change the names of the annotation to the same names as the source images:\n```\nimport os\nimport re\n\nlabel_job='labelturtles'\nmanifest_path=dir_name+'/'+label_job+'/'+'manifests/output/output.manifest'\n\nfile = open(manifest_path, \"r\") \ntxt=file.readlines()\noutput_path=dir_name+'/'+label_job+'/'+'annotations/consolidated-annotation/output'\nS3_name='turtle2022/'\nim_list=[]\nfor i in range(len(txt)):\n string = txt[i]\n try:\n im_name = re.search(S3_name+'(.+)'+'.jpg', string).group(1)\n print(im_name)\n im_png=im_name+'.png'\n im_list.append(im_name)\n annotation_name = re.search('output/(.+?)\"', string).group(1)\n os.rename(annotation_name, im_png)\n except AttributeError:\n pass\n```\n\n3. Split the train and validation datasets:\n\n```\nimport numpy as np\nfrom random import sample\n \n# Prints list of random items of given length\ntrain_num=len(im_list)*0.8\ntest_num=len(im_list)*0.2\ntrain_name=sample(im_list,int(train_num))\ntest_name = list(set(im_list) - set(train_name))\n```\n\n4. Make a directory in the required format for the semantic segmentation algorithm data channels:\n\n```\nos.chdir('./semantic_segmentation_pascalvoc_2022-01-11')\nos.mkdir('train')\nos.mkdir('validation')\nos.mkdir('train_annotation')\nos.mkdir('validation_annotation')\n```\n\n5. Move the train and validation images and their annotations to the created directories.\n a. For images, use the following code:\n\n```\nfor i in range(len(train_name)):\n train_im=train_name[i]+'.jpg'\n train_im_path=dir_name+'/'+train_im\n train_new_path='train/'+train_im\n shutil.move(train_im_path,train_new_path) \n \n train_annotation=train_name[i]+'.png'\n train_annotation_path=dir_name+'/labelturtles/annotations/consolidated-annotation/output/'+train_annotation\n train_annotation_new_path='train_annotation/'+train_annotation\n shutil.move(train_annotation_path,train_annotation_new_path)\n```\n\n b. For annotations, use the following code:\n\n```\nfor i in range(len(test_name)):\n val_im=test_name[i]+'.jpg'\n val_im_path=dir_name+'/'+val_im\n val_new_path='validation/'+val_im\n shutil.move(val_im_path,val_new_path) \n \n val_annotation=test_name[i]+'.png'\n val_annotation_path=dir_name+'/labelturtles/annotations/consolidated-annotation/output/'+val_annotation\n val_annotation_new_path='validation_annotationT/'+val_annotation\n shutil.move(val_annotation_path,val_annotation_new_path)\n```\n\n6. Upload the train and validation datasets and their annotation datasets to Amazon S3:\n\n```\n!aws s3 cp train s3://turtle2022/train/ --recursive\n!aws s3 cp train_annotation s3://turtle2022/train_annotation/ --recursive\n!aws s3 cp validation s3://turtle2022/validation/ --recursive\n!aws s3 cp validation_annotation s3://turtle2022/validation_annotation/ --recursive\n```\n\n#### **SageMaker semantic segmentation model training**\n\nIn this section, we walk through the steps to train your semantic segmentation model.\n\n#### **Follow the sample notebook and set up data channels**\n\nYou can follow the instructions in [Semantic Segmentation algorithm is now available in Amazon SageMaker](https://aws.amazon.com/blogs/machine-learning/semantic-segmentation-algorithm-is-now-available-in-amazon-sagemaker/) to implement the semantic segmentation algorithm to your labeled dataset. This sample notebook shows an end-to-end example introducing the algorithm. In the notebook, you learn how to train and host a semantic segmentation model using the fully convolutional network ([FCN](https://arxiv.org/abs/1605.06211)) algorithm using the [Pascal VOC dataset](http://host.robots.ox.ac.uk/pascal/VOC/) for training. Because I don’t plan to train a model from the Pascal VOC dataset, I skipped Step 3 (data preparation) in this notebook. Instead, I directly created ```train_channel```, ```train_annotation_channe```, ```validation_channel```, and ```validation_annotation_channel``` using the S3 locations where I stored my images and annotations:\n\n```\nTrain_channel=’s3://turtle2022/train’\ntrain_annotation_channel=’s3://turtle2022/train_annotation’\nvalidation_channel=’s3://turtle2022/validation’\nvalidation_annotation_channel=’s3://turtle2022/validation_annotation’\n```\n\n#### **Adjust hyperparameters for your own dataset in SageMaker estimator**\n\nI followed the notebook and created a SageMaker estimator object (```ss_estimator```) to train my segmentation algorithm. One thing we need to customize for the new dataset is in ```ss_estimator.set_hyperparameters```: we need to change ```num_classes=21``` to ```num_classes=2``` (```turtle``` and ```background```), and I also changed ```epochs=10``` to ```epochs=30``` because 10 is only for demo purposes. Then I used the p3.2xlarge instance for model training by setting ```instance_type=\"ml.p3.2xlarge\"```. The training completed in 8 minutes. The best [MIoU](https://medium.com/@cyborg.team.nitr/miou-calculation-4875f918f4cb) (Mean Intersection over Union) of 0.846 is achieved at epoch 11 with a ```pix_acc``` (the percent of pixels in your image that are classified correctly) of 0.925, which is a pretty good result for this small dataset.\n\n#### **Model inference results**\n\nI hosted the model on a low-cost ml.c5.xlarge instance:\n\n```\ntraining_job_name = 'ss-notebook-demo-2022-02-12-03-37-27-151'\nss_estimator = sagemaker.estimator.Estimator.attach(training_job_name)\nss_predictor = ss_estimator.deploy(initial_instance_count=1, instance_type=\"ml.c5.xlarge\")\n```\n\nFinally, I prepared a test set of 10 turtle images to see the inference result of the trained segmentation model:\n\n```\nimport os\n\npath = \"testturtle/\"\nimg_path_list=[]\nfiles = os.listdir(path)\n\nfor file in files:\n \n if file.endswith(('.jpg', '.png', 'jpeg')):\n img_path = path + file\n img_path_list.append(img_path)\n\ncolnum=5\nfig, axs = plt.subplots(2, colnum, figsize=(20, 10))\n\nfor i in range(len(img_path_list)):\n print(img_path_list[i])\n img = mpimg.imread(img_path_list[i])\n with open(img_path_list[i], \"rb\") as imfile:\n imbytes = imfile.read()\n cls_mask = ss_predictor.predict(imbytes)\n axs[int(i/colnum),i%colnum].imshow(img, cmap='gray') \n axs[int(i/colnum),i%colnum].imshow(np.ma.masked_equal(cls_mask,0), cmap='jet', alpha=0.8)\n \nplt.show()\n```\n\nThe following images show the results.\n\n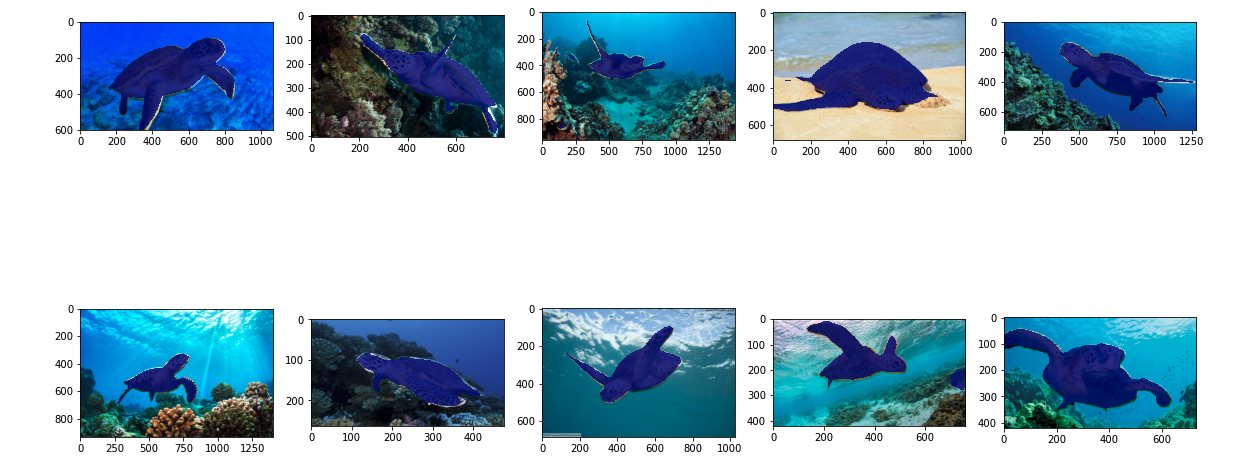\n\nThe segmentation masks of the sea turtles look accurate and I’m happy with this result trained on a 300-image dataset labeled by Mechanical Turk workers. You can also explore other available networks such as [pyramid-scene-parsing network (PSP)](https://arxiv.org/abs/1612.01105) or [DeepLab-V3](https://arxiv.org/abs/1706.05587) in the sample notebook with your dataset.\n\n#### **Clean up**\n\nDelete the endpoint when you’re finished with it to avoid incurring continued costs:\n\n```\nss_predictor.delete_endpoint()\n```\n\n#### **Conclusion**\n\nIn this post, I showed how to customize semantic segmentation data labeling and model training using SageMaker. First, you can set up a labeling job with the auto-segmentation tool or use a Mechanical Turk workforce (as well as other options). If you have more than 5,000 objects, you can also use automated data labeling. Then you transform the outputs from your Ground Truth labeling job to the required input formats for SageMaker built-in semantic segmentation training. After that, you can use an accelerated computing instance (such as p2 or p3) to train a semantic segmentation model with the following [notebook](https://github.com/aws/amazon-sagemaker-examples/blob/main/introduction_to_amazon_algorithms/semantic_segmentation_pascalvoc/semantic_segmentation_pascalvoc.ipynb) and deploy the model to a more cost-effective instance (such as ml.c5.xlarge). Lastly, you can review the inference results on your test dataset with a few lines of code.\n\nGet started with SageMaker semantic segmentation [data labeling](https://aws.amazon.com/sagemaker/data-labeling/) and [model training](https://docs.aws.amazon.com/sagemaker/latest/dg/semantic-segmentation.html) with your favorite dataset!\n\n#### **About the Author**\n\n\n\n**Kara Yang** is a Data Scientist in AWS Professional Services. She is passionate about helping customers achieve their business goals with AWS cloud services. She has helped organizations build ML solutions across multiple industries such as manufacturing, automotive, environmental sustainability and aerospace.","render":"<p>In computer vision, semantic segmentation is the task of classifying every pixel in an image with a class from a known set of labels such that pixels with the same label share certain characteristics. It generates a segmentation mask of the input images. For example, the following images show a segmentation mask of the <code>cat</code> label.</p>\n<p><img src=\"https://dev-media.amazoncloud.cn/f5c2945df9444914a290281e3316ff20_image.png\" alt=\"image.png\" /></p>\n<p>In November 2018, <a href=\"https://aws.amazon.com/sagemaker/\" target=\"_blank\">Amazon SageMaker</a> announced the launch of the SageMaker semantic segmentation algorithm. With this algorithm, you can train your models with a public dataset or your own dataset. Popular image segmentation datasets include the Common Objects in Context (COCO) dataset and PASCAL Visual Object Classes (PASCAL VOC), but the classes of their labels are limited and you may want to train a model on target objects that aren’t included in the public datasets. In this case, you can use <a href=\"https://aws.amazon.com/sagemaker/groundtruth/\" target=\"_blank\">Amazon SageMaker Ground Truth</a> to label your own dataset.</p>\n<p>In this post, I demonstrate the following solutions:</p>\n<ul>\n<li>Using Ground Truth to label a semantic segmentation dataset</li>\n<li>Transforming the results from Ground Truth to the required input format for the SageMaker built-in semantic segmentation algorithm</li>\n<li>Using the semantic segmentation algorithm to train a model and perform inference</li>\n</ul>\n<h4><a id=\"Semantic_segmentation_data_labeling_12\"></a><strong>Semantic segmentation data labeling</strong></h4>\n<p>To build a machine learning model for semantic segmentation, we need to label a dataset at the pixel level. Ground Truth gives you the option to use human annotators through <a href=\"https://www.mturk.com/\" target=\"_blank\">Amazon Mechanical Turk</a>, third-party vendors, or your own private workforce. To learn more about workforces, refer to <a href=\"https://docs.aws.amazon.com/sagemaker/latest/dg/sms-workforce-management.html\" target=\"_blank\">Create and Manage Workforces</a>. If you don’t want to manage the labeling workforce on your own, <a href=\"https://aws.amazon.com/about-aws/whats-new/2021/12/amazon-sagemaker-ground-truth-plus/\" target=\"_blank\">Amazon SageMaker Ground Truth Plus</a> is another great option as a new turnkey data labeling service that enables you to create high-quality training datasets quickly and reduces costs by up to 40%. For this post, I show you how to manually label the dataset with the Ground Truth auto-segment feature and crowdsource labeling with a Mechanical Turk workforce.</p>\n<h4><a id=\"Manual_labeling_with_Ground_Truth_16\"></a><strong>Manual labeling with Ground Truth</strong></h4>\n<p>In December 2019, Ground Truth added an auto-segment feature to the semantic segmentation labeling user interface to increase labeling throughput and improve accuracy. For more information, refer to <a href=\"https://aws.amazon.com/blogs/machine-learning/auto-segmenting-objects-when-performing-semantic-segmentation-labeling-with-amazon-sagemaker-ground-truth/\" target=\"_blank\">Auto-segmenting objects when performing semantic segmentation labeling with Amazon SageMaker Ground Truth</a>. With this new feature, you can accelerate your labeling process on segmentation tasks. Instead of drawing a tightly fitting polygon or using the brush tool to capture an object in an image, you only draw four points: at the top-most, bottom-most, left-most, and right-most points of the object. Ground Truth takes these four points as input and uses the Deep Extreme Cut (DEXTR) algorithm to produce a tightly fitting mask around the object. For a tutorial using Ground Truth for <a href=\"https://docs.aws.amazon.com/sagemaker/latest/dg/sms-semantic-segmentation.html\" target=\"_blank\">image semantic segmentation</a> labeling, refer to Image Semantic Segmentation. The following is an example of how the auto-segmentation tool generates a segmentation mask automatically after you choose the four extreme points of an object.</p>\n<p><img src=\"https://dev-media.amazoncloud.cn/7acd26b83a404771a059ce94565d0ed7_image.png\" alt=\"image.png\" /></p>\n<p><img src=\"https://dev-media.amazoncloud.cn/f3be9541ffc142ae8e9243fc8004bc8f_image.png\" alt=\"image.png\" /></p>\n<h4><a id=\"Crowdsourcing_labeling_with_a_Mechanical_Turk_workforce_24\"></a><strong>Crowdsourcing labeling with a Mechanical Turk workforce</strong></h4>\n<p>If you have a large dataset and you don’t want to manually label hundreds or thousands of images yourself, you can use Mechanical Turk, which provides an on-demand, scalable, human workforce to complete jobs that humans can do better than computers. Mechanical Turk software formalizes job offers to the thousands of workers willing to do piecemeal work at their convenience. The software also retrieves the work performed and compiles it for you, the requester, who pays the workers for satisfactory work (only). To get started with Mechanical Turk, refer to <a href=\"https://docs.aws.amazon.com/AWSMechTurk/latest/AWSMechanicalTurkGettingStartedGuide/SvcIntro.html\" target=\"_blank\">Introduction to Amazon Mechanical Turk</a>.</p>\n<h4><a id=\"Create_a_labeling_job_28\"></a><strong>Create a labeling job</strong></h4>\n<p>The following is an example of a Mechanical Turk labeling job for a sea turtle dataset. The sea turtle dataset is from the Kaggle competition <a href=\"https://www.kaggle.com/datasets/smaranjitghose/sea-turtle-face-detection\" target=\"_blank\">Sea Turtle Face Detection</a>, and I selected 300 images of the dataset for demonstration purposes. Sea turtle isn’t a common class in public datasets so it can represent a situation that requires labeling a massive dataset.</p>\n<ol>\n<li>On the SageMaker console, choose <strong>Labeling jobs</strong> in the navigation pane.</li>\n<li>Choose <strong>Create labeling job</strong>.</li>\n<li>Enter a name for your job.</li>\n<li>For <strong>Input data setup</strong>, select <strong>Automated data setup</strong>.<br />\nThis generates a manifest of input data.</li>\n<li>For <strong>S3 location for input datasets</strong>, enter the path for the dataset.</li>\n</ol>\n<p><img src=\"https://dev-media.amazoncloud.cn/fece1717b65344438a4f2bd89b406716_image.png\" alt=\"image.png\" /></p>\n<ol start=\"6\">\n<li>For <strong>Task category</strong>, choose <strong>Image</strong>.</li>\n<li>For <strong>Task selection</strong>, select <strong>Semantic segmentation</strong>.</li>\n</ol>\n<p><img src=\"https://dev-media.amazoncloud.cn/5abb0b49443e47a49508ba8e9d31ab14_image.png\" alt=\"image.png\" /></p>\n<ol start=\"8\">\n<li>For <strong>Worker types</strong>, select <strong>Amazon Mechanical Turk</strong>.</li>\n<li>Configure your settings for task timeout, task expiration time, and price per task.</li>\n</ol>\n<p><img src=\"https://dev-media.amazoncloud.cn/e84da4a2177c4cc990ebe607225db239_image.png\" alt=\"image.png\" /></p>\n<ol start=\"10\">\n<li>Add a label (for this post, <code>sea turtle</code>), and provide labeling instructions.</li>\n<li>Choose <strong>Create</strong>.</li>\n</ol>\n<p><img src=\"https://dev-media.amazoncloud.cn/bf52f9ccf6354a86a5b1a0dabdd066ca_image.png\" alt=\"image.png\" /></p>\n<p>After you set up the labeling job, you can check the labeling progress on the SageMaker console. When it’s marked as complete, you can choose the job to check the results and use them for the next steps.</p>\n<p><img src=\"https://dev-media.amazoncloud.cn/d9922b2ed44540fcb67f9e6c416bef7a_image.png\" alt=\"image.png\" /></p>\n<h4><a id=\"Dataset_transformation_60\"></a><strong>Dataset transformation</strong></h4>\n<p>After you get the output from Ground Truth, you can use SageMaker built-in algorithms to train a model on this dataset. First, you need to prepare the labeled dataset as the requested input interface for the SageMaker semantic segmentation algorithm.</p>\n<h4><a id=\"Requested_input_data_channels_64\"></a><strong>Requested input data channels</strong></h4>\n<p>SageMaker semantic segmentation expects your training dataset to be stored on<a href=\"http://aws.amazon.com/s3\" target=\"_blank\"> Amazon Simple Storage Service</a> (Amazon S3). The dataset in Amazon S3 is expected to be presented in two channels, one for <code>train</code> and one for <code>validation</code>, using four directories, two for images and two for annotations. Annotations are expected to be uncompressed PNG images. The dataset might also have a label map that describes how the annotation mappings are established. If not, the algorithm uses a default. For inference, an endpoint accepts images with an <code>image/jpeg</code> content type. The following is the required structure of the data channels:</p>\n<pre><code class=\"lang-\">s3://bucket_name\n |- train\n | - image1.jpg\n | - image2.jpg\n |- validation\n | - image3.jpg\n | - image4.jpg\n |- train_annotation\n | - image1.png\n | - image2.png\n |- validation_annotation\n | - image3.png\n | - image4.png\n |- label_map\n | - train_label_map.json\n | - validation_label_map.json\n</code></pre>\n<p>Every JPG image in the train and validation directories has a corresponding PNG label image with the same name in the <code>train_annotation</code> and <code>validation_annotation</code> directories. This naming convention helps the algorithm associate a label with its corresponding image during training. The train, <code>train_annotation</code>, validation, and <code>validation_annotation</code> channels are mandatory. The annotations are single-channel PNG images. The format works as long as the metadata (modes) in the image helps the algorithm read the annotation images into a single-channel 8-bit unsigned integer.</p>\n<h4><a id=\"Output_from_the_Ground_Truth_labeling_job_89\"></a><strong>Output from the Ground Truth labeling job</strong></h4>\n<p>The outputs generated from the Ground Truth labeling job have the following folder structure:</p>\n<pre><code class=\"lang-\">s3://turtle2022/labelturtles/\n |- activelearning\n |- annotation-tool\n |- annotations\n | - consolidated-annotation\n | - consolidation-request \n | - consolidation-response\n | - output\n\t\t\t | -0_2022-02-10T17:40:03.294994.png\n | -0_2022-02-10T17:41:04.530266.png\n | - intermediate\n | - worker-response\n |- intermediate\n |- manifests\n | - output\n | - output.manifest\n</code></pre>\n<p>The segmentation masks are saved in <code>s3://turtle2022/labelturtles/annotations/consolidated-annotation/output</code>. Each annotation image is a .png file named after the index of the source image and the time when this image labeling was completed. For example, the following are the source image (Image_1.jpg) and its segmentation mask generated by the Mechanical Turk workforce (0_2022-02-10T17:41:04.724225.png). Notice that the index of the mask is different than the number in the source image name.</p>\n<p><img src=\"https://dev-media.amazoncloud.cn/54d79e74eb0e48aab1c6cd84b69ea91b_image.png\" alt=\"image.png\" /></p>\n<p>The output manifest from the labeling job is in the <code>/manifests/output/output</code>.manifest file. It’s a JSON file, and each line records a mapping between the source image and its label and other metadata. The following JSON line records a mapping between the shown source image and its annotation:</p>\n<pre><code class=\"lang-\">{"source-ref":"s3://turtle2022/Image_1.jpg","labelturtles-ref":"s3://turtle2022/labelturtles/annotations/consolidated-annotation/output/0_2022-02-10T17:41:04.724225.png","labelturtles-ref-metadata":{"internal-color-map":{"0":{"class-name":"BACKGROUND","hex-color":"#ffffff","confidence":0.25988},"1":{"class-name":"Turtle","hex-color":"#2ca02c","confidence":0.25988}},"type":"groundtruth/semantic-segmentation","human-annotated":"yes","creation-date":"2022-02-10T17:41:04.801793","job-name":"labeling-job/labelturtles"}}\n</code></pre>\n<p>The source image is called Image_1.jpg, and the annotation’s name is 0_2022-02-10T17:41: 04.724225.png. To prepare the data as the required data channel formats of the SageMaker semantic segmentation algorithm, we need to change the annotation name so that it has the same name as the source JPG images. And we also need to split the dataset into <code>train</code> and <code>validation</code> directories for source images and the annotations.</p>\n<h4><a id=\"Transform_the_output_from_a_Ground_Truth_labeling_job_to_the_requested_input_format_124\"></a><strong>Transform the output from a Ground Truth labeling job to the requested input format</strong></h4>\n<p>To transform the output, complete the following steps:</p>\n<ol>\n<li>Download all the files from the labeling job from Amazon S3 to a local directory:</li>\n</ol>\n<pre><code class=\"lang-\">!aws s3 cp s3://turtle2022/ Seaturtles --recursive\n</code></pre>\n<ol start=\"2\">\n<li>Read the manifest file and change the names of the annotation to the same names as the source images:</li>\n</ol>\n<pre><code class=\"lang-\">import os\nimport re\n\nlabel_job='labelturtles'\nmanifest_path=dir_name+'/'+label_job+'/'+'manifests/output/output.manifest'\n\nfile = open(manifest_path, "r") \ntxt=file.readlines()\noutput_path=dir_name+'/'+label_job+'/'+'annotations/consolidated-annotation/output'\nS3_name='turtle2022/'\nim_list=[]\nfor i in range(len(txt)):\n string = txt[i]\n try:\n im_name = re.search(S3_name+'(.+)'+'.jpg', string).group(1)\n print(im_name)\n im_png=im_name+'.png'\n im_list.append(im_name)\n annotation_name = re.search('output/(.+?)"', string).group(1)\n os.rename(annotation_name, im_png)\n except AttributeError:\n pass\n</code></pre>\n<ol start=\"3\">\n<li>Split the train and validation datasets:</li>\n</ol>\n<pre><code class=\"lang-\">import numpy as np\nfrom random import sample\n \n# Prints list of random items of given length\ntrain_num=len(im_list)*0.8\ntest_num=len(im_list)*0.2\ntrain_name=sample(im_list,int(train_num))\ntest_name = list(set(im_list) - set(train_name))\n</code></pre>\n<ol start=\"4\">\n<li>Make a directory in the required format for the semantic segmentation algorithm data channels:</li>\n</ol>\n<pre><code class=\"lang-\">os.chdir('./semantic_segmentation_pascalvoc_2022-01-11')\nos.mkdir('train')\nos.mkdir('validation')\nos.mkdir('train_annotation')\nos.mkdir('validation_annotation')\n</code></pre>\n<ol start=\"5\">\n<li>Move the train and validation images and their annotations to the created directories.<br />\na. For images, use the following code:</li>\n</ol>\n<pre><code class=\"lang-\">for i in range(len(train_name)):\n train_im=train_name[i]+'.jpg'\n train_im_path=dir_name+'/'+train_im\n train_new_path='train/'+train_im\n shutil.move(train_im_path,train_new_path) \n \n train_annotation=train_name[i]+'.png'\n train_annotation_path=dir_name+'/labelturtles/annotations/consolidated-annotation/output/'+train_annotation\n train_annotation_new_path='train_annotation/'+train_annotation\n shutil.move(train_annotation_path,train_annotation_new_path)\n</code></pre>\n<p>b. For annotations, use the following code:</p>\n<pre><code class=\"lang-\">for i in range(len(test_name)):\n val_im=test_name[i]+'.jpg'\n val_im_path=dir_name+'/'+val_im\n val_new_path='validation/'+val_im\n shutil.move(val_im_path,val_new_path) \n \n val_annotation=test_name[i]+'.png'\n val_annotation_path=dir_name+'/labelturtles/annotations/consolidated-annotation/output/'+val_annotation\n val_annotation_new_path='validation_annotationT/'+val_annotation\n shutil.move(val_annotation_path,val_annotation_new_path)\n</code></pre>\n<ol start=\"6\">\n<li>Upload the train and validation datasets and their annotation datasets to Amazon S3:</li>\n</ol>\n<pre><code class=\"lang-\">!aws s3 cp train s3://turtle2022/train/ --recursive\n!aws s3 cp train_annotation s3://turtle2022/train_annotation/ --recursive\n!aws s3 cp validation s3://turtle2022/validation/ --recursive\n!aws s3 cp validation_annotation s3://turtle2022/validation_annotation/ --recursive\n</code></pre>\n<h4><a id=\"SageMaker_semantic_segmentation_model_training_223\"></a><strong>SageMaker semantic segmentation model training</strong></h4>\n<p>In this section, we walk through the steps to train your semantic segmentation model.</p>\n<h4><a id=\"Follow_the_sample_notebook_and_set_up_data_channels_227\"></a><strong>Follow the sample notebook and set up data channels</strong></h4>\n<p>You can follow the instructions in <a href=\"https://aws.amazon.com/blogs/machine-learning/semantic-segmentation-algorithm-is-now-available-in-amazon-sagemaker/\" target=\"_blank\">Semantic Segmentation algorithm is now available in Amazon SageMaker</a> to implement the semantic segmentation algorithm to your labeled dataset. This sample notebook shows an end-to-end example introducing the algorithm. In the notebook, you learn how to train and host a semantic segmentation model using the fully convolutional network (<a href=\"https://arxiv.org/abs/1605.06211\" target=\"_blank\">FCN</a>) algorithm using the <a href=\"http://host.robots.ox.ac.uk/pascal/VOC/\" target=\"_blank\">Pascal VOC dataset</a> for training. Because I don’t plan to train a model from the Pascal VOC dataset, I skipped Step 3 (data preparation) in this notebook. Instead, I directly created <code>train_channel</code>, <code>train_annotation_channe</code>, <code>validation_channel</code>, and <code>validation_annotation_channel</code> using the S3 locations where I stored my images and annotations:</p>\n<pre><code class=\"lang-\">Train_channel=’s3://turtle2022/train’\ntrain_annotation_channel=’s3://turtle2022/train_annotation’\nvalidation_channel=’s3://turtle2022/validation’\nvalidation_annotation_channel=’s3://turtle2022/validation_annotation’\n</code></pre>\n<h4><a id=\"Adjust_hyperparameters_for_your_own_dataset_in_SageMaker_estimator_238\"></a><strong>Adjust hyperparameters for your own dataset in SageMaker estimator</strong></h4>\n<p>I followed the notebook and created a SageMaker estimator object (<code>ss_estimator</code>) to train my segmentation algorithm. One thing we need to customize for the new dataset is in <code>ss_estimator.set_hyperparameters</code>: we need to change <code>num_classes=21</code> to <code>num_classes=2</code> (<code>turtle</code> and <code>background</code>), and I also changed <code>epochs=10</code> to <code>epochs=30</code> because 10 is only for demo purposes. Then I used the p3.2xlarge instance for model training by setting <code>instance_type="ml.p3.2xlarge"</code>. The training completed in 8 minutes. The best <a href=\"https://medium.com/@cyborg.team.nitr/miou-calculation-4875f918f4cb\" target=\"_blank\">MIoU</a> (Mean Intersection over Union) of 0.846 is achieved at epoch 11 with a <code>pix_acc</code> (the percent of pixels in your image that are classified correctly) of 0.925, which is a pretty good result for this small dataset.</p>\n<h4><a id=\"Model_inference_results_242\"></a><strong>Model inference results</strong></h4>\n<p>I hosted the model on a low-cost ml.c5.xlarge instance:</p>\n<pre><code class=\"lang-\">training_job_name = 'ss-notebook-demo-2022-02-12-03-37-27-151'\nss_estimator = sagemaker.estimator.Estimator.attach(training_job_name)\nss_predictor = ss_estimator.deploy(initial_instance_count=1, instance_type="ml.c5.xlarge")\n</code></pre>\n<p>Finally, I prepared a test set of 10 turtle images to see the inference result of the trained segmentation model:</p>\n<pre><code class=\"lang-\">import os\n\npath = "testturtle/"\nimg_path_list=[]\nfiles = os.listdir(path)\n\nfor file in files:\n \n if file.endswith(('.jpg', '.png', 'jpeg')):\n img_path = path + file\n img_path_list.append(img_path)\n\ncolnum=5\nfig, axs = plt.subplots(2, colnum, figsize=(20, 10))\n\nfor i in range(len(img_path_list)):\n print(img_path_list[i])\n img = mpimg.imread(img_path_list[i])\n with open(img_path_list[i], "rb") as imfile:\n imbytes = imfile.read()\n cls_mask = ss_predictor.predict(imbytes)\n axs[int(i/colnum),i%colnum].imshow(img, cmap='gray') \n axs[int(i/colnum),i%colnum].imshow(np.ma.masked_equal(cls_mask,0), cmap='jet', alpha=0.8)\n \nplt.show()\n</code></pre>\n<p>The following images show the results.</p>\n<p><img src=\"https://dev-media.amazoncloud.cn/3946b6e2744c49619a2c177d893faf12_image.png\" alt=\"image.png\" /></p>\n<p>The segmentation masks of the sea turtles look accurate and I’m happy with this result trained on a 300-image dataset labeled by Mechanical Turk workers. You can also explore other available networks such as <a href=\"https://arxiv.org/abs/1612.01105\" target=\"_blank\">pyramid-scene-parsing network (PSP)</a> or <a href=\"https://arxiv.org/abs/1706.05587\" target=\"_blank\">DeepLab-V3</a> in the sample notebook with your dataset.</p>\n<h4><a id=\"Clean_up_288\"></a><strong>Clean up</strong></h4>\n<p>Delete the endpoint when you’re finished with it to avoid incurring continued costs:</p>\n<pre><code class=\"lang-\">ss_predictor.delete_endpoint()\n</code></pre>\n<h4><a id=\"Conclusion_296\"></a><strong>Conclusion</strong></h4>\n<p>In this post, I showed how to customize semantic segmentation data labeling and model training using SageMaker. First, you can set up a labeling job with the auto-segmentation tool or use a Mechanical Turk workforce (as well as other options). If you have more than 5,000 objects, you can also use automated data labeling. Then you transform the outputs from your Ground Truth labeling job to the required input formats for SageMaker built-in semantic segmentation training. After that, you can use an accelerated computing instance (such as p2 or p3) to train a semantic segmentation model with the following <a href=\"https://github.com/aws/amazon-sagemaker-examples/blob/main/introduction_to_amazon_algorithms/semantic_segmentation_pascalvoc/semantic_segmentation_pascalvoc.ipynb\" target=\"_blank\">notebook</a> and deploy the model to a more cost-effective instance (such as ml.c5.xlarge). Lastly, you can review the inference results on your test dataset with a few lines of code.</p>\n<p>Get started with SageMaker semantic segmentation <a href=\"https://aws.amazon.com/sagemaker/data-labeling/\" target=\"_blank\">data labeling</a> and <a href=\"https://docs.aws.amazon.com/sagemaker/latest/dg/semantic-segmentation.html\" target=\"_blank\">model training</a> with your favorite dataset!</p>\n<h4><a id=\"About_the_Author_302\"></a><strong>About the Author</strong></h4>\n<p><img src=\"https://dev-media.amazoncloud.cn/3d7ffa3a72af41878d1f347b1b9413cd_image.png\" alt=\"image.png\" /></p>\n<p><strong>Kara Yang</strong> is a Data Scientist in AWS Professional Services. She is passionate about helping customers achieve their business goals with AWS cloud services. She has helped organizations build ML solutions across multiple industries such as manufacturing, automotive, environmental sustainability and aerospace.</p>\n"}
Semantic segmentation data labeling and model training using Amazon SageMaker
海外精选

海外精选的内容汇集了全球优质的亚马逊云科技相关技术内容。同时,内容中提到的“AWS”
是 “Amazon Web Services” 的缩写,在此网站不作为商标展示。

 0
0 0
0亚马逊云科技解决方案 基于行业客户应用场景及技术领域的解决方案
联系亚马逊云科技专家
亚马逊云科技解决方案
基于行业客户应用场景及技术领域的解决方案
联系专家

0
目录

 分享
分享 点赞
点赞 收藏
收藏 目录
目录立即注册,开启您的免费套餐
立即关注

亚马逊云开发者
公众号

User Group
公众号

亚马逊云科技
官方小程序
“AWS” 是 “Amazon Web Services” 的缩写,在此网站不作为商标展示。
立即关注
亚马逊云开发者
公众号
User Group
公众号
亚马逊云科技
官方小程序
“AWS” 是 “Amazon Web Services” 的缩写,在此网站不作为商标展示。
关于我们 
更多资源
开发者工具
更多支持
立即关注
亚马逊云开发者
公众号
User Group
公众号
亚马逊云科技
官方小程序
“AWS” 是 “Amazon Web Services” 的缩写,在此网站不作为商标展示。
