{"value":"Launched at AWS re:Invent 2021, [Amazon SageMaker Ground Truth Plus](https://aws.amazon.com/sagemaker/data-labeling) helps you create high-quality training datasets by removing the undifferentiated heavy lifting associated with building data labeling applications and managing the labeling workforce. All you do is share data along with labeling requirements, and Ground Truth Plus sets up and manages your data labeling workflow based on these requirements. From there, an expert workforce that is trained on a variety of machine learning (ML) tasks performs data labeling. You don’t even need deep ML expertise or knowledge of workflow design and quality management to use Ground Truth Plus.\n\nBuilding a high-quality training dataset for your ML algorithm is an iterative process. ML practitioners often build custom systems to inspect data labels because accurately labeled data is critical to ML model quality. To ensure you get high-quality training data, Ground Truth Plus provides you with a built-in user interface (Review UI) to inspect the quality of data labels and provide feedback on data labels until you’re satisfied that the labels accurately represent the ground truth, or what is directly observable in the real world.\n\nThis post walks you through steps to create a project team and use several new built-in features of the Review UI tool to efficiently complete your inspection of a labeled dataset. The walkthrough assumes that you have an active Ground Truth Plus labeling project. For more information, [see Amazon SageMaker Ground Truth Plus – Create Training Datasets Without Code or In-house Resources.](https://aws.amazon.com/blogs/aws/announcing-amazon-sagemaker-ground-truth-plus/)\n\n**Set up a project team**\nA project team provides access to the members from your organization to inspect data labels using the Review UI tool. To set up a project team, complete the following steps:\n\n1. On the Ground Truth Plus [console](https://us-east-1.console.aws.amazon.com/sagemaker/groundtruth?region=us-east-1#/plus), choose **Create project team**.\n2. Select **Create a new [Amazon Cognito](https://aws.amazon.com/cn/cognito/?trk=cndc-detail) user group** . If you already have an existing [Amazon Cognito](https://aws.amazon.com/cognito/) user group, select the **Import members** option.\n3. For **[Amazon Cognito](https://aws.amazon.com/cn/cognito/?trk=cndc-detail) user group name**, enter a name. This name can’t be changed.\n4. For **Email addresses**, enter the email addresses of up to 50 team members, separated by commas.\n5. Choose **Create project team**.\n\n[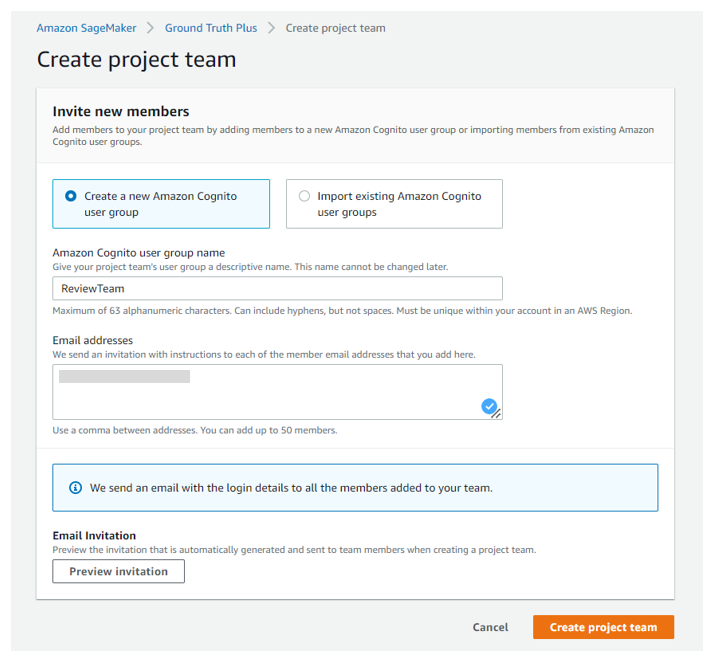](https://d2908q01vomqb2.cloudfront.net/f1f836cb4ea6efb2a0b1b99f41ad8b103eff4b59/2022/06/20/ML-8425-image001-new2.png)\n\nYour team members will receive an email inviting them to join the Ground Truth Plus project team. From there, they can log in to the Ground Truth Plus project portal to review the data labels.\n\n### **Inspect labeled dataset quality**\nNow let’s dive into a video object tracking example using [CBCL StreetScenes dataset](http://cbcl.mit.edu/software-datasets/streetscenes/).\n\nAfter the data in your batch has been labeled, the batch is marked as **Ready for review**.\n\n[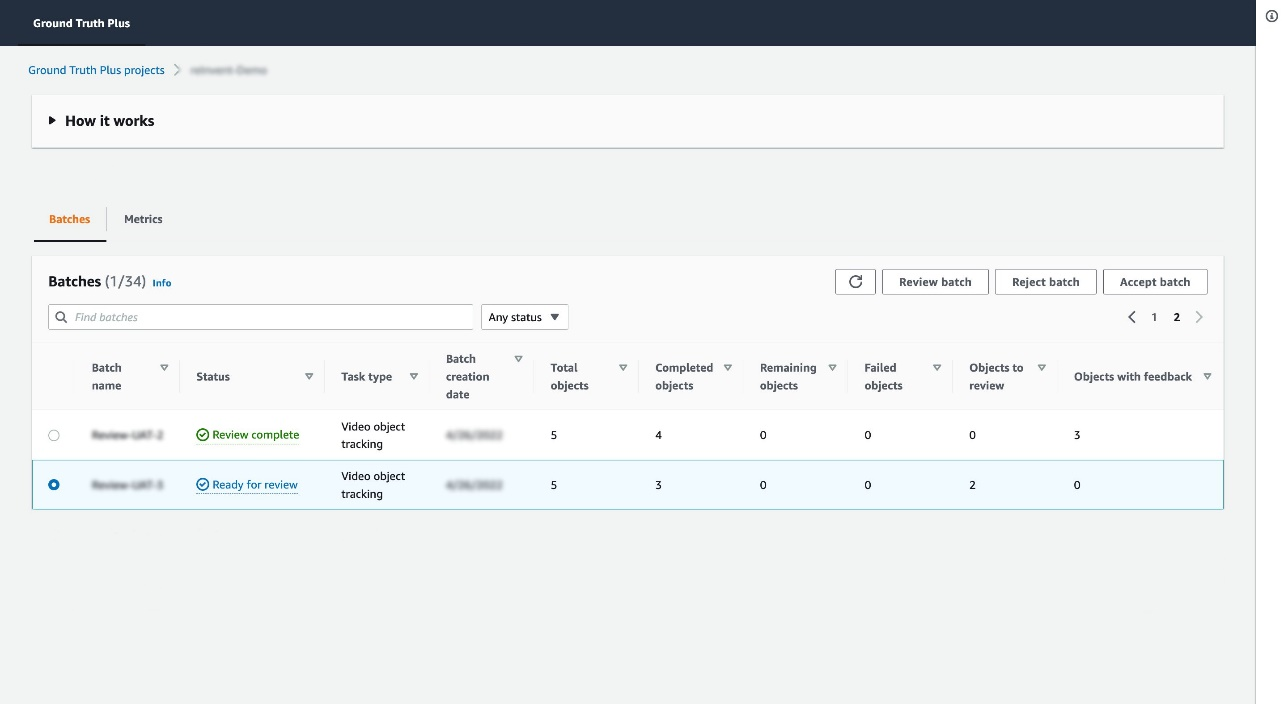](https://d2908q01vomqb2.cloudfront.net/f1f836cb4ea6efb2a0b1b99f41ad8b103eff4b59/2022/06/16/ML-8425-image003.jpg)\n\nSelect the batch and choose **Review batch**. You’re redirected to the Review UI. You have the flexibility to choose a different sampling rate for each batch you review. For instance, in our example batch, we have a total of five videos. You can specify if you want to review only a subset of these five videos or all of them.\n\nNow let’s look at the different functionalities within the Review UI that will help you in inspecting the quality of the labeled dataset at a faster pace, and providing feedback on the quality:\n\n- **Filter the labels based on label category** – Within the Review UI, in the right-hand pane, you can filter the labels based on their label category. This feature comes in handy when there are multiple label categories (for example,```Vehicles```, ```Pedestrians```, and ```Poles```) in a dense dataset object, and you want to view labels for one label category at a time. For example, let’s focus on the ```Car``` label category. Enter the ```Car``` label category in the right pane to filter for all annotations of only type ```Car```. The following screenshots show the Review UI view before and after applying the filter.\n\n[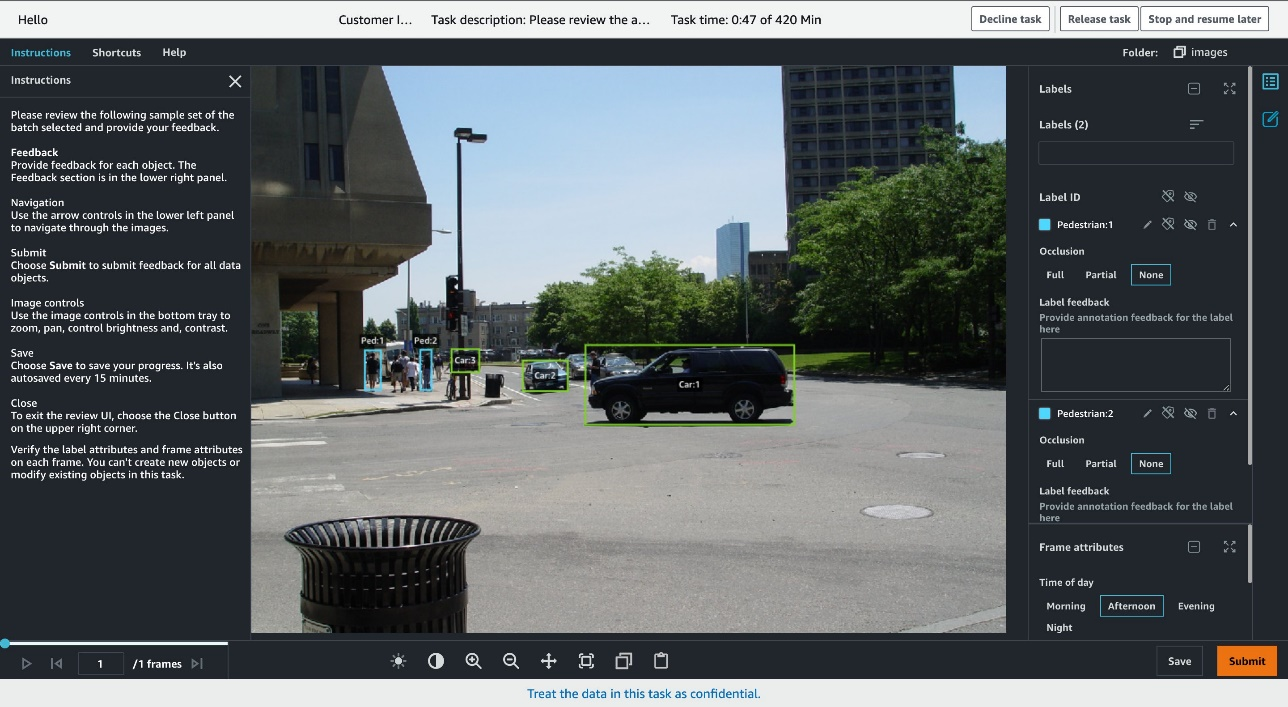](https://d2908q01vomqb2.cloudfront.net/f1f836cb4ea6efb2a0b1b99f41ad8b103eff4b59/2022/06/16/ML-8425-image005.jpg)\n\n[](https://d2908q01vomqb2.cloudfront.net/f1f836cb4ea6efb2a0b1b99f41ad8b103eff4b59/2022/06/16/ML-8425-image007.jpg)\n\n- **Overlay associated annotated attribute values** – Each label can be assigned attributes to be annotated. For example, for the label category ```Car```, say you want to ask the workers to also annotate the ```Color``` and ```Occlusion``` attributes for each label instance. When you load the Review UI, you will see the corresponding attributes under each label instance on the right pane. But what if you want to see these attribute annotations directly on the image instead? You select the label ```Car:1```, and to overlay the attribute annotations for ```Car:1```, you press **Ctrl+A**.\nNow you will see the annotation ```Dark Blue``` for the ```Color``` attribute and annotation ```None``` for the ```Occlusion``` attribute directly displayed on the image next to the ```Car:1``` bounding box. Now you can easily verify that ```Car:1``` was marked as ```Dark Blue```, with no occlusion just from looking at the image instead of having to locate ```Car:1``` on the right pane to see the attribute annotations.\n\n[](https://d2908q01vomqb2.cloudfront.net/f1f836cb4ea6efb2a0b1b99f41ad8b103eff4b59/2022/06/16/ML-8425-image009.jpg)\n\n- **Leave feedback at the label level** – For each label, you can leave feedback at the label level in that label’s **Label feedback** free string attribute. For example, in this image, ```Car:1``` looks more black than dark blue. You can relay this discrepancy as feedback for ```Car:1``` using the **Label feedback** field to track the comment to that label on that frame. Our internal quality control team will review this feedback and introduce changes to the annotation process and label policies, and train the annotators as required.\n\n[](https://d2908q01vomqb2.cloudfront.net/f1f836cb4ea6efb2a0b1b99f41ad8b103eff4b59/2022/06/16/ML-8425-image013.jpg)\n\n- **Leave feedback at the frame level** – Similarly, for each frame, you can leave feedback at the frame level under that frame’s **Frame feedback** free string attribute. In this case, the annotations for ```Car``` and ```Pedestrian``` classes look correct and well implemented in this frame. You can relay this positive feedback using the **Provide feedback** field, and your comment is linked to this frame.\n\n[](https://d2908q01vomqb2.cloudfront.net/f1f836cb4ea6efb2a0b1b99f41ad8b103eff4b59/2022/06/16/ML-8425-image013.jpg)\n\n- **Copy the annotation feedback to other frames** – You can copy both label-level and frame-level feedback to other frames if you right-click that attribute. This feature is useful when you want to duplicate the same feedback across frames for that label, or apply the same frame-level feedback to several frames. This feature allows you to quickly complete the inspection of data labels.\n\n[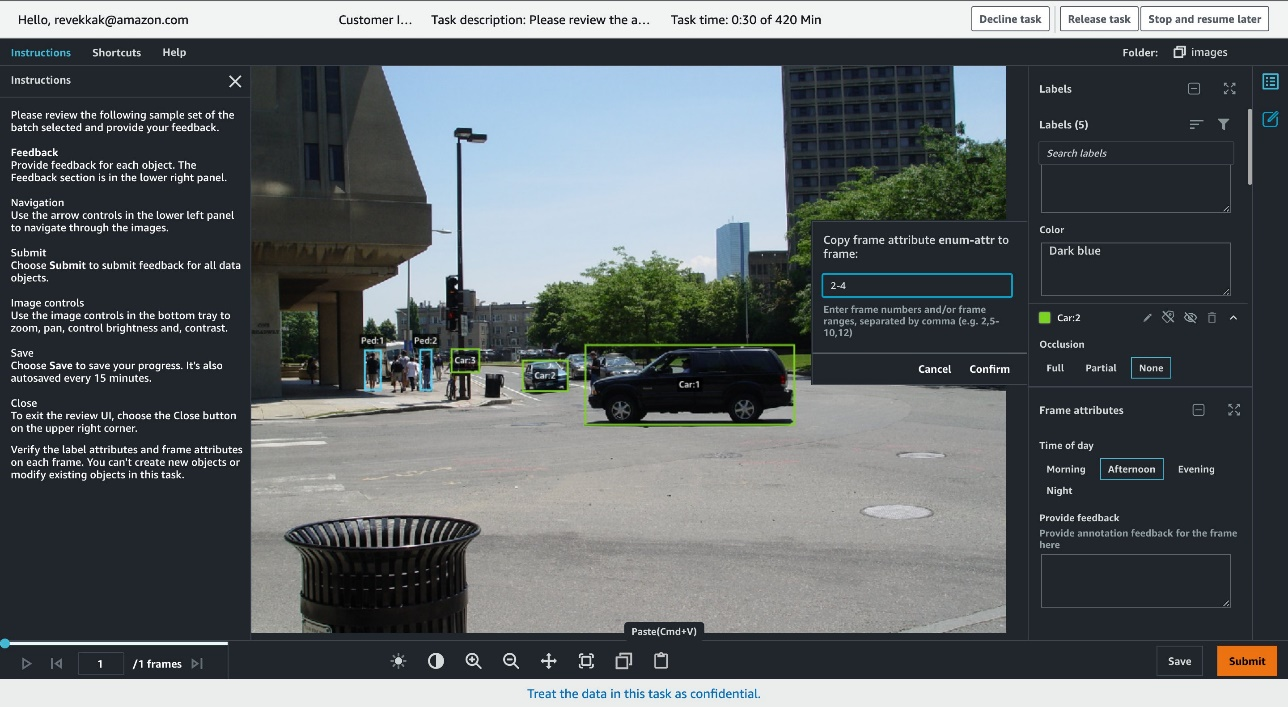](https://d2908q01vomqb2.cloudfront.net/f1f836cb4ea6efb2a0b1b99f41ad8b103eff4b59/2022/06/16/ML-8425-image015.jpg)\n\n- **Approve or reject each dataset object** – For each dataset object you review, you have the option to either choose Approve if you’re satisfied with the annotations or choose **Reject** if you’re not satisfied and want those annotations reworked. When you choose **Submit**, you’re presented with the option to approve or reject the video you just reviewed. In either case, you can provide additional commentary:\nIf you choose **Approve**, the commentary is optional.\n\n\n\nIf you choose **Reject**, commentary is required and we suggest providing detailed feedback. Your feedback will be reviewed by a dedicated Ground Truth Plus quality control team, who will take corrective actions to avoid similar mistakes in subsequent videos.\n\n\n\nAfter you submit the video with your feedback, you’re redirected back to the project detail page in the project portal, where you can view the number of rejected objects under the Rejected objects column and the error rate, which is calculated as the number of accepted objects out of reviewed objects under the Acceptance rate column for each batch in your project. For example, for batch 1 in the following screenshot, the acceptance rate is 80% because four objects were accepted out of the five reviewed objects.\n\n[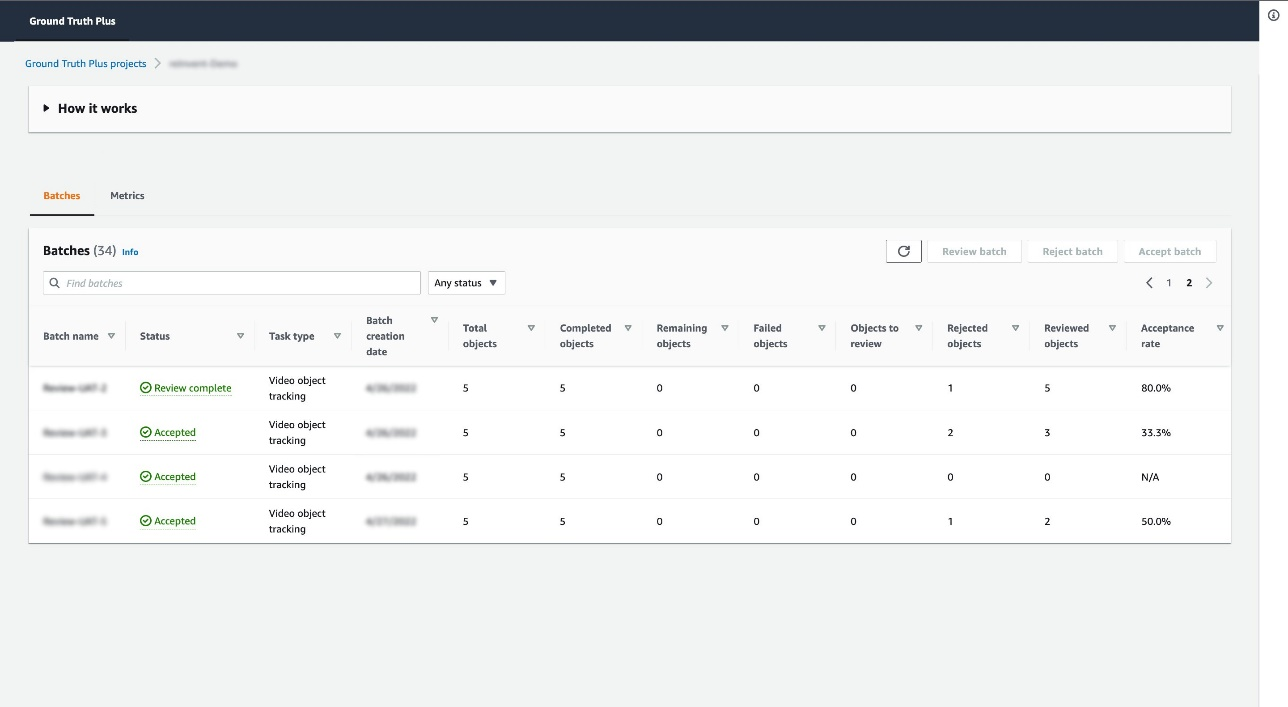](https://d2908q01vomqb2.cloudfront.net/f1f836cb4ea6efb2a0b1b99f41ad8b103eff4b59/2022/06/16/ML-8425-image017.jpg)\n\n\n### **Conclusion**\n\n\nA high-quality training dataset is critical for achieving your ML initiatives. With Ground Truth Plus, you now have an enhanced built-in Review UI tool that removes the undifferentiated heavy lifting associated with building custom tools to review the quality of the labeled dataset. This post walked you through how to set up a project team and use the new built-in features of the Review UI tool. Visit the [Ground Truth Plus console](https://console.aws.amazon.com/sagemaker/groundtruth?region=us-east-1#/plus) to get started.\n\nAs always, AWS welcomes feedback. Please submit any comments or questions.\n\n\n##### **About the Author**\n\n\n\n[](https://d2908q01vomqb2.cloudfront.net/f1f836cb4ea6efb2a0b1b99f41ad8b103eff4b59/2022/06/16/Manish-Goel.png)\n\n**Manish Goel** is the Product Manager for [Amazon SageMaker](https://aws.amazon.com/cn/sagemaker/?trk=cndc-detail) Ground Truth Plus. He is focused on building products that make it easier for customers to adopt machine learning. In his spare time, he enjoys road trips and reading books.\n\n[](https://d2908q01vomqb2.cloudfront.net/f1f836cb4ea6efb2a0b1b99f41ad8b103eff4b59/2022/06/20/revekkak-new.png)\n\n**Revekka Kostoeva** is a Software Developer Engineer at Amazon AWS where she works on customer facing and internal solutions to expand the breadth and scalability of Sagemaker Ground Truth services. As a researcher, she is driven to improve the tools of the trade to drive innovation forward.\n","render":"<p>Launched at AWS re:Invent 2021, <a href=\\"https://aws.amazon.com/sagemaker/data-labeling\\" target=\\"_blank\\">Amazon SageMaker Ground Truth Plus</a> helps you create high-quality training datasets by removing the undifferentiated heavy lifting associated with building data labeling applications and managing the labeling workforce. All you do is share data along with labeling requirements, and Ground Truth Plus sets up and manages your data labeling workflow based on these requirements. From there, an expert workforce that is trained on a variety of machine learning (ML) tasks performs data labeling. You don’t even need deep ML expertise or knowledge of workflow design and quality management to use Ground Truth Plus.</p>\\n<p>Building a high-quality training dataset for your ML algorithm is an iterative process. ML practitioners often build custom systems to inspect data labels because accurately labeled data is critical to ML model quality. To ensure you get high-quality training data, Ground Truth Plus provides you with a built-in user interface (Review UI) to inspect the quality of data labels and provide feedback on data labels until you’re satisfied that the labels accurately represent the ground truth, or what is directly observable in the real world.</p>\n<p>This post walks you through steps to create a project team and use several new built-in features of the Review UI tool to efficiently complete your inspection of a labeled dataset. The walkthrough assumes that you have an active Ground Truth Plus labeling project. For more information, <a href=\\"https://aws.amazon.com/blogs/aws/announcing-amazon-sagemaker-ground-truth-plus/\\" target=\\"_blank\\">see Amazon SageMaker Ground Truth Plus – Create Training Datasets Without Code or In-house Resources.</a></p>\\n<p><strong>Set up a project team</strong><br />\\nA project team provides access to the members from your organization to inspect data labels using the Review UI tool. To set up a project team, complete the following steps:</p>\n<ol>\\n<li>On the Ground Truth Plus <a href=\\"https://us-east-1.console.aws.amazon.com/sagemaker/groundtruth?region=us-east-1#/plus\\" target=\\"_blank\\">console</a>, choose <strong>Create project team</strong>.</li>\\n<li>Select <strong>Create a new Amazon Cognito user group</strong> . If you already have an existing <a href=\\"https://aws.amazon.com/cognito/\\" target=\\"_blank\\">Amazon Cognito</a> user group, select the <strong>Import members</strong> option.</li>\\n<li>For <strong>Amazon Cognito user group name</strong>, enter a name. This name can’t be changed.</li>\\n<li>For <strong>Email addresses</strong>, enter the email addresses of up to 50 team members, separated by commas.</li>\\n<li>Choose <strong>Create project team</strong>.</li>\\n</ol>\n<p><a href=\\"https://d2908q01vomqb2.cloudfront.net/f1f836cb4ea6efb2a0b1b99f41ad8b103eff4b59/2022/06/20/ML-8425-image001-new2.png\\" target=\\"_blank\\"><img src=\\"https://dev-media.amazoncloud.cn/2b626fb89a2c4c11a00f505a29d99797_image.png\\" alt=\\"image.png\\" /></a></p>\\n<p>Your team members will receive an email inviting them to join the Ground Truth Plus project team. From there, they can log in to the Ground Truth Plus project portal to review the data labels.</p>\n<h3><a id=\\"Inspect_labeled_dataset_quality_19\\"></a><strong>Inspect labeled dataset quality</strong></h3>\\n<p>Now let’s dive into a video object tracking example using <a href=\\"http://cbcl.mit.edu/software-datasets/streetscenes/\\" target=\\"_blank\\">CBCL StreetScenes dataset</a>.</p>\\n<p>After the data in your batch has been labeled, the batch is marked as <strong>Ready for review</strong>.</p>\\n<p><a href=\\"https://d2908q01vomqb2.cloudfront.net/f1f836cb4ea6efb2a0b1b99f41ad8b103eff4b59/2022/06/16/ML-8425-image003.jpg\\" target=\\"_blank\\"><img src=\\"https://dev-media.amazoncloud.cn/84b7c817b3444c0985fcc5c40f4b0794_image.png\\" alt=\\"image.png\\" /></a></p>\\n<p>Select the batch and choose <strong>Review batch</strong>. You’re redirected to the Review UI. You have the flexibility to choose a different sampling rate for each batch you review. For instance, in our example batch, we have a total of five videos. You can specify if you want to review only a subset of these five videos or all of them.</p>\\n<p>Now let’s look at the different functionalities within the Review UI that will help you in inspecting the quality of the labeled dataset at a faster pace, and providing feedback on the quality:</p>\n<ul>\\n<li><strong>Filter the labels based on label category</strong> – Within the Review UI, in the right-hand pane, you can filter the labels based on their label category. This feature comes in handy when there are multiple label categories (for example,<code>Vehicles</code>, <code>Pedestrians</code>, and <code>Poles</code>) in a dense dataset object, and you want to view labels for one label category at a time. For example, let’s focus on the <code>Car</code> label category. Enter the <code>Car</code> label category in the right pane to filter for all annotations of only type <code>Car</code>. The following screenshots show the Review UI view before and after applying the filter.</li>\\n</ul>\n<p><a href=\\"https://d2908q01vomqb2.cloudfront.net/f1f836cb4ea6efb2a0b1b99f41ad8b103eff4b59/2022/06/16/ML-8425-image005.jpg\\" target=\\"_blank\\"><img src=\\"https://dev-media.amazoncloud.cn/7cf0ce9b90904077a422152b5ff24f74_image.png\\" alt=\\"image.png\\" /></a></p>\\n<p><a href=\\"https://d2908q01vomqb2.cloudfront.net/f1f836cb4ea6efb2a0b1b99f41ad8b103eff4b59/2022/06/16/ML-8425-image007.jpg\\" target=\\"_blank\\"><img src=\\"https://dev-media.amazoncloud.cn/acdd7f5780b34491bdcde9e2ffab4aad_image.png\\" alt=\\"image.png\\" /></a></p>\\n<ul>\\n<li><strong>Overlay associated annotated attribute values</strong> – Each label can be assigned attributes to be annotated. For example, for the label category <code>Car</code>, say you want to ask the workers to also annotate the <code>Color</code> and <code>Occlusion</code> attributes for each label instance. When you load the Review UI, you will see the corresponding attributes under each label instance on the right pane. But what if you want to see these attribute annotations directly on the image instead? You select the label <code>Car:1</code>, and to overlay the attribute annotations for <code>Car:1</code>, you press <strong>Ctrl+A</strong>.<br />\\nNow you will see the annotation <code>Dark Blue</code> for the <code>Color</code> attribute and annotation <code>None</code> for the <code>Occlusion</code> attribute directly displayed on the image next to the <code>Car:1</code> bounding box. Now you can easily verify that <code>Car:1</code> was marked as <code>Dark Blue</code>, with no occlusion just from looking at the image instead of having to locate <code>Car:1</code> on the right pane to see the attribute annotations.</li>\\n</ul>\n<p><a href=\\"https://d2908q01vomqb2.cloudfront.net/f1f836cb4ea6efb2a0b1b99f41ad8b103eff4b59/2022/06/16/ML-8425-image009.jpg\\" target=\\"_blank\\"><img src=\\"https://dev-media.amazoncloud.cn/5eb2aa7d126c4a1194ef9924707328a2_image.png\\" alt=\\"image.png\\" /></a></p>\\n<ul>\\n<li><strong>Leave feedback at the label level</strong> – For each label, you can leave feedback at the label level in that label’s <strong>Label feedback</strong> free string attribute. For example, in this image, <code>Car:1</code> looks more black than dark blue. You can relay this discrepancy as feedback for <code>Car:1</code> using the <strong>Label feedback</strong> field to track the comment to that label on that frame. Our internal quality control team will review this feedback and introduce changes to the annotation process and label policies, and train the annotators as required.</li>\\n</ul>\n<p><a href=\\"https://d2908q01vomqb2.cloudfront.net/f1f836cb4ea6efb2a0b1b99f41ad8b103eff4b59/2022/06/16/ML-8425-image013.jpg\\" target=\\"_blank\\"><img src=\\"https://dev-media.amazoncloud.cn/42cc2fbc0d5f4416a6e04628945b7a7e_image.png\\" alt=\\"image.png\\" /></a></p>\\n<ul>\\n<li><strong>Leave feedback at the frame level</strong> – Similarly, for each frame, you can leave feedback at the frame level under that frame’s <strong>Frame feedback</strong> free string attribute. In this case, the annotations for <code>Car</code> and <code>Pedestrian</code> classes look correct and well implemented in this frame. You can relay this positive feedback using the <strong>Provide feedback</strong> field, and your comment is linked to this frame.</li>\\n</ul>\n<p><a href=\\"https://d2908q01vomqb2.cloudfront.net/f1f836cb4ea6efb2a0b1b99f41ad8b103eff4b59/2022/06/16/ML-8425-image013.jpg\\" target=\\"_blank\\"><img src=\\"https://dev-media.amazoncloud.cn/8e019a7b7de14972861f1b5fd9d14a88_image.png\\" alt=\\"image.png\\" /></a></p>\\n<ul>\\n<li><strong>Copy the annotation feedback to other frames</strong> – You can copy both label-level and frame-level feedback to other frames if you right-click that attribute. This feature is useful when you want to duplicate the same feedback across frames for that label, or apply the same frame-level feedback to several frames. This feature allows you to quickly complete the inspection of data labels.</li>\\n</ul>\n<p><a href=\\"https://d2908q01vomqb2.cloudfront.net/f1f836cb4ea6efb2a0b1b99f41ad8b103eff4b59/2022/06/16/ML-8425-image015.jpg\\" target=\\"_blank\\"><img src=\\"https://dev-media.amazoncloud.cn/d2b680f105b94398bc8359dd896f306e_image.png\\" alt=\\"image.png\\" /></a></p>\\n<ul>\\n<li><strong>Approve or reject each dataset object</strong> – For each dataset object you review, you have the option to either choose Approve if you’re satisfied with the annotations or choose <strong>Reject</strong> if you’re not satisfied and want those annotations reworked. When you choose <strong>Submit</strong>, you’re presented with the option to approve or reject the video you just reviewed. In either case, you can provide additional commentary:<br />\\nIf you choose <strong>Approve</strong>, the commentary is optional.</li>\\n</ul>\n<p><img src=\\"https://dev-media.amazoncloud.cn/857def95865a4b80bec4d1fac19ad90e_accept.gif\\" alt=\\"accept.gif\\" /></p>\n<p>If you choose <strong>Reject</strong>, commentary is required and we suggest providing detailed feedback. Your feedback will be reviewed by a dedicated Ground Truth Plus quality control team, who will take corrective actions to avoid similar mistakes in subsequent videos.</p>\\n<p><img src=\\"https://dev-media.amazoncloud.cn/0a59b9d530ab44e89f2b1400370702d0_reject.gif\\" alt=\\"reject.gif\\" /></p>\n<p>After you submit the video with your feedback, you’re redirected back to the project detail page in the project portal, where you can view the number of rejected objects under the Rejected objects column and the error rate, which is calculated as the number of accepted objects out of reviewed objects under the Acceptance rate column for each batch in your project. For example, for batch 1 in the following screenshot, the acceptance rate is 80% because four objects were accepted out of the five reviewed objects.</p>\n<p><a href=\\"https://d2908q01vomqb2.cloudfront.net/f1f836cb4ea6efb2a0b1b99f41ad8b103eff4b59/2022/06/16/ML-8425-image017.jpg\\" target=\\"_blank\\"><img src=\\"https://dev-media.amazoncloud.cn/8c6f23fd69da4015bcb912cd2b6438ea_image.png\\" alt=\\"image.png\\" /></a></p>\\n<h3><a id=\\"Conclusion_67\\"></a><strong>Conclusion</strong></h3>\\n<p>A high-quality training dataset is critical for achieving your ML initiatives. With Ground Truth Plus, you now have an enhanced built-in Review UI tool that removes the undifferentiated heavy lifting associated with building custom tools to review the quality of the labeled dataset. This post walked you through how to set up a project team and use the new built-in features of the Review UI tool. Visit the <a href=\\"https://console.aws.amazon.com/sagemaker/groundtruth?region=us-east-1#/plus\\" target=\\"_blank\\">Ground Truth Plus console</a> to get started.</p>\\n<p>As always, AWS welcomes feedback. Please submit any comments or questions.</p>\n<h5><a id=\\"About_the_Author_75\\"></a><strong>About the Author</strong></h5>\\n<p><a href=\\"https://d2908q01vomqb2.cloudfront.net/f1f836cb4ea6efb2a0b1b99f41ad8b103eff4b59/2022/06/16/Manish-Goel.png\\" target=\\"_blank\\"><img src=\\"https://dev-media.amazoncloud.cn/638961460721454f8b5d6c68fff59e8e_image.png\\" alt=\\"image.png\\" /></a></p>\\n<p><strong>Manish Goel</strong> is the Product Manager for [Amazon SageMaker](https://aws.amazon.com/cn/sagemaker/?trk=cndc-detail) Ground Truth Plus. He is focused on building products that make it easier for customers to adopt machine learning. In his spare time, he enjoys road trips and reading books.</p>\\n<p><a href=\\"https://d2908q01vomqb2.cloudfront.net/f1f836cb4ea6efb2a0b1b99f41ad8b103eff4b59/2022/06/20/revekkak-new.png\\" target=\\"_blank\\"><img src=\\"https://dev-media.amazoncloud.cn/334db05eb0e14ec9a0f9ecc92aec8dff_image.png\\" alt=\\"image.png\\" /></a></p>\\n<p><strong>Revekka Kostoeva</strong> is a Software Developer Engineer at Amazon AWS where she works on customer facing and internal solutions to expand the breadth and scalability of Sagemaker Ground Truth services. As a researcher, she is driven to improve the tools of the trade to drive innovation forward.</p>\n"}
Inspect your data labels with a visual, no code tool to create high-quality training datasets with Amazon SageMaker Ground Truth Plus
海外精选

海外精选的内容汇集了全球优质的亚马逊云科技相关技术内容。同时,内容中提到的“AWS”
是 “Amazon Web Services” 的缩写,在此网站不作为商标展示。

 0
0 0
0亚马逊云科技解决方案 基于行业客户应用场景及技术领域的解决方案
联系亚马逊云科技专家
亚马逊云科技解决方案
基于行业客户应用场景及技术领域的解决方案
联系专家

0
目录

 分享
分享 点赞
点赞 收藏
收藏 目录
目录立即注册,开启您的免费套餐
立即关注

亚马逊云开发者
公众号

User Group
公众号

亚马逊云科技
官方小程序
“AWS” 是 “Amazon Web Services” 的缩写,在此网站不作为商标展示。
立即关注
亚马逊云开发者
公众号
User Group
公众号
亚马逊云科技
官方小程序
“AWS” 是 “Amazon Web Services” 的缩写,在此网站不作为商标展示。
关于我们 
更多资源
开发者工具
更多支持
立即关注
亚马逊云开发者
公众号
User Group
公众号
亚马逊云科技
官方小程序
“AWS” 是 “Amazon Web Services” 的缩写,在此网站不作为商标展示。
