{"value":"Data scientists often work towards understanding the effects of various data preprocessing and feature engineering strategies in combination with different model architectures and hyperparameters. Doing so requires you to cover large parameter spaces iteratively, and it can be overwhelming to keep track of previously run configurations and results while keeping experiments reproducible.\n\nThis post walks you through an example of how to track your experiments across code, data, artifacts, and metrics by using[ Amazon SageMaker Experiments](https://sagemaker-experiments.readthedocs.io/en/latest/) in conjunction with [Data Version Control (DVC)](https://dvc.org/). We show how you can use DVC side by side with [Amazon SageMaker](https://aws.amazon.com/cn/sagemaker/) processing and training jobs. We train different CatBoost models on the California housing dataset from the [StatLib repository](http://lib.stat.cmu.edu/datasets/), and change holdout strategies while keeping track of the data version with DVC. In each individual experiment, we track input and output artifacts, code, and metrics using SageMaker Experiments.\n\n\n\n#### **SageMaker Experiments**\n\n\nSageMaker Experiments is an AWS service for tracking machine learning (ML) experiments. The [SageMaker Experiments Python SDK](https://github.com/aws/sagemaker-experiments) is a high-level interface to this service that helps you track experiment information using Python.\n\nThe goal of SageMaker Experiments is to make it as simple as possible to create experiments, populate them with trials, add tracking and lineage information, and run analytics across trials and experiments.\n\nWhen discussing SageMaker Experiments, we refer to the following concepts:\n\n- **Experiment** – A collection of related trials. You add trials to an experiment that you want to compare together.\n- **Trial** – A description of a multi-step ML workflow. Each step in the workflow is described by a trial component.\n- **Trial component** – A description of a single step in an ML workflow, such as data cleaning, feature extraction, model training, or model evaluation.\n- **Tracker** – A Python context manager for logging information about a single trial component (for example, parameters, metrics, or artifacts).\n\n#### **Data Version Control**\n\nData Version Control (DVC) is a new type of data versioning, workflow, and experiment management software that builds upon [Git](https://git-scm.com/) (although it can work standalone). DVC reduces the gap between established engineering toolsets and data science needs, allowing you to take advantage of new [features](https://dvc.org/doc/user-guide/what-is-dvc#core-features) while reusing existing skills and intuition.\n\nData science experiment sharing and collaboration can be done through a regular Git flow (commits, branching, tagging, pull requests) the same way it works for software engineers. With Git and DVC, data science and ML teams can version experiments, manage large datasets, and make projects reproducible.\n\nDVC has the following features:\n\n- DVC is a [free](https://github.com/iterative/dvc/blob/main/LICENSE), open-source [command line](https://dvc.org/doc/command-reference) tool.\n- DVC works on top of Git repositories and has a similar command line interface and flow as Git. DVC can also work standalone, but without [versioning](https://dvc.org/doc/use-cases/versioning-data-and-model-files) capabilities.\n- Data versioning is enabled by replacing large files, dataset directories, ML models, and so on with small [metafiles](https://dvc.org/doc/user-guide/project-structure) (easy to handle with Git). These placeholders point to the original data, which is decoupled from source code management.\n- You can use on-premises or cloud storage to store the project’s data separate from its code base. This is how data scientists can transfer large datasets or share a GPU-trained model with others.\n- DVC makes data science projects reproducible by creating lightweight [pipelines](https://dvc.org/doc/command-reference/dag) using implicit dependency graphs, and by codifying the data and artifacts involved.\n- DVC is platform agnostic. It runs on all major operating systems (Linux, macOS, and Windows), and works independently of the programming languages (Python, R, Julia, shell scripts, and so on) or ML libraries (Keras, TensorFlow, PyTorch, Scipy, and more) used in the project.\n- DVC is quick to [install](https://dvc.org/doc/install) and doesn’t require special infrastructure, nor does it depend on APIs or external services. It’s a standalone CLI tool.\n\n\n#### **SageMaker Experiments and DVC sample**\n\n\nThe following [GitHub sample](https://github.com/aws-samples/amazon-sagemaker-experiments-dvc-demo) shows how to use DVC within the SageMaker environment. In particular, we look at how to build a custom image with DVC libraries installed by default to provide a consistent development environment to your data scientists in [Amazon SageMaker Studio](https://docs.aws.amazon.com/sagemaker/latest/dg/studio.html), and how to run DVC alongside SageMaker managed infrastructure for processing and training. Furthermore, we show how to enrich SageMaker tracking information with data versioning information from DVC, and visualize them within the Studio console.\n\nThe following diagram illustrates the solution architecture and workflow.\n\n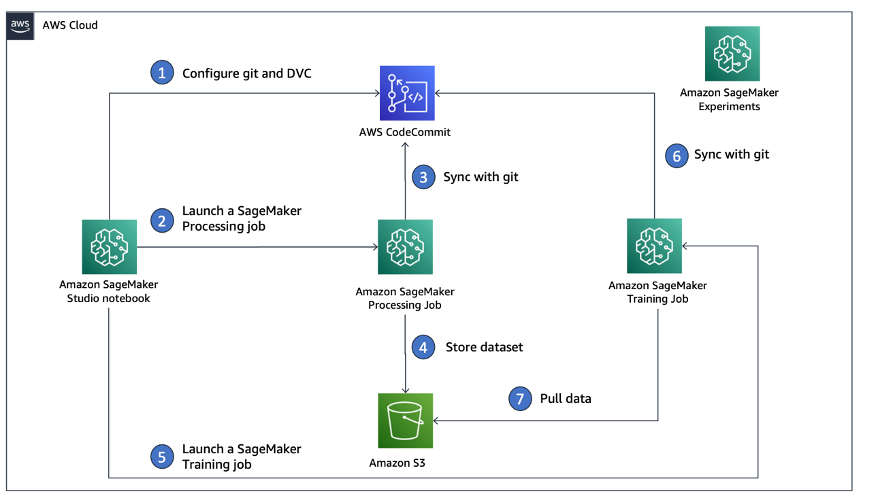\n\n#### **Build a custom Studio image with DVC already installed**\n\nIn this [GitHub repository](https://github.com/aws-samples/amazon-sagemaker-experiments-dvc-demo/blob/main/sagemaker-studio-dvc-image/README.md), we explain how to create a custom image for Studio that has DVC already installed. The advantage of creating an image and making it available to all Studio users is that it creates a consistent environment for the Studio users, which they could also run locally. Although the sample is based on [AWS Cloud9](https://aws.amazon.com/cn/cloud9/?trk=cndc-detail), you can also build the container on your local machine as long as you have Docker installed and running. This sample is based on the following [Dockerfile](https://github.com/aws-samples/amazon-sagemaker-experiments-dvc-demo/blob/main/sagemaker-studio-dvc-image/Dockerfile) and [environment](https://github.com/aws-samples/amazon-sagemaker-experiments-dvc-demo/blob/main/sagemaker-studio-dvc-image/environment.yml).yml. The resulting Docker image is stored in [Amazon Elastic Container Registry ](https://aws.amazon.com/cn/ecr/?trk=cndc-detail)([Amazon EMR](https://aws.amazon.com/cn/emr/?trk=cndc-detail)) in your AWS account. See the following code:\n\n\n```\\n# Login to ECR\\naws --region \${REGION} ecr get-login-password | docker login --username AWS --password-stdin \${ACCOUNT_ID}.dkr.ecr.\${REGION}.amazonaws.com/smstudio-custom\\n\\n# Create the ECR repository\\naws --region \${REGION} ecr create-repository --repository-name smstudio-custom\\n\\n# Build the image - it might take a few minutes to complete this step\\ndocker build . -t \${IMAGE_NAME} -t \${ACCOUNT_ID}.dkr.ecr.\${REGION}.amazonaws.com/smstudio-custom:\${IMAGE_NAME}\\n\\n# Push the image to ECR\\ndocker push \${ACCOUNT_ID}.dkr.ecr.\${REGION}.amazonaws.com/smstudio-custom:\${IMAGE_NAME}\\n```\n\nYou can now [create a new Studio domain](https://github.com/aws-samples/amazon-sagemaker-experiments-dvc-demo/blob/main/sagemaker-studio-dvc-image/README.md#create-a-new-sagemaker-studio) or [update an existing Studio domain](https://github.com/aws-samples/amazon-sagemaker-experiments-dvc-demo/blob/main/sagemaker-studio-dvc-image/README.md#update-an-existing-sagemaker-studio) that has access to the newly created Docker image.\n\nWe use [AWS Cloud Development Kit](AWS Cloud Development Kit) ([AWS CDK](https://aws.amazon.com/cn/cdk/?trk=cndc-detail)) to create the following resources via [AWS CloudFormation](https://aws.amazon.com/cn/cloudformation/):\n\n- A SageMaker execution role with the right permissions to your new or existing Studio domain\n- A SageMaker image and SageMaker image version from the Docker image ```conda-env-dvc-kernel``` that we created earlier\n- An ```AppImageConfig``` that specifies how the kernel gateway should be configured\n- A Studio user (```data-scientist-dvc```) with the correct SageMaker execution role and the custom Studio image available to it\n\nFor detailed instructions, refer to [Associate a custom image to SageMaker Studio](Associate a custom image to SageMaker Studio).\n\n\n**Run the lab**\n\nTo run the lab, complete the following steps:\n\n1. In the Studio domain, launch Studio for the ```data-scientist-dvc``` user.\n2. Choose the Git icon, then choose Clone a Repository.\n\n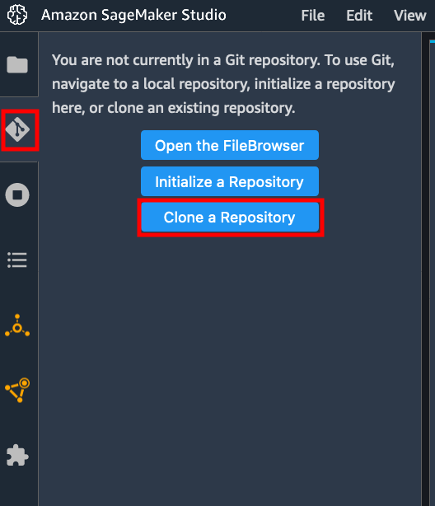\n\n3. Enter the URL of the repository (```https://github.com/aws-samples/amazon-sagemaker-experiments-dvc-demo```) and choose Clone.\n\n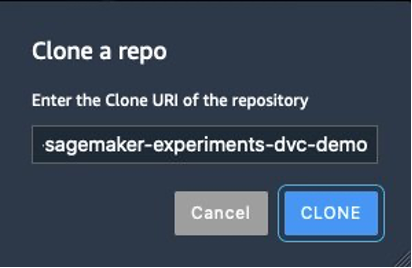\n4. In the file browser, choose the ```amazon-sagemaker-experiments-dvc-demo``` repository.\n5. Open the ```dvc_sagemaker_script_mode.ipynb``` notebook.\n6. For **Custom Image**, choose the image conda-env-dvc-kernel.\n7. Choose Select.\n\n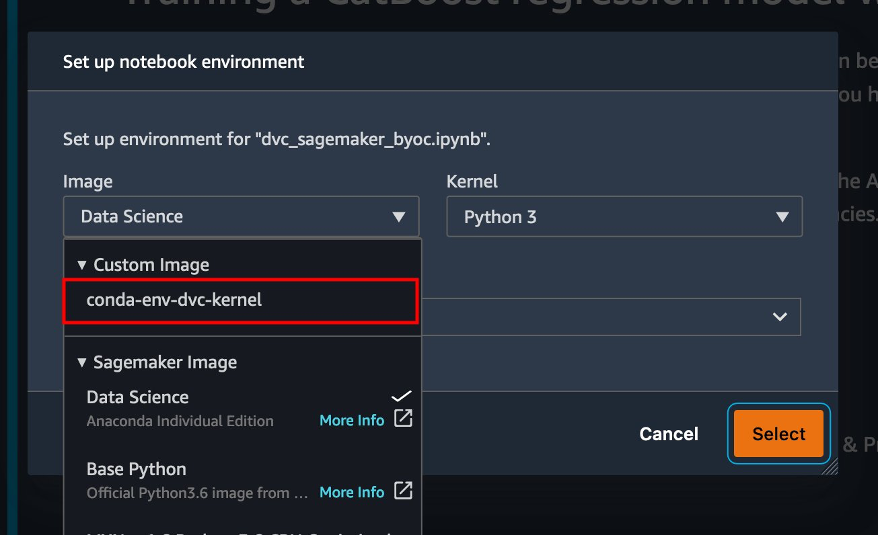\n\n#### **Configure DVC for data versioning**\n\n\nWe create a subdirectory where we prepare the data: sagemaker-dvc-sample. Within this subdirectory, we initialize a new Git repository and set the remote to a repository we create in [AWS CodeCommit](https://aws.amazon.com/cn/codecommit/). The goal is to have DVC configurations and files for data tracking versioned in this repository. However, Git offers native capabilities to manage subprojects via, for example, git submodules and git subtrees, and you can extend this sample to use any of the aforementioned tools that best fit your workflow.\n\nThe main advantage of using CodeCommit with SageMaker in our case is its integration with [AWS Identity and Access Management](https://aws.amazon.com/cn/iam/?trk=cndc-detail) (IAM) for authentication and authorization, meaning we can use IAM roles to push and pull data without the need to fetch credentials (or SSH keys). Setting the appropriate permissions on the SageMaker execution role also allows the Studio notebook and the SageMaker training and processing job to interact securely with CodeCommit.\n\nAlthough you can replace CodeCommit with any other source control service, such as GitHub, Gitlab, or Bitbucket, you need consider how to handle the credentials for your system. One possibility is to store these credentials on [AWS Secrets Manager](https://aws.amazon.com/cn/secrets-manager/) and fetch them at run time from the Studio notebook as well as from the SageMaker processing and training jobs.\n\n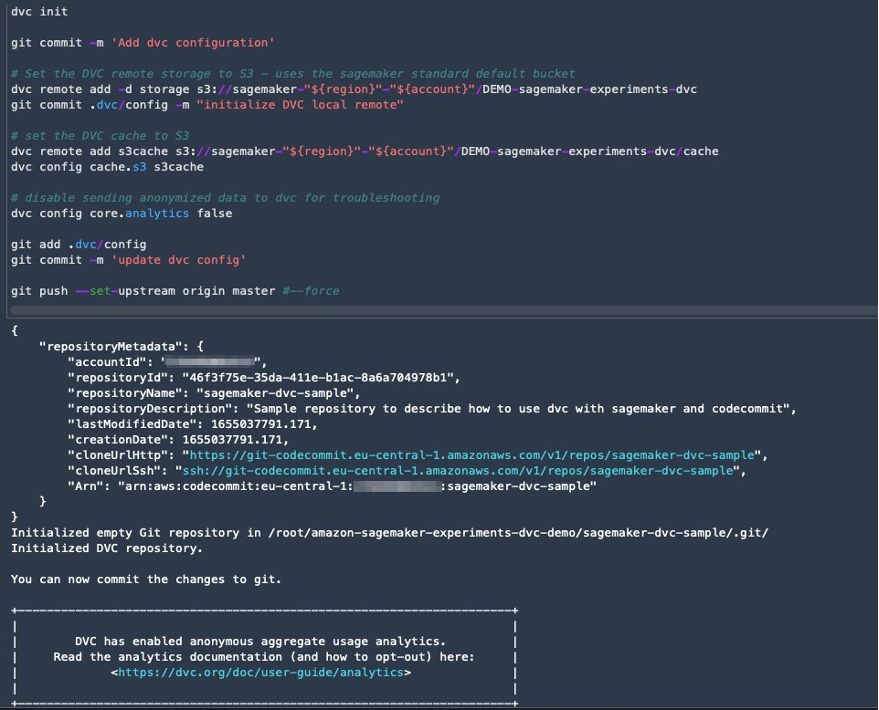\n\n#### **Process and train with DVC and SageMaker**\n\n\nIn this section, we explore two different approaches to tackle our problem and how we can keep track of the two tests using SageMaker Experiments according to the high-level conceptual architecture we showed you earlier.\n\n#### **Set up a SageMaker experiment**\n\n\nTo track this test in SageMaker, we need to create an experiment. We need to also define the trial within the experiment. For the sake of simplicity, we just consider one trial for the experiment, but you can have any number of trials within an experiment, for example, if you want to test different algorithms.\n\nWe create an experiment named ```DEMO-sagemaker-experiments-dvc``` with two trials, ```dvc-trial-single-file``` and ```dvc-trial-multi-files```, each representing a different version of the dataset.\n\nLet’s create the ```DEMO-sagemaker-experiments-dvc``` experiment:\n\n```\\nfrom smexperiments.experiment import Experiment\\nfrom smexperiments.trial import Trial\\nfrom smexperiments.trial_component import TrialComponent\\nfrom smexperiments.tracker import Tracker\\n\\nexperiment_name = 'DEMO-sagemaker-experiments-dvc'\\n\\n# create the experiment if it doesn't exist\\ntry:\\n my_experiment = Experiment.load(experiment_name=experiment_name)\\n print(\\"existing experiment loaded\\")\\nexcept Exception as ex:\\n if \\"ResourceNotFound\\" in str(ex):\\n my_experiment = Experiment.create(\\n experiment_name = experiment_name,\\n description = \\"How to integrate DVC\\"\\n )\\n print(\\"new experiment created\\")\\n else:\\n print(f\\"Unexpected {ex}=, {type(ex)}\\")\\n print(\\"Dont go forward!\\")\\n raise\\n```\n\n#### **Test 1: Generate single files for training and validation**\n\nIn this section, we create a processing script that fetches the raw data directly from [Amazon Simple Storage Service](https://aws.amazon.com/cn/s3/?trk=cndc-detail) ([Amazon S3](https://aws.amazon.com/cn/s3/?trk=cndc-detail)) as input; processes it to create the train, validation, and test datasets; and stores the results back to [Amazon S3](https://aws.amazon.com/cn/s3/?trk=cndc-detail) using DVC. Furthermore, we show how you can track output artifacts generated by DVC with SageMaker when running processing and training jobs and via SageMaker Experiments.\n\nFirst, we create the ```dvc-trial-single-file``` trial and add it to the ```DEMO-sagemaker-experiments-dvc``` experiment. By doing so, we keep all trial components related to this test organized in a meaningful way.\n\n```\\nfirst_trial_name = \\"dvc-trial-single-file\\"\\n\\ntry:\\n my_first_trial = Trial.load(trial_name=first_trial_name)\\n print(\\"existing trial loaded\\")\\nexcept Exception as ex:\\n if \\"ResourceNotFound\\" in str(ex):\\n my_first_trial = Trial.create(\\n experiment_name=experiment_name,\\n trial_name=first_trial_name,\\n )\\n print(\\"new trial created\\")\\n else:\\n print(f\\"Unexpected {ex}=, {type(ex)}\\")\\n print(\\"Dont go forward!\\")\\n raise\\n```\n\n#### **Use DVC in a SageMaker processing job to create the single file version**\n\n\nIn this section, we create a processing script that gets the raw data directly from [Amazon S3](https://aws.amazon.com/cn/s3/?trk=cndc-detail) as input using the managed data loading capability of SageMaker; processes it to create the train, validation, and test datasets; and stores the results back to [Amazon S3](https://aws.amazon.com/cn/s3/?trk=cndc-detail) using DVC. It’s very important to understand that when using DVC to store data to [Amazon S3](https://aws.amazon.com/cn/s3/?trk=cndc-detail) (or pull data from [Amazon S3](https://aws.amazon.com/cn/s3/?trk=cndc-detail)), we’re losing SageMaker managed data loading capabilities, which can potentially have an impact on performance and costs of our processing and training jobs, especially when working with very large datasets. For more information on the different SageMaker native input mode capabilities, refer to[ Access Training Data](https://docs.aws.amazon.com/sagemaker/latest/dg/model-access-training-data.html).\n\nFinally, we unify DVC tracking capabilities with SageMaker tracking capabilities when running processing jobs via SageMaker Experiments.\n\nThe processing script expects the address of the Git repository and the branch we want to create to store the DVC metadata passed via environmental variables. The datasets themselves are stored in [Amazon S3](https://aws.amazon.com/cn/s3/?trk=cndc-detail) by DVC. Although environmental variables are automatically tracked in SageMaker Experiments and visible in the trial component parameters, we might want to enrich the trial components with further information, which then become available for visualization in the Studio UI using a tracker object. In our case, the trial components parameters include the following:\n\n- ```\\n- DVC_REPO_URL\\n- DVC_BRANCH\\n- USER\\n- data_commit_hash\\n- train_test_split_ratio\\n- ```\n\n\nThe preprocessing script clones the Git repository; generates the train, validation, and test datasets; and syncs it using DVC. As mentioned earlier, when using DVC, we can’t take advantage of native SageMaker data loading capabilities. Aside from the performance penalties we might suffer on large datasets, we also lose the automatic tracking capabilities for the output artifacts. However, thanks to the tracker and the DVC Python API, we can compensate for these shortcomings, retrieve such information at run time, and store it in the trial component with little effort. The added value by doing so is to have in single view of the input and output artifacts that belong to this specific processing job.\n\nThe full preprocessing Python script is available in the [GitHub repo](https://github.com/aws-samples/amazon-sagemaker-experiments-dvc-demo/blob/main/source_dir/preprocessing-experiment.py).\n\n```\\nwith Tracker.load() as tracker:\\n tracker.log_parameters({\\"data_commit_hash\\": commit_hash})\\n for file_type in file_types:\\n path = dvc.api.get_url(\\n f\\"{data_path}/{file_type}/california_{file_type}.csv\\",\\n repo=dvc_repo_url,\\n rev=dvc_branch\\n )\\n tracker.log_output(name=f\\"california_{file_type}\\",value=path)\\n```\n\n\nSageMaker gives us the possibility to run our processing script on container images managed by AWS that are optimized to run on the AWS infrastructure. If our script requires additional dependencies, we can supply a ```requirements.txt``` file. When we start the processing job, SageMaker uses ```pip-install``` to install all the libraries we need (for example, DVC-related libraries). If you need to have a tighter control of all libraries installed on the containers, you can bring your own container in SageMaker, for example for [processing](https://docs.aws.amazon.com/sagemaker/latest/dg/use-your-own-processing-code.html) and training.\n\nWe have now all the ingredients to run our SageMaker processing job:\n\n- A processing script that can process several arguments (```--train-test-split-ratio```) and two environmental variables (```DVC_REPO_URL``` and ```DVC_BRANCH```)\n- A ```requiremets.txt``` file\n- A Git repository (in CodeCommit)\n- A SageMaker experiment and trial\n\n```\\nfrom sagemaker.processing import FrameworkProcessor, ProcessingInput\\nfrom sagemaker.sklearn.estimator import SKLearn\\n\\ndvc_repo_url = \\"codecommit::{}://sagemaker-dvc-sample\\".format(region)\\ndvc_branch = my_first_trial.trial_name\\n\\nscript_processor = FrameworkProcessor(\\n estimator_cls=SKLearn,\\n framework_version='0.23-1',\\n instance_count=1,\\n instance_type='ml.m5.xlarge',\\n env={\\n \\"DVC_REPO_URL\\": dvc_repo_url,\\n \\"DVC_BRANCH\\": dvc_branch,\\n \\"USER\\": \\"sagemaker\\"\\n },\\n role=role\\n)\\n\\nexperiment_config={\\n \\"ExperimentName\\": my_experiment.experiment_name,\\n \\"TrialName\\": my_first_trial.trial_name\\n}\\n```\n\nWe then run the processing job with the ```preprocessing-experiment.py``` script, ```experiment_config```, ```dvc_repo_url```, and ```dvc_branch``` we defined earlier.\n\n```\\n%%time\\n\\nscript_processor.run(\\n code='./source_dir/preprocessing-experiment.py',\\n dependencies=['./source_dir/requirements.txt'],\\n inputs=[ProcessingInput(source=s3_data_path, destination=\\"/opt/ml/processing/input\\")],\\n experiment_config=experiment_config,\\n arguments=[\\"--train-test-split-ratio\\", \\"0.2\\"]\\n)\\n```\n\n\nThe processing job takes approximately 5 minutes to complete. Now you can view the trial details for the single file dataset.\n\nThe following screenshot shows where you can find the stored information within Studio. Note the values for ```dvc-trial-single-file``` in ```DVC_BRANCH```, ```DVC_REPO_URL```, and ```data_commit_hash``` on the **Parameters** tab.\n\n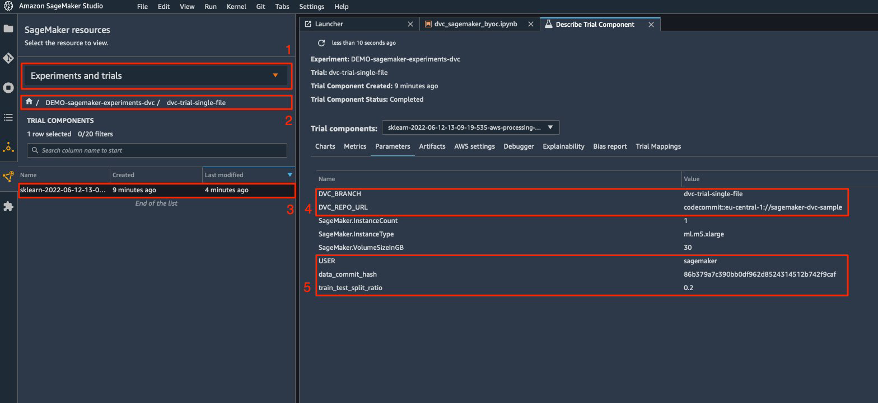\n\nAlso note the input and output details on the Artifacts tab.\n\n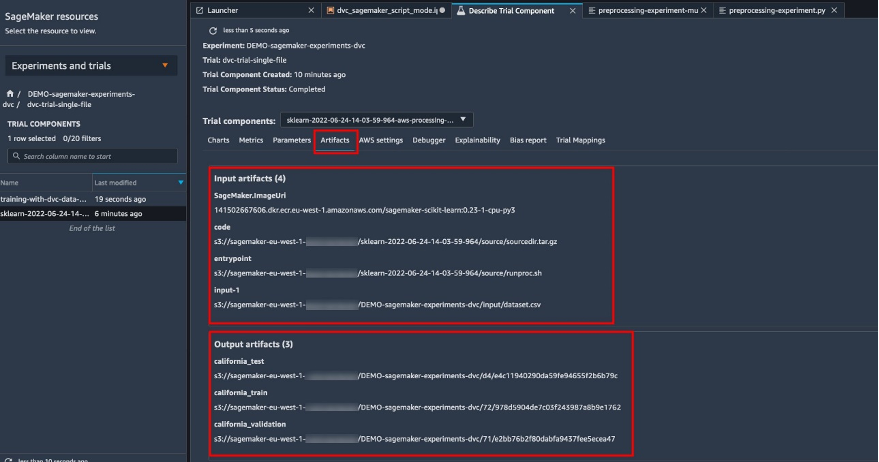\n\n**Create an estimator and fit the model with single file data version**\n\nTo use DVC integration inside a SageMaker training job, we pass a ```dvc_repo_url``` and ```dvc_branch``` as environmental variables when you create the Estimator object.\n\nWe train on the ```dvc-trial-single-file``` branch first.\n\nWhen pulling data with DVC, we use the following dataset structure:\n\n```\\ndataset\\n |-- train\\n | |-- california_train.csv\\n |-- test\\n | |-- california_test.csv\\n |-- validation\\n | |-- california_validation.csv\\n```\nNow we create a Scikit-learn Estimator using the [SageMaker Python SDK](https://github.com/aws/sagemaker-python-sdk). This allows us to specify the following:\n\n- The path to the Python source file, which should be run as the entry point to training.\n- The IAM role that controls permissions for accessing [Amazon S3](https://aws.amazon.com/cn/s3/?trk=cndc-detail) and CodeCommit data and running SageMaker functions.\n- A list of dictionaries that define the metrics used to evaluate the training jobs.\n- The number and type of training instances. We use one ml.m5.large instance.\n- Hyperparameters that are used for training.\n- Environment variables to use during the training job. We use ```DVC_REPO_URL```, ```DVC_BRANCH```, and ```USER```.\n\n```\\nmetric_definitions = [{'Name': 'median-AE', 'Regex': \\"AE-at-50th-percentile: ([0-9.]+).*\$\\"}]\\n\\nhyperparameters={ \\n \\"learning_rate\\" : 1,\\n \\"depth\\": 6\\n }\\nestimator = SKLearn(\\n entry_point='train.py',\\n source_dir='source_dir',\\n role=role,\\n metric_definitions=metric_definitions,\\n hyperparameters=hyperparameters,\\n instance_count=1,\\n instance_type='ml.m5.large',\\n framework_version='0.23-1',\\n base_job_name='training-with-dvc-data',\\n environment={\\n \\"DVC_REPO_URL\\": dvc_repo_url,\\n \\"DVC_BRANCH\\": dvc_branch,\\n \\"USER\\": \\"sagemaker\\"\\n }\\n)\\n\\nexperiment_config={\\n \\"ExperimentName\\": my_experiment.experiment_name,\\n \\"TrialName\\": my_first_trial.trial_name\\n}\\n```\n\nWe call the fit method of the Estimator with the experiment_config we defined earlier to start the training.\n\n```\\nRunning dvc pull command\\nA train/california_train.csv\\nA test/california_test.csv\\nA validation/california_validation.csv\\n3 files added and 3 files fetched\\nStarting the training.\\nFound train files: ['/opt/ml/input/data/dataset/train/california_train.csv']\\nFound validation files: ['/opt/ml/input/data/dataset/train/california_train.csv']\\n```\n#### **\nTest 2: Generate multiple files for training and validation\n**\n\nWe create a new ```dvc-trial-multi-files``` trial and add it to the current ```DEMO-sagemaker-experiments-dvc``` experiment.\n\n```\\nsecond_trial_name = \\"dvc-trial-multi-files\\"\\ntry:\\n my_second_trial = Trial.load(trial_name=second_trial_name)\\n print(\\"existing trial loaded\\")\\nexcept Exception as ex:\\n if \\"ResourceNotFound\\" in str(ex):\\n my_second_trial = Trial.create(\\n experiment_name=experiment_name,\\n trial_name=second_trial_name,\\n )\\n print(\\"new trial created\\")\\n else:\\n print(f\\"Unexpected {ex}=, {type(ex)}\\")\\n print(\\"Dont go forward!\\")\\n raise\\n```\n\nDifferently from the first processing script, we now create out of the original dataset multiple files for training and validation and store the DVC metadata in a different branch.\n\nYou can explore the second preprocessing Python script on [GitHub](https://github.com/aws-samples/amazon-sagemaker-experiments-dvc-demo/blob/main/source_dir/preprocessing-experiment-multifiles.py).\n\n```\\n%%time\\n\\nscript_processor.run(\\n code='./source_dir/preprocessing-experiment-multifiles.py',\\n dependencies=['./source_dir/requirements.txt'],\\n inputs=[ProcessingInput(source=s3_data_path, destination=\\"/opt/ml/processing/input\\")],\\n experiment_config=experiment_config,\\n arguments=[\\"--train-test-split-ratio\\", \\"0.1\\"]\\n)\\n```\n\n\nThe processing job takes approximately 5 minutes to complete. Now you can view the trial details for the multi-file dataset.\n\nThe following screenshots show where you can find the stored information within SageMaker Experiments in the **Trial components** section within the Studio UI. Note the values for ```dvc-trial-multi-files``` in ```DVC_BRANCH```, ```DVC_REPO_URL```, and ```data_commit_hash``` on the **Parameters** tab.\n\n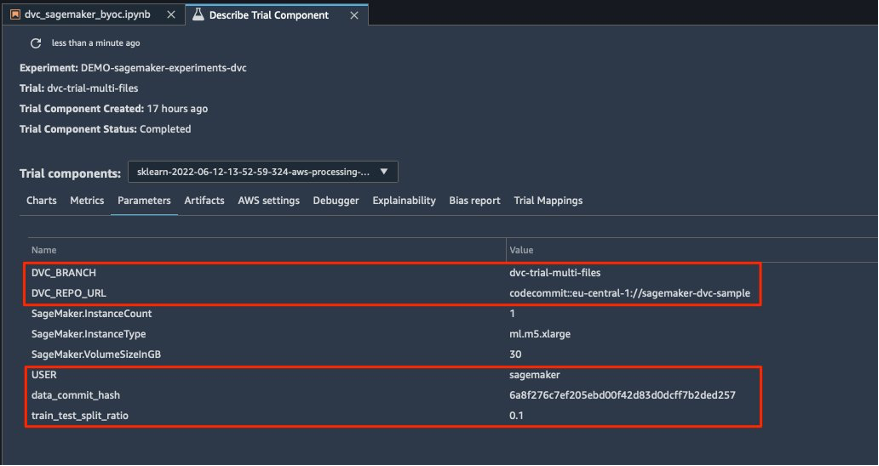\n\nYou can also review the input and output details on the **Artifacts** tab.\n\n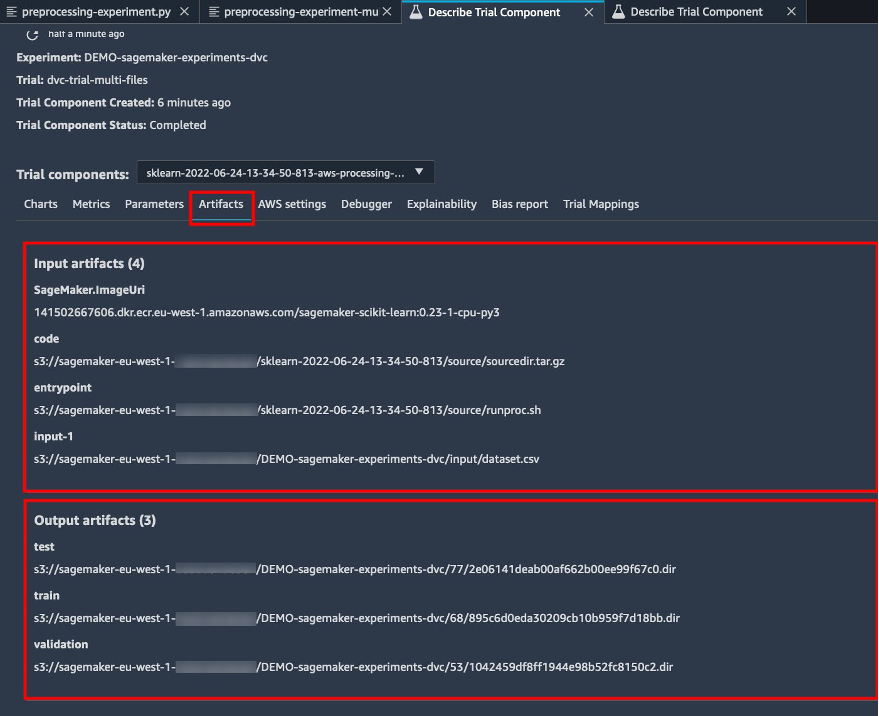\n\nWe now train on the ```dvc-trial-multi-files``` branch. When pulling data with DVC, we use the following dataset structure:\n\n```\\ndataset\\n |-- train\\n | |-- california_train_1.csv\\n | |-- california_train_2.csv\\n | |-- california_train_3.csv\\n | |-- california_train_4.csv\\n | |-- california_train_5.csv\\n |-- test\\n | |-- california_test.csv\\n |-- validation\\n | |-- california_validation_1.csv\\n | |-- california_validation_2.csv\\n | |-- california_validation_3.csv\\n```\n\nSimilar as we did before, we create a new Scikit-learn Estimator with the trial name ```dvc-trial-multi-files``` and start the training job.\n\n```\\n%%time\\n\\nestimator.fit(experiment_config=experiment_config)\\n```\n\nThe training job takes approximately 5 minutes to complete. On the training job logs output to the notebook, you can see those lines, indicating the files pulled by DVC:\n\n```\\nRunning dvc pull command\\nA validation/california_validation_2.csv\\nA validation/california_validation_1.csv\\nA validation/california_validation_3.csv\\nA train/california_train_4.csv\\nA train/california_train_5.csv\\nA train/california_train_2.csv\\nA train/california_train_3.csv\\nA train/california_train_1.csv\\nA test/california_test.csv\\n9 files added and 9 files fetched\\nStarting the training.\\nFound train files: ['/opt/ml/input/data/dataset/train/california_train_2.csv', '/opt/ml/input/data/dataset/train/california_train_5.csv', '/opt/ml/input/data/dataset/train/california_train_4.csv', '/opt/ml/input/data/dataset/train/california_train_1.csv', '/opt/ml/input/data/dataset/train/california_train_3.csv']\\nFound validation files: ['/opt/ml/input/data/dataset/validation/california_validation_2.csv', '/opt/ml/input/data/dataset/validation/california_validation_1.csv', '/opt/ml/input/data/dataset/validation/california_validation_3.csv']\\n```\n\n#### **Host your model in SageMaker**\n\n\nAfter you train your ML model, you can deploy it using SageMaker. To deploy a persistent, real-time endpoint that makes one prediction at a time, we use [SageMaker real-time hosting services](https://docs.aws.amazon.com/sagemaker/latest/dg/realtime-endpoints.html).\n\n```\\nfrom sagemaker.serializers import CSVSerializer\\n\\npredictor = estimator.deploy(1, \\"ml.t2.medium\\", serializer=CSVSerializer())\\n```\nFirst, we get the latest test dataset locally on the development notebook in Studio. For this purpose, we can use ```dvc.api.read()``` to load the raw data that was stored in [Amazon S3](https://aws.amazon.com/cn/s3/?trk=cndc-detail) by the SageMaker processing job.\n\n```\\nimport io\\nimport dvc.api\\n\\nraw = dvc.api.read(\\n \\"dataset/test/california_test.csv\\",\\n repo=dvc_repo_url,\\n rev=dvc_branch\\n)\\n```\n\nThen we prepare the data using Pandas, load a test CSV file, and call ```predictor.predict``` to invoke the SageMaker endpoint created earlier, with data, and get predictions.\n\n```\\ntest = pd.read_csv(io.StringIO(raw), sep=\\",\\", header=None)\\nX_test = test.iloc[:, 1:].values\\ny_test = test.iloc[:, 0:1].values\\n\\npredicted = predictor.predict(X_test)\\nfor i in range(len(predicted)-1):\\n print(f\\"predicted: {predicted[i]}, actual: {y_test[i][0]}\\")\\n```\n\n#### **Delete the endpoint**\n\n\nYou should delete endpoints when they’re no longer in use, because they’re billed by the time deployed (for more information, see [Amazon SageMaker Pricing](https://aws.amazon.com/cn/sagemaker/pricing/)). Make sure to delete the endpoint to avoid unexpected costs.\n\n```\\npredictor.delete_endpoint()\\n```\n\n#### **Clean up**\n\n\nBefore you remove all the resources you created, make sure that all apps are deleted from the ```data-scientist-dvc``` user, including all KernelGateway apps, as well as the default JupiterServer app.\n\nThen you can destroy the [AWS CDK](https://aws.amazon.com/cn/cdk/?trk=cndc-detail) stack by running the following command:\n\n```\\ncdk destroy\\n```\n\nIf you used an existing domain, also run the following commands:\n\n```\\n# inject your DOMAIN_ID into the configuration file\\nsed -i 's/<your-sagemaker-studio-domain-id>/'\\"\$DOMAIN_ID\\"'/' ../update-domain-no-custom-images.json\\n# update the sagemaker studio domain\\naws --region \${REGION} sagemaker update-domain --cli-input-json file://../update-domain-no-custom-images.json\\n```\n\n#### **Conclusion**\n\n\nIn this post, you walked through an example of how to track your experiments across code, data, artifacts, and metrics by using SageMaker Experiments and SageMaker processing and training jobs in conjunction with DVC. We created a Docker image containing DVC, which was required for Studio as the development notebook, and showed how you can use processing and training jobs with DVC. We prepared two versions of the data and used DVC to manage it with Git. Then you used SageMaker Experiments to track the processing and training with the two versions of the data in order to have a unified view of parameters, artifacts, and metrics in a single pane of glass. Finally, you deployed the model to a SageMaker endpoint and used a testing dataset from the second dataset version to invoke the SageMaker endpoint and get predictions.\n\nAs next step, you can extend the existing notebook and introduce your own feature engineering strategy and use DVC and SageMaker to run your experiments. Let’s go build!\n\nFor further reading, refer to the following resources:\n\n- [Amazon SageMaker Experiments – Organize, Track And Compare Your Machine Learning Training](https://aws.amazon.com/cn/blogs/aws/amazon-sagemaker-experiments-organize-track-and-compare-your-machine-learning-trainings/)\n- [Manage Machine Learning with Amazon SageMaker Experiments](https://docs.aws.amazon.com/sagemaker/latest/dg/experiments.html)\n- [SageMaker Experiments Python SDK](https://github.com/aws/sagemaker-experiments)\n- [DVC – Get Started](https://dvc.org/doc/start)\n- [DVC – Get Started: Data and Model Access](https://dvc.org/doc/start/data-management/access)\n\n#### **About the Authors**\n\n\n**Paolo Di** Francesco is a solutions architect at AWS. He has experience in the telecommunications and software engineering. He is passionate about machine learning and is currently focusing on using his experience to help customers reach their goals on AWS, in particular in discussions around MLOps. Outside of work, he enjoys playing football and reading.\n\n\n**Eitan Sela** is a Machine Learning Specialist Solutions Architect with Amazon Web Services. He works with AWS customers to provide guidance and technical assistance, helping them build and operate machine learning solutions on AWS. In his spare time, Eitan enjoys jogging and reading the latest machine learning articles.\n\n","render":"<p>Data scientists often work towards understanding the effects of various data preprocessing and feature engineering strategies in combination with different model architectures and hyperparameters. Doing so requires you to cover large parameter spaces iteratively, and it can be overwhelming to keep track of previously run configurations and results while keeping experiments reproducible.</p>\n<p>This post walks you through an example of how to track your experiments across code, data, artifacts, and metrics by using<a href=\\"https://sagemaker-experiments.readthedocs.io/en/latest/\\" target=\\"_blank\\"> Amazon SageMaker Experiments</a> in conjunction with <a href=\\"https://dvc.org/\\" target=\\"_blank\\">Data Version Control (DVC)</a>. We show how you can use DVC side by side with <a href=\\"https://aws.amazon.com/cn/sagemaker/\\" target=\\"_blank\\">Amazon SageMaker</a> processing and training jobs. We train different CatBoost models on the California housing dataset from the <a href=\\"http://lib.stat.cmu.edu/datasets/\\" target=\\"_blank\\">StatLib repository</a>, and change holdout strategies while keeping track of the data version with DVC. In each individual experiment, we track input and output artifacts, code, and metrics using SageMaker Experiments.</p>\\n<h4><a id=\\"SageMaker_Experiments_6\\"></a><strong>SageMaker Experiments</strong></h4>\\n<p>SageMaker Experiments is an AWS service for tracking machine learning (ML) experiments. The <a href=\\"https://github.com/aws/sagemaker-experiments\\" target=\\"_blank\\">SageMaker Experiments Python SDK</a> is a high-level interface to this service that helps you track experiment information using Python.</p>\\n<p>The goal of SageMaker Experiments is to make it as simple as possible to create experiments, populate them with trials, add tracking and lineage information, and run analytics across trials and experiments.</p>\n<p>When discussing SageMaker Experiments, we refer to the following concepts:</p>\n<ul>\\n<li><strong>Experiment</strong> – A collection of related trials. You add trials to an experiment that you want to compare together.</li>\\n<li><strong>Trial</strong> – A description of a multi-step ML workflow. Each step in the workflow is described by a trial component.</li>\\n<li><strong>Trial component</strong> – A description of a single step in an ML workflow, such as data cleaning, feature extraction, model training, or model evaluation.</li>\\n<li><strong>Tracker</strong> – A Python context manager for logging information about a single trial component (for example, parameters, metrics, or artifacts).</li>\\n</ul>\n<h4><a id=\\"Data_Version_Control_20\\"></a><strong>Data Version Control</strong></h4>\\n<p>Data Version Control (DVC) is a new type of data versioning, workflow, and experiment management software that builds upon <a href=\\"https://git-scm.com/\\" target=\\"_blank\\">Git</a> (although it can work standalone). DVC reduces the gap between established engineering toolsets and data science needs, allowing you to take advantage of new <a href=\\"https://dvc.org/doc/user-guide/what-is-dvc#core-features\\" target=\\"_blank\\">features</a> while reusing existing skills and intuition.</p>\\n<p>Data science experiment sharing and collaboration can be done through a regular Git flow (commits, branching, tagging, pull requests) the same way it works for software engineers. With Git and DVC, data science and ML teams can version experiments, manage large datasets, and make projects reproducible.</p>\n<p>DVC has the following features:</p>\n<ul>\\n<li>DVC is a <a href=\\"https://github.com/iterative/dvc/blob/main/LICENSE\\" target=\\"_blank\\">free</a>, open-source <a href=\\"https://dvc.org/doc/command-reference\\" target=\\"_blank\\">command line</a> tool.</li>\\n<li>DVC works on top of Git repositories and has a similar command line interface and flow as Git. DVC can also work standalone, but without <a href=\\"https://dvc.org/doc/use-cases/versioning-data-and-model-files\\" target=\\"_blank\\">versioning</a> capabilities.</li>\\n<li>Data versioning is enabled by replacing large files, dataset directories, ML models, and so on with small <a href=\\"https://dvc.org/doc/user-guide/project-structure\\" target=\\"_blank\\">metafiles</a> (easy to handle with Git). These placeholders point to the original data, which is decoupled from source code management.</li>\\n<li>You can use on-premises or cloud storage to store the project’s data separate from its code base. This is how data scientists can transfer large datasets or share a GPU-trained model with others.</li>\n<li>DVC makes data science projects reproducible by creating lightweight <a href=\\"https://dvc.org/doc/command-reference/dag\\" target=\\"_blank\\">pipelines</a> using implicit dependency graphs, and by codifying the data and artifacts involved.</li>\\n<li>DVC is platform agnostic. It runs on all major operating systems (Linux, macOS, and Windows), and works independently of the programming languages (Python, R, Julia, shell scripts, and so on) or ML libraries (Keras, TensorFlow, PyTorch, Scipy, and more) used in the project.</li>\n<li>DVC is quick to <a href=\\"https://dvc.org/doc/install\\" target=\\"_blank\\">install</a> and doesn’t require special infrastructure, nor does it depend on APIs or external services. It’s a standalone CLI tool.</li>\\n</ul>\n<h4><a id=\\"SageMaker_Experiments_and_DVC_sample_37\\"></a><strong>SageMaker Experiments and DVC sample</strong></h4>\\n<p>The following <a href=\\"https://github.com/aws-samples/amazon-sagemaker-experiments-dvc-demo\\" target=\\"_blank\\">GitHub sample</a> shows how to use DVC within the SageMaker environment. In particular, we look at how to build a custom image with DVC libraries installed by default to provide a consistent development environment to your data scientists in <a href=\\"https://docs.aws.amazon.com/sagemaker/latest/dg/studio.html\\" target=\\"_blank\\">Amazon SageMaker Studio</a>, and how to run DVC alongside SageMaker managed infrastructure for processing and training. Furthermore, we show how to enrich SageMaker tracking information with data versioning information from DVC, and visualize them within the Studio console.</p>\\n<p>The following diagram illustrates the solution architecture and workflow.</p>\n<p><img src=\\"https://dev-media.amazoncloud.cn/ead4ef6e04084682a33669a1395bb078_image.png\\" alt=\\"image.png\\" /></p>\n<h4><a id=\\"Build_a_custom_Studio_image_with_DVC_already_installed_46\\"></a><strong>Build a custom Studio image with DVC already installed</strong></h4>\\n<p>In this <a href=\\"https://github.com/aws-samples/amazon-sagemaker-experiments-dvc-demo/blob/main/sagemaker-studio-dvc-image/README.md\\" target=\\"_blank\\">GitHub repository</a>, we explain how to create a custom image for Studio that has DVC already installed. The advantage of creating an image and making it available to all Studio users is that it creates a consistent environment for the Studio users, which they could also run locally. Although the sample is based on [AWS Cloud9](https://aws.amazon.com/cn/cloud9/?trk=cndc-detail), you can also build the container on your local machine as long as you have Docker installed and running. This sample is based on the following <a href=\\"https://github.com/aws-samples/amazon-sagemaker-experiments-dvc-demo/blob/main/sagemaker-studio-dvc-image/Dockerfile\\" target=\\"_blank\\">Dockerfile</a> and <a href=\\"https://github.com/aws-samples/amazon-sagemaker-experiments-dvc-demo/blob/main/sagemaker-studio-dvc-image/environment.yml\\" target=\\"_blank\\">environment</a>.yml. The resulting Docker image is stored in [Amazon Elastic Container Registry ](https://aws.amazon.com/cn/ecr/?trk=cndc-detail)([Amazon EMR](https://aws.amazon.com/cn/emr/?trk=cndc-detail)) in your AWS account. See the following code:</p>\\n<pre><code class=\\"lang-\\"># Login to ECR\\naws --region \${REGION} ecr get-login-password | docker login --username AWS --password-stdin \${ACCOUNT_ID}.dkr.ecr.\${REGION}.amazonaws.com/smstudio-custom\\n\\n# Create the ECR repository\\naws --region \${REGION} ecr create-repository --repository-name smstudio-custom\\n\\n# Build the image - it might take a few minutes to complete this step\\ndocker build . -t \${IMAGE_NAME} -t \${ACCOUNT_ID}.dkr.ecr.\${REGION}.amazonaws.com/smstudio-custom:\${IMAGE_NAME}\\n\\n# Push the image to ECR\\ndocker push \${ACCOUNT_ID}.dkr.ecr.\${REGION}.amazonaws.com/smstudio-custom:\${IMAGE_NAME}\\n</code></pre>\\n<p>You can now <a href=\\"https://github.com/aws-samples/amazon-sagemaker-experiments-dvc-demo/blob/main/sagemaker-studio-dvc-image/README.md#create-a-new-sagemaker-studio\\" target=\\"_blank\\">create a new Studio domain</a> or <a href=\\"https://github.com/aws-samples/amazon-sagemaker-experiments-dvc-demo/blob/main/sagemaker-studio-dvc-image/README.md#update-an-existing-sagemaker-studio\\" target=\\"_blank\\">update an existing Studio domain</a> that has access to the newly created Docker image.</p>\\n<p>We use [AWS Cloud Development Kit](AWS Cloud Development Kit) (AWS CDK) to create the following resources via <a href=\\"https://aws.amazon.com/cn/cloudformation/\\" target=\\"_blank\\">AWS CloudFormation</a>:</p>\\n<ul>\\n<li>A SageMaker execution role with the right permissions to your new or existing Studio domain</li>\n<li>A SageMaker image and SageMaker image version from the Docker image <code>conda-env-dvc-kernel</code> that we created earlier</li>\\n<li>An <code>AppImageConfig</code> that specifies how the kernel gateway should be configured</li>\\n<li>A Studio user (<code>data-scientist-dvc</code>) with the correct SageMaker execution role and the custom Studio image available to it</li>\\n</ul>\n<p>For detailed instructions, refer to [Associate a custom image to SageMaker Studio](Associate a custom image to SageMaker Studio).</p>\n<p><strong>Run the lab</strong></p>\\n<p>To run the lab, complete the following steps:</p>\n<ol>\\n<li>In the Studio domain, launch Studio for the <code>data-scientist-dvc</code> user.</li>\\n<li>Choose the Git icon, then choose Clone a Repository.</li>\n</ol>\\n<p><img src=\\"https://dev-media.amazoncloud.cn/c85c8a2099314eb09ae1079d4d70a10a_image.png\\" alt=\\"image.png\\" /></p>\n<ol start=\\"3\\">\\n<li>Enter the URL of the repository (<code>https://github.com/aws-samples/amazon-sagemaker-experiments-dvc-demo</code>) and choose Clone.</li>\\n</ol>\n<p><img src=\\"https://dev-media.amazoncloud.cn/2691e864462b4c64bc29ba75839882c1_image.png\\" alt=\\"image.png\\" /><br />\\n4. In the file browser, choose the <code>amazon-sagemaker-experiments-dvc-demo</code> repository.<br />\\n5. Open the <code>dvc_sagemaker_script_mode.ipynb</code> notebook.<br />\\n6. For <strong>Custom Image</strong>, choose the image conda-env-dvc-kernel.<br />\\n7. Choose Select.</p>\n<p><img src=\\"https://dev-media.amazoncloud.cn/dfc2b6396a344eeebeff5110badb8026_image.png\\" alt=\\"image.png\\" /></p>\n<h4><a id=\\"Configure_DVC_for_data_versioning_96\\"></a><strong>Configure DVC for data versioning</strong></h4>\\n<p>We create a subdirectory where we prepare the data: sagemaker-dvc-sample. Within this subdirectory, we initialize a new Git repository and set the remote to a repository we create in <a href=\\"https://aws.amazon.com/cn/codecommit/\\" target=\\"_blank\\">AWS CodeCommit</a>. The goal is to have DVC configurations and files for data tracking versioned in this repository. However, Git offers native capabilities to manage subprojects via, for example, git submodules and git subtrees, and you can extend this sample to use any of the aforementioned tools that best fit your workflow.</p>\\n<p>The main advantage of using CodeCommit with SageMaker in our case is its integration with AWS Identity and Access Management (IAM) for authentication and authorization, meaning we can use IAM roles to push and pull data without the need to fetch credentials (or SSH keys). Setting the appropriate permissions on the SageMaker execution role also allows the Studio notebook and the SageMaker training and processing job to interact securely with CodeCommit.</p>\n<p>Although you can replace CodeCommit with any other source control service, such as GitHub, Gitlab, or Bitbucket, you need consider how to handle the credentials for your system. One possibility is to store these credentials on <a href=\\"https://aws.amazon.com/cn/secrets-manager/\\" target=\\"_blank\\">AWS Secrets Manager</a> and fetch them at run time from the Studio notebook as well as from the SageMaker processing and training jobs.</p>\\n<p><img src=\\"https://dev-media.amazoncloud.cn/898fee4c38e34515934ac2f1d5a3e898_image.png\\" alt=\\"image.png\\" /></p>\n<h4><a id=\\"Process_and_train_with_DVC_and_SageMaker_107\\"></a><strong>Process and train with DVC and SageMaker</strong></h4>\\n<p>In this section, we explore two different approaches to tackle our problem and how we can keep track of the two tests using SageMaker Experiments according to the high-level conceptual architecture we showed you earlier.</p>\n<h4><a id=\\"Set_up_a_SageMaker_experiment_112\\"></a><strong>Set up a SageMaker experiment</strong></h4>\\n<p>To track this test in SageMaker, we need to create an experiment. We need to also define the trial within the experiment. For the sake of simplicity, we just consider one trial for the experiment, but you can have any number of trials within an experiment, for example, if you want to test different algorithms.</p>\n<p>We create an experiment named <code>DEMO-sagemaker-experiments-dvc</code> with two trials, <code>dvc-trial-single-file</code> and <code>dvc-trial-multi-files</code>, each representing a different version of the dataset.</p>\\n<p>Let’s create the <code>DEMO-sagemaker-experiments-dvc</code> experiment:</p>\\n<pre><code class=\\"lang-\\">from smexperiments.experiment import Experiment\\nfrom smexperiments.trial import Trial\\nfrom smexperiments.trial_component import TrialComponent\\nfrom smexperiments.tracker import Tracker\\n\\nexperiment_name = 'DEMO-sagemaker-experiments-dvc'\\n\\n# create the experiment if it doesn't exist\\ntry:\\n my_experiment = Experiment.load(experiment_name=experiment_name)\\n print("existing experiment loaded")\\nexcept Exception as ex:\\n if "ResourceNotFound" in str(ex):\\n my_experiment = Experiment.create(\\n experiment_name = experiment_name,\\n description = "How to integrate DVC"\\n )\\n print("new experiment created")\\n else:\\n print(f"Unexpected {ex}=, {type(ex)}")\\n print("Dont go forward!")\\n raise\\n</code></pre>\\n<h4><a id=\\"Test_1_Generate_single_files_for_training_and_validation_146\\"></a><strong>Test 1: Generate single files for training and validation</strong></h4>\\n<p>In this section, we create a processing script that fetches the raw data directly from Amazon Simple Storage Service (Amazon S3) as input; processes it to create the train, validation, and test datasets; and stores the results back to Amazon S3 using DVC. Furthermore, we show how you can track output artifacts generated by DVC with SageMaker when running processing and training jobs and via SageMaker Experiments.</p>\n<p>First, we create the <code>dvc-trial-single-file</code> trial and add it to the <code>DEMO-sagemaker-experiments-dvc</code> experiment. By doing so, we keep all trial components related to this test organized in a meaningful way.</p>\\n<pre><code class=\\"lang-\\">first_trial_name = "dvc-trial-single-file"\\n\\ntry:\\n my_first_trial = Trial.load(trial_name=first_trial_name)\\n print("existing trial loaded")\\nexcept Exception as ex:\\n if "ResourceNotFound" in str(ex):\\n my_first_trial = Trial.create(\\n experiment_name=experiment_name,\\n trial_name=first_trial_name,\\n )\\n print("new trial created")\\n else:\\n print(f"Unexpected {ex}=, {type(ex)}")\\n print("Dont go forward!")\\n raise\\n</code></pre>\\n<h4><a id=\\"Use_DVC_in_a_SageMaker_processing_job_to_create_the_single_file_version_171\\"></a><strong>Use DVC in a SageMaker processing job to create the single file version</strong></h4>\\n<p>In this section, we create a processing script that gets the raw data directly from Amazon S3 as input using the managed data loading capability of SageMaker; processes it to create the train, validation, and test datasets; and stores the results back to Amazon S3 using DVC. It’s very important to understand that when using DVC to store data to Amazon S3 (or pull data from Amazon S3), we’re losing SageMaker managed data loading capabilities, which can potentially have an impact on performance and costs of our processing and training jobs, especially when working with very large datasets. For more information on the different SageMaker native input mode capabilities, refer to<a href=\\"https://docs.aws.amazon.com/sagemaker/latest/dg/model-access-training-data.html\\" target=\\"_blank\\"> Access Training Data</a>.</p>\\n<p>Finally, we unify DVC tracking capabilities with SageMaker tracking capabilities when running processing jobs via SageMaker Experiments.</p>\n<p>The processing script expects the address of the Git repository and the branch we want to create to store the DVC metadata passed via environmental variables. The datasets themselves are stored in Amazon S3 by DVC. Although environmental variables are automatically tracked in SageMaker Experiments and visible in the trial component parameters, we might want to enrich the trial components with further information, which then become available for visualization in the Studio UI using a tracker object. In our case, the trial components parameters include the following:</p>\n<ul>\\n<li>\\n<pre><code class=\\"lang-\\"></code></pre>\\n</li>\n<li>DVC_REPO_URL</li>\n<li>DVC_BRANCH</li>\n<li>USER</li>\n<li>data_commit_hash</li>\n<li>train_test_split_ratio</li>\n<li>\\n<pre><code class=\\"lang-\\">\\n\\n</code></pre>\\n</li>\n</ul>\\n<p>The preprocessing script clones the Git repository; generates the train, validation, and test datasets; and syncs it using DVC. As mentioned earlier, when using DVC, we can’t take advantage of native SageMaker data loading capabilities. Aside from the performance penalties we might suffer on large datasets, we also lose the automatic tracking capabilities for the output artifacts. However, thanks to the tracker and the DVC Python API, we can compensate for these shortcomings, retrieve such information at run time, and store it in the trial component with little effort. The added value by doing so is to have in single view of the input and output artifacts that belong to this specific processing job.</p>\n<p>The full preprocessing Python script is available in the <a href=\\"https://github.com/aws-samples/amazon-sagemaker-experiments-dvc-demo/blob/main/source_dir/preprocessing-experiment.py\\" target=\\"_blank\\">GitHub repo</a>.</p>\\n<pre><code class=\\"lang-\\">with Tracker.load() as tracker:\\n tracker.log_parameters({"data_commit_hash": commit_hash})\\n for file_type in file_types:\\n path = dvc.api.get_url(\\n f"{data_path}/{file_type}/california_{file_type}.csv",\\n repo=dvc_repo_url,\\n rev=dvc_branch\\n )\\n tracker.log_output(name=f"california_{file_type}",value=path)\\n</code></pre>\\n<p>SageMaker gives us the possibility to run our processing script on container images managed by AWS that are optimized to run on the AWS infrastructure. If our script requires additional dependencies, we can supply a <code>requirements.txt</code> file. When we start the processing job, SageMaker uses <code>pip-install</code> to install all the libraries we need (for example, DVC-related libraries). If you need to have a tighter control of all libraries installed on the containers, you can bring your own container in SageMaker, for example for <a href=\\"https://docs.aws.amazon.com/sagemaker/latest/dg/use-your-own-processing-code.html\\" target=\\"_blank\\">processing</a> and training.</p>\\n<p>We have now all the ingredients to run our SageMaker processing job:</p>\n<ul>\\n<li>A processing script that can process several arguments (<code>--train-test-split-ratio</code>) and two environmental variables (<code>DVC_REPO_URL</code> and <code>DVC_BRANCH</code>)</li>\\n<li>A <code>requiremets.txt</code> file</li>\\n<li>A Git repository (in CodeCommit)</li>\n<li>A SageMaker experiment and trial</li>\n</ul>\\n<pre><code class=\\"lang-\\">from sagemaker.processing import FrameworkProcessor, ProcessingInput\\nfrom sagemaker.sklearn.estimator import SKLearn\\n\\ndvc_repo_url = "codecommit::{}://sagemaker-dvc-sample".format(region)\\ndvc_branch = my_first_trial.trial_name\\n\\nscript_processor = FrameworkProcessor(\\n estimator_cls=SKLearn,\\n framework_version='0.23-1',\\n instance_count=1,\\n instance_type='ml.m5.xlarge',\\n env={\\n "DVC_REPO_URL": dvc_repo_url,\\n "DVC_BRANCH": dvc_branch,\\n "USER": "sagemaker"\\n },\\n role=role\\n)\\n\\nexperiment_config={\\n "ExperimentName": my_experiment.experiment_name,\\n "TrialName": my_first_trial.trial_name\\n}\\n</code></pre>\\n<p>We then run the processing job with the <code>preprocessing-experiment.py</code> script, <code>experiment_config</code>, <code>dvc_repo_url</code>, and <code>dvc_branch</code> we defined earlier.</p>\\n<pre><code class=\\"lang-\\">%%time\\n\\nscript_processor.run(\\n code='./source_dir/preprocessing-experiment.py',\\n dependencies=['./source_dir/requirements.txt'],\\n inputs=[ProcessingInput(source=s3_data_path, destination="/opt/ml/processing/input")],\\n experiment_config=experiment_config,\\n arguments=["--train-test-split-ratio", "0.2"]\\n)\\n</code></pre>\\n<p>The processing job takes approximately 5 minutes to complete. Now you can view the trial details for the single file dataset.</p>\n<p>The following screenshot shows where you can find the stored information within Studio. Note the values for <code>dvc-trial-single-file</code> in <code>DVC_BRANCH</code>, <code>DVC_REPO_URL</code>, and <code>data_commit_hash</code> on the <strong>Parameters</strong> tab.</p>\\n<p><img src=\\"https://dev-media.amazoncloud.cn/fc52e188c25f4a9e98b65e4b5a8fb0f2_image.png\\" alt=\\"image.png\\" /></p>\n<p>Also note the input and output details on the Artifacts tab.</p>\n<p><img src=\\"https://dev-media.amazoncloud.cn/c580466b79cb4665af5e73b2bd146b2e_image.png\\" alt=\\"image.png\\" /></p>\n<p><strong>Create an estimator and fit the model with single file data version</strong></p>\\n<p>To use DVC integration inside a SageMaker training job, we pass a <code>dvc_repo_url</code> and <code>dvc_branch</code> as environmental variables when you create the Estimator object.</p>\\n<p>We train on the <code>dvc-trial-single-file</code> branch first.</p>\\n<p>When pulling data with DVC, we use the following dataset structure:</p>\n<pre><code class=\\"lang-\\">dataset\\n |-- train\\n | |-- california_train.csv\\n |-- test\\n | |-- california_test.csv\\n |-- validation\\n | |-- california_validation.csv\\n</code></pre>\\n<p>Now we create a Scikit-learn Estimator using the <a href=\\"https://github.com/aws/sagemaker-python-sdk\\" target=\\"_blank\\">SageMaker Python SDK</a>. This allows us to specify the following:</p>\\n<ul>\\n<li>The path to the Python source file, which should be run as the entry point to training.</li>\n<li>The IAM role that controls permissions for accessing Amazon S3 and CodeCommit data and running SageMaker functions.</li>\n<li>A list of dictionaries that define the metrics used to evaluate the training jobs.</li>\n<li>The number and type of training instances. We use one ml.m5.large instance.</li>\n<li>Hyperparameters that are used for training.</li>\n<li>Environment variables to use during the training job. We use <code>DVC_REPO_URL</code>, <code>DVC_BRANCH</code>, and <code>USER</code>.</li>\\n</ul>\n<pre><code class=\\"lang-\\">metric_definitions = [{'Name': 'median-AE', 'Regex': "AE-at-50th-percentile: ([0-9.]+).*\$"}]\\n\\nhyperparameters={ \\n "learning_rate" : 1,\\n "depth": 6\\n }\\nestimator = SKLearn(\\n entry_point='train.py',\\n source_dir='source_dir',\\n role=role,\\n metric_definitions=metric_definitions,\\n hyperparameters=hyperparameters,\\n instance_count=1,\\n instance_type='ml.m5.large',\\n framework_version='0.23-1',\\n base_job_name='training-with-dvc-data',\\n environment={\\n "DVC_REPO_URL": dvc_repo_url,\\n "DVC_BRANCH": dvc_branch,\\n "USER": "sagemaker"\\n }\\n)\\n\\nexperiment_config={\\n "ExperimentName": my_experiment.experiment_name,\\n "TrialName": my_first_trial.trial_name\\n}\\n</code></pre>\\n<p>We call the fit method of the Estimator with the experiment_config we defined earlier to start the training.</p>\n<pre><code class=\\"lang-\\">Running dvc pull command\\nA train/california_train.csv\\nA test/california_test.csv\\nA validation/california_validation.csv\\n3 files added and 3 files fetched\\nStarting the training.\\nFound train files: ['/opt/ml/input/data/dataset/train/california_train.csv']\\nFound validation files: ['/opt/ml/input/data/dataset/train/california_train.csv']\\n</code></pre>\\n<h4><a id=\\"_334\\"></a>**</h4>\\n<p>Test 2: Generate multiple files for training and validation<br />\\n**</p>\n<p>We create a new <code>dvc-trial-multi-files</code> trial and add it to the current <code>DEMO-sagemaker-experiments-dvc</code> experiment.</p>\\n<pre><code class=\\"lang-\\">second_trial_name = "dvc-trial-multi-files"\\ntry:\\n my_second_trial = Trial.load(trial_name=second_trial_name)\\n print("existing trial loaded")\\nexcept Exception as ex:\\n if "ResourceNotFound" in str(ex):\\n my_second_trial = Trial.create(\\n experiment_name=experiment_name,\\n trial_name=second_trial_name,\\n )\\n print("new trial created")\\n else:\\n print(f"Unexpected {ex}=, {type(ex)}")\\n print("Dont go forward!")\\n raise\\n</code></pre>\\n<p>Differently from the first processing script, we now create out of the original dataset multiple files for training and validation and store the DVC metadata in a different branch.</p>\n<p>You can explore the second preprocessing Python script on <a href=\\"https://github.com/aws-samples/amazon-sagemaker-experiments-dvc-demo/blob/main/source_dir/preprocessing-experiment-multifiles.py\\" target=\\"_blank\\">GitHub</a>.</p>\\n<pre><code class=\\"lang-\\">%%time\\n\\nscript_processor.run(\\n code='./source_dir/preprocessing-experiment-multifiles.py',\\n dependencies=['./source_dir/requirements.txt'],\\n inputs=[ProcessingInput(source=s3_data_path, destination="/opt/ml/processing/input")],\\n experiment_config=experiment_config,\\n arguments=["--train-test-split-ratio", "0.1"]\\n)\\n</code></pre>\\n<p>The processing job takes approximately 5 minutes to complete. Now you can view the trial details for the multi-file dataset.</p>\n<p>The following screenshots show where you can find the stored information within SageMaker Experiments in the <strong>Trial components</strong> section within the Studio UI. Note the values for <code>dvc-trial-multi-files</code> in <code>DVC_BRANCH</code>, <code>DVC_REPO_URL</code>, and <code>data_commit_hash</code> on the <strong>Parameters</strong> tab.</p>\\n<p><img src=\\"https://dev-media.amazoncloud.cn/eaee0e083a6645a09ce520002e85119c_image.png\\" alt=\\"image.png\\" /></p>\n<p>You can also review the input and output details on the <strong>Artifacts</strong> tab.</p>\\n<p><img src=\\"https://dev-media.amazoncloud.cn/face8babe43a4d569d9041e3b269696b_image.png\\" alt=\\"image.png\\" /></p>\n<p>We now train on the <code>dvc-trial-multi-files</code> branch. When pulling data with DVC, we use the following dataset structure:</p>\\n<pre><code class=\\"lang-\\">dataset\\n |-- train\\n | |-- california_train_1.csv\\n | |-- california_train_2.csv\\n | |-- california_train_3.csv\\n | |-- california_train_4.csv\\n | |-- california_train_5.csv\\n |-- test\\n | |-- california_test.csv\\n |-- validation\\n | |-- california_validation_1.csv\\n | |-- california_validation_2.csv\\n | |-- california_validation_3.csv\\n</code></pre>\\n<p>Similar as we did before, we create a new Scikit-learn Estimator with the trial name <code>dvc-trial-multi-files</code> and start the training job.</p>\\n<pre><code class=\\"lang-\\">%%time\\n\\nestimator.fit(experiment_config=experiment_config)\\n</code></pre>\\n<p>The training job takes approximately 5 minutes to complete. On the training job logs output to the notebook, you can see those lines, indicating the files pulled by DVC:</p>\n<pre><code class=\\"lang-\\">Running dvc pull command\\nA validation/california_validation_2.csv\\nA validation/california_validation_1.csv\\nA validation/california_validation_3.csv\\nA train/california_train_4.csv\\nA train/california_train_5.csv\\nA train/california_train_2.csv\\nA train/california_train_3.csv\\nA train/california_train_1.csv\\nA test/california_test.csv\\n9 files added and 9 files fetched\\nStarting the training.\\nFound train files: ['/opt/ml/input/data/dataset/train/california_train_2.csv', '/opt/ml/input/data/dataset/train/california_train_5.csv', '/opt/ml/input/data/dataset/train/california_train_4.csv', '/opt/ml/input/data/dataset/train/california_train_1.csv', '/opt/ml/input/data/dataset/train/california_train_3.csv']\\nFound validation files: ['/opt/ml/input/data/dataset/validation/california_validation_2.csv', '/opt/ml/input/data/dataset/validation/california_validation_1.csv', '/opt/ml/input/data/dataset/validation/california_validation_3.csv']\\n</code></pre>\\n<h4><a id=\\"Host_your_model_in_SageMaker_430\\"></a><strong>Host your model in SageMaker</strong></h4>\\n<p>After you train your ML model, you can deploy it using SageMaker. To deploy a persistent, real-time endpoint that makes one prediction at a time, we use <a href=\\"https://docs.aws.amazon.com/sagemaker/latest/dg/realtime-endpoints.html\\" target=\\"_blank\\">SageMaker real-time hosting services</a>.</p>\\n<pre><code class=\\"lang-\\">from sagemaker.serializers import CSVSerializer\\n\\npredictor = estimator.deploy(1, "ml.t2.medium", serializer=CSVSerializer())\\n</code></pre>\\n<p>First, we get the latest test dataset locally on the development notebook in Studio. For this purpose, we can use <code>dvc.api.read()</code> to load the raw data that was stored in [Amazon S3](https://aws.amazon.com/cn/s3/?trk=cndc-detail) by the SageMaker processing job.</p>\\n<pre><code class=\\"lang-\\">import io\\nimport dvc.api\\n\\nraw = dvc.api.read(\\n "dataset/test/california_test.csv",\\n repo=dvc_repo_url,\\n rev=dvc_branch\\n)\\n</code></pre>\\n<p>Then we prepare the data using Pandas, load a test CSV file, and call <code>predictor.predict</code> to invoke the SageMaker endpoint created earlier, with data, and get predictions.</p>\\n<pre><code class=\\"lang-\\">test = pd.read_csv(io.StringIO(raw), sep=",", header=None)\\nX_test = test.iloc[:, 1:].values\\ny_test = test.iloc[:, 0:1].values\\n\\npredicted = predictor.predict(X_test)\\nfor i in range(len(predicted)-1):\\n print(f"predicted: {predicted[i]}, actual: {y_test[i][0]}")\\n</code></pre>\\n<h4><a id=\\"Delete_the_endpoint_465\\"></a><strong>Delete the endpoint</strong></h4>\\n<p>You should delete endpoints when they’re no longer in use, because they’re billed by the time deployed (for more information, see <a href=\\"https://aws.amazon.com/cn/sagemaker/pricing/\\" target=\\"_blank\\">Amazon SageMaker Pricing</a>). Make sure to delete the endpoint to avoid unexpected costs.</p>\\n<pre><code class=\\"lang-\\">predictor.delete_endpoint()\\n</code></pre>\\n<h4><a id=\\"Clean_up_474\\"></a><strong>Clean up</strong></h4>\\n<p>Before you remove all the resources you created, make sure that all apps are deleted from the <code>data-scientist-dvc</code> user, including all KernelGateway apps, as well as the default JupiterServer app.</p>\\n<p>Then you can destroy the AWS CDK stack by running the following command:</p>\n<pre><code class=\\"lang-\\">cdk destroy\\n</code></pre>\\n<p>If you used an existing domain, also run the following commands:</p>\n<pre><code class=\\"lang-\\"># inject your DOMAIN_ID into the configuration file\\nsed -i 's/<your-sagemaker-studio-domain-id>/'"\$DOMAIN_ID"'/' ../update-domain-no-custom-images.json\\n# update the sagemaker studio domain\\naws --region \${REGION} sagemaker update-domain --cli-input-json file://../update-domain-no-custom-images.json\\n</code></pre>\\n<h4><a id=\\"Conclusion_494\\"></a><strong>Conclusion</strong></h4>\\n<p>In this post, you walked through an example of how to track your experiments across code, data, artifacts, and metrics by using SageMaker Experiments and SageMaker processing and training jobs in conjunction with DVC. We created a Docker image containing DVC, which was required for Studio as the development notebook, and showed how you can use processing and training jobs with DVC. We prepared two versions of the data and used DVC to manage it with Git. Then you used SageMaker Experiments to track the processing and training with the two versions of the data in order to have a unified view of parameters, artifacts, and metrics in a single pane of glass. Finally, you deployed the model to a SageMaker endpoint and used a testing dataset from the second dataset version to invoke the SageMaker endpoint and get predictions.</p>\n<p>As next step, you can extend the existing notebook and introduce your own feature engineering strategy and use DVC and SageMaker to run your experiments. Let’s go build!</p>\n<p>For further reading, refer to the following resources:</p>\n<ul>\\n<li><a href=\\"https://aws.amazon.com/cn/blogs/aws/amazon-sagemaker-experiments-organize-track-and-compare-your-machine-learning-trainings/\\" target=\\"_blank\\">Amazon SageMaker Experiments – Organize, Track And Compare Your Machine Learning Training</a></li>\\n<li><a href=\\"https://docs.aws.amazon.com/sagemaker/latest/dg/experiments.html\\" target=\\"_blank\\">Manage Machine Learning with Amazon SageMaker Experiments</a></li>\\n<li><a href=\\"https://github.com/aws/sagemaker-experiments\\" target=\\"_blank\\">SageMaker Experiments Python SDK</a></li>\\n<li><a href=\\"https://dvc.org/doc/start\\" target=\\"_blank\\">DVC – Get Started</a></li>\\n<li><a href=\\"https://dvc.org/doc/start/data-management/access\\" target=\\"_blank\\">DVC – Get Started: Data and Model Access</a></li>\\n</ul>\n<h4><a id=\\"About_the_Authors_509\\"></a><strong>About the Authors</strong></h4>\\n<p><img src=\\"https://dev-media.amazoncloud.cn/bdc620c19a3245d1b79530dc1a7bb50c_image.png\\" alt=\\"image.png\\" /><br />\\n<strong>Paolo Di</strong> Francesco is a solutions architect at AWS. He has experience in the telecommunications and software engineering. He is passionate about machine learning and is currently focusing on using his experience to help customers reach their goals on AWS, in particular in discussions around MLOps. Outside of work, he enjoys playing football and reading.</p>\\n<p><img src=\\"https://dev-media.amazoncloud.cn/246bef054ad14acbb10d4beb6a412510_image.png\\" alt=\\"image.png\\" /><br />\\n<strong>Eitan Sela</strong> is a Machine Learning Specialist Solutions Architect with Amazon Web Services. He works with AWS customers to provide guidance and technical assistance, helping them build and operate machine learning solutions on AWS. In his spare time, Eitan enjoys jogging and reading the latest machine learning articles.</p>\n"}
Track your ML experiments end to end with Data Version Control and Amazon SageMaker Experiments
海外精选

海外精选的内容汇集了全球优质的亚马逊云科技相关技术内容。同时,内容中提到的“AWS”
是 “Amazon Web Services” 的缩写,在此网站不作为商标展示。

 0
0 0
0亚马逊云科技解决方案 基于行业客户应用场景及技术领域的解决方案
联系亚马逊云科技专家
亚马逊云科技解决方案
基于行业客户应用场景及技术领域的解决方案
联系专家

0
目录

 分享
分享 点赞
点赞 收藏
收藏 目录
目录立即注册,开启您的免费套餐
立即关注

亚马逊云开发者
公众号

User Group
公众号

亚马逊云科技
官方小程序
“AWS” 是 “Amazon Web Services” 的缩写,在此网站不作为商标展示。
立即关注
亚马逊云开发者
公众号
User Group
公众号
亚马逊云科技
官方小程序
“AWS” 是 “Amazon Web Services” 的缩写,在此网站不作为商标展示。
关于我们 
更多资源
开发者工具
更多支持
立即关注
亚马逊云开发者
公众号
User Group
公众号
亚马逊云科技
官方小程序
“AWS” 是 “Amazon Web Services” 的缩写,在此网站不作为商标展示。
