{"value":"[RStudio on Amazon SageMaker](https://aws.amazon.com/cn/blogs/aws/announcing-fully-managed-rstudio-on-amazon-sagemaker-for-data-scientists/) is the industry’s first fully managed RStudio Workbench in cloud. You can quickly launch the familiar RStudio integrated development environment (IDE), and dial up and down the underlying compute resources without interrupting your work, making it easy to build machine learning (ML) and analytics solutions in R at scale. RStudio on SageMaker already comes with a [built-in image](https://docs.aws.amazon.com/sagemaker/latest/dg/rstudio-use.html#rstudio-base-image) preconfigured with R programming and data science tools; however, you often need to customize your IDE environment. Starting today, you can bring your own custom image with packages and tools of your choice, and make them available to all the users of RStudio on SageMaker in a few clicks.\n\nBringing your own custom image has several benefits. You can standardize and simplify the getting started experience for data scientists and developers by providing a starter image, preconfigure the drivers required for connecting to data stores, or pre-install specialized data science software for your business domain. Furthermore, organizations that have previously hosted their own RStudio Workbench may have existing containerized environments that they want to continue to use in RStudio on SageMaker.\n\nIn this post, we share step-by-step instructions to create a custom image and bring it to RStudio on SageMaker using the [AWS Management Console](https://aws.amazon.com/cn/console/) or [AWS Command Line Interface](https://aws.amazon.com/cn/cli/) (AWS CLI). You can get your first custom IDE environment up and running in few simple steps. For more information on the content discussed in this post, refer to [Bring your own RStudio image](https://docs.aws.amazon.com/sagemaker/latest/dg/rstudio-byoi.html).\n\n#### **Solution overview**\n\nWhen a data scientist starts a new session in RStudio on SageMaker, a new on-demand ML compute instance is provisioned and a container image that defines the runtime environment (operating system, libraries, R versions, and so on) is run on the ML instance. You can provide your data scientists multiple choices for the runtime environment by creating custom container images and making them available on the RStudio Workbench launcher, as shown in the following screenshot.\n\n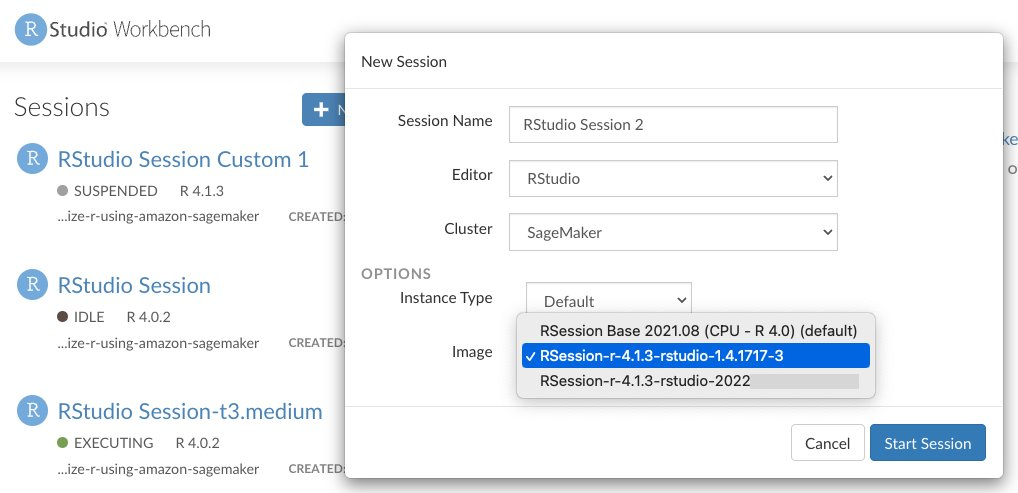\n\nThe following diagram describes the process to bring your custom image. First you build a custom container image from a Dockerfile and push it to a repository in Amazon Elastic Container Registry (Amazon ECR). Next, you create a SageMaker image that points to the container image in Amazon ECR, and attach that image to your [SageMaker domain](https://docs.aws.amazon.com/sagemaker/latest/dg/studio-entity-status.html). This makes the custom image available for launching a new session in RStudio.\n\n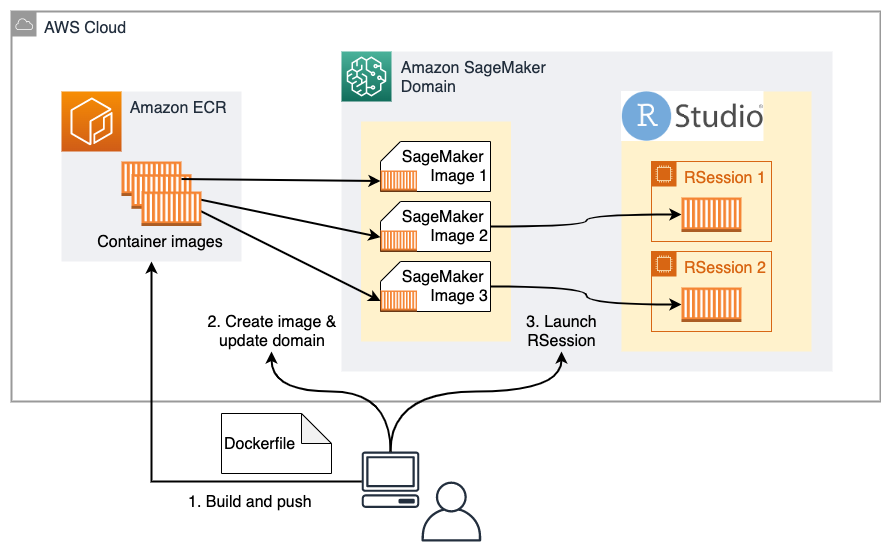\n\n#### **Prerequisites**\n\n\nTo implement this solution, you must have the following prerequisites:\n\n- An RStudio on SageMaker domain\n- [AWS Identity and Access Management ](http://aws.amazon.com/iam)(IAM) policies to interact with Amazon ECR\n- The appropriate AWS CLI version\n\nWe provide more details on each in this section.\n\n#### **RStudio on SageMaker domain**\n\nIf you have an existing SageMaker domain with RStudio enabled prior to April 7, 2022, you must delete and recreate the```RStudioServerPro``` app under the user profile name ```domain-shared```to get the latest updates for bring your own custom image capability. The AWS CLI commands are as follows. Note that this action interrupts RStudio users on SageMaker.\n\n```\naws sagemaker delete-app \\\n --domain-id <sagemaker-domain-id> \\\n --app-type RStudioServerPro \\\n --app-name default \\\n --user-profile-name domain-shared\naws sagemaker create-app \\\n --domain-id <sagemaker-domain-id> \\\n --app-type RStudioServerPro \\\n --app-name default \\\n --user-profile-name domain-shared\n```\n\nIf this is your first time using RStudio on SageMaker, follow the step-by-step setup process described in [Get started with RStudio on Amazon SageMaker](https://aws.amazon.com/cn/blogs/machine-learning/get-started-with-rstudio-on-amazon-sagemaker/), or run the following [AWS CloudFormation ](https://aws.amazon.com/cn/cloudformation/)template to set up your first RStudio on SageMaker domain. If you already have a working RStudio on SageMaker domain, you can skip this step.\n\nThe following RStudio on SageMaker CloudFormation template requires an RStudio license approved through AWS License Manager. For more about licensing, refer to [RStudio license](https://docs.aws.amazon.com/sagemaker/latest/dg/rstudio-license.html). Also note that only one SageMaker domain is permitted per AWS Region, so you’ll need to use an AWS account and Region that doesn’t have an existing domain.\n\n1. Choose **Launch Stack**.\n\tLaunch stack button\n\tThe link takes you to the us-east-1 Region, but you can change to your preferred Region.\n2. In the **Specify template** section, choose **Next**.\n3. In the **Specify stack details** section, for **Stack name**, enter a name.\n4. For **Parameters**, enter a SageMaker user profile name.\n5. Choose **Next**.\n6. In the **Configure stack options** section, choose **Next**.\n7. In the **Review** section, select **I acknowledge that AWS CloudFormation might create IAM resources** and choose **Next**.\n8. When the stack status changes to ```CREATE_COMPLETE```\n, go to the [Control Panel](https://signin.aws.amazon.com/signin?redirect_uri=https%3A%2F%2Fus-east-1.console.aws.amazon.com%2Fsagemaker%2Fhome%3Fregion%3Dus-east-1%26state%3DhashArgs%2523%252Fstudio%252F%26isauthcode%3Dtrue&client_id=arn%3Aaws%3Aiam%3A%3A015428540659%3Auser%2Fsagemaker&forceMobileApp=0&code_challenge=GNpxUE502CV6pZTQlh4LaXYR3LDrVKUnTbICTtb5AZU&code_challenge_method=SHA-256) on the SageMaker console to find the domain and the new user.\n\n#### **IAM policies to interact with Amazon ECR**\n\nTo interact with your private Amazon ECR repositories, you need the following IAM permissions in the IAM user or role you’ll use to build and push Docker images:\n\n```\n{ \n \"Version\":\"2012-10-17\", \n \"Statement\":[ \n {\n \"Sid\": \"VisualEditor0\",\n \"Effect\":\"Allow\", \n \"Action\":[ \n \"ecr:CreateRepository\", \n \"ecr:BatchGetImage\", \n \"ecr:CompleteLayerUpload\", \n \"ecr:DescribeImages\", \n \"ecr:DescribeRepositories\", \n \"ecr:UploadLayerPart\", \n \"ecr:ListImages\", \n \"ecr:InitiateLayerUpload\", \n \"ecr:BatchCheckLayerAvailability\", \n \"ecr:PutImage\" \n ], \n \"Resource\": \"*\" \n }\n ]\n}\n```\n\nTo initially build from a public Amazon ECR image as shown in this post, you need to attach the AWS-managed [AmazonElasticContainerRegistryPublicReadOnly](https://signin.aws.amazon.com/signin?redirect_uri=https%3A%2F%2Fus-east-1.console.aws.amazon.com%2Fiam%2Fhome%3Fregion%3Dus-east-1%26state%3DhashArgs%2523%252Fpolicies%252Farn%253Aaws%253Aiam%253A%253Aaws%253Apolicy%252FAmazonElasticContainerRegistryPublicReadOnly%26isauthcode%3Dtrue&client_id=arn%3Aaws%3Aiam%3A%3A015428540659%3Auser%2Fiam&forceMobileApp=0&code_challenge=r9a_lzTjuxi_JOVnFF2tC7IE5SUmzhjwDY1J-N4-Z90&code_challenge_method=SHA-256) policy to your IAM user or role as well.\n\nTo build a Docker container image, you can use either a local Docker client or the [SageMaker Docker Build](https://pypi.org/project/sagemaker-studio-image-build/) CLI tool from a terminal within RStudio on SageMaker. For the latter, follow the prerequisites in [Using the Amazon SageMaker Studio Image Build CLI to build container images from your Studio notebooks](https://aws.amazon.com/cn/blogs/machine-learning/using-the-amazon-sagemaker-studio-image-build-cli-to-build-container-images-from-your-studio-notebooks/) to set up the IAM permissions and CLI tool.\n\n#### **AWS CLI versions**\n\nThere are minimum version requirements for the AWS CLI tool to run the commands mentioned in this post. Make sure to upgrade AWS CLI on your terminal of choice:\n\n- AWS CLI v1 >= 1.23.6\n- AWS CLI v2 >= 2.6.2\n\n#### **Prepare a Dockerfile**\n\nYou can customize your runtime environment in RStudio in a Dockerfile. Because the customization depends on your use case and requirements, we show you the essentials and the most common customizations in this example. You can download the full [sample Dockerfile](https://aws-blogs-artifacts-public.s3.amazonaws.com/artifacts/ML-9305/sample-code/Dockerfile).\n\n#### **Install RStudio Workbench session components**\n\nThe most important software to install in your custom container image is RStudio Workbench. We download from the [public S3 bucket hosted by RStudio PBC](https://s3.amazonaws.com/rstudio-ide-build/). There are many version releases and OS distributions for use. The version of the installation needs to be compatible with the RStudio Workbench version used in RStudio on SageMaker, which is 1.4.1717-3 at the time of writing. The OS (argument OS in the following snippet) needs to match the base ```OS```used in the container image. In our sample [Dockerfile](https://aws-blogs-artifacts-public.s3.amazonaws.com/artifacts/ML-9305/sample-code/Dockerfile), the base image we use is Amazon Linux 2 from an AWS-managed public Amazon ECR repository. The compatible RStudio Workbench OS is centos7.\n\n```\nFROM public.ecr.aws/amazonlinux/amazonlinux\n...\nARG RSW_VERSION=1.4.1717-3\nARG RSW_NAME=rstudio-workbench-rhel\nARG OS=centos7\nARG RSW_DOWNLOAD_URL=https://s3.amazonaws.com/rstudio-ide-build/server/${OS}/x86_64\nRUN RSW_VERSION_URL=`echo -n \"${RSW_VERSION}\" | sed 's/+/-/g'` \\\n && curl -o rstudio-workbench.rpm ${RSW_DOWNLOAD_URL}/${RSW_NAME}-${RSW_VERSION_URL}-x86_64.rpm \\\n && yum install -y rstudio-workbench.rpm\n```\n\nYou can find all the OS release options with the following command:\n\n```\naws s3 ls s3://rstudio-ide-build/server/\n```\n\n#### **Install R (and versions of R)**\n\nThe runtime for your custom RStudio container image needs at least one version of R. We can first install a version of R and make it the default R by creating soft links to ```/usr/local/bin/```:\n\n```\n# Install main R version\nARG R_VERSION=4.1.3\nRUN curl -O https://cdn.rstudio.com/r/centos-7/pkgs/R-${R_VERSION}-1-1.x86_64.rpm && \\\n yum install -y R-${R_VERSION}-1-1.x86_64.rpm && \\\n yum clean all && \\\n rm -rf R-${R_VERSION}-1-1.x86_64.rpm\n\nRUN ln -s /opt/R/${R_VERSION}/bin/R /usr/local/bin/R && \\\n ln -s /opt/R/${R_VERSION}/bin/Rscript /usr/local/bin/Rscript\n```\n\nData scientists often need multiple versions of R so that they can easily switch between projects and code base. RStudio on SageMaker supports easy switching between R versions, as shown in the following screenshot.\n\n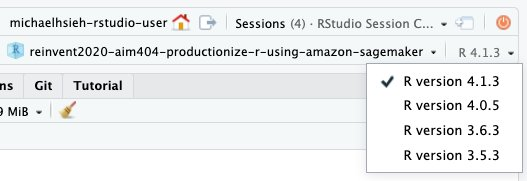\n\nRStudio on SageMaker [automatically scans and discovers versions of R in the following directories](https://support.rstudio.com/hc/en-us/articles/215488098):\n\n```\n/usr/lib/R\n/usr/lib64/R\n/usr/local/lib/R\n/usr/local/lib64/R\n/opt/local/lib/R\n/opt/local/lib64/R\n/opt/R/*\n/opt/local/R/*\n```\n\nWe can install more versions in the container image, as shown in the following snippet. They will be installed in\n```/opt/R/```.\n\n```\nRUN curl -O https://cdn.rstudio.com/r/centos-7/pkgs/R-4.0.5-1-1.x86_64.rpm && \\\n yum install -y R-4.0.5-1-1.x86_64.rpm && \\\n yum clean all && \\\n rm -rf R-4.0.5-1-1.x86_64.rpm\n\nRUN curl -O https://cdn.rstudio.com/r/centos-7/pkgs/R-3.6.3-1-1.x86_64.rpm && \\\n yum install -y R-3.6.3-1-1.x86_64.rpm && \\\n yum clean all && \\\n rm -rf R-3.6.3-1-1.x86_64.rpm\n\nRUN curl -O https://cdn.rstudio.com/r/centos-7/pkgs/R-3.5.3-1-1.x86_64.rpm && \\\n yum install -y R-3.5.3-1-1.x86_64.rpm && \\\n yum clean all && \\\n rm -rf R-3.5.3-1-1.x86_64.rpm\n```\n\n#### **Install RStudio Professional Drivers**\n\nData scientists often need to access data from sources such as [Amazon Athena](https://aws.amazon.com/cn/athena/?whats-new-cards.sort-by=item.additionalFields.postDateTime&whats-new-cards.sort-order=desc) and [Amazon](https://aws.amazon.com/cn/redshift/) Redshift within RStudio on SageMaker. You can do so using [RStudio Professional Drivers](https://docs.rstudio.com/pro-drivers/) and [RStudio Connections](https://support.rstudio.com/hc/en-us/articles/115010915687). Make sure you install the relevant libraries and drivers as shown in the following snippet:\n\n```\n# Install RStudio Professional Drivers ----------------------------------------#\nRUN yum update -y && \\\n yum install -y unixODBC unixODBC-devel && \\\n yum clean all\n\nARG DRIVERS_VERSION=2021.10.0-1\nRUN curl -O https://drivers.rstudio.org/7C152C12/installer/rstudio-drivers-${DRIVERS_VERSION}.el7.x86_64.rpm && \\\n yum install -y rstudio-drivers-${DRIVERS_VERSION}.el7.x86_64.rpm && \\\n yum clean all && \\\n rm -f rstudio-drivers-${DRIVERS_VERSION}.el7.x86_64.rpm && \\\n cp /opt/rstudio-drivers/odbcinst.ini.sample /etc/odbcinst.ini\n\nRUN /opt/R/${R_VERSION}/bin/R -e 'install.packages(\"odbc\", repos=\"https://packagemanager.rstudio.com/cran/__linux__/centos7/latest\")'\n```\n\n#### **Install custom libraries**\n\nYou can also install additional R and Python libraries so that data scientists don’t need to install them on the fly:\n\n```\nRUN /opt/R/${R_VERSION}/bin/R -e \\\n \"install.packages(c('reticulate', 'readr', 'curl', 'ggplot2', 'dplyr', 'stringr', 'fable', 'tsibble', 'dplyr', 'feasts', 'remotes', 'urca', 'sodium', 'plumber', 'jsonlite'), repos='https://packagemanager.rstudio.com/cran/__linux__/centos7/latest')\"\n \nRUN /opt/python/${PYTHON_VERSION}/bin/pip install --upgrade \\\n 'boto3>1.0<2.0' \\\n 'awscli>1.0<2.0' \\\n 'sagemaker[local]<3' \\\n 'sagemaker-studio-image-build' \\\n 'numpy'\n```\n\nWhen you’ve finished your customization in a Dockerfile, it’s time to build a container image and push it to Amazon ECR.\n\n#### **Build and push to Amazon ECR**\n\nYou can build a container image from the Dockerfile from a terminal where the Docker engine is installed, such as your local terminal or[ AWS Cloud9](https://aws.amazon.com/cn/cloud9/). If you’re building it from a terminal within RStudio on SageMaker, you can use [SageMaker Studio Image Build](https://pypi.org/project/sagemaker-studio-image-build/). We demonstrate the steps for both approaches.\n\nIn a local terminal where the Docker engine is present, you can run the following commands from where the Dockerfile is. You can use the sample script [create-and-update-image.sh](https://aws-blogs-artifacts-public.s3.amazonaws.com/artifacts/ML-9305/sample-code/create-and-update-image.sh).\n\n```\nIMAGE_NAME=r-4.1.3-rstudio-1.4.1717-3 # the name for SageMaker Image\nREPO=rstudio-custom # ECR repository name\nTAG=$IMAGE_NAME\n# login to your Amazon ECR\naws ecr get-login-password | docker login --username AWS --password-stdin ${ACCOUNT_ID}.dkr.ecr.${REGION}.amazonaws.com\n\n# create a repo\naws ecr create-repository --repository-name ${REPO}\n\n# build a docker image and push it to the repo\ndocker build . -t ${REPO}:${TAG} -t ${ACCOUNT_ID}.dkr.ecr.${REGION}.amazonaws.com/${REPO}:${TAG}\ndocker push ${ACCOUNT_ID}.dkr.ecr.${REGION}.amazonaws.com/${REPO}:${TAG}\n```\nIn a terminal on RStudio on SageMaker, run the following commands:\n\n```\npip install sagemaker-studio-image-build\nsm-docker build . --repository ${REPO}:${IMAGE_NAME}\n```\n\nAfter these commands, you have a repository and a Docker container image in Amazon ECR for our next step, in which we attach the container image for use in RStudio on SageMaker. Note the image URI in Amazon ECR\n```<ACCOUNT_ID>.dkr.ecr.<REGION>.amazonaws.com/<REPO>:<TAG>``` for later use.\n\n#### **Update RStudio on SageMaker through the console**\n\nRStudio on SageMaker allows runtime customization through the use of a custom SageMaker image. A SageMaker image is a holder for a set of SageMaker image versions. Each image version represents a container image that is compatible with RStudio on SageMaker and stored in an Amazon ECR repository. To make a custom SageMaker image available to all RStudio users within a domain, you can attach the image to the domain following the steps in this section.\n\n1.On the SageMaker console, navigate to the **Custom SageMaker Studio images attached to domain** page, and choose **Attach image**.\n\n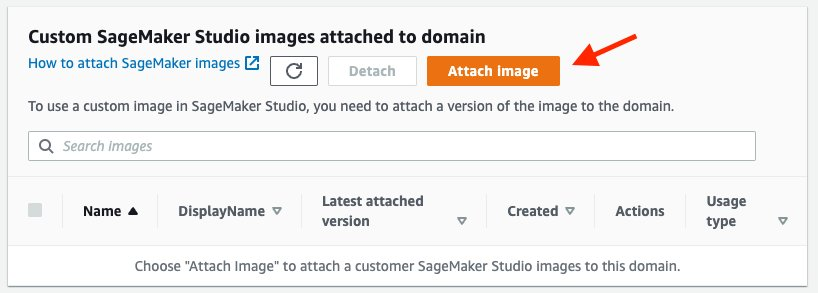\n\n2. Select **New image**, and enter your Amazon ECR image URI.\n3. Choose **Next**.\n\n\n\n4. In the **Image properties** section, provide an **Image name** (required), \n \t**Image display name** (optional), Description (optional), IAM role, and tags.\n\tThe **image display name**, if provided, is shown in the session launcher in RStudio on SageMaker. If the **Image display name** field is left empty, the **image name** is shown in RStudio on SageMaker instead.\n5. Leave **EFS mount path** and **Advanced configuration (User ID and Group ID)** as default because RStudio on SageMaker manages the configuration for us.\n6. In the **Image type section**, select **RStudio image**.\n7. Choose **Submit**.\n\n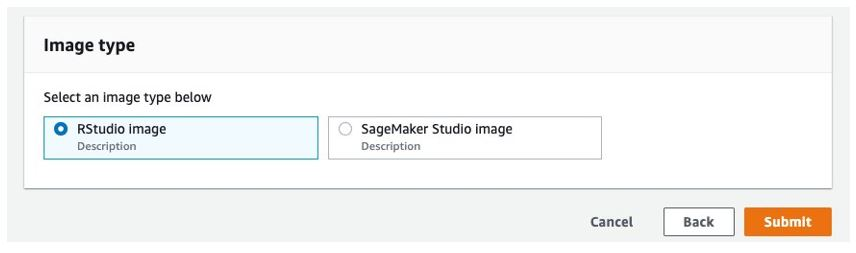\n\nYou can now see a new entry in the list. It’s worth noting that, with the introduction of the support of custom RStudio images, you can see a new **Usage type** column in the table to denote whether an image is an RStudio image or an [Amazon SageMaker Studio](Amazon SageMaker Studio) image.\n\nIt may take up to 5–10 minutes for the custom images to be available in the session launcher UI. You can then launch a new R session in RStudio on SageMaker with your custom images.\n\nOver time, you may want to retire old and outdated images. To remove the custom images from the list of custom images in RStudio, select the images in the list and choose **Detach**.\n\n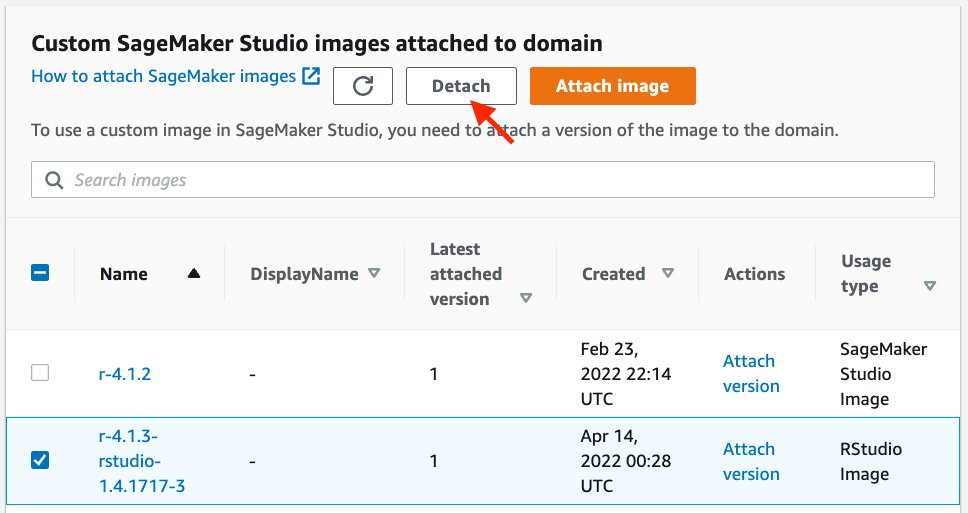\n\nChoose **Detach** again to confirm.\n\n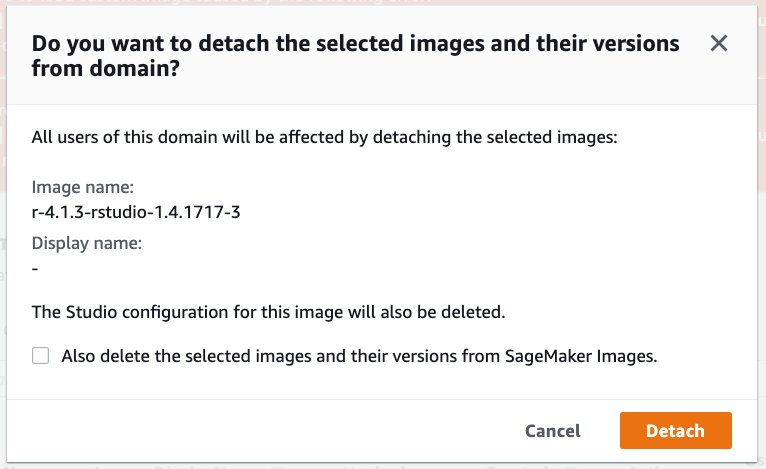\n\n**Update RStudio on SageMaker via the AWS CLI**\n\nThe following sections describe the steps to create a SageMaker image and attach it for use in RStudio on SageMaker on the SageMaker console and using the AWS CLI. You can use the sample script [create-and-update-image.sh](https://aws-blogs-artifacts-public.s3.amazonaws.com/artifacts/ML-9305/sample-code/create-and-update-image.sh).\n\n#### **Create the SageMaker image and image version**\n\nThe first step is to create a SageMaker image from the custom container image in Amazon ECR by running the following two commands:\n\n```\nROLE_ARN=<execution-role-that-has-AmazonSageMakerFullAccess-policy>\nDISPLAY_NAME=RSession-r-4.1.3-rstudio-1.4.1717-3\naws sagemaker create-image \\\n --image-name ${IMAGE_NAME} \\\n --display-name ${DISPLAY_NAME} \\\n --role-arn ${ROLE_ARN}\n\naws sagemaker create-image-version \\\n --image-name ${IMAGE_NAME} \\\n --base-image \"${ACCOUNT_ID}.dkr.ecr.${REGION}.amazonaws.com/${REPO}:${TAG}\"\n```\n\nNote that the custom image displayed in the session launcher in RStudio on SageMaker is determined by the input of```--display-name```. If the optional display name is not provided, the input of ```--image-name```is used instead. Also note that the IAM role allows SageMaker to attach an Amazon ECR image to RStudio on SageMaker.\n\n#### **Create an AppImageConfig**\n\nIn addition to a SageMaker image, which captures the image URI from Amazon ECR, an app image configuration ([AppImageConfig](https://docs.aws.amazon.com/sagemaker/latest/APIReference/API_CreateAppImageConfig.html%22%20/l%20%22API_CreateAppImageConfig_RequestSyntax)) is required for use in a SageMaker domain. We simplify the configuration for an```RSessionApp```mage so we can just create a placeholder configuration with the following command:\n\n```\nIMAGE_CONFIG_NAME=r-4-1-3-rstudio-1-4-1717-3\naws sagemaker create-app-image-config \\\n --app-image-config-name ${IMAGE_CONFIG_NAME}\n```\n\n#### **Attach to a SageMaker domain**\n\nWith the SageMaker image and the app image configuration created, we’re ready to attach the custom container image to the SageMaker domain. To make a custom SageMaker image available to all RStudio users within a domain, you attach the image to the domain as a default user setting. All existing users and any new users will be able to use the custom image.\n\nFor better readability, we place the following configuration into the JSON file [default-user-settings.json](https://aws-blogs-artifacts-public.s3.amazonaws.com/artifacts/ML-9305/sample-code/default-user-settings.json):\n\n```\n \"DefaultUserSettings\": {\n \"RSessionAppSettings\": {\n \"CustomImages\": [\n {\n \"ImageName\": \"r-4.1.3-rstudio-2022\",\n \"AppImageConfigName\": \"r-4-1-3-rstudio-2022\"\n },\n {\n \"ImageName\": \"r-4.1.3-rstudio-1.4.1717-3\",\n \"AppImageConfigName\": \"r-4-1-3-rstudio-1-4-1717-3\"\n }\n ]\n }\n }\n}\n```\n\nIn this file, we can specify the image and ```AppImageConfig name```pairs in a list in ```DefaultUserSettings.RSessionAppSettings.CustomImages```. This preceding snippet assumes two custom images are being created.\n\nThen run the following command to update the SageMaker domain:\n\n```\naws sagemaker update-domain \\\n --domain-id <sagemaker-domain-id> \\\n --cli-input-json file://default-user-settings.json\n```\n\nAfter you update the domaim, it may take up to 5–10 minutes for the custom images to be available in the session launcher UI. You can then launch a new R session in RStudio on SageMaker with your custom images.\n\n#### **Detach images from a SageMaker domain**\n\nou can detach images simply by removing the ```ImageName```and ```AppImageConfigName```pairs from ```default-user-settings.json```and updating the domain.\n\nFor example, updating the domain with the following ```default-user-settings.json```removes ```r-4.1.3-rstudio-2022```from the R session launching UI and leaves ```r-4.1.3-rstudio-1.4.1717-3``` as the only custom image available to all users in a domain:\n\n```\n{\n \"DefaultUserSettings\": {\n \"RSessionAppSettings\": {\n \"CustomImages\": [\n {\n \"ImageName\": \"r-4.1.3-rstudio-1.4.1717-3\",\n \"AppImageConfigName\": \"r-4-1-3-rstudio-1-4-1717-3\"\n }\n ]\n }\n }\n}\n```\n\n#### **Clean up**\n\nTo safely remove images and resources in the SageMaker domain, complete the following steps in [Clean up image resources](https://docs.aws.amazon.com/sagemaker/latest/dg/rstudio-byoi-sdk-cleanup.html).\n\nTo safely remove the RStudio on SageMaker and the SageMaker domain, complete the following steps in [Delete an Amazon SageMaker Domain](https://docs.aws.amazon.com/sagemaker/latest/dg/gs-studio-delete-domain.html) to delete any RSessionGateway app, user profile and the domain.\n\nTo safely remove images and repositories in Amazon ECR, complete the following steps in [Deleting an image](https://docs.aws.amazon.com/AmazonECR/latest/userguide/delete_image.html).\n\nFinally, to delete the CloudFormation template:\n\n1. On the AWS CloudFormation console, choose Stacks.\n2. Select the stack you deployed for this solution.\n3. Choose Delete.\n\n#### **Conclusion**\n\nRStudio on SageMaker makes it simple for data scientists to build ML and analytic solutions in R at scale, and for administrators to manage a robust data science environment for their developers. Data scientists want to customize the environment so that they can use the right libraries for the right job and achieve the desired reproducibility for each ML project. Administrators need to standardize the data science environment for regulatory and security reasons. You can now create custom container images that meet your organizational requirements and allow data scientists to use them in RStudio on SageMaker.\n\nWe encourage you to try it out. Happy developing!\n\n\t_____________________________________\n\n\n#### **About the Authors**\n\n **Michael Hsieh** is a Senior AI/ML Specialist Solutions Architect. He works with customers to advance their ML journey with a combination of AWS ML offerings and his ML domain knowledge. As a Seattle transplant, he loves exploring the great Mother Nature the city has to offer, such as the hiking trails, scenery kayaking in the SLU, and the sunset at Shilshole Bay.\n\n **Declan Kelly** is a Software Engineer on the Amazon SageMaker Studio team. He has been working on Amazon SageMaker Studio since its launch at AWS re:Invent 2019. Outside of work, he enjoys hiking and climbing.\n\n **Sean Morgan **is an AI/ML Solutions Architect at AWS. He has experience in the semiconductor and academic research fields, and uses his experience to help customers reach their goals on AWS. In his free time, Sean is an active open-source contributor and maintainer, and is the special interest group lead for TensorFlow Add-ons.\n\n\n\n\n\n\n ","render":"<p><a href=\"https://aws.amazon.com/cn/blogs/aws/announcing-fully-managed-rstudio-on-amazon-sagemaker-for-data-scientists/\" target=\"_blank\">RStudio on Amazon SageMaker</a> is the industry’s first fully managed RStudio Workbench in cloud. You can quickly launch the familiar RStudio integrated development environment (IDE), and dial up and down the underlying compute resources without interrupting your work, making it easy to build machine learning (ML) and analytics solutions in R at scale. RStudio on SageMaker already comes with a <a href=\"https://docs.aws.amazon.com/sagemaker/latest/dg/rstudio-use.html#rstudio-base-image\" target=\"_blank\">built-in image</a> preconfigured with R programming and data science tools; however, you often need to customize your IDE environment. Starting today, you can bring your own custom image with packages and tools of your choice, and make them available to all the users of RStudio on SageMaker in a few clicks.</p>\n<p>Bringing your own custom image has several benefits. You can standardize and simplify the getting started experience for data scientists and developers by providing a starter image, preconfigure the drivers required for connecting to data stores, or pre-install specialized data science software for your business domain. Furthermore, organizations that have previously hosted their own RStudio Workbench may have existing containerized environments that they want to continue to use in RStudio on SageMaker.</p>\n<p>In this post, we share step-by-step instructions to create a custom image and bring it to RStudio on SageMaker using the <a href=\"https://aws.amazon.com/cn/console/\" target=\"_blank\">AWS Management Console</a> or <a href=\"https://aws.amazon.com/cn/cli/\" target=\"_blank\">AWS Command Line Interface</a> (AWS CLI). You can get your first custom IDE environment up and running in few simple steps. For more information on the content discussed in this post, refer to <a href=\"https://docs.aws.amazon.com/sagemaker/latest/dg/rstudio-byoi.html\" target=\"_blank\">Bring your own RStudio image</a>.</p>\n<h4><a id=\"Solution_overview_6\"></a><strong>Solution overview</strong></h4>\n<p>When a data scientist starts a new session in RStudio on SageMaker, a new on-demand ML compute instance is provisioned and a container image that defines the runtime environment (operating system, libraries, R versions, and so on) is run on the ML instance. You can provide your data scientists multiple choices for the runtime environment by creating custom container images and making them available on the RStudio Workbench launcher, as shown in the following screenshot.</p>\n<p><img src=\"https://dev-media.amazoncloud.cn/adf57b7fac2b46a5a38ac0664ae14166_image.png\" alt=\"image.png\" /></p>\n<p>The following diagram describes the process to bring your custom image. First you build a custom container image from a Dockerfile and push it to a repository in Amazon Elastic Container Registry (Amazon ECR). Next, you create a SageMaker image that points to the container image in Amazon ECR, and attach that image to your <a href=\"https://docs.aws.amazon.com/sagemaker/latest/dg/studio-entity-status.html\" target=\"_blank\">SageMaker domain</a>. This makes the custom image available for launching a new session in RStudio.</p>\n<p><img src=\"https://dev-media.amazoncloud.cn/62919ea441a54daea8f56fd56b834af3_image.png\" alt=\"image.png\" /></p>\n<h4><a id=\"Prerequisites_16\"></a><strong>Prerequisites</strong></h4>\n<p>To implement this solution, you must have the following prerequisites:</p>\n<ul>\n<li>An RStudio on SageMaker domain</li>\n<li><a href=\"http://aws.amazon.com/iam\" target=\"_blank\">AWS Identity and Access Management </a>(IAM) policies to interact with Amazon ECR</li>\n<li>The appropriate AWS CLI version</li>\n</ul>\n<p>We provide more details on each in this section.</p>\n<h4><a id=\"RStudio_on_SageMaker_domain_27\"></a><strong>RStudio on SageMaker domain</strong></h4>\n<p>If you have an existing SageMaker domain with RStudio enabled prior to April 7, 2022, you must delete and recreate the<code>RStudioServerPro</code> app under the user profile name <code>domain-shared</code>to get the latest updates for bring your own custom image capability. The AWS CLI commands are as follows. Note that this action interrupts RStudio users on SageMaker.</p>\n<pre><code class=\"lang-\">aws sagemaker delete-app \\\n --domain-id <sagemaker-domain-id> \\\n --app-type RStudioServerPro \\\n --app-name default \\\n --user-profile-name domain-shared\naws sagemaker create-app \\\n --domain-id <sagemaker-domain-id> \\\n --app-type RStudioServerPro \\\n --app-name default \\\n --user-profile-name domain-shared\n</code></pre>\n<p>If this is your first time using RStudio on SageMaker, follow the step-by-step setup process described in <a href=\"https://aws.amazon.com/cn/blogs/machine-learning/get-started-with-rstudio-on-amazon-sagemaker/\" target=\"_blank\">Get started with RStudio on Amazon SageMaker</a>, or run the following <a href=\"https://aws.amazon.com/cn/cloudformation/\" target=\"_blank\">AWS CloudFormation </a>template to set up your first RStudio on SageMaker domain. If you already have a working RStudio on SageMaker domain, you can skip this step.</p>\n<p>The following RStudio on SageMaker CloudFormation template requires an RStudio license approved through AWS License Manager. For more about licensing, refer to <a href=\"https://docs.aws.amazon.com/sagemaker/latest/dg/rstudio-license.html\" target=\"_blank\">RStudio license</a>. Also note that only one SageMaker domain is permitted per AWS Region, so you’ll need to use an AWS account and Region that doesn’t have an existing domain.</p>\n<ol>\n<li>Choose <strong>Launch Stack</strong>.<br />\nLaunch stack button<br />\nThe link takes you to the us-east-1 Region, but you can change to your preferred Region.</li>\n<li>In the <strong>Specify template</strong> section, choose <strong>Next</strong>.</li>\n<li>In the <strong>Specify stack details</strong> section, for <strong>Stack name</strong>, enter a name.</li>\n<li>For <strong>Parameters</strong>, enter a SageMaker user profile name.</li>\n<li>Choose <strong>Next</strong>.</li>\n<li>In the <strong>Configure stack options</strong> section, choose <strong>Next</strong>.</li>\n<li>In the <strong>Review</strong> section, select <strong>I acknowledge that AWS CloudFormation might create IAM resources</strong> and choose <strong>Next</strong>.</li>\n<li>When the stack status changes to <code>CREATE_COMPLETE</code><br />\n, go to the <a href=\"https://signin.aws.amazon.com/signin?redirect_uri=https%3A%2F%2Fus-east-1.console.aws.amazon.com%2Fsagemaker%2Fhome%3Fregion%3Dus-east-1%26state%3DhashArgs%2523%252Fstudio%252F%26isauthcode%3Dtrue&client_id=arn%3Aaws%3Aiam%3A%3A015428540659%3Auser%2Fsagemaker&forceMobileApp=0&code_challenge=GNpxUE502CV6pZTQlh4LaXYR3LDrVKUnTbICTtb5AZU&code_challenge_method=SHA-256\" target=\"_blank\">Control Panel</a> on the SageMaker console to find the domain and the new user.</li>\n</ol>\n<h4><a id=\"IAM_policies_to_interact_with_Amazon_ECR_60\"></a><strong>IAM policies to interact with Amazon ECR</strong></h4>\n<p>To interact with your private Amazon ECR repositories, you need the following IAM permissions in the IAM user or role you’ll use to build and push Docker images:</p>\n<pre><code class=\"lang-\">{ \n "Version":"2012-10-17", \n "Statement":[ \n {\n "Sid": "VisualEditor0",\n "Effect":"Allow", \n "Action":[ \n "ecr:CreateRepository", \n "ecr:BatchGetImage", \n "ecr:CompleteLayerUpload", \n "ecr:DescribeImages", \n "ecr:DescribeRepositories", \n "ecr:UploadLayerPart", \n "ecr:ListImages", \n "ecr:InitiateLayerUpload", \n "ecr:BatchCheckLayerAvailability", \n "ecr:PutImage" \n ], \n "Resource": "*" \n }\n ]\n}\n</code></pre>\n<p>To initially build from a public Amazon ECR image as shown in this post, you need to attach the AWS-managed <a href=\"https://signin.aws.amazon.com/signin?redirect_uri=https%3A%2F%2Fus-east-1.console.aws.amazon.com%2Fiam%2Fhome%3Fregion%3Dus-east-1%26state%3DhashArgs%2523%252Fpolicies%252Farn%253Aaws%253Aiam%253A%253Aaws%253Apolicy%252FAmazonElasticContainerRegistryPublicReadOnly%26isauthcode%3Dtrue&client_id=arn%3Aaws%3Aiam%3A%3A015428540659%3Auser%2Fiam&forceMobileApp=0&code_challenge=r9a_lzTjuxi_JOVnFF2tC7IE5SUmzhjwDY1J-N4-Z90&code_challenge_method=SHA-256\" target=\"_blank\">AmazonElasticContainerRegistryPublicReadOnly</a> policy to your IAM user or role as well.</p>\n<p>To build a Docker container image, you can use either a local Docker client or the <a href=\"https://pypi.org/project/sagemaker-studio-image-build/\" target=\"_blank\">SageMaker Docker Build</a> CLI tool from a terminal within RStudio on SageMaker. For the latter, follow the prerequisites in <a href=\"https://aws.amazon.com/cn/blogs/machine-learning/using-the-amazon-sagemaker-studio-image-build-cli-to-build-container-images-from-your-studio-notebooks/\" target=\"_blank\">Using the Amazon SageMaker Studio Image Build CLI to build container images from your Studio notebooks</a> to set up the IAM permissions and CLI tool.</p>\n<h4><a id=\"AWS_CLI_versions_93\"></a><strong>AWS CLI versions</strong></h4>\n<p>There are minimum version requirements for the AWS CLI tool to run the commands mentioned in this post. Make sure to upgrade AWS CLI on your terminal of choice:</p>\n<ul>\n<li>AWS CLI v1 >= 1.23.6</li>\n<li>AWS CLI v2 >= 2.6.2</li>\n</ul>\n<h4><a id=\"Prepare_a_Dockerfile_100\"></a><strong>Prepare a Dockerfile</strong></h4>\n<p>You can customize your runtime environment in RStudio in a Dockerfile. Because the customization depends on your use case and requirements, we show you the essentials and the most common customizations in this example. You can download the full <a href=\"https://aws-blogs-artifacts-public.s3.amazonaws.com/artifacts/ML-9305/sample-code/Dockerfile\" target=\"_blank\">sample Dockerfile</a>.</p>\n<h4><a id=\"Install_RStudio_Workbench_session_components_104\"></a><strong>Install RStudio Workbench session components</strong></h4>\n<p>The most important software to install in your custom container image is RStudio Workbench. We download from the <a href=\"https://s3.amazonaws.com/rstudio-ide-build/\" target=\"_blank\">public S3 bucket hosted by RStudio PBC</a>. There are many version releases and OS distributions for use. The version of the installation needs to be compatible with the RStudio Workbench version used in RStudio on SageMaker, which is 1.4.1717-3 at the time of writing. The OS (argument OS in the following snippet) needs to match the base <code>OS</code>used in the container image. In our sample <a href=\"https://aws-blogs-artifacts-public.s3.amazonaws.com/artifacts/ML-9305/sample-code/Dockerfile\" target=\"_blank\">Dockerfile</a>, the base image we use is Amazon Linux 2 from an AWS-managed public Amazon ECR repository. The compatible RStudio Workbench OS is centos7.</p>\n<pre><code class=\"lang-\">FROM public.ecr.aws/amazonlinux/amazonlinux\n...\nARG RSW_VERSION=1.4.1717-3\nARG RSW_NAME=rstudio-workbench-rhel\nARG OS=centos7\nARG RSW_DOWNLOAD_URL=https://s3.amazonaws.com/rstudio-ide-build/server/${OS}/x86_64\nRUN RSW_VERSION_URL=`echo -n "${RSW_VERSION}" | sed 's/+/-/g'` \\\n && curl -o rstudio-workbench.rpm ${RSW_DOWNLOAD_URL}/${RSW_NAME}-${RSW_VERSION_URL}-x86_64.rpm \\\n && yum install -y rstudio-workbench.rpm\n</code></pre>\n<p>You can find all the OS release options with the following command:</p>\n<pre><code class=\"lang-\">aws s3 ls s3://rstudio-ide-build/server/\n</code></pre>\n<h4><a id=\"Install_R_and_versions_of_R_126\"></a><strong>Install R (and versions of R)</strong></h4>\n<p>The runtime for your custom RStudio container image needs at least one version of R. We can first install a version of R and make it the default R by creating soft links to <code>/usr/local/bin/</code>:</p>\n<pre><code class=\"lang-\"># Install main R version\nARG R_VERSION=4.1.3\nRUN curl -O https://cdn.rstudio.com/r/centos-7/pkgs/R-${R_VERSION}-1-1.x86_64.rpm && \\\n yum install -y R-${R_VERSION}-1-1.x86_64.rpm && \\\n yum clean all && \\\n rm -rf R-${R_VERSION}-1-1.x86_64.rpm\n\nRUN ln -s /opt/R/${R_VERSION}/bin/R /usr/local/bin/R && \\\n ln -s /opt/R/${R_VERSION}/bin/Rscript /usr/local/bin/Rscript\n</code></pre>\n<p>Data scientists often need multiple versions of R so that they can easily switch between projects and code base. RStudio on SageMaker supports easy switching between R versions, as shown in the following screenshot.</p>\n<p><img src=\"https://dev-media.amazoncloud.cn/e3b82df5304f4fedb167286617e6911c_image.png\" alt=\"image.png\" /></p>\n<p>RStudio on SageMaker <a href=\"https://support.rstudio.com/hc/en-us/articles/215488098\" target=\"_blank\">automatically scans and discovers versions of R in the following directories</a>:</p>\n<pre><code class=\"lang-\">/usr/lib/R\n/usr/lib64/R\n/usr/local/lib/R\n/usr/local/lib64/R\n/opt/local/lib/R\n/opt/local/lib64/R\n/opt/R/*\n/opt/local/R/*\n</code></pre>\n<p>We can install more versions in the container image, as shown in the following snippet. They will be installed in<br />\n<code>/opt/R/</code>.</p>\n<pre><code class=\"lang-\">RUN curl -O https://cdn.rstudio.com/r/centos-7/pkgs/R-4.0.5-1-1.x86_64.rpm && \\\n yum install -y R-4.0.5-1-1.x86_64.rpm && \\\n yum clean all && \\\n rm -rf R-4.0.5-1-1.x86_64.rpm\n\nRUN curl -O https://cdn.rstudio.com/r/centos-7/pkgs/R-3.6.3-1-1.x86_64.rpm && \\\n yum install -y R-3.6.3-1-1.x86_64.rpm && \\\n yum clean all && \\\n rm -rf R-3.6.3-1-1.x86_64.rpm\n\nRUN curl -O https://cdn.rstudio.com/r/centos-7/pkgs/R-3.5.3-1-1.x86_64.rpm && \\\n yum install -y R-3.5.3-1-1.x86_64.rpm && \\\n yum clean all && \\\n rm -rf R-3.5.3-1-1.x86_64.rpm\n</code></pre>\n<h4><a id=\"Install_RStudio_Professional_Drivers_179\"></a><strong>Install RStudio Professional Drivers</strong></h4>\n<p>Data scientists often need to access data from sources such as <a href=\"https://aws.amazon.com/cn/athena/?whats-new-cards.sort-by=item.additionalFields.postDateTime&whats-new-cards.sort-order=desc\" target=\"_blank\">Amazon Athena</a> and <a href=\"https://aws.amazon.com/cn/redshift/\" target=\"_blank\">Amazon</a> Redshift within RStudio on SageMaker. You can do so using <a href=\"https://docs.rstudio.com/pro-drivers/\" target=\"_blank\">RStudio Professional Drivers</a> and <a href=\"https://support.rstudio.com/hc/en-us/articles/115010915687\" target=\"_blank\">RStudio Connections</a>. Make sure you install the relevant libraries and drivers as shown in the following snippet:</p>\n<pre><code class=\"lang-\"># Install RStudio Professional Drivers ----------------------------------------#\nRUN yum update -y && \\\n yum install -y unixODBC unixODBC-devel && \\\n yum clean all\n\nARG DRIVERS_VERSION=2021.10.0-1\nRUN curl -O https://drivers.rstudio.org/7C152C12/installer/rstudio-drivers-${DRIVERS_VERSION}.el7.x86_64.rpm && \\\n yum install -y rstudio-drivers-${DRIVERS_VERSION}.el7.x86_64.rpm && \\\n yum clean all && \\\n rm -f rstudio-drivers-${DRIVERS_VERSION}.el7.x86_64.rpm && \\\n cp /opt/rstudio-drivers/odbcinst.ini.sample /etc/odbcinst.ini\n\nRUN /opt/R/${R_VERSION}/bin/R -e 'install.packages("odbc", repos="https://packagemanager.rstudio.com/cran/__linux__/centos7/latest")'\n</code></pre>\n<h4><a id=\"Install_custom_libraries_199\"></a><strong>Install custom libraries</strong></h4>\n<p>You can also install additional R and Python libraries so that data scientists don’t need to install them on the fly:</p>\n<pre><code class=\"lang-\">RUN /opt/R/${R_VERSION}/bin/R -e \\\n "install.packages(c('reticulate', 'readr', 'curl', 'ggplot2', 'dplyr', 'stringr', 'fable', 'tsibble', 'dplyr', 'feasts', 'remotes', 'urca', 'sodium', 'plumber', 'jsonlite'), repos='https://packagemanager.rstudio.com/cran/__linux__/centos7/latest')"\n \nRUN /opt/python/${PYTHON_VERSION}/bin/pip install --upgrade \\\n 'boto3>1.0<2.0' \\\n 'awscli>1.0<2.0' \\\n 'sagemaker[local]<3' \\\n 'sagemaker-studio-image-build' \\\n 'numpy'\n</code></pre>\n<p>When you’ve finished your customization in a Dockerfile, it’s time to build a container image and push it to Amazon ECR.</p>\n<h4><a id=\"Build_and_push_to_Amazon_ECR_217\"></a><strong>Build and push to Amazon ECR</strong></h4>\n<p>You can build a container image from the Dockerfile from a terminal where the Docker engine is installed, such as your local terminal or<a href=\"https://aws.amazon.com/cn/cloud9/\" target=\"_blank\"> AWS Cloud9</a>. If you’re building it from a terminal within RStudio on SageMaker, you can use <a href=\"https://pypi.org/project/sagemaker-studio-image-build/\" target=\"_blank\">SageMaker Studio Image Build</a>. We demonstrate the steps for both approaches.</p>\n<p>In a local terminal where the Docker engine is present, you can run the following commands from where the Dockerfile is. You can use the sample script <a href=\"https://aws-blogs-artifacts-public.s3.amazonaws.com/artifacts/ML-9305/sample-code/create-and-update-image.sh\" target=\"_blank\">create-and-update-image.sh</a>.</p>\n<pre><code class=\"lang-\">IMAGE_NAME=r-4.1.3-rstudio-1.4.1717-3 # the name for SageMaker Image\nREPO=rstudio-custom # ECR repository name\nTAG=$IMAGE_NAME\n# login to your Amazon ECR\naws ecr get-login-password | docker login --username AWS --password-stdin ${ACCOUNT_ID}.dkr.ecr.${REGION}.amazonaws.com\n\n# create a repo\naws ecr create-repository --repository-name ${REPO}\n\n# build a docker image and push it to the repo\ndocker build . -t ${REPO}:${TAG} -t ${ACCOUNT_ID}.dkr.ecr.${REGION}.amazonaws.com/${REPO}:${TAG}\ndocker push ${ACCOUNT_ID}.dkr.ecr.${REGION}.amazonaws.com/${REPO}:${TAG}\n</code></pre>\n<p>In a terminal on RStudio on SageMaker, run the following commands:</p>\n<pre><code class=\"lang-\">pip install sagemaker-studio-image-build\nsm-docker build . --repository ${REPO}:${IMAGE_NAME}\n</code></pre>\n<p>After these commands, you have a repository and a Docker container image in Amazon ECR for our next step, in which we attach the container image for use in RStudio on SageMaker. Note the image URI in Amazon ECR<br />\n<code><ACCOUNT_ID>.dkr.ecr.<REGION>.amazonaws.com/<REPO>:<TAG></code> for later use.</p>\n<h4><a id=\"Update_RStudio_on_SageMaker_through_the_console_247\"></a><strong>Update RStudio on SageMaker through the console</strong></h4>\n<p>RStudio on SageMaker allows runtime customization through the use of a custom SageMaker image. A SageMaker image is a holder for a set of SageMaker image versions. Each image version represents a container image that is compatible with RStudio on SageMaker and stored in an Amazon ECR repository. To make a custom SageMaker image available to all RStudio users within a domain, you can attach the image to the domain following the steps in this section.</p>\n<p>1.On the SageMaker console, navigate to the <strong>Custom SageMaker Studio images attached to domain</strong> page, and choose <strong>Attach image</strong>.</p>\n<p><img src=\"https://dev-media.amazoncloud.cn/81675c18b3bb4909af7306ab5e809d74_image.png\" alt=\"image.png\" /></p>\n<ol start=\"2\">\n<li>Select <strong>New image</strong>, and enter your Amazon ECR image URI.</li>\n<li>Choose <strong>Next</strong>.</li>\n</ol>\n<p><img src=\"https://dev-media.amazoncloud.cn/d5cb59dfc4674f3fb8960b7fd3d3ef30_image.png\" alt=\"image.png\" /></p>\n<ol start=\"4\">\n<li>In the <strong>Image properties</strong> section, provide an <strong>Image name</strong> (required),<br />\n<strong>Image display name</strong> (optional), Description (optional), IAM role, and tags.<br />\nThe <strong>image display name</strong>, if provided, is shown in the session launcher in RStudio on SageMaker. If the <strong>Image display name</strong> field is left empty, the <strong>image name</strong> is shown in RStudio on SageMaker instead.</li>\n<li>Leave <strong>EFS mount path</strong> and <strong>Advanced configuration (User ID and Group ID)</strong> as default because RStudio on SageMaker manages the configuration for us.</li>\n<li>In the <strong>Image type section</strong>, select <strong>RStudio image</strong>.</li>\n<li>Choose <strong>Submit</strong>.</li>\n</ol>\n<p><img src=\"https://dev-media.amazoncloud.cn/93cc16f17e6144f8a85fedbb82ae1164_image.png\" alt=\"image.png\" /></p>\n<p>You can now see a new entry in the list. It’s worth noting that, with the introduction of the support of custom RStudio images, you can see a new <strong>Usage type</strong> column in the table to denote whether an image is an RStudio image or an [Amazon SageMaker Studio](Amazon SageMaker Studio) image.</p>\n<p>It may take up to 5–10 minutes for the custom images to be available in the session launcher UI. You can then launch a new R session in RStudio on SageMaker with your custom images.</p>\n<p>Over time, you may want to retire old and outdated images. To remove the custom images from the list of custom images in RStudio, select the images in the list and choose <strong>Detach</strong>.</p>\n<p><img src=\"https://dev-media.amazoncloud.cn/ec6d0f0e3dcd4a749d9f792f3611aacd_image.png\" alt=\"image.png\" /></p>\n<p>Choose <strong>Detach</strong> again to confirm.</p>\n<p><img src=\"https://dev-media.amazoncloud.cn/9fa846f6358c451ca85ca1d8a35afd4a_image.png\" alt=\"image.png\" /></p>\n<p><strong>Update RStudio on SageMaker via the AWS CLI</strong></p>\n<p>The following sections describe the steps to create a SageMaker image and attach it for use in RStudio on SageMaker on the SageMaker console and using the AWS CLI. You can use the sample script <a href=\"https://aws-blogs-artifacts-public.s3.amazonaws.com/artifacts/ML-9305/sample-code/create-and-update-image.sh\" target=\"_blank\">create-and-update-image.sh</a>.</p>\n<h4><a id=\"Create_the_SageMaker_image_and_image_version_285\"></a><strong>Create the SageMaker image and image version</strong></h4>\n<p>The first step is to create a SageMaker image from the custom container image in Amazon ECR by running the following two commands:</p>\n<pre><code class=\"lang-\">ROLE_ARN=<execution-role-that-has-AmazonSageMakerFullAccess-policy>\nDISPLAY_NAME=RSession-r-4.1.3-rstudio-1.4.1717-3\naws sagemaker create-image \\\n --image-name ${IMAGE_NAME} \\\n --display-name ${DISPLAY_NAME} \\\n --role-arn ${ROLE_ARN}\n\naws sagemaker create-image-version \\\n --image-name ${IMAGE_NAME} \\\n --base-image "${ACCOUNT_ID}.dkr.ecr.${REGION}.amazonaws.com/${REPO}:${TAG}"\n</code></pre>\n<p>Note that the custom image displayed in the session launcher in RStudio on SageMaker is determined by the input of<code>--display-name</code>. If the optional display name is not provided, the input of <code>--image-name</code>is used instead. Also note that the IAM role allows SageMaker to attach an Amazon ECR image to RStudio on SageMaker.</p>\n<h4><a id=\"Create_an_AppImageConfig_304\"></a><strong>Create an AppImageConfig</strong></h4>\n<p>In addition to a SageMaker image, which captures the image URI from Amazon ECR, an app image configuration (<a href=\"https://docs.aws.amazon.com/sagemaker/latest/APIReference/API_CreateAppImageConfig.html%22%20/l%20%22API_CreateAppImageConfig_RequestSyntax\" target=\"_blank\">AppImageConfig</a>) is required for use in a SageMaker domain. We simplify the configuration for an<code>RSessionApp</code>mage so we can just create a placeholder configuration with the following command:</p>\n<pre><code class=\"lang-\">IMAGE_CONFIG_NAME=r-4-1-3-rstudio-1-4-1717-3\naws sagemaker create-app-image-config \\\n --app-image-config-name ${IMAGE_CONFIG_NAME}\n</code></pre>\n<h4><a id=\"Attach_to_a_SageMaker_domain_314\"></a><strong>Attach to a SageMaker domain</strong></h4>\n<p>With the SageMaker image and the app image configuration created, we’re ready to attach the custom container image to the SageMaker domain. To make a custom SageMaker image available to all RStudio users within a domain, you attach the image to the domain as a default user setting. All existing users and any new users will be able to use the custom image.</p>\n<p>For better readability, we place the following configuration into the JSON file <a href=\"https://aws-blogs-artifacts-public.s3.amazonaws.com/artifacts/ML-9305/sample-code/default-user-settings.json\" target=\"_blank\">default-user-settings.json</a>:</p>\n<pre><code class=\"lang-\"> "DefaultUserSettings": {\n "RSessionAppSettings": {\n "CustomImages": [\n {\n "ImageName": "r-4.1.3-rstudio-2022",\n "AppImageConfigName": "r-4-1-3-rstudio-2022"\n },\n {\n "ImageName": "r-4.1.3-rstudio-1.4.1717-3",\n "AppImageConfigName": "r-4-1-3-rstudio-1-4-1717-3"\n }\n ]\n }\n }\n}\n</code></pre>\n<p>In this file, we can specify the image and <code>AppImageConfig name</code>pairs in a list in <code>DefaultUserSettings.RSessionAppSettings.CustomImages</code>. This preceding snippet assumes two custom images are being created.</p>\n<p>Then run the following command to update the SageMaker domain:</p>\n<pre><code class=\"lang-\">aws sagemaker update-domain \\\n --domain-id <sagemaker-domain-id> \\\n --cli-input-json file://default-user-settings.json\n</code></pre>\n<p>After you update the domaim, it may take up to 5–10 minutes for the custom images to be available in the session launcher UI. You can then launch a new R session in RStudio on SageMaker with your custom images.</p>\n<h4><a id=\"Detach_images_from_a_SageMaker_domain_350\"></a><strong>Detach images from a SageMaker domain</strong></h4>\n<p>ou can detach images simply by removing the <code>ImageName</code>and <code>AppImageConfigName</code>pairs from <code>default-user-settings.json</code>and updating the domain.</p>\n<p>For example, updating the domain with the following <code>default-user-settings.json</code>removes <code>r-4.1.3-rstudio-2022</code>from the R session launching UI and leaves <code>r-4.1.3-rstudio-1.4.1717-3</code> as the only custom image available to all users in a domain:</p>\n<pre><code class=\"lang-\">{\n "DefaultUserSettings": {\n "RSessionAppSettings": {\n "CustomImages": [\n {\n "ImageName": "r-4.1.3-rstudio-1.4.1717-3",\n "AppImageConfigName": "r-4-1-3-rstudio-1-4-1717-3"\n }\n ]\n }\n }\n}\n</code></pre>\n<h4><a id=\"Clean_up_371\"></a><strong>Clean up</strong></h4>\n<p>To safely remove images and resources in the SageMaker domain, complete the following steps in <a href=\"https://docs.aws.amazon.com/sagemaker/latest/dg/rstudio-byoi-sdk-cleanup.html\" target=\"_blank\">Clean up image resources</a>.</p>\n<p>To safely remove the RStudio on SageMaker and the SageMaker domain, complete the following steps in <a href=\"https://docs.aws.amazon.com/sagemaker/latest/dg/gs-studio-delete-domain.html\" target=\"_blank\">Delete an Amazon SageMaker Domain</a> to delete any RSessionGateway app, user profile and the domain.</p>\n<p>To safely remove images and repositories in Amazon ECR, complete the following steps in <a href=\"https://docs.aws.amazon.com/AmazonECR/latest/userguide/delete_image.html\" target=\"_blank\">Deleting an image</a>.</p>\n<p>Finally, to delete the CloudFormation template:</p>\n<ol>\n<li>On the AWS CloudFormation console, choose Stacks.</li>\n<li>Select the stack you deployed for this solution.</li>\n<li>Choose Delete.</li>\n</ol>\n<h4><a id=\"Conclusion_385\"></a><strong>Conclusion</strong></h4>\n<p>RStudio on SageMaker makes it simple for data scientists to build ML and analytic solutions in R at scale, and for administrators to manage a robust data science environment for their developers. Data scientists want to customize the environment so that they can use the right libraries for the right job and achieve the desired reproducibility for each ML project. Administrators need to standardize the data science environment for regulatory and security reasons. You can now create custom container images that meet your organizational requirements and allow data scientists to use them in RStudio on SageMaker.</p>\n<p>We encourage you to try it out. Happy developing!</p>\n<pre><code>_____________________________________\n</code></pre>\n<h4><a id=\"About_the_Authors_394\"></a><strong>About the Authors</strong></h4>\n<p><img src=\"https://dev-media.amazoncloud.cn/38aa0ed30dd24dc19ce170c362ca6849_image.png\" alt=\"image.png\" /> <strong>Michael Hsieh</strong> is a Senior AI/ML Specialist Solutions Architect. He works with customers to advance their ML journey with a combination of AWS ML offerings and his ML domain knowledge. As a Seattle transplant, he loves exploring the great Mother Nature the city has to offer, such as the hiking trails, scenery kayaking in the SLU, and the sunset at Shilshole Bay.</p>\n<p><img src=\"https://dev-media.amazoncloud.cn/faede98d22174eeaa35e3d731457ef45_image.png\" alt=\"image.png\" /> <strong>Declan Kelly</strong> is a Software Engineer on the Amazon SageMaker Studio team. He has been working on Amazon SageMaker Studio since its launch at AWS re:Invent 2019. Outside of work, he enjoys hiking and climbing.</p>\n<p><img src=\"https://dev-media.amazoncloud.cn/c00064ec2bf14b23939207eebbdc35a6_image.png\" alt=\"image.png\" /> **Sean Morgan **is an AI/ML Solutions Architect at AWS. He has experience in the semiconductor and academic research fields, and uses his experience to help customers reach their goals on AWS. In his free time, Sean is an active open-source contributor and maintainer, and is the special interest group lead for TensorFlow Add-ons.</p>\n"}
Use a custom image to bring your own development environment to RStudio on Amazon SageMaker
海外精选

海外精选的内容汇集了全球优质的亚马逊云科技相关技术内容。同时,内容中提到的“AWS”
是 “Amazon Web Services” 的缩写,在此网站不作为商标展示。

 0
0 0
0亚马逊云科技解决方案 基于行业客户应用场景及技术领域的解决方案
联系亚马逊云科技专家
亚马逊云科技解决方案
基于行业客户应用场景及技术领域的解决方案
联系专家

0
目录

 分享
分享 点赞
点赞 收藏
收藏 目录
目录立即注册,开启您的免费套餐
立即关注

亚马逊云开发者
公众号

User Group
公众号

亚马逊云科技
官方小程序
“AWS” 是 “Amazon Web Services” 的缩写,在此网站不作为商标展示。
立即关注
亚马逊云开发者
公众号
User Group
公众号
亚马逊云科技
官方小程序
“AWS” 是 “Amazon Web Services” 的缩写,在此网站不作为商标展示。
关于我们 
更多资源
开发者工具
更多支持
立即关注
亚马逊云开发者
公众号
User Group
公众号
亚马逊云科技
官方小程序
“AWS” 是 “Amazon Web Services” 的缩写,在此网站不作为商标展示。
