{"value":"[Amazon SageMaker Studio](https://docs.aws.amazon.com/sagemaker/latest/dg/studio-ui.html) is a web-based integrated development environment (IDE) for machine learning (ML) that lets you build, train, debug, deploy, and monitor your ML models. Each onboarded user in Studio has their own dedicated set of resources, such as compute instances, a home directory on an [Amazon Elastic File System](https://aws.amazon.com/efs/) (Amazon EFS) volume, and a dedicated [AWS Identity and Access Management](http://aws.amazon.com/iam) (IAM) execution role.\n\nOne of the most common real-world challenges in setting up user access for Studio is how to manage multiple users, groups, and data science teams for data access and resource isolation.\n\nMany customers implement user management using federated identities with [AWS Single Sign-On](https://docs.aws.amazon.com/singlesignon/latest/userguide/what-is.html) (AWS SSO) and an external identity provider (IdP), such as Active Directory (AD) or AWS Managed Microsoft AD directory. It’s aligned with the AWS [recommended practice](https://wa.aws.amazon.com/wat.question.SEC_2.en.html) of using temporary credentials to access AWS accounts.\n\nAn [Amazon SageMaker](https://aws.amazon.com/sagemaker/) [domain](https://docs.aws.amazon.com/sagemaker/latest/dg/studio-entity-status.html) supports AWS SSO and can be configured in AWS SSO [authentication mode](https://docs.aws.amazon.com/singlesignon/latest/userguide/what-is.html). In this case, each entitled AWS SSO user has their own [Studio user profile](https://docs.aws.amazon.com/sagemaker/latest/dg/studio-entity-status.html). Users given access to Studio have a unique sign-in URL that directly opens Studio, and they sign in with their AWS SSO credentials. Organizations manage their users in AWS SSO instead of the SageMaker domain. You can assign multiple users access to the domain at the same time. You can use Studio user profiles for each user to define their security permissions in Studio notebooks via an IAM role attached to the user profile, called an execution role. This role controls permissions for SageMaker operations according to its IAM permission policies.\n\nIn AWS SSO authentication mode, there is always one-to-one mapping between users and user profiles. The SageMaker domain manages the creation of user profiles based on the AWS SSO user ID. You can’t create user profiles via the [AWS Management Console](http://aws.amazon.com/console). This works well in the case when one user is a member of only one data science team or if users have the same or very similar access requirements across their projects and teams. In a more common use case, when a user can participate in multiple ML projects and be a member of multiple teams with slightly different permission requirements, the user requires access to different Studio user profiles with different execution roles and permission policies. Because you can’t manage user profiles independently of AWS SSO in AWS SSO authentication mode, you can’t implement a one-to-many mapping between users and Studio user profiles.\n\nIf you need to establish a strong separation of security contexts, for example for different data categories, or need to entirely prevent the visibility of one group of users’ activity and resources to another, the recommended approach is to create multiple SageMaker domains. At the time of this writing, you can create only one domain per AWS account per Region. To implement the strong separation, you can use multiple AWS accounts with one domain per account as a workaround.\n\nThe second challenge is to [restrict access to the Studio IDE](https://aws.amazon.com/about-aws/whats-new/2020/12/secure-sagemaker-studio-access-using-aws-privatelink-aws-iam-sourceip-restrictions/) to only users from inside a corporate network or a designated VPC. You can achieve this by using [IAM-based access control policies](https://docs.aws.amazon.com/sagemaker/latest/dg/security_iam_id-based-policy-examples.html#api-access-policy). In this case, the SageMaker domain must be configured with [IAM authentication mode](https://docs.aws.amazon.com/sagemaker/latest/dg/onboard-iam.html), because the IAM identity-based polices aren’t supported by the sign-in mechanism in AWS SSO mode. The post Secure access to Amazon S[ageMaker Studio with AWS SSO and a SAML application](https://aws.amazon.com/blogs/machine-learning/secure-access-to-amazon-sagemaker-studio-with-aws-sso-and-a-saml-application/) solves this challenge and demonstrates how to control network access to a SageMaker domain.\n\nThis solution addresses these challenges of AWS SSO user management for Studio for a common use case of multiple user groups and a many-to-many mapping between users and teams. The solution outlines how to use a [custom SAML 2.0 application](https://docs.aws.amazon.com/singlesignon/latest/userguide/samlapps.html#addconfigcustomapp) as the mechanism to trigger the user authentication for Studio and support multiple Studio user profiles per one AWS SSO user.\n\nYou can use this approach to implement a custom user portal with applications backed by the SAML 2.0 authorization process. Your custom user portal can have maximum flexibility on how to manage and display user applications. For example, the user portal can show some ML project metadata to facilitate identifying an application to access.\n\nYou can find the solution’s source code in our [GitHub repository](https://github.com/aws-samples/users-and-team-management-with-amazon-sagemaker-and-aws-sso).\n\n### **Solution overview**\n\nThe solution implements the following architecture.\n\n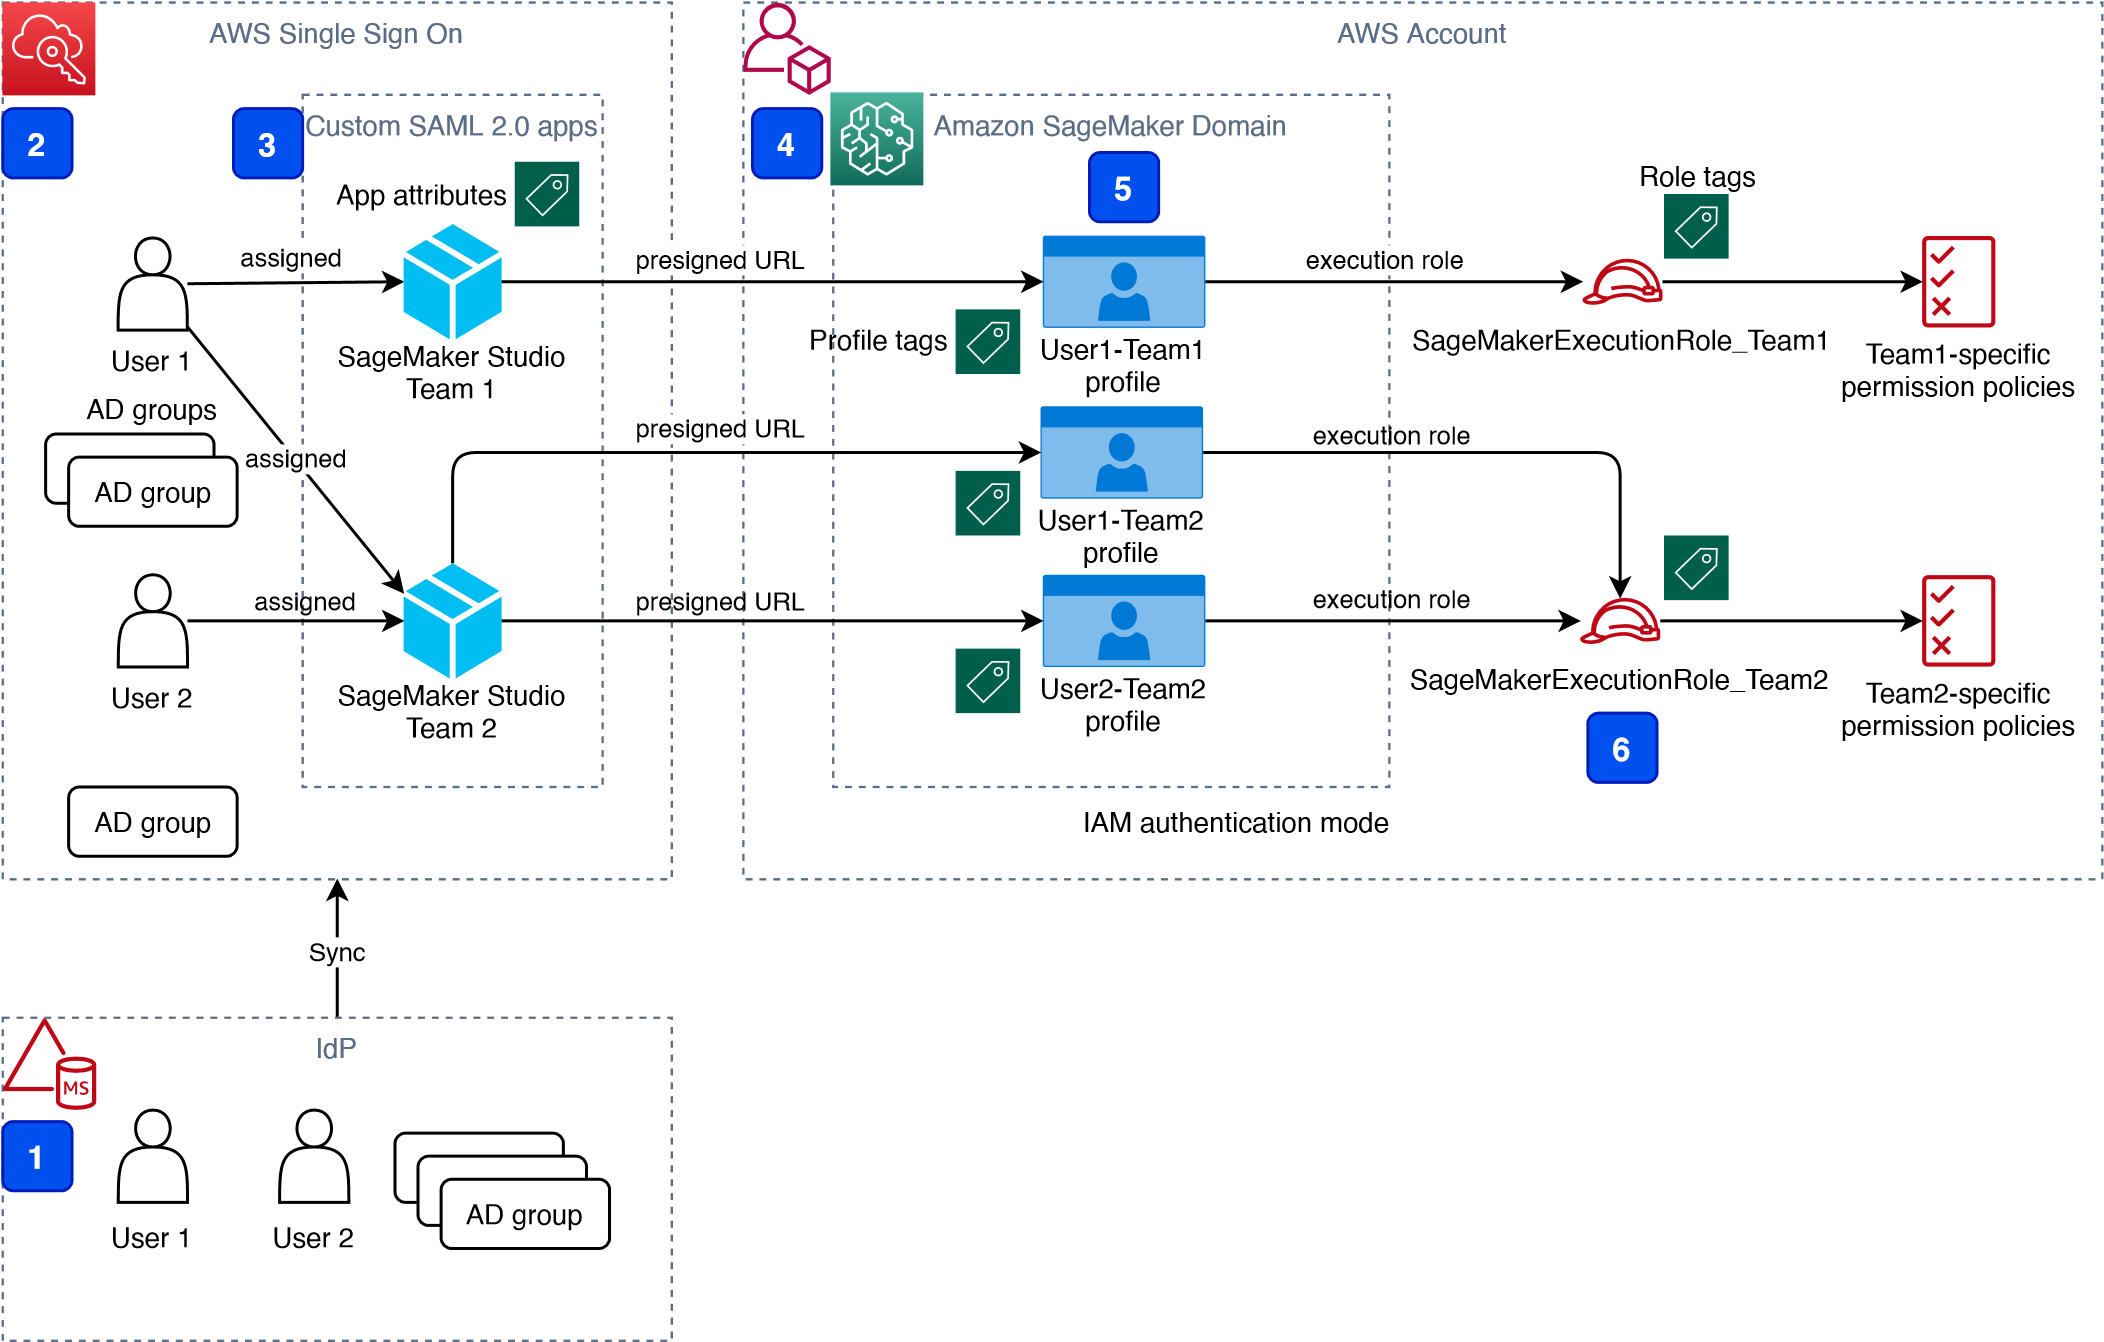\n\nThe main high-level architecture components are as follows:\n\n1. **Identity provide**r – Users and groups are managed in an external identity source, for example in Azure AD. User assignments to AD groups define what permissions a particular user has and which Studio team they have access to. The identity source must by synchronized with AWS SSO.\n2. **AWS SSO** – AWS SSO manages SSO users, SSO permission sets, and applications. This solution uses a custom SAML 2.0 application to provide access to Studio for entitled AWS SSO users. The solution also uses SAML attribute mapping to populate the SAML assertion with specific access-relevant data, such as user ID and user team. Because the solution creates a SAML API, you can use any IdP supporting SAML assertions to create this architecture. For example, you can use Okta or even your own web application that provides a landing page with a user portal and applications. For this post, we use AWS SSO.\n3. **Custom SAML 2.0 applications** – The solution creates one application per Studio team and assigns one or multiple applications to a user or a user group based on entitlements. Users can access these applications from within their AWS SSO user portal based on assigned permissions. Each application is configured with the [Amazon API Gateway](https://aws.amazon.com/api-gateway/) endpoint URL as its SAML backend.\n4. **SageMaker domain** – The solution provisions a SageMaker domain in an AWS account and creates a dedicated user profile for each combination of AWS SSO user and Studio team the user is assigned to. The domain must be configured in [IAM authentication mode](https://docs.aws.amazon.com/sagemaker/latest/dg/onboard-iam.html).\n5. **Studio user profiles** – The solution automatically creates a dedicated user profile for each user-team combination. For example, if a user is a member of two Studio teams and has corresponding permissions, the solution provisions two separate user profiles for this user. Each profile always belongs to one and only one user. Because you have a Studio user profile for each possible combination of a user and a team, you must consider your account limits for user profiles before implementing this approach. For example, if your limit is 500 user profiles, and each user is a member of two teams, you consume that limit 2.5 times faster, and as a result you can onboard 250 users. With a high number of users, we recommend implementing multiple domains and accounts for security context separation. To demonstrate the proof of concept, we use two users, User 1 and User 2, and two Studio teams, Team 1 and Team 2. User 1 belongs to both teams, whereas User 2 belongs to Team 2 only. User 1 can access Studio environments for both teams, whereas User 2 can access only the Studio environment for Team 2.\n6. **Studio execution roles** – Each Studio user profile uses a dedicated execution role with permission polices with the required level of access for the specific team the user belongs to. Studio execution roles implement an effective permission isolation between individual users and their team roles. You manage data and resource access for each role and not at an individual user level.\n\nThe solution also implements an attribute-based access control (ABAC) using SAML 2.0 attributes, tags on Studio user profiles, and tags on SageMaker execution roles.\n\nIn this particular configuration, we assume that AWS SSO users don’t have permissions to sign in to the AWS account and don’t have corresponding AWS SSO-controlled IAM roles in the account. Each user signs in to their Studio environment via a presigned URL from an AWS SSO portal without the need to go to the console in their AWS account. In a real-world environment, you might need to set up [AWS SSO permission sets](https://docs.aws.amazon.com/singlesignon/latest/userguide/permissionsetsconcept.html) for users to allow the authorized users to assume an IAM role and to sign in to an AWS account. For example, you can provide data scientist role permissions for a user to be able to interact with account resources and have the level of access they need to fulfill their role.\n\n### **Solution architecture and workflow**\n\nThe following diagram presents the end-to-end sign-in flow for an AWS SSO user.**\n\n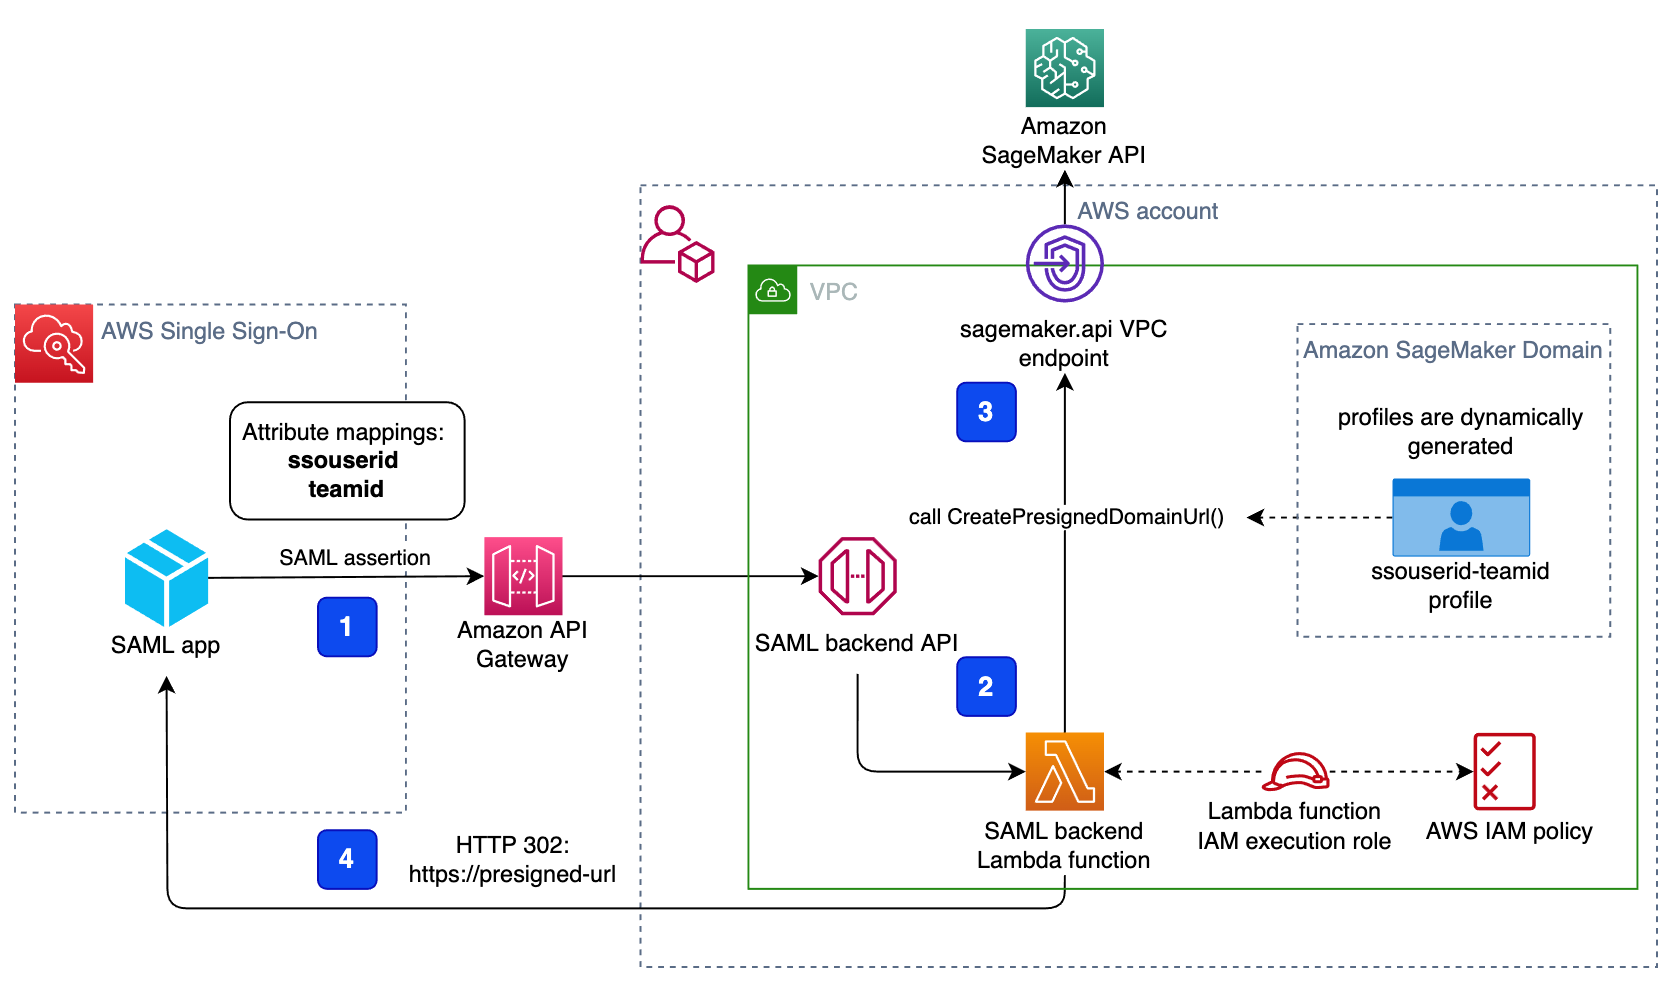\n\nAn AWS SSO user chooses a corresponding Studio application in their AWS SSO portal. AWS SSO prepares a SAML assertion (1) with configured SAML attribute mappings. A custom SAML application is configured with the API Gateway endpoint URL as its Assertion Consumer Service (ACS), and needs mapping attributes containing the AWS SSO user ID and team ID. We use ```ssouserid``` and ```teamid``` custom attributes to send all needed information to the SAML backend.\n\nThe API Gateway calls an SAML backend API. An [AWS Lambda](http://aws.amazon.com/lambda) function (2) implements the API, parses the SAML response to extract the user ID and team ID. The function uses them to retrieve a team-specific configuration, such as an execution role and SageMaker domain ID. The function checks if a required user profile exists in the domain, and creates a new one with the corresponding configuration settings if no profile exists. Afterwards, the function generates a Studio presigned URL for a specific Studio user profile by calling [CreatePresignedDomainUrl](https://docs.aws.amazon.com/sagemaker/latest/APIReference/API_CreatePresignedDomainUrl.html) API (3) via a SageMaker API VPC endpoint. The Lambda function finally returns the presigned URL with HTTP 302 redirection response to sign the user in to Studio.\n\nThe solution implements a non-production sample version of an SAML backend. The Lambda function parses the SAML assertion and uses only attributes in the ```<saml2:AttributeStatement>``` element to construct a ```CreatePresignedDomainUrl``` API call. In your production solution, you must use a proper SAML backend implementation, which must include a validation of an SAML response, a signature, and certificates, replay and redirect prevention, and any other features of an SAML authentication process. For example, you can use a [python3-saml SAML backend implementation or OneLogin open-source SAML toolkit to implement a secure SAML backend](https://python-social-auth.readthedocs.io/en/latest/backends/saml.html).\n\n### **Dynamic creation of Studio user profiles**\n\nThe solution automatically creates a Studio user profile for each user-team combination, as soon as the AWS SSO sign-in process requests a presigned URL. For this proof of concept and simplicity, the solution creates user profiles based on the configured metadata in the AWS [SAM template](https://github.com/aws-samples/users-and-team-management-with-amazon-sagemaker-and-aws-sso/blob/main/template.yaml):\n\n```\nMetadata:\n Team1:\n DomainId: !GetAtt SageMakerDomain.Outputs.SageMakerDomainId\n SessionExpiration: 43200\n Tags:\n - Key: Team\n Value: Team1\n UserSettings:\n ExecutionRole: !GetAtt IAM.Outputs.SageMakerStudioExecutionRoleTeam1Arn\n Team2:\n DomainId !GetAtt SageMakerDomain.Outputs.SageMakerDomainId\n SessionExpiration: 43200\n Tags:\n - Key: Team\n Value: Team2\n UserSettings:\n ExecutionRole: !GetAtt IAM.Outputs.SageMakerStudioExecutionRoleTeam2Arn\n```\nYou can configure own teams, custom settings, and tags by adding them to the metadata configuration for the AWS CloudFormation resource ```GetUserProfileMetadata```.\n\nFor more information on configuration elements of ```UserSettings```, refer to [create_user_profile in boto3](https://boto3.amazonaws.com/v1/documentation/api/latest/reference/services/sagemaker.html#SageMaker.Client.create_user_profile).\n\n#### **IAM roles**\n\nThe following diagram shows the IAM roles in this solution.\n\n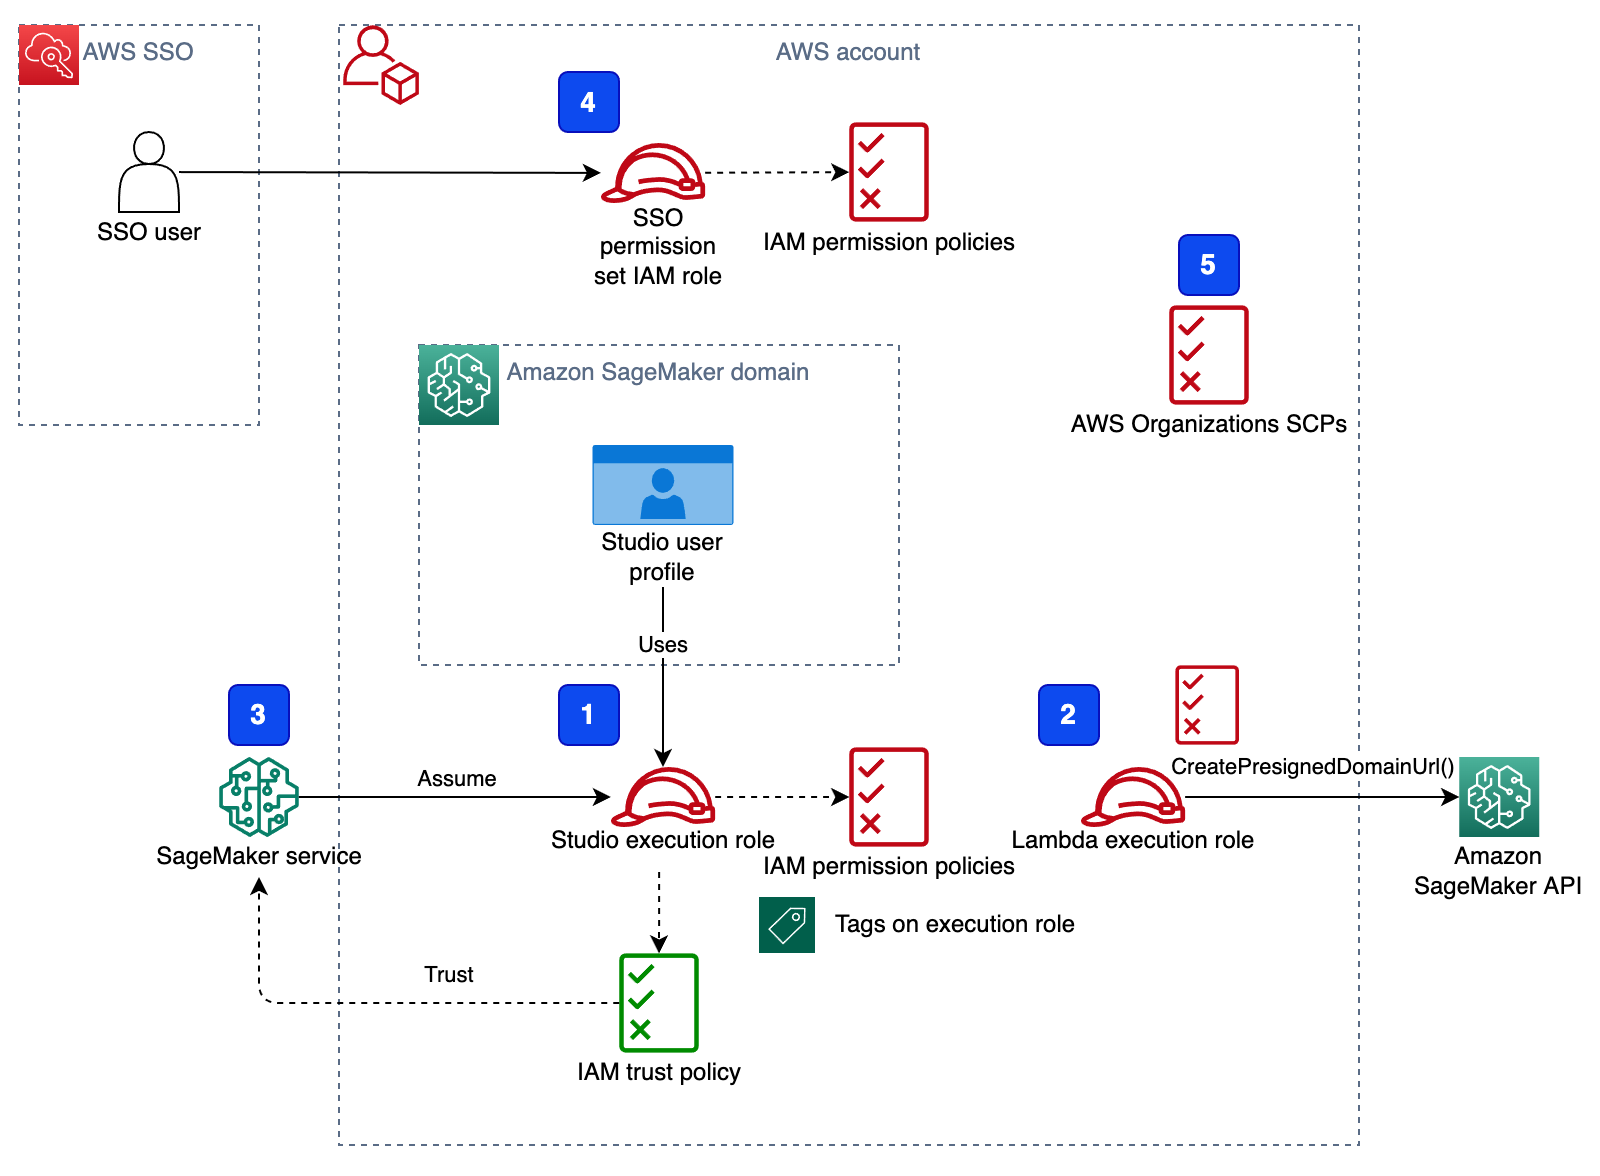\n\nThe roles are as follows:\n\n1. **Studio execution role** – A Studio user profile uses a dedicated Studio execution role with data and resource permissions specific for each team or user group. This role can also use tags to implement ABAC for data and resource access. For more information, refer to [SageMaker Roles](https://docs.aws.amazon.com/sagemaker/latest/dg/sagemaker-roles.html).\n2. **SAML backend Lambda execution role** – This execution role contains permission to call the ```CreatePresignedDomainUrl``` API. You can configure the permission policy to include additional conditional checks using ```Condition keys```. For example, to allow access to Studio only from a designated range of IP addresses within your private corporate network, use the following code:\n\n```\n{\n \"Version\": \"2012-10-17\",\n \"Statement\": [\n {\n \"Action\": [\n \"sagemaker:CreatePresignedDomainUrl\"\n ],\n \"Resource\": \"arn:aws:sagemaker:<Region>:<Account_id>:user-profile/*/*\",\n \"Effect\": \"Allow\"\n },\n {\n \"Condition\": {\n \"NotIpAddress\": {\n \"aws:VpcSourceIp\": \"10.100.10.0/24\"\n }\n },\n \"Action\": [\n \"sagemaker:*\"\n ],\n \"Resource\": \"arn:aws:sagemaker:<Region>:<Account_id>:user-profile/*/*\",\n \"Effect\": \"Deny\"\n }\n ]\n}\n```\n\nFor more examples on how to use conditions in IAM policies, refer to [Control Access to the SageMaker API by Using Identity-based Policies](https://docs.aws.amazon.com/sagemaker/latest/dg/security_iam_id-based-policy-examples.html#api-access-policy).\n\n3. **SageMaker** – SageMaker assumes the Studio execution role on your behalf, as controlled by a corresponding trust policy on the execution role. This allows the service to access data and resources, and perform actions on your behalf. The Studio execution role must contain a trust policy allowing SageMaker to assume this role.\n4. **AWS SSO permission set IAM role** – You can assign your AWS SSO users to AWS accounts in your AWS organization via [AWS SSO permission sets](https://docs.aws.amazon.com/singlesignon/latest/userguide/permissionsetsconcept.html). A permission set is a template that defines a collection of user role-specific IAM policies. You manage permission sets in AWS SSO, and AWS SSO controls the corresponding IAM roles in each account.\n5. **AWS Organizations Service Control Policies** – If you use [AWS Organizations](https://aws.amazon.com/organizations/), you can implement [Service Control Policies](https://docs.aws.amazon.com/organizations/latest/userguide/orgs_manage_policies_scps.html) (SCPs) to centrally control the maximum available permissions for all accounts and all IAM roles in your organization. For example, to centrally prevent access to Studio via the console, you can implement the following SCP and attach it to the accounts with the SageMaker domain:\n\n```\n{\n \"Version\": \"2012-10-17\",\n \"Statement\": [\n {\n \"Action\": [\n \"sagemaker:*\"\n ],\n \"Resource\": \"*\",\n \"Effect\": \"Allow\"\n },\n {\n \"Condition\": {\n \"NotIpAddress\": {\n \"aws:VpcSourceIp\": \"<AuthorizedPrivateSubnet>\"\n }\n },\n \"Action\": [\n \"sagemaker:CreatePresignedDomainUrl\"\n ],\n \"Resource\": \"*\",\n \"Effect\": \"Deny\"\n }\n ]\n}\n```\n\n### **Solution provisioned roles**\n\nThe [AWS CloudFormation stack](http://aws.amazon.com/cloudformation) for this solution creates three Studio execution roles used in the SageMaker domain:\n\n- ```SageMakerStudioExecutionRoleDefault```\n- ```SageMakerStudioExecutionRoleTeam1```\n- ```SageMakerStudioExecutionRoleTeam2```\n\nNone of the roles have the [AmazonSageMakerFullAccess](https://docs.aws.amazon.com/sagemaker/latest/dg/security-iam-awsmanpol.html) policy attached, and each has only a limited set of permissions. In your real-world SageMaker environment, you need to amend the role’s permissions based on your specific requirements.\n\n```SageMakerStudioExecutionRoleDefault``` has only the custom policy ```SageMakerReadOnlyPolicy``` attached with a restrictive list of allowed actions.\n\nBoth team roles, ```SageMakerStudioExecutionRoleTeam1``` and ```SageMakerStudioExecutionRoleTeam2```, additionally have two custom polices, ```SageMakerAccessSupportingServicesPolicy``` and ```SageMakerStudioDeveloperAccessPolicy```, allowing usage of particular services and one deny-only policy, ```SageMakerDeniedServicesPolicy```, with explicit deny on some SageMaker API calls.\n\nThe Studio developer access policy enforces the setting of the ```Team``` tag equal to the same value as the user’s own execution role for calling any SageMaker ```Create*``` API:\n\n```\n{\n \"Condition\": {\n \"ForAnyValue:StringEquals\": {\n \"aws:TagKeys\": [\n \"Team\"\n ]\n },\n \"StringEqualsIfExists\": {\n \"aws:RequestTag/Team\": \"${aws:PrincipalTag/Team}\"\n }\n },\n \"Action\": [\n \"sagemaker:Create*\"\n ],\n \"Resource\": [\n \"arn:aws:sagemaker:*:<ACCOUNT_ID>:*\"\n ],\n \"Effect\": \"Allow\",\n \"Sid\": \"AmazonSageMakerCreate\"\n}\n```\n\nFurthermore, it allows using delete, stop, update, and start operations only on resources tagged with the same Team tag as the user’s execution role:\n\n```\n{\n \"Condition\": {\n \"StringEquals\": {\n \"aws:PrincipalTag/Team\": \"${sagemaker:ResourceTag/Team}\"\n }\n },\n \"Action\": [\n \"sagemaker:Delete*\",\n \"sagemaker:Stop*\",\n \"sagemaker:Update*\",\n \"sagemaker:Start*\",\n \"sagemaker:DisassociateTrialComponent\",\n \"sagemaker:AssociateTrialComponent\",\n \"sagemaker:BatchPutMetrics\"\n ],\n \"Resource\": [\n \"arn:aws:sagemaker:*:<ACCOUNT_ID>:*\"\n ],\n \"Effect\": \"Allow\",\n \"Sid\": \"AmazonSageMakerUpdateDeleteExecutePolicy\"\n}\n```\n\nFor more information on roles and polices, [refer to Configuring Amazon SageMaker Studio for teams and groups with complete resource isolation](https://aws.amazon.com/fr/blogs/machine-learning/configuring-amazon-sagemaker-studio-for-teams-and-groups-with-complete-resource-isolation/).\n\n### **Network infrastructure**\n\nThe solution implements a fully isolated SageMaker domain environment with all network traffic going through [AWS PrivateLink](https://aws.amazon.com/privatelink) connections. You may optionally enable internet access from the Studio notebooks. The solution also creates three [VPC security groups](https://docs.aws.amazon.com/vpc/latest/userguide/VPC_SecurityGroups.html) to control traffic between all solution components such as the SAML backend Lambda function, [VPC endpoints](https://docs.aws.amazon.com/vpc/latest/privatelink/concepts.html), and Studio notebooks.\n\n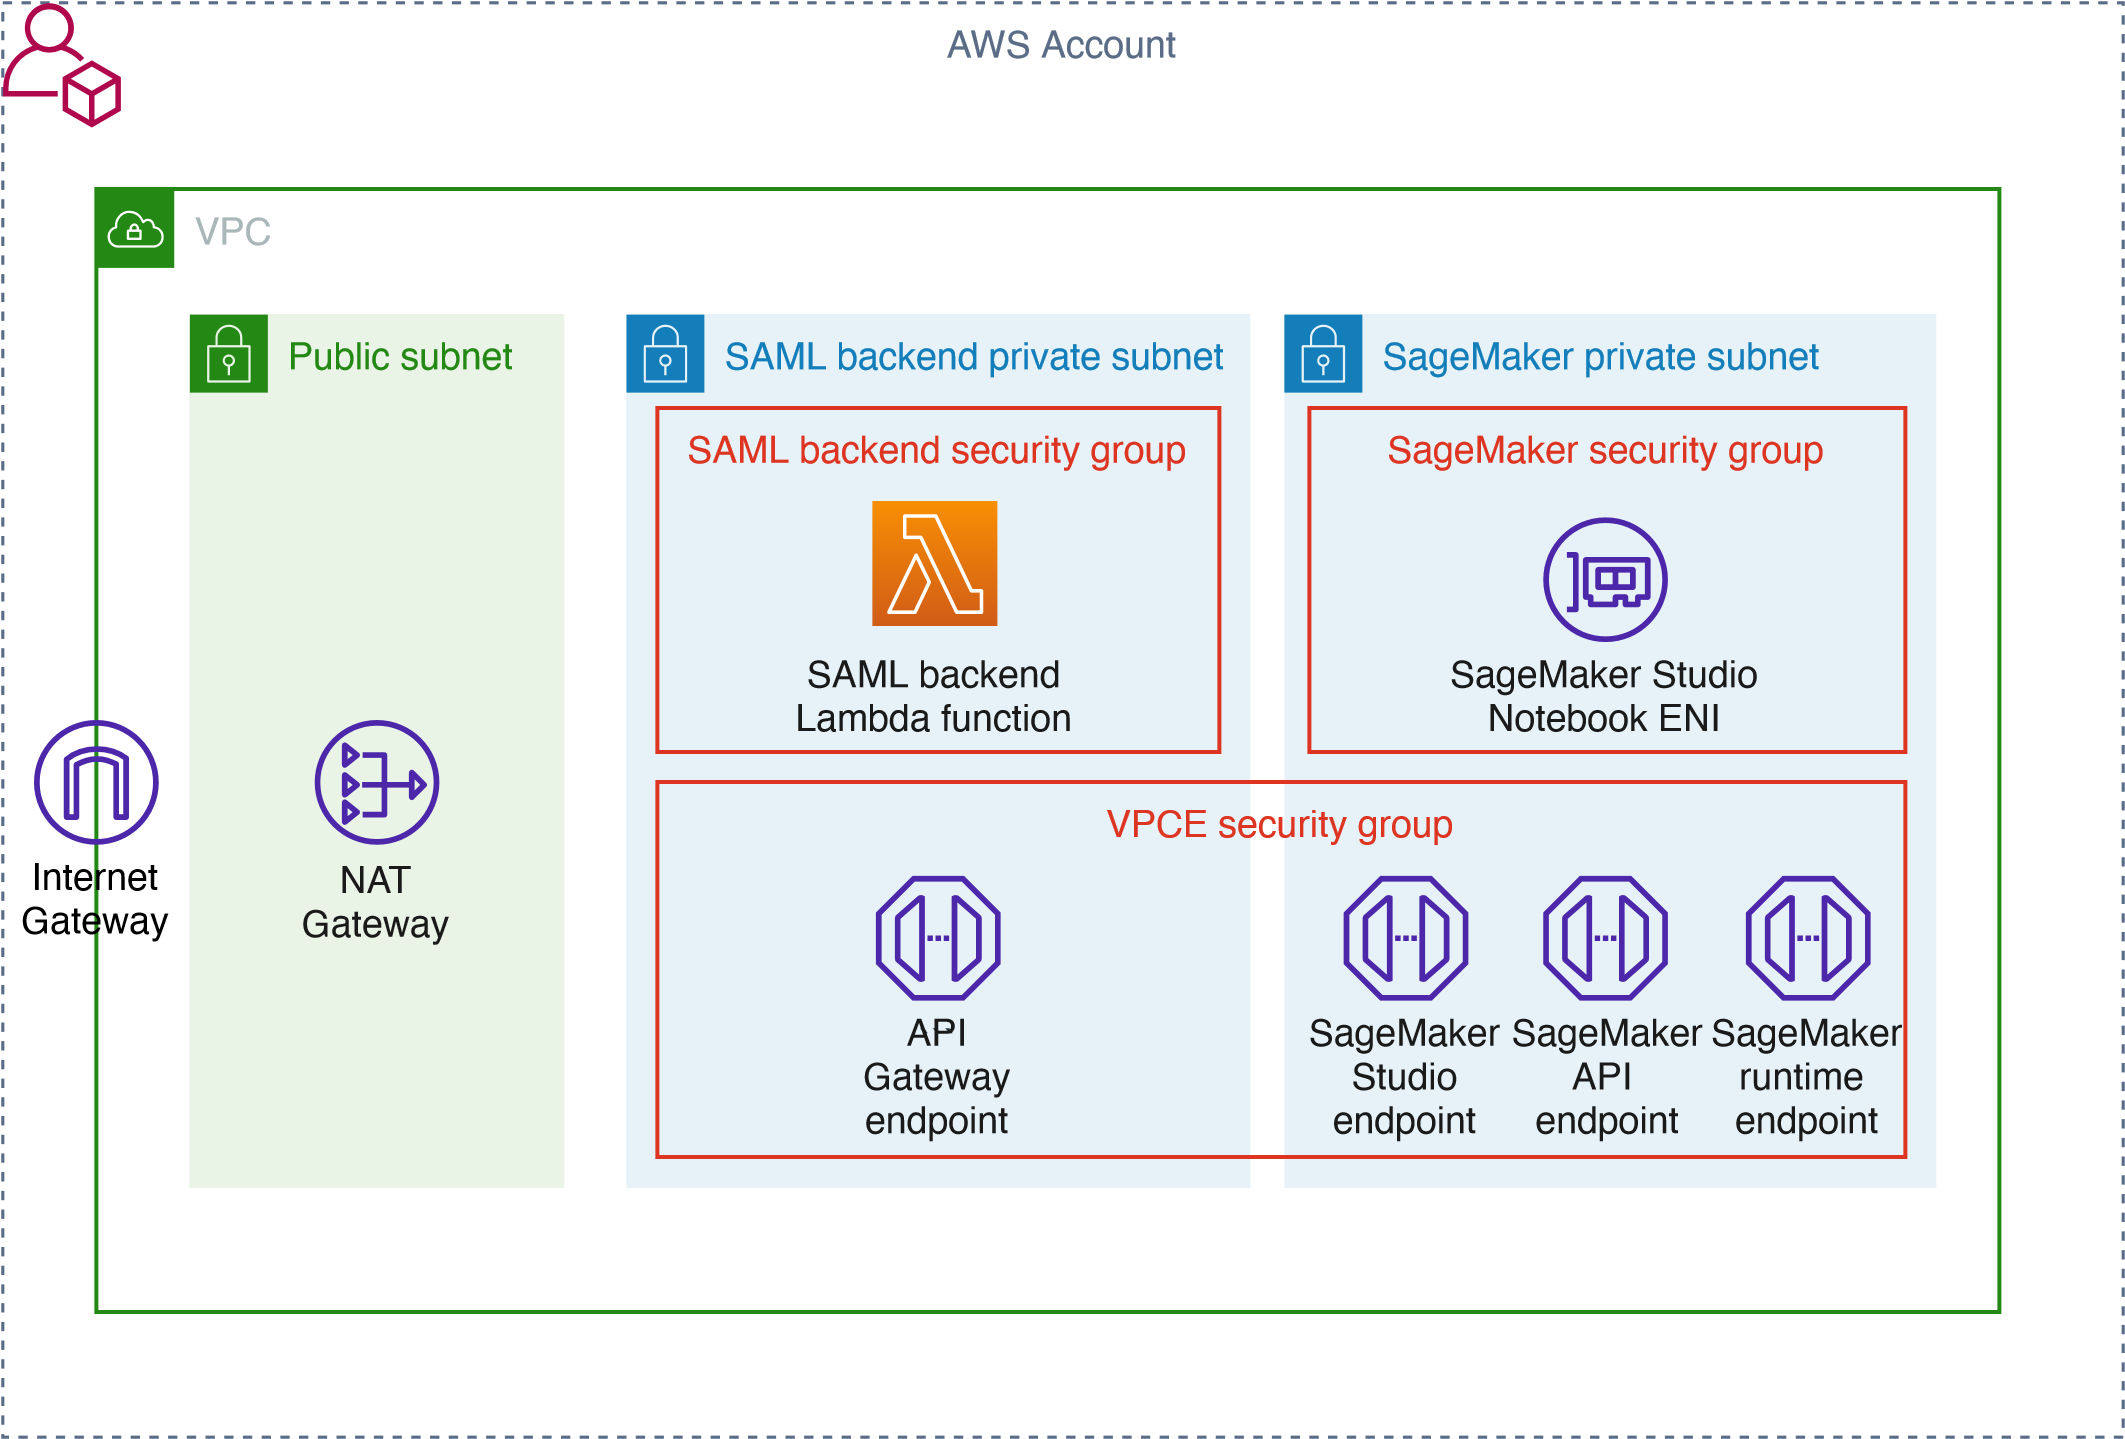\n\nFor this proof of concept and simplicity, the solution creates a SageMaker subnet in a single [Availability Zone](https://docs.aws.amazon.com/AWSEC2/latest/UserGuide/using-regions-availability-zones.html#concepts-availability-zones). For your production setup, you must use multiple private subnets across multiple Availability Zones and ensure that each subnet is appropriately sized, assuming minimum five IPs per user.\n\nThis solution provisions all required network infrastructure. The CloudFormation template [./cfn-templates/vpc.yaml](https://github.com/aws-samples/users-and-team-management-with-amazon-sagemaker-and-aws-sso/blob/main/cfn-templates/vpc.yaml) contains the source code.\n\n### **Deployment steps**\n\nTo deploy and test the solution, you must complete the following steps:\n\n1. Deploy the solution’s stack via an [AWS Serverless Application Model](https://aws.amazon.com/serverless/sam/) (AWS SAM) template.\n2. Create AWS SSO users, or use existing AWS SSO users.\n3. Create custom SAML 2.0 applications and assign AWS SSO users to the applications.\n\nThe full source code for the solution is provided in our GitHub r[epository](https://github.com/aws-samples/users-and-team-management-with-amazon-sagemaker-and-aws-sso).\n\n#### **Prerequisites**\n\nTo use this solution, the [AWS Command Line Interface](http://aws.amazon.com/cli) (AWS CLI), [AWS SAM CLI](https://docs.aws.amazon.com/serverless-application-model/latest/developerguide/serverless-sam-cli-install.html), and [Python3.8 or later](https://docs.aws.amazon.com/organizations/latest/userguide/orgs_introduction.html) must be installed.\n\nThe deployment procedure assumes that you enabled AWS SSO and configured for the [AWS Organizations](https://docs.aws.amazon.com/organizations/latest/userguide/orgs_introduction.html) in the account where the solution is deployed.\n\nTo set up AWS SSO, refer to the instructions in [GitHub](https://github.com/aws-samples/users-and-team-management-with-amazon-sagemaker-and-aws-sso/blob/main/aws-sso-setup.md).\n\n### **Solution deployment options**\n\nYou can choose from several solution deployment options to have the best fit for your existing AWS environment. You can also select the network and SageMaker domain provisioning options. For detailed information about the different deployment choices, refer to the [README file](https://github.com/aws-samples/users-and-team-management-with-amazon-sagemaker-and-aws-sso).\n\n### **Deploy the AWS SAM template**\n\nTo deploy the AWS SAM template, complete the following steps:\n\n1. Clone the source code repository to your local environment:\n\n```\ngit clone https://github.com/aws-samples/users-and-team-management-with-amazon-sagemaker-and-aws-sso.git\n```\n2. Build the AWS SAM application:\n\n```\nsam build\n```\n\n3. Deploy the application:\n\n```\nsam deploy --guided\n```\n\n4. Provide stack parameters according to your existing environment and desired deployment options, such as existing VPC, existing private and public subnets, and existing SageMaker domain, as discussed in the [Solution deployment options](https://github.com/aws-samples/users-and-team-management-with-amazon-sagemaker-and-aws-sso#solution-deployment-options) chapter of the README file.\n\nYou can leave all parameters at their default values to provision new network resources and a new SageMaker domain. Refer to detailed parameter usage in the [README](https://github.com/aws-samples/users-and-team-management-with-amazon-sagemaker-and-aws-sso) file if you need to change any default settings.\n\nWait until the stack deployment is complete. The end-to-end deployment including provisioning all network resources and a SageMaker domain takes about 20 minutes.\n\nTo see the stack output, run the following command in the terminal:\n\n```\nexport STACK_NAME=<SAM stack name>\n\naws cloudformation describe-stacks \\\n--stack-name $STACK_NAME\\\n--output table \\\n--query \"Stacks[0].Outputs[*].[OutputKey, OutputValue]\"\n```\n\n### **Create SSO users**\n\nFollow the instructions to [add AWS SSO users](https://github.com/aws-samples/users-and-team-management-with-amazon-sagemaker-and-aws-sso/blob/main/aws-sso-setup.md) to create two users with names User1 and User2 or use any two of your existing AWS SSO users to test the solution. Make sure you use AWS SSO in the same AWS Region in which you deployed the solution.\n\n### **Create custom SAML 2.0 applications**\n\nTo create the required custom SAML 2.0 applications for Team 1 and for Team 2, complete the following steps:\n\n1. Open the AWS SSO console in the AWS management account of your AWS organization, in the same Region where you deployed the solution stack.\n2. Choose **Applications** in the navigation pane.\n3. Choose Add a new **application**.\n4. Choose **Add a custom SAML 2.0 application**.\n5. For **Display name**, enter an application name, for example ```SageMaker Studio Team 1```.\n6. Leave **Application start URL** and **Relay state** empty.\n7. Choose **If you don’t have a metadata file, you can manually enter your metadata values**.\n8. For **Application ACS URL**, enter the URL provided in the ```SAMLBackendEndpoint``` key of the AWS SAM stack output.\n9. For **Application SAML** audience, enter the URL provided in the ```SAMLAudience``` key of the AWS SAM stack output.\n10. Choose **Save changes**.\n\n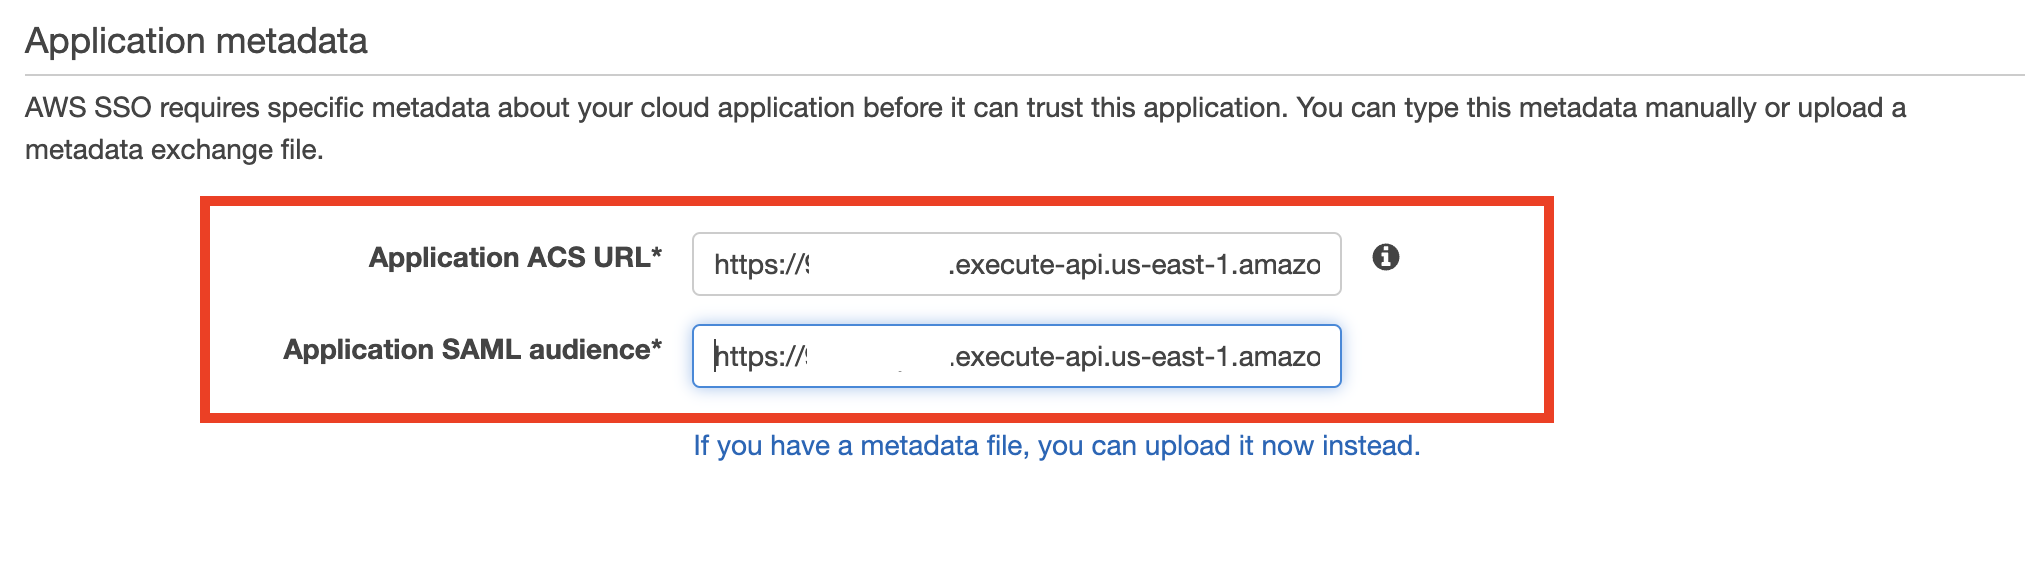\n\n11. Navigate to the **Attribute mappings** tab.\n12. Set the **Subject **to **email **and **Format **to **emailAddress**.\n13. Add the following new attributes:\na. ```ssouserid``` set to ```${user:AD_GUID}```\nb. ```teamid``` set to ```Team1``` or ```Team2```, respectively, for each application\n\n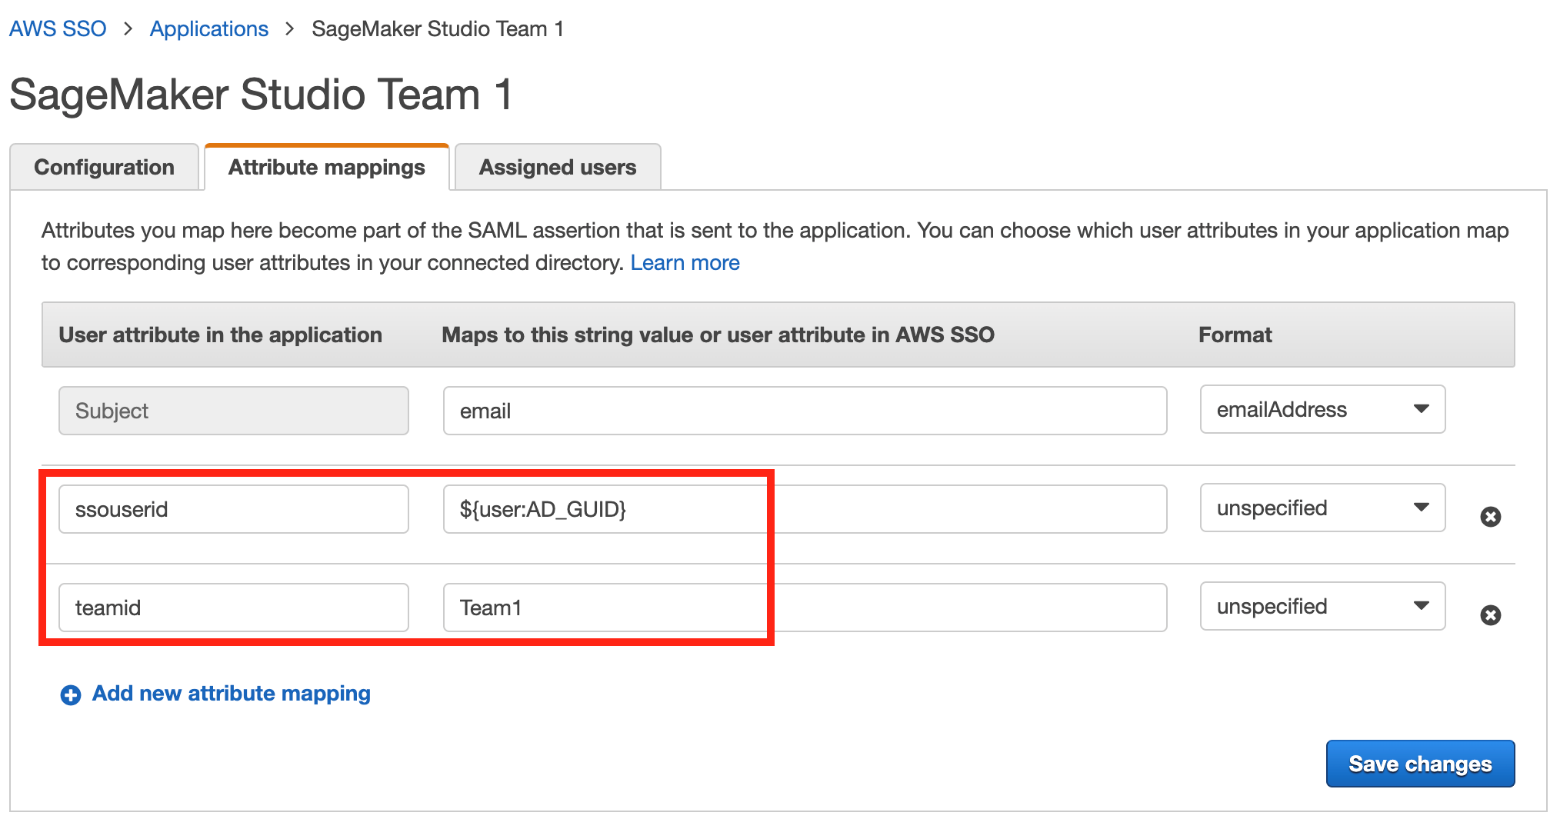\n\n14. Choose **Save changes**.\n15. On the **Assigned users** tab, choose **Assign users**.\n16. Choose User 1 for the Team 1 application and both User 1 and User 2 for the Team 2 application.\n17. Choose **Assign users**.\n\n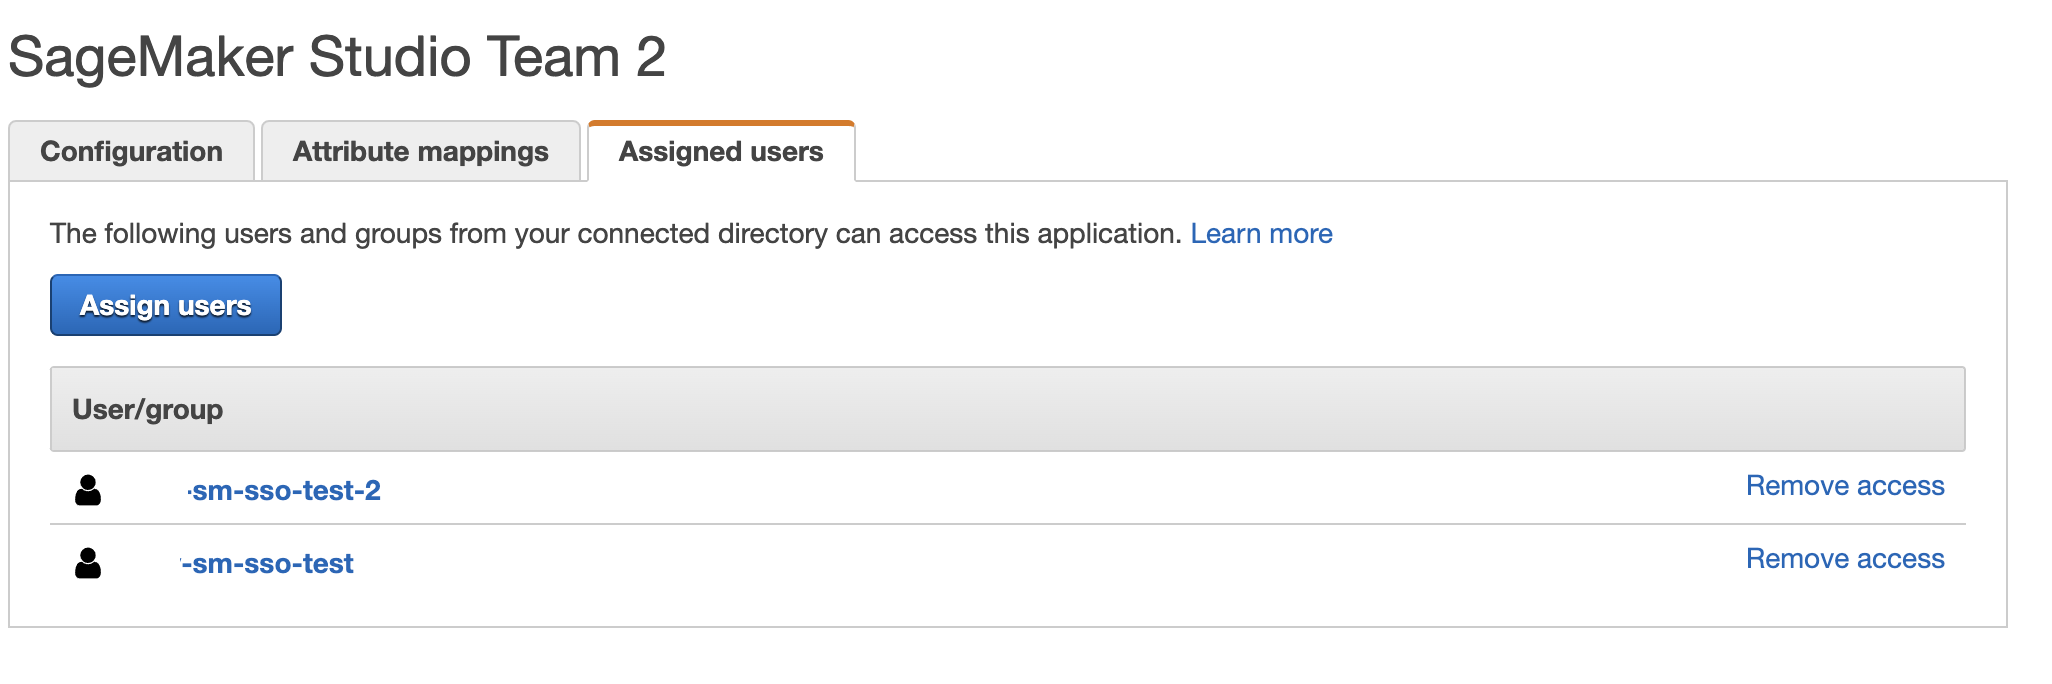\n\n### **Test the solution**\n\nTo test the solution, complete the following steps:\n\n1. Go to AWS SSO user portal ```https://<Identity Store ID>.awsapps.com/start``` and sign as User 1.\nTwo SageMaker applications are shown in the portal.\n\n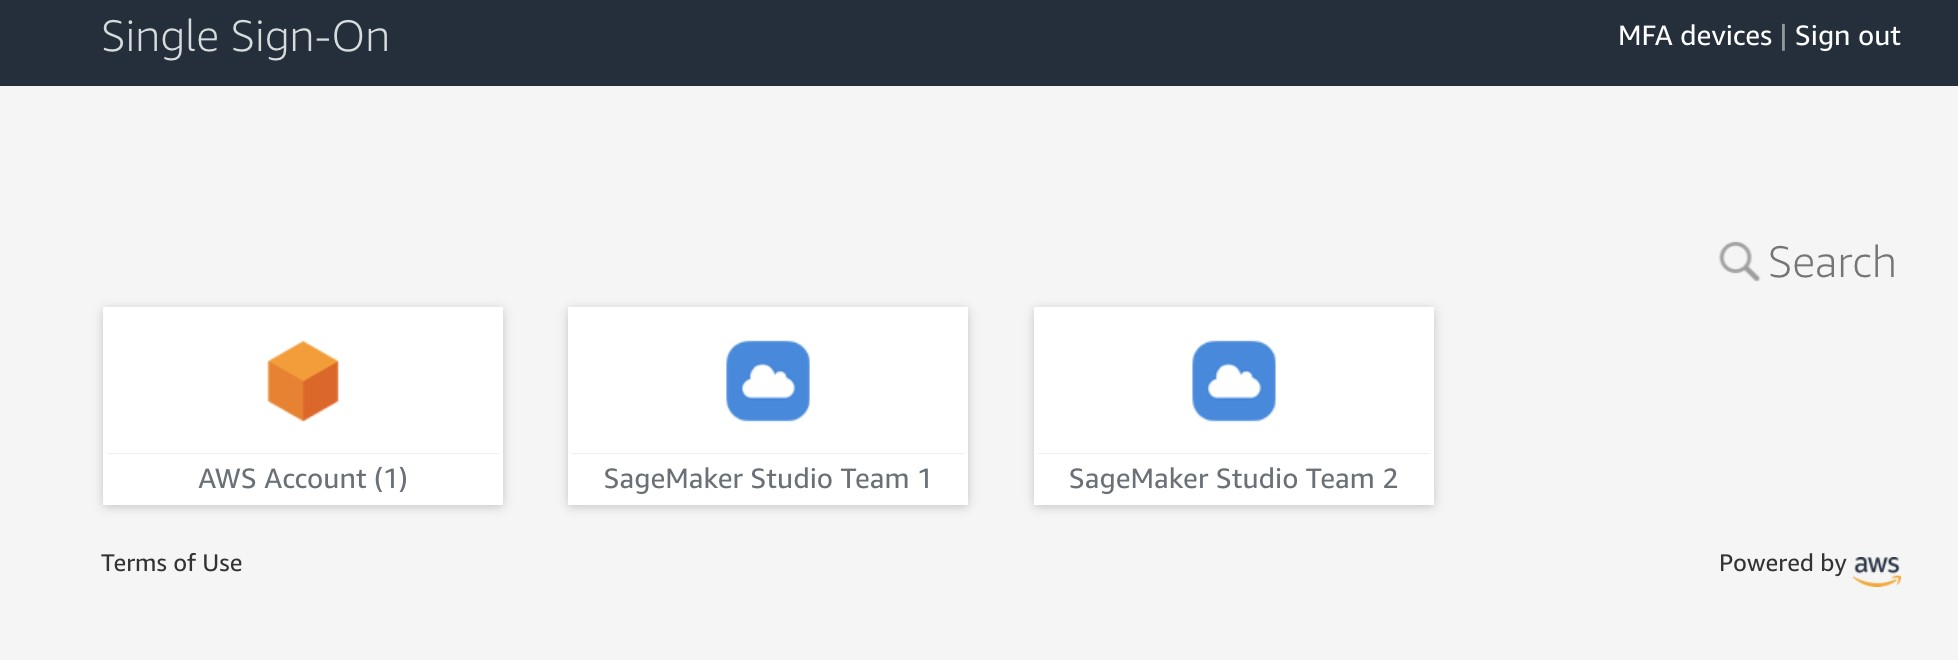\n\n2. Choose **SageMaker Studio Team 1**.\nYou’re redirected to the Studio instance for Team 1 in a new browser window.\n\n\n\nThe first time you start Studio, SageMaker creates a JupyterServer application. This process takes few minutes.\n\n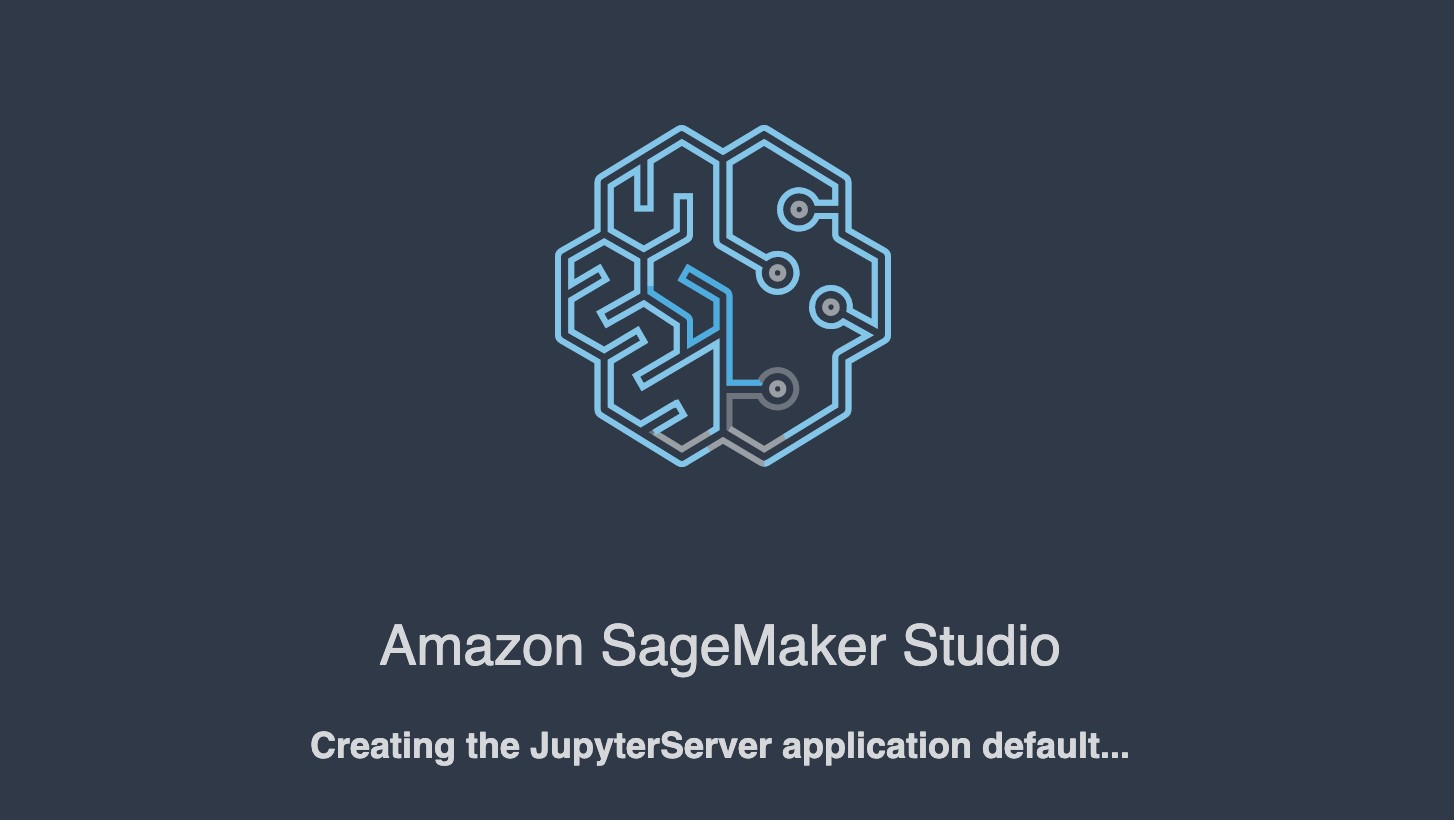\n\n3. In Studio, on the **File** menu, choose **New **and **Terminal **to start a new terminal.\n4. In the terminal command line, enter the following command:\n\n```\naws sts get-caller-identity\n```\n\nThe command returns the Studio execution role.\n\n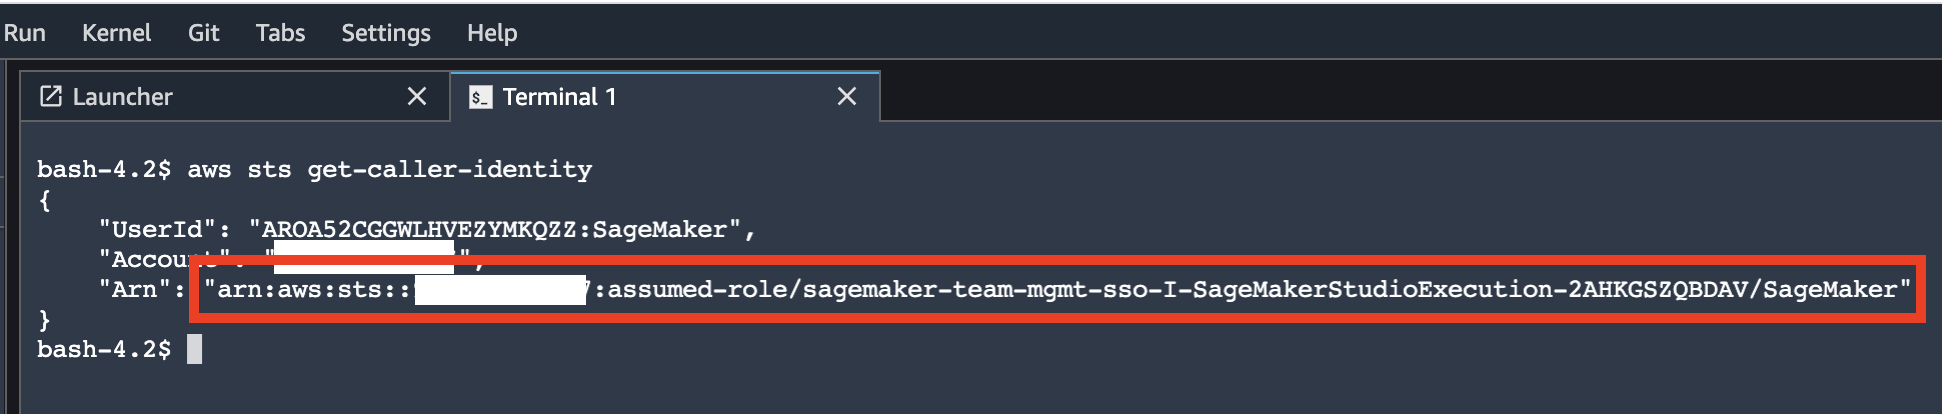\n\nIn our setup, this role must be different for each team. You can also check that each user in each instance of Studio has their own home directory on a mounted Amazon EFS volume.\n\n5. Return to the AWS SSO portal, still logged as User 1, and choose **SageMaker Studio Team 2**.\nYou’re redirected to a Team 2 Studio instance.\n\n\n\nThe start process can again take several minutes, because SageMaker starts a new JupyterServer application for User 2.\n\n6. Sign as User 2 in the AWS SSO portal.\nUser 2 has only one application assigned: SageMaker Studio Team 2.\n\n\n\nIf you start an instance of Studio via this user application, you can verify that it uses the same SageMaker execution role as User 1’s Team 2 instance. However, each Studio instance is completely isolated. User 2 has their own home directory on an Amazon EFS volume and own instance of JupyterServer application. You can verify this by creating a folder and some files for each of the users and see that each user’s home directory is isolated.\n\nNow you can sign in to the SageMaker console and see that there are three user profiles created.\n\n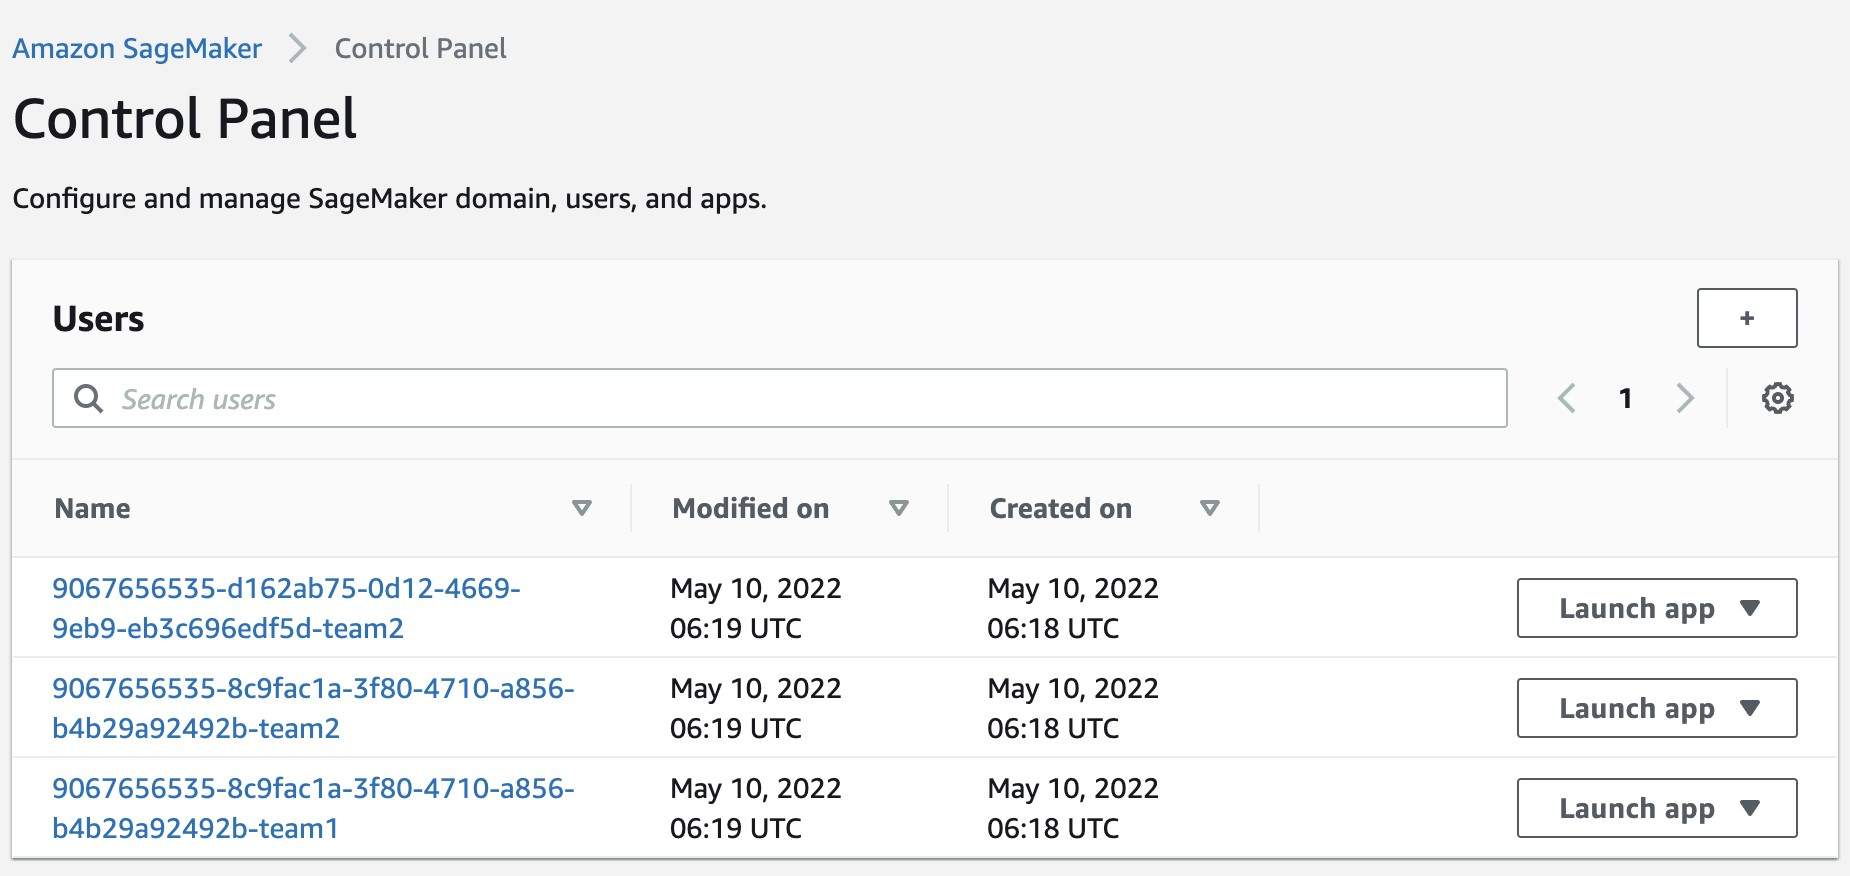\n\nYou just implemented a proof of concept solution to manage multiple users and teams with Studio.\n\n### **Clean up**\n\nTo avoid charges, you must remove all project-provisioned and generated resources from your AWS account. Use the following SAM CLI command to delete the solution CloudFormation stack:\n\n```\nsam delete delete-stack --stack-name <stack name of SAM stack>\n```\n\nFor security reasons and to prevent data loss, the Amazon EFS mount and the content associated with the Studio domain deployed in this solution are not deleted. The VPC and subnets associated with the SageMaker domain remain in your AWS account. For instructions to delete the file system and VPC, refer to [Deleting an Amazon EFS file system](https://docs.aws.amazon.com/efs/latest/ug/delete-efs-fs.html) and [Work with VPCs](https://docs.aws.amazon.com/vpc/latest/userguide/working-with-vpcs.html), respectively.\n\nTo delete the custom SAML application, complete the following steps:\n\n1. Open the AWS SSO console in the AWS SSO management account.\n2. Choose **Applications**.\n3. Select **SageMaker Studio Team 1**.\n4. On the **Actions **menu, choose Remove.\n5. Repeat these steps for **SageMaker Studio Team 2**.\n\n### **Conclusion**\n\nThis solution demonstrated how you can create a flexible and customizable environment using AWS SSO and Studio user profiles to support your own organization structure. The next possible improvement steps towards a production-ready solution could be:\n\n- Implement automated Studio user profile management as a dedicated microservice to support an automated profile provisioning workflow and to handle metadata and configuration for user profiles, for example in [Amazon DynamoDB](https://aws.amazon.com/dynamodb).\n- Use the same mechanism in a more general case of multiple SageMaker domains and multiple AWS accounts. The same SAML backend can vend a corresponding presigned URL redirecting to a user profile-domain-account combination according to your custom logic based on user entitlements and team setup.\n- Implement a synchronization mechanism between your IdP and AWS SSO and automate creation of custom SAML 2.0 applications.\n- Implement scalable data and resource access management with attribute-based access control[ (ABAC).\n](https://docs.aws.amazon.com/singlesignon/latest/userguide/configure-abac.html)\n\nIf you have any feedback or questions, please leave them in the comments.\n\n### **Further reading**\n\n#### **Documentation**\n\n- [AWS Single Sign-On](https://docs.aws.amazon.com/singlesignon/latest/userguide/what-is.html)\n- [Attributes for access control](https://docs.aws.amazon.com/singlesignon/latest/userguide/attributesforaccesscontrol.html)\n- [Attribute mappings](https://docs.aws.amazon.com/singlesignon/latest/userguide/attributemappingsconcept.html)\n\n#### **Blog posts**\n\n- [Onboarding Amazon SageMaker Studio with AWS SSO and Okta Universal Directory](https://aws.amazon.com/fr/blogs/machine-learning/onboarding-amazon-sagemaker-studio-with-aws-sso-and-okta-universal-directory/)\n- [Configuring Amazon SageMaker Studio for teams and groups with complete resource isolation](https://aws.amazon.com/fr/blogs/machine-learning/configuring-amazon-sagemaker-studio-for-teams-and-groups-with-complete-resource-isolation/)\n- [Secure access to Amazon SageMaker Studio with AWS SSO and a SAML application](https://aws.amazon.com/blogs/machine-learning/secure-access-to-amazon-sagemaker-studio-with-aws-sso-and-a-saml-application/)\n\n#### **About the Author**\n\n\n\n**Yevgeniy Ilyin** is a Solutions Architect at AWS. He has over 20 years of experience working at all levels of software development and solutions architecture and has used programming languages from COBOL and Assembler to .NET, Java, and Python. He develops and codes cloud native solutions with a focus on big data, analytics, and data engineering.\n\n\n","render":"<p><a href=\"https://docs.aws.amazon.com/sagemaker/latest/dg/studio-ui.html\" target=\"_blank\">Amazon SageMaker Studio</a> is a web-based integrated development environment (IDE) for machine learning (ML) that lets you build, train, debug, deploy, and monitor your ML models. Each onboarded user in Studio has their own dedicated set of resources, such as compute instances, a home directory on an <a href=\"https://aws.amazon.com/efs/\" target=\"_blank\">Amazon Elastic File System</a> (Amazon EFS) volume, and a dedicated <a href=\"http://aws.amazon.com/iam\" target=\"_blank\">AWS Identity and Access Management</a> (IAM) execution role.</p>\n<p>One of the most common real-world challenges in setting up user access for Studio is how to manage multiple users, groups, and data science teams for data access and resource isolation.</p>\n<p>Many customers implement user management using federated identities with <a href=\"https://docs.aws.amazon.com/singlesignon/latest/userguide/what-is.html\" target=\"_blank\">AWS Single Sign-On</a> (AWS SSO) and an external identity provider (IdP), such as Active Directory (AD) or AWS Managed Microsoft AD directory. It’s aligned with the AWS <a href=\"https://wa.aws.amazon.com/wat.question.SEC_2.en.html\" target=\"_blank\">recommended practice</a> of using temporary credentials to access AWS accounts.</p>\n<p>An <a href=\"https://aws.amazon.com/sagemaker/\" target=\"_blank\">Amazon SageMaker</a> <a href=\"https://docs.aws.amazon.com/sagemaker/latest/dg/studio-entity-status.html\" target=\"_blank\">domain</a> supports AWS SSO and can be configured in AWS SSO <a href=\"https://docs.aws.amazon.com/singlesignon/latest/userguide/what-is.html\" target=\"_blank\">authentication mode</a>. In this case, each entitled AWS SSO user has their own <a href=\"https://docs.aws.amazon.com/sagemaker/latest/dg/studio-entity-status.html\" target=\"_blank\">Studio user profile</a>. Users given access to Studio have a unique sign-in URL that directly opens Studio, and they sign in with their AWS SSO credentials. Organizations manage their users in AWS SSO instead of the SageMaker domain. You can assign multiple users access to the domain at the same time. You can use Studio user profiles for each user to define their security permissions in Studio notebooks via an IAM role attached to the user profile, called an execution role. This role controls permissions for SageMaker operations according to its IAM permission policies.</p>\n<p>In AWS SSO authentication mode, there is always one-to-one mapping between users and user profiles. The SageMaker domain manages the creation of user profiles based on the AWS SSO user ID. You can’t create user profiles via the <a href=\"http://aws.amazon.com/console\" target=\"_blank\">AWS Management Console</a>. This works well in the case when one user is a member of only one data science team or if users have the same or very similar access requirements across their projects and teams. In a more common use case, when a user can participate in multiple ML projects and be a member of multiple teams with slightly different permission requirements, the user requires access to different Studio user profiles with different execution roles and permission policies. Because you can’t manage user profiles independently of AWS SSO in AWS SSO authentication mode, you can’t implement a one-to-many mapping between users and Studio user profiles.</p>\n<p>If you need to establish a strong separation of security contexts, for example for different data categories, or need to entirely prevent the visibility of one group of users’ activity and resources to another, the recommended approach is to create multiple SageMaker domains. At the time of this writing, you can create only one domain per AWS account per Region. To implement the strong separation, you can use multiple AWS accounts with one domain per account as a workaround.</p>\n<p>The second challenge is to <a href=\"https://aws.amazon.com/about-aws/whats-new/2020/12/secure-sagemaker-studio-access-using-aws-privatelink-aws-iam-sourceip-restrictions/\" target=\"_blank\">restrict access to the Studio IDE</a> to only users from inside a corporate network or a designated VPC. You can achieve this by using <a href=\"https://docs.aws.amazon.com/sagemaker/latest/dg/security_iam_id-based-policy-examples.html#api-access-policy\" target=\"_blank\">IAM-based access control policies</a>. In this case, the SageMaker domain must be configured with <a href=\"https://docs.aws.amazon.com/sagemaker/latest/dg/onboard-iam.html\" target=\"_blank\">IAM authentication mode</a>, because the IAM identity-based polices aren’t supported by the sign-in mechanism in AWS SSO mode. The post Secure access to Amazon S<a href=\"https://aws.amazon.com/blogs/machine-learning/secure-access-to-amazon-sagemaker-studio-with-aws-sso-and-a-saml-application/\" target=\"_blank\">ageMaker Studio with AWS SSO and a SAML application</a> solves this challenge and demonstrates how to control network access to a SageMaker domain.</p>\n<p>This solution addresses these challenges of AWS SSO user management for Studio for a common use case of multiple user groups and a many-to-many mapping between users and teams. The solution outlines how to use a <a href=\"https://docs.aws.amazon.com/singlesignon/latest/userguide/samlapps.html#addconfigcustomapp\" target=\"_blank\">custom SAML 2.0 application</a> as the mechanism to trigger the user authentication for Studio and support multiple Studio user profiles per one AWS SSO user.</p>\n<p>You can use this approach to implement a custom user portal with applications backed by the SAML 2.0 authorization process. Your custom user portal can have maximum flexibility on how to manage and display user applications. For example, the user portal can show some ML project metadata to facilitate identifying an application to access.</p>\n<p>You can find the solution’s source code in our <a href=\"https://github.com/aws-samples/users-and-team-management-with-amazon-sagemaker-and-aws-sso\" target=\"_blank\">GitHub repository</a>.</p>\n<h3><a id=\"Solution_overview_20\"></a><strong>Solution overview</strong></h3>\n<p>The solution implements the following architecture.</p>\n<p><img src=\"https://dev-media.amazoncloud.cn/6377d2c8a683427a8ff6dec7eaa28193_image.png\" alt=\"image.png\" /></p>\n<p>The main high-level architecture components are as follows:</p>\n<ol>\n<li><strong>Identity provide</strong>r – Users and groups are managed in an external identity source, for example in Azure AD. User assignments to AD groups define what permissions a particular user has and which Studio team they have access to. The identity source must by synchronized with AWS SSO.</li>\n<li><strong>AWS SSO</strong> – AWS SSO manages SSO users, SSO permission sets, and applications. This solution uses a custom SAML 2.0 application to provide access to Studio for entitled AWS SSO users. The solution also uses SAML attribute mapping to populate the SAML assertion with specific access-relevant data, such as user ID and user team. Because the solution creates a SAML API, you can use any IdP supporting SAML assertions to create this architecture. For example, you can use Okta or even your own web application that provides a landing page with a user portal and applications. For this post, we use AWS SSO.</li>\n<li><strong>Custom SAML 2.0 applications</strong> – The solution creates one application per Studio team and assigns one or multiple applications to a user or a user group based on entitlements. Users can access these applications from within their AWS SSO user portal based on assigned permissions. Each application is configured with the <a href=\"https://aws.amazon.com/api-gateway/\" target=\"_blank\">Amazon API Gateway</a> endpoint URL as its SAML backend.</li>\n<li><strong>SageMaker domain</strong> – The solution provisions a SageMaker domain in an AWS account and creates a dedicated user profile for each combination of AWS SSO user and Studio team the user is assigned to. The domain must be configured in <a href=\"https://docs.aws.amazon.com/sagemaker/latest/dg/onboard-iam.html\" target=\"_blank\">IAM authentication mode</a>.</li>\n<li><strong>Studio user profiles</strong> – The solution automatically creates a dedicated user profile for each user-team combination. For example, if a user is a member of two Studio teams and has corresponding permissions, the solution provisions two separate user profiles for this user. Each profile always belongs to one and only one user. Because you have a Studio user profile for each possible combination of a user and a team, you must consider your account limits for user profiles before implementing this approach. For example, if your limit is 500 user profiles, and each user is a member of two teams, you consume that limit 2.5 times faster, and as a result you can onboard 250 users. With a high number of users, we recommend implementing multiple domains and accounts for security context separation. To demonstrate the proof of concept, we use two users, User 1 and User 2, and two Studio teams, Team 1 and Team 2. User 1 belongs to both teams, whereas User 2 belongs to Team 2 only. User 1 can access Studio environments for both teams, whereas User 2 can access only the Studio environment for Team 2.</li>\n<li><strong>Studio execution roles</strong> – Each Studio user profile uses a dedicated execution role with permission polices with the required level of access for the specific team the user belongs to. Studio execution roles implement an effective permission isolation between individual users and their team roles. You manage data and resource access for each role and not at an individual user level.</li>\n</ol>\n<p>The solution also implements an attribute-based access control (ABAC) using SAML 2.0 attributes, tags on Studio user profiles, and tags on SageMaker execution roles.</p>\n<p>In this particular configuration, we assume that AWS SSO users don’t have permissions to sign in to the AWS account and don’t have corresponding AWS SSO-controlled IAM roles in the account. Each user signs in to their Studio environment via a presigned URL from an AWS SSO portal without the need to go to the console in their AWS account. In a real-world environment, you might need to set up <a href=\"https://docs.aws.amazon.com/singlesignon/latest/userguide/permissionsetsconcept.html\" target=\"_blank\">AWS SSO permission sets</a> for users to allow the authorized users to assume an IAM role and to sign in to an AWS account. For example, you can provide data scientist role permissions for a user to be able to interact with account resources and have the level of access they need to fulfill their role.</p>\n<h3><a id=\"Solution_architecture_and_workflow_39\"></a><strong>Solution architecture and workflow</strong></h3>\n<p>The following diagram presents the end-to-end sign-in flow for an AWS SSO user.**</p>\n<p><img src=\"https://dev-media.amazoncloud.cn/0a89702cf8744d519e425b8e6cced8e9_image.png\" alt=\"image.png\" /></p>\n<p>An AWS SSO user chooses a corresponding Studio application in their AWS SSO portal. AWS SSO prepares a SAML assertion (1) with configured SAML attribute mappings. A custom SAML application is configured with the API Gateway endpoint URL as its Assertion Consumer Service (ACS), and needs mapping attributes containing the AWS SSO user ID and team ID. We use <code>ssouserid</code> and <code>teamid</code> custom attributes to send all needed information to the SAML backend.</p>\n<p>The API Gateway calls an SAML backend API. An <a href=\"http://aws.amazon.com/lambda\" target=\"_blank\">AWS Lambda</a> function (2) implements the API, parses the SAML response to extract the user ID and team ID. The function uses them to retrieve a team-specific configuration, such as an execution role and SageMaker domain ID. The function checks if a required user profile exists in the domain, and creates a new one with the corresponding configuration settings if no profile exists. Afterwards, the function generates a Studio presigned URL for a specific Studio user profile by calling <a href=\"https://docs.aws.amazon.com/sagemaker/latest/APIReference/API_CreatePresignedDomainUrl.html\" target=\"_blank\">CreatePresignedDomainUrl</a> API (3) via a SageMaker API VPC endpoint. The Lambda function finally returns the presigned URL with HTTP 302 redirection response to sign the user in to Studio.</p>\n<p>The solution implements a non-production sample version of an SAML backend. The Lambda function parses the SAML assertion and uses only attributes in the <code><saml2:AttributeStatement></code> element to construct a <code>CreatePresignedDomainUrl</code> API call. In your production solution, you must use a proper SAML backend implementation, which must include a validation of an SAML response, a signature, and certificates, replay and redirect prevention, and any other features of an SAML authentication process. For example, you can use a <a href=\"https://python-social-auth.readthedocs.io/en/latest/backends/saml.html\" target=\"_blank\">python3-saml SAML backend implementation or OneLogin open-source SAML toolkit to implement a secure SAML backend</a>.</p>\n<h3><a id=\"Dynamic_creation_of_Studio_user_profiles_51\"></a><strong>Dynamic creation of Studio user profiles</strong></h3>\n<p>The solution automatically creates a Studio user profile for each user-team combination, as soon as the AWS SSO sign-in process requests a presigned URL. For this proof of concept and simplicity, the solution creates user profiles based on the configured metadata in the AWS <a href=\"https://github.com/aws-samples/users-and-team-management-with-amazon-sagemaker-and-aws-sso/blob/main/template.yaml\" target=\"_blank\">SAM template</a>:</p>\n<pre><code class=\"lang-\">Metadata:\n Team1:\n DomainId: !GetAtt SageMakerDomain.Outputs.SageMakerDomainId\n SessionExpiration: 43200\n Tags:\n - Key: Team\n Value: Team1\n UserSettings:\n ExecutionRole: !GetAtt IAM.Outputs.SageMakerStudioExecutionRoleTeam1Arn\n Team2:\n DomainId !GetAtt SageMakerDomain.Outputs.SageMakerDomainId\n SessionExpiration: 43200\n Tags:\n - Key: Team\n Value: Team2\n UserSettings:\n ExecutionRole: !GetAtt IAM.Outputs.SageMakerStudioExecutionRoleTeam2Arn\n</code></pre>\n<p>You can configure own teams, custom settings, and tags by adding them to the metadata configuration for the AWS CloudFormation resource <code>GetUserProfileMetadata</code>.</p>\n<p>For more information on configuration elements of <code>UserSettings</code>, refer to <a href=\"https://boto3.amazonaws.com/v1/documentation/api/latest/reference/services/sagemaker.html#SageMaker.Client.create_user_profile\" target=\"_blank\">create_user_profile in boto3</a>.</p>\n<h4><a id=\"IAM_roles_78\"></a><strong>IAM roles</strong></h4>\n<p>The following diagram shows the IAM roles in this solution.</p>\n<p><img src=\"https://dev-media.amazoncloud.cn/2bf90e4a7386413cb8c1785510bdbe91_image.png\" alt=\"image.png\" /></p>\n<p>The roles are as follows:</p>\n<ol>\n<li><strong>Studio execution role</strong> – A Studio user profile uses a dedicated Studio execution role with data and resource permissions specific for each team or user group. This role can also use tags to implement ABAC for data and resource access. For more information, refer to <a href=\"https://docs.aws.amazon.com/sagemaker/latest/dg/sagemaker-roles.html\" target=\"_blank\">SageMaker Roles</a>.</li>\n<li><strong>SAML backend Lambda execution role</strong> – This execution role contains permission to call the <code>CreatePresignedDomainUrl</code> API. You can configure the permission policy to include additional conditional checks using <code>Condition keys</code>. For example, to allow access to Studio only from a designated range of IP addresses within your private corporate network, use the following code:</li>\n</ol>\n<pre><code class=\"lang-\">{\n "Version": "2012-10-17",\n "Statement": [\n {\n "Action": [\n "sagemaker:CreatePresignedDomainUrl"\n ],\n "Resource": "arn:aws:sagemaker:<Region>:<Account_id>:user-profile/*/*",\n "Effect": "Allow"\n },\n {\n "Condition": {\n "NotIpAddress": {\n "aws:VpcSourceIp": "10.100.10.0/24"\n }\n },\n "Action": [\n "sagemaker:*"\n ],\n "Resource": "arn:aws:sagemaker:<Region>:<Account_id>:user-profile/*/*",\n "Effect": "Deny"\n }\n ]\n}\n</code></pre>\n<p>For more examples on how to use conditions in IAM policies, refer to <a href=\"https://docs.aws.amazon.com/sagemaker/latest/dg/security_iam_id-based-policy-examples.html#api-access-policy\" target=\"_blank\">Control Access to the SageMaker API by Using Identity-based Policies</a>.</p>\n<ol start=\"3\">\n<li><strong>SageMaker</strong> – SageMaker assumes the Studio execution role on your behalf, as controlled by a corresponding trust policy on the execution role. This allows the service to access data and resources, and perform actions on your behalf. The Studio execution role must contain a trust policy allowing SageMaker to assume this role.</li>\n<li><strong>AWS SSO permission set IAM role</strong> – You can assign your AWS SSO users to AWS accounts in your AWS organization via <a href=\"https://docs.aws.amazon.com/singlesignon/latest/userguide/permissionsetsconcept.html\" target=\"_blank\">AWS SSO permission sets</a>. A permission set is a template that defines a collection of user role-specific IAM policies. You manage permission sets in AWS SSO, and AWS SSO controls the corresponding IAM roles in each account.</li>\n<li><strong>AWS Organizations Service Control Policies</strong> – If you use <a href=\"https://aws.amazon.com/organizations/\" target=\"_blank\">AWS Organizations</a>, you can implement <a href=\"https://docs.aws.amazon.com/organizations/latest/userguide/orgs_manage_policies_scps.html\" target=\"_blank\">Service Control Policies</a> (SCPs) to centrally control the maximum available permissions for all accounts and all IAM roles in your organization. For example, to centrally prevent access to Studio via the console, you can implement the following SCP and attach it to the accounts with the SageMaker domain:</li>\n</ol>\n<pre><code class=\"lang-\">{\n "Version": "2012-10-17",\n "Statement": [\n {\n "Action": [\n "sagemaker:*"\n ],\n "Resource": "*",\n "Effect": "Allow"\n },\n {\n "Condition": {\n "NotIpAddress": {\n "aws:VpcSourceIp": "<AuthorizedPrivateSubnet>"\n }\n },\n "Action": [\n "sagemaker:CreatePresignedDomainUrl"\n ],\n "Resource": "*",\n "Effect": "Deny"\n }\n ]\n}\n</code></pre>\n<h3><a id=\"Solution_provisioned_roles_149\"></a><strong>Solution provisioned roles</strong></h3>\n<p>The <a href=\"http://aws.amazon.com/cloudformation\" target=\"_blank\">AWS CloudFormation stack</a> for this solution creates three Studio execution roles used in the SageMaker domain:</p>\n<ul>\n<li><code>SageMakerStudioExecutionRoleDefault</code></li>\n<li><code>SageMakerStudioExecutionRoleTeam1</code></li>\n<li><code>SageMakerStudioExecutionRoleTeam2</code></li>\n</ul>\n<p>None of the roles have the <a href=\"https://docs.aws.amazon.com/sagemaker/latest/dg/security-iam-awsmanpol.html\" target=\"_blank\">AmazonSageMakerFullAccess</a> policy attached, and each has only a limited set of permissions. In your real-world SageMaker environment, you need to amend the role’s permissions based on your specific requirements.</p>\n<p><code>SageMakerStudioExecutionRoleDefault</code> has only the custom policy <code>SageMakerReadOnlyPolicy</code> attached with a restrictive list of allowed actions.</p>\n<p>Both team roles, <code>SageMakerStudioExecutionRoleTeam1</code> and <code>SageMakerStudioExecutionRoleTeam2</code>, additionally have two custom polices, <code>SageMakerAccessSupportingServicesPolicy</code> and <code>SageMakerStudioDeveloperAccessPolicy</code>, allowing usage of particular services and one deny-only policy, <code>SageMakerDeniedServicesPolicy</code>, with explicit deny on some SageMaker API calls.</p>\n<p>The Studio developer access policy enforces the setting of the <code>Team</code> tag equal to the same value as the user’s own execution role for calling any SageMaker <code>Create*</code> API:</p>\n<pre><code class=\"lang-\">{\n "Condition": {\n "ForAnyValue:StringEquals": {\n "aws:TagKeys": [\n "Team"\n ]\n },\n "StringEqualsIfExists": {\n "aws:RequestTag/Team": "${aws:PrincipalTag/Team}"\n }\n },\n "Action": [\n "sagemaker:Create*"\n ],\n "Resource": [\n "arn:aws:sagemaker:*:<ACCOUNT_ID>:*"\n ],\n "Effect": "Allow",\n "Sid": "AmazonSageMakerCreate"\n}\n</code></pre>\n<p>Furthermore, it allows using delete, stop, update, and start operations only on resources tagged with the same Team tag as the user’s execution role:</p>\n<pre><code class=\"lang-\">{\n "Condition": {\n "StringEquals": {\n "aws:PrincipalTag/Team": "${sagemaker:ResourceTag/Team}"\n }\n },\n "Action": [\n "sagemaker:Delete*",\n "sagemaker:Stop*",\n "sagemaker:Update*",\n "sagemaker:Start*",\n "sagemaker:DisassociateTrialComponent",\n "sagemaker:AssociateTrialComponent",\n "sagemaker:BatchPutMetrics"\n ],\n "Resource": [\n "arn:aws:sagemaker:*:<ACCOUNT_ID>:*"\n ],\n "Effect": "Allow",\n "Sid": "AmazonSageMakerUpdateDeleteExecutePolicy"\n}\n</code></pre>\n<p>For more information on roles and polices, <a href=\"https://aws.amazon.com/fr/blogs/machine-learning/configuring-amazon-sagemaker-studio-for-teams-and-groups-with-complete-resource-isolation/\" target=\"_blank\">refer to Configuring Amazon SageMaker Studio for teams and groups with complete resource isolation</a>.</p>\n<h3><a id=\"Network_infrastructure_216\"></a><strong>Network infrastructure</strong></h3>\n<p>The solution implements a fully isolated SageMaker domain environment with all network traffic going through <a href=\"https://aws.amazon.com/privatelink\" target=\"_blank\">AWS PrivateLink</a> connections. You may optionally enable internet access from the Studio notebooks. The solution also creates three <a href=\"https://docs.aws.amazon.com/vpc/latest/userguide/VPC_SecurityGroups.html\" target=\"_blank\">VPC security groups</a> to control traffic between all solution components such as the SAML backend Lambda function, <a href=\"https://docs.aws.amazon.com/vpc/latest/privatelink/concepts.html\" target=\"_blank\">VPC endpoints</a>, and Studio notebooks.</p>\n<p><img src=\"https://dev-media.amazoncloud.cn/1a15a217a9ea4ad286fb8e8c784cf343_image.png\" alt=\"image.png\" /></p>\n<p>For this proof of concept and simplicity, the solution creates a SageMaker subnet in a single <a href=\"https://docs.aws.amazon.com/AWSEC2/latest/UserGuide/using-regions-availability-zones.html#concepts-availability-zones\" target=\"_blank\">Availability Zone</a>. For your production setup, you must use multiple private subnets across multiple Availability Zones and ensure that each subnet is appropriately sized, assuming minimum five IPs per user.</p>\n<p>This solution provisions all required network infrastructure. The CloudFormation template <a href=\"https://github.com/aws-samples/users-and-team-management-with-amazon-sagemaker-and-aws-sso/blob/main/cfn-templates/vpc.yaml\" target=\"_blank\">./cfn-templates/vpc.yaml</a> contains the source code.</p>\n<h3><a id=\"Deployment_steps_226\"></a><strong>Deployment steps</strong></h3>\n<p>To deploy and test the solution, you must complete the following steps:</p>\n<ol>\n<li>Deploy the solution’s stack via an <a href=\"https://aws.amazon.com/serverless/sam/\" target=\"_blank\">AWS Serverless Application Model</a> (AWS SAM) template.</li>\n<li>Create AWS SSO users, or use existing AWS SSO users.</li>\n<li>Create custom SAML 2.0 applications and assign AWS SSO users to the applications.</li>\n</ol>\n<p>The full source code for the solution is provided in our GitHub r<a href=\"https://github.com/aws-samples/users-and-team-management-with-amazon-sagemaker-and-aws-sso\" target=\"_blank\">epository</a>.</p>\n<h4><a id=\"Prerequisites_236\"></a><strong>Prerequisites</strong></h4>\n<p>To use this solution, the <a href=\"http://aws.amazon.com/cli\" target=\"_blank\">AWS Command Line Interface</a> (AWS CLI), <a href=\"https://docs.aws.amazon.com/serverless-application-model/latest/developerguide/serverless-sam-cli-install.html\" target=\"_blank\">AWS SAM CLI</a>, and <a href=\"https://docs.aws.amazon.com/organizations/latest/userguide/orgs_introduction.html\" target=\"_blank\">Python3.8 or later</a> must be installed.</p>\n<p>The deployment procedure assumes that you enabled AWS SSO and configured for the <a href=\"https://docs.aws.amazon.com/organizations/latest/userguide/orgs_introduction.html\" target=\"_blank\">AWS Organizations</a> in the account where the solution is deployed.</p>\n<p>To set up AWS SSO, refer to the instructions in <a href=\"https://github.com/aws-samples/users-and-team-management-with-amazon-sagemaker-and-aws-sso/blob/main/aws-sso-setup.md\" target=\"_blank\">GitHub</a>.</p>\n<h3><a id=\"Solution_deployment_options_244\"></a><strong>Solution deployment options</strong></h3>\n<p>You can choose from several solution deployment options to have the best fit for your existing AWS environment. You can also select the network and SageMaker domain provisioning options. For detailed information about the different deployment choices, refer to the <a href=\"https://github.com/aws-samples/users-and-team-management-with-amazon-sagemaker-and-aws-sso\" target=\"_blank\">README file</a>.</p>\n<h3><a id=\"Deploy_the_AWS_SAM_template_248\"></a><strong>Deploy the AWS SAM template</strong></h3>\n<p>To deploy the AWS SAM template, complete the following steps:</p>\n<ol>\n<li>Clone the source code repository to your local environment:</li>\n</ol>\n<pre><code class=\"lang-\">git clone https://github.com/aws-samples/users-and-team-management-with-amazon-sagemaker-and-aws-sso.git\n</code></pre>\n<ol start=\"2\">\n<li>Build the AWS SAM application:</li>\n</ol>\n<pre><code class=\"lang-\">sam build\n</code></pre>\n<ol start=\"3\">\n<li>Deploy the application:</li>\n</ol>\n<pre><code class=\"lang-\">sam deploy --guided\n</code></pre>\n<ol start=\"4\">\n<li>Provide stack parameters according to your existing environment and desired deployment options, such as existing VPC, existing private and public subnets, and existing SageMaker domain, as discussed in the <a href=\"https://github.com/aws-samples/users-and-team-management-with-amazon-sagemaker-and-aws-sso#solution-deployment-options\" target=\"_blank\">Solution deployment options</a> chapter of the README file.</li>\n</ol>\n<p>You can leave all parameters at their default values to provision new network resources and a new SageMaker domain. Refer to detailed parameter usage in the <a href=\"https://github.com/aws-samples/users-and-team-management-with-amazon-sagemaker-and-aws-sso\" target=\"_blank\">README</a> file if you need to change any default settings.</p>\n<p>Wait until the stack deployment is complete. The end-to-end deployment including provisioning all network resources and a SageMaker domain takes about 20 minutes.</p>\n<p>To see the stack output, run the following command in the terminal:</p>\n<pre><code class=\"lang-\">export STACK_NAME=<SAM stack name>\n\naws cloudformation describe-stacks \\\n--stack-name $STACK_NAME\\\n--output table \\\n--query "Stacks[0].Outputs[*].[OutputKey, OutputValue]"\n</code></pre>\n<h3><a id=\"Create_SSO_users_286\"></a><strong>Create SSO users</strong></h3>\n<p>Follow the instructions to <a href=\"https://github.com/aws-samples/users-and-team-management-with-amazon-sagemaker-and-aws-sso/blob/main/aws-sso-setup.md\" target=\"_blank\">add AWS SSO users</a> to create two users with names User1 and User2 or use any two of your existing AWS SSO users to test the solution. Make sure you use AWS SSO in the same AWS Region in which you deployed the solution.</p>\n<h3><a id=\"Create_custom_SAML_20_applications_290\"></a><strong>Create custom SAML 2.0 applications</strong></h3>\n<p>To create the required custom SAML 2.0 applications for Team 1 and for Team 2, complete the following steps:</p>\n<ol>\n<li>Open the AWS SSO console in the AWS management account of your AWS organization, in the same Region where you deployed the solution stack.</li>\n<li>Choose <strong>Applications</strong> in the navigation pane.</li>\n<li>Choose Add a new <strong>application</strong>.</li>\n<li>Choose <strong>Add a custom SAML 2.0 application</strong>.</li>\n<li>For <strong>Display name</strong>, enter an application name, for example <code>SageMaker Studio Team 1</code>.</li>\n<li>Leave <strong>Application start URL</strong> and <strong>Relay state</strong> empty.</li>\n<li>Choose <strong>If you don’t have a metadata file, you can manually enter your metadata values</strong>.</li>\n<li>For <strong>Application ACS URL</strong>, enter the URL provided in the <code>SAMLBackendEndpoint</code> key of the AWS SAM stack output.</li>\n<li>For <strong>Application SAML</strong> audience, enter the URL provided in the <code>SAMLAudience</code> key of the AWS SAM stack output.</li>\n<li>Choose <strong>Save changes</strong>.</li>\n</ol>\n<p><img src=\"https://dev-media.amazoncloud.cn/29b2688e2a384c9ea764d9b517f4e5a4_image.png\" alt=\"image.png\" /></p>\n<ol start=\"11\">\n<li>Navigate to the <strong>Attribute mappings</strong> tab.</li>\n<li>Set the **Subject **to **email **and **Format **to <strong>emailAddress</strong>.</li>\n<li>Add the following new attributes:<br />\na. <code>ssouserid</code> set to <code>${user:AD_GUID}</code><br />\nb. <code>teamid</code> set to <code>Team1</code> or <code>Team2</code>, respectively, for each application</li>\n</ol>\n<p><img src=\"https://dev-media.amazoncloud.cn/8ce76e80fe1343fa93a74c58dea45f77_image.png\" alt=\"image.png\" /></p>\n<ol start=\"14\">\n<li>Choose <strong>Save changes</strong>.</li>\n<li>On the <strong>Assigned users</strong> tab, choose <strong>Assign users</strong>.</li>\n<li>Choose User 1 for the Team 1 application and both User 1 and User 2 for the Team 2 application.</li>\n<li>Choose <strong>Assign users</strong>.</li>\n</ol>\n<p><img src=\"https://dev-media.amazoncloud.cn/9dbd2fa496f44b4fb6724080914ff18d_image.png\" alt=\"image.png\" /></p>\n<h3><a id=\"Test_the_solution_322\"></a><strong>Test the solution</strong></h3>\n<p>To test the solution, complete the following steps:</p>\n<ol>\n<li>Go to AWS SSO user portal <code>https://<Identity Store ID>.awsapps.com/start</code> and sign as User 1.<br />\nTwo SageMaker applications are shown in the portal.</li>\n</ol>\n<p><img src=\"https://dev-media.amazoncloud.cn/21d35231faf446f2baedf8cc2273afb3_image.png\" alt=\"image.png\" /></p>\n<ol start=\"2\">\n<li>Choose <strong>SageMaker Studio Team 1</strong>.<br />\nYou’re redirected to the Studio instance for Team 1 in a new browser window.</li>\n</ol>\n<p><img src=\"https://dev-media.amazoncloud.cn/819dda4687e04aacb59e10dc08c347a6_image.png\" alt=\"image.png\" /></p>\n<p>The first time you start Studio, SageMaker creates a JupyterServer application. This process takes few minutes.</p>\n<p><img src=\"https://dev-media.amazoncloud.cn/d3594ca0dac741679335b69ba0b542e2_image.png\" alt=\"image.png\" /></p>\n<ol start=\"3\">\n<li>In Studio, on the <strong>File</strong> menu, choose **New **and **Terminal **to start a new terminal.</li>\n<li>In the terminal command line, enter the following command:</li>\n</ol>\n<pre><code class=\"lang-\">aws sts get-caller-identity\n</code></pre>\n<p>The command returns the Studio execution role.</p>\n<p><img src=\"https://dev-media.amazoncloud.cn/4768d3b6ba484086b43fd53475a5b5ef_image.png\" alt=\"image.png\" /></p>\n<p>In our setup, this role must be different for each team. You can also check that each user in each instance of Studio has their own home directory on a mounted Amazon EFS volume.</p>\n<ol start=\"5\">\n<li>Return to the AWS SSO portal, still logged as User 1, and choose <strong>SageMaker Studio Team 2</strong>.<br />\nYou’re redirected to a Team 2 Studio instance.</li>\n</ol>\n<p><img src=\"https://dev-media.amazoncloud.cn/0f374e76fbdb47da89a1bc77d27919d1_image.png\" alt=\"image.png\" /></p>\n<p>The start process can again take several minutes, because SageMaker starts a new JupyterServer application for User 2.</p>\n<ol start=\"6\">\n<li>Sign as User 2 in the AWS SSO portal.<br />\nUser 2 has only one application assigned: SageMaker Studio Team 2.</li>\n</ol>\n<p><img src=\"https://dev-media.amazoncloud.cn/705a4c19b15f40829dc538e27206a6f9_image.png\" alt=\"image.png\" /></p>\n<p>If you start an instance of Studio via this user application, you can verify that it uses the same SageMaker execution role as User 1’s Team 2 instance. However, each Studio instance is completely isolated. User 2 has their own home directory on an Amazon EFS volume and own instance of JupyterServer application. You can verify this by creating a folder and some files for each of the users and see that each user’s home directory is isolated.</p>\n<p>Now you can sign in to the SageMaker console and see that there are three user profiles created.</p>\n<p><img src=\"https://dev-media.amazoncloud.cn/6d12c7bf1edf4999b1e39bbf887c3a20_image.png\" alt=\"image.png\" /></p>\n<p>You just implemented a proof of concept solution to manage multiple users and teams with Studio.</p>\n<h3><a id=\"Clean_up_373\"></a><strong>Clean up</strong></h3>\n<p>To avoid charges, you must remove all project-provisioned and generated resources from your AWS account. Use the following SAM CLI command to delete the solution CloudFormation stack:</p>\n<pre><code class=\"lang-\">sam delete delete-stack --stack-name <stack name of SAM stack>\n</code></pre>\n<p>For security reasons and to prevent data loss, the Amazon EFS mount and the content associated with the Studio domain deployed in this solution are not deleted. The VPC and subnets associated with the SageMaker domain remain in your AWS account. For instructions to delete the file system and VPC, refer to <a href=\"https://docs.aws.amazon.com/efs/latest/ug/delete-efs-fs.html\" target=\"_blank\">Deleting an Amazon EFS file system</a> and <a href=\"https://docs.aws.amazon.com/vpc/latest/userguide/working-with-vpcs.html\" target=\"_blank\">Work with VPCs</a>, respectively.</p>\n<p>To delete the custom SAML application, complete the following steps:</p>\n<ol>\n<li>Open the AWS SSO console in the AWS SSO management account.</li>\n<li>Choose <strong>Applications</strong>.</li>\n<li>Select <strong>SageMaker Studio Team 1</strong>.</li>\n<li>On the **Actions **menu, choose Remove.</li>\n<li>Repeat these steps for <strong>SageMaker Studio Team 2</strong>.</li>\n</ol>\n<h3><a id=\"Conclusion_391\"></a><strong>Conclusion</strong></h3>\n<p>This solution demonstrated how you can create a flexible and customizable environment using AWS SSO and Studio user profiles to support your own organization structure. The next possible improvement steps towards a production-ready solution could be:</p>\n<ul>\n<li>Implement automated Studio user profile management as a dedicated microservice to support an automated profile provisioning workflow and to handle metadata and configuration for user profiles, for example in <a href=\"https://aws.amazon.com/dynamodb\" target=\"_blank\">Amazon DynamoDB</a>.</li>\n<li>Use the same mechanism in a more general case of multiple SageMaker domains and multiple AWS accounts. The same SAML backend can vend a corresponding presigned URL redirecting to a user profile-domain-account combination according to your custom logic based on user entitlements and team setup.</li>\n<li>Implement a synchronization mechanism between your IdP and AWS SSO and automate creation of custom SAML 2.0 applications.</li>\n<li>Implement scalable data and resource access management with attribute-based access control<a href=\"https://docs.aws.amazon.com/singlesignon/latest/userguide/configure-abac.html\" target=\"_blank\"> (ABAC).<br />\n</a></li>\n</ul>\n<p>If you have any feedback or questions, please leave them in the comments.</p>\n<h3><a id=\"Further_reading_403\"></a><strong>Further reading</strong></h3>\n<h4><a id=\"Documentation_405\"></a><strong>Documentation</strong></h4>\n<ul>\n<li><a href=\"https://docs.aws.amazon.com/singlesignon/latest/userguide/what-is.html\" target=\"_blank\">AWS Single Sign-On</a></li>\n<li><a href=\"https://docs.aws.amazon.com/singlesignon/latest/userguide/attributesforaccesscontrol.html\" target=\"_blank\">Attributes for access control</a></li>\n<li><a href=\"https://docs.aws.amazon.com/singlesignon/latest/userguide/attributemappingsconcept.html\" target=\"_blank\">Attribute mappings</a></li>\n</ul>\n<h4><a id=\"Blog_posts_411\"></a><strong>Blog posts</strong></h4>\n<ul>\n<li><a href=\"https://aws.amazon.com/fr/blogs/machine-learning/onboarding-amazon-sagemaker-studio-with-aws-sso-and-okta-universal-directory/\" target=\"_blank\">Onboarding Amazon SageMaker Studio with AWS SSO and Okta Universal Directory</a></li>\n<li><a href=\"https://aws.amazon.com/fr/blogs/machine-learning/configuring-amazon-sagemaker-studio-for-teams-and-groups-with-complete-resource-isolation/\" target=\"_blank\">Configuring Amazon SageMaker Studio for teams and groups with complete resource isolation</a></li>\n<li><a href=\"https://aws.amazon.com/blogs/machine-learning/secure-access-to-amazon-sagemaker-studio-with-aws-sso-and-a-saml-application/\" target=\"_blank\">Secure access to Amazon SageMaker Studio with AWS SSO and a SAML application</a></li>\n</ul>\n<h4><a id=\"About_the_Author_417\"></a><strong>About the Author</strong></h4>\n<p><img src=\"https://dev-media.amazoncloud.cn/133353e0d2664e999bbe18578fd254de_image.png\" alt=\"image.png\" /></p>\n<p><strong>Yevgeniy Ilyin</strong> is a Solutions Architect at AWS. He has over 20 years of experience working at all levels of software development and solutions architecture and has used programming languages from COBOL and Assembler to .NET, Java, and Python. He develops and codes cloud native solutions with a focus on big data, analytics, and data engineering.</p>\n"}
Team and user management with Amazon SageMaker and Amazon SSO
海外精选

海外精选的内容汇集了全球优质的亚马逊云科技相关技术内容。同时,内容中提到的“AWS”
是 “Amazon Web Services” 的缩写,在此网站不作为商标展示。

 0
0 0
0亚马逊云科技解决方案 基于行业客户应用场景及技术领域的解决方案
联系亚马逊云科技专家
亚马逊云科技解决方案
基于行业客户应用场景及技术领域的解决方案
联系专家

0
目录

 分享
分享 点赞
点赞 收藏
收藏 目录
目录立即注册,开启您的免费套餐
立即关注

亚马逊云开发者
公众号

User Group
公众号

亚马逊云科技
官方小程序
“AWS” 是 “Amazon Web Services” 的缩写,在此网站不作为商标展示。
立即关注
亚马逊云开发者
公众号
User Group
公众号
亚马逊云科技
官方小程序
“AWS” 是 “Amazon Web Services” 的缩写,在此网站不作为商标展示。
关于我们 
更多资源
开发者工具
更多支持
立即关注
亚马逊云开发者
公众号
User Group
公众号
亚马逊云科技
官方小程序
“AWS” 是 “Amazon Web Services” 的缩写,在此网站不作为商标展示。
