{"value":"Automated defect detection using computer vision helps improve quality and lower the cost of inspection. Defect detection involves identifying the presence of a defect, classifying types of defects, and identifying where the defects are located. Many manufacturing processes require detection at a low latency, with limited compute resources, and with limited connectivity.\n\n[Amazon Lookout for Vision](https://aws.amazon.com/lookout-for-vision/) is a machine learning (ML) service that helps spot product defects using computer vision to automate the quality inspection process in your manufacturing lines, with no ML expertise required. Lookout for Vision now includes the ability to provide the location and type of anomalies using semantic segmentation ML models. These customized ML models can either be deployed to the AWS Cloud using [cloud APIs](https://aws.amazon.com/lookout-for-vision/resources/) or to custom edge hardware using [AWS IoT Greengrass](https://aws.amazon.com/greengrass/). Lookout for Vision now supports inference on an x86 compute platform running Linux with or without an NVIDIA GPU accelerator and on any NVIDIA Jetson-based edge appliance. This flexibility allows detection of defects on existing or new hardware.\n\nIn this post, we show you how to detect defective parts using Lookout for Vision ML models running on an edge appliance, which we simulate using an [Amazon Elastic Compute Cloud](http://aws.amazon.com/ec2) (Amazon EC2) instance. We walk through training the new semantic segmentation models, exporting them as AWS IoT Greengrass components, and running inference in CPU-only mode with Python example code.\n\n### **Solution overview**\n\nIn this post, we use a set of pictures of [toy aliens](https://github.com/aws-samples/amazon-lookout-for-vision/tree/main/aliens-dataset) composed of normal and defective images such as missing limbs, eyes, or other parts. We train a Lookout for Vision model in the cloud to identify defective toy aliens. We compile the model to a target X86 CPU, package the trained Lookout for Vision model as an AWS IoT Greengrass component, and deploy the model to an EC2 instance without a GPU using the AWS IoT Greengrass console. Finally, we demonstrate a Python-based sample application running on the EC2 (C5a.2xl) instance that sources the toy alien images from the edge device file system, runs the inference on the Lookout for Vision model using the [gRPC](https://grpc.io/docs/what-is-grpc/introduction/) interface, and sends the inference data to an [MQTT](https://docs.aws.amazon.com/iot/latest/developerguide/mqtt.html) topic in the AWS Cloud. The scripts outputs an image that includes the color and location of the defects on the anomalous image.\n\nThe following diagram illustrates the solution architecture. It’s important to note for each defect type you want to detect in localization, you must have 10 marked anomaly images in training and 10 in test data, for a total of 20 images of that type. For this post, we search for missing limbs on the toy.\n\n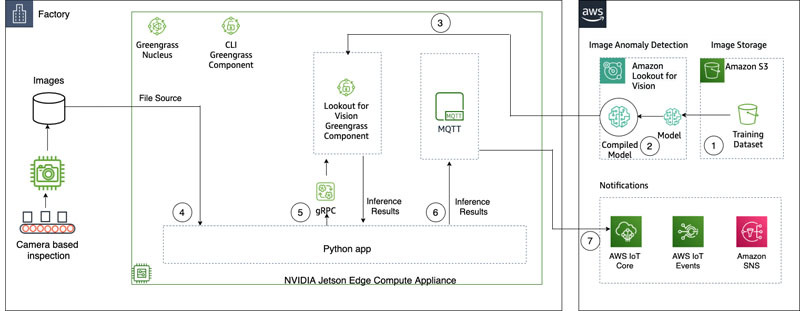\n\nThe solution has the following workflow:\n\n1. Upload a training dataset and a test dataset to [Amazon Simple Storage Service](http://aws.amazon.com/s3) (Amazon S3).\n2. Use the new Lookout for Vision UI to add an anomaly type and mark where those anomalies are in the training and test images.\n3. Train a Lookout for Vision model in the cloud.\n4. Compile the model to the target architecture (X86) and deploy the model to the EC2 (C5a.2xl) instance using the AWS IoT Greengrass console.\n5. Source images from local disk.\n6. Run inferences on the deployed model via the gRPC interface and retrieve an image of anomaly masks overlaid on the original image.\n7. Post the inference results to an MQTT client running on the edge instance.\n8. Receive the MQTT message on a topic in [AWS IoT Core](https://aws.amazon.com/iot-core/) in the AWS Cloud for further monitoring and visualization.\nSteps 5, 6, and 7 are coordinated with the sample Python application.\n\n### **Prerequisites**\n\nBefore you get started, complete the following prerequisites. For this post, we use an EC2 c5.2xl instance and install AWS IoT Greengrass V2 on it to try out the new features. If you want to run on an NVIDIA Jetson, follow the steps in our previous post, [Amazon Lookout for Vision now supports visual inspection of product defects at the edge](https://aws.amazon.com/blogs/machine-learning/amazon-lookout-for-vision-now-supports-visual-inspection-of-product-defects-at-the-edge/).\n\n1. [Create an AWS account](https://aws.amazon.com/premiumsupport/knowledge-center/create-and-activate-aws-account/).\n2. Start an EC2 instance that we can install AWS IoT Greengrass on and use the new CPU-only inference mode.You can also use an Intel X86 64 bit machine with 8 gigabytes of ram or more (we use a c5a.2xl, but anything with greater than 8 gigabytes on x86 platform should work) running Ubuntu 20.04.\n3. Install AWS IoT Greengrass V2:\n\n```\ngit clone https://github.com/aws-samples/amazon-lookout-for-vision.git\ncd edge\n# be sure to edit the installation script to match your region, also adjust any device names and groups!\nvi install_greengrass.sh\n```\n\n4. Install the needed system and Python 3 dependencies (Ubuntu 20.04):\n\n```\n# install Ubuntu dependencies on the EC2 instance\n./install-ec2-ubuntu-deps.sh\npip3 install -r requirements.txt\n# Replace ENDPOINT variable in sample-client-file-mqtt.py with the value on the AWS console AWS IoT->Things->l4JetsonXavierNX->Interact. \n# Under HTTPS. It will be of type <name>-ats.iot.<region>.amazon.com \n```\n\n### **Upload the dataset and train the model**\n\nWe use the [toy aliens dataset](https://github.com/aws-samples/amazon-lookout-for-vision/tree/main/aliens-dataset) to demonstrate the solution. The dataset contains normal and anomalous images. Here are a few sample images from the dataset.\n\nThe following image shows a normal toy alien.\n\n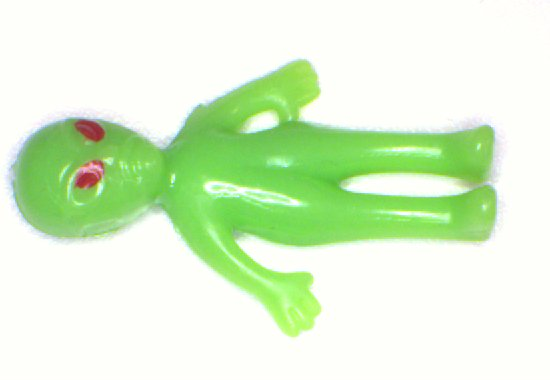\n\nThe following image shows a toy alien missing a leg.\n\n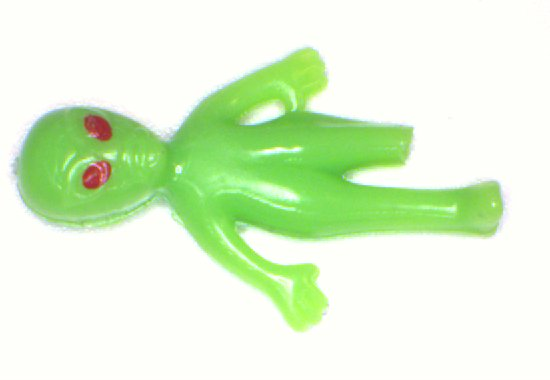\n\nThe following image shows a toy alien missing a head.\n\n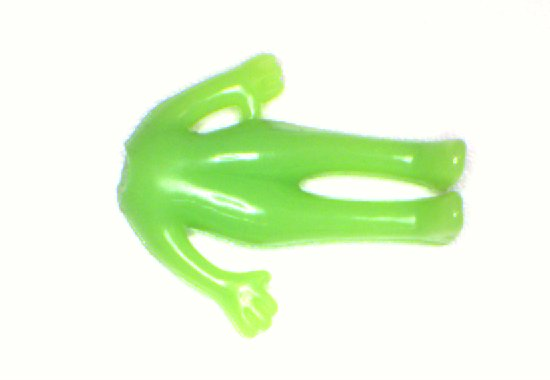\n\nIn this post, we look for missing limbs. We use the new user interface to draw a mask around the defects in our training and tests data. This will tell the semantic segmentation models how to identify this type of defect.\n\n1. Start by uploading your dataset, either via Amazon S3 or from your computer.\n2. Sort them into folders titled ```normal``` and ```anomaly```.\n3. When creating your dataset, select Automatically attach labels to images based on the folder name.This allows us to sort out the anomalous images later and draw in the areas to be labeled with a defect.\n\n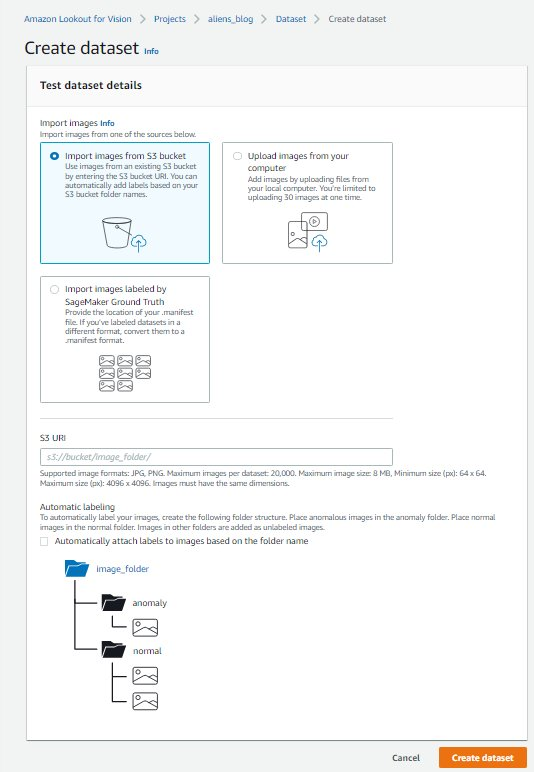\n\n4. Try to hold back some images for testing later of both ```normal``` and ```anomaly```.\n5. After all the images have been added to the dataset, choose **Add anomaly labels**.\n6. Begin labeling data by choosing **Start labeling**.\n7. To speed up the process, you can select multiple images and classify them as ```Normal``` or ```Anomaly```.\n\n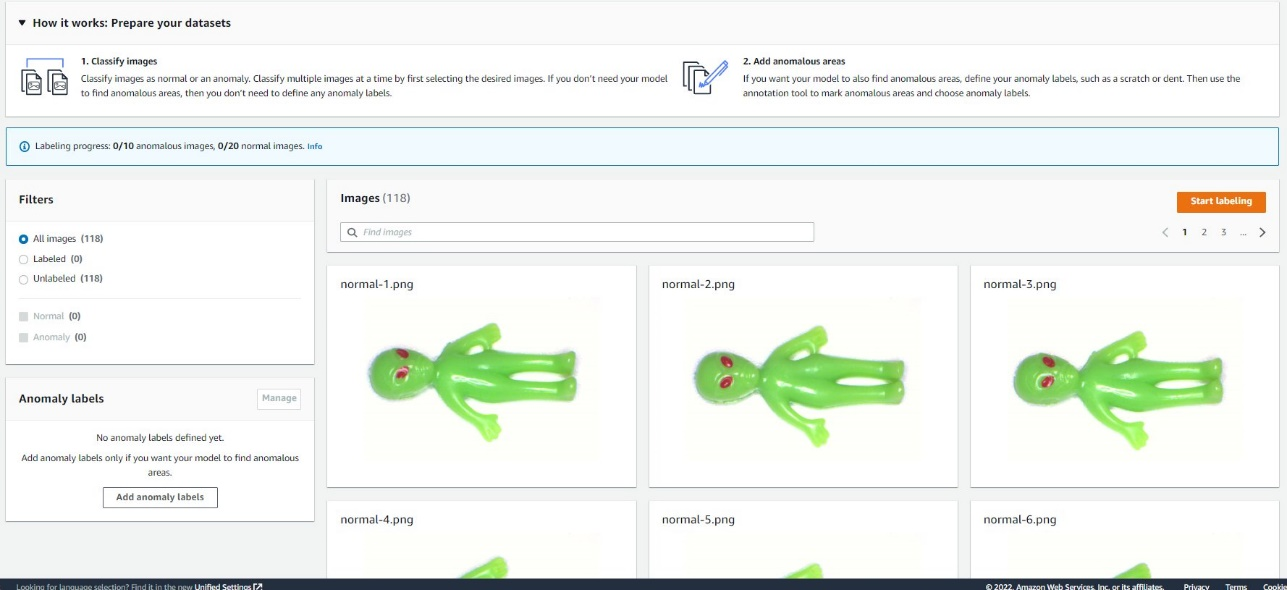\n\nIf you want to highlight anomalies in addition to classifying them, you need to highlight where the anomalies are located.\n\n8. Choose the image you want to annotate.\n9. Use the drawing tools to show the area where part of the subject is missing, or draw a mask over the defect.\n10. Choose **Submit and close** to keep these changes.\n\n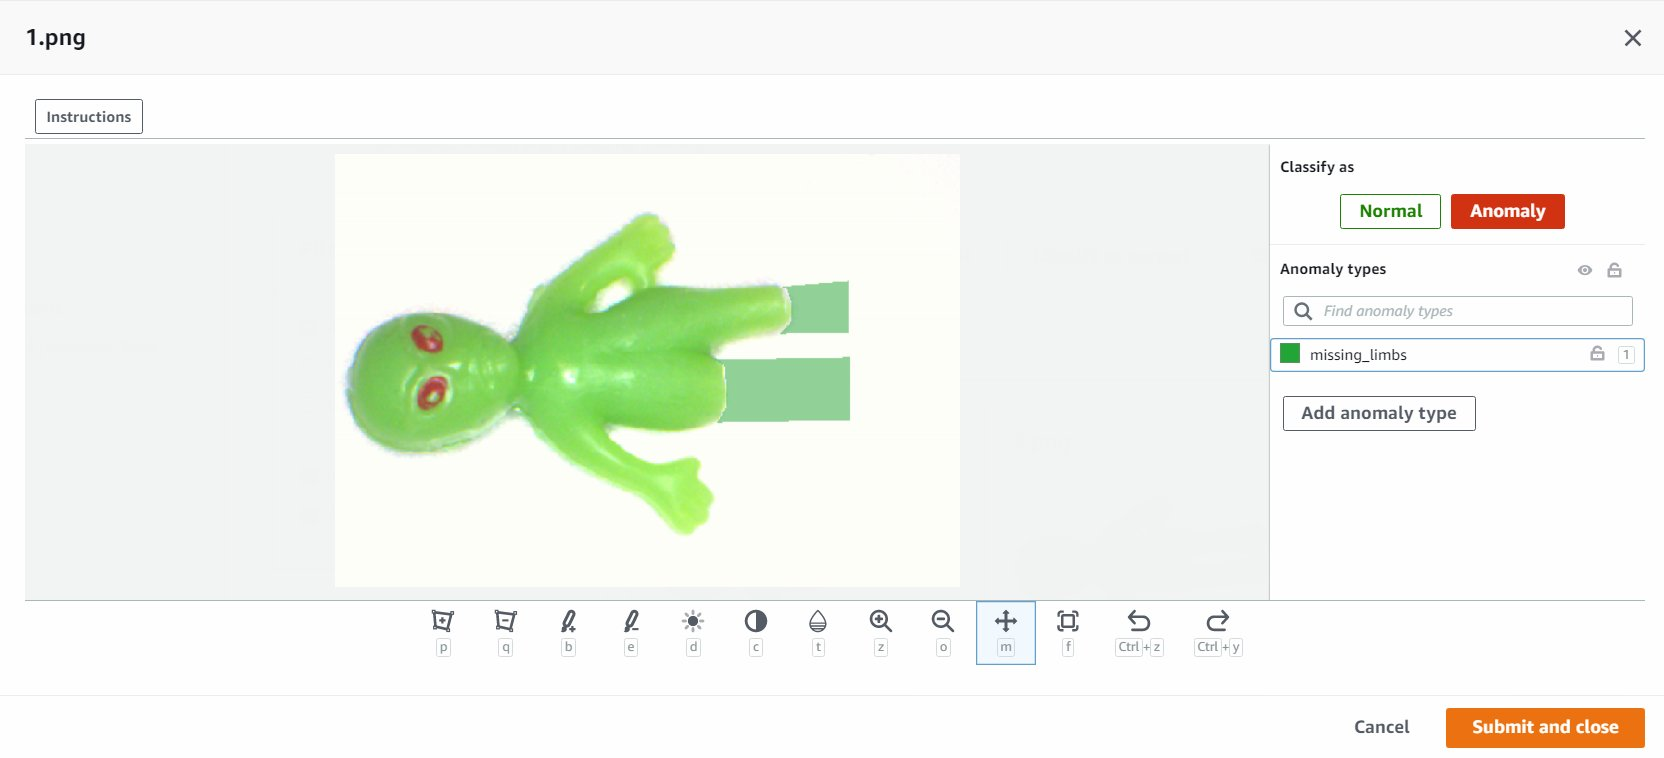\n\n11. Repeat this process for all your images.\n12. When you’re done, choose **Save** to persist your changes. Now you’re ready to train your model.\n\n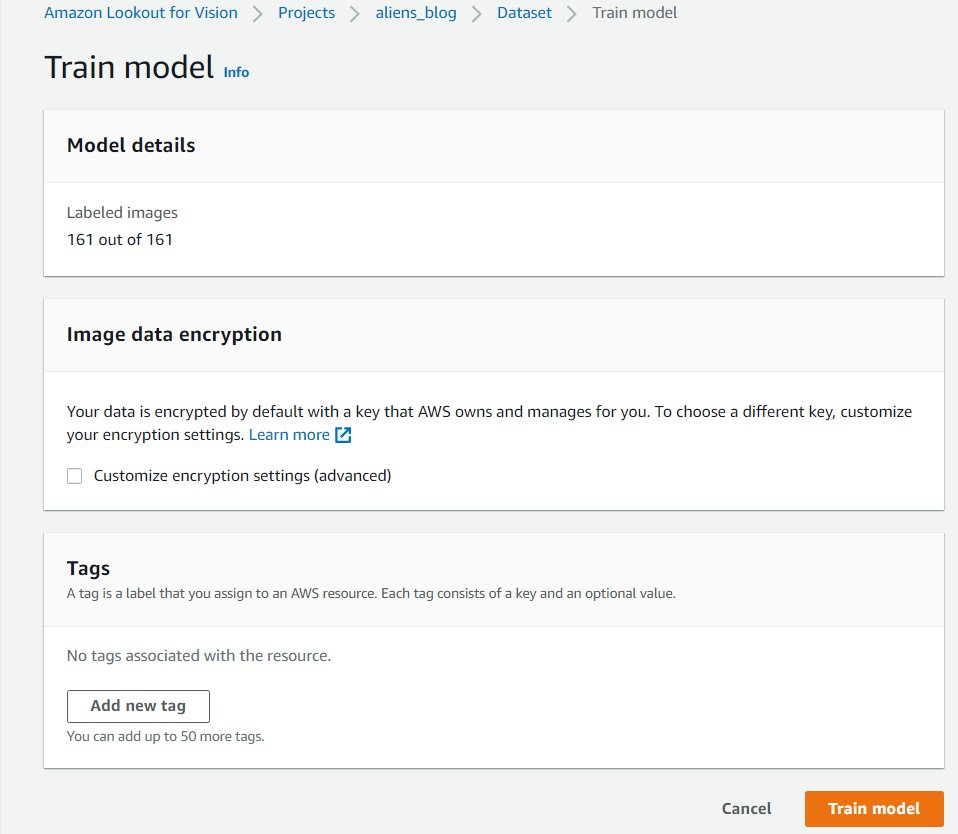\n\n13. Choose **Train model**.\n\nAfter you complete these steps, you can navigate to the project and the **Models** page to check the performance of the trained model. You can start the process of exporting the model to the target edge device any time after the model is trained.\n\n### **Retrain the model with corrected images**\n\nSometimes the anomaly tagging may not be quite correct. You have the chance to help your model learn your anomalies better. For example, the following image is identified as an anomaly, but doesn’t show the ```missing_limbs``` tag.\n\n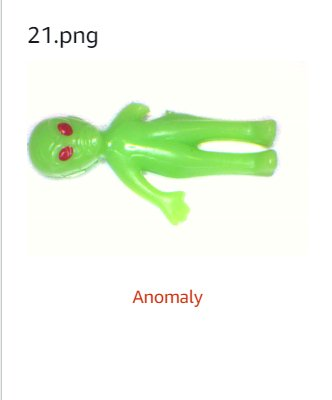\n\nLet’s open the editor and fix this.\n\nGo through any images you find like this. If you find it’s tagged an anomaly incorrectly, you can use the eraser tool to remove the incorrect tag.\n\n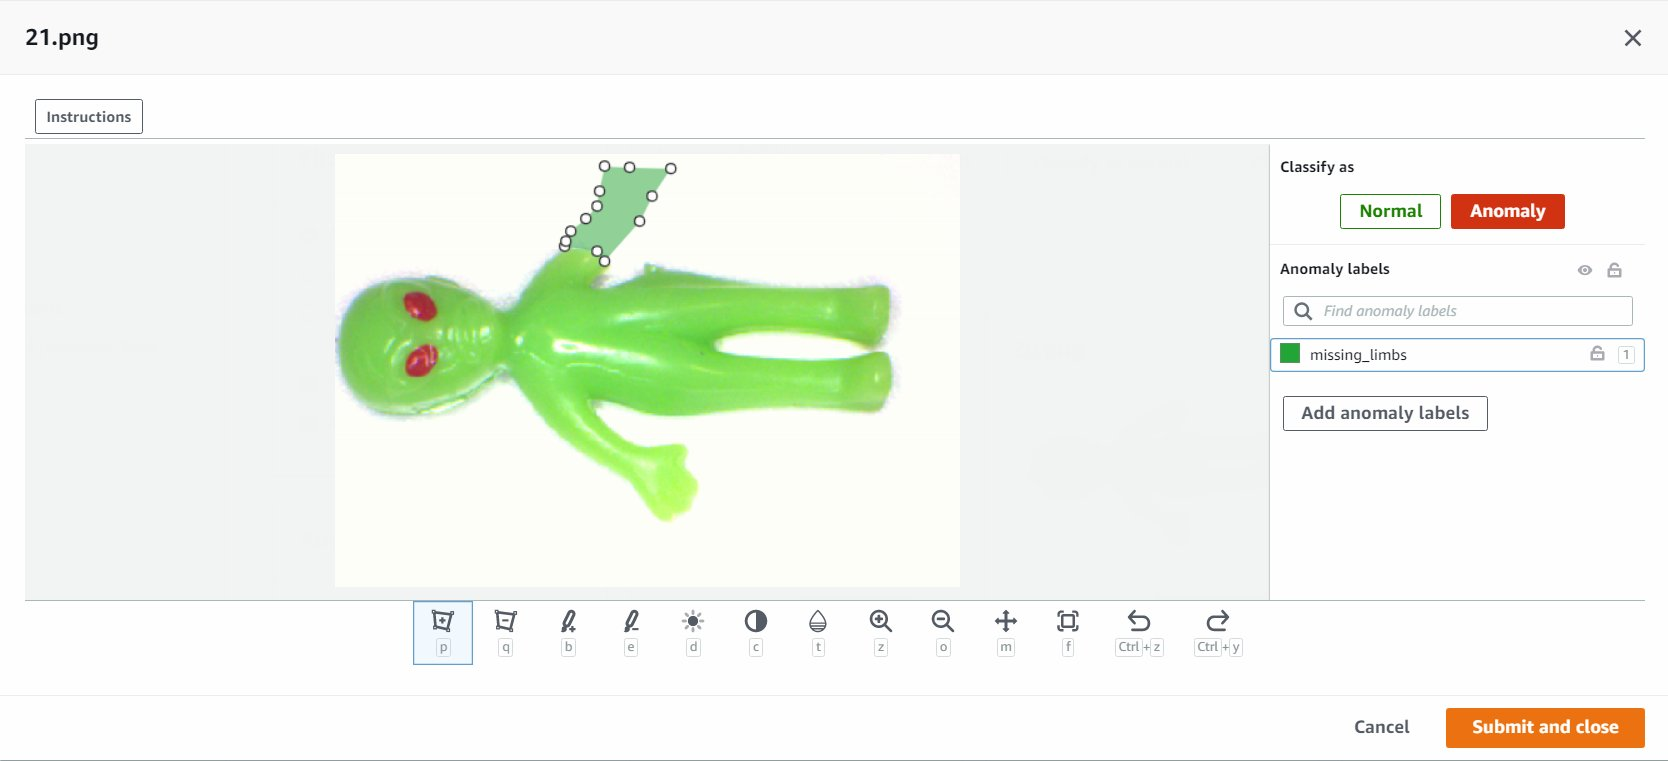\n\nYou can now train your model again and achieve better accuracy.\n\n### **Compile and package the model as an AWS IoT Greengrass component**\n\nIn this section, we walk through the steps to compile the toy alien model to our target edge device and package the model as an AWS IoT Greengrass component.\n\n1. On the Lookout for Vision console, choose your project.\n2. In the navigation pane, choose **Edge model packages**.\n3. Choose **Create model packaging job**.\n4. For **Job name**, enter a name.\n5. For **Job description**, enter an optional description.\n6. Choose **Browse models**.\n7. Select the model version (the toy alien model built in the previous section).\n8. Choose **Choose**.\n\n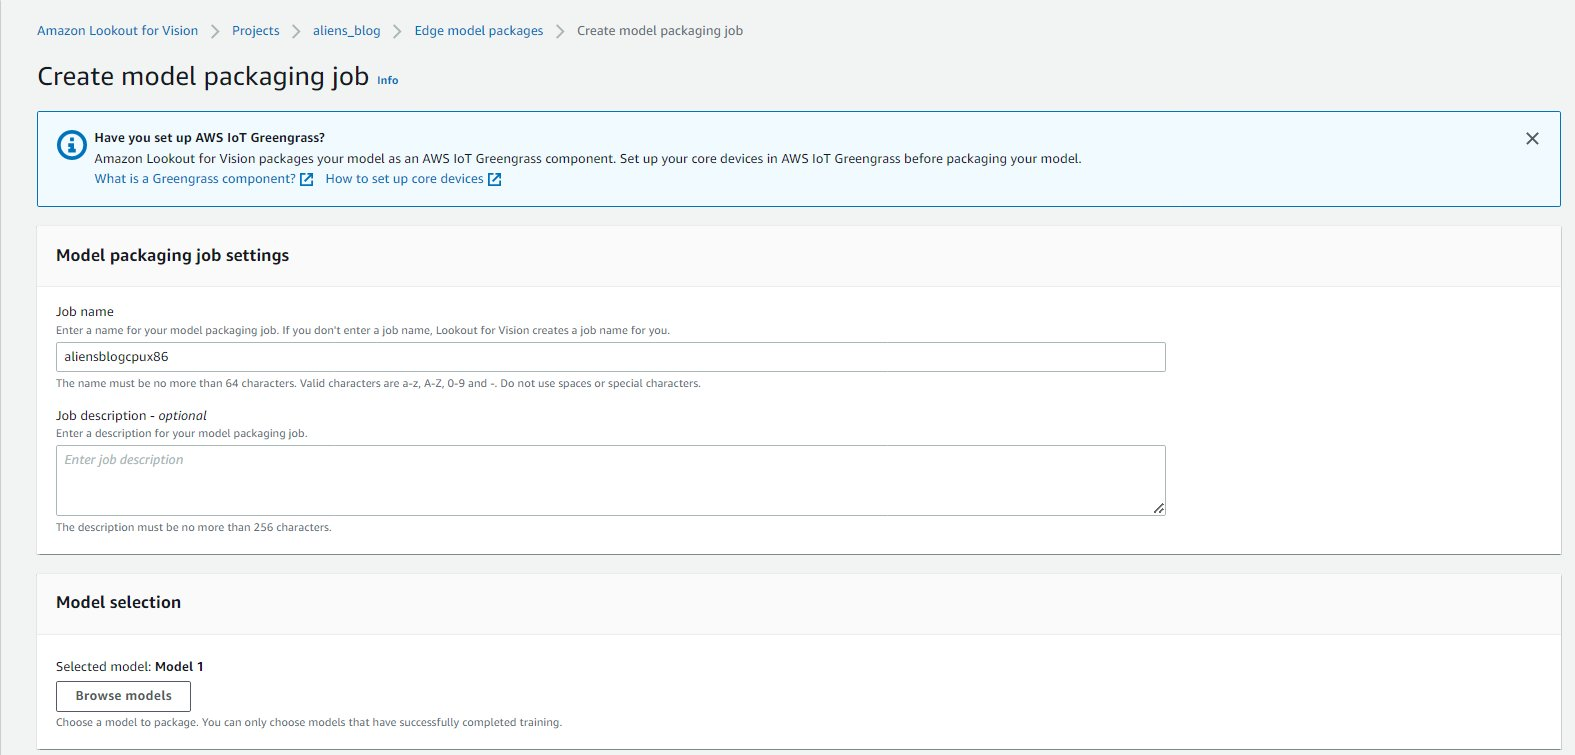\n\n9. If you’re running this on Amazon EC2 or an X86-64 device, select **Target platform** and choose **Linux, X86**, and **CPU**.\nIf using CPU, you can leave the compiler options empty if you’re not sure and don’t have an NVIDIA GPU. If you have an Intel-based platform that supports AVX512, you can add these compiler options to optimize for better performance: ```{\"mcpu\": \"skylake-avx512\"}```.\n\n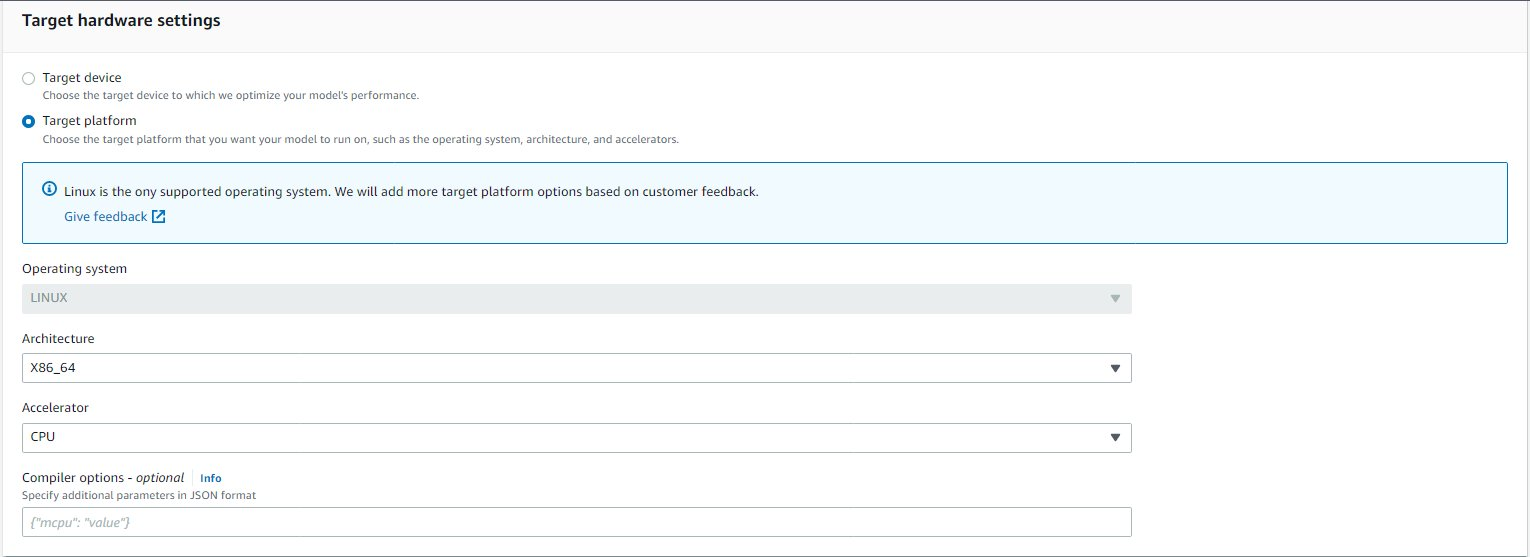\n\nYou can see your job name and status showing as ```In progress```. The model packaging job may take a few minutes to complete.When the model packaging job is complete, the status shows as ```Success```.\n10. Choose your job name (in our case it’s ```aliensblogcpux86```) to see the job details.\n\n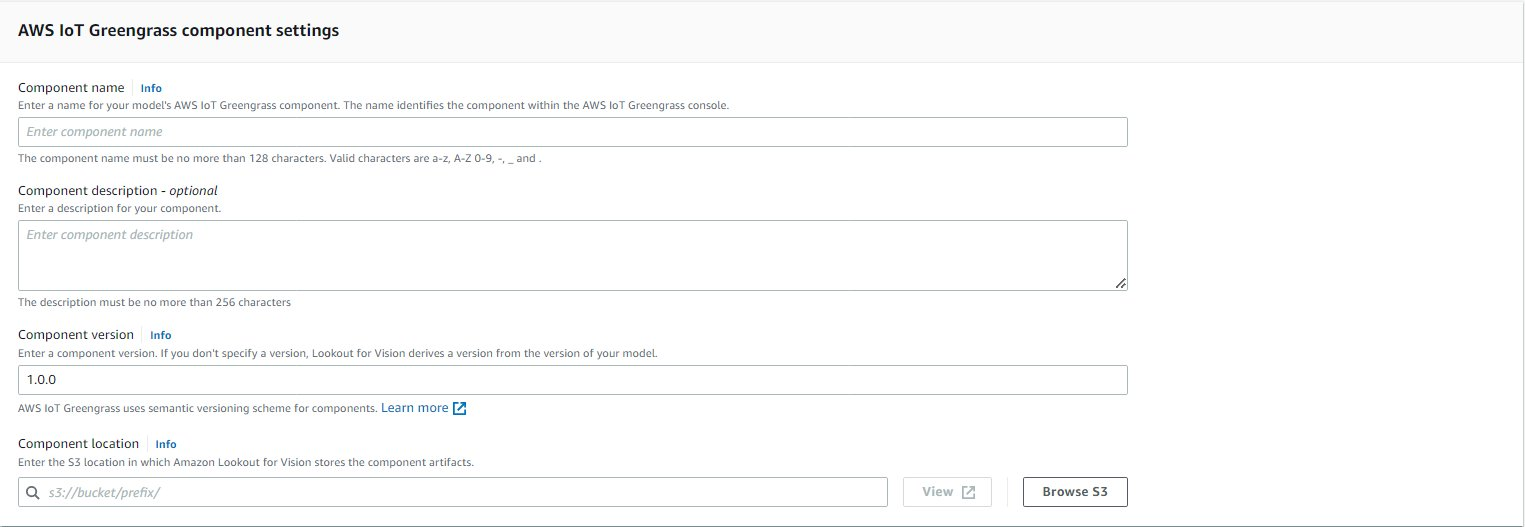\n\n11. Choose **Create model packaging job**.\n\n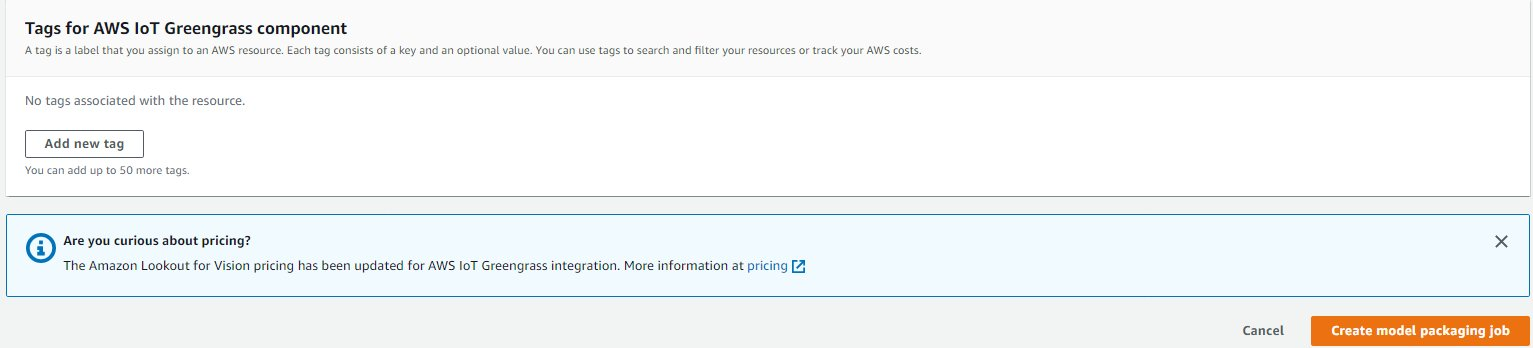\n\n12. Enter the details for **Component name**, **Component description** (optional), **Component version**, and **Component location**.Lookout for Vision stores the component recipes and artifacts in this Amazon S3 location.\n13. Choose **Continue deployment in Greengrass** to deploy the component to the target edge device.\n\n\n\nThe AWS IoT Greengrass component and model artifacts have been created in your AWS account.\n\n### **Deploy the model**\n\nBe sure you have AWS IoT Greengrass V2 installed on your target device for your account before you continue. For instructions, refer to [Install the AWS IoT Greengrass Core software](https://docs.aws.amazon.com/greengrass/v2/developerguide/install-greengrass-core-v2.html).\n\nIn this section, we walk through the steps to deploy the toy alien model to the edge device using the AWS IoT Greengrass console.\n\n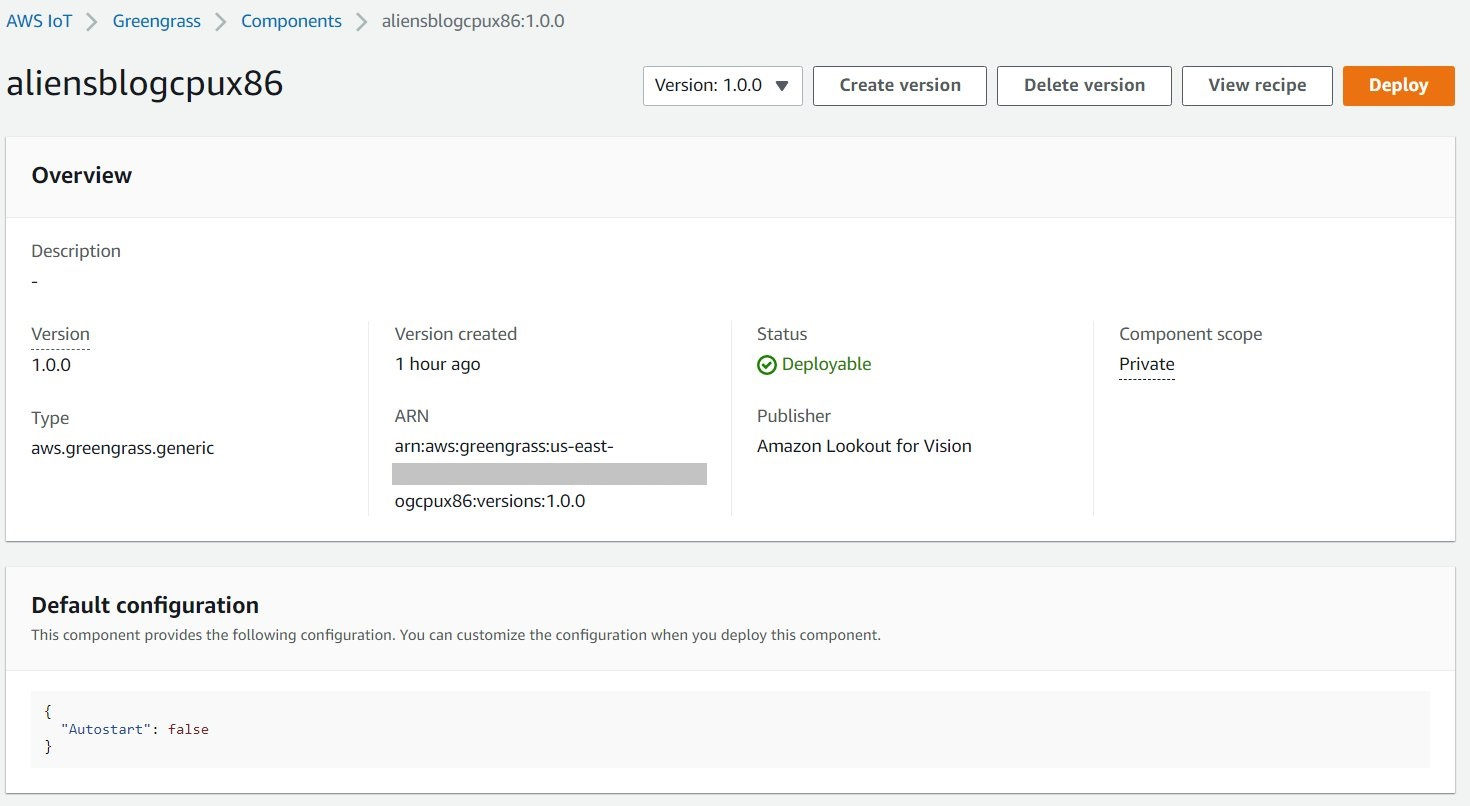\n\n1. On the AWS IoT Greengrass console, navigate to your edge device.\n2. Choose **Deploy **to initiate the deployment steps.\n3. Select **Core device** (because the deployment is to a single device) and enter a name for **Target name**.The target name is the same name you used to name the core device during the AWS IoT Greengrass V2 installation process.\n4. Choose your component. In our case, the component name is ```aliensblogcpux86```, which contains the toy alien model.\n5. Choose **Next**.\n6. Configure the component (optional).\n7. Choose **Next**.\n8. Expand **Deployment policies**.\n9. For **Component update policy**, select **Notify components**.This allows the already deployed component (a prior version of the component) to defer an update until you’re ready to update.\n10. For **Failure handling policy**, select **Don’t roll back**.In case of a failure, this option allows us to investigate the errors in deployment.\n11. Choose **Next**.\n12. Review the list of components that will be deployed on the target (edge) device.\n13. Choose **Next**.You should see the message ```Deployment successfully created````.\n14. To validate the model deployment was successful, run the following command on your edge device:\n\n```\nsudo /greengrass/v2/bin/greengrass-cli component list\n```\n\nYou should see a similar output running the ```aliensblogcpux86``` lifecycle startup script:\n\nComponents currently running in Greengrass:\n\n```\nComponents currently running in Greengrass:\n \nComponent Name: aws.iot.lookoutvision.EdgeAgent\n Version: 0.1.34\n State: RUNNING\n Configuration: {\"Socket\":\"unix:///tmp/aws.iot.lookoutvision.EdgeAgent.sock\"}\n Component Name: aliensblogcpux86\n Version: 1.0.0\n State: RUNNING\n Configuration: {\"Autostart\":false}\n```\n\n### **Run inferences on the model**\n\n**Note**: If you are running Greengrass as another user than what you are logged in as, you will need to change permissions of the file ```/tmp/aws.iot.lookoutvision.EdgeAgent.sock```:\n\n```\nchmod 666 /tmp/aws.iot.lookoutvision.EdgeAgent.sock\n```\n\nWe’re now ready to run inferences on the model. On your edge device, run the following command to load the model (replace <modelName> with the model name used in your component):\n\n```\n# run command to load the model# This will load the model into running state pass\n# the name of the model component as a parameter.\npython3 warmup-model.py <modelName>\n```\n\nTo generate inferences, run the following command with the source file name (replace <path/to/images> with the path and file name of the image to check and replace <modelName> with the model name used for your component):\n\n```\npython3 sample-client-file-mqtt.py </path/to/images> <modelName>\n\nstart client ['sample-client-file.py', 'aliens-dataset/anomaly/1.png', 'aliensblogcpux86']\nchannel set\nshape=(380, 550, 3)\nImage is anomalous, (90.05860090255737 % confidence) contains defects with total area over .1%: {'missing_limbs': '#FFFFFF'}\n```\n\nThe model correctly predicts the image as anomalous (```missing_limbs```) with a confidence score of 0.9996867775917053. It tells us the mask of the anomaly tag ```missing_limbs``` and the percentage area. The response also contains bitmap data you can decode of what it found.\n\nDownload and open the file ```blended.png```, which looks like the following image. Note the area highlighted with the defect around the legs.\n\n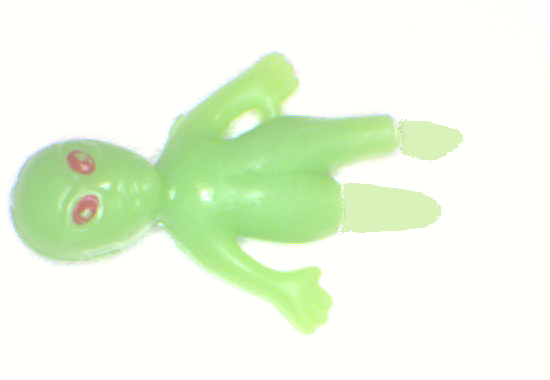\n\n### **Customer stories**\n\nWith AWS IoT Greengrass and Lookout for Vision, you can now automate visual inspection with computer vision for processes like quality control and defect assessment—all on the edge and in real time. You can proactively identify problems such as parts damage (like dents, scratches, or poor welding), missing product components, or defects with repeating patterns on the production line itself—saving you time and money. Customers like Tyson and Baxter are discovering the power of Lookout for Vision to increase quality and reduce operational costs by automating visual inspection.\n\n*“Operational excellence is a key priority at Tyson Foods. Predictive maintenance is an essential asset for achieving this objective by continuously improving overall equipment effectiveness (OEE). In 2021, Tyson Foods launched a machine learning-based computer vision project to identify failing product carriers during production to prevent them from impacting team member safety, operations, or product quality. The models trained using Amazon Lookout for Vision performed well. The pin detection model achieved 95% accuracy across both classes. The Amazon Lookout for Vision model was tuned to perform at 99.1% accuracy for failing pin detection. By far the most exciting result of this project was the speedup in development time. Although this project utilizes two models and a more complex application code, it took 12% less developer time to complete. This project for monitoring the condition of the product carriers at Tyson Foods was completed in record time using AWS managed services such as Amazon Lookout for Vision.”\n\n—Audrey Timmerman, Sr Applications Developer, Tyson Foods.\n\n“Latency and inferencing speed is critical for real-time assessment and critical quality checks of our manufacturing processes. Amazon Lookout for Vision edge on a CPU device gives us the ability to achieve this on production-grade equipment, enabling us to deliver cost-effective AI vision solutions at scale.”\n\n—A.K. Karan, Global Senior Director – Digital Transformation, Integrated Supply Chain, Baxter International Inc.*\n\n### **Cleanup**\n\nComplete the following steps to remove the assets you created from your account and avoid any ongoing billing:\n\n1. On the Lookout for Vision console, navigate to your project.\n2. On the **Actions **menu, delete your datasets.\n\n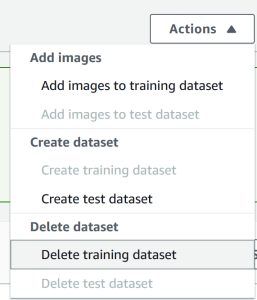\n\n3. Delete your models.\n\n\n\n4. On the Amazon S3 console, empty the buckets you created, then delete the buckets.\n5. On the Amazon EC2 console, delete the instance you started to run AWS IoT Greengrass.\n6. On the AWS IoT Greengrass console, choose Deployments in the navigation pane.\n7. Delete your component versions.\n\n\n\n8. On the AWS IoT Greengrass console, delete the AWS IoT things, groups, and devices.\n\n### **Conclusion**\n\nIn this post, we described a typical scenario for industrial defect detection at the edge using defect localization and deployed to a CPU-only device. We walked through the key components of the cloud and edge lifecycle with an end-to-end example using Lookout for Vision and AWS IoT Greengrass. With Lookout for Vision, we trained an anomaly detection model in the cloud using the [toy alien dataset](https://github.com/aws-samples/ds-peoplecounter-l4v-workshop/tree/main/aliens-dataset), compiled the model to a target architecture, and packaged the model as an AWS IoT Greengrass component. With AWS IoT Greengrass, we deployed the model to an edge device. We demonstrated a Python-based sample application that sources toy alien images from the edge device local file system, runs the inferences on the Lookout for Vision model at the edge using the gRPC interface, and sends the inference data to an MQTT topic in the AWS Cloud.\n\nIn a future post, we will show how to run inferences on a real-time stream of images using a GStreamer media pipeline.\n\nStart your journey towards industrial anomaly detection and identification by visiting the [Amazon Lookout for Vision](https://aws.amazon.com/lookout-for-vision/resources/) and [AWS IoT Greengrass](https://aws.amazon.com/greengrass/resources/) resource pages.\n\n### **About the authors**\n\n\n\n**Manish Talreja** is a Senior Industrial ML Practice Manager with AWS Professional Services. He helps AWS customers achieve their business goals by architecting and building innovative solutions that use AWS ML and IoT services on the AWS Cloud.\n\n\n\n**Ryan Vanderwerf** is a partner solutions architect at Amazon Web Services. He previously provided Java virtual machine-focused consulting and project development as a software engineer at OCI on the Grails and Micronaut team. He was chief architect/director of products at ReachForce, with a focus on software and system architecture for AWS Cloud SaaS solutions for marketing data management. Ryan has built several SaaS solutions in several domains such as financial, media, telecom, and e-learning companies since 1996.\n\n\n\n**Prakash Krishnan** is a Senior Software Development Manager at Amazon Web Services. He leads the engineering teams that are building large-scale distributed systems to apply fast, efficient, and highly scalable algorithms to deep learning-based image and video recognition problems.\n\n\n","render":"<p>Automated defect detection using computer vision helps improve quality and lower the cost of inspection. Defect detection involves identifying the presence of a defect, classifying types of defects, and identifying where the defects are located. Many manufacturing processes require detection at a low latency, with limited compute resources, and with limited connectivity.</p>\n<p><a href=\"https://aws.amazon.com/lookout-for-vision/\" target=\"_blank\">Amazon Lookout for Vision</a> is a machine learning (ML) service that helps spot product defects using computer vision to automate the quality inspection process in your manufacturing lines, with no ML expertise required. Lookout for Vision now includes the ability to provide the location and type of anomalies using semantic segmentation ML models. These customized ML models can either be deployed to the AWS Cloud using <a href=\"https://aws.amazon.com/lookout-for-vision/resources/\" target=\"_blank\">cloud APIs</a> or to custom edge hardware using <a href=\"https://aws.amazon.com/greengrass/\" target=\"_blank\">AWS IoT Greengrass</a>. Lookout for Vision now supports inference on an x86 compute platform running Linux with or without an NVIDIA GPU accelerator and on any NVIDIA Jetson-based edge appliance. This flexibility allows detection of defects on existing or new hardware.</p>\n<p>In this post, we show you how to detect defective parts using Lookout for Vision ML models running on an edge appliance, which we simulate using an <a href=\"http://aws.amazon.com/ec2\" target=\"_blank\">Amazon Elastic Compute Cloud</a> (Amazon EC2) instance. We walk through training the new semantic segmentation models, exporting them as AWS IoT Greengrass components, and running inference in CPU-only mode with Python example code.</p>\n<h3><a id=\"Solution_overview_6\"></a><strong>Solution overview</strong></h3>\n<p>In this post, we use a set of pictures of <a href=\"https://github.com/aws-samples/amazon-lookout-for-vision/tree/main/aliens-dataset\" target=\"_blank\">toy aliens</a> composed of normal and defective images such as missing limbs, eyes, or other parts. We train a Lookout for Vision model in the cloud to identify defective toy aliens. We compile the model to a target X86 CPU, package the trained Lookout for Vision model as an AWS IoT Greengrass component, and deploy the model to an EC2 instance without a GPU using the AWS IoT Greengrass console. Finally, we demonstrate a Python-based sample application running on the EC2 (C5a.2xl) instance that sources the toy alien images from the edge device file system, runs the inference on the Lookout for Vision model using the <a href=\"https://grpc.io/docs/what-is-grpc/introduction/\" target=\"_blank\">gRPC</a> interface, and sends the inference data to an <a href=\"https://docs.aws.amazon.com/iot/latest/developerguide/mqtt.html\" target=\"_blank\">MQTT</a> topic in the AWS Cloud. The scripts outputs an image that includes the color and location of the defects on the anomalous image.</p>\n<p>The following diagram illustrates the solution architecture. It’s important to note for each defect type you want to detect in localization, you must have 10 marked anomaly images in training and 10 in test data, for a total of 20 images of that type. For this post, we search for missing limbs on the toy.</p>\n<p><img src=\"https://dev-media.amazoncloud.cn/e129b1e4e85648fe9e2b8e4e6bc95d70_image.png\" alt=\"image.png\" /></p>\n<p>The solution has the following workflow:</p>\n<ol>\n<li>Upload a training dataset and a test dataset to <a href=\"http://aws.amazon.com/s3\" target=\"_blank\">Amazon Simple Storage Service</a> (Amazon S3).</li>\n<li>Use the new Lookout for Vision UI to add an anomaly type and mark where those anomalies are in the training and test images.</li>\n<li>Train a Lookout for Vision model in the cloud.</li>\n<li>Compile the model to the target architecture (X86) and deploy the model to the EC2 (C5a.2xl) instance using the AWS IoT Greengrass console.</li>\n<li>Source images from local disk.</li>\n<li>Run inferences on the deployed model via the gRPC interface and retrieve an image of anomaly masks overlaid on the original image.</li>\n<li>Post the inference results to an MQTT client running on the edge instance.</li>\n<li>Receive the MQTT message on a topic in <a href=\"https://aws.amazon.com/iot-core/\" target=\"_blank\">AWS IoT Core</a> in the AWS Cloud for further monitoring and visualization.<br />\nSteps 5, 6, and 7 are coordinated with the sample Python application.</li>\n</ol>\n<h3><a id=\"Prerequisites_26\"></a><strong>Prerequisites</strong></h3>\n<p>Before you get started, complete the following prerequisites. For this post, we use an EC2 c5.2xl instance and install AWS IoT Greengrass V2 on it to try out the new features. If you want to run on an NVIDIA Jetson, follow the steps in our previous post, <a href=\"https://aws.amazon.com/blogs/machine-learning/amazon-lookout-for-vision-now-supports-visual-inspection-of-product-defects-at-the-edge/\" target=\"_blank\">Amazon Lookout for Vision now supports visual inspection of product defects at the edge</a>.</p>\n<ol>\n<li><a href=\"https://aws.amazon.com/premiumsupport/knowledge-center/create-and-activate-aws-account/\" target=\"_blank\">Create an AWS account</a>.</li>\n<li>Start an EC2 instance that we can install AWS IoT Greengrass on and use the new CPU-only inference mode.You can also use an Intel X86 64 bit machine with 8 gigabytes of ram or more (we use a c5a.2xl, but anything with greater than 8 gigabytes on x86 platform should work) running Ubuntu 20.04.</li>\n<li>Install AWS IoT Greengrass V2:</li>\n</ol>\n<pre><code class=\"lang-\">git clone https://github.com/aws-samples/amazon-lookout-for-vision.git\ncd edge\n# be sure to edit the installation script to match your region, also adjust any device names and groups!\nvi install_greengrass.sh\n</code></pre>\n<ol start=\"4\">\n<li>Install the needed system and Python 3 dependencies (Ubuntu 20.04):</li>\n</ol>\n<pre><code class=\"lang-\"># install Ubuntu dependencies on the EC2 instance\n./install-ec2-ubuntu-deps.sh\npip3 install -r requirements.txt\n# Replace ENDPOINT variable in sample-client-file-mqtt.py with the value on the AWS console AWS IoT->Things->l4JetsonXavierNX->Interact. \n# Under HTTPS. It will be of type <name>-ats.iot.<region>.amazon.com \n</code></pre>\n<h3><a id=\"Upload_the_dataset_and_train_the_model_51\"></a><strong>Upload the dataset and train the model</strong></h3>\n<p>We use the <a href=\"https://github.com/aws-samples/amazon-lookout-for-vision/tree/main/aliens-dataset\" target=\"_blank\">toy aliens dataset</a> to demonstrate the solution. The dataset contains normal and anomalous images. Here are a few sample images from the dataset.</p>\n<p>The following image shows a normal toy alien.</p>\n<p><img src=\"https://dev-media.amazoncloud.cn/b127b96adb7343cb924fa1d8ee67cf86_image.png\" alt=\"image.png\" /></p>\n<p>The following image shows a toy alien missing a leg.</p>\n<p><img src=\"https://dev-media.amazoncloud.cn/320a0b805e9d4a69a1ff77cfcb818672_image.png\" alt=\"image.png\" /></p>\n<p>The following image shows a toy alien missing a head.</p>\n<p><img src=\"https://dev-media.amazoncloud.cn/6b2c3dd4d4bd4baa9a1c71ea1d333be8_image.png\" alt=\"image.png\" /></p>\n<p>In this post, we look for missing limbs. We use the new user interface to draw a mask around the defects in our training and tests data. This will tell the semantic segmentation models how to identify this type of defect.</p>\n<ol>\n<li>Start by uploading your dataset, either via Amazon S3 or from your computer.</li>\n<li>Sort them into folders titled <code>normal</code> and <code>anomaly</code>.</li>\n<li>When creating your dataset, select Automatically attach labels to images based on the folder name.This allows us to sort out the anomalous images later and draw in the areas to be labeled with a defect.</li>\n</ol>\n<p><img src=\"https://dev-media.amazoncloud.cn/4769d66a8228482e942acfd98f697c36_image.png\" alt=\"image.png\" /></p>\n<ol start=\"4\">\n<li>Try to hold back some images for testing later of both <code>normal</code> and <code>anomaly</code>.</li>\n<li>After all the images have been added to the dataset, choose <strong>Add anomaly labels</strong>.</li>\n<li>Begin labeling data by choosing <strong>Start labeling</strong>.</li>\n<li>To speed up the process, you can select multiple images and classify them as <code>Normal</code> or <code>Anomaly</code>.</li>\n</ol>\n<p><img src=\"https://dev-media.amazoncloud.cn/4007bcc435ad4d309b863ff18c1bc20f_image.png\" alt=\"image.png\" /></p>\n<p>If you want to highlight anomalies in addition to classifying them, you need to highlight where the anomalies are located.</p>\n<ol start=\"8\">\n<li>Choose the image you want to annotate.</li>\n<li>Use the drawing tools to show the area where part of the subject is missing, or draw a mask over the defect.</li>\n<li>Choose <strong>Submit and close</strong> to keep these changes.</li>\n</ol>\n<p><img src=\"https://dev-media.amazoncloud.cn/b096d99302b0423891c1da329e61e91b_image.png\" alt=\"image.png\" /></p>\n<ol start=\"11\">\n<li>Repeat this process for all your images.</li>\n<li>When you’re done, choose <strong>Save</strong> to persist your changes. Now you’re ready to train your model.</li>\n</ol>\n<p><img src=\"https://dev-media.amazoncloud.cn/f4429d1984c048f89fa8b3457027ee35_image.png\" alt=\"image.png\" /></p>\n<ol start=\"13\">\n<li>Choose <strong>Train model</strong>.</li>\n</ol>\n<p>After you complete these steps, you can navigate to the project and the <strong>Models</strong> page to check the performance of the trained model. You can start the process of exporting the model to the target edge device any time after the model is trained.</p>\n<h3><a id=\"Retrain_the_model_with_corrected_images_99\"></a><strong>Retrain the model with corrected images</strong></h3>\n<p>Sometimes the anomaly tagging may not be quite correct. You have the chance to help your model learn your anomalies better. For example, the following image is identified as an anomaly, but doesn’t show the <code>missing_limbs</code> tag.</p>\n<p><img src=\"https://dev-media.amazoncloud.cn/ae04607e66164deda75fc60fdcab7345_image.png\" alt=\"image.png\" /></p>\n<p>Let’s open the editor and fix this.</p>\n<p>Go through any images you find like this. If you find it’s tagged an anomaly incorrectly, you can use the eraser tool to remove the incorrect tag.</p>\n<p><img src=\"https://dev-media.amazoncloud.cn/03cbd0016c0c4fbfbf522345f17621f5_image.png\" alt=\"image.png\" /></p>\n<p>You can now train your model again and achieve better accuracy.</p>\n<h3><a id=\"Compile_and_package_the_model_as_an_AWS_IoT_Greengrass_component_113\"></a><strong>Compile and package the model as an AWS IoT Greengrass component</strong></h3>\n<p>In this section, we walk through the steps to compile the toy alien model to our target edge device and package the model as an AWS IoT Greengrass component.</p>\n<ol>\n<li>On the Lookout for Vision console, choose your project.</li>\n<li>In the navigation pane, choose <strong>Edge model packages</strong>.</li>\n<li>Choose <strong>Create model packaging job</strong>.</li>\n<li>For <strong>Job name</strong>, enter a name.</li>\n<li>For <strong>Job description</strong>, enter an optional description.</li>\n<li>Choose <strong>Browse models</strong>.</li>\n<li>Select the model version (the toy alien model built in the previous section).</li>\n<li>Choose <strong>Choose</strong>.</li>\n</ol>\n<p><img src=\"https://dev-media.amazoncloud.cn/0ee4325e0b5740edaf4db99ff3ed067c_image.png\" alt=\"image.png\" /></p>\n<ol start=\"9\">\n<li>If you’re running this on Amazon EC2 or an X86-64 device, select <strong>Target platform</strong> and choose <strong>Linux, X86</strong>, and <strong>CPU</strong>.<br />\nIf using CPU, you can leave the compiler options empty if you’re not sure and don’t have an NVIDIA GPU. If you have an Intel-based platform that supports AVX512, you can add these compiler options to optimize for better performance: <code>{"mcpu": "skylake-avx512"}</code>.</li>\n</ol>\n<p><img src=\"https://dev-media.amazoncloud.cn/e19f71f8b94b40cdb47819867d73ad10_image.png\" alt=\"image.png\" /></p>\n<p>You can see your job name and status showing as <code>In progress</code>. The model packaging job may take a few minutes to complete.When the model packaging job is complete, the status shows as <code>Success</code>.<br />\n10. Choose your job name (in our case it’s <code>aliensblogcpux86</code>) to see the job details.</p>\n<p><img src=\"https://dev-media.amazoncloud.cn/327b649b134b4d9aae5335423b6eca1f_image.png\" alt=\"image.png\" /></p>\n<ol start=\"11\">\n<li>Choose <strong>Create model packaging job</strong>.</li>\n</ol>\n<p><img src=\"https://dev-media.amazoncloud.cn/2f7d2d62f89a459093c4383bd92a0d52_image.png\" alt=\"image.png\" /></p>\n<ol start=\"12\">\n<li>Enter the details for <strong>Component name</strong>, <strong>Component description</strong> (optional), <strong>Component version</strong>, and <strong>Component location</strong>.Lookout for Vision stores the component recipes and artifacts in this Amazon S3 location.</li>\n<li>Choose <strong>Continue deployment in Greengrass</strong> to deploy the component to the target edge device.</li>\n</ol>\n<p><img src=\"https://dev-media.amazoncloud.cn/dc20b43317734ee8849051549950e017_image.png\" alt=\"image.png\" /></p>\n<p>The AWS IoT Greengrass component and model artifacts have been created in your AWS account.</p>\n<h3><a id=\"Deploy_the_model_149\"></a><strong>Deploy the model</strong></h3>\n<p>Be sure you have AWS IoT Greengrass V2 installed on your target device for your account before you continue. For instructions, refer to <a href=\"https://docs.aws.amazon.com/greengrass/v2/developerguide/install-greengrass-core-v2.html\" target=\"_blank\">Install the AWS IoT Greengrass Core software</a>.</p>\n<p>In this section, we walk through the steps to deploy the toy alien model to the edge device using the AWS IoT Greengrass console.</p>\n<p><img src=\"https://dev-media.amazoncloud.cn/d8fda72c0a164606b0458ef55e193476_image.png\" alt=\"image.png\" /></p>\n<ol>\n<li>On the AWS IoT Greengrass console, navigate to your edge device.</li>\n<li>Choose **Deploy **to initiate the deployment steps.</li>\n<li>Select <strong>Core device</strong> (because the deployment is to a single device) and enter a name for <strong>Target name</strong>.The target name is the same name you used to name the core device during the AWS IoT Greengrass V2 installation process.</li>\n<li>Choose your component. In our case, the component name is <code>aliensblogcpux86</code>, which contains the toy alien model.</li>\n<li>Choose <strong>Next</strong>.</li>\n<li>Configure the component (optional).</li>\n<li>Choose <strong>Next</strong>.</li>\n<li>Expand <strong>Deployment policies</strong>.</li>\n<li>For <strong>Component update policy</strong>, select <strong>Notify components</strong>.This allows the already deployed component (a prior version of the component) to defer an update until you’re ready to update.</li>\n<li>For <strong>Failure handling policy</strong>, select <strong>Don’t roll back</strong>.In case of a failure, this option allows us to investigate the errors in deployment.</li>\n<li>Choose <strong>Next</strong>.</li>\n<li>Review the list of components that will be deployed on the target (edge) device.</li>\n<li>Choose <strong>Next</strong>.You should see the message ```Deployment successfully created````.</li>\n<li>To validate the model deployment was successful, run the following command on your edge device:</li>\n</ol>\n<pre><code class=\"lang-\">sudo /greengrass/v2/bin/greengrass-cli component list\n</code></pre>\n<p>You should see a similar output running the <code>aliensblogcpux86</code> lifecycle startup script:</p>\n<p>Components currently running in Greengrass:</p>\n<pre><code class=\"lang-\">Components currently running in Greengrass:\n \nComponent Name: aws.iot.lookoutvision.EdgeAgent\n Version: 0.1.34\n State: RUNNING\n Configuration: {"Socket":"unix:///tmp/aws.iot.lookoutvision.EdgeAgent.sock"}\n Component Name: aliensblogcpux86\n Version: 1.0.0\n State: RUNNING\n Configuration: {"Autostart":false}\n</code></pre>\n<h3><a id=\"Run_inferences_on_the_model_193\"></a><strong>Run inferences on the model</strong></h3>\n<p><strong>Note</strong>: If you are running Greengrass as another user than what you are logged in as, you will need to change permissions of the file <code>/tmp/aws.iot.lookoutvision.EdgeAgent.sock</code>:</p>\n<pre><code class=\"lang-\">chmod 666 /tmp/aws.iot.lookoutvision.EdgeAgent.sock\n</code></pre>\n<p>We’re now ready to run inferences on the model. On your edge device, run the following command to load the model (replace <modelName> with the model name used in your component):</p>\n<pre><code class=\"lang-\"># run command to load the model# This will load the model into running state pass\n# the name of the model component as a parameter.\npython3 warmup-model.py <modelName>\n</code></pre>\n<p>To generate inferences, run the following command with the source file name (replace <path/to/images> with the path and file name of the image to check and replace <modelName> with the model name used for your component):</p>\n<pre><code class=\"lang-\">python3 sample-client-file-mqtt.py </path/to/images> <modelName>\n\nstart client ['sample-client-file.py', 'aliens-dataset/anomaly/1.png', 'aliensblogcpux86']\nchannel set\nshape=(380, 550, 3)\nImage is anomalous, (90.05860090255737 % confidence) contains defects with total area over .1%: {'missing_limbs': '#FFFFFF'}\n</code></pre>\n<p>The model correctly predicts the image as anomalous (<code>missing_limbs</code>) with a confidence score of 0.9996867775917053. It tells us the mask of the anomaly tag <code>missing_limbs</code> and the percentage area. The response also contains bitmap data you can decode of what it found.</p>\n<p>Download and open the file <code>blended.png</code>, which looks like the following image. Note the area highlighted with the defect around the legs.</p>\n<p><img src=\"https://dev-media.amazoncloud.cn/47f1369efd9e487996753e471e42c2d3_image.png\" alt=\"image.png\" /></p>\n<h3><a id=\"Customer_stories_226\"></a><strong>Customer stories</strong></h3>\n<p>With AWS IoT Greengrass and Lookout for Vision, you can now automate visual inspection with computer vision for processes like quality control and defect assessment—all on the edge and in real time. You can proactively identify problems such as parts damage (like dents, scratches, or poor welding), missing product components, or defects with repeating patterns on the production line itself—saving you time and money. Customers like Tyson and Baxter are discovering the power of Lookout for Vision to increase quality and reduce operational costs by automating visual inspection.</p>\n<p>*“Operational excellence is a key priority at Tyson Foods. Predictive maintenance is an essential asset for achieving this objective by continuously improving overall equipment effectiveness (OEE). In 2021, Tyson Foods launched a machine learning-based computer vision project to identify failing product carriers during production to prevent them from impacting team member safety, operations, or product quality. The models trained using Amazon Lookout for Vision performed well. The pin detection model achieved 95% accuracy across both classes. The Amazon Lookout for Vision model was tuned to perform at 99.1% accuracy for failing pin detection. By far the most exciting result of this project was the speedup in development time. Although this project utilizes two models and a more complex application code, it took 12% less developer time to complete. This project for monitoring the condition of the product carriers at Tyson Foods was completed in record time using AWS managed services such as Amazon Lookout for Vision.”</p>\n<p>—Audrey Timmerman, Sr Applications Developer, Tyson Foods.</p>\n<p>“Latency and inferencing speed is critical for real-time assessment and critical quality checks of our manufacturing processes. Amazon Lookout for Vision edge on a CPU device gives us the ability to achieve this on production-grade equipment, enabling us to deliver cost-effective AI vision solutions at scale.”</p>\n<p>—A.K. Karan, Global Senior Director – Digital Transformation, Integrated Supply Chain, Baxter International Inc.*</p>\n<h3><a id=\"Cleanup_238\"></a><strong>Cleanup</strong></h3>\n<p>Complete the following steps to remove the assets you created from your account and avoid any ongoing billing:</p>\n<ol>\n<li>On the Lookout for Vision console, navigate to your project.</li>\n<li>On the **Actions **menu, delete your datasets.</li>\n</ol>\n<p><img src=\"https://dev-media.amazoncloud.cn/68963ccf9e064730a6f9c780d7696220_image.png\" alt=\"image.png\" /></p>\n<ol start=\"3\">\n<li>Delete your models.</li>\n</ol>\n<p><img src=\"https://dev-media.amazoncloud.cn/199b04b7c84545248ade05a7b207a354_image.png\" alt=\"image.png\" /></p>\n<ol start=\"4\">\n<li>On the Amazon S3 console, empty the buckets you created, then delete the buckets.</li>\n<li>On the Amazon EC2 console, delete the instance you started to run AWS IoT Greengrass.</li>\n<li>On the AWS IoT Greengrass console, choose Deployments in the navigation pane.</li>\n<li>Delete your component versions.</li>\n</ol>\n<p><img src=\"https://dev-media.amazoncloud.cn/2c25526f2af34790aaeaab4ec30fd13f_image.png\" alt=\"image.png\" /></p>\n<ol start=\"8\">\n<li>On the AWS IoT Greengrass console, delete the AWS IoT things, groups, and devices.</li>\n</ol>\n<h3><a id=\"Conclusion_260\"></a><strong>Conclusion</strong></h3>\n<p>In this post, we described a typical scenario for industrial defect detection at the edge using defect localization and deployed to a CPU-only device. We walked through the key components of the cloud and edge lifecycle with an end-to-end example using Lookout for Vision and AWS IoT Greengrass. With Lookout for Vision, we trained an anomaly detection model in the cloud using the <a href=\"https://github.com/aws-samples/ds-peoplecounter-l4v-workshop/tree/main/aliens-dataset\" target=\"_blank\">toy alien dataset</a>, compiled the model to a target architecture, and packaged the model as an AWS IoT Greengrass component. With AWS IoT Greengrass, we deployed the model to an edge device. We demonstrated a Python-based sample application that sources toy alien images from the edge device local file system, runs the inferences on the Lookout for Vision model at the edge using the gRPC interface, and sends the inference data to an MQTT topic in the AWS Cloud.</p>\n<p>In a future post, we will show how to run inferences on a real-time stream of images using a GStreamer media pipeline.</p>\n<p>Start your journey towards industrial anomaly detection and identification by visiting the <a href=\"https://aws.amazon.com/lookout-for-vision/resources/\" target=\"_blank\">Amazon Lookout for Vision</a> and <a href=\"https://aws.amazon.com/greengrass/resources/\" target=\"_blank\">AWS IoT Greengrass</a> resource pages.</p>\n<h3><a id=\"About_the_authors_268\"></a><strong>About the authors</strong></h3>\n<p><img src=\"https://dev-media.amazoncloud.cn/84e922f016414989bfebd4a211dc94a1_image.png\" alt=\"image.png\" /></p>\n<p><strong>Manish Talreja</strong> is a Senior Industrial ML Practice Manager with AWS Professional Services. He helps AWS customers achieve their business goals by architecting and building innovative solutions that use AWS ML and IoT services on the AWS Cloud.</p>\n<p><img src=\"https://dev-media.amazoncloud.cn/49d27ddce40243b0a5a937c5e1970b7a_image.png\" alt=\"image.png\" /></p>\n<p><strong>Ryan Vanderwerf</strong> is a partner solutions architect at Amazon Web Services. He previously provided Java virtual machine-focused consulting and project development as a software engineer at OCI on the Grails and Micronaut team. He was chief architect/director of products at ReachForce, with a focus on software and system architecture for AWS Cloud SaaS solutions for marketing data management. Ryan has built several SaaS solutions in several domains such as financial, media, telecom, and e-learning companies since 1996.</p>\n<p><img src=\"https://dev-media.amazoncloud.cn/db134d57120b46a0a75d7bce4cf7e49a_image.png\" alt=\"image.png\" /></p>\n<p><strong>Prakash Krishnan</strong> is a Senior Software Development Manager at Amazon Web Services. He leads the engineering teams that are building large-scale distributed systems to apply fast, efficient, and highly scalable algorithms to deep learning-based image and video recognition problems.</p>\n"}
Identify the location of anomalies using Amazon Lookout for Vision at the edge without using a GPU
海外精选

海外精选的内容汇集了全球优质的亚马逊云科技相关技术内容。同时,内容中提到的“AWS”
是 “Amazon Web Services” 的缩写,在此网站不作为商标展示。

 0
0 0
0亚马逊云科技解决方案 基于行业客户应用场景及技术领域的解决方案
联系亚马逊云科技专家
亚马逊云科技解决方案
基于行业客户应用场景及技术领域的解决方案
联系专家

0
目录

 分享
分享 点赞
点赞 收藏
收藏 目录
目录立即注册,开启您的免费套餐
立即关注

亚马逊云开发者
公众号

User Group
公众号

亚马逊云科技
官方小程序
“AWS” 是 “Amazon Web Services” 的缩写,在此网站不作为商标展示。
立即关注
亚马逊云开发者
公众号
User Group
公众号
亚马逊云科技
官方小程序
“AWS” 是 “Amazon Web Services” 的缩写,在此网站不作为商标展示。
关于我们 
更多资源
开发者工具
更多支持
立即关注
亚马逊云开发者
公众号
User Group
公众号
亚马逊云科技
官方小程序
“AWS” 是 “Amazon Web Services” 的缩写,在此网站不作为商标展示。
