{"value":"Customers running their workload on [SAP Adaptive Server Enterprise (Sybase ASE)](https://www.sap.com/products/sybase-ase.html)) databases often ask us how they can modernize their workload as they move to AWS with minimum application changes. Customers who want to keep [Transact-SQL](https://infocenter.sybase.com/help/index.jsp?topic=/com.sybase.infocenter.dc38151.1510/html/iqrefbb/Tsos.htm) (T-SQL) as their preferred database programming language and [Tabular Data Stream](https://infocenter.sybase.com/help/index.jsp?topic=/com.sybase.help.sdk_12.5.1.ctref/html/ctref/X36927.htm) (TDS) as their communication protocol can take advantage of the managed database service [Amazon Relational Database Service (Amazon RDS) for SQL Server. Amazon RDS for SQL Server](https://aws.amazon.com/rds/sqlserver/) makes it easy to set up and operate SQL Server deployments in the cloud by managing time-consuming database administration tasks, including provisioning, backups, software patching, monitoring, and hardware scaling.\n\nIn this post, we examine a use case in which you migrate your Sybase ASE database to Amazon RDS for SQL Server using [SQL Server Migration Assistant (SSMA) for Sybase](https://docs.microsoft.com/en-us/sql/ssma/sybase/sql-server-migration-assistant-for-sybase-sybasetosql?view=sql-server-ver15). We show you how to use SSMA to migrate the schema and data from Sybase ASE to Amazon RDS for SQL Server.\n\n[SQL Server Migration Assistant (SSMA) for Sybase](https://docs.microsoft.com/en-us/sql/ssma/sybase/sql-server-migration-assistant-for-sybase-sybasetosql?view=sql-server-ver15) is a tool for migrating Sybase ASE databases to Microsoft SQL Server. You can use SSMA for Sybase to convert Sybase ASE database objects to SQL Server database objects, create those objects in Amazon RDS for SQL Server, and then migrate data from Sybase ASE to Amazon RDS for SQL Server.\n\nAs of this writing, [AWS Schema Conversion Tool](https://aws.amazon.com/dms/schema-conversion-tool) (AWS SCT) does not have the support to use Sybase ASE as source and Amazon RDS for SQL Server as target. If you’re an application owner or migration specialist working on migrating Sybase ASE to Amazon RDS for SQL Server, you may have wondered which tool you can use to convert the schema and migrate the data.\n\n#### **Solution overview**\nThe SSMA-based migration solution has the following major components:\n\n- [SQL Server Migration Assistant (SSMA) for Sybase](https://www.microsoft.com/en-us/download/details.aspx?id=54256) – SSMA is a free tool from Microsoft, used to migrate from Sybase ASE to Amazon RDS for SQL Server\n- [Amazon Elastic Compute Cloud (Amazon EC2)](https://aws.amazon.com/ec2/) – A Microsoft Windows Server 2016 Base AMI is used to support the SSMA tool\n- [AWS Direct Connect](https://aws.amazon.com/directconnect/) – Direct Connect is recommended to establish a dedicated network connection between your on-premises data centers and AWS\n\nThe following diagram illustrates the solution architecture.\n\n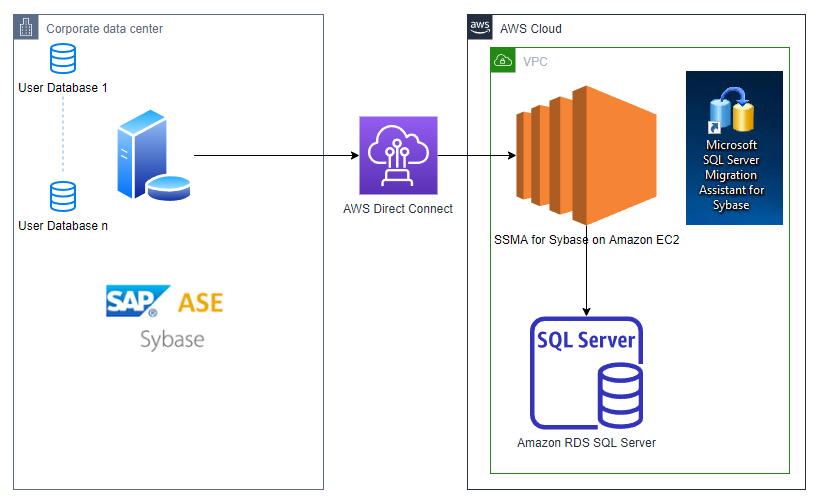\n\nFor our use case, we take the scenario in which our Sybase ASE database is running on Amazon EC2, and see how we migrate the user databases to Amazon RDS for SQL Server using SSMA for Sybase. The following diagram illustrates our architecture.\n\n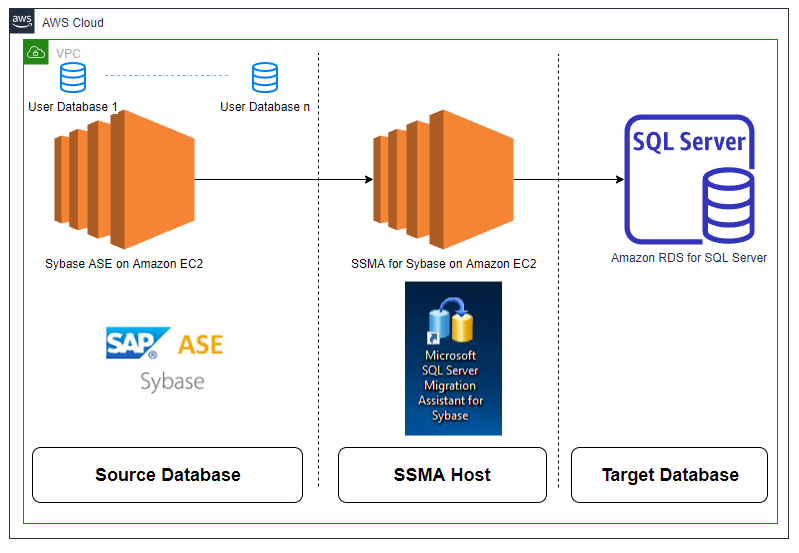\n\nThis solution has the following characteristics:\n\n- Sybase ASE is installed and configured to run on an Amazon EC2 server, which we refer to as the source database.\n- SSMA for Sybase tool is installed on an Amazon EC2 Windows Server. The user needs to Remote Desktop to the Amazon EC2 Windows Server to complete the migration. In our solution, we refer to Amazon EC2 Windows Server as the SSMA host.\n- Amazon RDS for SQL Server, which we refer to as the target database.\n\n#### **Prerequisites**\n\nTo test this scenario, you must have the following prerequisites:\n\n- An [AWS account](https://aws.amazon.com/console/)\n- An EC2 instance with Sybase ASE installed and a user database (pubs2) created with tables and procedures\n- The Sybase ASE account, which we use to migrate the schema and data, created and granted the [required permissions](https://docs.microsoft.com/en-us/sql/ssma/sybase/connecting-to-sybase-ase-sybasetosql?view=sql-server-ver15)\n- SSMA for Sybase software [downloaded](https://www.microsoft.com/en-us/download/details.aspx?id=54256) on the SSMA host\n\n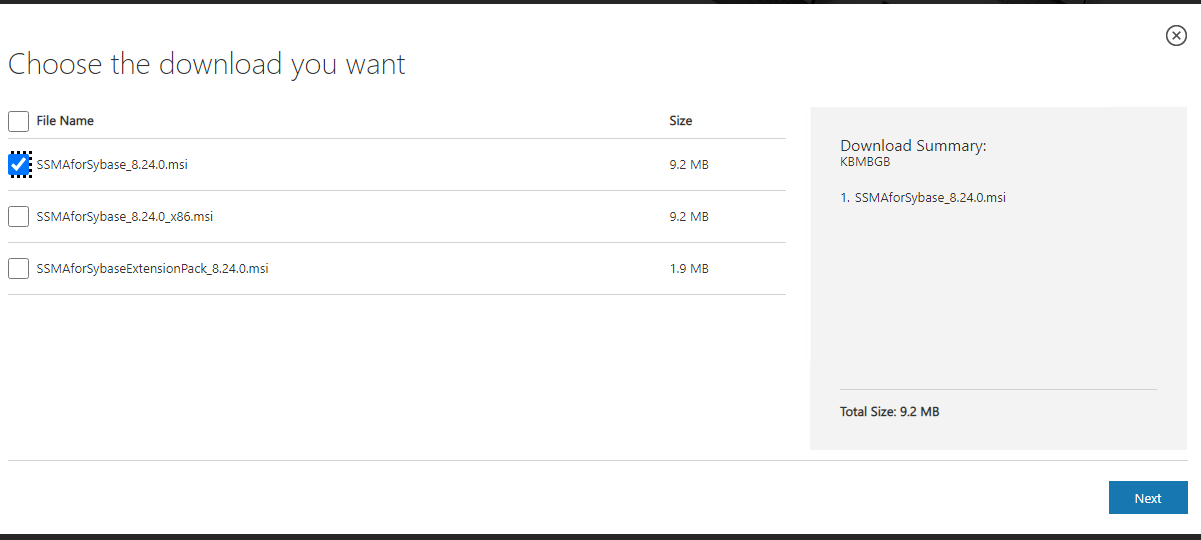\n\n- An RDS for SQL Server instance created, and a user database created using the following command through SSMS:\n```\nCREATE DATABASE pubs2;\n```\n#### **Install SSMA for Sybase**\nTo install SSMA for Sybase, complete the following steps:\n\n1. [Connect](https://docs.aws.amazon.com/AWSEC2/latest/WindowsGuide/connecting_to_windows_instance.html) to the SSMA host using Remote Desktop.\n2. In the **Download** section, choose **Install**.\n3. Choose **Next**.\n\n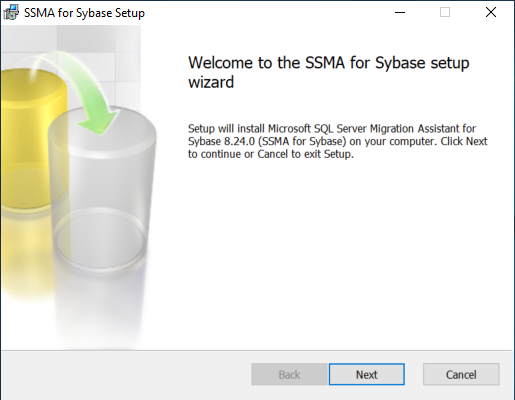\n\nYou can ignore the warnings on missing components. We will install the drivers separately.\n\n4. Choose **Next**.\n\n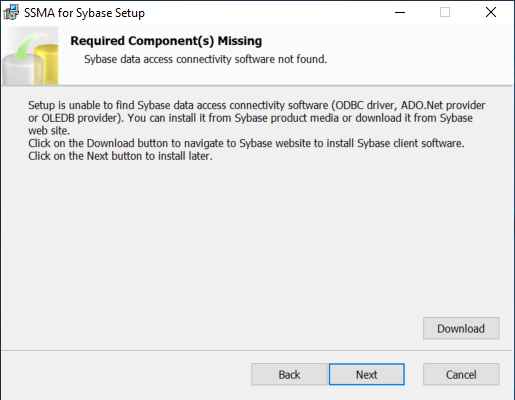\n\n5. Select **I accept the agreemen**t on the **End-User License Agreement** page and choose **Next**.\n6. Choose **Complete** on the **Setup Type** menu.\n7. On the next page, choose **Install**.\n8. On the **SSMA for Sybase Installation Complete** page, choose **Finish** to complete the installation and close the window.\n9. [Download](https://developers.sap.com/trials-downloads.html) and install the latest ADO.NET Data Provider for Windows on the SSMA host.\n\n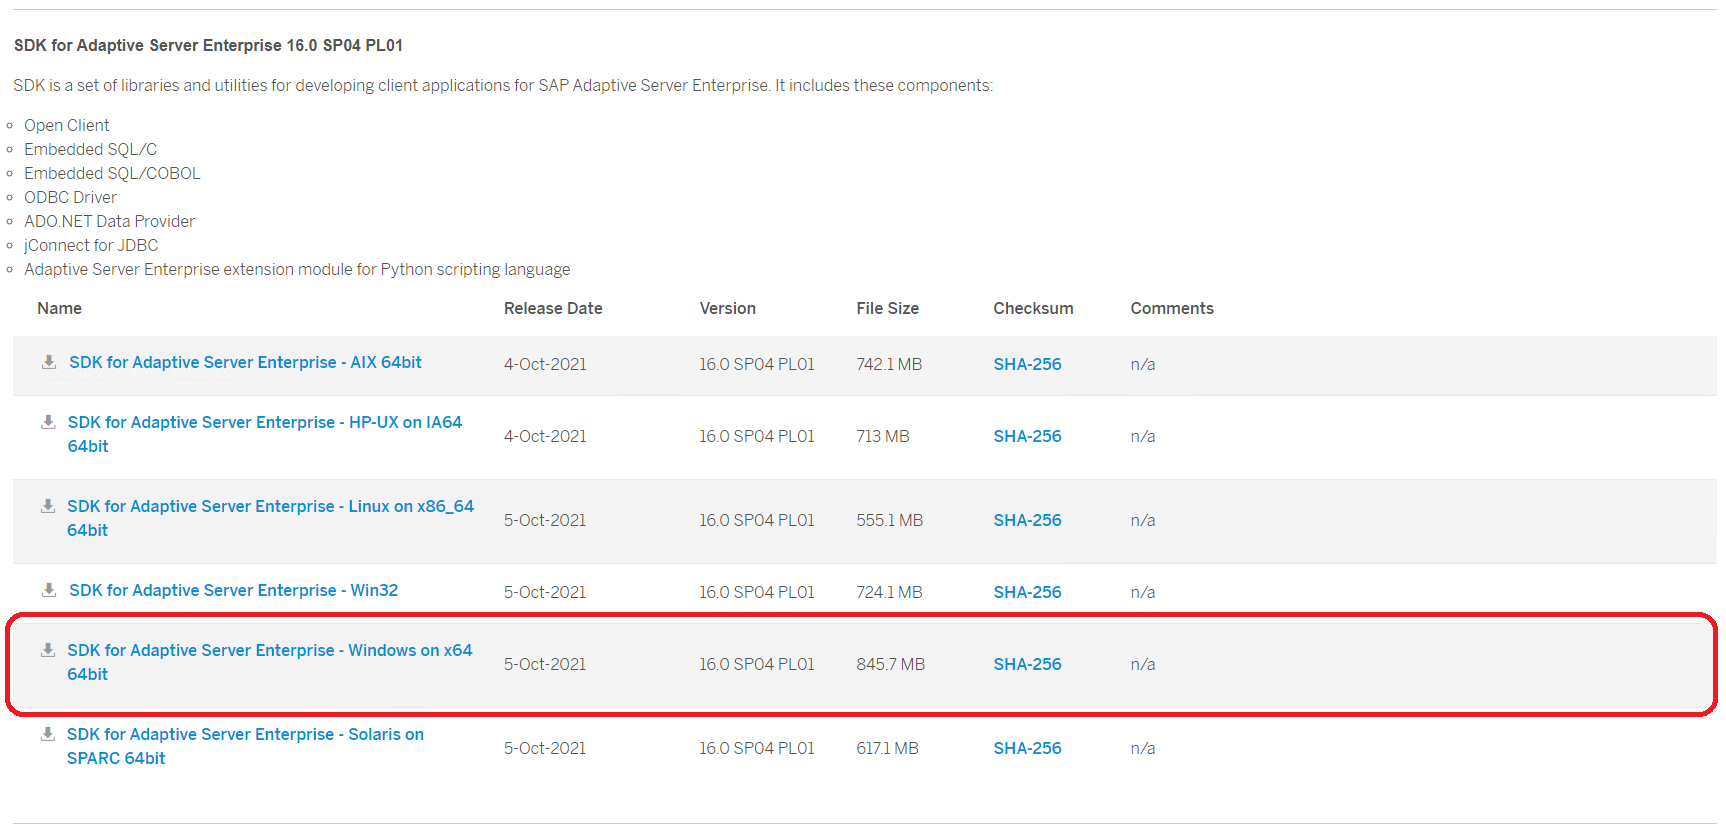\n\n#### **Migrate the schema**\n\nTo migrate the schema from Sybase ASE to Amazon RDS for SQL Server, complete the following steps:\n\n1. [Connect](https://docs.aws.amazon.com/AWSEC2/latest/WindowsGuide/connecting_to_windows_instance.html) to the SSMA host using Remote Desktop.\n2. On the Windows **Start** menu, navigate to Microsoft SQL Server Migration Assistant for Sybase and open it.\n3. On the **File** menu, open a new project and enter a name and location of your choice.\n4. For **Migrate To**, choose the same engine version you picked for Amazon RDS for SQL Server.\n5. Choose **OK**.\n\n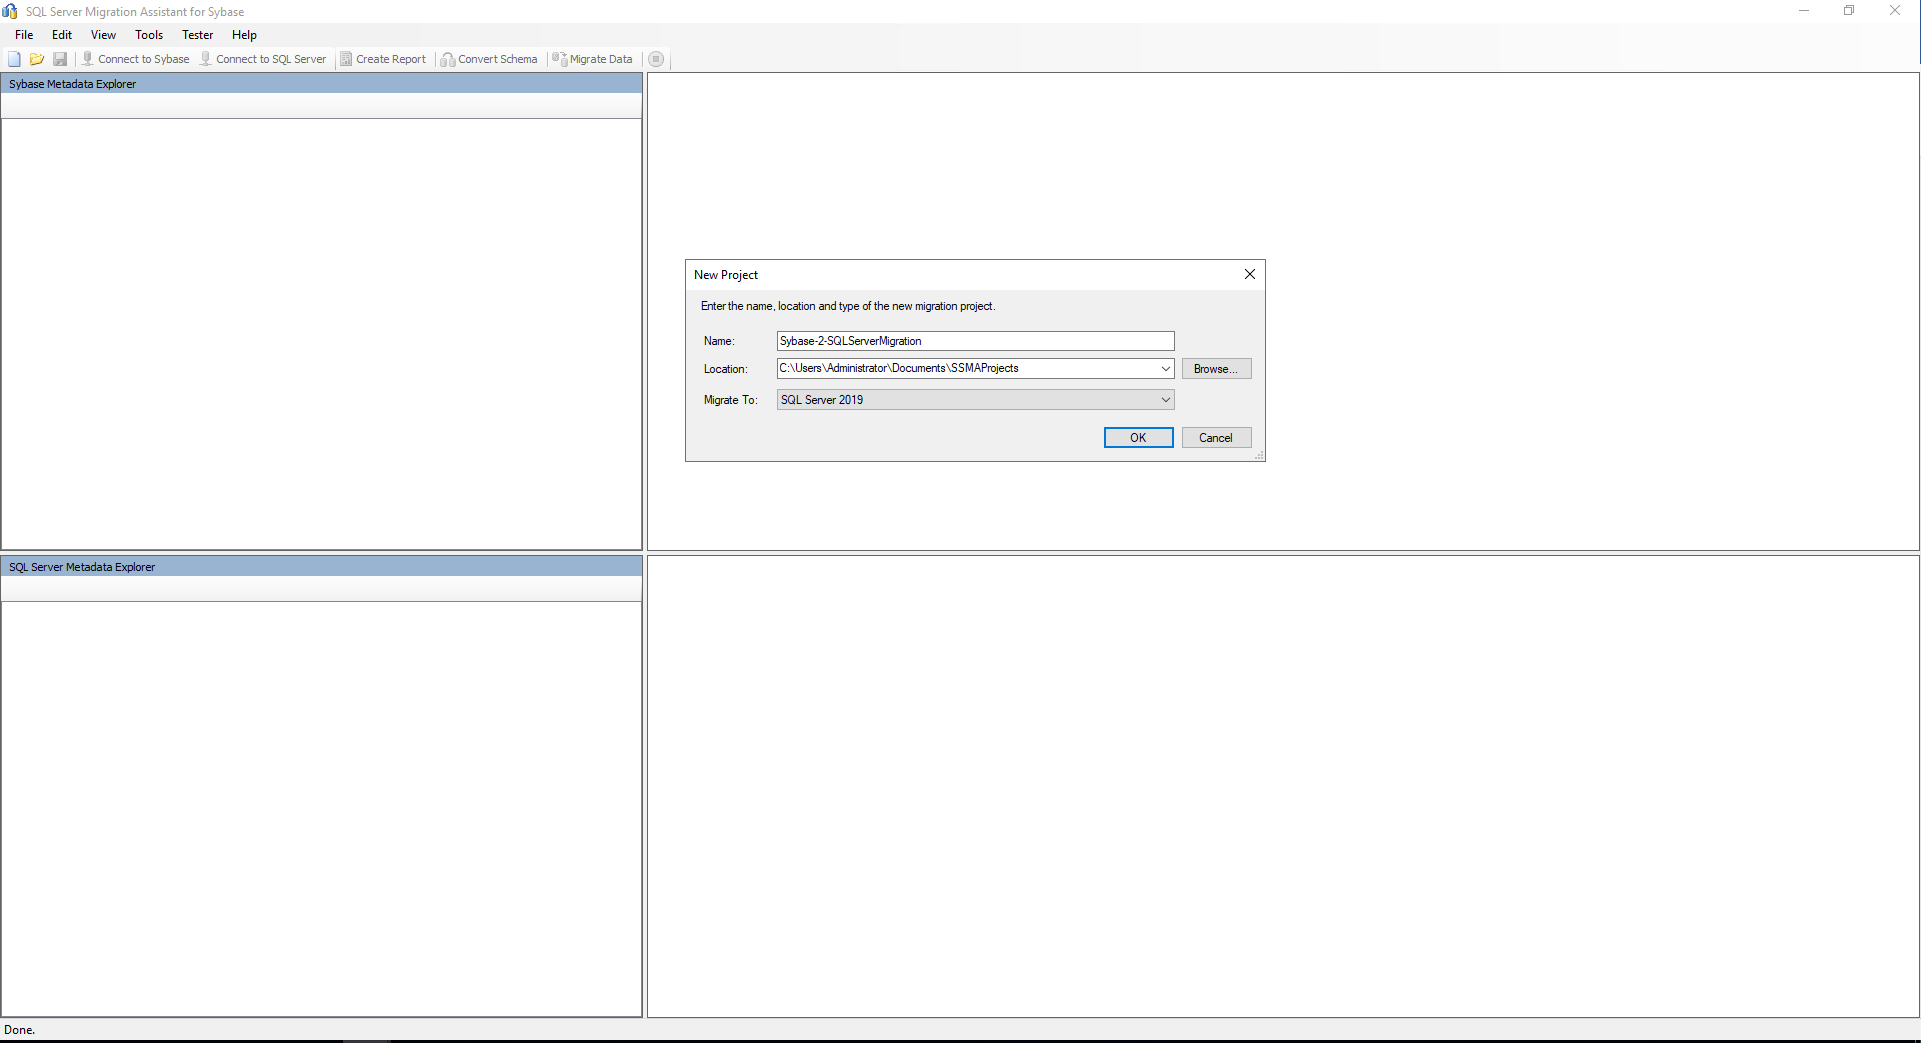\n\n6. On the **Provider** menu, choose **Connect to Sybase**.\n7. Choose **ADO.NET Provider**.\n8. Enter a server name, server port, user name, and password.\n9. Choose **Connect**.\n\n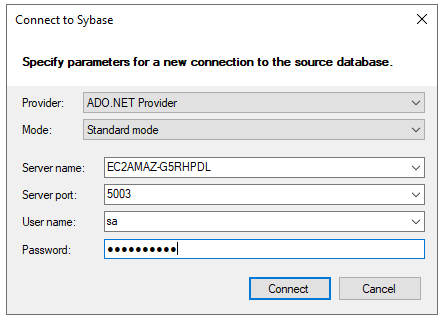\n\n10. Select the databases you want to migrate.\nThe databases ```master``` and ```subsystemprocs``` are selected by default and can’t be deselected.\n11. Choose **OK**.\n\n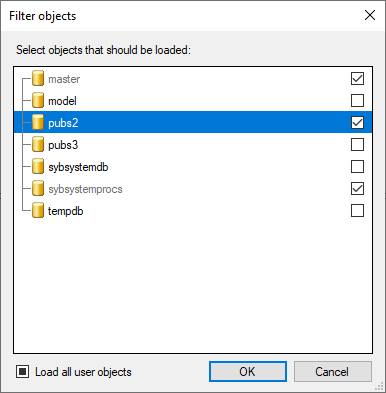\n\n12. Choose **Connect to SQL Server**.\n13. For **Server name**, enter your RDS for SQL Server endpoint name.\n14. Enter a server port and database.\n15. For **Authentication**, choose **SQL Server Authentication**.\nFor this post, we use SQL Server authentication, but SSMA also supports Windows Authentication. If you created the RDS for SQL Server instance with [Microsoft SQL Server Windows Authentication](https://docs.aws.amazon.com/AmazonRDS/latest/UserGuide/USER_SQLServerWinAuth.html) enabled using the [AWS Managed Microsoft AD](https://docs.aws.amazon.com/directoryservice/latest/admin-guide/directory_microsoft_ad.html) option, you can choose **Windows Authentication** on the **Authentication** menu.\n16. Enter a user name and password.\n17. Select **Encrypt Connection** and **Trust Server Certificate**.\n18. Choose **Connect**.\n\n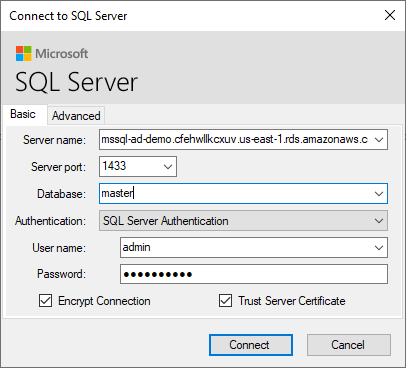\n\nNow you can see the **panels Sybase Metadata Explorer** and **SQL Server Metadata Explorer**.\n\n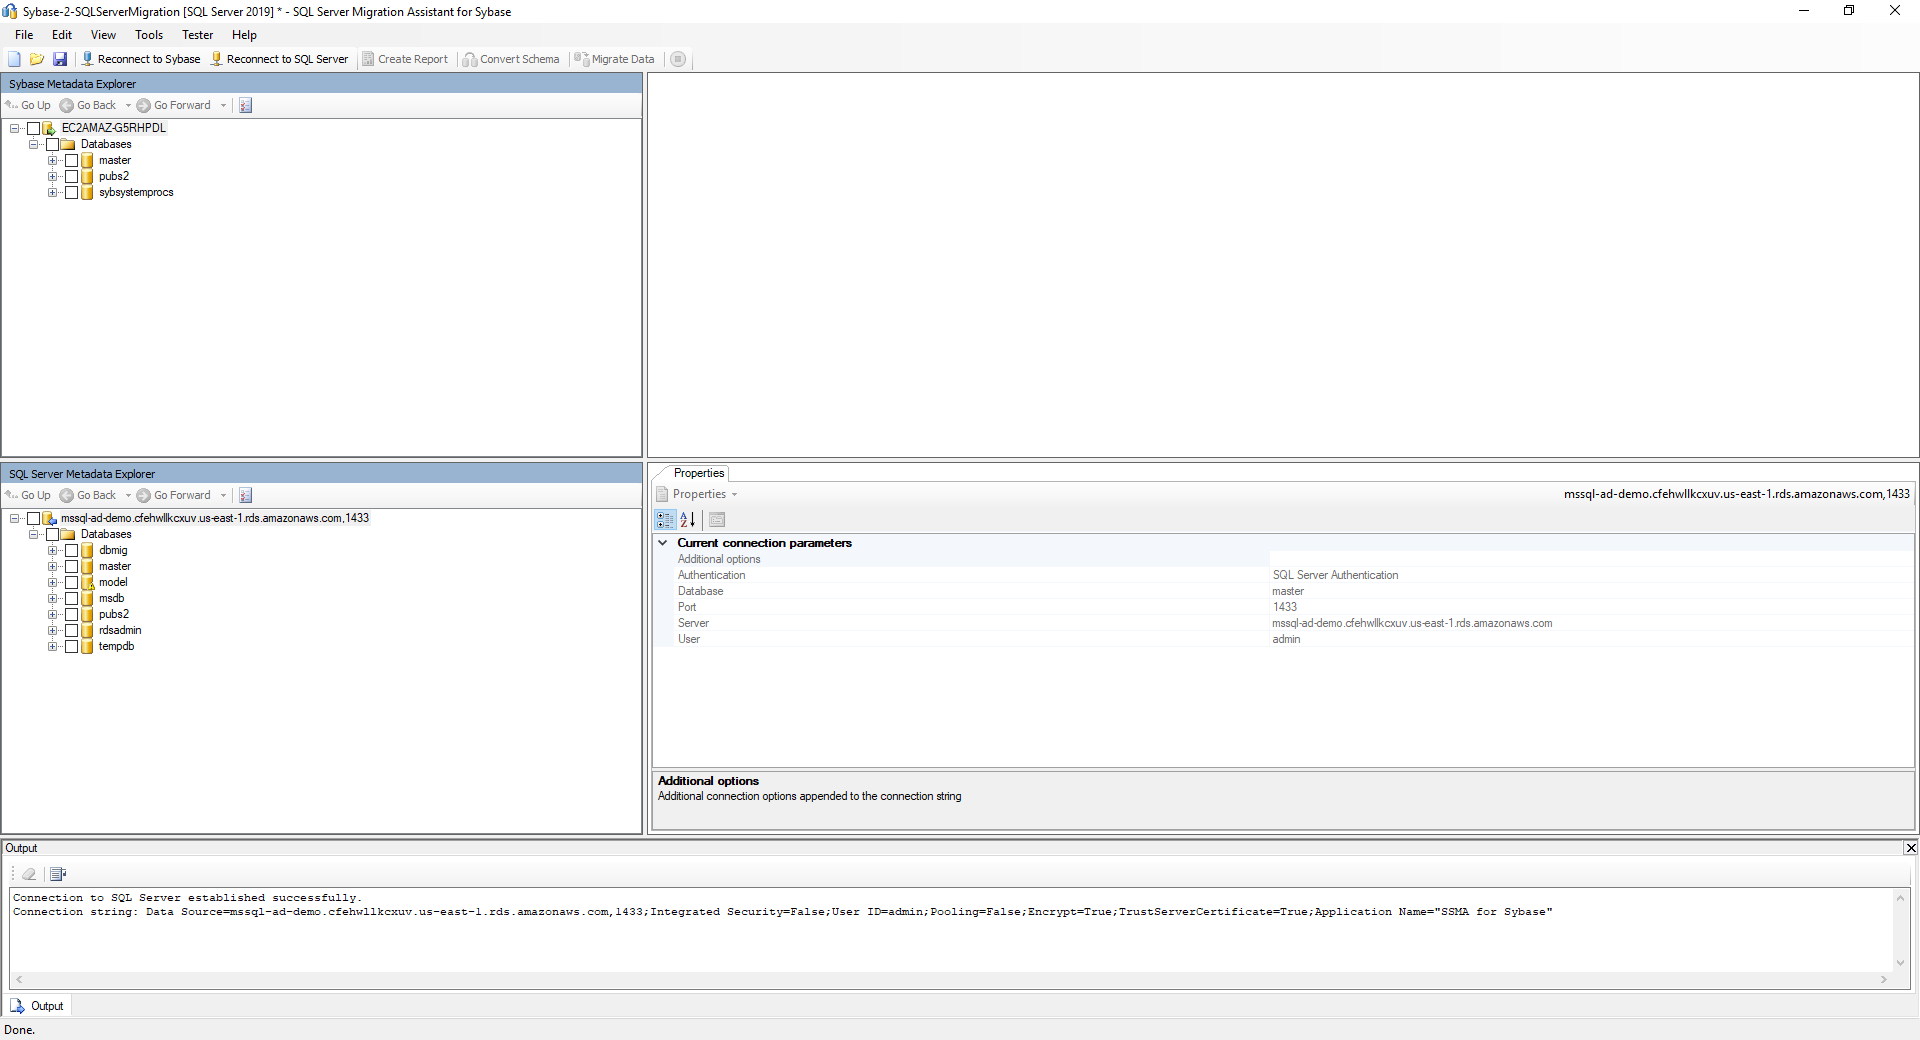\n\n19. Select the database you want to migrate in the **Sybase Metadata Explorer** panel and on the **Tools** menu, choose **Create Report**.\n\n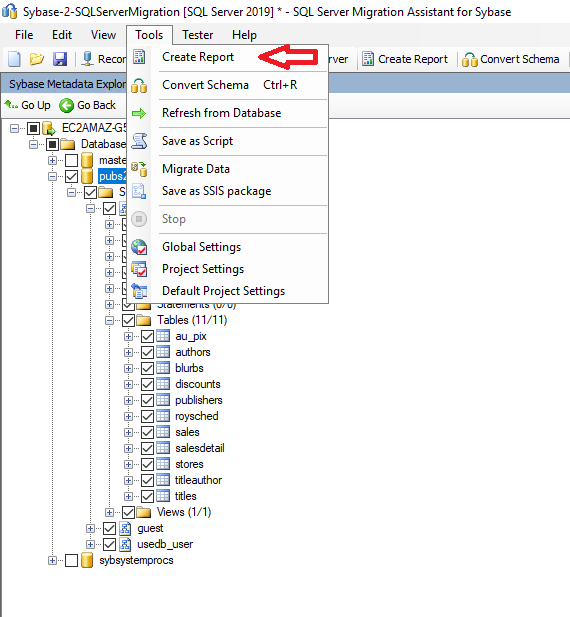\n\nAn assessment report is generated, which can help you understand the level of complexity for this database migration.\n\n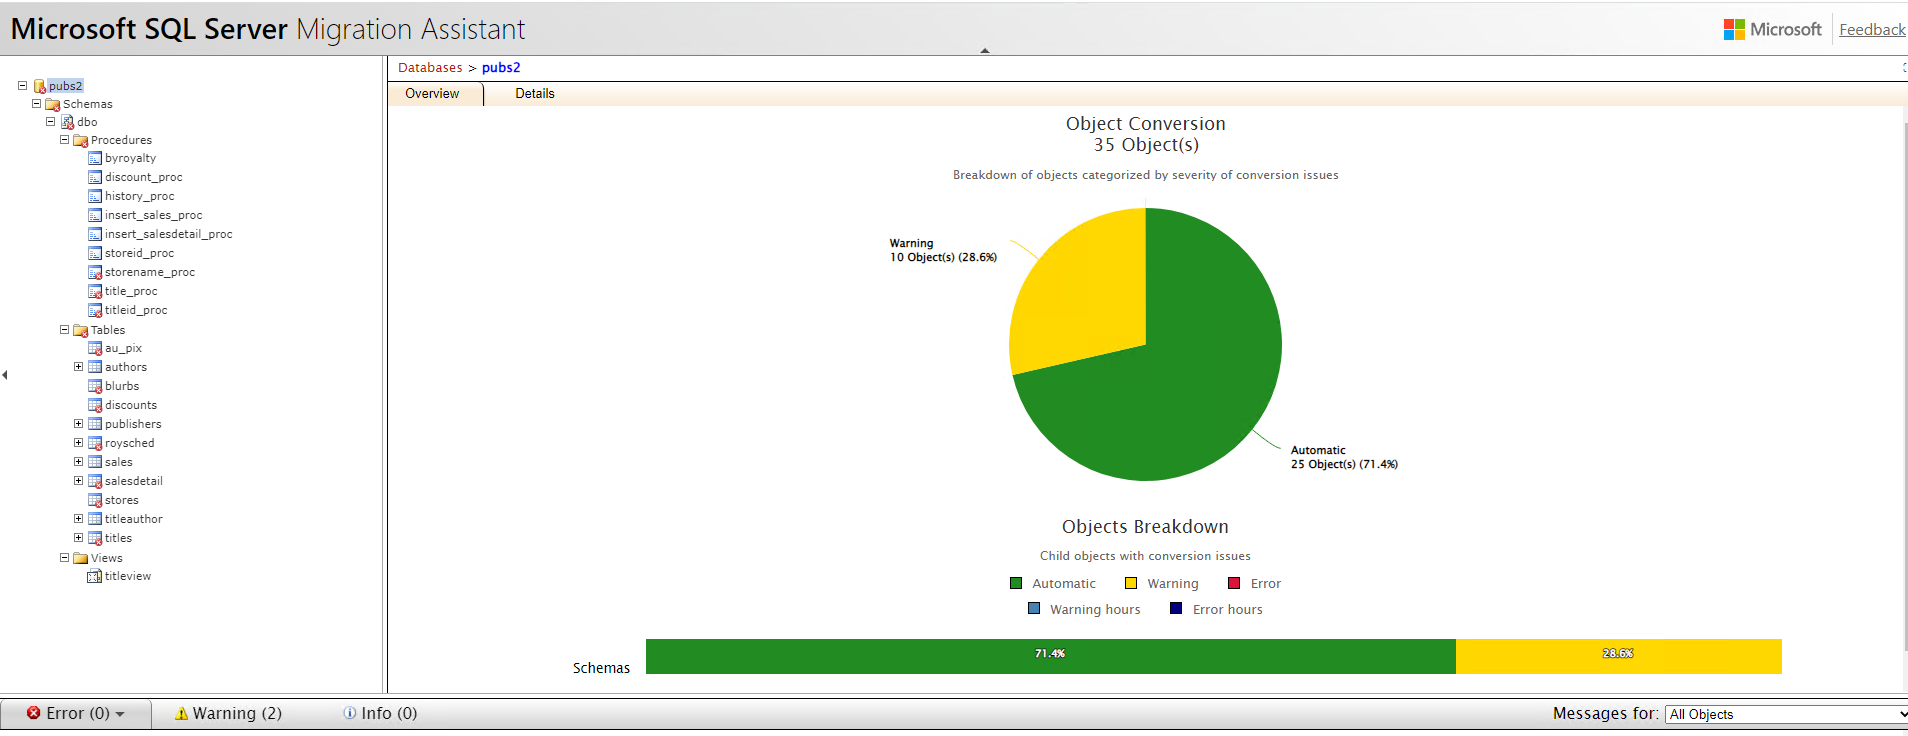\n\nYou can find a detailed view on the **Details** tab of the Microsoft SQL Server Migration Assistant report, where it’s broken down by object conversion and syntax conversion (see the following screenshots).\n\n\n\n\n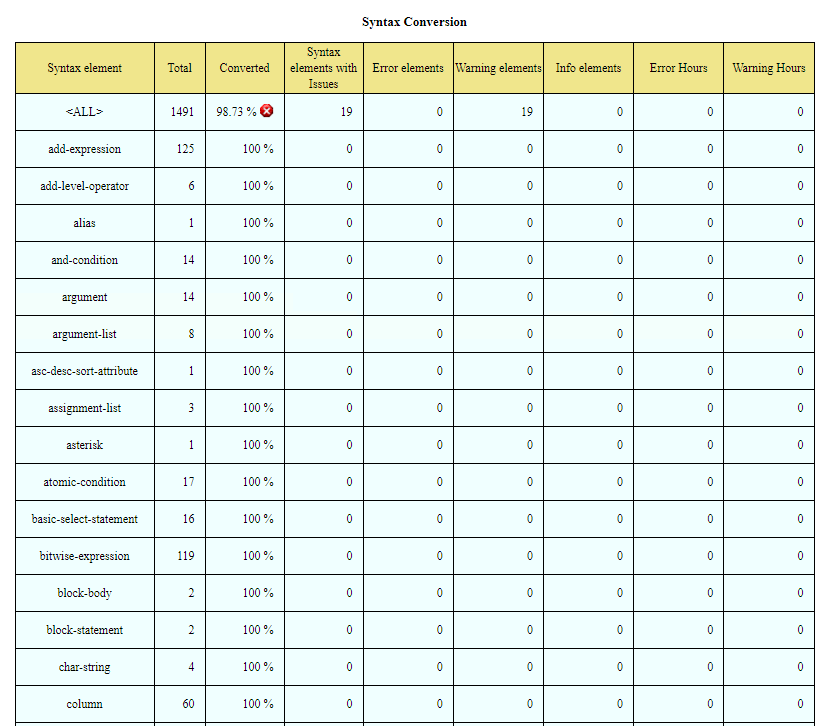\n\n20. On the **Tools** menu, choose **Convert Schema**.\n\n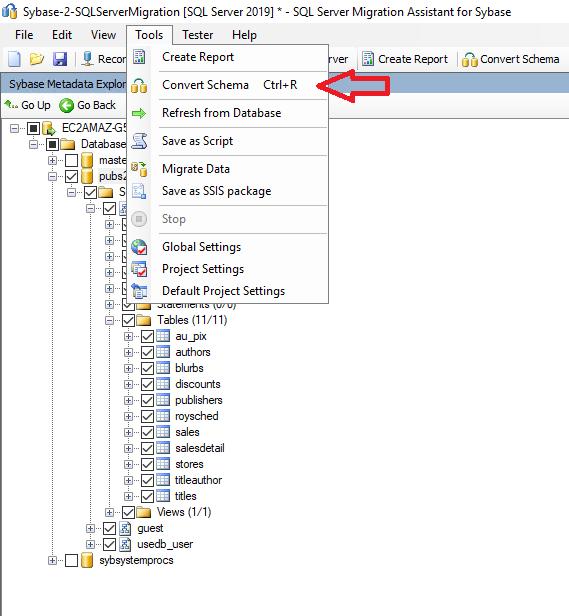\n\nYou can see the converted schema saved in the **SQL Server Metadata Explorer** panel.\n\n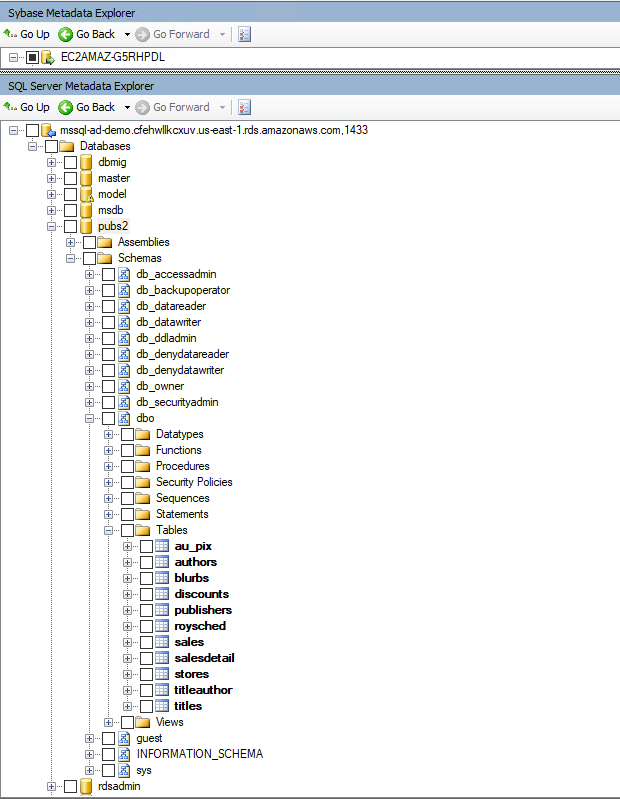\n\nHere you have option to choose **Synchronize with Database** or **Save as Script**. If you want to manually review and deploy the schema changes, choose **Save as Script**. Choose **Synchronize with Database** for the SSMA tool to connect to the target database and create the database objects for you.\n\n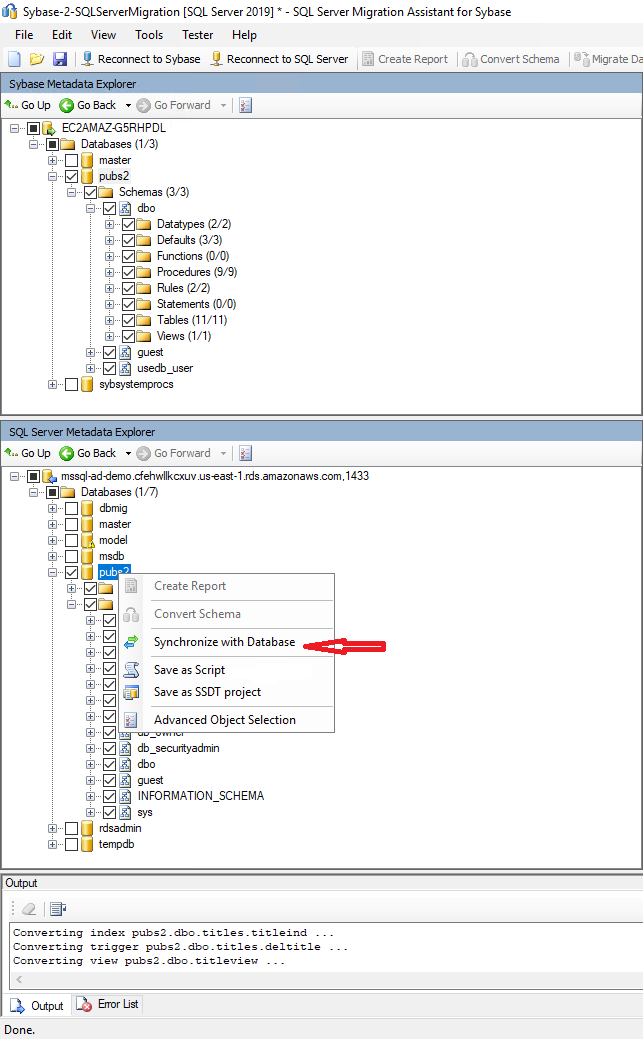\n\n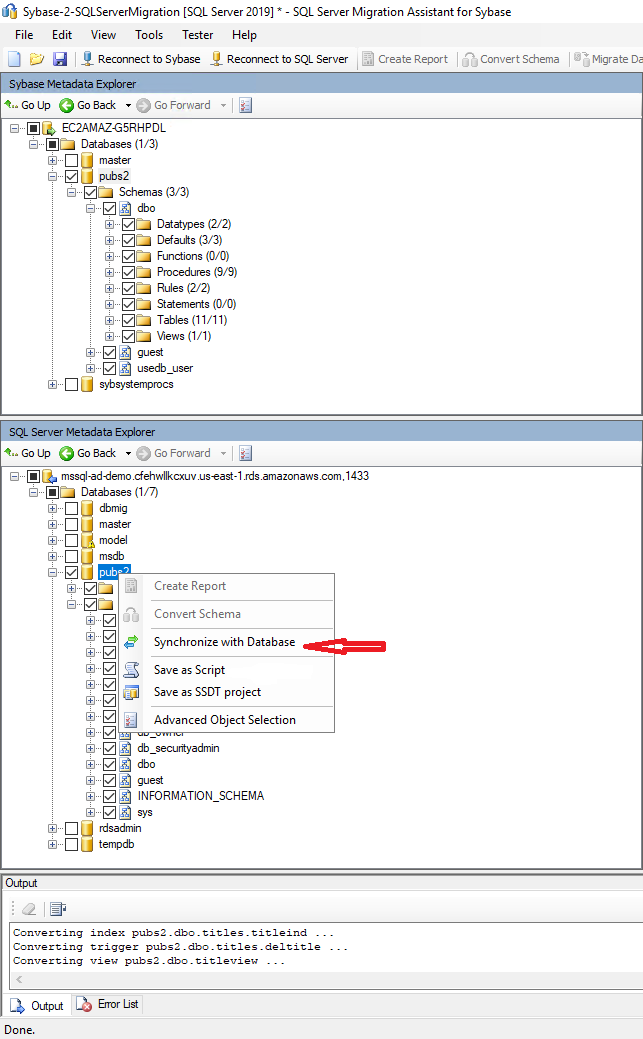\n\nBefore you complete the migration, you can review the database objects side by side between your source and target database.\n\n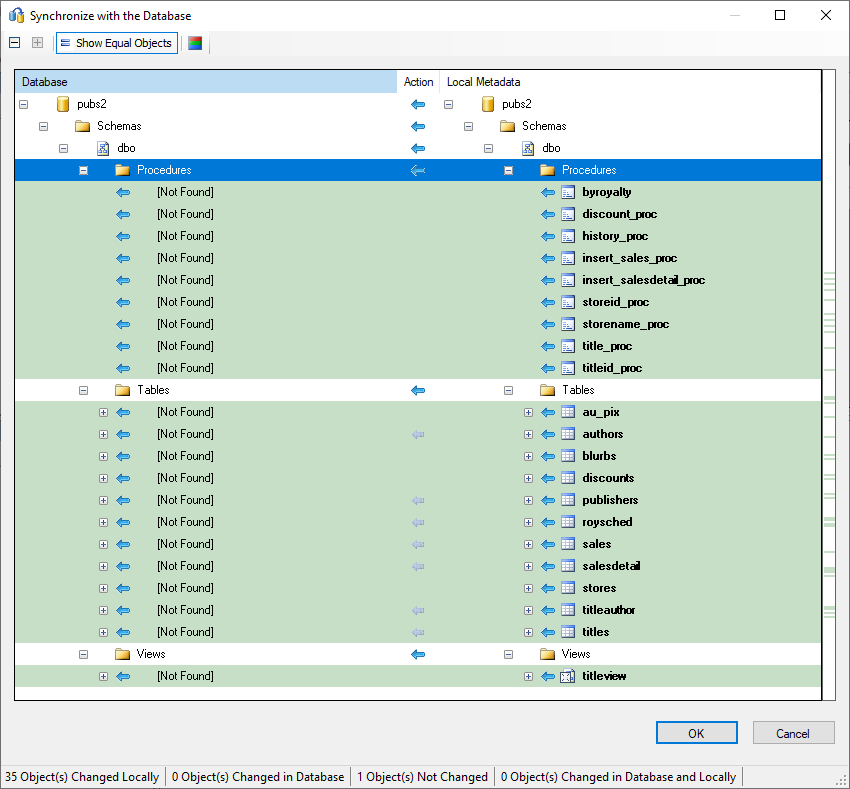\n\nIn the **Output** panel, you can see the “Synchronization operation complete” message:\n\n```\nSynchronizing pubs2.dbo ...\nLoading to database new table pubs2.dbo.au_pix ...\nLoading to database new table pubs2.dbo.authors ...\nLoading to database new table pubs2.dbo.blurbs ...\nLoading to database new table pubs2.dbo.discounts ...\nLoading to database new table pubs2.dbo.publishers ...\nLoading to database new table pubs2.dbo.roysched ...\nLoading to database new table pubs2.dbo.sales ...\nLoading to database new table pubs2.dbo.salesdetail ...\nLoading to database new table pubs2.dbo.stores ...\nLoading to database new table pubs2.dbo.titleauthor ...\nLoading to database new table pubs2.dbo.titles ...\nLoading to database new procedure pubs2.dbo.byroyalty ...\nLoading to database new trigger pubs2.dbo.titles.deltitle ...\nLoading to database new procedure pubs2.dbo.discount_proc ...\nLoading to database new procedure pubs2.dbo.history_proc ...\nLoading to database new procedure pubs2.dbo.insert_sales_proc ...\nLoading to database new procedure pubs2.dbo.insert_salesdetail_proc ...\nLoading to database new procedure pubs2.dbo.storeid_proc ...\nLoading to database new procedure pubs2.dbo.storename_proc ...\nLoading to database new procedure pubs2.dbo.title_proc ...\nLoading to database new procedure pubs2.dbo.titleid_proc ...\nLoading to database new trigger pubs2.dbo.salesdetail.totalsales_trig ...\nLoading to database new view pubs2.dbo.titleview ...\nLoading to database new index pubs2.dbo.authors.auidind ...\nLoading to database new index pubs2.dbo.titleauthor.auidind ...\nLoading to database new index pubs2.dbo.authors.aunmind ...\nLoading to database new index pubs2.dbo.publishers.pubind ...\nLoading to database new index pubs2.dbo.salesdetail.salesdetailind ...\nLoading to database new index pubs2.dbo.sales.salesind ...\nLoading to database new index pubs2.dbo.titleauthor.taind ...\nLoading to database new index pubs2.dbo.titleauthor.titleidind ...\nLoading to database new index pubs2.dbo.salesdetail.titleidind ...\nLoading to database new index pubs2.dbo.titles.titleidind ...\nLoading to database new index pubs2.dbo.roysched.titleidind ...\nLoading to database new index pubs2.dbo.titles.titleind ...\nLoading to database new table pubs2.dbo.publishers check constraints ...\nLoading to database new table pubs2.dbo.salesdetail check constraints ...\nLoading to database new table pubs2.dbo.titles check constraints ...\nLoading to database new table pubs2.dbo.authors columns default ...\nLoading to database new table pubs2.dbo.titles columns default ...\nSynchronization operation is complete.\n```\n#### **Migrate the data**\nTo migrate the data from Sybase ASE to Amazon RDS for SQL Server, complete the following steps:\n\n1. In the **Sybase Metadata Explore**r panel, on the **Tools** menu, choose **Migrate Data**.\n2. Select the source databases you want to migrate from.\n3. In the **SQL Server Metadata Explorer** panel, select the target databases you want to migrate to.\n\n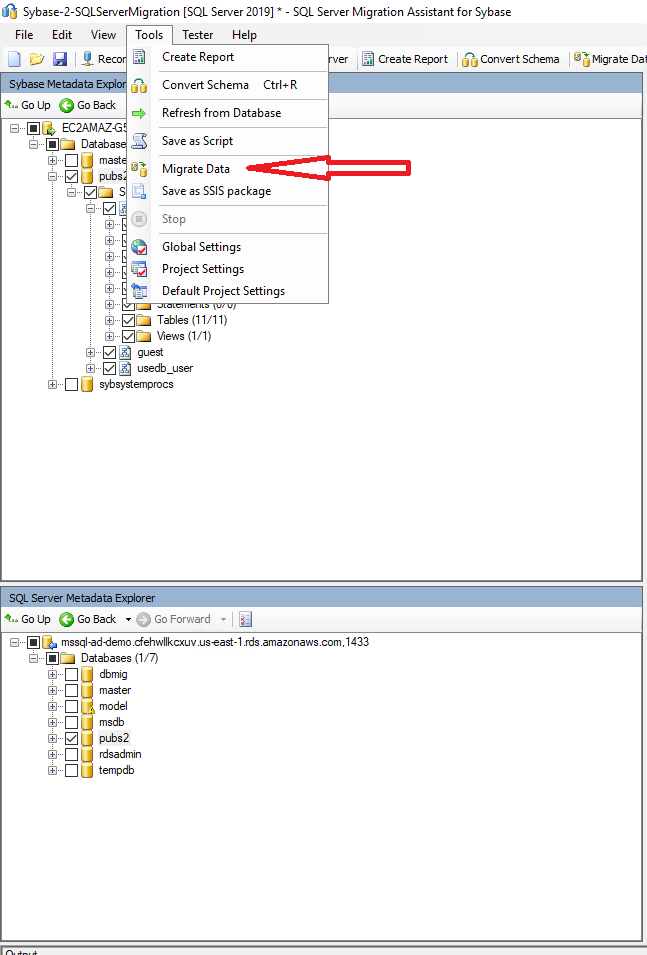\n\nA **Data Migration Report** window opens with the migration details. You can save this report in CSV format for your reference.\n\n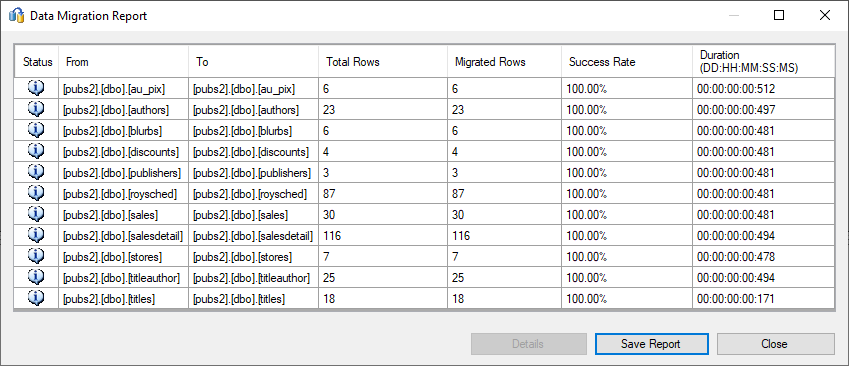\n\nThe **Output** window also shows the progress and details for each table.\n\n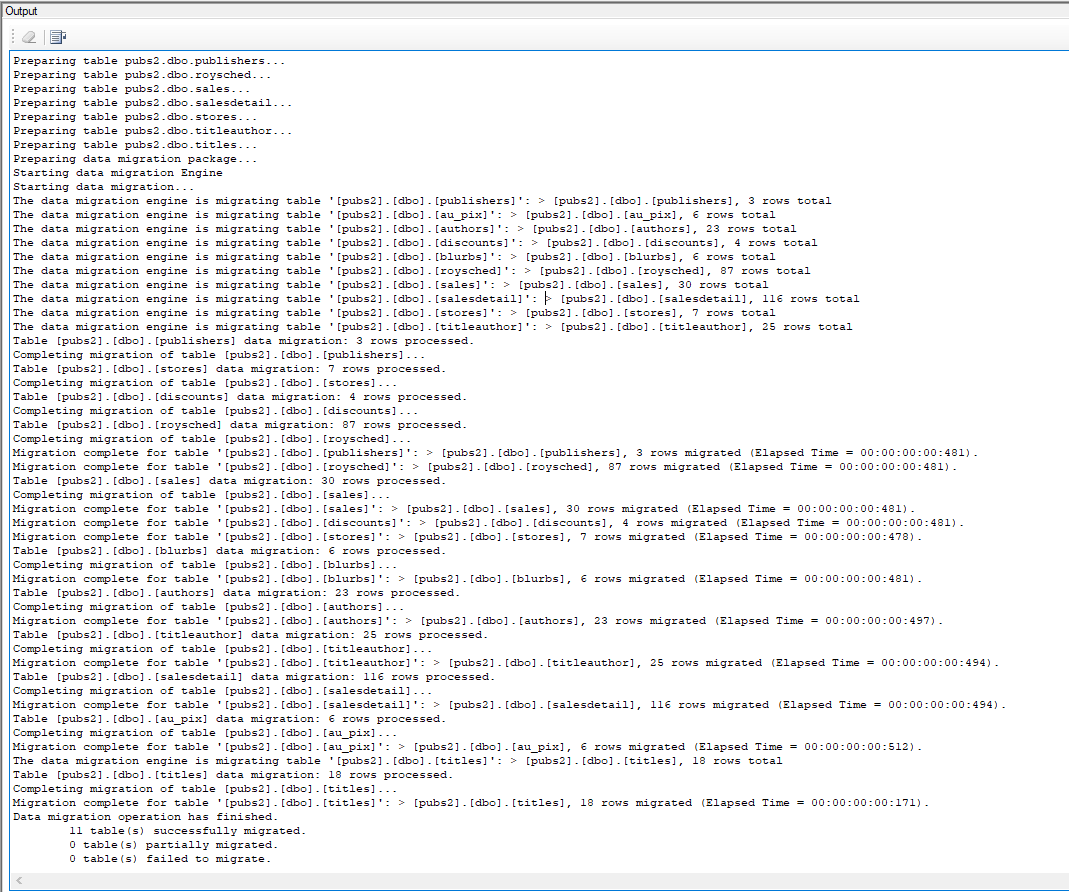\n\n#### **Validate the migration**\nTo validate the migration, follow the instructions in [Testing Migrated Database Objects (SybaseToSQL)](https://docs.microsoft.com/en-us/sql/ssma/sybase/testing-migrated-database-objects-sybasetosql?view=sql-server-ver15).\n\n#### **Best practices**\nThe following best practices are recommended:\n\n- Create the SSMA host in the same [AWS Region and Availability Zone](https://aws.amazon.com/about-aws/global-infrastructure/regions_az/) as Amazon RDS for SQL Server to have minimum network latency between them.\n- Right-size the SSMA host in terms of CPU, memory, and storage based on your database size and data types in the database.\n- Navigate to the SSMA **Tools** menu and choose **Project Settings** to edit type mapping as needed.\n\n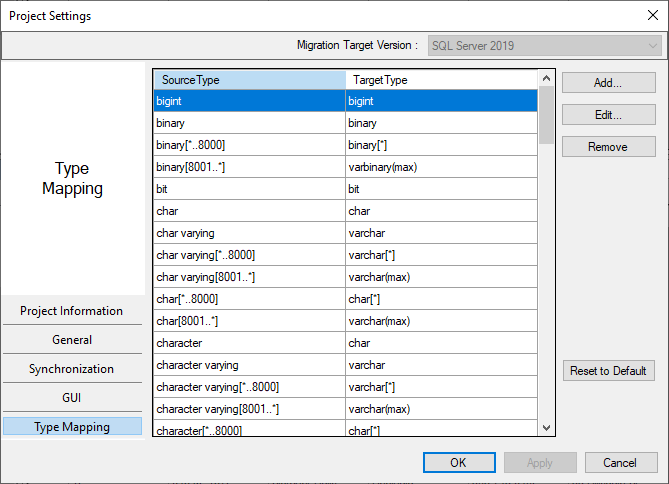\n\n- Consider reducing the batch size when working on large tables with BLOB data types from 10000 to 7500.\n- Consider changing the data migration timeout value from 15 to a higher number for large databases to avoid timeout errors.\n\n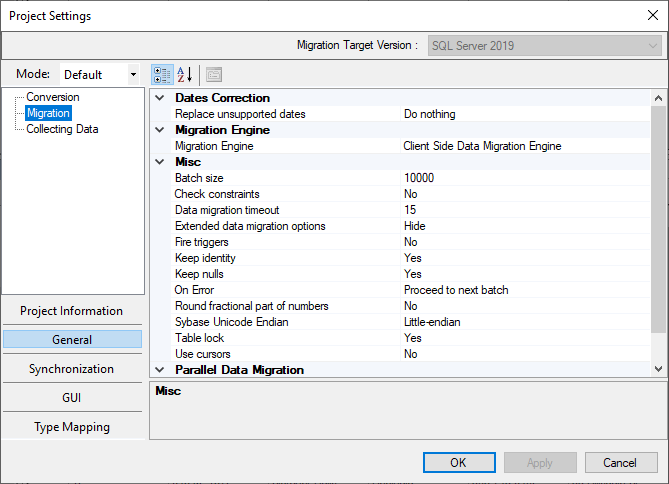\n\n#### **Clean up**\nTo remove all the components created by this solution and avoid future charges, complete the following steps:\n\n1. Sign in to the [AWS Management Console](http://aws.amazon.com/console).\n2. Choose the Region where your EC2 instance and RDS for SQL Server instance reside.\n3. On the Amazon RDS console, choose **Databases**.\n4. Select the RDS for SQL Server instance.\n5. On the **Actions** menu, choose **Delete**.\n6. On the Amazon EC2 console, choose **Instances**.\n7. Select the EC2 instances used as source data and SSMA host.\n8. On the **Instance state** menu, choose **Terminate instance**.\n\n#### **Summary**\nIn this post, we demonstrated how to install and configure the SSMA for Sybase tool on Amazon EC2 running Windows Server followed by schema and data migration from Sybase ASE to Amazon RDS for SQL Server using SSMA. Try out Amazon RDS for SQL Server and migrate your Sybase ASE database workload to AWS.\n\nIf you have any comments or feedback, please leave them in the comments section.\n\n##### **About the Author**\n\n\n\n**Rajib Sadhu** is Senior Database Specialist Solutions Architect with over 15 years of experience in Microsoft SQL Server and other database technologies. He helps customers architect and migrate their database solutions to AWS. Prior to joining AWS, he supported production and mission-critical database implementation across financial and travel and hospitality industry segments.","render":"<p>Customers running their workload on <a href=\"https://www.sap.com/products/sybase-ase.html%EF%BC%89\" target=\"_blank\">SAP Adaptive Server Enterprise (Sybase ASE)</a> databases often ask us how they can modernize their workload as they move to AWS with minimum application changes. Customers who want to keep <a href=\"https://infocenter.sybase.com/help/index.jsp?topic=/com.sybase.infocenter.dc38151.1510/html/iqrefbb/Tsos.htm\" target=\"_blank\">Transact-SQL</a> (T-SQL) as their preferred database programming language and <a href=\"https://infocenter.sybase.com/help/index.jsp?topic=/com.sybase.help.sdk_12.5.1.ctref/html/ctref/X36927.htm\" target=\"_blank\">Tabular Data Stream</a> (TDS) as their communication protocol can take advantage of the managed database service <a href=\"https://aws.amazon.com/rds/sqlserver/\" target=\"_blank\">Amazon Relational Database Service (Amazon RDS) for SQL Server. Amazon RDS for SQL Server</a> makes it easy to set up and operate SQL Server deployments in the cloud by managing time-consuming database administration tasks, including provisioning, backups, software patching, monitoring, and hardware scaling.</p>\n<p>In this post, we examine a use case in which you migrate your Sybase ASE database to Amazon RDS for SQL Server using <a href=\"https://docs.microsoft.com/en-us/sql/ssma/sybase/sql-server-migration-assistant-for-sybase-sybasetosql?view=sql-server-ver15\" target=\"_blank\">SQL Server Migration Assistant (SSMA) for Sybase</a>. We show you how to use SSMA to migrate the schema and data from Sybase ASE to Amazon RDS for SQL Server.</p>\n<p><a href=\"https://docs.microsoft.com/en-us/sql/ssma/sybase/sql-server-migration-assistant-for-sybase-sybasetosql?view=sql-server-ver15\" target=\"_blank\">SQL Server Migration Assistant (SSMA) for Sybase</a> is a tool for migrating Sybase ASE databases to Microsoft SQL Server. You can use SSMA for Sybase to convert Sybase ASE database objects to SQL Server database objects, create those objects in Amazon RDS for SQL Server, and then migrate data from Sybase ASE to Amazon RDS for SQL Server.</p>\n<p>As of this writing, <a href=\"https://aws.amazon.com/dms/schema-conversion-tool\" target=\"_blank\">AWS Schema Conversion Tool</a> (AWS SCT) does not have the support to use Sybase ASE as source and Amazon RDS for SQL Server as target. If you’re an application owner or migration specialist working on migrating Sybase ASE to Amazon RDS for SQL Server, you may have wondered which tool you can use to convert the schema and migrate the data.</p>\n<h4><a id=\"Solution_overview_8\"></a><strong>Solution overview</strong></h4>\n<p>The SSMA-based migration solution has the following major components:</p>\n<ul>\n<li><a href=\"https://www.microsoft.com/en-us/download/details.aspx?id=54256\" target=\"_blank\">SQL Server Migration Assistant (SSMA) for Sybase</a> – SSMA is a free tool from Microsoft, used to migrate from Sybase ASE to Amazon RDS for SQL Server</li>\n<li><a href=\"https://aws.amazon.com/ec2/\" target=\"_blank\">Amazon Elastic Compute Cloud (Amazon EC2)</a> – A Microsoft Windows Server 2016 Base AMI is used to support the SSMA tool</li>\n<li><a href=\"https://aws.amazon.com/directconnect/\" target=\"_blank\">AWS Direct Connect</a> – Direct Connect is recommended to establish a dedicated network connection between your on-premises data centers and AWS</li>\n</ul>\n<p>The following diagram illustrates the solution architecture.</p>\n<p><img src=\"https://dev-media.amazoncloud.cn/ccc2aa6967dc49e5bca6d109b0795a4d_image.png\" alt=\"image.png\" /></p>\n<p>For our use case, we take the scenario in which our Sybase ASE database is running on Amazon EC2, and see how we migrate the user databases to Amazon RDS for SQL Server using SSMA for Sybase. The following diagram illustrates our architecture.</p>\n<p><img src=\"https://dev-media.amazoncloud.cn/a67b988dd7d24dd4b9d51b6526678bc7_image.png\" alt=\"image.png\" /></p>\n<p>This solution has the following characteristics:</p>\n<ul>\n<li>Sybase ASE is installed and configured to run on an Amazon EC2 server, which we refer to as the source database.</li>\n<li>SSMA for Sybase tool is installed on an Amazon EC2 Windows Server. The user needs to Remote Desktop to the Amazon EC2 Windows Server to complete the migration. In our solution, we refer to Amazon EC2 Windows Server as the SSMA host.</li>\n<li>Amazon RDS for SQL Server, which we refer to as the target database.</li>\n</ul>\n<h4><a id=\"Prerequisites_29\"></a><strong>Prerequisites</strong></h4>\n<p>To test this scenario, you must have the following prerequisites:</p>\n<ul>\n<li>An <a href=\"https://aws.amazon.com/console/\" target=\"_blank\">AWS account</a></li>\n<li>An EC2 instance with Sybase ASE installed and a user database (pubs2) created with tables and procedures</li>\n<li>The Sybase ASE account, which we use to migrate the schema and data, created and granted the <a href=\"https://docs.microsoft.com/en-us/sql/ssma/sybase/connecting-to-sybase-ase-sybasetosql?view=sql-server-ver15\" target=\"_blank\">required permissions</a></li>\n<li>SSMA for Sybase software <a href=\"https://www.microsoft.com/en-us/download/details.aspx?id=54256\" target=\"_blank\">downloaded</a> on the SSMA host</li>\n</ul>\n<p><img src=\"https://dev-media.amazoncloud.cn/3561fa58ed7d41cfb3cf55358ca386e5_image.png\" alt=\"image.png\" /></p>\n<ul>\n<li>An RDS for SQL Server instance created, and a user database created using the following command through SSMS:</li>\n</ul>\n<pre><code class=\"lang-\">CREATE DATABASE pubs2;\n</code></pre>\n<h4><a id=\"Install_SSMA_for_Sybase_44\"></a><strong>Install SSMA for Sybase</strong></h4>\n<p>To install SSMA for Sybase, complete the following steps:</p>\n<ol>\n<li><a href=\"https://docs.aws.amazon.com/AWSEC2/latest/WindowsGuide/connecting_to_windows_instance.html\" target=\"_blank\">Connect</a> to the SSMA host using Remote Desktop.</li>\n<li>In the <strong>Download</strong> section, choose <strong>Install</strong>.</li>\n<li>Choose <strong>Next</strong>.</li>\n</ol>\n<p><img src=\"https://dev-media.amazoncloud.cn/ac958cc935bb444b88b497c05a233a3f_image.png\" alt=\"image.png\" /></p>\n<p>You can ignore the warnings on missing components. We will install the drivers separately.</p>\n<ol start=\"4\">\n<li>Choose <strong>Next</strong>.</li>\n</ol>\n<p><img src=\"https://dev-media.amazoncloud.cn/83c28e97763b4aae80a2bd055b413b5a_image.png\" alt=\"image.png\" /></p>\n<ol start=\"5\">\n<li>Select <strong>I accept the agreemen</strong>t on the <strong>End-User License Agreement</strong> page and choose <strong>Next</strong>.</li>\n<li>Choose <strong>Complete</strong> on the <strong>Setup Type</strong> menu.</li>\n<li>On the next page, choose <strong>Install</strong>.</li>\n<li>On the <strong>SSMA for Sybase Installation Complete</strong> page, choose <strong>Finish</strong> to complete the installation and close the window.</li>\n<li><a href=\"https://developers.sap.com/trials-downloads.html\" target=\"_blank\">Download</a> and install the latest ADO.NET Data Provider for Windows on the SSMA host.</li>\n</ol>\n<p><img src=\"https://dev-media.amazoncloud.cn/c45e657ffd924e7188de29fc5fa03d67_image.png\" alt=\"image.png\" /></p>\n<h4><a id=\"Migrate_the_schema_67\"></a><strong>Migrate the schema</strong></h4>\n<p>To migrate the schema from Sybase ASE to Amazon RDS for SQL Server, complete the following steps:</p>\n<ol>\n<li><a href=\"https://docs.aws.amazon.com/AWSEC2/latest/WindowsGuide/connecting_to_windows_instance.html\" target=\"_blank\">Connect</a> to the SSMA host using Remote Desktop.</li>\n<li>On the Windows <strong>Start</strong> menu, navigate to Microsoft SQL Server Migration Assistant for Sybase and open it.</li>\n<li>On the <strong>File</strong> menu, open a new project and enter a name and location of your choice.</li>\n<li>For <strong>Migrate To</strong>, choose the same engine version you picked for Amazon RDS for SQL Server.</li>\n<li>Choose <strong>OK</strong>.</li>\n</ol>\n<p><img src=\"https://dev-media.amazoncloud.cn/2cccbf362db04bd2b1e4902fd427525e_image.png\" alt=\"image.png\" /></p>\n<ol start=\"6\">\n<li>On the <strong>Provider</strong> menu, choose <strong>Connect to Sybase</strong>.</li>\n<li>Choose <strong>ADO.NET Provider</strong>.</li>\n<li>Enter a server name, server port, user name, and password.</li>\n<li>Choose <strong>Connect</strong>.</li>\n</ol>\n<p><img src=\"https://dev-media.amazoncloud.cn/9b097e82a94f4b6ca2ce5daa274a9f45_image.png\" alt=\"image.png\" /></p>\n<ol start=\"10\">\n<li>Select the databases you want to migrate.<br />\nThe databases <code>master</code> and <code>subsystemprocs</code> are selected by default and can’t be deselected.</li>\n<li>Choose <strong>OK</strong>.</li>\n</ol>\n<p><img src=\"https://dev-media.amazoncloud.cn/8ad49b92ae7d4b5a9d457f548c87c872_image.png\" alt=\"image.png\" /></p>\n<ol start=\"12\">\n<li>Choose <strong>Connect to SQL Server</strong>.</li>\n<li>For <strong>Server name</strong>, enter your RDS for SQL Server endpoint name.</li>\n<li>Enter a server port and database.</li>\n<li>For <strong>Authentication</strong>, choose <strong>SQL Server Authentication</strong>.<br />\nFor this post, we use SQL Server authentication, but SSMA also supports Windows Authentication. If you created the RDS for SQL Server instance with <a href=\"https://docs.aws.amazon.com/AmazonRDS/latest/UserGuide/USER_SQLServerWinAuth.html\" target=\"_blank\">Microsoft SQL Server Windows Authentication</a> enabled using the <a href=\"https://docs.aws.amazon.com/directoryservice/latest/admin-guide/directory_microsoft_ad.html\" target=\"_blank\">AWS Managed Microsoft AD</a> option, you can choose <strong>Windows Authentication</strong> on the <strong>Authentication</strong> menu.</li>\n<li>Enter a user name and password.</li>\n<li>Select <strong>Encrypt Connection</strong> and <strong>Trust Server Certificate</strong>.</li>\n<li>Choose <strong>Connect</strong>.</li>\n</ol>\n<p><img src=\"https://dev-media.amazoncloud.cn/569954778ccb47af91778b4ac58b109a_image.png\" alt=\"image.png\" /></p>\n<p>Now you can see the <strong>panels Sybase Metadata Explorer</strong> and <strong>SQL Server Metadata Explorer</strong>.</p>\n<p><img src=\"https://dev-media.amazoncloud.cn/605a966e19ff4bdcb5920b38b6f50f8b_image.png\" alt=\"image.png\" /></p>\n<ol start=\"19\">\n<li>Select the database you want to migrate in the <strong>Sybase Metadata Explorer</strong> panel and on the <strong>Tools</strong> menu, choose <strong>Create Report</strong>.</li>\n</ol>\n<p><img src=\"https://dev-media.amazoncloud.cn/011c4a0a403f4dddaa76548d0c7702d7_image.png\" alt=\"image.png\" /></p>\n<p>An assessment report is generated, which can help you understand the level of complexity for this database migration.</p>\n<p><img src=\"https://dev-media.amazoncloud.cn/b0cae169fd544043ad4a8cc9c3234248_image.png\" alt=\"image.png\" /></p>\n<p>You can find a detailed view on the <strong>Details</strong> tab of the Microsoft SQL Server Migration Assistant report, where it’s broken down by object conversion and syntax conversion (see the following screenshots).</p>\n<p><img src=\"https://dev-media.amazoncloud.cn/0f7e1971d4ce4726af233ee2ca46b043_image.png\" alt=\"image.png\" /></p>\n<p><img src=\"https://dev-media.amazoncloud.cn/4ffa5e043de547cdbcbb8e328a6bb67d_image.png\" alt=\"image.png\" /></p>\n<ol start=\"20\">\n<li>On the <strong>Tools</strong> menu, choose <strong>Convert Schema</strong>.</li>\n</ol>\n<p><img src=\"https://dev-media.amazoncloud.cn/b3a9a2ab116944c188e66ff067c9f275_image.png\" alt=\"image.png\" /></p>\n<p>You can see the converted schema saved in the <strong>SQL Server Metadata Explorer</strong> panel.</p>\n<p><img src=\"https://dev-media.amazoncloud.cn/208b39e071b040968244095ccc4264ca_image.png\" alt=\"image.png\" /></p>\n<p>Here you have option to choose <strong>Synchronize with Database</strong> or <strong>Save as Script</strong>. If you want to manually review and deploy the schema changes, choose <strong>Save as Script</strong>. Choose <strong>Synchronize with Database</strong> for the SSMA tool to connect to the target database and create the database objects for you.</p>\n<p><img src=\"https://dev-media.amazoncloud.cn/f874b5ffa4ec4d319a8b6f7936efe7b8_image.png\" alt=\"image.png\" /></p>\n<p><img src=\"https://dev-media.amazoncloud.cn/989f964bfb7e40d8a6fa22bc453423aa_image.png\" alt=\"image.png\" /></p>\n<p>Before you complete the migration, you can review the database objects side by side between your source and target database.</p>\n<p><img src=\"https://dev-media.amazoncloud.cn/d35bfea914104aa29d04871b6b9092ab_image.png\" alt=\"image.png\" /></p>\n<p>In the <strong>Output</strong> panel, you can see the “Synchronization operation complete” message:</p>\n<pre><code class=\"lang-\">Synchronizing pubs2.dbo ...\nLoading to database new table pubs2.dbo.au_pix ...\nLoading to database new table pubs2.dbo.authors ...\nLoading to database new table pubs2.dbo.blurbs ...\nLoading to database new table pubs2.dbo.discounts ...\nLoading to database new table pubs2.dbo.publishers ...\nLoading to database new table pubs2.dbo.roysched ...\nLoading to database new table pubs2.dbo.sales ...\nLoading to database new table pubs2.dbo.salesdetail ...\nLoading to database new table pubs2.dbo.stores ...\nLoading to database new table pubs2.dbo.titleauthor ...\nLoading to database new table pubs2.dbo.titles ...\nLoading to database new procedure pubs2.dbo.byroyalty ...\nLoading to database new trigger pubs2.dbo.titles.deltitle ...\nLoading to database new procedure pubs2.dbo.discount_proc ...\nLoading to database new procedure pubs2.dbo.history_proc ...\nLoading to database new procedure pubs2.dbo.insert_sales_proc ...\nLoading to database new procedure pubs2.dbo.insert_salesdetail_proc ...\nLoading to database new procedure pubs2.dbo.storeid_proc ...\nLoading to database new procedure pubs2.dbo.storename_proc ...\nLoading to database new procedure pubs2.dbo.title_proc ...\nLoading to database new procedure pubs2.dbo.titleid_proc ...\nLoading to database new trigger pubs2.dbo.salesdetail.totalsales_trig ...\nLoading to database new view pubs2.dbo.titleview ...\nLoading to database new index pubs2.dbo.authors.auidind ...\nLoading to database new index pubs2.dbo.titleauthor.auidind ...\nLoading to database new index pubs2.dbo.authors.aunmind ...\nLoading to database new index pubs2.dbo.publishers.pubind ...\nLoading to database new index pubs2.dbo.salesdetail.salesdetailind ...\nLoading to database new index pubs2.dbo.sales.salesind ...\nLoading to database new index pubs2.dbo.titleauthor.taind ...\nLoading to database new index pubs2.dbo.titleauthor.titleidind ...\nLoading to database new index pubs2.dbo.salesdetail.titleidind ...\nLoading to database new index pubs2.dbo.titles.titleidind ...\nLoading to database new index pubs2.dbo.roysched.titleidind ...\nLoading to database new index pubs2.dbo.titles.titleind ...\nLoading to database new table pubs2.dbo.publishers check constraints ...\nLoading to database new table pubs2.dbo.salesdetail check constraints ...\nLoading to database new table pubs2.dbo.titles check constraints ...\nLoading to database new table pubs2.dbo.authors columns default ...\nLoading to database new table pubs2.dbo.titles columns default ...\nSynchronization operation is complete.\n</code></pre>\n<h4><a id=\"Migrate_the_data_186\"></a><strong>Migrate the data</strong></h4>\n<p>To migrate the data from Sybase ASE to Amazon RDS for SQL Server, complete the following steps:</p>\n<ol>\n<li>In the <strong>Sybase Metadata Explore</strong>r panel, on the <strong>Tools</strong> menu, choose <strong>Migrate Data</strong>.</li>\n<li>Select the source databases you want to migrate from.</li>\n<li>In the <strong>SQL Server Metadata Explorer</strong> panel, select the target databases you want to migrate to.</li>\n</ol>\n<p><img src=\"https://dev-media.amazoncloud.cn/39ee5b21325843b8bbe4bad45b90a784_image.png\" alt=\"image.png\" /></p>\n<p>A <strong>Data Migration Report</strong> window opens with the migration details. You can save this report in CSV format for your reference.</p>\n<p><img src=\"https://dev-media.amazoncloud.cn/5b5c07ccabe04f4f91daa0bff22c15c8_image.png\" alt=\"image.png\" /></p>\n<p>The <strong>Output</strong> window also shows the progress and details for each table.</p>\n<p><img src=\"https://dev-media.amazoncloud.cn/8a30f8d44cfe4180b02a0aa2f91c2b74_image.png\" alt=\"image.png\" /></p>\n<h4><a id=\"Validate_the_migration_203\"></a><strong>Validate the migration</strong></h4>\n<p>To validate the migration, follow the instructions in <a href=\"https://docs.microsoft.com/en-us/sql/ssma/sybase/testing-migrated-database-objects-sybasetosql?view=sql-server-ver15\" target=\"_blank\">Testing Migrated Database Objects (SybaseToSQL)</a>.</p>\n<h4><a id=\"Best_practices_206\"></a><strong>Best practices</strong></h4>\n<p>The following best practices are recommended:</p>\n<ul>\n<li>Create the SSMA host in the same <a href=\"https://aws.amazon.com/about-aws/global-infrastructure/regions_az/\" target=\"_blank\">AWS Region and Availability Zone</a> as Amazon RDS for SQL Server to have minimum network latency between them.</li>\n<li>Right-size the SSMA host in terms of CPU, memory, and storage based on your database size and data types in the database.</li>\n<li>Navigate to the SSMA <strong>Tools</strong> menu and choose <strong>Project Settings</strong> to edit type mapping as needed.</li>\n</ul>\n<p><img src=\"https://dev-media.amazoncloud.cn/2b8174418f354fb08813954c4a2a64ee_image.png\" alt=\"image.png\" /></p>\n<ul>\n<li>Consider reducing the batch size when working on large tables with BLOB data types from 10000 to 7500.</li>\n<li>Consider changing the data migration timeout value from 15 to a higher number for large databases to avoid timeout errors.</li>\n</ul>\n<p><img src=\"https://dev-media.amazoncloud.cn/396836a720b747c6ad99ca9b586291bc_image.png\" alt=\"image.png\" /></p>\n<h4><a id=\"Clean_up_220\"></a><strong>Clean up</strong></h4>\n<p>To remove all the components created by this solution and avoid future charges, complete the following steps:</p>\n<ol>\n<li>Sign in to the <a href=\"http://aws.amazon.com/console\" target=\"_blank\">AWS Management Console</a>.</li>\n<li>Choose the Region where your EC2 instance and RDS for SQL Server instance reside.</li>\n<li>On the Amazon RDS console, choose <strong>Databases</strong>.</li>\n<li>Select the RDS for SQL Server instance.</li>\n<li>On the <strong>Actions</strong> menu, choose <strong>Delete</strong>.</li>\n<li>On the Amazon EC2 console, choose <strong>Instances</strong>.</li>\n<li>Select the EC2 instances used as source data and SSMA host.</li>\n<li>On the <strong>Instance state</strong> menu, choose <strong>Terminate instance</strong>.</li>\n</ol>\n<h4><a id=\"Summary_232\"></a><strong>Summary</strong></h4>\n<p>In this post, we demonstrated how to install and configure the SSMA for Sybase tool on Amazon EC2 running Windows Server followed by schema and data migration from Sybase ASE to Amazon RDS for SQL Server using SSMA. Try out Amazon RDS for SQL Server and migrate your Sybase ASE database workload to AWS.</p>\n<p>If you have any comments or feedback, please leave them in the comments section.</p>\n<h5><a id=\"About_the_Author_237\"></a><strong>About the Author</strong></h5>\n<p><img src=\"https://dev-media.amazoncloud.cn/912e32c3fd6f4ed6a776de657aa62738_image.png\" alt=\"image.png\" /></p>\n<p><strong>Rajib Sadhu</strong> is Senior Database Specialist Solutions Architect with over 15 years of experience in Microsoft SQL Server and other database technologies. He helps customers architect and migrate their database solutions to AWS. Prior to joining AWS, he supported production and mission-critical database implementation across financial and travel and hospitality industry segments.</p>\n"}
Migrate your SAP ASE (Sybase ASE) database to Amazon RDS for SQL Server
海外精选
海外精选的内容汇集了全球优质的亚马逊云科技相关技术内容。同时,内容中提到的“AWS”
是 “Amazon Web Services” 的缩写,在此网站不作为商标展示。

 0
0 0
0亚马逊云科技解决方案 基于行业客户应用场景及技术领域的解决方案
联系亚马逊云科技专家
目录
亚马逊云科技解决方案 基于行业客户应用场景及技术领域的解决方案
联系亚马逊云科技专家
亚马逊云科技解决方案
基于行业客户应用场景及技术领域的解决方案
联系专家
0
目录
 分享
分享 点赞
点赞 收藏
收藏 目录
目录立即关注

亚马逊云开发者
公众号

User Group
公众号

亚马逊云科技
官方小程序
“AWS” 是 “Amazon Web Services” 的缩写,在此网站不作为商标展示。
立即关注

亚马逊云开发者
公众号

User Group
公众号

亚马逊云科技
官方小程序
“AWS” 是 “Amazon Web Services” 的缩写,在此网站不作为商标展示。
立即关注

亚马逊云开发者
公众号

User Group
公众号

亚马逊云科技
官方小程序
“AWS” 是 “Amazon Web Services” 的缩写,在此网站不作为商标展示。
