{"value":"[Amazon Relational Database Service (Amazon RDS) Custom for SQL Server](https://aws.amazon.com/rds/custom/) is a managed database service for legacy, custom, and packaged applications that require access to the underlying operating system (OS) and database (DB) environment. Amazon RDS Custom is now available for the SQL Server database engine. Amazon RDS Custom for SQL Server automates setup, operation, and scaling of databases in the cloud while granting access to the database and underlying operating system to configure settings, install drivers, and enable native features to meet the dependent application’s requirements.\n\nIn this post, you setup a SQL Server transactional replication between [Amazon RDS Custom for SQL Server](https://aws.amazon.com/rds/sqlserver/) (Publisher) and Amazon RDS for SQL Server (Subscriber) using SQL Server running on [Amazon Elastic Compute Cloud (Amazon EC2)](https://aws.amazon.com/ec2/) that acts as distributor. You can use this solution in use cases such as moving Production Data to Test and Development environments and migration parts of Databases to new SQL Server instances\n\n#### **Overview of SQL Server replication**\nSQL Server transactional replication is implemented by the replication agents Snapshot Agent, Log Reader Agent, and Distribution Agent.\n\n- The Snapshot Agent prepares snapshot files containing schema and data of published tables and database objects, stores the files in the snapshot folder, and records synchronization jobs in the distribution database on the Distributor.\n- The Log Reader Agent monitors the transaction log of each database configured for transactional replication, and copies the transactions marked for replication from the transaction log into the distribution database, which acts as a reliable store-and-forward queue.\n- The Distribution Agent copies the initial snapshot files from the snapshot folder and the transactions held in the distribution database tables to Subscribers.\n\nIncremental changes are made at the Publisher flow to Subscribers, according to the schedule of the Distribution Agent. The Distribution Agent can run continuously for minimal latency, or at scheduled intervals.\n\nFigure 1 shows the principal components of transactional replication.\n\n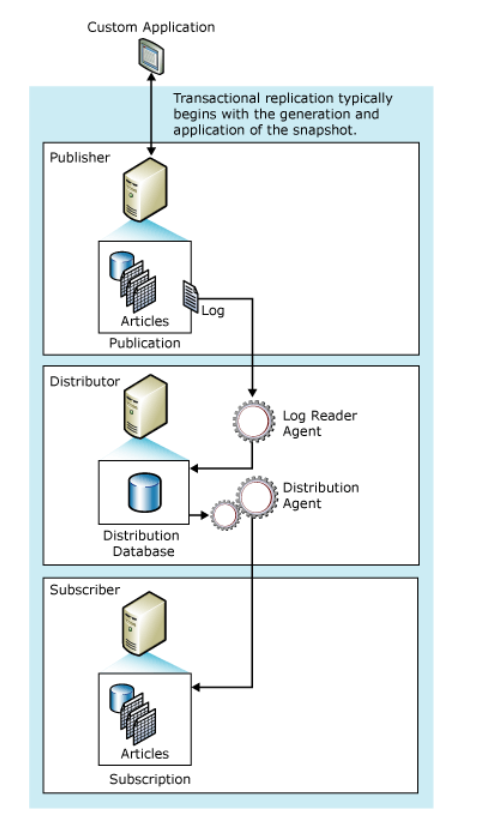\n\nFigure 1: Principal components of transactional replication\n\n#### **Infrastructure setup details**\nFor your initial setup, you need one instance of Amazon RDS Custom for SQL Server (Publisher), Amazon RDS for SQL Server (Subscriber), and a SQL Server instance running on Amazon EC2 (Remote Distributor), as shown in Figure 2.\n\n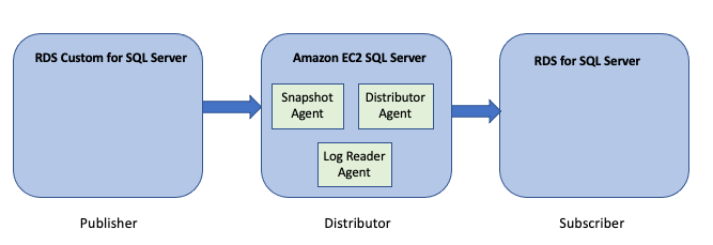\n\nFigure 2: Initial set up diagram\n\n#### **Prerequisites**\n\nBefore we begin, we assume that you meet the following prerequisites:\n1. Background knowledge about MS Replication\n2. [AWS CLI](https://aws.amazon.com/cli/) installed and configured\n3. knowledge on how to setup and launch RDS for SQL Server and RDS for Custom SQL Server instances.\n\nFor more information, refer to [Creating and connecting to a DB instance for Amazon RDS for custom SQL Server](https://docs.aws.amazon.com/AmazonRDS/latest/UserGuide/custom-creating-sqlserver.html) , [Creating and connecting to a DB instance for Amazon RDS for SQL Server](https://docs.aws.amazon.com/AmazonRDS/latest/UserGuide/CHAP_GettingStarted.CreatingConnecting.SQLServer.html), and [Microsoft SQL Server Replication](https://docs.microsoft.com/en-us/sql/relational-databases/replication/sql-server-replication).\n\nSince this solution involves AWS resource setup and utilization it is going to incur the costs on your account, refer to [AWS Pricing](https://aws.amazon.com/pricing/) for more information.\nWe strongly recommend that you set this up in a non-production instance and run end-to-end validations before you implement this solution in a production environment.\n\n#### **Instance creation**\nThe following example shows you how to launch instances that are running on the same [Amazon Virtual Private Cloud (Amazon VPC)](https://aws.amazon.com/pt/vpc/), subnet, and [security group](https://docs.aws.amazon.com/vpc/latest/userguide/VPC_SecurityGroups.html#VPCSecurityGroups). If you want to follow along, you must create an Amazon RDS subnet group and a security group. Take note of your database subnet group name as well as your security group id as we’re going to use them on the next steps.\n\nOverview:\n\n1. Create an RDS for SQL Server instance\n2. Create RDS Custom for SQL Server\n3. Create SQL Server on windows EC2 Instance\n\n##### **1. To create an RDS for SQL Server instance**\nUse the following [AWS CLI](https://aws.amazon.com/cli/) command to create RDS SQL Server instance with the name ```rdssqlprimary```. In the following example we have specified db subnet group (```RDS-custom-sng```) and security group (```sg-0ab05f9777265061a```) from our environment. You must replace it with your db subnet group name and security group id.\n```\naws rds create-db-instance \\\n--engine sqlserver-ee \\\n--engine-version 15.00.4073.23.v1 \\\n--db-instance-identifier rdssqlprimary \\\n--db-instance-class db.m5.4xlarge \\\n--allocated-storage 1000 --storage-type io1 --iops 10000 \\\n--master-username admin \\\n--master-user-password <XXXXX> \\\n--license-model license-included \\\n--db-subnet-group-name RDS-custom-sng \\\n--vpc-security-group-ids sg-0ab05f9777265061a \\\n--publicly-accessible \\\n--region us-west-2\n```\nFor more details, see [Creating and connecting to a DB instance for Amazon RDS for SQL Server](https://docs.aws.amazon.com/AmazonRDS/latest/UserGuide/CHAP_GettingStarted.CreatingConnecting.SQLServer.html).\n\n##### **2. To create an RDS Custom for SQL Server instance**\nUse the following AWS CLI command to create an RDS Custom SQL Server instance with the name ```rdssqlcustom1```. In the following example we have specified db subnet group (```RDS-custom-sng```) and security group (```sg-0ab05f9777265061a```) from our environment. You must replace it with your db subnet group name and security group id.\n```\naws rds create-db-instance \\\n--engine custom-sqlserver-ee \\\n--engine-version 15.00.4073.23.v1 \\\n--db-instance-identifier rdssqlcustom1 \\\n--db-instance-class db.m5.4xlarge \\\n--allocated-storage 1000 --storage-type io1 --iops 10000 \\\n--master-username master \\\n--master-user-password <XXXXX> \\\n--kms-key-id <kms-key-id> \\\n--custom-iam-instance-profile RDSCustomIAMProfile \\\n--db-subnet-group-name RDS-custom-sng \\\n--vpc-security-group-ids sg-0ab05f9777265061a \\\n--publicly-accessible \\\n--region us-west-2\n```\nFor more details, see [Creating and connecting to a DB instance for Amazon RDS Custom for SQL Server](https://docs.aws.amazon.com/AmazonRDS/latest/UserGuide/custom-creating-sqlserver.html).\n\n##### **3. To create an EC2 Instance with SQL Server running on it**\nOpen the [Amazon EC2 console](https://console.aws.amazon.com/ec2/).\n1. Choose **Launch Instance**.\n2. In **Step 1: Choose an Amazon Machine Image (AMI)**, for this example use **Microsoft Windows Server 2019 with SQL Server 2019 ami-0bae68af8d6df6b7f**.\nNote: If you can’t find the exact AMI , select the one which is applicable to your region.\n3. In **Step 2: Choose an Instance Type**, choose **Next: Configure Instance Details**. For this example, choose **m5.xlarge instance type**.\n4. In **Step 3: Configure Instance Details**, provide the following information:\n\t- For **Network**, choose the entry for the same VPC that you have specified for RDS SQL Server and RDS Custom SQL Server.\n\t- For **Subnet**, choose the same subnet as RDS SQL Server and RDS Custom SQL Server.\n\t- Set **Auto-assign Public IP** to **Enable**\n5. Choose **Next: Add Storage**, change the root storage size to 1000 GiB and volume type to GP2.\n6. Choose **Next: Add Tags**.\n7. Enter a name for your instance and choose **Next: Configure Security Group**.\n8. Choose the same security group used on the creation of your RDS for SQL Server and RDS Custom for SQL Server DB instances.\n9. Choose **Review and Launch**.\n10. Choose **Launch**.\n11. Select the check box for the key pair that you created, and then choose **Launch Instances**.\n\n#### **Preparation steps**\n##### **1. Enable Remote Desktop Protocol (RDP) on RDS Custom SQL Server**\nTo connect RDS Custom for SQL Server instances, follow the instructions to [enable Remote Desktop Protocol (RDP)](https://docs.aws.amazon.com/AmazonRDS/latest/UserGuide/custom-creating-sqlserver.html#custom-creating-sqlserver.rdp).\n\n##### **2. Pause RDS Custom automation temporarily**\nFollow the instructions to [pause RDS Custom automation](https://docs.aws.amazon.com/AmazonRDS/latest/UserGuide/custom-managing.html#custom-managing.pausing) for the duration of the replication setup, so that RDS automation doesn’t interfere with the configuration tasks that you perform.\n\n##### **3. Validate @@SERVERNAME is set to correct value**\nFor SQL Server running on all the three nodes (Publisher, Subscriber, and Distributor), Host name can change in some scenarios like a host replacement on RDS, Failover in a Multi-AZ (high availability) configuration. Make sure that @@SERVERNAME is set to correct value .\n\n##### **4. Validate SQL Server Agent is running on Publisher, Subscriber, and Distributor**\nMake sure SQL Server Agent is running on Publisher, Subscriber and Distributor. If not start the agent.\n\n##### **5. Use server name instead of RDS SQL Server endpoint**s\nIf you are using endpoints to create Publication, you might run into the following Cannot connect error “SQL Server replication requires the actual server name to make a connection to the server”, as shown in Figure 3.\n\n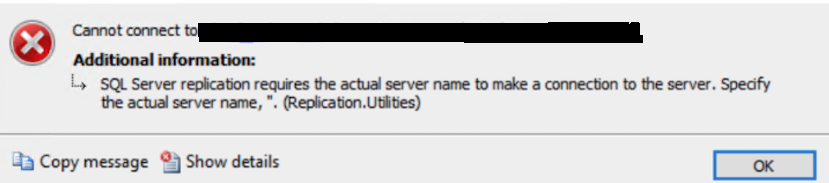\n\nFigure 3: Cannot connect error.\n\nTo resolve the issue:\n\n1. Check the Amazon RDS Custom for SQL Server name using select ```@@servername```.\n2. Run ```xp_readerrorlog``` and look into SQL Errorlog and you should find that SQL Server Name is different, as shown in Figure 4.\n\n\n\nFigure 4. SQL Server error log, server name is RDSAMAZ-V26S6JH.\n\n3. To resolve this, there are two options.\na. **The first option** is to open SQL Server Configuration Manager and create Alias Name, EC2AMAZ-GF313QT in our case, on Port 1433, as shown in Figure 5.\n\n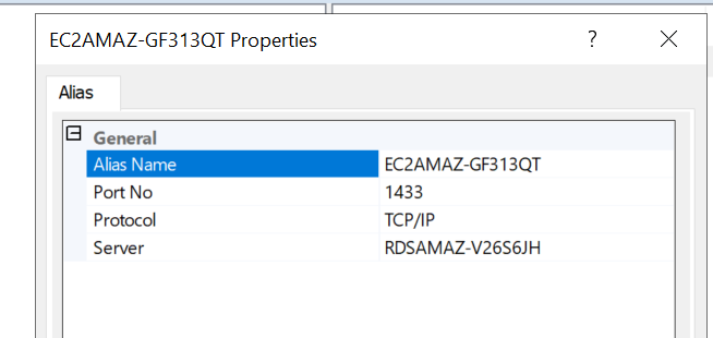\n\nFigure 5: Create Alias\n\nDo the same for Distributor and Subscriber as well on the client machine where you are going to setup transactional replication.\n\nb. **The second option**, if you are not comfortable creating Aliases, is that you open the command prompt and use the ```nslookup``` command for the RDS endpoint. It returns the IP address of the RDS instance, as shown in Figure 6.\n\n\n\nFigure 6. IP address of the RDS instance\n\nNext, you open the host file by navigating to the path C:\\Windows\\System32\\drivers\\etc\\hosts. In this host file, map the RDS instance IP address and hostname as shown in Figure 7.\n\n\t\n\nFigure 7: Map the RDS instance IP address and hostname\n\nRepeat to add Distributor and Subscriber details in Host file.\n\n**Note**: Because IP address may change during any patch upgrade or host replacement, the first option of creating aliases through SQL Server Configuration Manager is preferred.\n\nAfter you connect to SQL Management Studio, it should look like Figure 8.\n\n\n\nFigure 8: Subscriber, Publisher, and Distributor in SQL Management Studio\n\n##### **6. Network and communication setup ( Optional step if done earlier)**\nUse SQL Server Management Studio (SSMS) to make sure that you are able to connect to both RDS Custom SQL Server (Publisher), and Amazon RDS for SQL Server (Subscriber) from SQL Server instance running on Amazon EC2 (Remote Distributor). This might include settings of VPC Security groups, routing tables and Windows Firewall rules. For the example in this post, we launched all the three instances using same VPC and Security group.\n\nOn the Amazon EC2 (Remote Distributor) instance, do the following:\n\n1. Open cmd, nslookup <rds-sqlserver-endpoint>,nslookup <rds-custom-sqlserver-endpoint> to get their IP addresses.\n2. Run **xp_readerrorlog** and look into SQL Error log to get the hostname.\n3. Navigate to the folder path ```C:\\Windows\\System32\\drivers\\etc```.\n4. Edit the host file to include entries for RDS Custom SQL Server (Publisher), Amazon RDS for SQL Server (Subscriber), in the following format ```<IP address> <Hostname> <RDS-Endpoint>```. Figure 9 shows an example host file.\n\n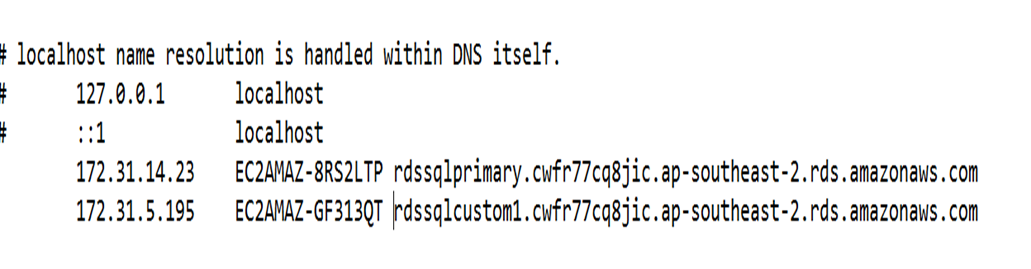\n\nFigure 9: Edited host file\n\n#### **Replication security**\nReplication uses a number of standalone programs, called agents, to carry out the tasks associated with tracking changes and distributing data. By default, replication agents run as jobs scheduled under SQL Server Agent, and SQL Server Agent must be running for the jobs to run. It’s important to plan for security before you configure your replication topology. These steps shows you how to better secure your replication topology. If you are setting up transactional replication between non-domain-joined servers, you create the following Windows account for replication on Publisher and Distributor. If you are using domain-joined servers for replication, then you can use a domain account with appropriate privileges as documented in [Security Role Requirements for Replication – SQL Server | Microsoft Docs](https://docs.microsoft.com/en-us/sql/relational-databases/replication/security/security-role-requirements-for-replication?view=sql-server-ver15). You need Windows Authentication to setup replication.\n\n##### **Create Windows accounts for replication**\nIn this section, you create Windows accounts to run replication agents. You create a separate Windows account on the local server for the following agents. This step is required if you are setting up transactional replication on non-domain joined servers.\n\n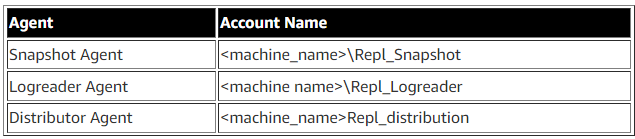\n\n**Note**: All these logins must be created on Publisher and Distributor with system administrator permission, however individual replication agents (Snapshot, Logreader, and Distributor) must run from Distributor only, as shown in the following table:\n\n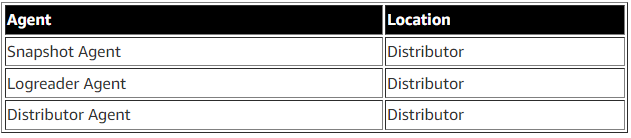\n\n##### **Configure distributor on Remote SQL Server on Amazon EC2 (Distributor)**\nPerform the following steps on SQL Server on Amazon EC2 (Distributor):\nTo create Windows accounts, prepare snapshot folder and configure Distributor, follow the Microsoft [Tutorial: Prepare for replication](https://docs.microsoft.com/en-us/sql/relational-databases/replication/tutorial-preparing-the-server-for-replication?view=sql-server-ver15).\n\n**Note**: All the replication agents account should have full permission on shared snapshot folder.\n\nFigure 10 demonstrates Distributor Properties after you have configured the Distribution Database.\n\n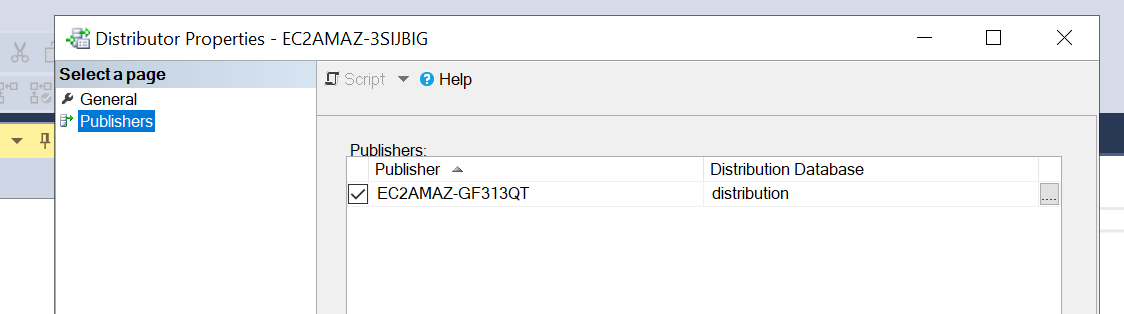\n\nFigure 10: Distributor Properties\n\nYou have now successfully prepared your server for replication. In next section, you configure transactional replication. You create a publication and add the articles that are required to publish on the RDS instance.\n\n##### **Create publication in SQL Server replication on RDS Custom SQL Server (Publisher**)\nOn RDS Custom SQL Server (publisher):\n1. Connect to Amazon RDS Custom for SQL Server instance.\n2. Choose the **Replication** folder to expand it, then and right-click **Publication** and select **New Publication Wizard** as shown below.\n\n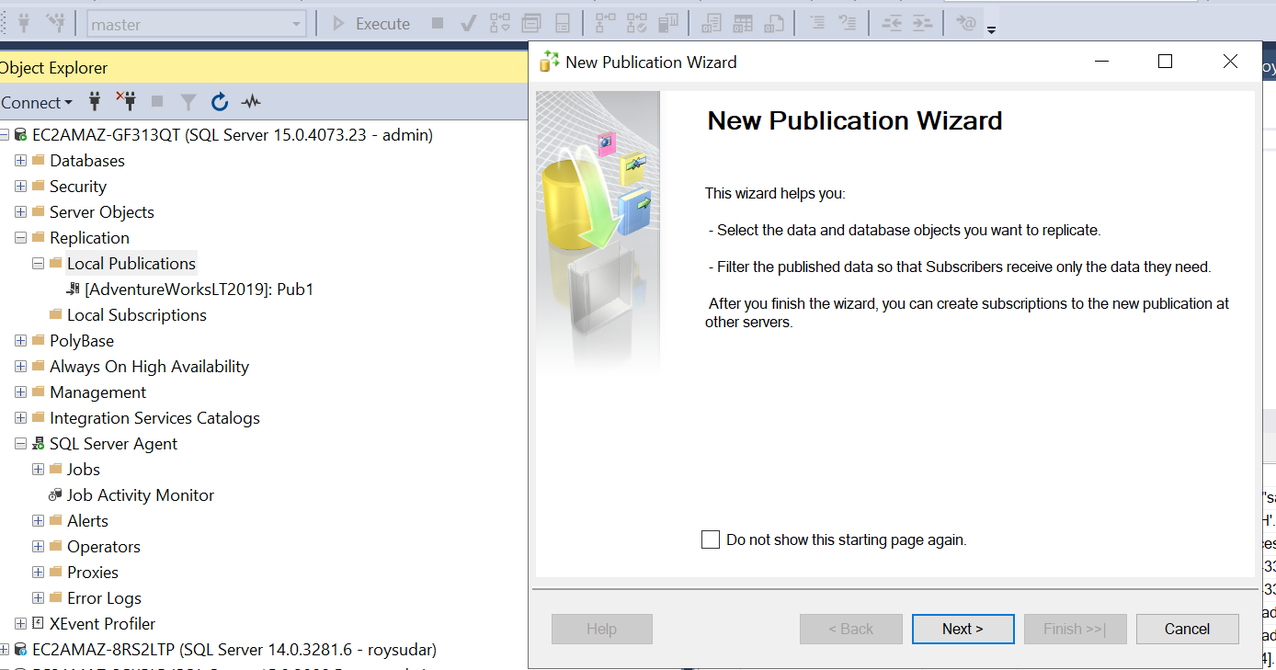\n\nFigure 11: New Publication Wizard\n\nFollow the steps to create a Publication as described in the Microsoft [Tutorial: Configure Transactional Replication](https://docs.microsoft.com/en-us/sql/relational-databases/replication/tutorial-replicating-data-between-continuously-connected-servers?view=sql-server-ver15).\n\n##### **Configure a remote subscriber in SQL Server replication for RDS SQL Server (Subscriber)**\nPerform the following steps on RDS Custom for SQL Server (Publisher). As described earlier, you will use the Amazon RDS for SQL Server as a subscriber for receiving data from Amazon RDS for SQL Server Custom.\n\n###### **To create the subscriber**\n\n1. Go to Amazon RDS for SQL Server Custom and choose **New Subscriptions**.\n2. Choose **Next**.\n\n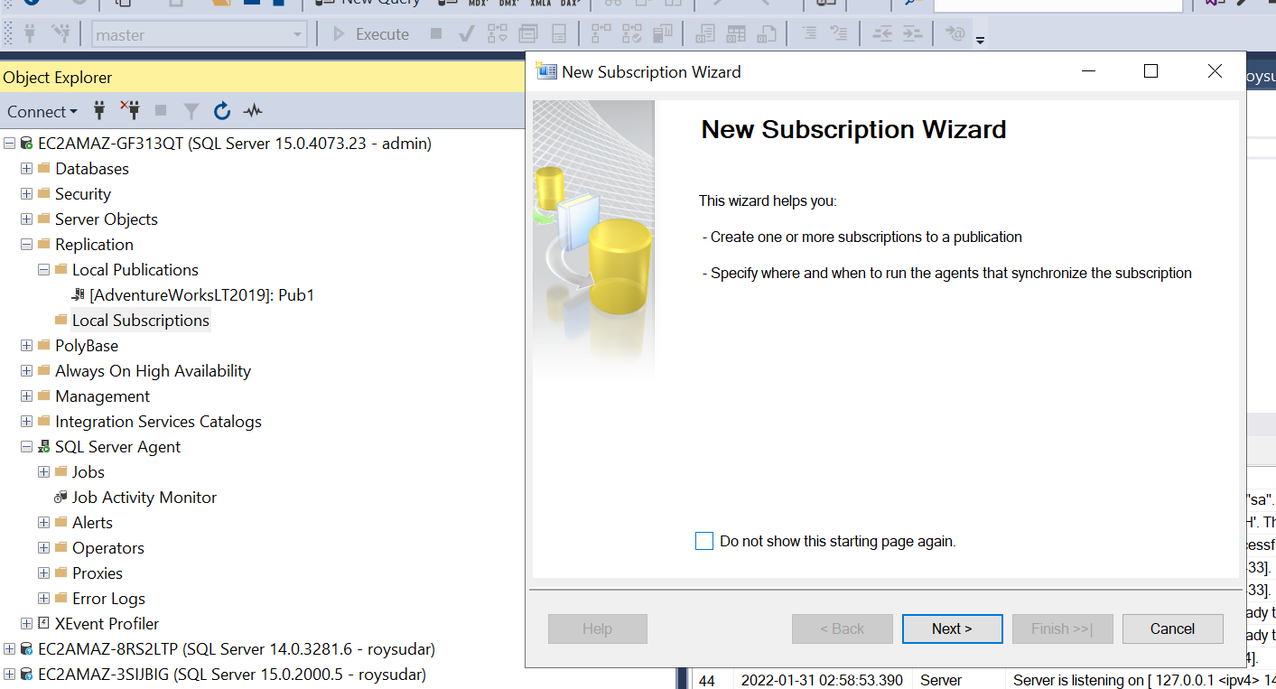\n\nFigure 12: New Subscription Wizard\n\n3. Select **Pub1** Publication. then select **Next**.\n\n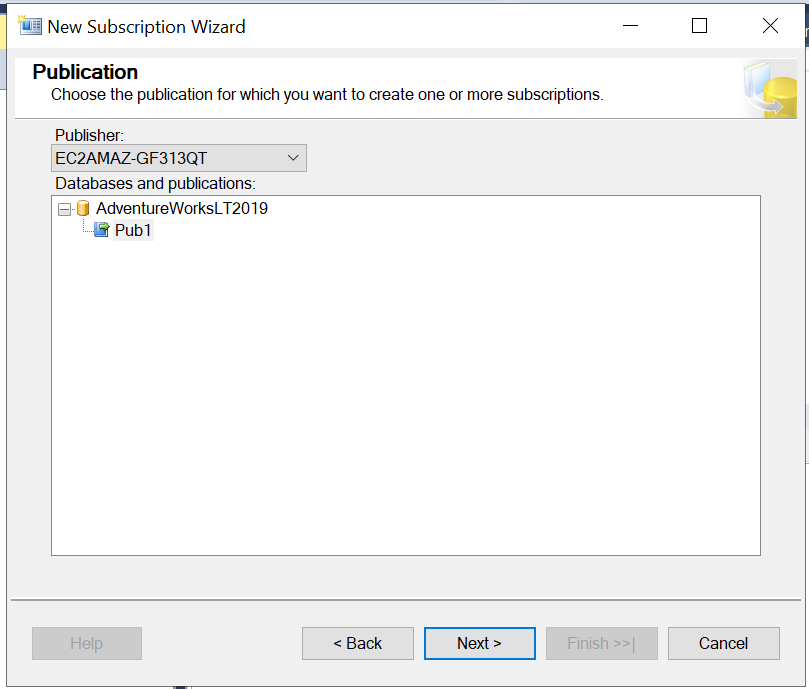\n\nFigure 13: Choose Publication\n\n4. Select **Run all agents** at Distributor and choose **Next**.\n\n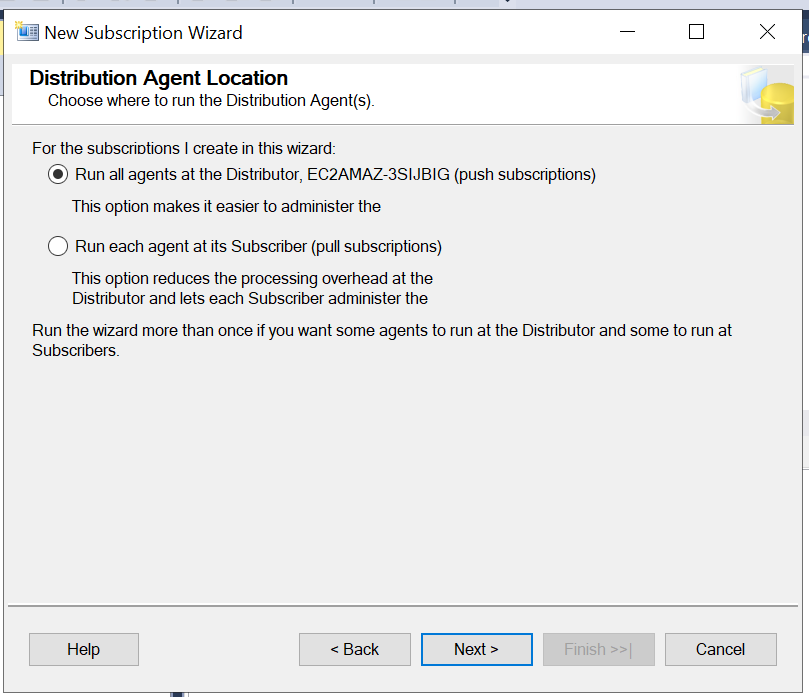\n\nFigure 14: Distribution Agent Location\n\n5. Select subscription server and database and choose **Next**.\n\n\n\nFigure 15: Subscribers\n\n6. Enter Agent Process Account and choose **Next**.\n\n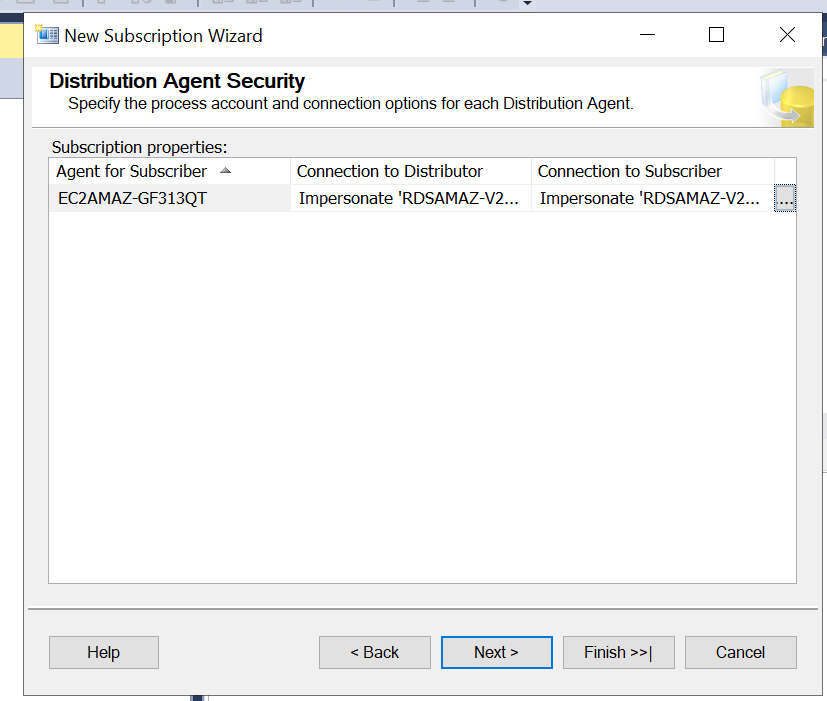\n\nFigure 16: Distribution Agent Security\n\n7. After few steps you will come to last page of the New Subscription Wizard, which will look like the image below:\n\n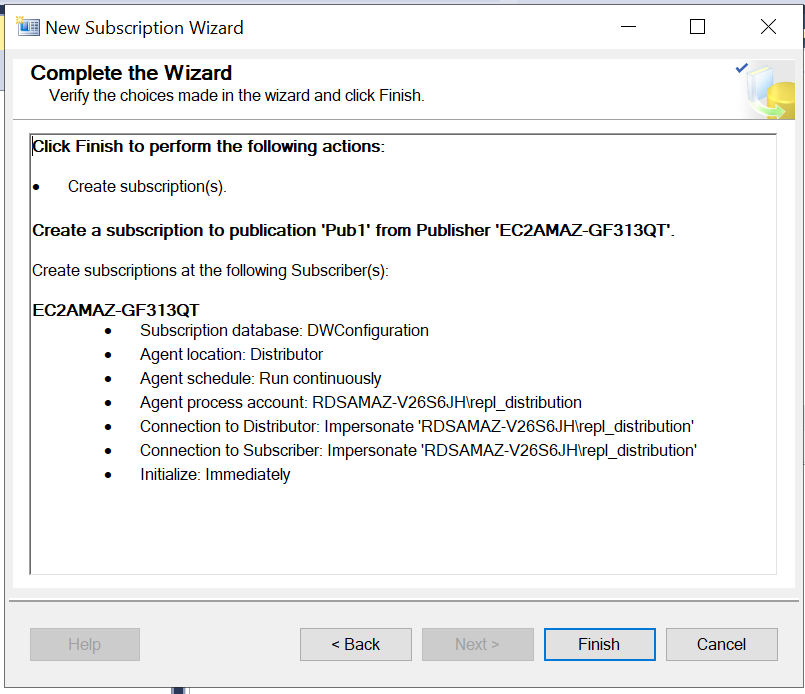\n\nFigure 17: Verify choices and finish\n\n8. After completion of transactional replication setup, make sure replication is running successfully. Go to Publisher server and right-click Replication Folder and select Launch Replication Monitor as shown below:\n\n\n\nFigure 18: Status of Replication in Replication Monitor\n\n\n\nFig 19: Status of Replication in Replication Monitor\n\n#### **Cleaning up RDS for SQL Server Replication Setup**\nTo avoid future charges and remove all the components created while testing this use case, complete the following steps:\n\nOpen the [Amazon RDS service console](https://console.aws.amazon.com/rds/home) , select [Databases](https://console.aws.amazon.com/rds/home#databases:) from left navigation pane. Select the databases you setup replication, go to **Actions**, and then choose **Delete**. It will ask for the final snapshot, and you need to type in ‘delete me’ to delete the RDS for SQL Server databases. For more details you can follow the instructions on the [RDS Documentation](https://docs.aws.amazon.com/AmazonRDS/latest/UserGuide/USER_DeleteInstance.html). On the [Amazon EC2](http://console.aws.amazon.com/ec2/v2/home) service console, locate the SQL Server EC2 instance that you used as remote distributor and [terminate it](https://docs.aws.amazon.com/AWSEC2/latest/UserGuide/terminating-instances.html).\n\n#### **Summary**\nIn this post, you learned about transaction replication between Amazon RDS for SQL Server Custom and Amazon RDS for SQL Server with a remote distributor. Transactional replication is useful if you want subscribers to get incremental changes as they occur, and require low latency between changes made at the publisher and those reflected at the subscriber.\n\nTry out the deployment of the solution in your Amazon RDS for SQL Server Custom instance and if you have any comments or questions, leave them in the comments section.\n\n##### **About the Authors**\n\n\n\n**Sudarshan Roy** is a Senior Database Specialist Cloud Solution Architect with World Wide AWS Database Services Organization (WWSO). He has led large scale Database Migration & Modernization engagements for Enterprise Customers and his passionate of solving complex migration challenges while moving database workload to AWS Cloud.\n\n\n\n**Srikanth Katakam** is a Senior Database Engineer at Amazon Web Services. He works on the RDS team, focusing on commercial database engines, RDS Custom and SQL Server. He enjoys working on technical challenges in Amazon RDS and is passionate about learning from and sharing knowledge with his teammates and AWS customers.","render":"<p><a href=\"https://aws.amazon.com/rds/custom/\" target=\"_blank\">Amazon Relational Database Service (Amazon RDS) Custom for SQL Server</a> is a managed database service for legacy, custom, and packaged applications that require access to the underlying operating system (OS) and database (DB) environment. Amazon RDS Custom is now available for the SQL Server database engine. Amazon RDS Custom for SQL Server automates setup, operation, and scaling of databases in the cloud while granting access to the database and underlying operating system to configure settings, install drivers, and enable native features to meet the dependent application’s requirements.</p>\n<p>In this post, you setup a SQL Server transactional replication between <a href=\"https://aws.amazon.com/rds/sqlserver/\" target=\"_blank\">Amazon RDS Custom for SQL Server</a> (Publisher) and Amazon RDS for SQL Server (Subscriber) using SQL Server running on <a href=\"https://aws.amazon.com/ec2/\" target=\"_blank\">Amazon Elastic Compute Cloud (Amazon EC2)</a> that acts as distributor. You can use this solution in use cases such as moving Production Data to Test and Development environments and migration parts of Databases to new SQL Server instances</p>\n<h4><a id=\"Overview_of_SQL_Server_replication_4\"></a><strong>Overview of SQL Server replication</strong></h4>\n<p>SQL Server transactional replication is implemented by the replication agents Snapshot Agent, Log Reader Agent, and Distribution Agent.</p>\n<ul>\n<li>The Snapshot Agent prepares snapshot files containing schema and data of published tables and database objects, stores the files in the snapshot folder, and records synchronization jobs in the distribution database on the Distributor.</li>\n<li>The Log Reader Agent monitors the transaction log of each database configured for transactional replication, and copies the transactions marked for replication from the transaction log into the distribution database, which acts as a reliable store-and-forward queue.</li>\n<li>The Distribution Agent copies the initial snapshot files from the snapshot folder and the transactions held in the distribution database tables to Subscribers.</li>\n</ul>\n<p>Incremental changes are made at the Publisher flow to Subscribers, according to the schedule of the Distribution Agent. The Distribution Agent can run continuously for minimal latency, or at scheduled intervals.</p>\n<p>Figure 1 shows the principal components of transactional replication.</p>\n<p><img src=\"https://dev-media.amazoncloud.cn/f6d5d8e7276b474387db5df2172da408_image.png\" alt=\"image.png\" /></p>\n<p>Figure 1: Principal components of transactional replication</p>\n<h4><a id=\"Infrastructure_setup_details_19\"></a><strong>Infrastructure setup details</strong></h4>\n<p>For your initial setup, you need one instance of Amazon RDS Custom for SQL Server (Publisher), Amazon RDS for SQL Server (Subscriber), and a SQL Server instance running on Amazon EC2 (Remote Distributor), as shown in Figure 2.</p>\n<p><img src=\"https://dev-media.amazoncloud.cn/613dddfab97349a99d0a59d02bbba15c_image.png\" alt=\"image.png\" /></p>\n<p>Figure 2: Initial set up diagram</p>\n<h4><a id=\"Prerequisites_26\"></a><strong>Prerequisites</strong></h4>\n<p>Before we begin, we assume that you meet the following prerequisites:</p>\n<ol>\n<li>Background knowledge about MS Replication</li>\n<li><a href=\"https://aws.amazon.com/cli/\" target=\"_blank\">AWS CLI</a> installed and configured</li>\n<li>knowledge on how to setup and launch RDS for SQL Server and RDS for Custom SQL Server instances.</li>\n</ol>\n<p>For more information, refer to <a href=\"https://docs.aws.amazon.com/AmazonRDS/latest/UserGuide/custom-creating-sqlserver.html\" target=\"_blank\">Creating and connecting to a DB instance for Amazon RDS for custom SQL Server</a> , <a href=\"https://docs.aws.amazon.com/AmazonRDS/latest/UserGuide/CHAP_GettingStarted.CreatingConnecting.SQLServer.html\" target=\"_blank\">Creating and connecting to a DB instance for Amazon RDS for SQL Server</a>, and <a href=\"https://docs.microsoft.com/en-us/sql/relational-databases/replication/sql-server-replication\" target=\"_blank\">Microsoft SQL Server Replication</a>.</p>\n<p>Since this solution involves AWS resource setup and utilization it is going to incur the costs on your account, refer to <a href=\"https://aws.amazon.com/pricing/\" target=\"_blank\">AWS Pricing</a> for more information.<br />\nWe strongly recommend that you set this up in a non-production instance and run end-to-end validations before you implement this solution in a production environment.</p>\n<h4><a id=\"Instance_creation_38\"></a><strong>Instance creation</strong></h4>\n<p>The following example shows you how to launch instances that are running on the same <a href=\"https://aws.amazon.com/pt/vpc/\" target=\"_blank\">Amazon Virtual Private Cloud (Amazon VPC)</a>, subnet, and <a href=\"https://docs.aws.amazon.com/vpc/latest/userguide/VPC_SecurityGroups.html#VPCSecurityGroups\" target=\"_blank\">security group</a>. If you want to follow along, you must create an Amazon RDS subnet group and a security group. Take note of your database subnet group name as well as your security group id as we’re going to use them on the next steps.</p>\n<p>Overview:</p>\n<ol>\n<li>Create an RDS for SQL Server instance</li>\n<li>Create RDS Custom for SQL Server</li>\n<li>Create SQL Server on windows EC2 Instance</li>\n</ol>\n<h5><a id=\"1_To_create_an_RDS_for_SQL_Server_instance_47\"></a><strong>1. To create an RDS for SQL Server instance</strong></h5>\n<p>Use the following <a href=\"https://aws.amazon.com/cli/\" target=\"_blank\">AWS CLI</a> command to create RDS SQL Server instance with the name <code>rdssqlprimary</code>. In the following example we have specified db subnet group (<code>RDS-custom-sng</code>) and security group (<code>sg-0ab05f9777265061a</code>) from our environment. You must replace it with your db subnet group name and security group id.</p>\n<pre><code class=\"lang-\">aws rds create-db-instance \\\n--engine sqlserver-ee \\\n--engine-version 15.00.4073.23.v1 \\\n--db-instance-identifier rdssqlprimary \\\n--db-instance-class db.m5.4xlarge \\\n--allocated-storage 1000 --storage-type io1 --iops 10000 \\\n--master-username admin \\\n--master-user-password <XXXXX> \\\n--license-model license-included \\\n--db-subnet-group-name RDS-custom-sng \\\n--vpc-security-group-ids sg-0ab05f9777265061a \\\n--publicly-accessible \\\n--region us-west-2\n</code></pre>\n<p>For more details, see <a href=\"https://docs.aws.amazon.com/AmazonRDS/latest/UserGuide/CHAP_GettingStarted.CreatingConnecting.SQLServer.html\" target=\"_blank\">Creating and connecting to a DB instance for Amazon RDS for SQL Server</a>.</p>\n<h5><a id=\"2_To_create_an_RDS_Custom_for_SQL_Server_instance_66\"></a><strong>2. To create an RDS Custom for SQL Server instance</strong></h5>\n<p>Use the following AWS CLI command to create an RDS Custom SQL Server instance with the name <code>rdssqlcustom1</code>. In the following example we have specified db subnet group (<code>RDS-custom-sng</code>) and security group (<code>sg-0ab05f9777265061a</code>) from our environment. You must replace it with your db subnet group name and security group id.</p>\n<pre><code class=\"lang-\">aws rds create-db-instance \\\n--engine custom-sqlserver-ee \\\n--engine-version 15.00.4073.23.v1 \\\n--db-instance-identifier rdssqlcustom1 \\\n--db-instance-class db.m5.4xlarge \\\n--allocated-storage 1000 --storage-type io1 --iops 10000 \\\n--master-username master \\\n--master-user-password <XXXXX> \\\n--kms-key-id <kms-key-id> \\\n--custom-iam-instance-profile RDSCustomIAMProfile \\\n--db-subnet-group-name RDS-custom-sng \\\n--vpc-security-group-ids sg-0ab05f9777265061a \\\n--publicly-accessible \\\n--region us-west-2\n</code></pre>\n<p>For more details, see <a href=\"https://docs.aws.amazon.com/AmazonRDS/latest/UserGuide/custom-creating-sqlserver.html\" target=\"_blank\">Creating and connecting to a DB instance for Amazon RDS Custom for SQL Server</a>.</p>\n<h5><a id=\"3_To_create_an_EC2_Instance_with_SQL_Server_running_on_it_86\"></a><strong>3. To create an EC2 Instance with SQL Server running on it</strong></h5>\n<p>Open the <a href=\"https://console.aws.amazon.com/ec2/\" target=\"_blank\">Amazon EC2 console</a>.</p>\n<ol>\n<li>Choose <strong>Launch Instance</strong>.</li>\n<li>In <strong>Step 1: Choose an Amazon Machine Image (AMI)</strong>, for this example use <strong>Microsoft Windows Server 2019 with SQL Server 2019 ami-0bae68af8d6df6b7f</strong>.<br />\nNote: If you can’t find the exact AMI , select the one which is applicable to your region.</li>\n<li>In <strong>Step 2: Choose an Instance Type</strong>, choose <strong>Next: Configure Instance Details</strong>. For this example, choose <strong>m5.xlarge instance type</strong>.</li>\n<li>In <strong>Step 3: Configure Instance Details</strong>, provide the following information:\n<ul>\n<li>For <strong>Network</strong>, choose the entry for the same VPC that you have specified for RDS SQL Server and RDS Custom SQL Server.</li>\n<li>For <strong>Subnet</strong>, choose the same subnet as RDS SQL Server and RDS Custom SQL Server.</li>\n<li>Set <strong>Auto-assign Public IP</strong> to <strong>Enable</strong></li>\n</ul>\n</li>\n<li>Choose <strong>Next: Add Storage</strong>, change the root storage size to 1000 GiB and volume type to GP2.</li>\n<li>Choose <strong>Next: Add Tags</strong>.</li>\n<li>Enter a name for your instance and choose <strong>Next: Configure Security Group</strong>.</li>\n<li>Choose the same security group used on the creation of your RDS for SQL Server and RDS Custom for SQL Server DB instances.</li>\n<li>Choose <strong>Review and Launch</strong>.</li>\n<li>Choose <strong>Launch</strong>.</li>\n<li>Select the check box for the key pair that you created, and then choose <strong>Launch Instances</strong>.</li>\n</ol>\n<h4><a id=\"Preparation_steps_104\"></a><strong>Preparation steps</strong></h4>\n<h5><a id=\"1_Enable_Remote_Desktop_Protocol_RDP_on_RDS_Custom_SQL_Server_105\"></a><strong>1. Enable Remote Desktop Protocol (RDP) on RDS Custom SQL Server</strong></h5>\n<p>To connect RDS Custom for SQL Server instances, follow the instructions to <a href=\"https://docs.aws.amazon.com/AmazonRDS/latest/UserGuide/custom-creating-sqlserver.html#custom-creating-sqlserver.rdp\" target=\"_blank\">enable Remote Desktop Protocol (RDP)</a>.</p>\n<h5><a id=\"2_Pause_RDS_Custom_automation_temporarily_108\"></a><strong>2. Pause RDS Custom automation temporarily</strong></h5>\n<p>Follow the instructions to <a href=\"https://docs.aws.amazon.com/AmazonRDS/latest/UserGuide/custom-managing.html#custom-managing.pausing\" target=\"_blank\">pause RDS Custom automation</a> for the duration of the replication setup, so that RDS automation doesn’t interfere with the configuration tasks that you perform.</p>\n<h5><a id=\"3_Validate_SERVERNAME_is_set_to_correct_value_111\"></a><strong>3. Validate @@SERVERNAME is set to correct value</strong></h5>\n<p>For SQL Server running on all the three nodes (Publisher, Subscriber, and Distributor), Host name can change in some scenarios like a host replacement on RDS, Failover in a Multi-AZ (high availability) configuration. Make sure that @@SERVERNAME is set to correct value .</p>\n<h5><a id=\"4_Validate_SQL_Server_Agent_is_running_on_Publisher_Subscriber_and_Distributor_114\"></a><strong>4. Validate SQL Server Agent is running on Publisher, Subscriber, and Distributor</strong></h5>\n<p>Make sure SQL Server Agent is running on Publisher, Subscriber and Distributor. If not start the agent.</p>\n<h5><a id=\"5_Use_server_name_instead_of_RDS_SQL_Server_endpoints_117\"></a><strong>5. Use server name instead of RDS SQL Server endpoint</strong>s</h5>\n<p>If you are using endpoints to create Publication, you might run into the following Cannot connect error “SQL Server replication requires the actual server name to make a connection to the server”, as shown in Figure 3.</p>\n<p><img src=\"https://dev-media.amazoncloud.cn/bcb6d829711e42d68069e3cf50e54ee6_image.png\" alt=\"image.png\" /></p>\n<p>Figure 3: Cannot connect error.</p>\n<p>To resolve the issue:</p>\n<ol>\n<li>Check the Amazon RDS Custom for SQL Server name using select <code>@@servername</code>.</li>\n<li>Run <code>xp_readerrorlog</code> and look into SQL Errorlog and you should find that SQL Server Name is different, as shown in Figure 4.</li>\n</ol>\n<p><img src=\"https://dev-media.amazoncloud.cn/a4e81de0ddcc4bc5aa90cbfcf48cb016_image.png\" alt=\"image.png\" /></p>\n<p>Figure 4. SQL Server error log, server name is RDSAMAZ-V26S6JH.</p>\n<ol start=\"3\">\n<li>To resolve this, there are two options.<br />\na. <strong>The first option</strong> is to open SQL Server Configuration Manager and create Alias Name, EC2AMAZ-GF313QT in our case, on Port 1433, as shown in Figure 5.</li>\n</ol>\n<p><img src=\"https://dev-media.amazoncloud.cn/70ce4c462abf408099e43bfb55250b94_image.png\" alt=\"image.png\" /></p>\n<p>Figure 5: Create Alias</p>\n<p>Do the same for Distributor and Subscriber as well on the client machine where you are going to setup transactional replication.</p>\n<p>b. <strong>The second option</strong>, if you are not comfortable creating Aliases, is that you open the command prompt and use the <code>nslookup</code> command for the RDS endpoint. It returns the IP address of the RDS instance, as shown in Figure 6.</p>\n<p><img src=\"https://dev-media.amazoncloud.cn/d953728ea8374cabb7dcfab2caccd511_image.png\" alt=\"image.png\" /></p>\n<p>Figure 6. IP address of the RDS instance</p>\n<p>Next, you open the host file by navigating to the path C:\\Windows\\System32\\drivers\\etc\\hosts. In this host file, map the RDS instance IP address and hostname as shown in Figure 7.</p>\n<p><img src=\"https://dev-media.amazoncloud.cn/78f3825d036445ae9ad6ab9b0afaf283_image.png\" alt=\"image.png\" /></p>\n<p>Figure 7: Map the RDS instance IP address and hostname</p>\n<p>Repeat to add Distributor and Subscriber details in Host file.</p>\n<p><strong>Note</strong>: Because IP address may change during any patch upgrade or host replacement, the first option of creating aliases through SQL Server Configuration Manager is preferred.</p>\n<p>After you connect to SQL Management Studio, it should look like Figure 8.</p>\n<p><img src=\"https://dev-media.amazoncloud.cn/dd97035ba605442cb886122c20a9ab11_image.png\" alt=\"image.png\" /></p>\n<p>Figure 8: Subscriber, Publisher, and Distributor in SQL Management Studio</p>\n<h5><a id=\"6_Network_and_communication_setup__Optional_step_if_done_earlier_164\"></a><strong>6. Network and communication setup ( Optional step if done earlier)</strong></h5>\n<p>Use SQL Server Management Studio (SSMS) to make sure that you are able to connect to both RDS Custom SQL Server (Publisher), and Amazon RDS for SQL Server (Subscriber) from SQL Server instance running on Amazon EC2 (Remote Distributor). This might include settings of VPC Security groups, routing tables and Windows Firewall rules. For the example in this post, we launched all the three instances using same VPC and Security group.</p>\n<p>On the Amazon EC2 (Remote Distributor) instance, do the following:</p>\n<ol>\n<li>Open cmd, nslookup <rds-sqlserver-endpoint>,nslookup <rds-custom-sqlserver-endpoint> to get their IP addresses.</li>\n<li>Run <strong>xp_readerrorlog</strong> and look into SQL Error log to get the hostname.</li>\n<li>Navigate to the folder path <code>C:\\Windows\\System32\\drivers\\etc</code>.</li>\n<li>Edit the host file to include entries for RDS Custom SQL Server (Publisher), Amazon RDS for SQL Server (Subscriber), in the following format <code><IP address> <Hostname> <RDS-Endpoint></code>. Figure 9 shows an example host file.</li>\n</ol>\n<p><img src=\"https://dev-media.amazoncloud.cn/53a96101abee44f2ae651f401260ae13_image.png\" alt=\"image.png\" /></p>\n<p>Figure 9: Edited host file</p>\n<h4><a id=\"Replication_security_178\"></a><strong>Replication security</strong></h4>\n<p>Replication uses a number of standalone programs, called agents, to carry out the tasks associated with tracking changes and distributing data. By default, replication agents run as jobs scheduled under SQL Server Agent, and SQL Server Agent must be running for the jobs to run. It’s important to plan for security before you configure your replication topology. These steps shows you how to better secure your replication topology. If you are setting up transactional replication between non-domain-joined servers, you create the following Windows account for replication on Publisher and Distributor. If you are using domain-joined servers for replication, then you can use a domain account with appropriate privileges as documented in <a href=\"https://docs.microsoft.com/en-us/sql/relational-databases/replication/security/security-role-requirements-for-replication?view=sql-server-ver15\" target=\"_blank\">Security Role Requirements for Replication – SQL Server | Microsoft Docs</a>. You need Windows Authentication to setup replication.</p>\n<h5><a id=\"Create_Windows_accounts_for_replication_181\"></a><strong>Create Windows accounts for replication</strong></h5>\n<p>In this section, you create Windows accounts to run replication agents. You create a separate Windows account on the local server for the following agents. This step is required if you are setting up transactional replication on non-domain joined servers.</p>\n<p><img src=\"https://dev-media.amazoncloud.cn/eb227c308f5c48edbc69a29adde6f4e6_image.png\" alt=\"image.png\" /></p>\n<p><strong>Note</strong>: All these logins must be created on Publisher and Distributor with system administrator permission, however individual replication agents (Snapshot, Logreader, and Distributor) must run from Distributor only, as shown in the following table:</p>\n<p><img src=\"https://dev-media.amazoncloud.cn/2e833d18ff5d4095b7d379d2adb4cfb7_image.png\" alt=\"image.png\" /></p>\n<h5><a id=\"Configure_distributor_on_Remote_SQL_Server_on_Amazon_EC2_Distributor_190\"></a><strong>Configure distributor on Remote SQL Server on Amazon EC2 (Distributor)</strong></h5>\n<p>Perform the following steps on SQL Server on Amazon EC2 (Distributor):<br />\nTo create Windows accounts, prepare snapshot folder and configure Distributor, follow the Microsoft <a href=\"https://docs.microsoft.com/en-us/sql/relational-databases/replication/tutorial-preparing-the-server-for-replication?view=sql-server-ver15\" target=\"_blank\">Tutorial: Prepare for replication</a>.</p>\n<p><strong>Note</strong>: All the replication agents account should have full permission on shared snapshot folder.</p>\n<p>Figure 10 demonstrates Distributor Properties after you have configured the Distribution Database.</p>\n<p><img src=\"https://dev-media.amazoncloud.cn/20e3c438535941d1b784ab54ea600062_image.png\" alt=\"image.png\" /></p>\n<p>Figure 10: Distributor Properties</p>\n<p>You have now successfully prepared your server for replication. In next section, you configure transactional replication. You create a publication and add the articles that are required to publish on the RDS instance.</p>\n<h5><a id=\"Create_publication_in_SQL_Server_replication_on_RDS_Custom_SQL_Server_Publisher_204\"></a><strong>Create publication in SQL Server replication on RDS Custom SQL Server (Publisher</strong>)</h5>\n<p>On RDS Custom SQL Server (publisher):</p>\n<ol>\n<li>Connect to Amazon RDS Custom for SQL Server instance.</li>\n<li>Choose the <strong>Replication</strong> folder to expand it, then and right-click <strong>Publication</strong> and select <strong>New Publication Wizard</strong> as shown below.</li>\n</ol>\n<p><img src=\"https://dev-media.amazoncloud.cn/ca01f2e0a7364c188138d1d9a95f7d81_image.png\" alt=\"image.png\" /></p>\n<p>Figure 11: New Publication Wizard</p>\n<p>Follow the steps to create a Publication as described in the Microsoft <a href=\"https://docs.microsoft.com/en-us/sql/relational-databases/replication/tutorial-replicating-data-between-continuously-connected-servers?view=sql-server-ver15\" target=\"_blank\">Tutorial: Configure Transactional Replication</a>.</p>\n<h5><a id=\"Configure_a_remote_subscriber_in_SQL_Server_replication_for_RDS_SQL_Server_Subscriber_215\"></a><strong>Configure a remote subscriber in SQL Server replication for RDS SQL Server (Subscriber)</strong></h5>\n<p>Perform the following steps on RDS Custom for SQL Server (Publisher). As described earlier, you will use the Amazon RDS for SQL Server as a subscriber for receiving data from Amazon RDS for SQL Server Custom.</p>\n<h6><a id=\"To_create_the_subscriber_218\"></a><strong>To create the subscriber</strong></h6>\n<ol>\n<li>Go to Amazon RDS for SQL Server Custom and choose <strong>New Subscriptions</strong>.</li>\n<li>Choose <strong>Next</strong>.</li>\n</ol>\n<p><img src=\"https://dev-media.amazoncloud.cn/5fb94bcc705548f188506c96f21f1035_image.png\" alt=\"image.png\" /></p>\n<p>Figure 12: New Subscription Wizard</p>\n<ol start=\"3\">\n<li>Select <strong>Pub1</strong> Publication. then select <strong>Next</strong>.</li>\n</ol>\n<p><img src=\"https://dev-media.amazoncloud.cn/b386208add294e7bb9ca3f1876f2e50e_image.png\" alt=\"image.png\" /></p>\n<p>Figure 13: Choose Publication</p>\n<ol start=\"4\">\n<li>Select <strong>Run all agents</strong> at Distributor and choose <strong>Next</strong>.</li>\n</ol>\n<p><img src=\"https://dev-media.amazoncloud.cn/3cbef351b0a342bd877bdef77404745a_image.png\" alt=\"image.png\" /></p>\n<p>Figure 14: Distribution Agent Location</p>\n<ol start=\"5\">\n<li>Select subscription server and database and choose <strong>Next</strong>.</li>\n</ol>\n<p><img src=\"https://dev-media.amazoncloud.cn/a7f20910dc7540848a91fa1228796e82_image.png\" alt=\"image.png\" /></p>\n<p>Figure 15: Subscribers</p>\n<ol start=\"6\">\n<li>Enter Agent Process Account and choose <strong>Next</strong>.</li>\n</ol>\n<p><img src=\"https://dev-media.amazoncloud.cn/e6e3f87db92c4a4bab10b1c24a2e451d_image.png\" alt=\"image.png\" /></p>\n<p>Figure 16: Distribution Agent Security</p>\n<ol start=\"7\">\n<li>After few steps you will come to last page of the New Subscription Wizard, which will look like the image below:</li>\n</ol>\n<p><img src=\"https://dev-media.amazoncloud.cn/08d77dc940254a798fbd6072278cc3f9_image.png\" alt=\"image.png\" /></p>\n<p>Figure 17: Verify choices and finish</p>\n<ol start=\"8\">\n<li>After completion of transactional replication setup, make sure replication is running successfully. Go to Publisher server and right-click Replication Folder and select Launch Replication Monitor as shown below:</li>\n</ol>\n<p><img src=\"https://dev-media.amazoncloud.cn/a844d4a8cf754309a1cb09c3cf9e7c33_image.png\" alt=\"image.png\" /></p>\n<p>Figure 18: Status of Replication in Replication Monitor</p>\n<p><img src=\"https://dev-media.amazoncloud.cn/9e5817d5217b49da9909377c21110cb8_image.png\" alt=\"image.png\" /></p>\n<p>Fig 19: Status of Replication in Replication Monitor</p>\n<h4><a id=\"Cleaning_up_RDS_for_SQL_Server_Replication_Setup_267\"></a><strong>Cleaning up RDS for SQL Server Replication Setup</strong></h4>\n<p>To avoid future charges and remove all the components created while testing this use case, complete the following steps:</p>\n<p>Open the <a href=\"https://console.aws.amazon.com/rds/home\" target=\"_blank\">Amazon RDS service console</a> , select <a href=\"https://console.aws.amazon.com/rds/home#databases:\" target=\"_blank\">Databases</a> from left navigation pane. Select the databases you setup replication, go to <strong>Actions</strong>, and then choose <strong>Delete</strong>. It will ask for the final snapshot, and you need to type in ‘delete me’ to delete the RDS for SQL Server databases. For more details you can follow the instructions on the <a href=\"https://docs.aws.amazon.com/AmazonRDS/latest/UserGuide/USER_DeleteInstance.html\" target=\"_blank\">RDS Documentation</a>. On the <a href=\"http://console.aws.amazon.com/ec2/v2/home\" target=\"_blank\">Amazon EC2</a> service console, locate the SQL Server EC2 instance that you used as remote distributor and <a href=\"https://docs.aws.amazon.com/AWSEC2/latest/UserGuide/terminating-instances.html\" target=\"_blank\">terminate it</a>.</p>\n<h4><a id=\"Summary_272\"></a><strong>Summary</strong></h4>\n<p>In this post, you learned about transaction replication between Amazon RDS for SQL Server Custom and Amazon RDS for SQL Server with a remote distributor. Transactional replication is useful if you want subscribers to get incremental changes as they occur, and require low latency between changes made at the publisher and those reflected at the subscriber.</p>\n<p>Try out the deployment of the solution in your Amazon RDS for SQL Server Custom instance and if you have any comments or questions, leave them in the comments section.</p>\n<h5><a id=\"About_the_Authors_277\"></a><strong>About the Authors</strong></h5>\n<p><img src=\"https://dev-media.amazoncloud.cn/0389cda0be5c4cf3a30b5f9e934316ee_image.png\" alt=\"image.png\" /></p>\n<p><strong>Sudarshan Roy</strong> is a Senior Database Specialist Cloud Solution Architect with World Wide AWS Database Services Organization (WWSO). He has led large scale Database Migration & Modernization engagements for Enterprise Customers and his passionate of solving complex migration challenges while moving database workload to AWS Cloud.</p>\n<p><img src=\"https://dev-media.amazoncloud.cn/a83baff089ad488a89da91c93fcd262d_image.png\" alt=\"image.png\" /></p>\n<p><strong>Srikanth Katakam</strong> is a Senior Database Engineer at Amazon Web Services. He works on the RDS team, focusing on commercial database engines, RDS Custom and SQL Server. He enjoys working on technical challenges in Amazon RDS and is passionate about learning from and sharing knowledge with his teammates and AWS customers.</p>\n"}
Configure SQL Server replication between Amazon RDS Custom for SQL Server and Amazon RDS for SQL Server
海外精选

海外精选的内容汇集了全球优质的亚马逊云科技相关技术内容。同时,内容中提到的“AWS”
是 “Amazon Web Services” 的缩写,在此网站不作为商标展示。

 0
0 0
0亚马逊云科技解决方案 基于行业客户应用场景及技术领域的解决方案
联系亚马逊云科技专家
亚马逊云科技解决方案
基于行业客户应用场景及技术领域的解决方案
联系专家

0
目录

 分享
分享 点赞
点赞 收藏
收藏 目录
目录立即注册,开启您的免费套餐
立即关注

亚马逊云开发者
公众号

User Group
公众号

亚马逊云科技
官方小程序
“AWS” 是 “Amazon Web Services” 的缩写,在此网站不作为商标展示。
立即关注
亚马逊云开发者
公众号
User Group
公众号
亚马逊云科技
官方小程序
“AWS” 是 “Amazon Web Services” 的缩写,在此网站不作为商标展示。
关于我们 
更多资源
开发者工具
更多支持
立即关注
亚马逊云开发者
公众号
User Group
公众号
亚马逊云科技
官方小程序
“AWS” 是 “Amazon Web Services” 的缩写,在此网站不作为商标展示。
