{"value":"Transactional data lake technologies such as Apache Hudi, Delta Lake, Apache Iceberg, and [Amazon Web ServicesLake Formation governed tables](https://docs.aws.amazon.com/lake-formation/latest/dg/governed-tables-main.html) is evolving rapidly, and gaining great popularity. These technologies simplified the data processing pipeline significantly, and they provided further useful capabilities like upserts, rolling back, and time travel queries.\n\nIn [the first post of this series](https://aws.amazon.com/blogs/big-data/part-1-integrate-apache-hudi-delta-lake-apache-iceberg-datasets-at-scale-aws-glue-studio-notebook/), we went through how to process Apache Hudi, Delta Lake, and Apache Iceberg datasets using [Amazon Web Services Glue](https://aws.amazon.com/glue/) connectors. Amazon Web Services Glue simplifies reading and writing your data in those data lake formats, and building the data lakes on top of those technologies. Running the sample notebooks on Amazon Web Services Glue Studio notebook, you could interactively develop and run your code, then immediately see the results. The notebooks let you explore how those technologies work when you have coding experience.\n\nThis second post focuses on other use cases for customers who prefer visual job authoring without writing custom code. Even without coding experience, you can easily build your transactional data lakes on Amazon Web ServicesGlue Studio visual editor, and take advantage of those transactional data lake technologies. In addition, you can also use [Amazon Athena](https://aws.amazon.com/athena/) to query the data stored using Hudi and Iceberg. This tutorial demonstrates how to read and write each format on Amazon Web Services Glue Studio visual editor, and then how to query from Athena.\n\n**Process Apache Hudi, Delta Lake, Apache Iceberg dataset at scale**\n- Part 1: [Amazon Web Services Glue Studio Notebook](https://aws.amazon.com/blogs/big-data/part-1-integrate-apache-hudi-delta-lake-apache-iceberg-datasets-at-scale-aws-glue-studio-notebook/)\n- **Part 2: Using Amazon Web Services Glue Studio Visual Editor**\n\n\n\n#### **Prerequisites**\n\n\nThe following are the instructions to read/write tables using each data lake format on Amazon Web Services Glue Studio Visual Editor. You can use any of the marketplace connector or the custom connector based on your requirements.\n\nTo continue this tutorial, you must create the following Amazon Web Services resources in advance:\n\n- [Amazon Web Services Identity and Access Management (IAM)](https://aws.amazon.com/iam/) role for your ETL job or notebook as instructed in [Set up IAM permissions for Amazon Web Services Glue Studio](https://docs.aws.amazon.com/glue/latest/ug/setting-up.html#getting-started-iam-permissions).\n- [Amazon Simple Storage Service (Amazon S3)](https://aws.amazon.com/s3/) bucket for storing data.\n- [AWS Glue](https://aws.amazon.com/cn/glue/?trk=cndc-detail) connection created in [the previous post](https://aws.amazon.com/blogs/big-data/part-1-integrate-apache-hudi-delta-lake-apache-iceberg-datasets-at-scale-aws-glue-studio-notebook/).\n\n\n#### **Reads/writes using the connector on Amazon Web Services Glue Studio Visual Editor**\n\n\nIn this tutorial, you read and write each of the transaction data lake format data on the Amazon Web Services Glue Studio Visual Editor. There are three main configurations: **connection, connection options**, and **job parameters** that you must configure per the data lake format. Note that no code is included in this tutorial. Let’s see how it works.\n\n\n##### **Apache Hudi writes**\n\nComplete following steps to write into Apache Hudi table using the connector:\n\n1. Open Amazon Web Services Glue Studio.\n2. Choose **Jobs**.\n3. Choose **Visual with a source and target**.\n4. For Source, choose **[Amazon S3](https://aws.amazon.com/cn/s3/?trk=cndc-detail)**.\n5. For Target, choose ```hudi-0101-byoc-connector```.\n6. Choose **Create**.\n7. Under **Visual**, choose **Data source – S3 bucket**.\n8. Under **Node properties**, for **S3 source type**, choose **S3 location**.\n9. For **S3 URL**, enter ```s3://covid19-lake/rearc-covid-19-world-cases-deaths-testing/json/```.\n10. Choose **Data target – Connector**.\n11. Under **Node properties**, for **Connection**, choose hudi-0101-byoc-connection.\n12. For **Connection options**, enter the following pairs of Key and Value (choose **Add new option** to enter a new pair).\na. Key: ```path```. Value: ```<Your S3 path for Hudi table location>```\nb. Key: ```hoodie.table.name```, Value: ```test```\nc. Key: ```hoodie.datasource.write.storage.type```, Value: ```COPY_ON_WRITE```\nd. Key: ```hoodie.datasource.write.operation```, Value: ```upsert```\ne. Key: ```hoodie.datasource.write.recordkey.field```, Value: ```location```\nf. Key: ```hoodie.datasource.write.precombine.field```, Value: ```date```\ng. Key: ```hoodie.datasource.write.partitionpath.field```, Value: ```iso_code```\nh. Key: ```hoodie.datasource.write.hive_style_partitioning```, Value: ```true```\ni. Key: ```hoodie.datasource.hive_sync.enable```, Value: ```true```\ng. Key: ```hoodie.datasource.hive_sync.database```, Value: ```hudi```\nk. Key: ```hoodie.datasource.hive_sync.table```, Value: ```test```\nl. Key: ```hoodie.datasource.hive_sync.partition_fields```, Value: ```iso_code```\nm. Key: ```hoodie.datasource.hive_sync.partition_extractor_class```, Value: ```org.apache.hudi.hive.MultiPartKeysValueExtractor```\nn. Key: ```hoodie.datasource.hive_sync.use_jdbc```, Value: ```false```\no. Key: ```hoodie.datasource.hive_sync.mode```, Value: ```hms```\n\n13. Under **Job details**, for **IAM Role**, choose your IAM role.\n14. Under **Advanced properties**, for **Job parameters**, choose **Add new parameter**.\n15. For **Key**, enter ```--conf```.\n16. For **Value**, enter ```spark.serializer=org.apache.spark.serializer.KryoSerializer```.\n17. Choose **Save**.\n18. Choose **Run**.\n\n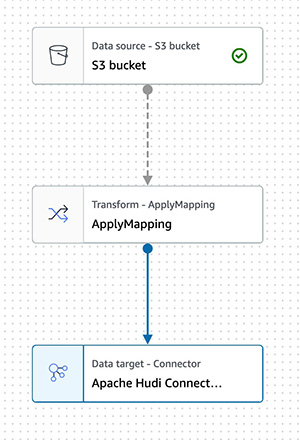\n\n##### **Apache Hudi reads**\n\nComplete following steps to read from the Apache Hudi table that you created in the previous section using the connector:\n\n1. Open Amazon Web Services Glue Studio.\n2. Choose **Jobs**.\n3. Choose **Visual with a source and target**.\n4. For Source, choose ```hudi-0101-byoc-connector```.\n5. For Target, choose **[Amazon S3](https://aws.amazon.com/cn/s3/?trk=cndc-detail)**.\n6. Choose **Create**.\n7. Under **Visual**, choose **Data source – Connection**.\n8. Under **Node properties**, for **Connection**, choose ```hudi-0101-byoc-connection```.\n9. For **Connection options**, choose **Add new option**.\n10. For **Key**, enter ```path```. For **Value**, enter your S3 path for your Hudi table that you created in the previous section.\n11. Choose **Transform – ApplyMapping**, and choose **Remove**.\n12. Choose **Data target – S3 bucket**.\n13. Under **Data target properties**, for Format, choose **JSON**.\n14. For **S3 Target type**. choose **S3** location.\n15. For **S3 Target Location** enter your S3 path for output location.\n16. Under **Job details**, for **IAM Role**, choose your IAM role.\n17. Choose **Save**.\n18. Choose **Run**.\n\n\n\n##### **Delta Lake writes**\n\n\nComplete the following steps to write into the Delta Lake table using the connector:\n\n1. Open Amazon Web Services Glue Studio.\n2. Choose **Jobs**.\n3. Choose **Visual with a source and target**.\n4. For Source, choose **[Amazon S3](https://aws.amazon.com/cn/s3/?trk=cndc-detail)**.\n5. For Target, choose ```delta-100-byoc-connector```.\n6. Choose **Create**.\n7. Under **Visual**, choose **Data source – S3 bucket**.\n8. Under **Node properties**, for **S3 source type**, choose **S3 location**.\n9. For **S3 URL**, enter ```s3://covid19-lake/rearc-covid-19-world-cases-deaths-testing/json/```.\n10. Choose **Data target – Connector**.\n11. Under **Node properties**, for **Connection**, choose your ```delta-100-byoc-connection```.\n12. For **Connection options**, choose **Add new option**.\n13. For **Key**, enter ```path```. For Value, enter your S3 path for Delta table location. Choose **Add new option**.\n14. For **Key**, enter ```partitionKeys```. For Value, enter ```iso_code```.\n15. Under **Job** details, for **IAM Role**, choose your IAM role.\n16. Under **Advanced properties**, for **Job parameters**, choose **Add new parameter**.\n17. For **Key**, enter ```--conf```.\n18. For **Value**, enter\n\n```\\nspark.sql.extensions=io.delta.sql.DeltaSparkSessionExtension --conf spark.sql.catalog.spark_catalog=org.apache.spark.sql.delta.catalog.DeltaCatalog.\\n```\n19. Choose **Save**.\n20. Choose **Run**.\n\n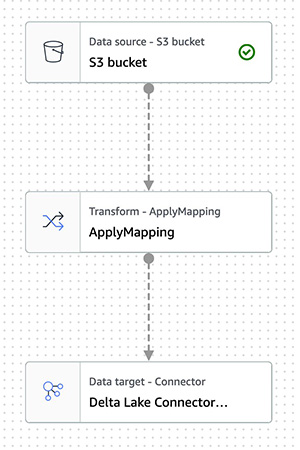\n\n\n##### **Delta Lake reads**\n\n\nComplete the following steps to read from the Delta Lake table that you created in the previous section using the connector:\n\n1. Open Amazon Web Services Glue Studio.\n2. Choose **Jobs**.\n3. Choose **Visual with a source and target**.\n4. For Source, choose ```delta-100-byoc-connector```.\n5. For Target, choose **[Amazon S3](https://aws.amazon.com/cn/s3/?trk=cndc-detail)**.\n6. Choose **Create**.\n7. Under **Visual**, choose **Data source – Connection**.\n8. Under **Node properties**, for **Connection**, choose ```delta-100-byoc-connection```.\n9. For **Connection options**, choose **Add new option**.\n10. For **Key**, enter ```path```. For **Value**, enter your S3 path for Delta table that you created in the previous section. Choose **Add new option**.\n11. For **Key**, enter ```partitionKeys```. For **Value**, enter ```iso_code```.\n12. Choose **Transform – ApplyMapping**, and choose **Remove**.\n13. Choose **Data target – S3 bucket**.\n14. Under **Data target properties**, for **Format**, choose **JSON**.\n15. For **S3 Target type**, choose **S3 location**.\n16. For **S3 Target Location** enter your S3 path for output location.\n17. Under **Job details**, for **IAM Role**, choose your IAM role.\n18. Under **Advanced properties**, for **Job parameters**, choose **Add new parameter**.\n19. For **Key**, enter ```--conf```.\n20. For **Value**, enter\n\n```\\nspark.sql.extensions=io.delta.sql.DeltaSparkSessionExtension --conf spark.sql.catalog.spark_catalog=org.apache.spark.sql.delta.catalog.DeltaCatalog\\n```\n\n21. Choose **Save**.\n22. Choose **Run**.\n\n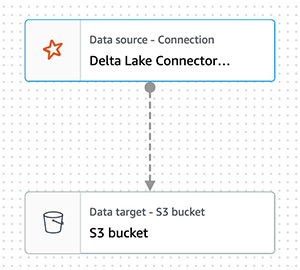\n\n##### **Apache Iceberg writes**\n\nComplete the following steps to write into Apache Iceberg table using the connector:\n\n1. Open Amazon Web Services Glue console.\n2. Choose **Databases**.\n3. Choose **Add database**.\n4. For **database name**, enter iceberg, and choose **Create**.\n5. Open Amazon Web Services Glue Studio.\n6. Choose **Jobs**.\n7. Choose **Visual with a source and target**.\n8. For Source, choose **[Amazon S3](https://aws.amazon.com/cn/s3/?trk=cndc-detail)**.\n9. For Target, choose ```iceberg-0131-byoc-connector```.\n10. Choose **Create**.\n11. Under **Visual**, choose **Data source – S3 bucket**.\n12. Under **Node properties**, for **S3 source type**, choose **S3 location**.\n13. For **S3 URL**, enter ```s3://covid19-lake/rearc-covid-19-world-cases-deaths-testing/json/```.\n14. Choose **Data target – Connector**.\n15. Under **Node properties**, for **Connection**, choose ```iceberg-0131-byoc-connection```.\n16. For **Connection options**, choose **Add new option**.\n17. For **Key**, enter ```path```. For Value, enter ```glue_catalog.iceberg.test```.\n18. Choose **SQL** under **Transform** to create a new Amazon Web Services Glue Studio node.\n19. Under **Node properties**, for **Node parents**, choose **ApplyMapping**.\n20. Under **Transform**, for **SQL alias**, verify that ```myDataSource``` is entered.\n21. For **SQL query**, enter ```CREATE TABLE glue_catalog.iceberg.test AS SELECT * FROM myDataSource WHERE 1=2```. This is to create a table definition with no records because the Iceberg target requires table definition before data ingestion.\n22. Under **Job details**, for **IAM Role**, choose your IAM role.\n23. Under **Advanced properties**, for **Job parameters**, choose **Add new parameter**.\n24. For **Key**, enter ```--conf```.\n25. For **Value**, enter the following value (replace the placeholder ```your_s3_bucket``` with your S3 bucket name):\n\n```\\nspark.sql.catalog.glue_catalog=org.apache.iceberg.spark.SparkCatalog --conf spark.sql.catalog.glue_catalog.warehouse=s3://your_s3_bucket/iceberg/warehouse --conf spark.sql.catalog.glue_catalog.catalog-impl --conf park.sql.catalog.glue_catalog.io-impl=org.apache.iceberg.aws.s3.S3FileIO --conf spark.sql.catalog.glue_catalog.lock-impl=org.apache.iceberg.aws.glue.DynamoLockManager --conf spark.sql.catalog.glue_catalog.lock.table=iceberg_lock --conf spark.sql.extensions=org.apache.iceberg.spark.extensions.IcebergSparkSessionExtensions\\n```\n\n26. Choose **Save**.\n27. Choose **Run**.\n\n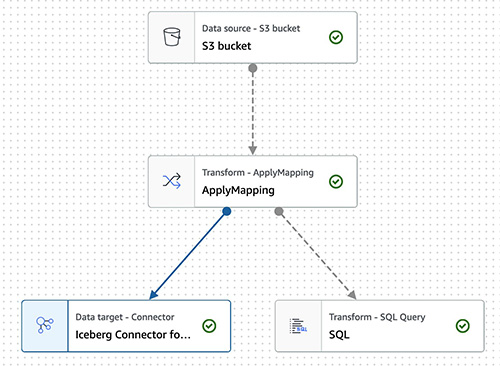\n\n\n##### **Apache Iceberg reads**\n\nComplete the following steps to read from Apache Iceberg table that you created in the previous section using the connector:\n\n1. Open Amazon Web Services Glue Studio.\n2. Choose **Jobs**.\n3. Choose **Visual with a source and target**.\n4. For Source, choose **Apache Iceberg Connector for Amazon Web Services Glue 3.0**.\n5. For Target, choose **[Amazon S3](https://aws.amazon.com/cn/s3/?trk=cndc-detail)**.\n6. Choose **Create**.\n7. Under **Visual**, choose **Data source – Connection**.\n8. Under **Node properties**, for **Connection**, choose your Iceberg connection name.\n9. For **Connection** **options**, choose **Add new option**.\n10. For **Key**, enter ```path``. For Value, enter ```glue_catalog.iceberg.test```.\\n11. Choose **Transform – ApplyMapping**, and choose **Remove**.\\n12. Choose **Data target – S3 bucket**.\\n13. Under **Data target properties**, for **Format**, choose **JSON**.\\n14. For **S3 Target type**, choose **S3 location**.\\n15. For **S3 Target Location** enter your S3 path for the output location.\\n16. Under **Job details**, for **IAM Role**, choose your IAM role.\\n17. Under **Advanced properties**, for Job parameters, choose **Add new parameter**.\\n18. For **Key**, enter ```--conf```.\\n19. For **Value**, enter the following value (replace the placeholder ```your_s3_bucket``` with your S3 bucket name):\\n\\n```\nspark.sql.catalog.glue_catalog=org.apache.iceberg.spark.SparkCatalog --conf spark.sql.catalog.glue_catalog.warehouse=s3://your_s3_bucket/iceberg/warehouse --conf spark.sql.catalog.glue_catalog.catalog-impl --conf park.sql.catalog.glue_catalog.io-impl=org.apache.iceberg.aws.s3.S3FileIO --conf spark.sql.catalog.glue_catalog.lock-impl=org.apache.iceberg.aws.glue.DynamoLockManager --conf spark.sql.catalog.glue_catalog.lock.table=iceberg_lock --conf spark.sql.extensions=org.apache.iceberg.spark.extensions.IcebergSparkSessionExtensions\n```\\n\\n20. Choose **Save**.\\n21. Choose **Run**.\\n\\n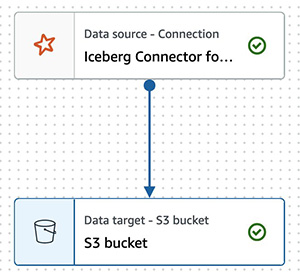\\n\\n\\n#### **Query from Athena**\\n\\n\\nThe Hudi table and the iceberg tables created with the above instructions are also queryable from Athena.\\n\\n1. Open the Athena console.\\n2. Run the following SQL to query the Hudi table:\\n\\n```\nSELECT * FROM \"hudi\".\"test\" LIMIT 10\n```\\n\\n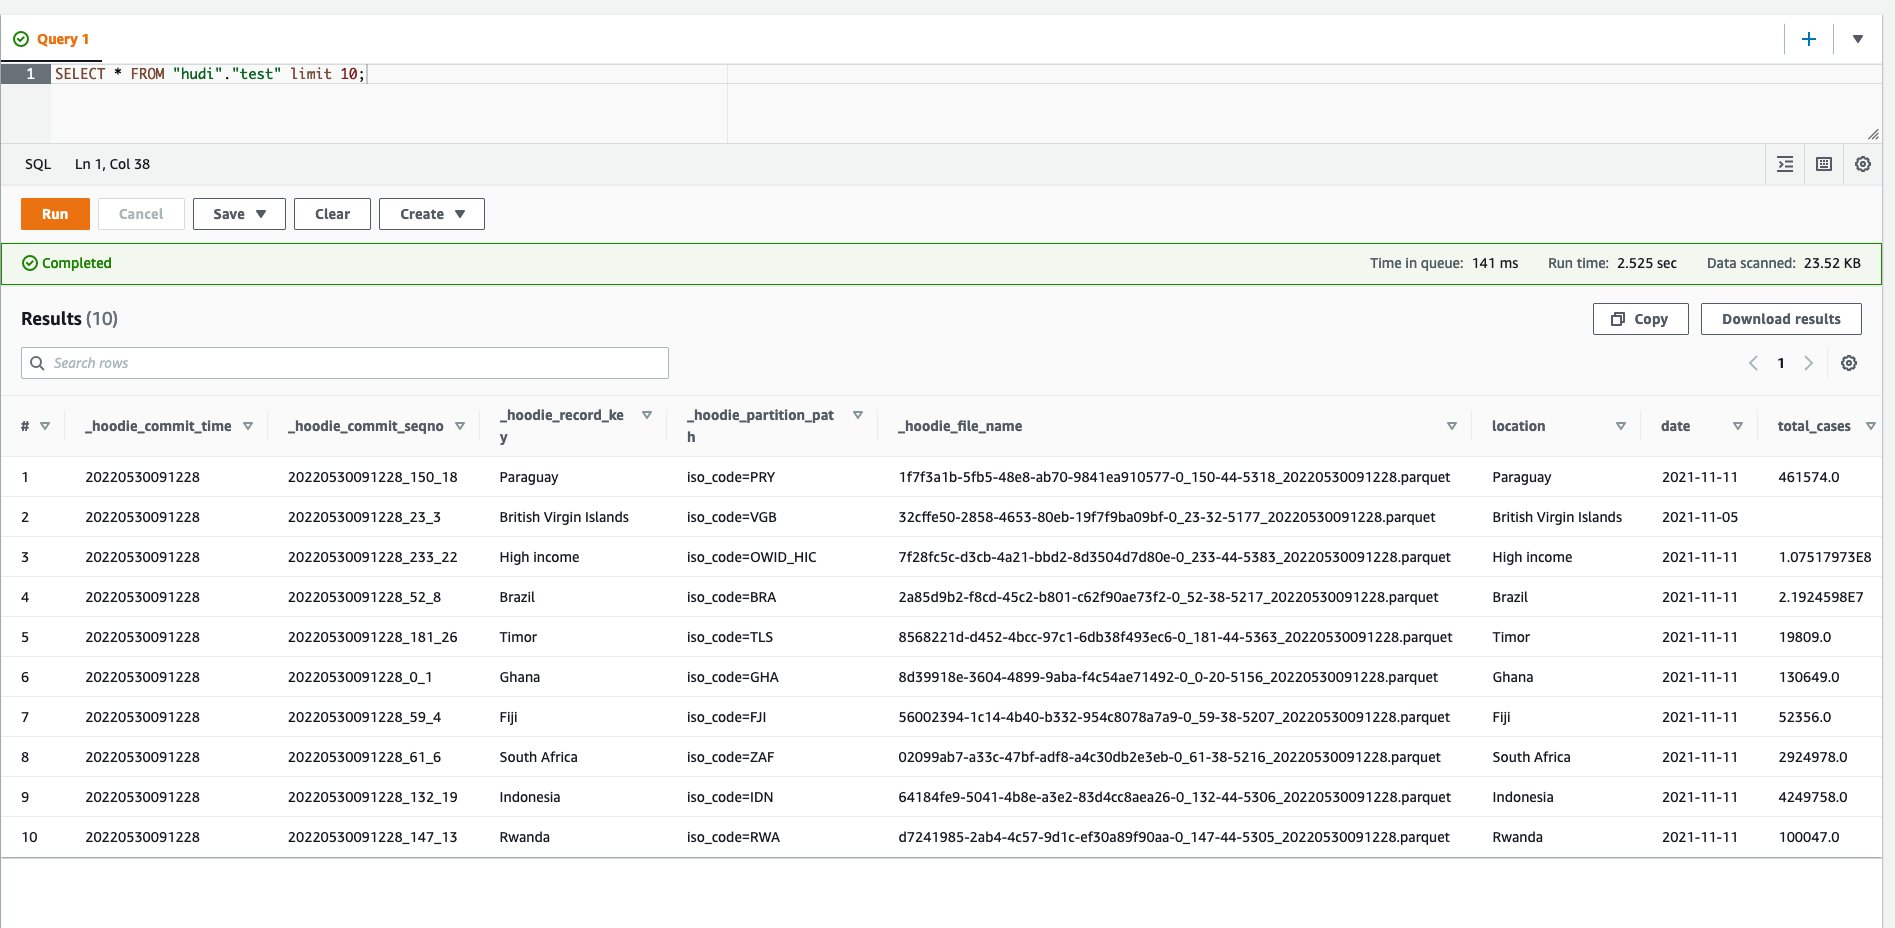\\n\\n\\n3. Run the following SQL to query the Iceberg table:\\n\\n```\nSELECT * FROM \"iceberg\".\"test\" LIMIT 10\n```\\n\\n\\n\\n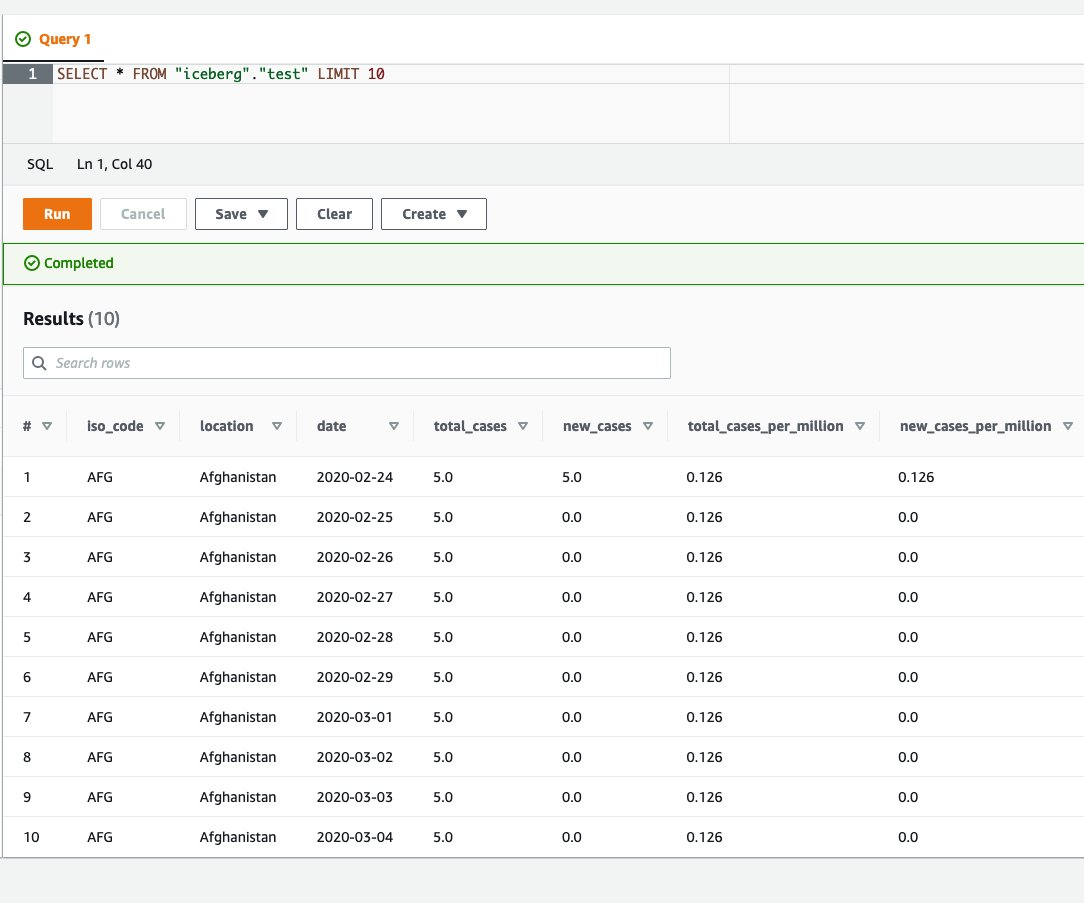\\n\\nIf you want to query the Delta table from Athena, follow [Presto, Trino, and Athena to Delta Lake integration using manifests](https://docs.delta.io/latest/presto-integration.html).\\n\\n\\n#### **Conclusion**\\n\\n\\nThis post summarized how to utilize Apache Hudi, Delta Lake, and Apache Iceberg on Amazon Web Services Glue platform, as well as demonstrated how each format works with the Amazon Web Services Glue Studio Visual Editor. You can start using those data lake formats easily in any of the Amazon Web Services Glue DynamicFrames, Spark DataFrames, and Spark SQL on the Amazon Web Services Glue jobs, the Amazon Web Services Glue Studio notebooks, and the Amazon Web Services Glue Studio visual editor.\\n\\n\\n##### **About the Author**\\n\\n\\n\\n\\n**Noritaka Sekiyama** is a Principal Big Data Architect on the Amazon Web Services Glue team. He enjoys collaborating with different teams to deliver results like this post. In his spare time, he enjoys playing video games with his family.","render":"<p>Transactional data lake technologies such as Apache Hudi, Delta Lake, Apache Iceberg, and <a href=\\"https://docs.aws.amazon.com/lake-formation/latest/dg/governed-tables-main.html\\" target=\\"_blank\\">Amazon Web ServicesLake Formation governed tables</a> is evolving rapidly, and gaining great popularity. These technologies simplified the data processing pipeline significantly, and they provided further useful capabilities like upserts, rolling back, and time travel queries.</p>\\n<p>In <a href=\\"https://aws.amazon.com/blogs/big-data/part-1-integrate-apache-hudi-delta-lake-apache-iceberg-datasets-at-scale-aws-glue-studio-notebook/\\" target=\\"_blank\\">the first post of this series</a>, we went through how to process Apache Hudi, Delta Lake, and Apache Iceberg datasets using <a href=\\"https://aws.amazon.com/glue/\\" target=\\"_blank\\">Amazon Web Services Glue</a> connectors. Amazon Web Services Glue simplifies reading and writing your data in those data lake formats, and building the data lakes on top of those technologies. Running the sample notebooks on Amazon Web Services Glue Studio notebook, you could interactively develop and run your code, then immediately see the results. The notebooks let you explore how those technologies work when you have coding experience.</p>\\n<p>This second post focuses on other use cases for customers who prefer visual job authoring without writing custom code. Even without coding experience, you can easily build your transactional data lakes on Amazon Web ServicesGlue Studio visual editor, and take advantage of those transactional data lake technologies. In addition, you can also use <a href=\\"https://aws.amazon.com/athena/\\" target=\\"_blank\\">Amazon Athena</a> to query the data stored using Hudi and Iceberg. This tutorial demonstrates how to read and write each format on Amazon Web Services Glue Studio visual editor, and then how to query from Athena.</p>\\n<p><strong>Process Apache Hudi, Delta Lake, Apache Iceberg dataset at scale</strong></p>\\n<ul>\\n<li>Part 1: <a href=\\"https://aws.amazon.com/blogs/big-data/part-1-integrate-apache-hudi-delta-lake-apache-iceberg-datasets-at-scale-aws-glue-studio-notebook/\\" target=\\"_blank\\">Amazon Web Services Glue Studio Notebook</a></li>\\n<li><strong>Part 2: Using Amazon Web Services Glue Studio Visual Editor</strong></li>\\n</ul>\\n<h4><a id=\\"Prerequisites_12\\"></a><strong>Prerequisites</strong></h4>\\n<p>The following are the instructions to read/write tables using each data lake format on Amazon Web Services Glue Studio Visual Editor. You can use any of the marketplace connector or the custom connector based on your requirements.</p>\\n<p>To continue this tutorial, you must create the following Amazon Web Services resources in advance:</p>\\n<ul>\\n<li><a href=\\"https://aws.amazon.com/iam/\\" target=\\"_blank\\">Amazon Web Services Identity and Access Management (IAM)</a> role for your ETL job or notebook as instructed in <a href=\\"https://docs.aws.amazon.com/glue/latest/ug/setting-up.html#getting-started-iam-permissions\\" target=\\"_blank\\">Set up IAM permissions for Amazon Web Services Glue Studio</a>.</li>\\n<li><a href=\\"https://aws.amazon.com/s3/\\" target=\\"_blank\\">Amazon Simple Storage Service (Amazon S3)</a> bucket for storing data.</li>\\n<li>AWS Glue connection created in <a href=\\"https://aws.amazon.com/blogs/big-data/part-1-integrate-apache-hudi-delta-lake-apache-iceberg-datasets-at-scale-aws-glue-studio-notebook/\\" target=\\"_blank\\">the previous post</a>.</li>\\n</ul>\\n<h4><a id=\\"Readswrites_using_the_connector_on_Amazon_Web_Services_Glue_Studio_Visual_Editor_24\\"></a><strong>Reads/writes using the connector on Amazon Web Services Glue Studio Visual Editor</strong></h4>\\n<p>In this tutorial, you read and write each of the transaction data lake format data on the Amazon Web Services Glue Studio Visual Editor. There are three main configurations: <strong>connection, connection options</strong>, and <strong>job parameters</strong> that you must configure per the data lake format. Note that no code is included in this tutorial. Let’s see how it works.</p>\\n<h5><a id=\\"Apache_Hudi_writes_30\\"></a><strong>Apache Hudi writes</strong></h5>\\n<p>Complete following steps to write into Apache Hudi table using the connector:</p>\\n<ol>\\n<li>\\n<p>Open Amazon Web Services Glue Studio.</p>\\n</li>\\n<li>\\n<p>Choose <strong>Jobs</strong>.</p>\\n</li>\\n<li>\\n<p>Choose <strong>Visual with a source and target</strong>.</p>\\n</li>\\n<li>\\n<p>For Source, choose <strong>Amazon S3</strong>.</p>\\n</li>\\n<li>\\n<p>For Target, choose <code>hudi-0101-byoc-connector</code>.</p>\\n</li>\\n<li>\\n<p>Choose <strong>Create</strong>.</p>\\n</li>\\n<li>\\n<p>Under <strong>Visual</strong>, choose <strong>Data source – S3 bucket</strong>.</p>\\n</li>\\n<li>\\n<p>Under <strong>Node properties</strong>, for <strong>S3 source type</strong>, choose <strong>S3 location</strong>.</p>\\n</li>\\n<li>\\n<p>For <strong>S3 URL</strong>, enter <code>s3://covid19-lake/rearc-covid-19-world-cases-deaths-testing/json/</code>.</p>\\n</li>\\n<li>\\n<p>Choose <strong>Data target – Connector</strong>.</p>\\n</li>\\n<li>\\n<p>Under <strong>Node properties</strong>, for <strong>Connection</strong>, choose hudi-0101-byoc-connection.</p>\\n</li>\\n<li>\\n<p>For <strong>Connection options</strong>, enter the following pairs of Key and Value (choose <strong>Add new option</strong> to enter a new pair).<br />\\na. Key: <code>path</code>. Value: <code><Your S3 path for Hudi table location></code><br />\\nb. Key: <code>hoodie.table.name</code>, Value: <code>test</code><br />\\nc. Key: <code>hoodie.datasource.write.storage.type</code>, Value: <code>COPY_ON_WRITE</code><br />\\nd. Key: <code>hoodie.datasource.write.operation</code>, Value: <code>upsert</code><br />\\ne. Key: <code>hoodie.datasource.write.recordkey.field</code>, Value: <code>location</code><br />\\nf. Key: <code>hoodie.datasource.write.precombine.field</code>, Value: <code>date</code><br />\\ng. Key: <code>hoodie.datasource.write.partitionpath.field</code>, Value: <code>iso_code</code><br />\\nh. Key: <code>hoodie.datasource.write.hive_style_partitioning</code>, Value: <code>true</code><br />\\ni. Key: <code>hoodie.datasource.hive_sync.enable</code>, Value: <code>true</code><br />\\ng. Key: <code>hoodie.datasource.hive_sync.database</code>, Value: <code>hudi</code><br />\\nk. Key: <code>hoodie.datasource.hive_sync.table</code>, Value: <code>test</code><br />\\nl. Key: <code>hoodie.datasource.hive_sync.partition_fields</code>, Value: <code>iso_code</code><br />\\nm. Key: <code>hoodie.datasource.hive_sync.partition_extractor_class</code>, Value: <code>org.apache.hudi.hive.MultiPartKeysValueExtractor</code><br />\\nn. Key: <code>hoodie.datasource.hive_sync.use_jdbc</code>, Value: <code>false</code><br />\\no. Key: <code>hoodie.datasource.hive_sync.mode</code>, Value: <code>hms</code></p>\\n</li>\\n<li>\\n<p>Under <strong>Job details</strong>, for <strong>IAM Role</strong>, choose your IAM role.</p>\\n</li>\\n<li>\\n<p>Under <strong>Advanced properties</strong>, for <strong>Job parameters</strong>, choose <strong>Add new parameter</strong>.</p>\\n</li>\\n<li>\\n<p>For <strong>Key</strong>, enter <code>--conf</code>.</p>\\n</li>\\n<li>\\n<p>For <strong>Value</strong>, enter <code>spark.serializer=org.apache.spark.serializer.KryoSerializer</code>.</p>\\n</li>\\n<li>\\n<p>Choose <strong>Save</strong>.</p>\\n</li>\\n<li>\\n<p>Choose <strong>Run</strong>.</p>\\n</li>\\n</ol>\\n<p><img src=\\"https://dev-media.amazoncloud.cn/ad11403e2c3745998a0520cbe4f3820b_image.png\\" alt=\\"image.png\\" /></p>\\n<h5><a id=\\"Apache_Hudi_reads_71\\"></a><strong>Apache Hudi reads</strong></h5>\\n<p>Complete following steps to read from the Apache Hudi table that you created in the previous section using the connector:</p>\\n<ol>\\n<li>Open Amazon Web Services Glue Studio.</li>\\n<li>Choose <strong>Jobs</strong>.</li>\\n<li>Choose <strong>Visual with a source and target</strong>.</li>\\n<li>For Source, choose <code>hudi-0101-byoc-connector</code>.</li>\\n<li>For Target, choose <strong>Amazon S3</strong>.</li>\\n<li>Choose <strong>Create</strong>.</li>\\n<li>Under <strong>Visual</strong>, choose <strong>Data source – Connection</strong>.</li>\\n<li>Under <strong>Node properties</strong>, for <strong>Connection</strong>, choose <code>hudi-0101-byoc-connection</code>.</li>\\n<li>For <strong>Connection options</strong>, choose <strong>Add new option</strong>.</li>\\n<li>For <strong>Key</strong>, enter <code>path</code>. For <strong>Value</strong>, enter your S3 path for your Hudi table that you created in the previous section.</li>\\n<li>Choose <strong>Transform – ApplyMapping</strong>, and choose <strong>Remove</strong>.</li>\\n<li>Choose <strong>Data target – S3 bucket</strong>.</li>\\n<li>Under <strong>Data target properties</strong>, for Format, choose <strong>JSON</strong>.</li>\\n<li>For <strong>S3 Target type</strong>. choose <strong>S3</strong> location.</li>\\n<li>For <strong>S3 Target Location</strong> enter your S3 path for output location.</li>\\n<li>Under <strong>Job details</strong>, for <strong>IAM Role</strong>, choose your IAM role.</li>\\n<li>Choose <strong>Save</strong>.</li>\\n<li>Choose <strong>Run</strong>.</li>\\n</ol>\\n<p><img src=\\"https://dev-media.amazoncloud.cn/664bc6293b2d49939c04405403d63324_image.png\\" alt=\\"image.png\\" /></p>\\n<h5><a id=\\"Delta_Lake_writes_96\\"></a><strong>Delta Lake writes</strong></h5>\\n<p>Complete the following steps to write into the Delta Lake table using the connector:</p>\\n<ol>\\n<li>Open Amazon Web Services Glue Studio.</li>\\n<li>Choose <strong>Jobs</strong>.</li>\\n<li>Choose <strong>Visual with a source and target</strong>.</li>\\n<li>For Source, choose <strong>Amazon S3</strong>.</li>\\n<li>For Target, choose <code>delta-100-byoc-connector</code>.</li>\\n<li>Choose <strong>Create</strong>.</li>\\n<li>Under <strong>Visual</strong>, choose <strong>Data source – S3 bucket</strong>.</li>\\n<li>Under <strong>Node properties</strong>, for <strong>S3 source type</strong>, choose <strong>S3 location</strong>.</li>\\n<li>For <strong>S3 URL</strong>, enter <code>s3://covid19-lake/rearc-covid-19-world-cases-deaths-testing/json/</code>.</li>\\n<li>Choose <strong>Data target – Connector</strong>.</li>\\n<li>Under <strong>Node properties</strong>, for <strong>Connection</strong>, choose your <code>delta-100-byoc-connection</code>.</li>\\n<li>For <strong>Connection options</strong>, choose <strong>Add new option</strong>.</li>\\n<li>For <strong>Key</strong>, enter <code>path</code>. For Value, enter your S3 path for Delta table location. Choose <strong>Add new option</strong>.</li>\\n<li>For <strong>Key</strong>, enter <code>partitionKeys</code>. For Value, enter <code>iso_code</code>.</li>\\n<li>Under <strong>Job</strong> details, for <strong>IAM Role</strong>, choose your IAM role.</li>\\n<li>Under <strong>Advanced properties</strong>, for <strong>Job parameters</strong>, choose <strong>Add new parameter</strong>.</li>\\n<li>For <strong>Key</strong>, enter <code>--conf</code>.</li>\\n<li>For <strong>Value</strong>, enter</li>\\n</ol>\\n<pre><code class=\\"lang-\\">spark.sql.extensions=io.delta.sql.DeltaSparkSessionExtension --conf spark.sql.catalog.spark_catalog=org.apache.spark.sql.delta.catalog.DeltaCatalog.\\n</code></pre>\\n<ol start=\\"19\\">\\n<li>Choose <strong>Save</strong>.</li>\\n<li>Choose <strong>Run</strong>.</li>\\n</ol>\\n<p><img src=\\"https://dev-media.amazoncloud.cn/fadf4742c6af4af3ab187fac079736b1_image.png\\" alt=\\"image.png\\" /></p>\\n<h5><a id=\\"Delta_Lake_reads_129\\"></a><strong>Delta Lake reads</strong></h5>\\n<p>Complete the following steps to read from the Delta Lake table that you created in the previous section using the connector:</p>\\n<ol>\\n<li>Open Amazon Web Services Glue Studio.</li>\\n<li>Choose <strong>Jobs</strong>.</li>\\n<li>Choose <strong>Visual with a source and target</strong>.</li>\\n<li>For Source, choose <code>delta-100-byoc-connector</code>.</li>\\n<li>For Target, choose <strong>Amazon S3</strong>.</li>\\n<li>Choose <strong>Create</strong>.</li>\\n<li>Under <strong>Visual</strong>, choose <strong>Data source – Connection</strong>.</li>\\n<li>Under <strong>Node properties</strong>, for <strong>Connection</strong>, choose <code>delta-100-byoc-connection</code>.</li>\\n<li>For <strong>Connection options</strong>, choose <strong>Add new option</strong>.</li>\\n<li>For <strong>Key</strong>, enter <code>path</code>. For <strong>Value</strong>, enter your S3 path for Delta table that you created in the previous section. Choose <strong>Add new option</strong>.</li>\\n<li>For <strong>Key</strong>, enter <code>partitionKeys</code>. For <strong>Value</strong>, enter <code>iso_code</code>.</li>\\n<li>Choose <strong>Transform – ApplyMapping</strong>, and choose <strong>Remove</strong>.</li>\\n<li>Choose <strong>Data target – S3 bucket</strong>.</li>\\n<li>Under <strong>Data target properties</strong>, for <strong>Format</strong>, choose <strong>JSON</strong>.</li>\\n<li>For <strong>S3 Target type</strong>, choose <strong>S3 location</strong>.</li>\\n<li>For <strong>S3 Target Location</strong> enter your S3 path for output location.</li>\\n<li>Under <strong>Job details</strong>, for <strong>IAM Role</strong>, choose your IAM role.</li>\\n<li>Under <strong>Advanced properties</strong>, for <strong>Job parameters</strong>, choose <strong>Add new parameter</strong>.</li>\\n<li>For <strong>Key</strong>, enter <code>--conf</code>.</li>\\n<li>For <strong>Value</strong>, enter</li>\\n</ol>\\n<pre><code class=\\"lang-\\">spark.sql.extensions=io.delta.sql.DeltaSparkSessionExtension --conf spark.sql.catalog.spark_catalog=org.apache.spark.sql.delta.catalog.DeltaCatalog\\n</code></pre>\\n<ol start=\\"21\\">\\n<li>Choose <strong>Save</strong>.</li>\\n<li>Choose <strong>Run</strong>.</li>\\n</ol>\\n<p><img src=\\"https://dev-media.amazoncloud.cn/e5c0707882024b6fbcbda9deddefaa80_image.png\\" alt=\\"image.png\\" /></p>\\n<h5><a id=\\"Apache_Iceberg_writes_164\\"></a><strong>Apache Iceberg writes</strong></h5>\\n<p>Complete the following steps to write into Apache Iceberg table using the connector:</p>\\n<ol>\\n<li>Open Amazon Web Services Glue console.</li>\\n<li>Choose <strong>Databases</strong>.</li>\\n<li>Choose <strong>Add database</strong>.</li>\\n<li>For <strong>database name</strong>, enter iceberg, and choose <strong>Create</strong>.</li>\\n<li>Open Amazon Web Services Glue Studio.</li>\\n<li>Choose <strong>Jobs</strong>.</li>\\n<li>Choose <strong>Visual with a source and target</strong>.</li>\\n<li>For Source, choose <strong>Amazon S3</strong>.</li>\\n<li>For Target, choose <code>iceberg-0131-byoc-connector</code>.</li>\\n<li>Choose <strong>Create</strong>.</li>\\n<li>Under <strong>Visual</strong>, choose <strong>Data source – S3 bucket</strong>.</li>\\n<li>Under <strong>Node properties</strong>, for <strong>S3 source type</strong>, choose <strong>S3 location</strong>.</li>\\n<li>For <strong>S3 URL</strong>, enter <code>s3://covid19-lake/rearc-covid-19-world-cases-deaths-testing/json/</code>.</li>\\n<li>Choose <strong>Data target – Connector</strong>.</li>\\n<li>Under <strong>Node properties</strong>, for <strong>Connection</strong>, choose <code>iceberg-0131-byoc-connection</code>.</li>\\n<li>For <strong>Connection options</strong>, choose <strong>Add new option</strong>.</li>\\n<li>For <strong>Key</strong>, enter <code>path</code>. For Value, enter <code>glue_catalog.iceberg.test</code>.</li>\\n<li>Choose <strong>SQL</strong> under <strong>Transform</strong> to create a new Amazon Web Services Glue Studio node.</li>\\n<li>Under <strong>Node properties</strong>, for <strong>Node parents</strong>, choose <strong>ApplyMapping</strong>.</li>\\n<li>Under <strong>Transform</strong>, for <strong>SQL alias</strong>, verify that <code>myDataSource</code> is entered.</li>\\n<li>For <strong>SQL query</strong>, enter <code>CREATE TABLE glue_catalog.iceberg.test AS SELECT * FROM myDataSource WHERE 1=2</code>. This is to create a table definition with no records because the Iceberg target requires table definition before data ingestion.</li>\\n<li>Under <strong>Job details</strong>, for <strong>IAM Role</strong>, choose your IAM role.</li>\\n<li>Under <strong>Advanced properties</strong>, for <strong>Job parameters</strong>, choose <strong>Add new parameter</strong>.</li>\\n<li>For <strong>Key</strong>, enter <code>--conf</code>.</li>\\n<li>For <strong>Value</strong>, enter the following value (replace the placeholder <code>your_s3_bucket</code> with your S3 bucket name):</li>\\n</ol>\\n<pre><code class=\\"lang-\\">spark.sql.catalog.glue_catalog=org.apache.iceberg.spark.SparkCatalog --conf spark.sql.catalog.glue_catalog.warehouse=s3://your_s3_bucket/iceberg/warehouse --conf spark.sql.catalog.glue_catalog.catalog-impl --conf park.sql.catalog.glue_catalog.io-impl=org.apache.iceberg.aws.s3.S3FileIO --conf spark.sql.catalog.glue_catalog.lock-impl=org.apache.iceberg.aws.glue.DynamoLockManager --conf spark.sql.catalog.glue_catalog.lock.table=iceberg_lock --conf spark.sql.extensions=org.apache.iceberg.spark.extensions.IcebergSparkSessionExtensions\\n</code></pre>\\n<ol start=\\"26\\">\\n<li>Choose <strong>Save</strong>.</li>\\n<li>Choose <strong>Run</strong>.</li>\\n</ol>\\n<p><img src=\\"https://dev-media.amazoncloud.cn/3a74e3d7d03144c99df115c13f671c6e_image.png\\" alt=\\"image.png\\" /></p>\\n<h5><a id=\\"Apache_Iceberg_reads_204\\"></a><strong>Apache Iceberg reads</strong></h5>\\n<p>Complete the following steps to read from Apache Iceberg table that you created in the previous section using the connector:</p>\\n<ol>\\n<li>Open Amazon Web Services Glue Studio.</li>\\n<li>Choose <strong>Jobs</strong>.</li>\\n<li>Choose <strong>Visual with a source and target</strong>.</li>\\n<li>For Source, choose <strong>Apache Iceberg Connector for Amazon Web Services Glue 3.0</strong>.</li>\\n<li>For Target, choose <strong>Amazon S3</strong>.</li>\\n<li>Choose <strong>Create</strong>.</li>\\n<li>Under <strong>Visual</strong>, choose <strong>Data source – Connection</strong>.</li>\\n<li>Under <strong>Node properties</strong>, for <strong>Connection</strong>, choose your Iceberg connection name.</li>\\n<li>For <strong>Connection</strong> <strong>options</strong>, choose <strong>Add new option</strong>.</li>\\n<li>For <strong>Key</strong>, enter <code>path``. For Value, enter </code>glue_catalog.iceberg.test```.</li>\\n<li>Choose <strong>Transform – ApplyMapping</strong>, and choose <strong>Remove</strong>.</li>\\n<li>Choose <strong>Data target – S3 bucket</strong>.</li>\\n<li>Under <strong>Data target properties</strong>, for <strong>Format</strong>, choose <strong>JSON</strong>.</li>\\n<li>For <strong>S3 Target type</strong>, choose <strong>S3 location</strong>.</li>\\n<li>For <strong>S3 Target Location</strong> enter your S3 path for the output location.</li>\\n<li>Under <strong>Job details</strong>, for <strong>IAM Role</strong>, choose your IAM role.</li>\\n<li>Under <strong>Advanced properties</strong>, for Job parameters, choose <strong>Add new parameter</strong>.</li>\\n<li>For <strong>Key</strong>, enter <code>--conf</code>.</li>\\n<li>For <strong>Value</strong>, enter the following value (replace the placeholder <code>your_s3_bucket</code> with your S3 bucket name):</li>\\n</ol>\n<pre><code class=\\"lang-\\">spark.sql.catalog.glue_catalog=org.apache.iceberg.spark.SparkCatalog --conf spark.sql.catalog.glue_catalog.warehouse=s3://your_s3_bucket/iceberg/warehouse --conf spark.sql.catalog.glue_catalog.catalog-impl --conf park.sql.catalog.glue_catalog.io-impl=org.apache.iceberg.aws.s3.S3FileIO --conf spark.sql.catalog.glue_catalog.lock-impl=org.apache.iceberg.aws.glue.DynamoLockManager --conf spark.sql.catalog.glue_catalog.lock.table=iceberg_lock --conf spark.sql.extensions=org.apache.iceberg.spark.extensions.IcebergSparkSessionExtensions\\n</code></pre>\\n<ol start=\\"20\\">\\n<li>Choose <strong>Save</strong>.</li>\\n<li>Choose <strong>Run</strong>.</li>\\n</ol>\n<p><img src=\\"https://dev-media.amazoncloud.cn/e9de95b1e43f459db0ecc5f6747bd582_image.png\\" alt=\\"image.png\\" /></p>\n<h4><a id=\\"Query_from_Athena_238\\"></a><strong>Query from Athena</strong></h4>\\n<p>The Hudi table and the iceberg tables created with the above instructions are also queryable from Athena.</p>\n<ol>\\n<li>Open the Athena console.</li>\n<li>Run the following SQL to query the Hudi table:</li>\n</ol>\\n<pre><code class=\\"lang-\\">SELECT * FROM "hudi"."test" LIMIT 10\\n</code></pre>\\n<p><img src=\\"https://dev-media.amazoncloud.cn/71cca76b8faf444ebe3ac33a68a48e17_image.png\\" alt=\\"image.png\\" /></p>\n<ol start=\\"3\\">\\n<li>Run the following SQL to query the Iceberg table:</li>\n</ol>\\n<pre><code class=\\"lang-\\">SELECT * FROM "iceberg"."test" LIMIT 10\\n</code></pre>\\n<p><img src=\\"https://dev-media.amazoncloud.cn/33e235f45ad4476098f61fdcfbd68ee2_image.png\\" alt=\\"image.png\\" /></p>\n<p><img src=\\"https://dev-media.amazoncloud.cn/dbe5973c9d3c4145a23378f53cc6b6d4_image.png\\" alt=\\"image.png\\" /></p>\n<p>If you want to query the Delta table from Athena, follow <a href=\\"https://docs.delta.io/latest/presto-integration.html\\" target=\\"_blank\\">Presto, Trino, and Athena to Delta Lake integration using manifests</a>.</p>\\n<h4><a id=\\"Conclusion_266\\"></a><strong>Conclusion</strong></h4>\\n<p>This post summarized how to utilize Apache Hudi, Delta Lake, and Apache Iceberg on Amazon Web Services Glue platform, as well as demonstrated how each format works with the Amazon Web Services Glue Studio Visual Editor. You can start using those data lake formats easily in any of the Amazon Web Services Glue DynamicFrames, Spark DataFrames, and Spark SQL on the Amazon Web Services Glue jobs, the Amazon Web Services Glue Studio notebooks, and the Amazon Web Services Glue Studio visual editor.</p>\n<h5><a id=\\"About_the_Author_272\\"></a><strong>About the Author</strong></h5>\\n<p><img src=\\"https://dev-media.amazoncloud.cn/7800310ee2144546ba457e5fd4bad4b8_image.png\\" alt=\\"image.png\\" /></p>\n<p><strong>Noritaka Sekiyama</strong> is a Principal Big Data Architect on the Amazon Web Services Glue team. He enjoys collaborating with different teams to deliver results like this post. In his spare time, he enjoys playing video games with his family.</p>\n"}
Process Apache Hudi, Delta Lake, Apache Iceberg dataset at scale, part 2: Using Amazon Glue Studio Visual Editor
海外精选

海外精选的内容汇集了全球优质的亚马逊云科技相关技术内容。同时,内容中提到的“AWS”
是 “Amazon Web Services” 的缩写,在此网站不作为商标展示。

 0
0 0
0亚马逊云科技解决方案 基于行业客户应用场景及技术领域的解决方案
联系亚马逊云科技专家
亚马逊云科技解决方案
基于行业客户应用场景及技术领域的解决方案
联系专家

0
目录

 分享
分享 点赞
点赞 收藏
收藏 目录
目录立即注册,开启您的免费套餐
立即关注

亚马逊云开发者
公众号

User Group
公众号

亚马逊云科技
官方小程序
“AWS” 是 “Amazon Web Services” 的缩写,在此网站不作为商标展示。
立即关注
亚马逊云开发者
公众号
User Group
公众号
亚马逊云科技
官方小程序
“AWS” 是 “Amazon Web Services” 的缩写,在此网站不作为商标展示。
关于我们 
更多资源
开发者工具
更多支持
立即关注
亚马逊云开发者
公众号
User Group
公众号
亚马逊云科技
官方小程序
“AWS” 是 “Amazon Web Services” 的缩写,在此网站不作为商标展示。
