{"value":"In this post, we present several bulk data loading strategies optimized for [Amazon Relational Database Service (Amazon RDS) for PostgreSQL](https://aws.amazon.com/rds/postgresql/). Although [general optimization guides](https://www.postgresql.org/docs/current/populate.html) for bulk data loading into PostgreSQL are widely available, we illustrate how to apply these strategies in an Amazon RDS for PostgreSQL context.\n\nFirst, a word of caution. No combination of optimizations or strategies is appropriate for every customer use case. DBAs and developers must decide what strategies are best given the business requirements and other operational risks.\n\nHow to optimize an Amazon RDS for PostgreSQL database for bulk loading is a common question we get from customers. Some scenarios customers describe for why they need to bulk load data are:\n\n#### **Enriching operational data with insights**\n\nThird-party data or data from other systems may be ingested and integrated in a data lake, but the refined data needs to be merged into the operational database to provide insights to users.\n\n#### **Specialized PostgreSQL capabilities**\n\nSome analysts prefer to use PostgreSQL’s specialized querying features for geospatial and JSON data.\n\n#### **Legacy reporting**\n\nExisting PostgreSQL reporting or analysis queries may be difficult or costly to migrate to alternative platforms.\n\n#### **Data security and tenant isolation**\n\nThe business may want to use a PostgreSQL database to provide a few analysts with secure access to sensitive data. Similarly, the business could initialize a new PostgreSQL database to provide secure data access to an external stakeholder, such as a customer, vendor, or auditor.\n\n#### **Constraints**\n\nTo narrow the focus and dive deep, we set the following constraints to control for several variables:\n\n- **Amazon S3 and the COPY command** – In all our testing scenarios, data is loaded into Amazon RDS for PostgreSQL from [Amazon Simple Storage Service](http://aws.amazon.com/s3) (Amazon S3) using the ```aws_s3``` extension and the COPY command.\n- **GZIP compression**– PostgreSQL is capable of loading data files compressed with standard GZIP compression. Compressing data files reduces the amount of data transferred over the network from Amazon S3. We use GZIP compression in all scenarios.\n- **AWS Graviton2** – We use [AWS Graviton2](https://aws.amazon.com/ec2/graviton/)-based instance types exclusively. Comparing the performance of different chipsets or instance families is out of scope for this post. Choosing one controls this variable.\n- **PostgreSQL version** – We use PostgreSQL major version 14 in all scenarios.\n\n#### **Solution overview**\n\nThe following diagram illustrates the solution architecture we use for the benchmark tests.\n\n\n\nThe database instance isn’t publicly accessible because it’s in a private subnet. Instead, the database instance is accessed via the bastion host in the public subnet. We use security group rules to restrict SSH access on the bastion host to our IP address. We use [AWS Identity and Access Management](http://aws.amazon.com/iam) (IAM) to authenticate to the database from the bastion host. Finally, we use an S3 VPC endpoint to provide a private route from Amazon S3 to our VPC where our RDS for PostgreSQL database resides.\n\nWe place the bastion host in the same Availability Zone as the RDS for PostgreSQL instance to minimize network latency. For our tests, we submit ```psql``` commands to the database from bash scripts run on the bastion host.\n\n#### **Prerequisites**\n\nIf you intend to set up a similar testbench, note the following prerequisites.\n\n#### **Create an RDS for PostgreSQL instance**\n\nWe use the db.r6g.2xlarge instance size with 250 GB of General Purpose SSD (gp2) storage. Later we will change the database storage type to Provisioned IOPS SSD (io1) to compare performance with gp2. Note that dedicated [Amazon Elastic Block Store](http://aws.amazon.com/ebs) (Amazon EBS) bandwidth and network bandwidth vary by instance size. Refer to the RDS for PostgreSQL [pricing page](https://aws.amazon.com/rds/postgresql/pricing/) for cost information.\n\n1. On the Amazon RDS console, choose **Create database**.\n2. For **Engine type**, select **PostgreSQL**.\n3. For **Version**, choose **PostgreSQL 14.2-R1**.\n\n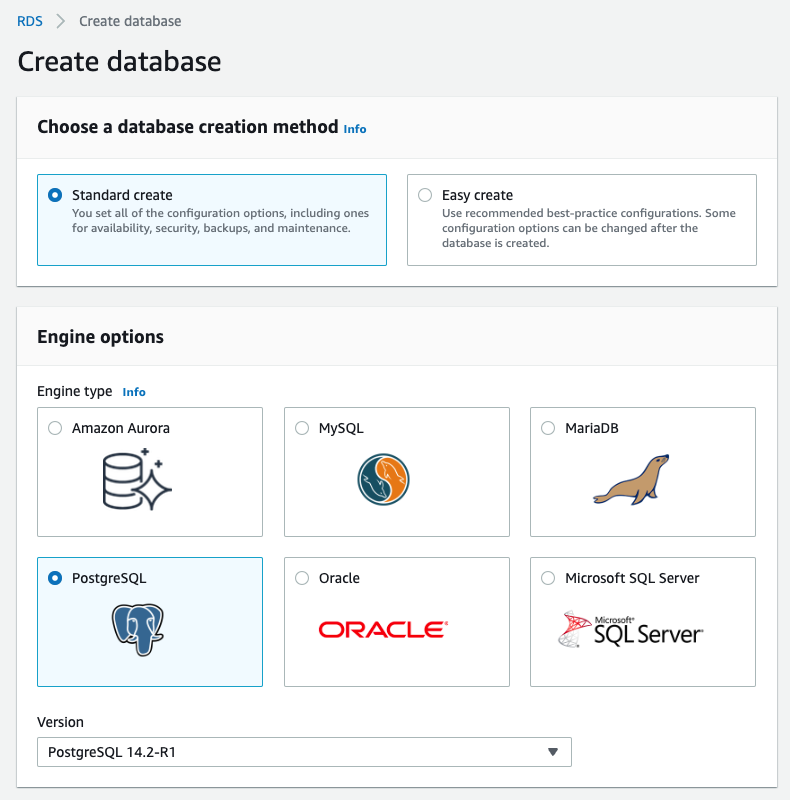\n\n4. For **DB instance identifier**, enter a name for the DB instance.\n5. Under **Credentials Settings**, enter a user name and password.\n6. For **DB instance class**, select **Memory optimized classes**.\n7. Choose db.r6g.2xlarge for the instance size.\n\n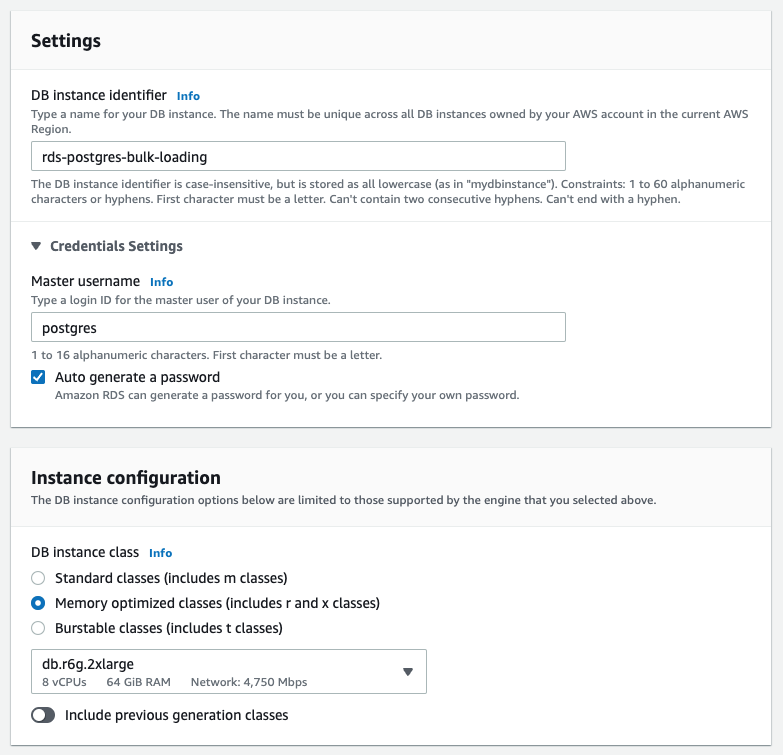\n\n8. Allocate 250 GB of General Purpose SSD (gp2) storage.\n9. Select **Enable storage autoscaling**.\n\n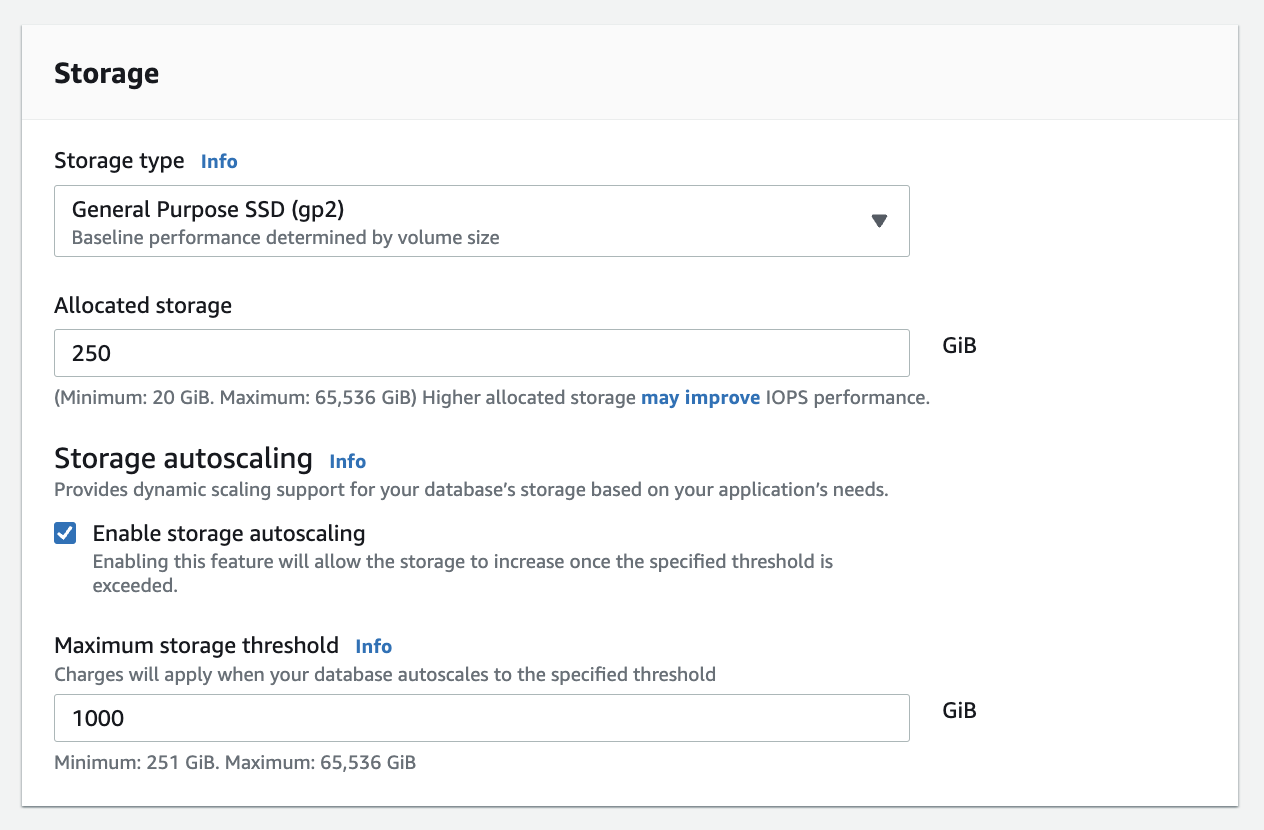\n\n10. For **Database authentication options**, select **Password and IAM database authentication**.\n\nWe recommend using IAM database authentication to connect to your database instance from the bastion host.\n\n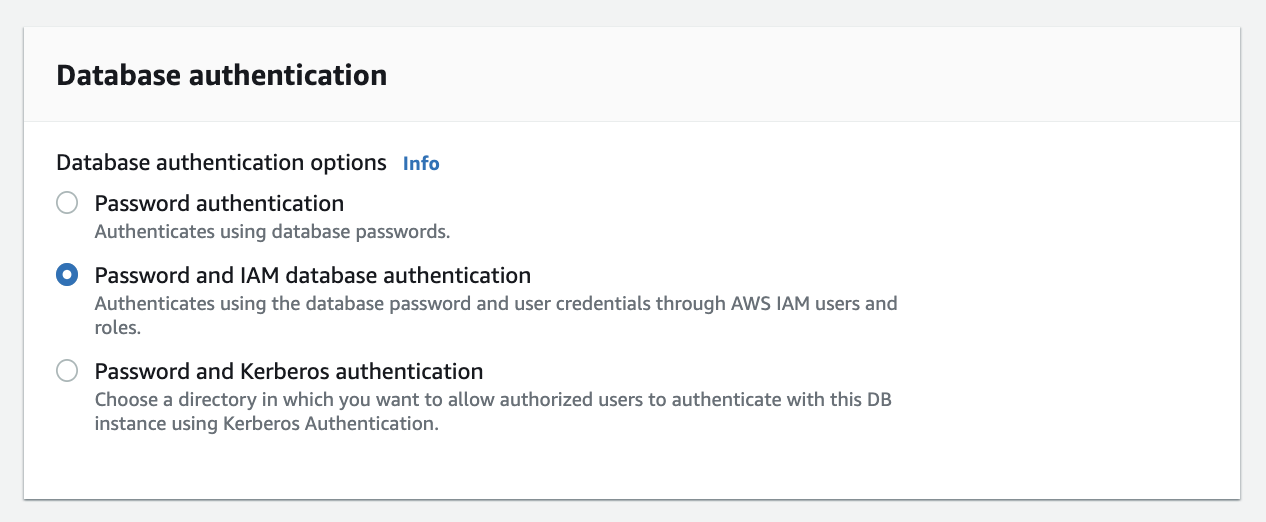\n\nTo connect to your RDS instance using IAM database authentication, refer to [How do I connect to my Amazon RDS for PostgreSQL or Amazon Aurora PostgreSQL using IAM authentication](https://aws.amazon.com/premiumsupport/knowledge-center/rds-postgresql-connect-using-iam/).\n\n#### **Set up bastion host**\n\nIf you don’t have a bastion host set up already you can refer to the [Linux Bastion Hosts on AWS](https://aws.amazon.com/quickstart/architecture/linux-bastion/) reference deployment. You will need to update the security group for your RDS for PostgreSQL instance to allow access from the security group of the bastion host.\n\n#### **Create database and target tables**\n\nUse the DDL scripts provided in the [GitHub repo](https://github.com/aws-samples/amazon-rds-postgresql-bulk-loading-blog) associated with this post to create the ```imdb``` database, the staging schema, and the target tables. There are no indexes, keys, or constraints and the data type of the table columns are ```text``` to simplify loading.\n\n#### **Install the aws_s3 extension**\n\nTo bulk load files from Amazon S3 using the COPY command, you need to install the ```aws_s3``` extension on the RDS database server. You also need to associate an IAM role and policy that provides S3 bucket permissions for the ```s3import``` function. For instructions, refer to [Importing Amazon S3 data into an RDS for PostgreSQL DB instance](https://docs.aws.amazon.com/AmazonRDS/latest/UserGuide/USER_PostgreSQL.S3Import.html).\n1. Connect to the ```imdb``` database from the bastion host using ```psql``` command. Execute the following command to Install the ```aws_s3``` extension:\n\n```\npsql=> CREATE EXTENSION aws_s3 CASCADE;\nNOTICE: installing required extension \"aws_commons\"\n```\n\n2. Use the following CLI command to create an IAM policy that provides S3 bucket permissions for the ```s3import``` extension:\n\n```\naws iam create-policy \\\n --policy-name rds-s3-import-policy \\\n --policy-document '{\n \"Version\": \"2012-10-17\",\n \"Statement\": [\n {\n \"Sid\": \"s3import\",\n \"Action\": [\n \"s3:GetObject\",\n \"s3:ListBucket\"\n ],\n \"Effect\": \"Allow\",\n \"Resource\": [\n \"arn:aws:s3:::[S3_BUCKET_NAME]\", \n \"arn:aws:s3:::[S3_BUCKET_NAME]/*\"\n ] \n }\n ] \n }'\n```\n3. Create an IAM role and associate the policy you just created:\n\n```\naws iam create-role \\\n --role-name rds-s3-import-role \\\n --assume-role-policy-document '{\n \"Version\": \"2012-10-17\",\n \"Statement\": [\n {\n \"Effect\": \"Allow\",\n \"Principal\": {\n \"Service\": \"rds.amazonaws.com\"\n },\n \"Action\": \"sts:AssumeRole\",\n \"Condition\": {\n \"StringEquals\": {\n \"aws:SourceAccount\": [AWS_ACCOUNT_NUMBER],\n \"aws:SourceArn\": \"[RDS_DATABASE_ARN]\"\n }\n }\n }\n ] \n }'\n```\n\n4. Attach the policy:\n\n```\naws iam attach-role-policy \\\n --policy-arn rds-s3-import-policy \\\n --role-name rds-s3-import-role\n```\n\n5. Add the IAM role to the RDS for PostgreSQL instance:\n\n```\naws rds add-role-to-db-instance \\\n --db-instance-identifier [DB_INSTANCE_IDENTIFIER] \\\n --feature-name s3Import \\\n --role-arn rds-s3-import-role \\\n --region [REGION]\n```\n\n#### **Acquire benchmark datasets**\n\nWe use the publicly available [IMDb datasets](https://www.imdb.com/interfaces/) for the benchmarking tests presented in this post. We opted not to use the popular benchmarking tool [pgbench](https://www.postgresql.org/docs/current/pgbench.html) because its intended primary use is to measure performance of simulated concurrent users executing transactional SQL operations (```SELECT```, ```INSERT```, ```UPDATE```) rather than bulk loading using the COPY command.\n\nUpload these public datasets to the S3 bucket you specified in the IAM policy.\n\n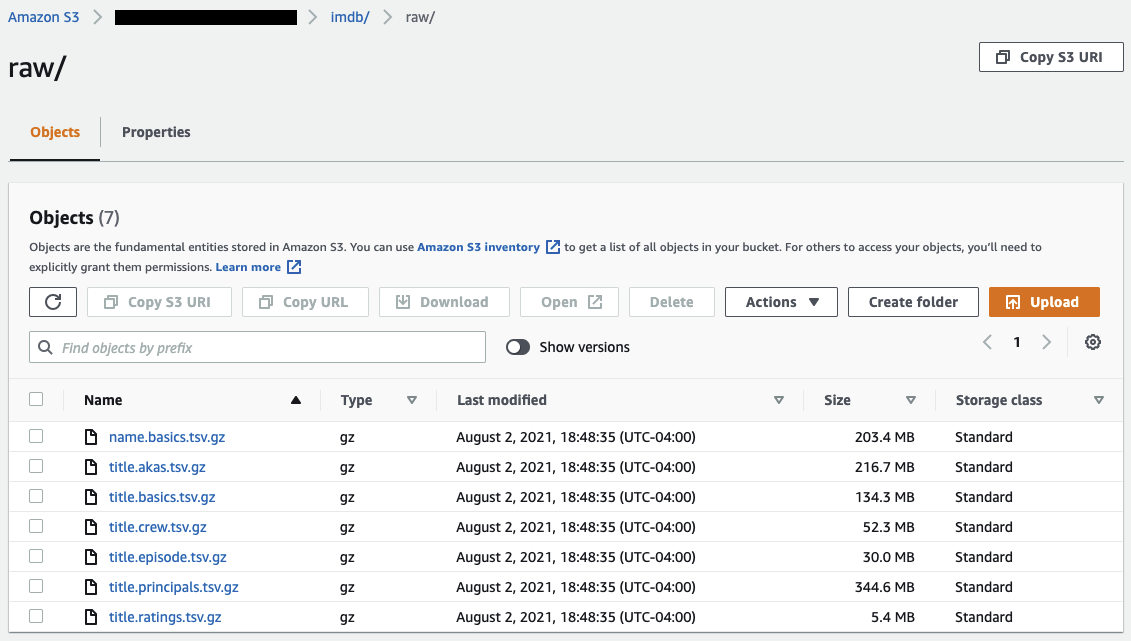\n\n#### **Benchmark baseline**\n\nBefore we start applying optimizations, let’s take a baseline measurement using the default database settings in a Multi-AZ configuration. From the [IMDb dataset](https://www.imdb.com/interfaces/), we bulk load the largest file, ```titles.principals.tsv.gz```, which is 361 MB.\n\nFrom our [Amazon Elastic Compute Cloud](http://aws.amazon.com/ec2) (Amazon EC2) bastion, we use a psql command from a shell script. Setting up a [pgass file](https://www.postgresql.org/docs/current/libpq-pgpass.html) with credentials allows us to run commands using these scripts.\n\n```\n#!/bin/sh\nhost=\"[DATABASE_INSTANCE_HOSTNAME]\"\ndb=\"imdb\"\npsql -h $host -p 5432 -d $db -U postgres -c \"\\i principals.sql\" &\nwait\n```\n\nThe ```principals.sql``` file contains the following SQL command using the ```aws_s3.table_import_from_s3``` function:\n\n```\nSELECT aws_s3.table_import_from_s3(\n 'staging.title_principals', '', '(FORMAT csv, HEADER true, DELIMITER E''\\t'')',\n '[S3_BUCKET_NAME]', '[S3_PREFIX]/title.principals.tsv.gz', '[REGION]'\n);\n```\n\nWe get the following results.\n\n\n\nThis is significantly higher than expected. In the next section, we’ll demonstrate how to identify and eliminate bottlenecks.\n\n#### **Optimizing storage-based IOPS**\n\nA common bottleneck constraining bulk loading performance in Amazon RDS for PostgreSQL is storage disk IOPS capacity. Database IOPS capacity doesn’t reach peak utilization if the EBS volume IOPS capacity is a limiting factor. In this section, we demonstrate how to analyze and optimize EBS volume IOPS performance when used with Amazon RDS for PostgreSQL.\n\nThree storage types are available, each with different IOPS capabilities, as described in the following table (Magnetic is listed in the table for completeness, but it is not recommended for database use).\n\n\n\nTo detect whether disk IOPS capacity is a bottleneck, we monitor the disk queue length metric from the performance insights dashboard. When an IOPS request can’t be served immediately by the disk, it’s added to a queue. The length of this queue indicates how much of the I/O load is deferred due to throughput limitations.\n\n1. On the Amazon RDS dashboard, open your database.\n2. On the **Monitoring** tab, expand the **Monitoring** menu and choose **Performance Insights**.\n\n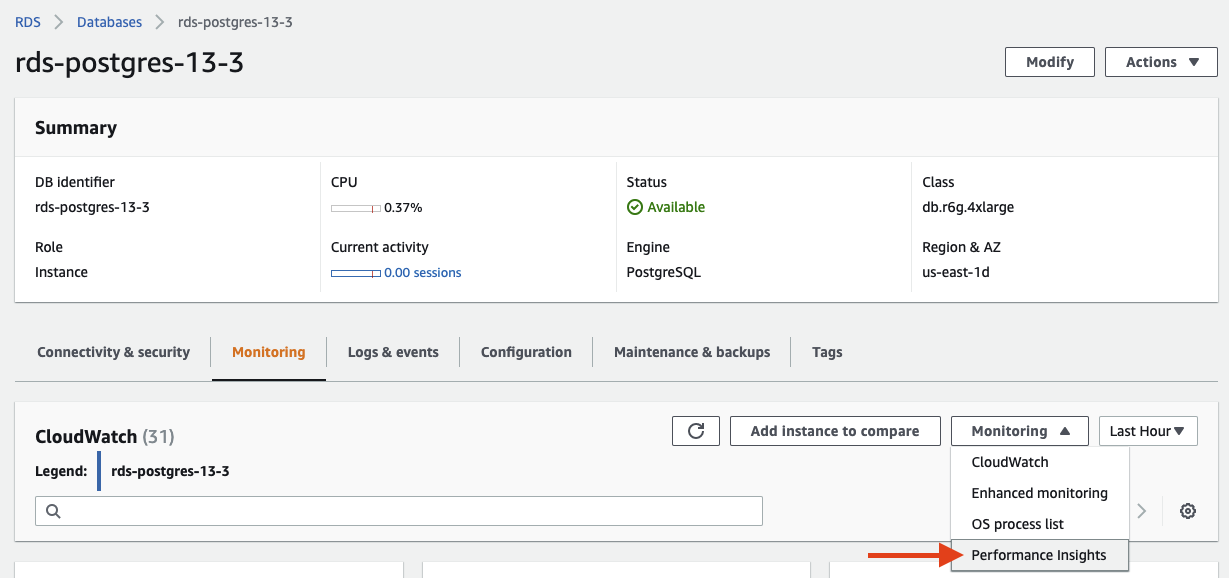\n\n3. Choose **Manage metrics**.\n4. Select the ```rdsdev.avgQueueLen``` metric from the **diskIO** section.\n5. Choose **Update graph**.\n\n\n\nRunning the bulk loading benchmark with the baseline configuration again revealed a large average queue length, indicating that the operation is constrained by the IOPS capacity of the EBS volume.\n\n\n\nFrom these results, we see a max average queue length of 2,048 requests.\n\nTo remediate this, there are two primary options:\n\n- ncrease the volume size of the Amazon EBS General Purpose SSD (gp2) volume\n- Choose the Amazon EBS Provisioned IOPS (io1) volume and set the IOPS independent of volume size\n\nLet’s look at the gp2 option first. The General Purpose SSD (gp2) provides a baseline of 100 IOPS at a 33.33 GB volume size, then 3 IOPS per GB above that, with the ability to burst to 3,000 IOPS for extended periods. For more information, see [Solid state drives (SSD)](https://docs.aws.amazon.com/AWSEC2/latest/UserGuide/ebs-volume-types.html#solid-state-drives).\n\nWe originally provisioned a General Purpose SSD (gp2) volume sized at 250 GB. This provides a baseline of 750 IOPS.\n\nCombining 750 IOPS and the max average queue depth, we get 2750 IOPS. We increased the volume size to 1500 GB to yield 4400 IOPS and ran the same baseline benchmark.\n\n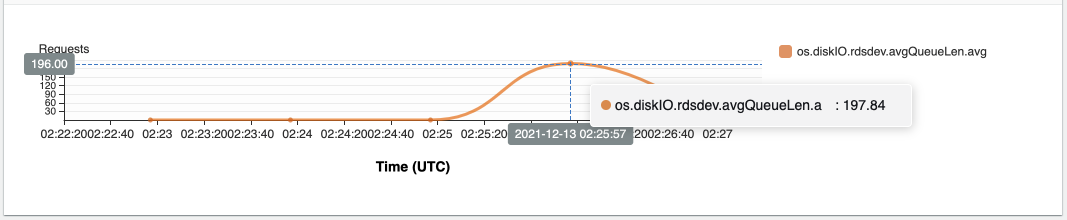\n\nThis reduced our max average queue depth by 10 times, from 2,048 to just under 200. To compare, we also converted storage of our test database to Provisioned IOPS (io1) and provisioned 10,000 IOPS. Results were comparable with a queue length of 170.\n\n\n\nWith our EBS storage volumes optimized for higher IOPS capacity, we ran the baseline benchmark again, yielding a significant increase in throughput.\n\n\n\nLoading times dropped from 5 minutes, 45 seconds, to just over 1 minute, for an increase in throughput of 82%. Now that we have our storage IOPS optimized, let’s look at database configuration optimizations.\n\n#### **Parallelize bulk loading commands**\n\nYou can run multiple ```psql``` commands in parallel by using the ampersand character suffix in a Linux bash script. This tells the OS to fork and run the command in a subshell. In this section, we test bulk loading multiple files in parallel and sequentially and compare the results. First let’s test sequential runs of our psql commands.\n\nThe following is our ```copy_bulk_sequential.sh``` bash script:\n\n```\n#!/bin/sh\nhost=\"[DATABASE_INSTANCE_HOSTNAME]\"\ndb=\"imdb\"\n\npsql -h $host -p 5432 -d $db -U postgres -c \"\\i title.sql\"\npsql -h $host -p 5432 -d $db -U postgres -c \"\\i crew.sql\"\npsql -h $host -p 5432 -d $db -U postgres -c \"\\i title_basics.sql\"\npsql -h $host -p 5432 -d $db -U postgres -c \"\\i episode.sql\"\npsql -h $host -p 5432 -d $db -U postgres -c \"\\i principals.sql\"\npsql -h $host -p 5432 -d $db -U postgres -c \"\\i ratings.sql\"\npsql -h $host -p 5432 -d $db -U postgres -c \"\\i name_basics.sql\"\n\nwait\n```\nWe observe the following results.\n\n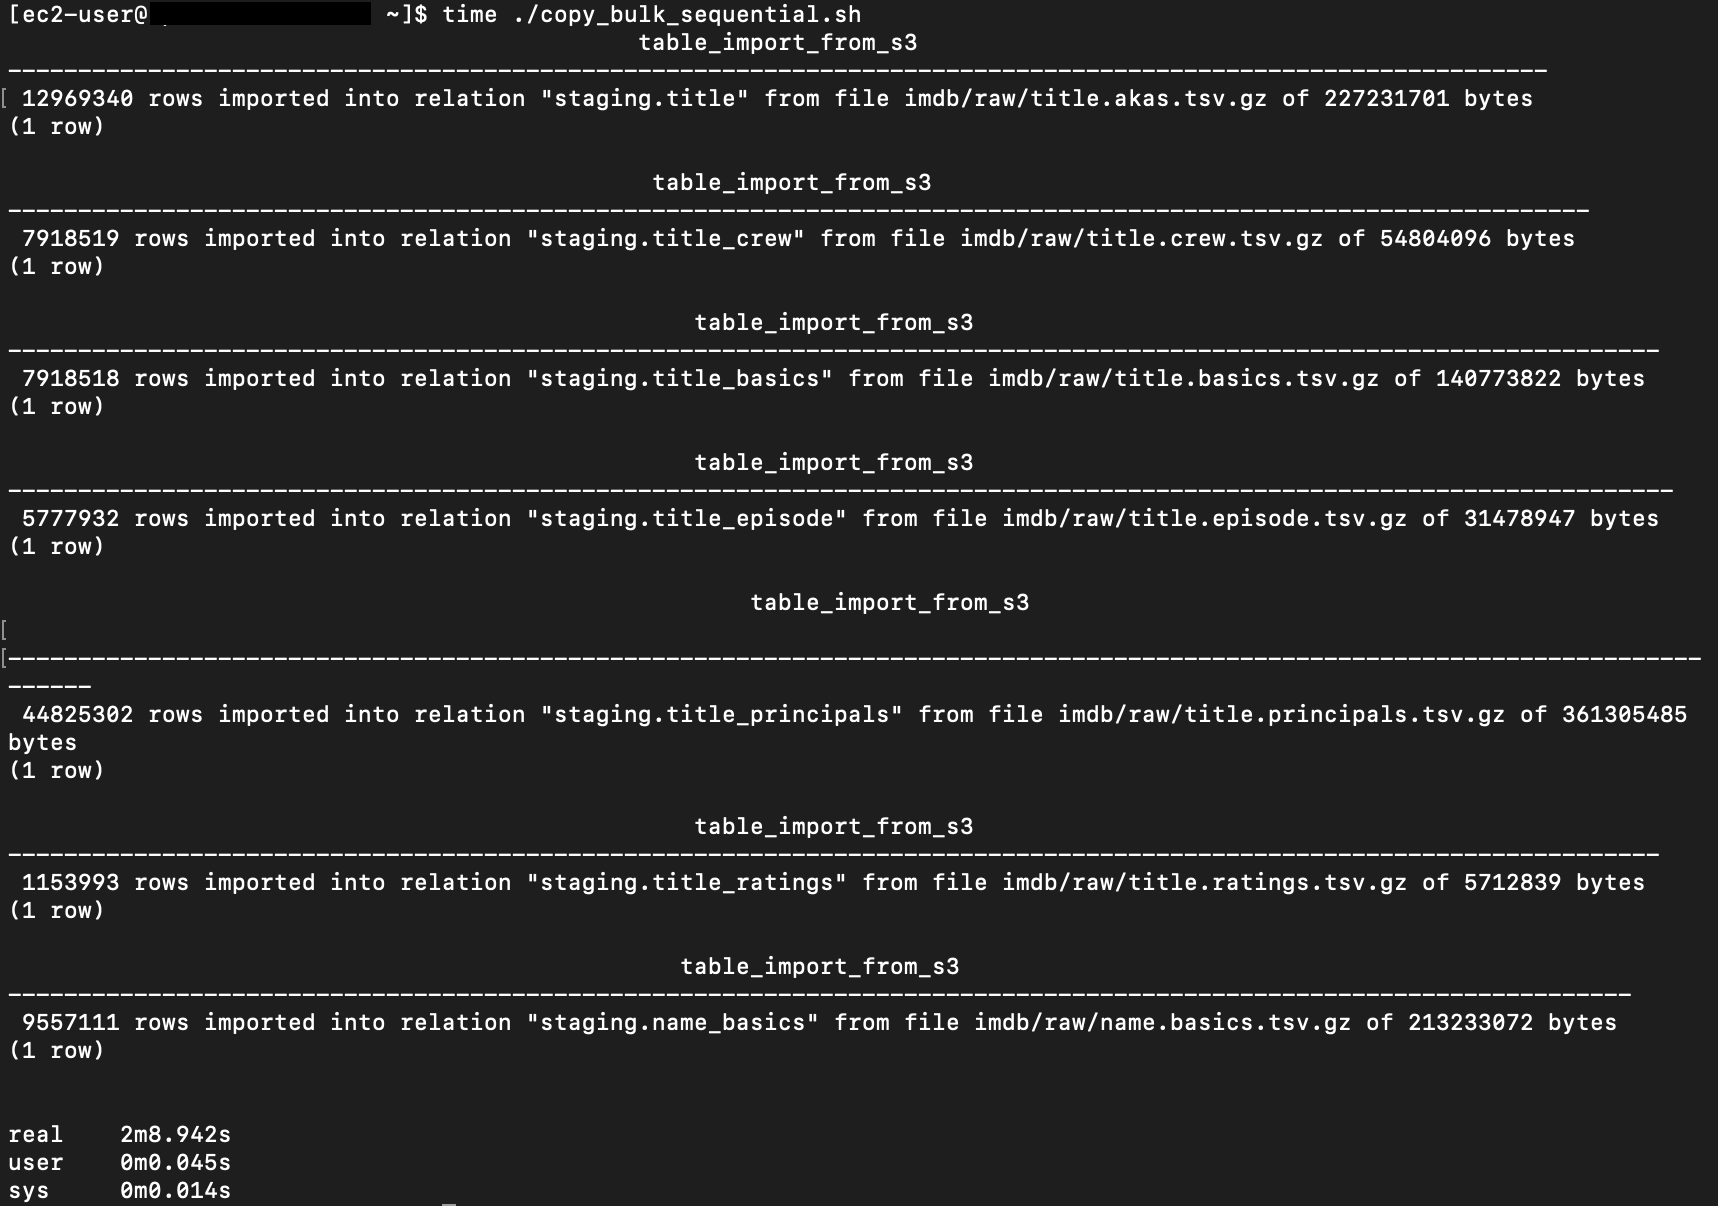\n\nLet’s look at some of the database metrics during the sequential load.\n\n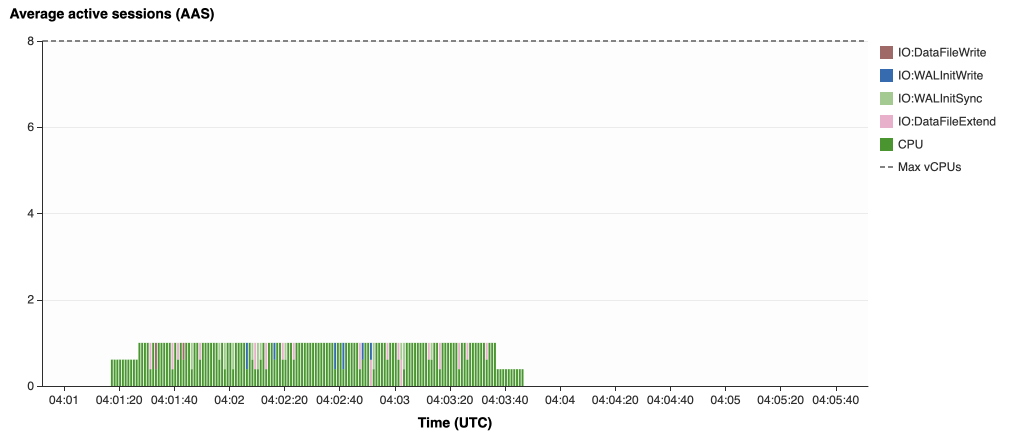\n\nAs expected, our db.r6g.2xlarge instance with 8 vCPU shows one active session.\n\n\n\nCPU utilization averages 15% and doesn’t get above 30%.\n\n\n\nWe average about 200K Kb/s and spike at just over 400K Kb/s.\n\nNow let’s see how parallelizing the ```psql``` commands alters performance. The following ```copy_bulk_parallel.sh``` script runs each ```psql``` command in a separate subprocess. Each call creates a separate session in the RDS instance and performs the bulk loading of these seven files in parallel.\n\n```\n#!/bin/sh\nhost=\"[DATABASE_INSTANCE_HOSTNAME]\"\ndb=\"imdb\"\n\npsql -h $host -p 5432 -d $db -U postgres -c \"\\i title.sql\" &\npsql -h $host -p 5432 -d $db -U postgres -c \"\\i crew.sql\" &\npsql -h $host -p 5432 -d $db -U postgres -c \"\\i title_basics.sql\" &\npsql -h $host -p 5432 -d $db -U postgres -c \"\\i episode.sql\" &\npsql -h $host -p 5432 -d $db -U postgres -c \"\\i principals.sql\" &\npsql -h $host -p 5432 -d $db -U postgres -c \"\\i ratings.sql\" &\npsql -h $host -p 5432 -d $db -U postgres -c \"\\i name_basics.sql\" &\n\nwait\n```\n\nThe following screenshot shows the results of our parallel load.\n\n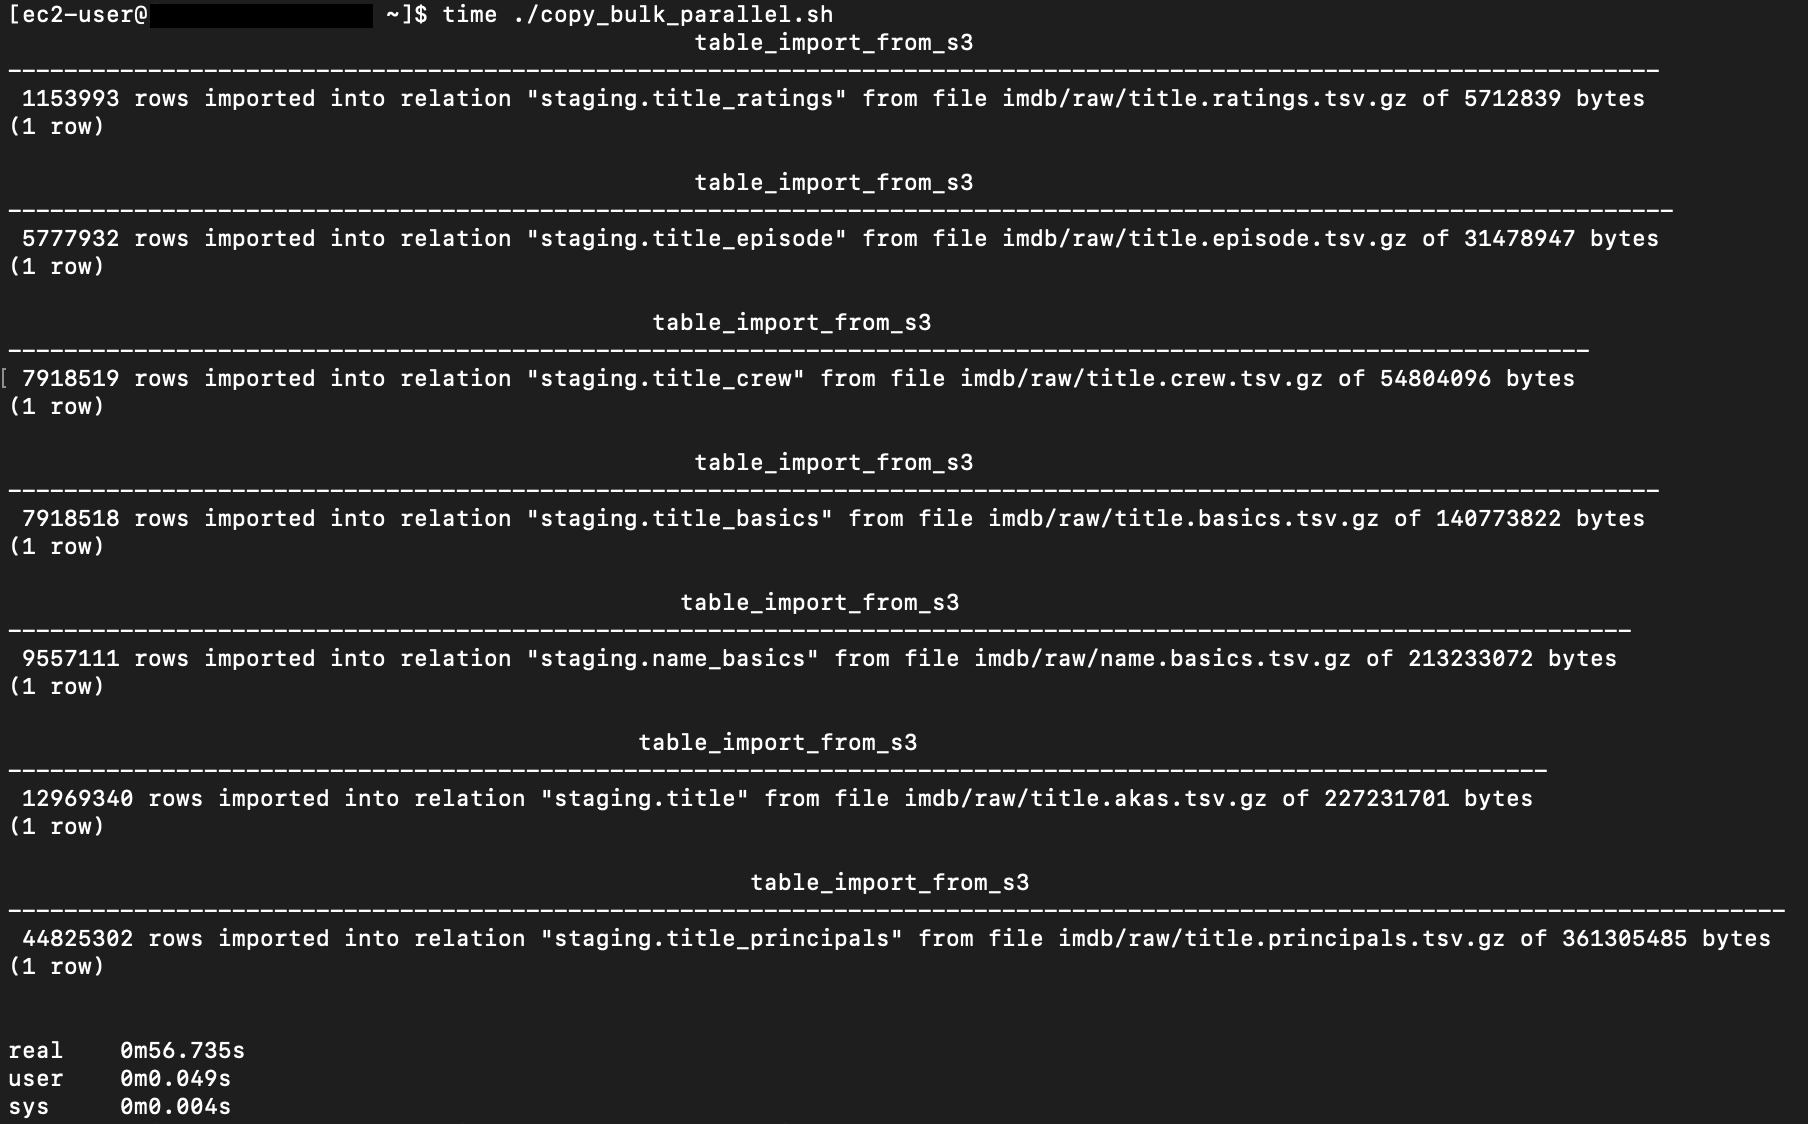\n\nFor all seven files, we were able to reduce loading time by more than half, or 56%, from 2 minutes, 9 seconds, down to 57 seconds.\n\n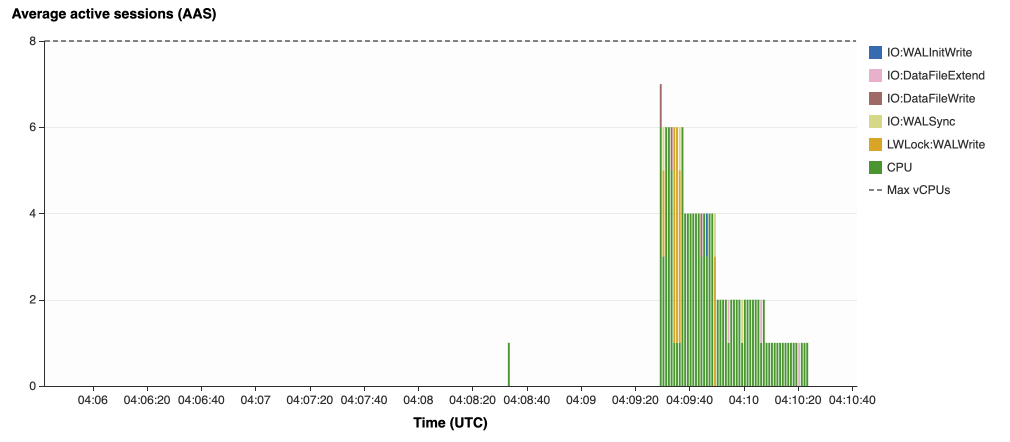\n\nOur parallel load saturated nearly all the available cores. As files completed their load, sessions closed and quickly dropped our concurrent active sessions count.\n\n\n\nThe CPU utilization initially spiked to 90%.\n\n\n\nWrite throughput averaged over 400K Kb/s and spiked to over 800K Kb/s, essentially doubling the throughput of the sequential load.\n\nWhen you have multiple large files to bulk load, run your bulk loading commands in parallel to achieve the highest throughput. A general guideline is to limit the number of concurrent bulk loading sessions to one less than the number of vCPUs.\n\nNow let’s look at database configuration.\n\n#### **Database configuration optimizations**\n\nSection [14.4 Populating a Database](https://www.postgresql.org/docs/current/populate.html) of the official PostgreSQL documentation provides configuration recommendations to optimize for bulk loading. We implement many of these recommendations in Amazon RDS for PostgreSQL.\n\nBecause certain administrative rights are restricted in AWS managed databases, setting database configuration in RDS databases is performed through a conceptual container called [database parameter groups](https://docs.aws.amazon.com/AmazonRDS/latest/UserGuide/USER_WorkingWithParamGroups.html). Database parameter groups are engine-specific and can be applied as part of a database modification task.\n\nThis abstraction provides a useful mechanism for persisting and managing multiple configurations that can be swapped in and out for different scenarios, including bulk data loading.\n\nConfiguration parameters are classified with either a dynamic or static apply type, which can be viewed through the console. Dynamic parameters can be applied immediately. Static parameters require a database server restart.\n\nTo create a parameter group for bulk loading, we choose the postgres14 parameter group family because it reflects the major PostgreSQL version of our database instance. The creation of database parameter groups and the setting of parameter values can be done programmatically via the [AWS Command Line Interface](http://aws.amazon.com/cli) (AWS CLI), SDK, or API. We use the AWS CLI for these examples, which are available in the [GitHub repo](https://github.com/aws-samples/amazon-rds-postgresql-bulk-loading-blog).\n\n1. Create the parameter groups with the following code:\n\n```\naws rds create-db-parameter-group \\\n --db-parameter-group-name rds-postgres14-bulkload \\\n --db-parameter-group-family postgres14 \\\n --description \"Optimized database parameters for bulk loading into PostgreSQL for RDS\"\n\n```\nThe following screenshot shows the JSON response.\n\n\n\n2. Now we set the parameter values for Amazon RDS for PostgreSQL. We use a JSON file with database parameter values optimized for bulk loading.\n\n```\n{\n \"DBParameterGroupName\": \"rds-postgres14-bulkload\",\n \"Parameters\": [\n\t{\n\t\t\"ParameterName\": \"maintenance_work_mem\",\n\t\t\"ParameterValue\": \"1048576\",\n\t\t\"ApplyMethod\": \"immediate\"\n\t},\n\t{\n\t\t\"ParameterName\": \"max_wal_size\",\n\t\t\"ParameterValue\": \"4096\",\n\t\t\"ApplyMethod\": \"immediate\"\n\t},\n\t{\n\t\t\"ParameterName\": \"checkpoint_timeout\",\n\t\t\"ParameterValue\": \"1800\",\n\t\t\"ApplyMethod\": \"immediate\"\n\t}\n ]\n}\n```\n\n3. Pass the JSON file to the AWS CLI command to modify the values stored in our bulk load parameter group:\n\n```\naws rds modify-db-parameter-group \\\n --db-parameter-group-name rds-postgres14-bulkload \\\n --cli-input-json file://rds-postgresql14-bulkload.json\n```\n\n4. Modify the RDS instance by applying the bulk loading parameter group:\n5. \n```\naws rds modify-db-instance \\\n --db-instance-identifier [DB_INSTANCE_IDENTIFIER] \\\n --db-parameter-group rds-postgres14-bulkload\n```\n\nBefore we continue, let’s review the parameter changes made and how they impact bulk loading performance.\n\n#### **Increase maintenance_work_mem**\n\nIncreasing ```maintenance_work_mem``` doesn’t improve performance of the COPY itself, but it does improve performance of ```CREATE INDEX```, ```ADD FOREIGN KEY```, and ```ALTER TABLE``` statements that would likely follow if keys and indexes are dropped prior to loading and readded after loading completes. AUTOVACUUM performance is also improved by this parameter setting.\n\nSetting the ```maintenance_work_mem``` parameter to 1 GB is recommended (PostgreSQL doesn’t use more than 1GB so setting this higher won’t add any benefit). The parameter takes an integer value in kB. For 1 GB, the value is 1048576.\n\n#### **Avoid automatic checkpointing**\n\nAll modifications to a PostgreSQL database are written to a log called the Write-Ahead Log (WAL). A checkpoint is a point in the WAL at which all data files have been written to disk. An automated operation called checkpointing occurs regularly to flush dirty pages to disk so the WAL up to that checkpoint can be recycled. In normal operation, frequent checkpointing ensures faster recovery in the event of system failure. During bulk loading, checkpointing inhibits overall write throughput.\n\nThree PostgreSQL parameters control the frequency of checkpointing:\n\n- ```max_wal_size```\n\n- ```checkpoint_completion_target```\n- ```checkpoint_timeout```\n\nThe ```max_wal_size``` and ```checkpoint_completion_target``` parameters set the size the WAL can grow to before automatic checkpointing is triggered. By default, the ```checkpoint_completion_target``` is 0.9. This means that the I/O needed to process 90% of the checkpointing (90% of the ```max_wal_size``` limit) is spread evenly within the time period specified in the ```checkpoint_timeout``` to reduce the impact on other database operations. The ```checkpoint_timeout``` parameter triggers checkpointing after a specified time interval. The default is 5 minutes.\n\nYou can trigger the checkpointing process manually using the ```CHECKPOINT``` command immediately after bulk loading is complete. This is recommended. For bulk loading, we advise setting the parameter values high enough to avoid automatic checkpointing as much as possible. For ```max_wal_size```, we follow the recommendation specified in [Importing data into PostgreSQL on Amazon RDS](https://docs.aws.amazon.com/AmazonRDS/latest/UserGuide/PostgreSQL.Procedural.Importing.html), and set it to 4 GB. We increase ```checkpoint_timeout``` to 30 minutes. Note that these gains in performance come with availability risk. In the event of a failover or crash, these settings could result in a recovery time of 10 minutes or more (depending on the workload) instead of the default 1 to 2 minutes.\n\nIn addition to these global parameter settings, there are local settings that provide additional optimizations. Let’s review these next.\n\n#### **Disable synchronous_commit at the transaction level**\n\nThe ```synchronous_commit``` setting can be applied at the global, session, or transaction level. It is never recommended to disable ```synchronous_commit``` at the global level to improve bulk loading performance. If a failover or crash occurs, this will cause data loss for transactions executing in any session. We can instead disable ```synchronous_commit``` locally from within the transaction, which will expire when the transaction is committed. This limits the risk when the data to be loaded is staged in a durable storage service like S3. Any bulk loaded data lost can simply be reloaded.\n\nThe following code block demonstrates how to disable ```synchronous_commit``` at the transaction level:\n\n```\nbegin;\n SET LOCAL synchronous_commit TO OFF;\n [COPY COMMAND]\ncommit;\n\n```\n\n#### **Disable autovacuum at the table level**\n\nNever turn off autovacuum globally. Autovacuum performs necessary maintenance tasks that keeps the database working. Prior to PostgreSQL version 13, ```autovacuum``` wasn’t triggered by inserts so it didn’t have a performance impact during bulk loading. The downside was that insert-only tables were never vacuumed. For these tables, vacuuming needed to be performed manually. Starting with PostgreSQL version 13, ```autovacuum``` is now triggered by inserts. For most scenarios, the performance impact of autovacuum during bulk loading will be negligible. Optimizing ```maintenance_work_mem``` as discussed previously also enhances autovacuum performance. If I/O operations from autovacuuming is observed to impact performance, the service can be disabled at the table level and ```vacuum``` can be run manually after bulk loading completes.\n\n#### **Disable autovacuum for table:**\n\n```\nALTER TABLE [TABLE] SET (autovacuum_enabled = false);\n```\n\nEnable autovacuum for table:\n\n```\nALTER TABLE [TABLE] SET (autovacuum_enabled = true);\n```\n\n#### **Avoid bulk loading when weekly maintenance is being performed**\n\nIt is recommended to avoid bulk loading when weekly maintenance is being performed. You can view the weekly maintenance window from the Maintenance & backups tab of the RDS dashboard.\n\n\n\nYou can set a maintenance window when creating or modifying the database.\n\nThis concludes the review of PostgreSQL database configuration settings and approaches for optimizing bulk loading.\n\nNow let’s run our single file load test using the principals.gz file with these database optimizations applied. Here are the results.\n\n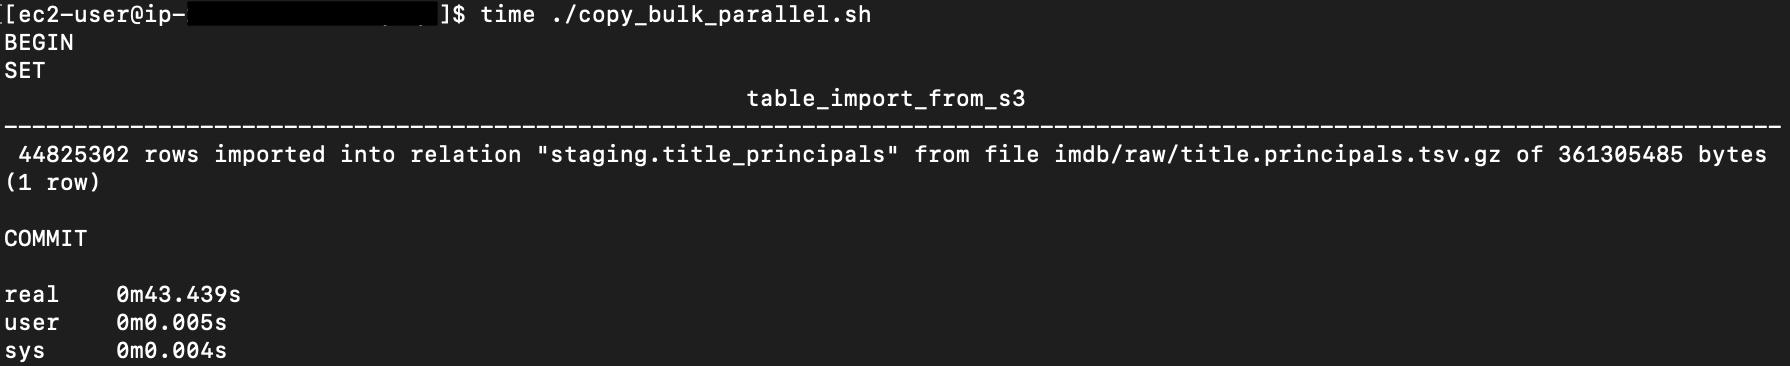\n\nThe loading time for our single file dropped from 57 to 44 seconds for an additional 23% speedup.\n\n#### **Anti-patterns**\n\nBefore we conclude, let’s discuss some optimization strategies for bulk loading that are not recommended. The following are anti-patterns that should be avoided.\n\n#### **Do not disable Multi-AZ**\nAmazon RDS for PostgreSQL with the Multi-AZ feature enabled increases availability by synchronously replicating data to a standby instance in a different Availability Zone. The database can fail over to this standby instance if the primary instance becomes unreachable. Disabling Multi-AZ will yield better bulk loading performance, but it is not recommended for production workloads due to the durability and availability risk.\n\n**Do not disable table logging**\n\nPostgreSQL truncates all unlogged tables on startup, including failovers and snapshot restores. Unlogged tables are also not replicated to PostgreSQL replicas. Due to the risk of data loss, use of unlogged tables is not recommended for production workloads.\n\n#### **Conclusion**\n\nIn this post, we presented strategies for optimizing RDS for PostgreSQL databases for bulk loading from Amazon S3. We demonstrated how to detect if a bulk loading operation is constrained by insufficient storage-based IOPS capacity and provided options for remediation. We demonstrated how to parallelize bulk loading operations using psql commands from bash scripts. We presented several recommendations to maximize bulk loading performance. As a result of these optimizations, we were able to reduce single file loading times for our benchmark dataset from 5 minutes, 45 seconds, to 44 seconds—a performance gain of 87%. We also identified anti-patterns for bulk loading optimization that should be avoided.\n\nIf you found our guidance helpful, let us know in the comments.\n\n#### **About the Author**\n\n\n\nJustin Leto is a Sr. Solutions Architect at Amazon Web Services with specialization in databases, big data analytics, and machine learning. His passion is helping customers achieve better cloud adoption. In his spare time, he enjoys offshore sailing and playing jazz piano. He lives in New York City with his wife Veera and baby daughter Elsi.","render":"<p>In this post, we present several bulk data loading strategies optimized for <a href=\"https://aws.amazon.com/rds/postgresql/\" target=\"_blank\">Amazon Relational Database Service (Amazon RDS) for PostgreSQL</a>. Although <a href=\"https://www.postgresql.org/docs/current/populate.html\" target=\"_blank\">general optimization guides</a> for bulk data loading into PostgreSQL are widely available, we illustrate how to apply these strategies in an Amazon RDS for PostgreSQL context.</p>\n<p>First, a word of caution. No combination of optimizations or strategies is appropriate for every customer use case. DBAs and developers must decide what strategies are best given the business requirements and other operational risks.</p>\n<p>How to optimize an Amazon RDS for PostgreSQL database for bulk loading is a common question we get from customers. Some scenarios customers describe for why they need to bulk load data are:</p>\n<h4><a id=\"Enriching_operational_data_with_insights_6\"></a><strong>Enriching operational data with insights</strong></h4>\n<p>Third-party data or data from other systems may be ingested and integrated in a data lake, but the refined data needs to be merged into the operational database to provide insights to users.</p>\n<h4><a id=\"Specialized_PostgreSQL_capabilities_10\"></a><strong>Specialized PostgreSQL capabilities</strong></h4>\n<p>Some analysts prefer to use PostgreSQL’s specialized querying features for geospatial and JSON data.</p>\n<h4><a id=\"Legacy_reporting_14\"></a><strong>Legacy reporting</strong></h4>\n<p>Existing PostgreSQL reporting or analysis queries may be difficult or costly to migrate to alternative platforms.</p>\n<h4><a id=\"Data_security_and_tenant_isolation_18\"></a><strong>Data security and tenant isolation</strong></h4>\n<p>The business may want to use a PostgreSQL database to provide a few analysts with secure access to sensitive data. Similarly, the business could initialize a new PostgreSQL database to provide secure data access to an external stakeholder, such as a customer, vendor, or auditor.</p>\n<h4><a id=\"Constraints_22\"></a><strong>Constraints</strong></h4>\n<p>To narrow the focus and dive deep, we set the following constraints to control for several variables:</p>\n<ul>\n<li><strong>Amazon S3 and the COPY command</strong> – In all our testing scenarios, data is loaded into Amazon RDS for PostgreSQL from <a href=\"http://aws.amazon.com/s3\" target=\"_blank\">Amazon Simple Storage Service</a> (Amazon S3) using the <code>aws_s3</code> extension and the COPY command.</li>\n<li><strong>GZIP compression</strong>– PostgreSQL is capable of loading data files compressed with standard GZIP compression. Compressing data files reduces the amount of data transferred over the network from Amazon S3. We use GZIP compression in all scenarios.</li>\n<li><strong>AWS Graviton2</strong> – We use <a href=\"https://aws.amazon.com/ec2/graviton/\" target=\"_blank\">AWS Graviton2</a>-based instance types exclusively. Comparing the performance of different chipsets or instance families is out of scope for this post. Choosing one controls this variable.</li>\n<li><strong>PostgreSQL version</strong> – We use PostgreSQL major version 14 in all scenarios.</li>\n</ul>\n<h4><a id=\"Solution_overview_31\"></a><strong>Solution overview</strong></h4>\n<p>The following diagram illustrates the solution architecture we use for the benchmark tests.</p>\n<p><img src=\"https://dev-media.amazoncloud.cn/939307751b5f445b8aa769fd11cf9069_image.png\" alt=\"image.png\" /></p>\n<p>The database instance isn’t publicly accessible because it’s in a private subnet. Instead, the database instance is accessed via the bastion host in the public subnet. We use security group rules to restrict SSH access on the bastion host to our IP address. We use <a href=\"http://aws.amazon.com/iam\" target=\"_blank\">AWS Identity and Access Management</a> (IAM) to authenticate to the database from the bastion host. Finally, we use an S3 VPC endpoint to provide a private route from Amazon S3 to our VPC where our RDS for PostgreSQL database resides.</p>\n<p>We place the bastion host in the same Availability Zone as the RDS for PostgreSQL instance to minimize network latency. For our tests, we submit <code>psql</code> commands to the database from bash scripts run on the bastion host.</p>\n<h4><a id=\"Prerequisites_41\"></a><strong>Prerequisites</strong></h4>\n<p>If you intend to set up a similar testbench, note the following prerequisites.</p>\n<h4><a id=\"Create_an_RDS_for_PostgreSQL_instance_45\"></a><strong>Create an RDS for PostgreSQL instance</strong></h4>\n<p>We use the db.r6g.2xlarge instance size with 250 GB of General Purpose SSD (gp2) storage. Later we will change the database storage type to Provisioned IOPS SSD (io1) to compare performance with gp2. Note that dedicated <a href=\"http://aws.amazon.com/ebs\" target=\"_blank\">Amazon Elastic Block Store</a> (Amazon EBS) bandwidth and network bandwidth vary by instance size. Refer to the RDS for PostgreSQL <a href=\"https://aws.amazon.com/rds/postgresql/pricing/\" target=\"_blank\">pricing page</a> for cost information.</p>\n<ol>\n<li>On the Amazon RDS console, choose <strong>Create database</strong>.</li>\n<li>For <strong>Engine type</strong>, select <strong>PostgreSQL</strong>.</li>\n<li>For <strong>Version</strong>, choose <strong>PostgreSQL 14.2-R1</strong>.</li>\n</ol>\n<p><img src=\"https://dev-media.amazoncloud.cn/5af6c4f152904c0a8b872a6333ece2cb_image.png\" alt=\"image.png\" /></p>\n<ol start=\"4\">\n<li>For <strong>DB instance identifier</strong>, enter a name for the DB instance.</li>\n<li>Under <strong>Credentials Settings</strong>, enter a user name and password.</li>\n<li>For <strong>DB instance class</strong>, select <strong>Memory optimized classes</strong>.</li>\n<li>Choose db.r6g.2xlarge for the instance size.</li>\n</ol>\n<p><img src=\"https://dev-media.amazoncloud.cn/7816d74bbcec40c3beb2252d18f6263d_image.png\" alt=\"image.png\" /></p>\n<ol start=\"8\">\n<li>Allocate 250 GB of General Purpose SSD (gp2) storage.</li>\n<li>Select <strong>Enable storage autoscaling</strong>.</li>\n</ol>\n<p><img src=\"https://dev-media.amazoncloud.cn/a1ba0321958b42f198f2f8576e45ed61_image.png\" alt=\"image.png\" /></p>\n<ol start=\"10\">\n<li>For <strong>Database authentication options</strong>, select <strong>Password and IAM database authentication</strong>.</li>\n</ol>\n<p>We recommend using IAM database authentication to connect to your database instance from the bastion host.</p>\n<p><img src=\"https://dev-media.amazoncloud.cn/75e7d439cfab431a93d512100d9f43b9_image.png\" alt=\"image.png\" /></p>\n<p>To connect to your RDS instance using IAM database authentication, refer to <a href=\"https://aws.amazon.com/premiumsupport/knowledge-center/rds-postgresql-connect-using-iam/\" target=\"_blank\">How do I connect to my Amazon RDS for PostgreSQL or Amazon Aurora PostgreSQL using IAM authentication</a>.</p>\n<h4><a id=\"Set_up_bastion_host_75\"></a><strong>Set up bastion host</strong></h4>\n<p>If you don’t have a bastion host set up already you can refer to the <a href=\"https://aws.amazon.com/quickstart/architecture/linux-bastion/\" target=\"_blank\">Linux Bastion Hosts on AWS</a> reference deployment. You will need to update the security group for your RDS for PostgreSQL instance to allow access from the security group of the bastion host.</p>\n<h4><a id=\"Create_database_and_target_tables_79\"></a><strong>Create database and target tables</strong></h4>\n<p>Use the DDL scripts provided in the <a href=\"https://github.com/aws-samples/amazon-rds-postgresql-bulk-loading-blog\" target=\"_blank\">GitHub repo</a> associated with this post to create the <code>imdb</code> database, the staging schema, and the target tables. There are no indexes, keys, or constraints and the data type of the table columns are <code>text</code> to simplify loading.</p>\n<h4><a id=\"Install_the_aws_s3_extension_83\"></a><strong>Install the aws_s3 extension</strong></h4>\n<p>To bulk load files from Amazon S3 using the COPY command, you need to install the <code>aws_s3</code> extension on the RDS database server. You also need to associate an IAM role and policy that provides S3 bucket permissions for the <code>s3import</code> function. For instructions, refer to <a href=\"https://docs.aws.amazon.com/AmazonRDS/latest/UserGuide/USER_PostgreSQL.S3Import.html\" target=\"_blank\">Importing Amazon S3 data into an RDS for PostgreSQL DB instance</a>.</p>\n<ol>\n<li>Connect to the <code>imdb</code> database from the bastion host using <code>psql</code> command. Execute the following command to Install the <code>aws_s3</code> extension:</li>\n</ol>\n<pre><code class=\"lang-\">psql=> CREATE EXTENSION aws_s3 CASCADE;\nNOTICE: installing required extension "aws_commons"\n</code></pre>\n<ol start=\"2\">\n<li>Use the following CLI command to create an IAM policy that provides S3 bucket permissions for the <code>s3import</code> extension:</li>\n</ol>\n<pre><code class=\"lang-\">aws iam create-policy \\\n --policy-name rds-s3-import-policy \\\n --policy-document '{\n "Version": "2012-10-17",\n "Statement": [\n {\n "Sid": "s3import",\n "Action": [\n "s3:GetObject",\n "s3:ListBucket"\n ],\n "Effect": "Allow",\n "Resource": [\n "arn:aws:s3:::[S3_BUCKET_NAME]", \n "arn:aws:s3:::[S3_BUCKET_NAME]/*"\n ] \n }\n ] \n }'\n</code></pre>\n<ol start=\"3\">\n<li>Create an IAM role and associate the policy you just created:</li>\n</ol>\n<pre><code class=\"lang-\">aws iam create-role \\\n --role-name rds-s3-import-role \\\n --assume-role-policy-document '{\n "Version": "2012-10-17",\n "Statement": [\n {\n "Effect": "Allow",\n "Principal": {\n "Service": "rds.amazonaws.com"\n },\n "Action": "sts:AssumeRole",\n "Condition": {\n "StringEquals": {\n "aws:SourceAccount": [AWS_ACCOUNT_NUMBER],\n "aws:SourceArn": "[RDS_DATABASE_ARN]"\n }\n }\n }\n ] \n }'\n</code></pre>\n<ol start=\"4\">\n<li>Attach the policy:</li>\n</ol>\n<pre><code class=\"lang-\">aws iam attach-role-policy \\\n --policy-arn rds-s3-import-policy \\\n --role-name rds-s3-import-role\n</code></pre>\n<ol start=\"5\">\n<li>Add the IAM role to the RDS for PostgreSQL instance:</li>\n</ol>\n<pre><code class=\"lang-\">aws rds add-role-to-db-instance \\\n --db-instance-identifier [DB_INSTANCE_IDENTIFIER] \\\n --feature-name s3Import \\\n --role-arn rds-s3-import-role \\\n --region [REGION]\n</code></pre>\n<h4><a id=\"Acquire_benchmark_datasets_159\"></a><strong>Acquire benchmark datasets</strong></h4>\n<p>We use the publicly available <a href=\"https://www.imdb.com/interfaces/\" target=\"_blank\">IMDb datasets</a> for the benchmarking tests presented in this post. We opted not to use the popular benchmarking tool <a href=\"https://www.postgresql.org/docs/current/pgbench.html\" target=\"_blank\">pgbench</a> because its intended primary use is to measure performance of simulated concurrent users executing transactional SQL operations (<code>SELECT</code>, <code>INSERT</code>, <code>UPDATE</code>) rather than bulk loading using the COPY command.</p>\n<p>Upload these public datasets to the S3 bucket you specified in the IAM policy.</p>\n<p><img src=\"https://dev-media.amazoncloud.cn/ad4b0170f8654bf9af763a9b2e9245fa_image.png\" alt=\"image.png\" /></p>\n<h4><a id=\"Benchmark_baseline_167\"></a><strong>Benchmark baseline</strong></h4>\n<p>Before we start applying optimizations, let’s take a baseline measurement using the default database settings in a Multi-AZ configuration. From the <a href=\"https://www.imdb.com/interfaces/\" target=\"_blank\">IMDb dataset</a>, we bulk load the largest file, <code>titles.principals.tsv.gz</code>, which is 361 MB.</p>\n<p>From our <a href=\"http://aws.amazon.com/ec2\" target=\"_blank\">Amazon Elastic Compute Cloud</a> (Amazon EC2) bastion, we use a psql command from a shell script. Setting up a <a href=\"https://www.postgresql.org/docs/current/libpq-pgpass.html\" target=\"_blank\">pgass file</a> with credentials allows us to run commands using these scripts.</p>\n<pre><code class=\"lang-\">#!/bin/sh\nhost="[DATABASE_INSTANCE_HOSTNAME]"\ndb="imdb"\npsql -h $host -p 5432 -d $db -U postgres -c "\\i principals.sql" &\nwait\n</code></pre>\n<p>The <code>principals.sql</code> file contains the following SQL command using the <code>aws_s3.table_import_from_s3</code> function:</p>\n<pre><code class=\"lang-\">SELECT aws_s3.table_import_from_s3(\n 'staging.title_principals', '', '(FORMAT csv, HEADER true, DELIMITER E''\\t'')',\n '[S3_BUCKET_NAME]', '[S3_PREFIX]/title.principals.tsv.gz', '[REGION]'\n);\n</code></pre>\n<p>We get the following results.</p>\n<p><img src=\"https://dev-media.amazoncloud.cn/bcaa93396b9040e5a8e5bc605a7b28bb_image.png\" alt=\"image.png\" /></p>\n<p>This is significantly higher than expected. In the next section, we’ll demonstrate how to identify and eliminate bottlenecks.</p>\n<h4><a id=\"Optimizing_storagebased_IOPS_196\"></a><strong>Optimizing storage-based IOPS</strong></h4>\n<p>A common bottleneck constraining bulk loading performance in Amazon RDS for PostgreSQL is storage disk IOPS capacity. Database IOPS capacity doesn’t reach peak utilization if the EBS volume IOPS capacity is a limiting factor. In this section, we demonstrate how to analyze and optimize EBS volume IOPS performance when used with Amazon RDS for PostgreSQL.</p>\n<p>Three storage types are available, each with different IOPS capabilities, as described in the following table (Magnetic is listed in the table for completeness, but it is not recommended for database use).</p>\n<p><img src=\"https://dev-media.amazoncloud.cn/27385895b78f4bc893e9c696ea3deb6b_image.png\" alt=\"image.png\" /></p>\n<p>To detect whether disk IOPS capacity is a bottleneck, we monitor the disk queue length metric from the performance insights dashboard. When an IOPS request can’t be served immediately by the disk, it’s added to a queue. The length of this queue indicates how much of the I/O load is deferred due to throughput limitations.</p>\n<ol>\n<li>On the Amazon RDS dashboard, open your database.</li>\n<li>On the <strong>Monitoring</strong> tab, expand the <strong>Monitoring</strong> menu and choose <strong>Performance Insights</strong>.</li>\n</ol>\n<p><img src=\"https://dev-media.amazoncloud.cn/058bb228642641ab99ea9089dc3f2a2e_image.png\" alt=\"image.png\" /></p>\n<ol start=\"3\">\n<li>Choose <strong>Manage metrics</strong>.</li>\n<li>Select the <code>rdsdev.avgQueueLen</code> metric from the <strong>diskIO</strong> section.</li>\n<li>Choose <strong>Update graph</strong>.</li>\n</ol>\n<p><img src=\"https://dev-media.amazoncloud.cn/6c57d751d0e04827bf9f2791d89a46a9_image.png\" alt=\"image.png\" /></p>\n<p>Running the bulk loading benchmark with the baseline configuration again revealed a large average queue length, indicating that the operation is constrained by the IOPS capacity of the EBS volume.</p>\n<p><img src=\"https://dev-media.amazoncloud.cn/8cbeec81c7bf41d0bb72d164ff01a708_image.png\" alt=\"image.png\" /></p>\n<p>From these results, we see a max average queue length of 2,048 requests.</p>\n<p>To remediate this, there are two primary options:</p>\n<ul>\n<li>ncrease the volume size of the Amazon EBS General Purpose SSD (gp2) volume</li>\n<li>Choose the Amazon EBS Provisioned IOPS (io1) volume and set the IOPS independent of volume size</li>\n</ul>\n<p>Let’s look at the gp2 option first. The General Purpose SSD (gp2) provides a baseline of 100 IOPS at a 33.33 GB volume size, then 3 IOPS per GB above that, with the ability to burst to 3,000 IOPS for extended periods. For more information, see <a href=\"https://docs.aws.amazon.com/AWSEC2/latest/UserGuide/ebs-volume-types.html#solid-state-drives\" target=\"_blank\">Solid state drives (SSD)</a>.</p>\n<p>We originally provisioned a General Purpose SSD (gp2) volume sized at 250 GB. This provides a baseline of 750 IOPS.</p>\n<p>Combining 750 IOPS and the max average queue depth, we get 2750 IOPS. We increased the volume size to 1500 GB to yield 4400 IOPS and ran the same baseline benchmark.</p>\n<p><img src=\"https://dev-media.amazoncloud.cn/abd269ee163a4ad3b42750cf73e6b532_image.png\" alt=\"image.png\" /></p>\n<p>This reduced our max average queue depth by 10 times, from 2,048 to just under 200. To compare, we also converted storage of our test database to Provisioned IOPS (io1) and provisioned 10,000 IOPS. Results were comparable with a queue length of 170.</p>\n<p><img src=\"https://dev-media.amazoncloud.cn/c2143539711d4759b68f68b795fe2a5f_image.png\" alt=\"image.png\" /></p>\n<p>With our EBS storage volumes optimized for higher IOPS capacity, we ran the baseline benchmark again, yielding a significant increase in throughput.</p>\n<p><img src=\"https://dev-media.amazoncloud.cn/a6f1efdb11104115813baad552b96482_image.png\" alt=\"image.png\" /></p>\n<p>Loading times dropped from 5 minutes, 45 seconds, to just over 1 minute, for an increase in throughput of 82%. Now that we have our storage IOPS optimized, let’s look at database configuration optimizations.</p>\n<h4><a id=\"Parallelize_bulk_loading_commands_246\"></a><strong>Parallelize bulk loading commands</strong></h4>\n<p>You can run multiple <code>psql</code> commands in parallel by using the ampersand character suffix in a Linux bash script. This tells the OS to fork and run the command in a subshell. In this section, we test bulk loading multiple files in parallel and sequentially and compare the results. First let’s test sequential runs of our psql commands.</p>\n<p>The following is our <code>copy_bulk_sequential.sh</code> bash script:</p>\n<pre><code class=\"lang-\">#!/bin/sh\nhost="[DATABASE_INSTANCE_HOSTNAME]"\ndb="imdb"\n\npsql -h $host -p 5432 -d $db -U postgres -c "\\i title.sql"\npsql -h $host -p 5432 -d $db -U postgres -c "\\i crew.sql"\npsql -h $host -p 5432 -d $db -U postgres -c "\\i title_basics.sql"\npsql -h $host -p 5432 -d $db -U postgres -c "\\i episode.sql"\npsql -h $host -p 5432 -d $db -U postgres -c "\\i principals.sql"\npsql -h $host -p 5432 -d $db -U postgres -c "\\i ratings.sql"\npsql -h $host -p 5432 -d $db -U postgres -c "\\i name_basics.sql"\n\nwait\n</code></pre>\n<p>We observe the following results.</p>\n<p><img src=\"https://dev-media.amazoncloud.cn/c2df3d49be05495d8c348a8c71253d30_image.png\" alt=\"image.png\" /></p>\n<p>Let’s look at some of the database metrics during the sequential load.</p>\n<p><img src=\"https://dev-media.amazoncloud.cn/00b1c60865fc4ed8b99382e12c4d449a_image.png\" alt=\"image.png\" /></p>\n<p>As expected, our db.r6g.2xlarge instance with 8 vCPU shows one active session.</p>\n<p><img src=\"https://dev-media.amazoncloud.cn/57edbf7cf7f94878a83432e0c378737b_image.png\" alt=\"image.png\" /></p>\n<p>CPU utilization averages 15% and doesn’t get above 30%.</p>\n<p><img src=\"https://dev-media.amazoncloud.cn/61681157a6e4436daa53c0d29e21bea7_image.png\" alt=\"image.png\" /></p>\n<p>We average about 200K Kb/s and spike at just over 400K Kb/s.</p>\n<p>Now let’s see how parallelizing the <code>psql</code> commands alters performance. The following <code>copy_bulk_parallel.sh</code> script runs each <code>psql</code> command in a separate subprocess. Each call creates a separate session in the RDS instance and performs the bulk loading of these seven files in parallel.</p>\n<pre><code class=\"lang-\">#!/bin/sh\nhost="[DATABASE_INSTANCE_HOSTNAME]"\ndb="imdb"\n\npsql -h $host -p 5432 -d $db -U postgres -c "\\i title.sql" &\npsql -h $host -p 5432 -d $db -U postgres -c "\\i crew.sql" &\npsql -h $host -p 5432 -d $db -U postgres -c "\\i title_basics.sql" &\npsql -h $host -p 5432 -d $db -U postgres -c "\\i episode.sql" &\npsql -h $host -p 5432 -d $db -U postgres -c "\\i principals.sql" &\npsql -h $host -p 5432 -d $db -U postgres -c "\\i ratings.sql" &\npsql -h $host -p 5432 -d $db -U postgres -c "\\i name_basics.sql" &\n\nwait\n</code></pre>\n<p>The following screenshot shows the results of our parallel load.</p>\n<p><img src=\"https://dev-media.amazoncloud.cn/8d14c876450b4ac4b3045b062e819db8_image.png\" alt=\"image.png\" /></p>\n<p>For all seven files, we were able to reduce loading time by more than half, or 56%, from 2 minutes, 9 seconds, down to 57 seconds.</p>\n<p><img src=\"https://dev-media.amazoncloud.cn/842aa74885be4349b1cbed63fe610705_image.png\" alt=\"image.png\" /></p>\n<p>Our parallel load saturated nearly all the available cores. As files completed their load, sessions closed and quickly dropped our concurrent active sessions count.</p>\n<p><img src=\"https://dev-media.amazoncloud.cn/76ae86046d36442c861d872b93ac9044_image.png\" alt=\"image.png\" /></p>\n<p>The CPU utilization initially spiked to 90%.</p>\n<p><img src=\"https://dev-media.amazoncloud.cn/e1991faa86bf43e29e28e41b2115ec3a_image.png\" alt=\"image.png\" /></p>\n<p>Write throughput averaged over 400K Kb/s and spiked to over 800K Kb/s, essentially doubling the throughput of the sequential load.</p>\n<p>When you have multiple large files to bulk load, run your bulk loading commands in parallel to achieve the highest throughput. A general guideline is to limit the number of concurrent bulk loading sessions to one less than the number of vCPUs.</p>\n<p>Now let’s look at database configuration.</p>\n<h4><a id=\"Database_configuration_optimizations_325\"></a><strong>Database configuration optimizations</strong></h4>\n<p>Section <a href=\"https://www.postgresql.org/docs/current/populate.html\" target=\"_blank\">14.4 Populating a Database</a> of the official PostgreSQL documentation provides configuration recommendations to optimize for bulk loading. We implement many of these recommendations in Amazon RDS for PostgreSQL.</p>\n<p>Because certain administrative rights are restricted in AWS managed databases, setting database configuration in RDS databases is performed through a conceptual container called <a href=\"https://docs.aws.amazon.com/AmazonRDS/latest/UserGuide/USER_WorkingWithParamGroups.html\" target=\"_blank\">database parameter groups</a>. Database parameter groups are engine-specific and can be applied as part of a database modification task.</p>\n<p>This abstraction provides a useful mechanism for persisting and managing multiple configurations that can be swapped in and out for different scenarios, including bulk data loading.</p>\n<p>Configuration parameters are classified with either a dynamic or static apply type, which can be viewed through the console. Dynamic parameters can be applied immediately. Static parameters require a database server restart.</p>\n<p>To create a parameter group for bulk loading, we choose the postgres14 parameter group family because it reflects the major PostgreSQL version of our database instance. The creation of database parameter groups and the setting of parameter values can be done programmatically via the <a href=\"http://aws.amazon.com/cli\" target=\"_blank\">AWS Command Line Interface</a> (AWS CLI), SDK, or API. We use the AWS CLI for these examples, which are available in the <a href=\"https://github.com/aws-samples/amazon-rds-postgresql-bulk-loading-blog\" target=\"_blank\">GitHub repo</a>.</p>\n<ol>\n<li>Create the parameter groups with the following code:</li>\n</ol>\n<pre><code class=\"lang-\">aws rds create-db-parameter-group \\\n --db-parameter-group-name rds-postgres14-bulkload \\\n --db-parameter-group-family postgres14 \\\n --description "Optimized database parameters for bulk loading into PostgreSQL for RDS"\n\n</code></pre>\n<p>The following screenshot shows the JSON response.</p>\n<p><img src=\"https://dev-media.amazoncloud.cn/aacceef017504197b8a6f24d5233ca1a_image.png\" alt=\"image.png\" /></p>\n<ol start=\"2\">\n<li>Now we set the parameter values for Amazon RDS for PostgreSQL. We use a JSON file with database parameter values optimized for bulk loading.</li>\n</ol>\n<pre><code class=\"lang-\">{\n "DBParameterGroupName": "rds-postgres14-bulkload",\n "Parameters": [\n\t{\n\t\t"ParameterName": "maintenance_work_mem",\n\t\t"ParameterValue": "1048576",\n\t\t"ApplyMethod": "immediate"\n\t},\n\t{\n\t\t"ParameterName": "max_wal_size",\n\t\t"ParameterValue": "4096",\n\t\t"ApplyMethod": "immediate"\n\t},\n\t{\n\t\t"ParameterName": "checkpoint_timeout",\n\t\t"ParameterValue": "1800",\n\t\t"ApplyMethod": "immediate"\n\t}\n ]\n}\n</code></pre>\n<ol start=\"3\">\n<li>Pass the JSON file to the AWS CLI command to modify the values stored in our bulk load parameter group:</li>\n</ol>\n<pre><code class=\"lang-\">aws rds modify-db-parameter-group \\\n --db-parameter-group-name rds-postgres14-bulkload \\\n --cli-input-json file://rds-postgresql14-bulkload.json\n</code></pre>\n<ol start=\"4\">\n<li>Modify the RDS instance by applying the bulk loading parameter group:</li>\n<li></li>\n</ol>\n<pre><code class=\"lang-\">aws rds modify-db-instance \\\n --db-instance-identifier [DB_INSTANCE_IDENTIFIER] \\\n --db-parameter-group rds-postgres14-bulkload\n</code></pre>\n<p>Before we continue, let’s review the parameter changes made and how they impact bulk loading performance.</p>\n<h4><a id=\"Increase_maintenance_work_mem_393\"></a><strong>Increase maintenance_work_mem</strong></h4>\n<p>Increasing <code>maintenance_work_mem</code> doesn’t improve performance of the COPY itself, but it does improve performance of <code>CREATE INDEX</code>, <code>ADD FOREIGN KEY</code>, and <code>ALTER TABLE</code> statements that would likely follow if keys and indexes are dropped prior to loading and readded after loading completes. AUTOVACUUM performance is also improved by this parameter setting.</p>\n<p>Setting the <code>maintenance_work_mem</code> parameter to 1 GB is recommended (PostgreSQL doesn’t use more than 1GB so setting this higher won’t add any benefit). The parameter takes an integer value in kB. For 1 GB, the value is 1048576.</p>\n<h4><a id=\"Avoid_automatic_checkpointing_399\"></a><strong>Avoid automatic checkpointing</strong></h4>\n<p>All modifications to a PostgreSQL database are written to a log called the Write-Ahead Log (WAL). A checkpoint is a point in the WAL at which all data files have been written to disk. An automated operation called checkpointing occurs regularly to flush dirty pages to disk so the WAL up to that checkpoint can be recycled. In normal operation, frequent checkpointing ensures faster recovery in the event of system failure. During bulk loading, checkpointing inhibits overall write throughput.</p>\n<p>Three PostgreSQL parameters control the frequency of checkpointing:</p>\n<ul>\n<li>\n<p><code>max_wal_size</code></p>\n</li>\n<li>\n<p><code>checkpoint_completion_target</code></p>\n</li>\n<li>\n<p><code>checkpoint_timeout</code></p>\n</li>\n</ul>\n<p>The <code>max_wal_size</code> and <code>checkpoint_completion_target</code> parameters set the size the WAL can grow to before automatic checkpointing is triggered. By default, the <code>checkpoint_completion_target</code> is 0.9. This means that the I/O needed to process 90% of the checkpointing (90% of the <code>max_wal_size</code> limit) is spread evenly within the time period specified in the <code>checkpoint_timeout</code> to reduce the impact on other database operations. The <code>checkpoint_timeout</code> parameter triggers checkpointing after a specified time interval. The default is 5 minutes.</p>\n<p>You can trigger the checkpointing process manually using the <code>CHECKPOINT</code> command immediately after bulk loading is complete. This is recommended. For bulk loading, we advise setting the parameter values high enough to avoid automatic checkpointing as much as possible. For <code>max_wal_size</code>, we follow the recommendation specified in <a href=\"https://docs.aws.amazon.com/AmazonRDS/latest/UserGuide/PostgreSQL.Procedural.Importing.html\" target=\"_blank\">Importing data into PostgreSQL on Amazon RDS</a>, and set it to 4 GB. We increase <code>checkpoint_timeout</code> to 30 minutes. Note that these gains in performance come with availability risk. In the event of a failover or crash, these settings could result in a recovery time of 10 minutes or more (depending on the workload) instead of the default 1 to 2 minutes.</p>\n<p>In addition to these global parameter settings, there are local settings that provide additional optimizations. Let’s review these next.</p>\n<h4><a id=\"Disable_synchronous_commit_at_the_transaction_level_416\"></a><strong>Disable synchronous_commit at the transaction level</strong></h4>\n<p>The <code>synchronous_commit</code> setting can be applied at the global, session, or transaction level. It is never recommended to disable <code>synchronous_commit</code> at the global level to improve bulk loading performance. If a failover or crash occurs, this will cause data loss for transactions executing in any session. We can instead disable <code>synchronous_commit</code> locally from within the transaction, which will expire when the transaction is committed. This limits the risk when the data to be loaded is staged in a durable storage service like S3. Any bulk loaded data lost can simply be reloaded.</p>\n<p>The following code block demonstrates how to disable <code>synchronous_commit</code> at the transaction level:</p>\n<pre><code class=\"lang-\">begin;\n SET LOCAL synchronous_commit TO OFF;\n [COPY COMMAND]\ncommit;\n\n</code></pre>\n<h4><a id=\"Disable_autovacuum_at_the_table_level_430\"></a><strong>Disable autovacuum at the table level</strong></h4>\n<p>Never turn off autovacuum globally. Autovacuum performs necessary maintenance tasks that keeps the database working. Prior to PostgreSQL version 13, <code>autovacuum</code> wasn’t triggered by inserts so it didn’t have a performance impact during bulk loading. The downside was that insert-only tables were never vacuumed. For these tables, vacuuming needed to be performed manually. Starting with PostgreSQL version 13, <code>autovacuum</code> is now triggered by inserts. For most scenarios, the performance impact of autovacuum during bulk loading will be negligible. Optimizing <code>maintenance_work_mem</code> as discussed previously also enhances autovacuum performance. If I/O operations from autovacuuming is observed to impact performance, the service can be disabled at the table level and <code>vacuum</code> can be run manually after bulk loading completes.</p>\n<h4><a id=\"Disable_autovacuum_for_table_434\"></a><strong>Disable autovacuum for table:</strong></h4>\n<pre><code class=\"lang-\">ALTER TABLE [TABLE] SET (autovacuum_enabled = false);\n</code></pre>\n<p>Enable autovacuum for table:</p>\n<pre><code class=\"lang-\">ALTER TABLE [TABLE] SET (autovacuum_enabled = true);\n</code></pre>\n<h4><a id=\"Avoid_bulk_loading_when_weekly_maintenance_is_being_performed_446\"></a><strong>Avoid bulk loading when weekly maintenance is being performed</strong></h4>\n<p>It is recommended to avoid bulk loading when weekly maintenance is being performed. You can view the weekly maintenance window from the Maintenance & backups tab of the RDS dashboard.</p>\n<p><img src=\"https://dev-media.amazoncloud.cn/a7c3ba032abe4f66ac2b562fef0b3400_image.png\" alt=\"image.png\" /></p>\n<p>You can set a maintenance window when creating or modifying the database.</p>\n<p>This concludes the review of PostgreSQL database configuration settings and approaches for optimizing bulk loading.</p>\n<p>Now let’s run our single file load test using the principals.gz file with these database optimizations applied. Here are the results.</p>\n<p><img src=\"https://dev-media.amazoncloud.cn/aa63c29076f64c558d069bb17eec730a_image.png\" alt=\"image.png\" /></p>\n<p>The loading time for our single file dropped from 57 to 44 seconds for an additional 23% speedup.</p>\n<h4><a id=\"Antipatterns_462\"></a><strong>Anti-patterns</strong></h4>\n<p>Before we conclude, let’s discuss some optimization strategies for bulk loading that are not recommended. The following are anti-patterns that should be avoided.</p>\n<h4><a id=\"Do_not_disable_MultiAZ_466\"></a><strong>Do not disable Multi-AZ</strong></h4>\n<p>Amazon RDS for PostgreSQL with the Multi-AZ feature enabled increases availability by synchronously replicating data to a standby instance in a different Availability Zone. The database can fail over to this standby instance if the primary instance becomes unreachable. Disabling Multi-AZ will yield better bulk loading performance, but it is not recommended for production workloads due to the durability and availability risk.</p>\n<p><strong>Do not disable table logging</strong></p>\n<p>PostgreSQL truncates all unlogged tables on startup, including failovers and snapshot restores. Unlogged tables are also not replicated to PostgreSQL replicas. Due to the risk of data loss, use of unlogged tables is not recommended for production workloads.</p>\n<h4><a id=\"Conclusion_473\"></a><strong>Conclusion</strong></h4>\n<p>In this post, we presented strategies for optimizing RDS for PostgreSQL databases for bulk loading from Amazon S3. We demonstrated how to detect if a bulk loading operation is constrained by insufficient storage-based IOPS capacity and provided options for remediation. We demonstrated how to parallelize bulk loading operations using psql commands from bash scripts. We presented several recommendations to maximize bulk loading performance. As a result of these optimizations, we were able to reduce single file loading times for our benchmark dataset from 5 minutes, 45 seconds, to 44 seconds—a performance gain of 87%. We also identified anti-patterns for bulk loading optimization that should be avoided.</p>\n<p>If you found our guidance helpful, let us know in the comments.</p>\n<h4><a id=\"About_the_Author_479\"></a><strong>About the Author</strong></h4>\n<p><img src=\"https://dev-media.amazoncloud.cn/1be4ae54650c4efa802ab112e311d4ab_image.png\" alt=\"image.png\" /></p>\n<p>Justin Leto is a Sr. Solutions Architect at Amazon Web Services with specialization in databases, big data analytics, and machine learning. His passion is helping customers achieve better cloud adoption. In his spare time, he enjoys offshore sailing and playing jazz piano. He lives in New York City with his wife Veera and baby daughter Elsi.</p>\n"}
Optimized bulk loading in Amazon RDS for PostgreSQL
海外精选

海外精选的内容汇集了全球优质的亚马逊云科技相关技术内容。同时,内容中提到的“AWS”
是 “Amazon Web Services” 的缩写,在此网站不作为商标展示。

 0
0 0
0亚马逊云科技解决方案 基于行业客户应用场景及技术领域的解决方案
联系亚马逊云科技专家
亚马逊云科技解决方案
基于行业客户应用场景及技术领域的解决方案
联系专家

0
目录

 分享
分享 点赞
点赞 收藏
收藏 目录
目录立即注册,开启您的免费套餐
立即关注

亚马逊云开发者
公众号

User Group
公众号

亚马逊云科技
官方小程序
“AWS” 是 “Amazon Web Services” 的缩写,在此网站不作为商标展示。
立即关注
亚马逊云开发者
公众号
User Group
公众号
亚马逊云科技
官方小程序
“AWS” 是 “Amazon Web Services” 的缩写,在此网站不作为商标展示。
关于我们 
更多资源
开发者工具
更多支持
立即关注
亚马逊云开发者
公众号
User Group
公众号
亚马逊云科技
官方小程序
“AWS” 是 “Amazon Web Services” 的缩写,在此网站不作为商标展示。
