{"value":"After data scientists carefully come up with a satisfying machine learning (ML) model, the model must be deployed to be easily accessible for inference by other members of the organization. However, deploying models at scale with optimized cost and compute efficiencies can be a daunting and cumbersome task. Amazon SageMaker endpoints provide an easily scalable and cost-optimized solution for model deployment. The YOLOv5 model, distributed under the GPLv3 license, is a popular object detection model known for its runtime efficiency as well as detection accuracy. In this post, we demonstrate how to host a pre-trained YOLOv5 model on SageMaker endpoints and use AWS Lambda functions to invoke these endpoints.\n\n#### **Solution overview**\n\nThe following image outlines the AWS services used to host the YOLOv5 model using a SageMaker endpoint and invoke the endpoint using Lambda. The SageMaker notebook accesses a YOLOv5 PyTorch model from an [Amazon Simple Storage Service](https://aws.amazon.com/s3/) (Amazon S3) bucket, converts it to YOLOv5 TensorFlow ```SavedModel```format, and stores it back to the S3 bucket. This model is then used when hosting the endpoint. When an image is uploaded to Amazon S3, it acts as a trigger to run the Lambda function. The function utilizes OpenCV [Lambda layers](https://docs.aws.amazon.com/lambda/latest/dg/invocation-layers.html) to read the uploaded image and run inference using the endpoint. After the inference is run, you can use the results obtained from it as needed.\n\nhttps://d2908q01vomqb2.cloudfront.net/f1f836cb4ea6efb2a0b1b99f41ad8b103eff4b59/2022/07/22/ML8827_image_01-1024x691.png\n\nIn this post, we walk through the process of utilizing a YOLOv5 default model in PyTorch and converting it to a TensorFlow ```SavedModel```. This model is hosted using a SageMaker endpoint. Then we create and publish a Lambda function that invokes the endpoint to run inference. Pre-trained YOLOv5 models are available on GitHub. For the purpose of this post, we use the [yolov5l](https://github.com/ultralytics/yolov5/releases/download/v6.1/yolov5l.pt) model.\n\n#### **Prerequisites**\n\nAs a prerequisite, we need to set up the following [AWS Identity and Access Management](http://aws.amazon.com/iam) (IAM) roles with appropriate [access policies](https://docs.aws.amazon.com/IAM/latest/UserGuide/access_policies.html) for SageMaker, Lambda, and Amazon S3:\n\n- **SageMaker IAM role** – This requires ```AmazonS3FullAccess``` policies attached for storing and accessing the model in the S3 bucket\n\n- **Lambda IAM role** – This role needs multiple policies:\n- To access images stored in Amazon S3, we require the following IAM policies:\n\n```s3:GetObject```\n\n```s3:ListBucket```\n\nTo run the SageMaker endpoint, we need access to the following IAM policies:\n\n\n```sagemaker:ListEndpoints```\n\n```sagemaker:DescribeEndpoint```\n\n```sagemaker:InvokeEndpoint```\n\n```sagemaker:InvokeEndpointAsync```\n\nYou also need the following resources and services:\n\n- The [AWS Command Line Interface](https://aws.amazon.com/cli/) (AWS CLI), which we use to create and configure Lambda.\n- A SageMaker notebook instance. These come with Docker pre-installed, and we use this to create the Lambda layers. To set up the notebook instance, complete the following steps:\n- On the SageMaker console, create a notebook instance and provide the notebook name, instance type (for this post, we use ml.c5.large), IAM role, and other parameters.\n- Clone the [public repository](https://github.com/aws-samples/host-yolov5-on-sagemaker-endpoint) and add the [YOLOv5 repository](https://github.com/aws-samples/host-yolov5-on-sagemaker-endpoint) provided by Ultralytics.\n\n#### **Host YOLOv5 on a SageMaker endpoint**\n\nBefore we can host the pre-trained YOLOv5 model on SageMaker, we must export and package it in the correct directory structure inside ```model.tar.g```z. For this post, we demonstrate how to host YOLOv5 in the ```saved_model ```format. The YOLOv5 repo provides an ```export.py```file that can export the model in many different ways. After you clone the YOLOv5 and enter the YOLOv5 directory from command line, you can export the model with the following command:\n\n```\n$ cd yolov5\n$ pip install -r requirements.txt tensorflow-cpu\n$ python export.py --weights yolov5l.pt --include saved_model --nms\n\n```\n\nThis command creates a new directory called ```yolov5l_saved_model```inside the ```yolov5```directory. Inside the ```yolov5l_saved_model```directory, we should see the following items:\n\n```\nyolov5l_saved_model\n ├─ assets\n ├─ variables\n │ ├── variables.data-00000-of-00001\n │ └── variables.index\n └── saved_model.pb\n```\n\nTo create a ```model.tar.gz``` file, move the contents of ```yolov5l_saved_model``` to ```export/Servo/1```. From the command line, we can compress the ```export``` directory by running the following command and upload the model to the S3 bucket:\n\n```\n$ mkdir export && mkdir export/Servo\n$ mv yolov5l_saved_model export/Servo/1\n$ tar -czvf model.tar.gz export/\n$ aws s3 cp model.tar.gz \"<s3://BUCKET/PATH/model.tar.gz>\"\n```\n\nThen, we can deploy a SageMaker endpoint from a SageMaker notebook by running the following code:\n\n```\nimport os\nimport tensorflow as tf\nfrom tensorflow.keras import backend\nfrom sagemaker.tensorflow import TensorFlowModel\n\nmodel_data = '<s3://BUCKET/PATH/model.tar.gz>'\nrole = '<IAM ROLE>'\n\nmodel = TensorFlowModel(model_data=model_data,\n framework_version='2.8', role=role)\n\nINSTANCE_TYPE = 'ml.m5.xlarge'\nENDPOINT_NAME = 'yolov5l-demo'\n\npredictor = model.deploy(initial_instance_count=1,\n instance_type=INSTANCE_TYPE,\n endpoint_name=ENDPOINT_NAME)\n```\n\nThe preceding script takes approximately 2–3 minutes to fully deploy the model to the SageMaker endpoint. You can monitor the status of the deployment on the SageMaker console. After the model is hosted successfully, the model is ready for inference.\n\n#### **Test the SageMaker endpoint**\n\nAfter the model is successfully hosted on a SageMaker endpoint, we can test it out, which we do using a blank image. The testing code is as follows:\n\n```\nimport numpy as np\n\nENDPOINT_NAME = 'yolov5l-demo'\n\nmodelHeight, modelWidth = 640, 640\nblank_image = np.zeros((modelHeight,modelWidth,3), np.uint8)\ndata = np.array(resized_image.astype(np.float32)/255.)\npayload = json.dumps([data.tolist()])\nresponse = runtime.invoke_endpoint(EndpointName=ENDPOINT_NAME,\nContentType='application/json',\nBody=payload)\n\nresult = json.loads(response['Body'].read().decode())\nprint('Results: ', result)\n```\n\n#### **Set up Lambda with layers and triggers**\n\nWe use OpenCV to demonstrate the model by passing an image and getting the inference results. Lambda doesn’t come with external libraries like OpenCV pre-built, therefore we need to build it before we can invoke the Lambda code. Furthermore, we want to make sure that we don’t build external libraries like OpenCV every time Lambda is being invoked. For this purpose, Lambda provides a functionality to create Lambda layers. We can define what goes in these layers, and they can be consumed by the Lambda code every time it’s invoked. We also demonstrate how to create the Lambda layers for OpenCV. For this post, we use an [Amazon Elastic Compute Cloud](https://aws.amazon.com/ec2/) (Amazon EC2) instance to create the layers.\n\nAfter we have the layers in place, we create the app.py script, which is the Lambda code that uses the layers, runs the inference, and gets results. The following diagram illustrates this workflow.\n\n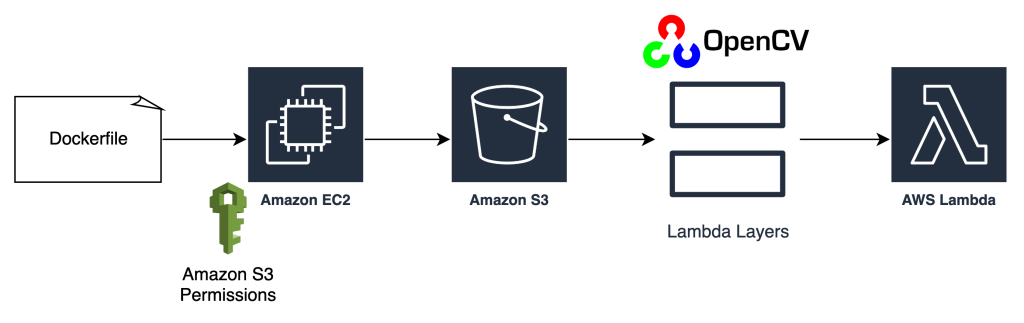\n\n#### **Create Lambda layers for OpenCV using Docker**\n\nUse Dockerfile as follows to create the Docker image using Python 3.7:\n\n```\nFROM amazonlinux\n\nRUN yum update -y\nRUN yum install gcc openssl-devel bzip2-devel libffi-devel wget tar gzip zip make -y\n\n# Install Python 3.7\nWORKDIR /\nRUN wget https://www.python.org/ftp/python/3.7.12/Python-3.7.12.tgz\nRUN tar -xzvf Python-3.7.12.tgz\nWORKDIR /Python-3.7.12\nRUN ./configure --enable-optimizations\nRUN make altinstall\n\n# Install Python packages\nRUN mkdir /packages\nRUN echo \"opencv-python\" >> /packages/requirements.txt\nRUN mkdir -p /packages/opencv-python-3.7/python/lib/python3.7/site-packages\nRUN pip3.7 install -r /packages/requirements.txt -t /packages/opencv-python-3.7/python/lib/python3.7/site-packages\n\n# Create zip files for Lambda Layer deployment\nWORKDIR /packages/opencv-python-3.7/\nRUN zip -r9 /packages/cv2-python37.zip .\nWORKDIR /packages/\nRUN rm -rf /packages/opencv-python-3.7/\n```\n\nBuild and run Docker and store the output ZIP file in the current directory under ```layers```:\n\n```\n$ docker build --tag aws-lambda-layers:latest <PATH/TO/Dockerfile>\n$ docker run -rm -it -v $(pwd):/layers aws-lambda-layers cp /packages/cv2-python37.zip /layers\n```\n\nNow we can upload the OpenCV layer artifacts to Amazon S3 and create the Lambda layer:\n\n```\n$ aws s3 cp layers/cv2-python37.zip s3://<BUCKET>/<PATH/TO/STORE/ARTIFACTS>\n$ aws lambda publish-layer-version --layer-name cv2 --description \"Open CV\" --content S3Bucket=<BUCKET>,S3Key=<PATH/TO/STORE/ARTIFACTS>/cv2-python37.zip --compatible-runtimes python3.7\n```\n\nAfter the preceding commands run successfully, you have an OpenCV layer in Lambda, which you can review on the Lambda console.\n\n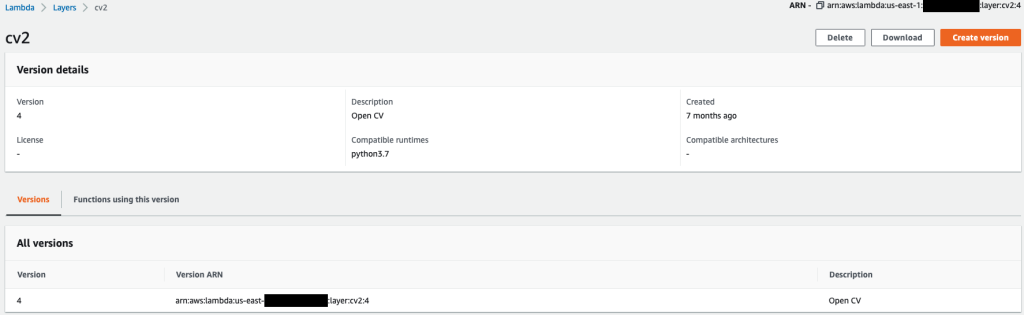\n\n\n#### **Create the Lambda function**\n\nWe utilize the ```app.py``` script to create the Lambda function and use OpenCV. In the following code, change the values for ```BUCKET_NAME``` and ```IMAGE_LOCATION``` to the location for accessing the image:\n\n```\nimport os, logging, json, time, urllib.parse\nimport boto3, botocore\nimport numpy as np, cv2\n\nlogger = logging.getLogger()\nlogger.setLevel(logging.INFO)\nclient = boto3.client('lambda')\n\n# S3 BUCKETS DETAILS\ns3 = boto3.resource('s3')\nBUCKET_NAME = \"<NAME OF S3 BUCKET FOR INPUT IMAGE>\"\nIMAGE_LOCATION = \"<S3 PATH TO IMAGE>/image.png\"\n\n# INFERENCE ENDPOINT DETAILS\nENDPOINT_NAME = 'yolov5l-demo'\nconfig = botocore.config.Config(read_timeout=80)\nruntime = boto3.client('runtime.sagemaker', config=config)\nmodelHeight, modelWidth = 640, 640\n\n# RUNNING LAMBDA\ndef lambda_handler(event, context):\n key = urllib.parse.unquote_plus(event['Records'][0]['s3']['object']['key'], encoding='utf-8')\n\n # INPUTS - Download Image file from S3 to Lambda /tmp/\n input_imagename = key.split('/')[-1]\n logger.info(f'Input Imagename: {input_imagename}')\n s3.Bucket(BUCKET_NAME).download_file(IMAGE_LOCATION + '/' + input_imagename, '/tmp/' + input_imagename)\n\n # INFERENCE - Invoke the SageMaker Inference Endpoint\n logger.info(f'Starting Inference ... ')\n orig_image = cv2.imread('/tmp/' + input_imagename)\n if orig_image is not None:\n start_time_iter = time.time()\n # pre-processing input image\n image = cv2.resize(orig_image.copy(), (modelWidth, modelHeight), interpolation = cv2.INTER_AREA)\n data = np.array(image.astype(np.float32)/255.)\n payload = json.dumps([data.tolist()])\n # run inference\n response = runtime.invoke_endpoint(EndpointName=ENDPOINT_NAME, ContentType='application/json', Body=payload)\n # get the output results\n result = json.loads(response['Body'].read().decode())\n end_time_iter = time.time()\n # get the total time taken for inference\n inference_time = round((end_time_iter - start_time_iter)*100)/100\n logger.info(f'Inference Completed ... ')\n\n # OUTPUTS - Using the output to utilize in other services downstream\n return {\n \"statusCode\": 200,\n \"body\": json.dumps({\n \"message\": \"Inference Time:// \" + str(inference_time) + \" seconds.\",\n \"results\": result\n }),\n }\n```\n\nDeploy the Lambda function with the following code:\n\n```\n$ zip app.zip app.py\n$ aws s3 cp app.zip s3://<BUCKET>/<PATH/TO/STORE/FUNCTION>\n$ aws lambda create-function --function-name yolov5-lambda --handler app.lambda_handler --region us-east-1 --runtime python3.7 --environment \"Variables={BUCKET_NAME=$BUCKET_NAME,S3_KEY=$S3_KEY}\" --code S3Bucket=<BUCKET>,S3Key=\"<PATH/TO/STORE/FUNCTION/app.zip>\"\n```\n\n#### **Attach the OpenCV layer to the Lambda function**\n\nAfter we have the Lambda function and layer in place, we can connect the layer to the function as follows:\n\n```\n$ aws lambda update-function-configuration --function-name yolov5-lambda --layers cv2\n```\n\nWe can review the layer settings via the Lambda console.\n\n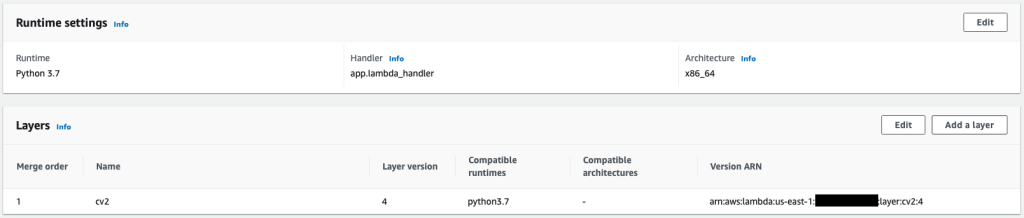\n\n#### **Trigger Lambda when an image is uploaded to Amazon S3**\n\nWe use an image upload to Amazon S3 as a trigger to run the Lambda function. For instructions, refer to [Tutorial: Using an Amazon S3 trigger to invoke a Lambda function](https://docs.aws.amazon.com/lambda/latest/dg/with-s3-example.html).\n\nYou should see the following function details on the Lambda console.\n\n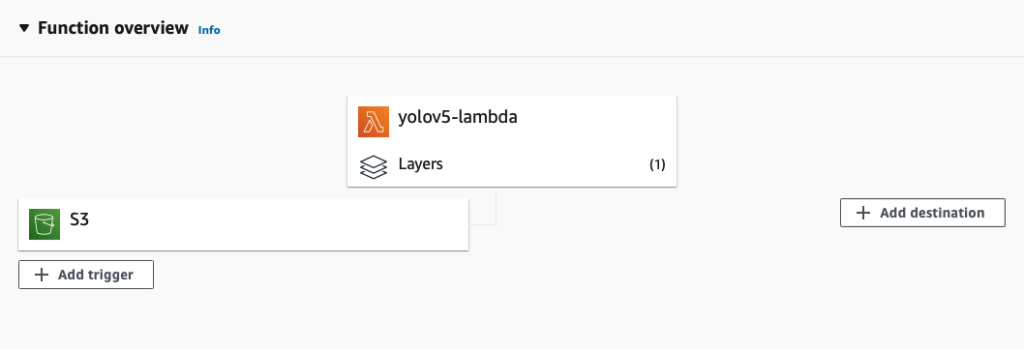\n\n#### **Run inference**\n\nAfter you set up Lambda and the SageMaker endpoint, you can test the output by invoking the Lambda function. We use an image upload to Amazon S3 as a trigger to invoke Lambda, which in turn invokes the endpoint for inference. As an example, we upload the following image to the Amazon S3 location ```<S3 PATH TO IMAGE>/test_image.png``` configured in the previous section.\n\n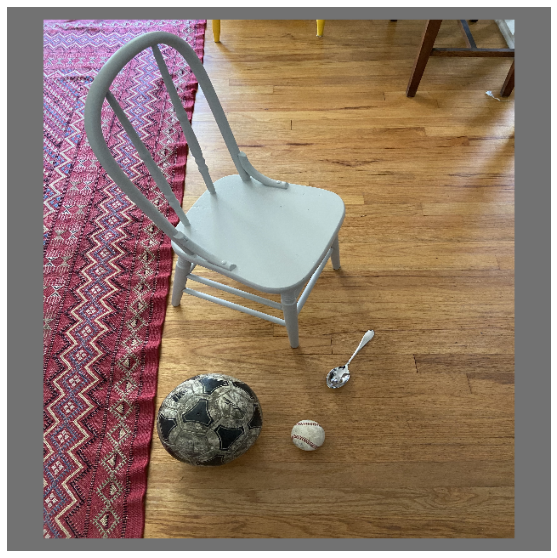\n\nAfter the image is uploaded, the Lambda function is triggered to download and read the image data and send it to the SageMaker endpoint for inference. The output result from the SageMaker endpoint is obtained and returned by the function in JSON format, which we can use in different ways. The following image shows example output overlayed on the image.\n\n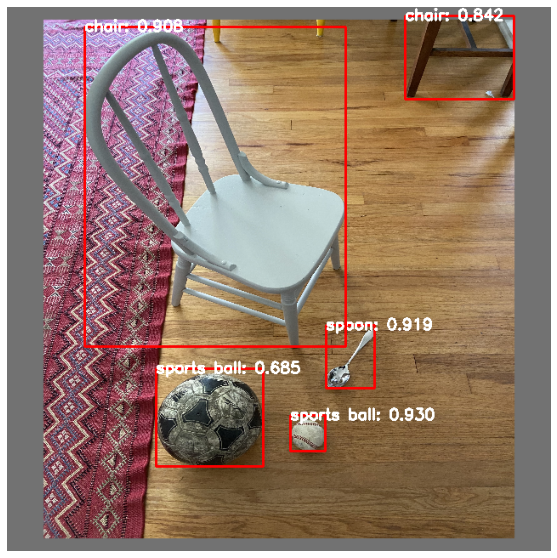\n\n#### **Clean up**\n\nDepending on the instance type, SageMaker notebooks can require significant compute usage and cost. To avoid unnecessary costs, we advise stopping the notebook instance when it’s not in use. Additionally, Lambda functions and SageMaker endpoints incur charges only when they’re invoked. Therefore, no cleanup is necessary for those services. However, if an endpoint isn’t being used any longer, it’s good practice to remove the endpoint and the model.\n\n#### **Conclusion**\n\nIn this post, we demonstrated how to host a pre-trained YOLOv5 model on a SageMaker endpoint and use Lambda to invoke inference and process the output. The detailed code is available on [GitHub](https://github.com/aws-samples/host-yolov5-on-sagemaker-endpoint).\n\nTo learn more about SageMaker endpoints, check out [Create your endpoint and deploy your model](https://docs.aws.amazon.com/sagemaker/latest/dg/realtime-endpoints-deployment.html) and Build, test, and [deploy your Amazon SageMaker inference models to AWS Lambda](https://aws.amazon.com/blogs/machine-learning/build-test-and-deploy-your-amazon-sagemaker-inference-models-to-aws-lambda/), which highlights how you can automate the process of deploying YOLOv5 models.\n\n#### **About the authors**\n\n\n\n**Kevin Song** is an IoT Edge Data Scientist at AWS Professional Services. Kevin holds a PhD in Biophysics from The University of Chicago. He has over 4 years of industry experience in Computer Vision and Machine Learning. He is involved in helping customers in the sports and life sciences industry deploy Machine Learning models.\n\n\n\n**Romil Shah** is an IoT Edge Data Scientist at AWS Professional Services. Romil has over 6 years of industry experience in Computer Vision, Machine Learning and IoT edge devices. He is involved in helping customers optimize and deploy their Machine Learning models for edge devices for industrial setup.","render":"<p>After data scientists carefully come up with a satisfying machine learning (ML) model, the model must be deployed to be easily accessible for inference by other members of the organization. However, deploying models at scale with optimized cost and compute efficiencies can be a daunting and cumbersome task. Amazon SageMaker endpoints provide an easily scalable and cost-optimized solution for model deployment. The YOLOv5 model, distributed under the GPLv3 license, is a popular object detection model known for its runtime efficiency as well as detection accuracy. In this post, we demonstrate how to host a pre-trained YOLOv5 model on SageMaker endpoints and use AWS Lambda functions to invoke these endpoints.</p>\n<h4><a id=\"Solution_overview_2\"></a><strong>Solution overview</strong></h4>\n<p>The following image outlines the AWS services used to host the YOLOv5 model using a SageMaker endpoint and invoke the endpoint using Lambda. The SageMaker notebook accesses a YOLOv5 PyTorch model from an <a href=\"https://aws.amazon.com/s3/\" target=\"_blank\">Amazon Simple Storage Service</a> (Amazon S3) bucket, converts it to YOLOv5 TensorFlow <code>SavedModel</code>format, and stores it back to the S3 bucket. This model is then used when hosting the endpoint. When an image is uploaded to Amazon S3, it acts as a trigger to run the Lambda function. The function utilizes OpenCV <a href=\"https://docs.aws.amazon.com/lambda/latest/dg/invocation-layers.html\" target=\"_blank\">Lambda layers</a> to read the uploaded image and run inference using the endpoint. After the inference is run, you can use the results obtained from it as needed.</p>\n<p>https://d2908q01vomqb2.cloudfront.net/f1f836cb4ea6efb2a0b1b99f41ad8b103eff4b59/2022/07/22/ML8827_image_01-1024x691.png</p>\n<p>In this post, we walk through the process of utilizing a YOLOv5 default model in PyTorch and converting it to a TensorFlow <code>SavedModel</code>. This model is hosted using a SageMaker endpoint. Then we create and publish a Lambda function that invokes the endpoint to run inference. Pre-trained YOLOv5 models are available on GitHub. For the purpose of this post, we use the <a href=\"https://github.com/ultralytics/yolov5/releases/download/v6.1/yolov5l.pt\" target=\"_blank\">yolov5l</a> model.</p>\n<h4><a id=\"Prerequisites_10\"></a><strong>Prerequisites</strong></h4>\n<p>As a prerequisite, we need to set up the following <a href=\"http://aws.amazon.com/iam\" target=\"_blank\">AWS Identity and Access Management</a> (IAM) roles with appropriate <a href=\"https://docs.aws.amazon.com/IAM/latest/UserGuide/access_policies.html\" target=\"_blank\">access policies</a> for SageMaker, Lambda, and Amazon S3:</p>\n<ul>\n<li>\n<p><strong>SageMaker IAM role</strong> – This requires <code>AmazonS3FullAccess</code> policies attached for storing and accessing the model in the S3 bucket</p>\n</li>\n<li>\n<p><strong>Lambda IAM role</strong> – This role needs multiple policies:</p>\n</li>\n<li>\n<p>To access images stored in Amazon S3, we require the following IAM policies:</p>\n</li>\n</ul>\n<p><code>s3:GetObject</code></p>\n<p><code>s3:ListBucket</code></p>\n<p>To run the SageMaker endpoint, we need access to the following IAM policies:</p>\n<p><code>sagemaker:ListEndpoints</code></p>\n<p><code>sagemaker:DescribeEndpoint</code></p>\n<p><code>sagemaker:InvokeEndpoint</code></p>\n<p><code>sagemaker:InvokeEndpointAsync</code></p>\n<p>You also need the following resources and services:</p>\n<ul>\n<li>The <a href=\"https://aws.amazon.com/cli/\" target=\"_blank\">AWS Command Line Interface</a> (AWS CLI), which we use to create and configure Lambda.</li>\n<li>A SageMaker notebook instance. These come with Docker pre-installed, and we use this to create the Lambda layers. To set up the notebook instance, complete the following steps:</li>\n<li>On the SageMaker console, create a notebook instance and provide the notebook name, instance type (for this post, we use ml.c5.large), IAM role, and other parameters.</li>\n<li>Clone the <a href=\"https://github.com/aws-samples/host-yolov5-on-sagemaker-endpoint\" target=\"_blank\">public repository</a> and add the <a href=\"https://github.com/aws-samples/host-yolov5-on-sagemaker-endpoint\" target=\"_blank\">YOLOv5 repository</a> provided by Ultralytics.</li>\n</ul>\n<h4><a id=\"Host_YOLOv5_on_a_SageMaker_endpoint_41\"></a><strong>Host YOLOv5 on a SageMaker endpoint</strong></h4>\n<p>Before we can host the pre-trained YOLOv5 model on SageMaker, we must export and package it in the correct directory structure inside <code>model.tar.g</code>z. For this post, we demonstrate how to host YOLOv5 in the <code>saved_model </code>format. The YOLOv5 repo provides an <code>export.py</code>file that can export the model in many different ways. After you clone the YOLOv5 and enter the YOLOv5 directory from command line, you can export the model with the following command:</p>\n<pre><code class=\"lang-\">$ cd yolov5\n$ pip install -r requirements.txt tensorflow-cpu\n$ python export.py --weights yolov5l.pt --include saved_model --nms\n\n</code></pre>\n<p>This command creates a new directory called <code>yolov5l_saved_model</code>inside the <code>yolov5</code>directory. Inside the <code>yolov5l_saved_model</code>directory, we should see the following items:</p>\n<pre><code class=\"lang-\">yolov5l_saved_model\n ├─ assets\n ├─ variables\n │ ├── variables.data-00000-of-00001\n │ └── variables.index\n └── saved_model.pb\n</code></pre>\n<p>To create a <code>model.tar.gz</code> file, move the contents of <code>yolov5l_saved_model</code> to <code>export/Servo/1</code>. From the command line, we can compress the <code>export</code> directory by running the following command and upload the model to the S3 bucket:</p>\n<pre><code class=\"lang-\">$ mkdir export && mkdir export/Servo\n$ mv yolov5l_saved_model export/Servo/1\n$ tar -czvf model.tar.gz export/\n$ aws s3 cp model.tar.gz "<s3://BUCKET/PATH/model.tar.gz>"\n</code></pre>\n<p>Then, we can deploy a SageMaker endpoint from a SageMaker notebook by running the following code:</p>\n<pre><code class=\"lang-\">import os\nimport tensorflow as tf\nfrom tensorflow.keras import backend\nfrom sagemaker.tensorflow import TensorFlowModel\n\nmodel_data = '<s3://BUCKET/PATH/model.tar.gz>'\nrole = '<IAM ROLE>'\n\nmodel = TensorFlowModel(model_data=model_data,\n framework_version='2.8', role=role)\n\nINSTANCE_TYPE = 'ml.m5.xlarge'\nENDPOINT_NAME = 'yolov5l-demo'\n\npredictor = model.deploy(initial_instance_count=1,\n instance_type=INSTANCE_TYPE,\n endpoint_name=ENDPOINT_NAME)\n</code></pre>\n<p>The preceding script takes approximately 2–3 minutes to fully deploy the model to the SageMaker endpoint. You can monitor the status of the deployment on the SageMaker console. After the model is hosted successfully, the model is ready for inference.</p>\n<h4><a id=\"Test_the_SageMaker_endpoint_96\"></a><strong>Test the SageMaker endpoint</strong></h4>\n<p>After the model is successfully hosted on a SageMaker endpoint, we can test it out, which we do using a blank image. The testing code is as follows:</p>\n<pre><code class=\"lang-\">import numpy as np\n\nENDPOINT_NAME = 'yolov5l-demo'\n\nmodelHeight, modelWidth = 640, 640\nblank_image = np.zeros((modelHeight,modelWidth,3), np.uint8)\ndata = np.array(resized_image.astype(np.float32)/255.)\npayload = json.dumps([data.tolist()])\nresponse = runtime.invoke_endpoint(EndpointName=ENDPOINT_NAME,\nContentType='application/json',\nBody=payload)\n\nresult = json.loads(response['Body'].read().decode())\nprint('Results: ', result)\n</code></pre>\n<h4><a id=\"Set_up_Lambda_with_layers_and_triggers_117\"></a><strong>Set up Lambda with layers and triggers</strong></h4>\n<p>We use OpenCV to demonstrate the model by passing an image and getting the inference results. Lambda doesn’t come with external libraries like OpenCV pre-built, therefore we need to build it before we can invoke the Lambda code. Furthermore, we want to make sure that we don’t build external libraries like OpenCV every time Lambda is being invoked. For this purpose, Lambda provides a functionality to create Lambda layers. We can define what goes in these layers, and they can be consumed by the Lambda code every time it’s invoked. We also demonstrate how to create the Lambda layers for OpenCV. For this post, we use an <a href=\"https://aws.amazon.com/ec2/\" target=\"_blank\">Amazon Elastic Compute Cloud</a> (Amazon EC2) instance to create the layers.</p>\n<p>After we have the layers in place, we create the app.py script, which is the Lambda code that uses the layers, runs the inference, and gets results. The following diagram illustrates this workflow.</p>\n<p><img src=\"https://dev-media.amazoncloud.cn/ff422abd06884ebab5bfab1a40a5e60b_image.png\" alt=\"image.png\" /></p>\n<h4><a id=\"Create_Lambda_layers_for_OpenCV_using_Docker_125\"></a><strong>Create Lambda layers for OpenCV using Docker</strong></h4>\n<p>Use Dockerfile as follows to create the Docker image using Python 3.7:</p>\n<pre><code class=\"lang-\">FROM amazonlinux\n\nRUN yum update -y\nRUN yum install gcc openssl-devel bzip2-devel libffi-devel wget tar gzip zip make -y\n\n# Install Python 3.7\nWORKDIR /\nRUN wget https://www.python.org/ftp/python/3.7.12/Python-3.7.12.tgz\nRUN tar -xzvf Python-3.7.12.tgz\nWORKDIR /Python-3.7.12\nRUN ./configure --enable-optimizations\nRUN make altinstall\n\n# Install Python packages\nRUN mkdir /packages\nRUN echo "opencv-python" >> /packages/requirements.txt\nRUN mkdir -p /packages/opencv-python-3.7/python/lib/python3.7/site-packages\nRUN pip3.7 install -r /packages/requirements.txt -t /packages/opencv-python-3.7/python/lib/python3.7/site-packages\n\n# Create zip files for Lambda Layer deployment\nWORKDIR /packages/opencv-python-3.7/\nRUN zip -r9 /packages/cv2-python37.zip .\nWORKDIR /packages/\nRUN rm -rf /packages/opencv-python-3.7/\n</code></pre>\n<p>Build and run Docker and store the output ZIP file in the current directory under <code>layers</code>:</p>\n<pre><code class=\"lang-\">$ docker build --tag aws-lambda-layers:latest <PATH/TO/Dockerfile>\n$ docker run -rm -it -v $(pwd):/layers aws-lambda-layers cp /packages/cv2-python37.zip /layers\n</code></pre>\n<p>Now we can upload the OpenCV layer artifacts to Amazon S3 and create the Lambda layer:</p>\n<pre><code class=\"lang-\">$ aws s3 cp layers/cv2-python37.zip s3://<BUCKET>/<PATH/TO/STORE/ARTIFACTS>\n$ aws lambda publish-layer-version --layer-name cv2 --description "Open CV" --content S3Bucket=<BUCKET>,S3Key=<PATH/TO/STORE/ARTIFACTS>/cv2-python37.zip --compatible-runtimes python3.7\n</code></pre>\n<p>After the preceding commands run successfully, you have an OpenCV layer in Lambda, which you can review on the Lambda console.</p>\n<p><img src=\"https://dev-media.amazoncloud.cn/86d9154e8c78474d99d31410414afdab_image.png\" alt=\"image.png\" /></p>\n<h4><a id=\"Create_the_Lambda_function_175\"></a><strong>Create the Lambda function</strong></h4>\n<p>We utilize the <code>app.py</code> script to create the Lambda function and use OpenCV. In the following code, change the values for <code>BUCKET_NAME</code> and <code>IMAGE_LOCATION</code> to the location for accessing the image:</p>\n<pre><code class=\"lang-\">import os, logging, json, time, urllib.parse\nimport boto3, botocore\nimport numpy as np, cv2\n\nlogger = logging.getLogger()\nlogger.setLevel(logging.INFO)\nclient = boto3.client('lambda')\n\n# S3 BUCKETS DETAILS\ns3 = boto3.resource('s3')\nBUCKET_NAME = "<NAME OF S3 BUCKET FOR INPUT IMAGE>"\nIMAGE_LOCATION = "<S3 PATH TO IMAGE>/image.png"\n\n# INFERENCE ENDPOINT DETAILS\nENDPOINT_NAME = 'yolov5l-demo'\nconfig = botocore.config.Config(read_timeout=80)\nruntime = boto3.client('runtime.sagemaker', config=config)\nmodelHeight, modelWidth = 640, 640\n\n# RUNNING LAMBDA\ndef lambda_handler(event, context):\n key = urllib.parse.unquote_plus(event['Records'][0]['s3']['object']['key'], encoding='utf-8')\n\n # INPUTS - Download Image file from S3 to Lambda /tmp/\n input_imagename = key.split('/')[-1]\n logger.info(f'Input Imagename: {input_imagename}')\n s3.Bucket(BUCKET_NAME).download_file(IMAGE_LOCATION + '/' + input_imagename, '/tmp/' + input_imagename)\n\n # INFERENCE - Invoke the SageMaker Inference Endpoint\n logger.info(f'Starting Inference ... ')\n orig_image = cv2.imread('/tmp/' + input_imagename)\n if orig_image is not None:\n start_time_iter = time.time()\n # pre-processing input image\n image = cv2.resize(orig_image.copy(), (modelWidth, modelHeight), interpolation = cv2.INTER_AREA)\n data = np.array(image.astype(np.float32)/255.)\n payload = json.dumps([data.tolist()])\n # run inference\n response = runtime.invoke_endpoint(EndpointName=ENDPOINT_NAME, ContentType='application/json', Body=payload)\n # get the output results\n result = json.loads(response['Body'].read().decode())\n end_time_iter = time.time()\n # get the total time taken for inference\n inference_time = round((end_time_iter - start_time_iter)*100)/100\n logger.info(f'Inference Completed ... ')\n\n # OUTPUTS - Using the output to utilize in other services downstream\n return {\n "statusCode": 200,\n "body": json.dumps({\n "message": "Inference Time:// " + str(inference_time) + " seconds.",\n "results": result\n }),\n }\n</code></pre>\n<p>Deploy the Lambda function with the following code:</p>\n<pre><code class=\"lang-\">$ zip app.zip app.py\n$ aws s3 cp app.zip s3://<BUCKET>/<PATH/TO/STORE/FUNCTION>\n$ aws lambda create-function --function-name yolov5-lambda --handler app.lambda_handler --region us-east-1 --runtime python3.7 --environment "Variables={BUCKET_NAME=$BUCKET_NAME,S3_KEY=$S3_KEY}" --code S3Bucket=<BUCKET>,S3Key="<PATH/TO/STORE/FUNCTION/app.zip>"\n</code></pre>\n<h4><a id=\"Attach_the_OpenCV_layer_to_the_Lambda_function_244\"></a><strong>Attach the OpenCV layer to the Lambda function</strong></h4>\n<p>After we have the Lambda function and layer in place, we can connect the layer to the function as follows:</p>\n<pre><code class=\"lang-\">$ aws lambda update-function-configuration --function-name yolov5-lambda --layers cv2\n</code></pre>\n<p>We can review the layer settings via the Lambda console.</p>\n<p><img src=\"https://dev-media.amazoncloud.cn/28c14bf675194a109b2728ec3508611a_image.png\" alt=\"image.png\" /></p>\n<h4><a id=\"Trigger_Lambda_when_an_image_is_uploaded_to_Amazon_S3_256\"></a><strong>Trigger Lambda when an image is uploaded to Amazon S3</strong></h4>\n<p>We use an image upload to Amazon S3 as a trigger to run the Lambda function. For instructions, refer to <a href=\"https://docs.aws.amazon.com/lambda/latest/dg/with-s3-example.html\" target=\"_blank\">Tutorial: Using an Amazon S3 trigger to invoke a Lambda function</a>.</p>\n<p>You should see the following function details on the Lambda console.</p>\n<p><img src=\"https://dev-media.amazoncloud.cn/8be1621e048646518fd52661c96767e0_image.png\" alt=\"image.png\" /></p>\n<h4><a id=\"Run_inference_264\"></a><strong>Run inference</strong></h4>\n<p>After you set up Lambda and the SageMaker endpoint, you can test the output by invoking the Lambda function. We use an image upload to Amazon S3 as a trigger to invoke Lambda, which in turn invokes the endpoint for inference. As an example, we upload the following image to the Amazon S3 location <code><S3 PATH TO IMAGE>/test_image.png</code> configured in the previous section.</p>\n<p><img src=\"https://dev-media.amazoncloud.cn/e57db6ab78bc408b9320228cec063176_image.png\" alt=\"image.png\" /></p>\n<p>After the image is uploaded, the Lambda function is triggered to download and read the image data and send it to the SageMaker endpoint for inference. The output result from the SageMaker endpoint is obtained and returned by the function in JSON format, which we can use in different ways. The following image shows example output overlayed on the image.</p>\n<p><img src=\"https://dev-media.amazoncloud.cn/42d9a2dce6b54801afb4eaa457b4b6af_image.png\" alt=\"image.png\" /></p>\n<h4><a id=\"Clean_up_274\"></a><strong>Clean up</strong></h4>\n<p>Depending on the instance type, SageMaker notebooks can require significant compute usage and cost. To avoid unnecessary costs, we advise stopping the notebook instance when it’s not in use. Additionally, Lambda functions and SageMaker endpoints incur charges only when they’re invoked. Therefore, no cleanup is necessary for those services. However, if an endpoint isn’t being used any longer, it’s good practice to remove the endpoint and the model.</p>\n<h4><a id=\"Conclusion_278\"></a><strong>Conclusion</strong></h4>\n<p>In this post, we demonstrated how to host a pre-trained YOLOv5 model on a SageMaker endpoint and use Lambda to invoke inference and process the output. The detailed code is available on <a href=\"https://github.com/aws-samples/host-yolov5-on-sagemaker-endpoint\" target=\"_blank\">GitHub</a>.</p>\n<p>To learn more about SageMaker endpoints, check out <a href=\"https://docs.aws.amazon.com/sagemaker/latest/dg/realtime-endpoints-deployment.html\" target=\"_blank\">Create your endpoint and deploy your model</a> and Build, test, and <a href=\"https://aws.amazon.com/blogs/machine-learning/build-test-and-deploy-your-amazon-sagemaker-inference-models-to-aws-lambda/\" target=\"_blank\">deploy your Amazon SageMaker inference models to AWS Lambda</a>, which highlights how you can automate the process of deploying YOLOv5 models.</p>\n<h4><a id=\"About_the_authors_284\"></a><strong>About the authors</strong></h4>\n<p><img src=\"https://dev-media.amazoncloud.cn/2401c6d4fb4249228f2bcbec974665b5_image.png\" alt=\"image.png\" /></p>\n<p><strong>Kevin Song</strong> is an IoT Edge Data Scientist at AWS Professional Services. Kevin holds a PhD in Biophysics from The University of Chicago. He has over 4 years of industry experience in Computer Vision and Machine Learning. He is involved in helping customers in the sports and life sciences industry deploy Machine Learning models.</p>\n<p><img src=\"https://dev-media.amazoncloud.cn/8c5f76bf52954ae2a01afc91734bde8a_image.png\" alt=\"image.png\" /></p>\n<p><strong>Romil Shah</strong> is an IoT Edge Data Scientist at AWS Professional Services. Romil has over 6 years of industry experience in Computer Vision, Machine Learning and IoT edge devices. He is involved in helping customers optimize and deploy their Machine Learning models for edge devices for industrial setup.</p>\n"}
Scale YOLOv5 inference with Amazon SageMaker endpoints and Amazon Lambda
海外精选

海外精选的内容汇集了全球优质的亚马逊云科技相关技术内容。同时,内容中提到的“AWS”
是 “Amazon Web Services” 的缩写,在此网站不作为商标展示。

 0
0 0
0亚马逊云科技解决方案 基于行业客户应用场景及技术领域的解决方案
联系亚马逊云科技专家
亚马逊云科技解决方案
基于行业客户应用场景及技术领域的解决方案
联系专家

0
目录

 分享
分享 点赞
点赞 收藏
收藏 目录
目录立即注册,开启您的免费套餐
立即关注

亚马逊云开发者
公众号

User Group
公众号

亚马逊云科技
官方小程序
“AWS” 是 “Amazon Web Services” 的缩写,在此网站不作为商标展示。
立即关注
亚马逊云开发者
公众号
User Group
公众号
亚马逊云科技
官方小程序
“AWS” 是 “Amazon Web Services” 的缩写,在此网站不作为商标展示。
关于我们 
更多资源
开发者工具
更多支持
立即关注
亚马逊云开发者
公众号
User Group
公众号
亚马逊云科技
官方小程序
“AWS” 是 “Amazon Web Services” 的缩写,在此网站不作为商标展示。
