{"value":"When you use [Amazon Relational Database Service](https://aws.amazon.com/rds/) (Amazon RDS) and [Amazon Aurora](https://aws.amazon.com/rds/aurora/), you may have noticed that the IP addresses of your database instances keep changing. There are several reasons for this. The IP address changes when the primary database of Amazon RDS fails over to a standby database. Furthermore, when Amazon RDS is restarted or the [Amazon Elastic Compute Cloud](https://docs.aws.amazon.com/AWSEC2/latest/UserGuide/concepts.html) (Amazon EC2) instance is replaced with another instance due to a specific patch, the IP address changes. Even if the IP address changes, normal applications can still access Amazon RDS because these applications can connect using the DNS of Amazon RDS. In general, it is recommended for applications to [access RDS using RDS DNS](https://docs.aws.amazon.com/AmazonRDS/latest/UserGuide/CHAP_CommonTasks.Connect.html). However, due to the following requirements, many enterprise customers want to use Amazon RDS with a static IP address (a non-changing IP address):\n \n- In many cases, when your firewall policy applies rules, only a static IP is allowed as a policy rule. Specifically, this rule is applied when connecting servers on a public cloud service from the on-premises servers.\n- Quite often, third-party software that must connect to Amazon RDS only support connection with a static IP address.\n- Some legacy applications in on-premises servers only use a static IP address when connecting to databases.\n\nIn this post, I present a way to access Amazon RDS based on static IP addresses.\n\n#### **Solution overview**\n\nIn the architecture presented in this post, you can connect to Amazon RDS using static IP addresses provided by a [Network Load Balancer](https://docs.aws.amazon.com/elasticloadbalancing/latest/network/introduction.html). You configure an Amazon EC2-based RDS router so that it can connect with Amazon RDS through a Network Load Balancer. To achieve this, you configure an RDS router as the target EC2 instance of the Network Load Balancer. With the help of the iptables command on the RDS router, traffic coming into the RDS router is configured to be connected to the Amazon RDS IP address. Also, if you use the RDS router created in this post, then you can share it with multiple RDS databases. When this architecture is applied to multiple RDS databases, one thing to note is that the listening ports on RDS Routers must be configured differently. For example, when configuring to connect two Amazon RDS for MySQL using this architecture, one RDS database is configured to be connected to port ```3306``` and the other RDS database is configured to be connected to port ```3307```.\n\nThe following diagram illustrates the proposed architecture.\n\n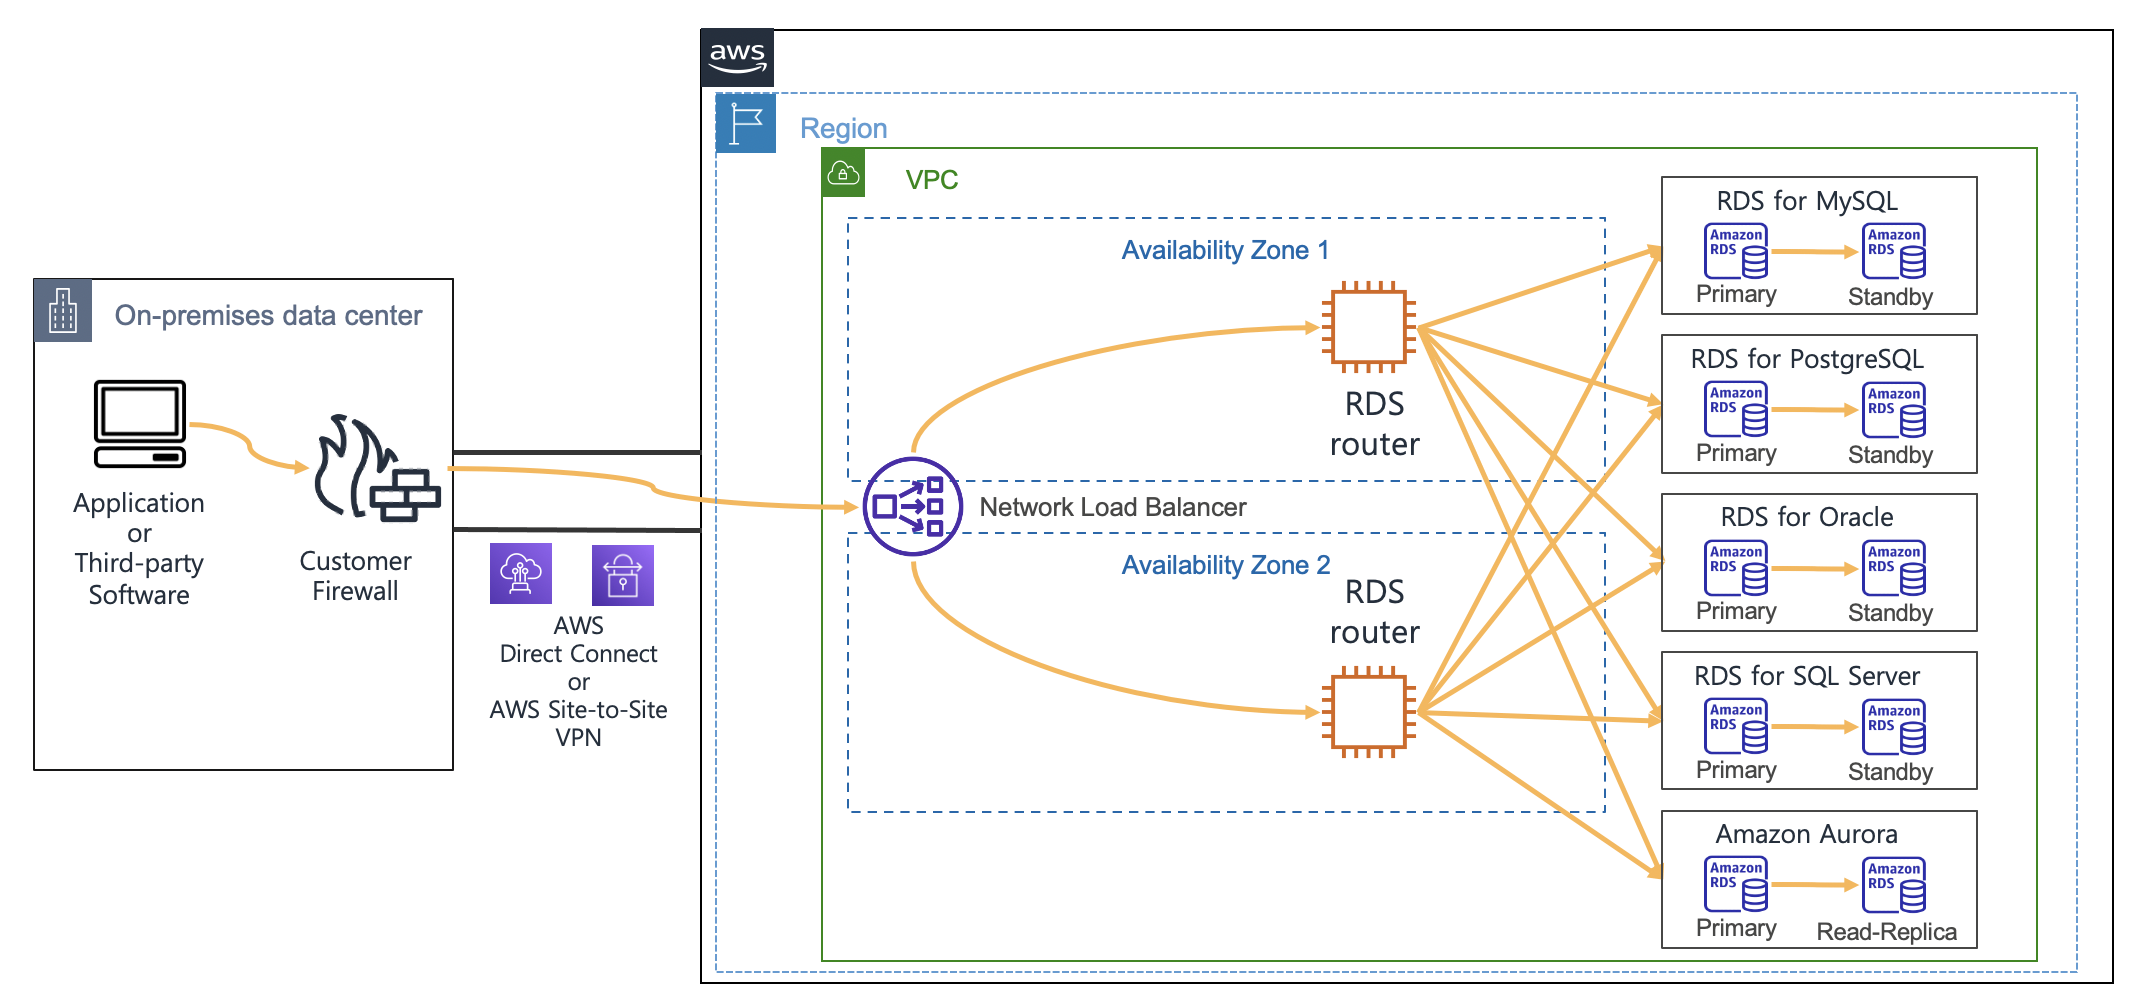\n\nConsidering High Availability, this architecture is configured using two Availability Zones so that it can operate even in the event of one Availability Zone failure. Thus, Network Load Balancer and RDS routers were configured in each Availability Zone.\n\n#### **Deploy the solution**\n\nYou can implement the architecture using the following [Amazon Web Services CloudFormation stack](http://aws.amazon.com/cloudformation). To use this CloudFormation, you must have an Amazon Web Services account. To connect using SSH, you need to create [EC2 key pairs](https://docs.aws.amazon.com/AWSEC2/latest/UserGuide/ec2-key-pairs.html) in advance so that you can connect to EC2 by using the EC2 key pairs. To deploy the CloudFormation stack, Complete the following steps:\n\n1. Download the CloudFormation [stack file](https://aws-blogs-artifacts-public.s3.amazonaws.com/artifacts/DBBLOG-1990/nlb-rds-router-masquerade.yaml).\n2. On the CloudFormation console, choose **Create stack with new resources (standard).**\n3. Upload the stack file, and choose **Next.**\n4. For **Stack name**, enter ```rdsStack```.\n5. For **SSHKeyName**¸ enter your own key name.\n6. For **MyPcIpAddress**, enter your PC IP address by visiting [whatismyipaddress.com](https://whatismyipaddress.com/). Fill the IP address with format of ```xxx.xxx.xxx.xxx/32```.\n7. For **RdsMasterUserPassword**, enter your password of RDS master user with at least 8 characters.\n8. For **RdsMasterUsername**, enter your master username of RDS (like ```admin```).\n9. Choose **Next**.\n10. Choose **Next** again.\n11. Choose **Create stack**.\n\nStack creation takes approximately 20 minutes to complete. This solution incurs costs because all of the resources described here aren’t under the [Amazon Web Services Free Tier](https://aws.amazon.com/free/). For more information about costs, see [Amazon Web Services Pricing](https://aws.amazon.com/pricing/).\n\n#### **Connect to Amazon RDS using a Network Load Balancer**\n\nAfter you create the solution resources with the CloudFormation stack, you’re ready to connect to Amazon RDS using a static IP address.\n\nCheck the bastion client Amazon EC2 IP address in the CloudFormation stack output, and [connect to Amazon EC2](https://docs.aws.amazon.com/AWSEC2/latest/UserGuide/AccessingInstancesLinux.html) as follows (use your own bastion host IP address):\n\n```\nssh -A ec2-user@<<your-bastion-ip-address>> ## BastionClientAz1\n```\nThe CloudFormation stack configured an [Amazon RDS for MySQL](https://aws.amazon.com/rds/mysql/) as an example database service. Also, it installed a MySQL client in the bastion client. Therefore, you can connect to Amazon RDS for MySQL using the Network Load Balancer URL from the CloudFormation stack output with the following command:\n\n```\nmysql -u '<<rds_username>>' -h '<<your_NLB_IP_or_DNS>>' -p<<rds_password>>\n```\n\nYou can also connect to Amazon RDS for MySQL using the static IP address of the Network Load Balancer with the following command. You can find IP addresses of the Network Load Balancer by running the nslookup command:\n\n```\nnslookup <<your-NLB-URL>> \n```\n\n\nWith IP addresses of the Network Load Balancer from above output, you can connect to Amazon RDS the following command:\n\n```\nmysql -u '<<rds_username>>' -h '<<your_NLB_IP_ADDRESS_OF_AZ1>>' -p<<rds_password>>\nmysql -u '<<rds_username>>' -h '<<your_NLB_IP_ADDRESS_OF_AZ2>>' -p<<rds_password>>\n```\n\nIf you’re using [Amazon RDS for PostgreSQL](https://aws.amazon.com/rds/postgresql/) with this approach and a proper PostgreSQL client installed in the client machine, then you can connect to Amazon RDS for PostgreSQL using the static IP address or DNS of the Network Load Balancer with the following command:\n\n```\npsql -U <<rds_username>> -d <<database_name>> -h <<your_NLB_IP_or_DNS>> -p <<database_port>>\n```\n\nWith an [Amazon RDS for Oracle](https://aws.amazon.com/rds/oracle/) environment, you can connect using the Network Load Balancer URL with the following command:\n\n```\nsqlplus <<rds_username>>/<<rds_password>>@//<<your_NLB_IP_or_DNS>>:<<database_port>>/<<database_name>>\n```\n\n\nFor an [Amazon RDS for SQL Server](https://aws.amazon.com/rds/sqlserver/) environment, you can connect using the static IP address of the Network Load Balancer with the following command:\n\n```\nmssql -s <<your_NLB_IP_or_DNS>> -u <<rds_username>> -p <<rds_password>> -e\n```\n\n\nIf you’re using an Amazon [Aurora MySQL-Compatible Edition](https://aws.amazon.com/rds/aurora/mysql-features/) environment with this approach, then you can connect using the static IP address of the Network Load Balancer with the following command:\n```\n\nmysql -u '<<rds_username>>' -h '<<your_NLB_IP_or_DNS>>' -p<<rds_password>>\n```\n\nFor an Amazon [Aurora PostgreSQL-Compatible Edition ](https://aws.amazon.com/rds/aurora/postgresql-features/) environment with this approach, you can connect using the static IP address of the Network Load Balancer with the following command:\n\n```\npsql -U <<rds_username>> -d <<database_name>> -h <<your_NLB_IP_or_DNS>> -p <<database_port>>\n```\n\n#### **Implement an RDS router**\n\nA key component of this architecture is RDS router instances, which forward the Network Load Balancer traffic to the Amazon RDS IP address. The CloudFormation already implemented the RDS router and required integration with Network Load Balancer. To implement this router by yourself, you configure the router on Amazon EC2. The RDS router on Amazon EC2 forwards traffic from the Network Load Balancer to the Amazon RDS IP through the ```iptables``` command.\n\nYou can configure routing through the DNAT command of [iptables](https://en.wikipedia.org/wiki/Iptables) so that the incoming traffic in the RDS router on Amazon EC2 is forwarded to the Amazon RDS IP address. To identify the Amazon RDS IP address, you can use the ```nslookup``` command toward the DNS of Amazon RDS. I used ```\nRDS_CONNECTION_IP```environment variable for the Amazon RDS IP address in the upcoming command. For example, see the following code (using Amazon RDS for MySQL):\n\n```\niptables -t nat -A PREROUTING -i eth0 -p tcp --dport 3306 -j DNAT --to $RDS_CONNECTION_IP:3306\n```\n\nYou can connect to other databases, such as Oracle, PostgreSQL, SQL Server, and Aurora, as shown in the following code:\n\n```\n# For Oracle\niptables -t nat -A PREROUTING -i eth0 -p tcp --dport 1521 -j DNAT --to $RDS_CONNECTION_IP:1521\n# For PostgreSQL\niptables -t nat -A PREROUTING -i eth0 -p tcp --dport 5432 -j DNAT --to $RDS_CONNECTION_IP:5432\n# For MS SQL Server\niptables -t nat -A PREROUTING -i eth0 -p tcp --dport 1433 -j DNAT --to $RDS_CONNECTION_IP:1433\n# For Aurora MySQL\niptables -t nat -A PREROUTING -i eth0 -p tcp --dport 3306 -j DNAT --to $RDS_CONNECTION_IP:3306\n# For Aurora PostgreSQL\niptables -t nat -A PREROUTING -i eth0 -p tcp --dport 5432 -j DNAT --to $RDS_CONNECTION_IP:5432\n\n```\n\n#### **Integrate a Network Load Balancer with an RDS router**\n\nBecause the RDS router is configured on Amazon EC2, you can configure the router as the target instance of the Network Load Balancer. You can send traffic by specifying the RDS router in each Availability Zone as the target group for a Network Load Balancer.\n\nHowever, if you configure Network Load Balancer health checks in a standard way, then an issue may arise during a health check. In the case of a specific database management system, when traffic that only checks for port open status without performing a normal database connection, such as a Network Load Balancer health check, the client IP may be blocked. The following is an example client IP blocking message because of health check traffic when your Network Load Balancer tries to connect to Amazon RDS for MySQL:\n\n```\nERROR 1129 (HY000): Host '10.0.1.14' is blocked because of many connection errors; unblock with 'mysqladmin flush-hosts'\n```\n\nTo address this issue when performing a Network Load Balancer health check, you should implement a separate health check port which should be different from the Amazon RDS port. You can implement this function through the [health check port override feature of the Network Load Balancer](https://docs.aws.amazon.com/elasticloadbalancing/latest/network/create-target-group.html). In the CloudFormation stack provided earlier, this health check override port was configured using port 15000.\n\nOne consideration of choosing Amazon EC2 is that every [Amazon EC2 instance type](https://aws.amazon.com/ec2/instance-types/) has [its own network bandwidth limit](https://docs.aws.amazon.com/AWSEC2/latest/UserGuide/ec2-instance-network-bandwidth.html). Therefore, you must consider your required amount of network traffic when choosing an Amazon EC2 instance type.\n\n#### **Update iptables**\n\nThe IP address of Amazon RDS may change due to various events in Amazon RDS. To see the current value of the IP address, you must look up the DNS of Amazon RDS. In the RDS router on Amazon EC2, the ```iptables DNAT``` command forwards the incoming Network Load Balancer traffic to the Amazon RDS IP address. If the IP address changes due to Amazon RDS events, then you must run DNS lookup to find the latest IP address and rerun the ```iptables DNAT``` command to forward incoming Network Load Balancer traffic to the new IP address.\n\nThere are two possible ways to automate this procedure:\n\n- The first method is to periodically run the ```iptables DNAT``` command through the Linux ```crontab``` command by looking up the DNS of Amazon RDS.\n- The second method is to use [Amazon Web Services Lambda](http://aws.amazon.com/lambda) to run an ```iptables DNAT``` command whenever an Amazon RDS event occurs.\n\nThe CloudFormation stack provided earlier periodically updates ```iptables``` using the Linux ```crontab```\ncommand. The shorter the ```crontab``` run cycle is, the shorter the ```iptables``` update cycle can be.\n\n#### **Limitations of Network Load Balancer timeout**\n\nThe Network Load Balancer provides the advantage of using a static IP. However, you have the limitation of idle timeout when using a Network Load Balancer. If no packets are sent for 350 seconds after making a connection through the Network Load Balancer, then the connection is disconnected. Therefore, if the valid database connection time is less than 350 seconds, it’s okay to use a Network Load Balancer. Also, when a client connects using Network Load Balancer, it is recommended to apply the keepalive timeout of the client to 350 seconds or less. By doing that, the client can quickly process the connection timeout before the Network Load Balancer timeout occurs. If a database job requires idle time more than 350 seconds because of long running queries, then consider another method where you directly connect to the IP address of the RDS router on Amazon EC2. When connecting with the RDS router on Amazon EC2, the database connection can be maintained for more than 350 seconds because it’s not restricted by the Network Load Balancer idle timeout. However, when connecting to the RDS router on Amazon EC2, there is a disadvantage: if the router fails, then the application with direct connection with the router might have a problem connecting to Amazon RDS. The following diagram illustrates these idle timeout options.\n\n\n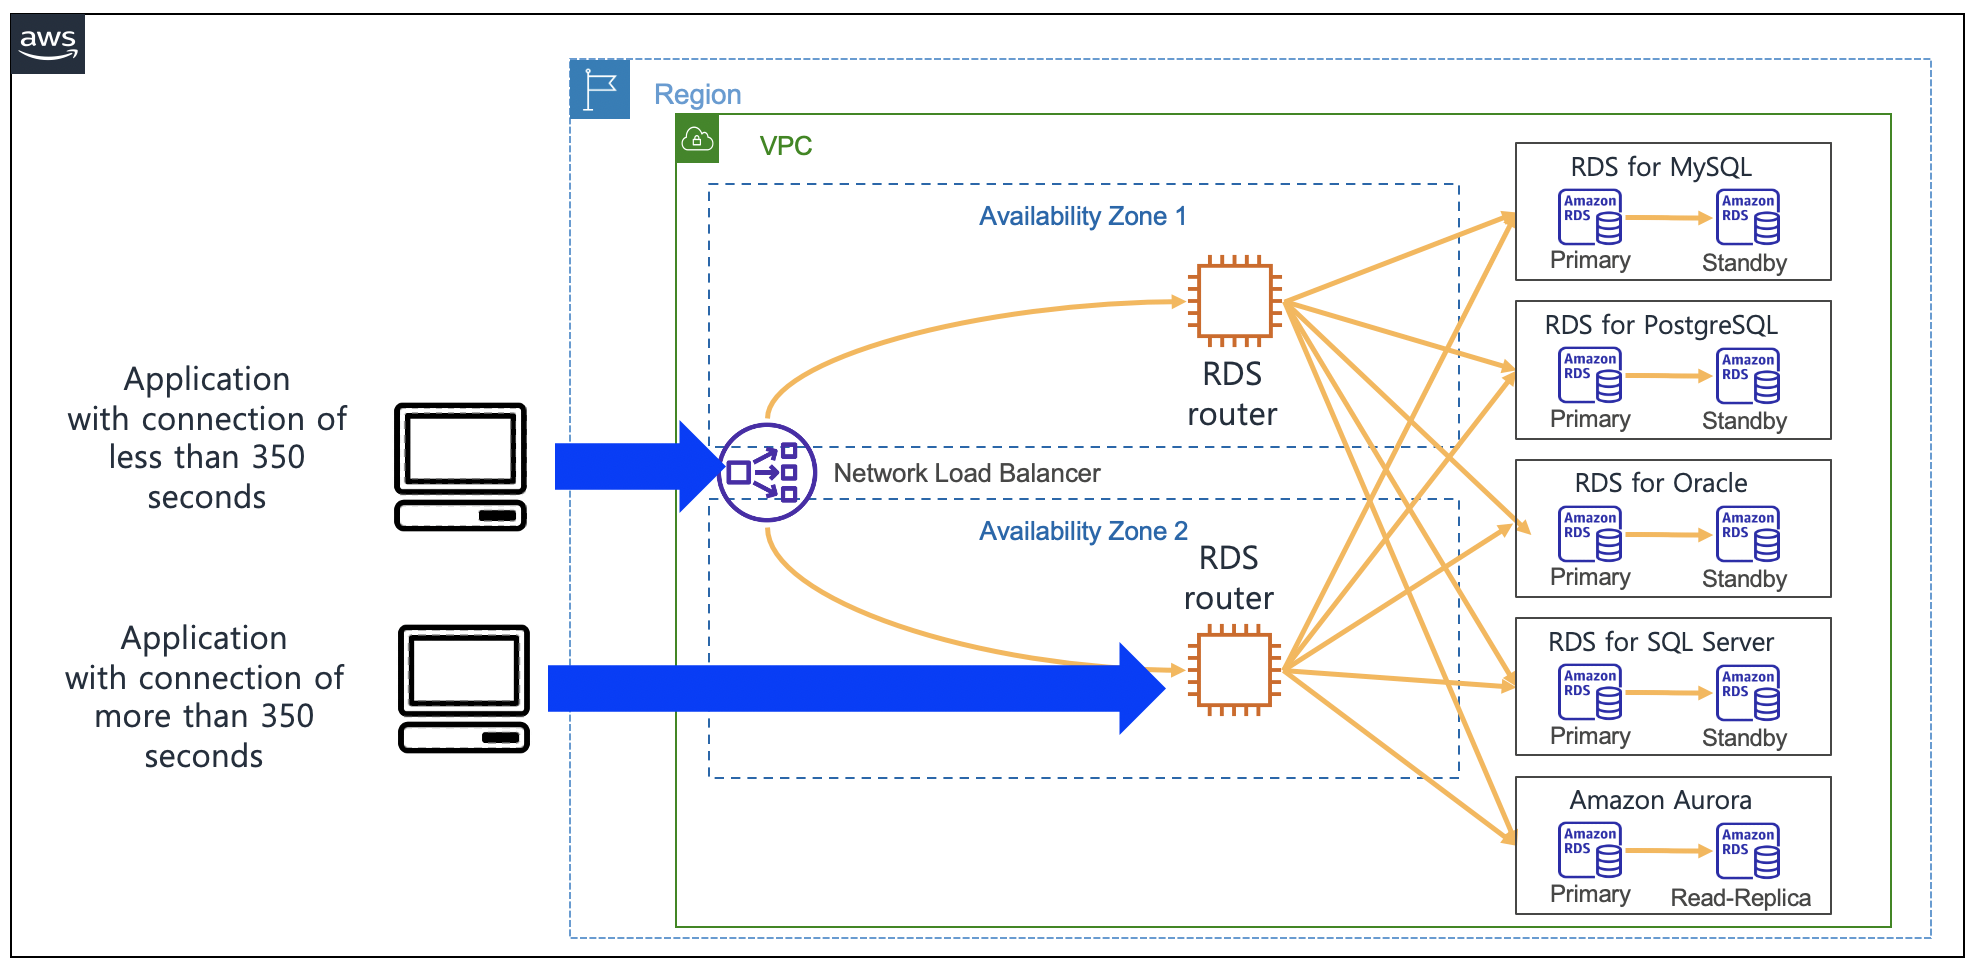\n\n#### **How to keep track of client IP addresses**\n\nWhen your client application connects to Amazon RDS using the architecture configured with the CloudFormation stack provided, Amazon RDS can only track the IP address of the RDS router on Amazon EC2 other than your client application. This is because when the traffic that has passed through the RDS router on Amazon EC2 connects to Amazon RDS, it connects using the IP address of the RDS router on Amazon EC2.\n\nTo check which IP address is used to connect to Amazon RDS, you can test by accessing RDS from the client. The command below was tested with the client IP address configured as ```10.1.1.92``` and the IP address of the RDS router on Amazon EC2 configured as ```10.1.1.41```. Run the following command:\n\n```\n[ec2-user@ip-10-1-1-92 ~]$ mysql -u '<<rds_username>>' -h '<<your_NLB_IP_or_DNS>>' -p<<rds_password>> -e\"SELECT SUBSTRING_INDEX(USER(), '@', -1) AS ip;\"\n+-----------+\n| ip |\n+-----------+\n| 10.1.1.41 |\n+-----------+\n[ec2-user@ip-10-1-1-92 ~]$\n```\n\nAs you can see, the connected IP address is the IP address of the RDS router on Amazon EC2.\n\nIf you want the RDS router on Amazon EC2 to deliver the original client IP as is, then you can remove the ```masquerade``` command from the ```iptables``` commands in the router. However, this may cause routing problems because return packets with the return traffic can’t find the original client again. If you’re required to track the original client IP address, then you can avoid the routing problem by configuring only one RDS router on Amazon EC2. Furthermore, you should set the route table of the RDS subnet to use [more specific routings](https://aws.amazon.com/blogs/aws/inspect-subnet-to-subnet-traffic-with-amazon-vpc-more-specific-routing/), which the return traffic from the RDS subnet should go through using an RDS router. Even if the client traffic originates from another Availability Zone, the return traffic must go through one RDS router on Amazon EC2. This is the only way to avoid this routing problem.\n\nThis CloudFormation [stack](https://aws-blogs-artifacts-public.s3.amazonaws.com/artifacts/DBBLOG-1990/nlb-rds-router-no-masquerade.yaml) collects the original client IP address of your applications. You can simulate how to collect the client IP address by downloading and implementing this CloudFormation stack. When you’re configuring the stack parameters, you can change the SSH key name to your own key name. Also, you should fill ```MyPcIpAddress```, ```RdsMasterUserPassword``` and ```RdsMasterUsername``` as you did for the previous CloudFormation template. For the rest of the settings, use the default settings.\n\nThe following diagram illustrates this workaround.\n\n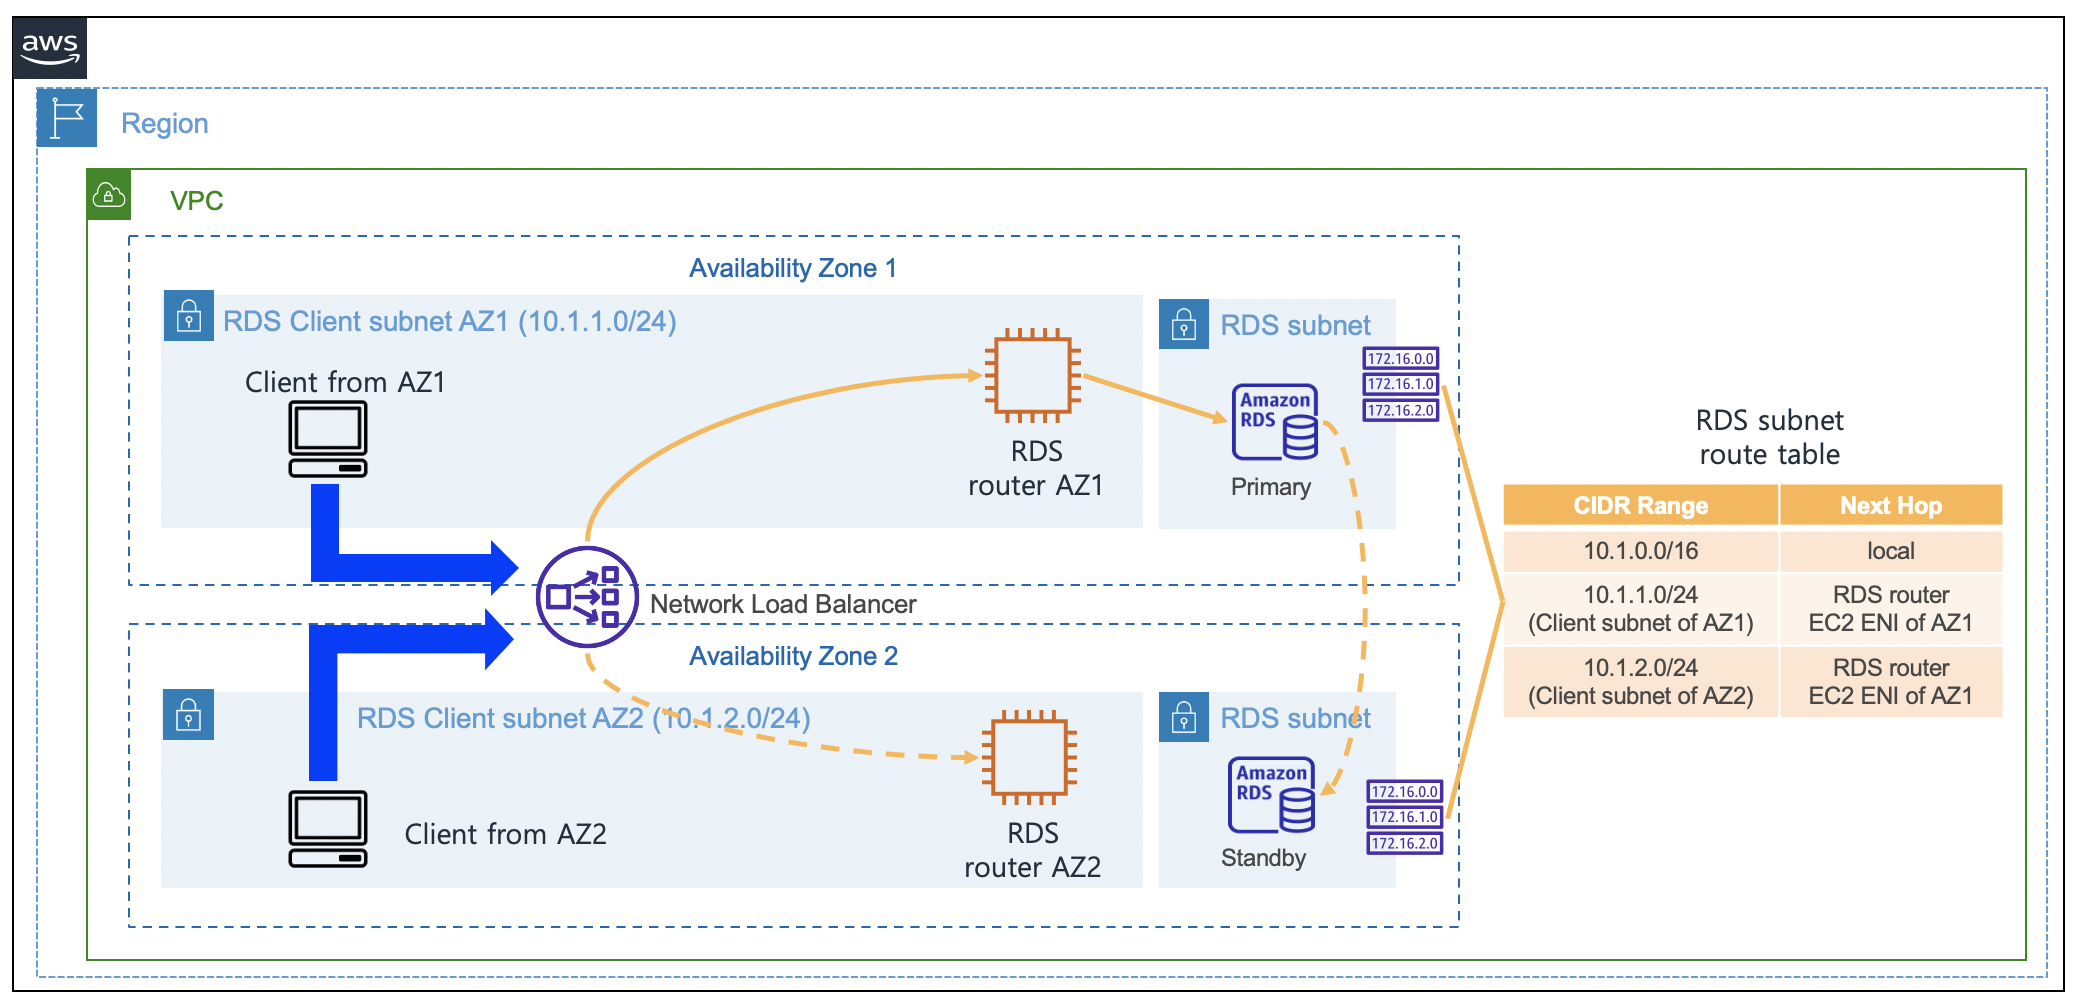\n\nAfter you deploy the CloudFormation stack, you can try to connect to Amazon RDS through the Network Load Balancer. To check the original client IP address from the Amazon RDS connection, use the following command:\n\n```\n[ec2-user@ip-10-1-1-204 ~]$ mysql -u '<<rds_username>>' -h '<<your_NLB_IP_or_DNS>>' -p<<rds_password>> -e\"SELECT SUBSTRING_INDEX(USER(), '@', -1) AS ip;\"\n+------------+\n| ip |\n+------------+\n| 10.1.1.204 |\n+------------+\n[ec2-user@ip-10-1-1-204 ~]$\n```\n\nBecause this architecture uses only one RDS router on Amazon EC2, you can’t connect Amazon RDS in the case of router failure on Amazon EC2 in Availability Zone 1. If the RDS router in Availability Zone 1 fails, then you must use the router in Availability Zone 2. Also, in this case, you must update the route table of the RDS subnet to use the RDS router in Availability Zone 2. If necessary, you can use [Amazon Web Services Lambda](https://aws.amazon.com/lambda/) to automate updating the route table of the RDS subnet. The following diagram explains what to change in the case of RDS router failure on Amazon EC2 in Availability Zone 1.\n\n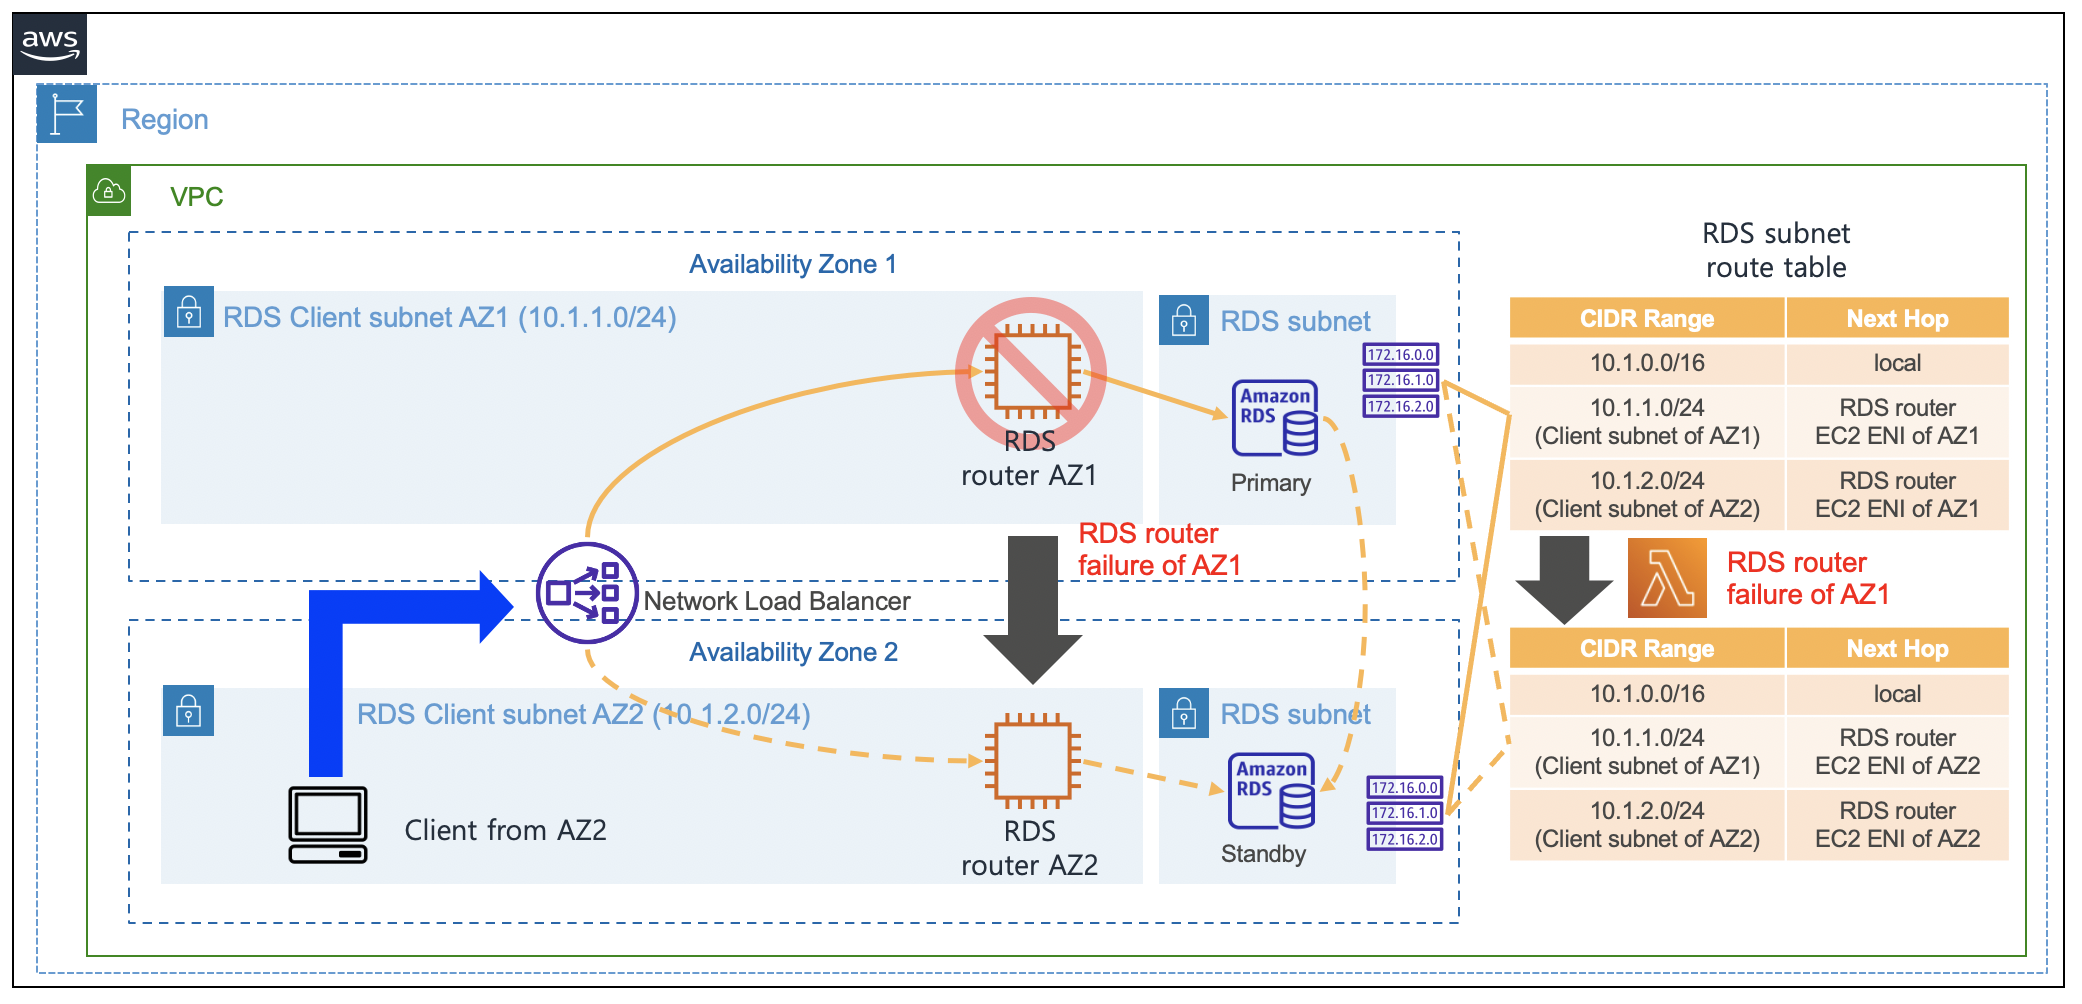\n\nI created a Lambda function that automatically updates the route tables of the RDS subnet in the preceding CloudFormation stack when the RDS router in Availability Zone 1 fails. You can simulate an automatic routing update of the Lambda function with the following steps:\n\n1. On the CloudFormation console, navigate to the Outputs tab for the stack.\n2. Locate the RdsRouterVmAz1 key and corresponding value.\n3. Connect to RdsRouterVmAz1 using the Amazon EC2 connection string from the preceding value:\n ```\n ssh -A ec2-user@<<your-rdsRouter-ip-address>> ## RdsRouterVmAz1\n ```\n4. Drop packets towards health check port using the following command:\n\n```\nsudo iptables -A INPUT -p tcp --dport 15000 -j DROP\n```\n\n- This triggers the Lambda function to update the route tables of the RDS subnet.\n\n- Now you can connect to the bastion host and check if communication with Amazon RDS is possible.\n\n5. On the CloudFormation console, navigate to the **Outputs** tab for the stack.\n \n6. Find the ```BastionClientAz1``` key and corresponding value.\n7. Connect to ```BastionClientAz1``` using the Amazon EC2 connection string from the preceding value:\n\n ```\n ssh -A ec2-user@<<your-bastion-ip-address>> ## BastionClientAz1\n```\n\n8. Try to connect to Amazon RDS using the following command:\n \n```\n mysql -u '<<rds_username>>' -h '<<your_NLB_IP_or_DNS>>' -p<<rds_password>> -e\"SELECT SUBSTRING_INDEX(USER(), '@', -1) AS ip;\"\n```\n\nAs shown in the following output, the IP address of the bastion host is collected even when the RDS router in Availability Zone 1 fails:\n\n```\n[ec2-user@ip-10-1-1-204 ~]$ mysql -u '<<rds_username>>' -h '<<your_NLB_IP_or_DNS>>' -p<<rds_password>> -e\"SELECT SUBSTRING_INDEX(USER(), '@', -1) AS ip;\"\n+------------+\n| ip |\n+------------+\n| 10.1.1.204 |\n+------------+\n[ec2-user@ip-10-1-1-204 ~]$\n```\n\nThis Lambda function is configured to run once per minute. Therefore, it may take 2–3 minutes for the route tables to be updated in the case of a failure of the RDS router in Availability Zone 1. You can check what happens in the function when the failure occurs through the Lambda function execution logs in [Amazon CloudWatch Logs](http://aws.amazon.com/cloudwatch).\n\n#### **Clean up**\n\nAs I mentioned earlier, you might incur costs because not all of the resources are under the Amazon Web Services Free Tier. To avoid ongoing charges, [delete the resources](https://docs.aws.amazon.com/AWSCloudFormation/latest/UserGuide/cfn-console-delete-stack.html) you created as part of this post.\n\n#### **Conclusion**\n\nIn this post, I explained how to connect to Amazon RDS using a static IP provided by a Network Load Balancer. You might be concerned about the situation where you need the additional Amazon EC2 when implementing this architecture. When using Amazon RDS, you may use a large number of databases. Therefore, you can configure and use a Network Load Balancer plus RDS router architecture for multiple databases. By doing so, you can construct the architecture with minimal costs while also meeting the static IP requirements. The static IP feature of Amazon Network Load Balancer provides a solution to the non-changing IP requirements that occurs when connecting on-premises to Amazon Web Services Cloud.\n\nYou can refer to [Network Load Balancers documentation](https://docs.aws.amazon.com/elasticloadbalancing/latest/network/network-load-balancers.html) for additional details about the feature of static IP of Amazon Network Load Balancer.\n\n#### **About the Author**\n\n\n\n**Byeong-eok Kang** is a Solutions Architect at Amazon Web Services. He specializes in databases and has a deep understanding of the finance industry. Outside of work, he likes riding his bike and playing with his cat.\n\n","render":"<p>When you use <a href=\"https://aws.amazon.com/rds/\" target=\"_blank\">Amazon Relational Database Service</a> (Amazon RDS) and <a href=\"https://aws.amazon.com/rds/aurora/\" target=\"_blank\">Amazon Aurora</a>, you may have noticed that the IP addresses of your database instances keep changing. There are several reasons for this. The IP address changes when the primary database of Amazon RDS fails over to a standby database. Furthermore, when Amazon RDS is restarted or the <a href=\"https://docs.aws.amazon.com/AWSEC2/latest/UserGuide/concepts.html\" target=\"_blank\">Amazon Elastic Compute Cloud</a> (Amazon EC2) instance is replaced with another instance due to a specific patch, the IP address changes. Even if the IP address changes, normal applications can still access Amazon RDS because these applications can connect using the DNS of Amazon RDS. In general, it is recommended for applications to <a href=\"https://docs.aws.amazon.com/AmazonRDS/latest/UserGuide/CHAP_CommonTasks.Connect.html\" target=\"_blank\">access RDS using RDS DNS</a>. However, due to the following requirements, many enterprise customers want to use Amazon RDS with a static IP address (a non-changing IP address):</p>\n<ul>\n<li>In many cases, when your firewall policy applies rules, only a static IP is allowed as a policy rule. Specifically, this rule is applied when connecting servers on a public cloud service from the on-premises servers.</li>\n<li>Quite often, third-party software that must connect to Amazon RDS only support connection with a static IP address.</li>\n<li>Some legacy applications in on-premises servers only use a static IP address when connecting to databases.</li>\n</ul>\n<p>In this post, I present a way to access Amazon RDS based on static IP addresses.</p>\n<h4><a id=\"Solution_overview_8\"></a><strong>Solution overview</strong></h4>\n<p>In the architecture presented in this post, you can connect to Amazon RDS using static IP addresses provided by a <a href=\"https://docs.aws.amazon.com/elasticloadbalancing/latest/network/introduction.html\" target=\"_blank\">Network Load Balancer</a>. You configure an Amazon EC2-based RDS router so that it can connect with Amazon RDS through a Network Load Balancer. To achieve this, you configure an RDS router as the target EC2 instance of the Network Load Balancer. With the help of the iptables command on the RDS router, traffic coming into the RDS router is configured to be connected to the Amazon RDS IP address. Also, if you use the RDS router created in this post, then you can share it with multiple RDS databases. When this architecture is applied to multiple RDS databases, one thing to note is that the listening ports on RDS Routers must be configured differently. For example, when configuring to connect two Amazon RDS for MySQL using this architecture, one RDS database is configured to be connected to port <code>3306</code> and the other RDS database is configured to be connected to port <code>3307</code>.</p>\n<p>The following diagram illustrates the proposed architecture.</p>\n<p><img src=\"https://dev-media.amazoncloud.cn/28cb855eb3e340ac8ab0d79c915bb82a_image.png\" alt=\"image.png\" /></p>\n<p>Considering High Availability, this architecture is configured using two Availability Zones so that it can operate even in the event of one Availability Zone failure. Thus, Network Load Balancer and RDS routers were configured in each Availability Zone.</p>\n<h4><a id=\"Deploy_the_solution_18\"></a><strong>Deploy the solution</strong></h4>\n<p>You can implement the architecture using the following <a href=\"http://aws.amazon.com/cloudformation\" target=\"_blank\">Amazon Web Services CloudFormation stack</a>. To use this CloudFormation, you must have an Amazon Web Services account. To connect using SSH, you need to create <a href=\"https://docs.aws.amazon.com/AWSEC2/latest/UserGuide/ec2-key-pairs.html\" target=\"_blank\">EC2 key pairs</a> in advance so that you can connect to EC2 by using the EC2 key pairs. To deploy the CloudFormation stack, Complete the following steps:</p>\n<ol>\n<li>Download the CloudFormation <a href=\"https://aws-blogs-artifacts-public.s3.amazonaws.com/artifacts/DBBLOG-1990/nlb-rds-router-masquerade.yaml\" target=\"_blank\">stack file</a>.</li>\n<li>On the CloudFormation console, choose <strong>Create stack with new resources (standard).</strong></li>\n<li>Upload the stack file, and choose <strong>Next.</strong></li>\n<li>For <strong>Stack name</strong>, enter <code>rdsStack</code>.</li>\n<li>For <strong>SSHKeyName</strong>¸ enter your own key name.</li>\n<li>For <strong>MyPcIpAddress</strong>, enter your PC IP address by visiting <a href=\"https://whatismyipaddress.com/\" target=\"_blank\">whatismyipaddress.com</a>. Fill the IP address with format of <code>xxx.xxx.xxx.xxx/32</code>.</li>\n<li>For <strong>RdsMasterUserPassword</strong>, enter your password of RDS master user with at least 8 characters.</li>\n<li>For <strong>RdsMasterUsername</strong>, enter your master username of RDS (like <code>admin</code>).</li>\n<li>Choose <strong>Next</strong>.</li>\n<li>Choose <strong>Next</strong> again.</li>\n<li>Choose <strong>Create stack</strong>.</li>\n</ol>\n<p>Stack creation takes approximately 20 minutes to complete. This solution incurs costs because all of the resources described here aren’t under the <a href=\"https://aws.amazon.com/free/\" target=\"_blank\">Amazon Web Services Free Tier</a>. For more information about costs, see <a href=\"https://aws.amazon.com/pricing/\" target=\"_blank\">Amazon Web Services Pricing</a>.</p>\n<h4><a id=\"Connect_to_Amazon_RDS_using_a_Network_Load_Balancer_36\"></a><strong>Connect to Amazon RDS using a Network Load Balancer</strong></h4>\n<p>After you create the solution resources with the CloudFormation stack, you’re ready to connect to Amazon RDS using a static IP address.</p>\n<p>Check the bastion client Amazon EC2 IP address in the CloudFormation stack output, and <a href=\"https://docs.aws.amazon.com/AWSEC2/latest/UserGuide/AccessingInstancesLinux.html\" target=\"_blank\">connect to Amazon EC2</a> as follows (use your own bastion host IP address):</p>\n<pre><code class=\"lang-\">ssh -A ec2-user@<<your-bastion-ip-address>> ## BastionClientAz1\n</code></pre>\n<p>The CloudFormation stack configured an <a href=\"https://aws.amazon.com/rds/mysql/\" target=\"_blank\">Amazon RDS for MySQL</a> as an example database service. Also, it installed a MySQL client in the bastion client. Therefore, you can connect to Amazon RDS for MySQL using the Network Load Balancer URL from the CloudFormation stack output with the following command:</p>\n<pre><code class=\"lang-\">mysql -u '<<rds_username>>' -h '<<your_NLB_IP_or_DNS>>' -p<<rds_password>>\n</code></pre>\n<p>You can also connect to Amazon RDS for MySQL using the static IP address of the Network Load Balancer with the following command. You can find IP addresses of the Network Load Balancer by running the nslookup command:</p>\n<pre><code class=\"lang-\">nslookup <<your-NLB-URL>> \n</code></pre>\n<p>With IP addresses of the Network Load Balancer from above output, you can connect to Amazon RDS the following command:</p>\n<pre><code class=\"lang-\">mysql -u '<<rds_username>>' -h '<<your_NLB_IP_ADDRESS_OF_AZ1>>' -p<<rds_password>>\nmysql -u '<<rds_username>>' -h '<<your_NLB_IP_ADDRESS_OF_AZ2>>' -p<<rds_password>>\n</code></pre>\n<p>If you’re using <a href=\"https://aws.amazon.com/rds/postgresql/\" target=\"_blank\">Amazon RDS for PostgreSQL</a> with this approach and a proper PostgreSQL client installed in the client machine, then you can connect to Amazon RDS for PostgreSQL using the static IP address or DNS of the Network Load Balancer with the following command:</p>\n<pre><code class=\"lang-\">psql -U <<rds_username>> -d <<database_name>> -h <<your_NLB_IP_or_DNS>> -p <<database_port>>\n</code></pre>\n<p>With an <a href=\"https://aws.amazon.com/rds/oracle/\" target=\"_blank\">Amazon RDS for Oracle</a> environment, you can connect using the Network Load Balancer URL with the following command:</p>\n<pre><code class=\"lang-\">sqlplus <<rds_username>>/<<rds_password>>@//<<your_NLB_IP_or_DNS>>:<<database_port>>/<<database_name>>\n</code></pre>\n<p>For an <a href=\"https://aws.amazon.com/rds/sqlserver/\" target=\"_blank\">Amazon RDS for SQL Server</a> environment, you can connect using the static IP address of the Network Load Balancer with the following command:</p>\n<pre><code class=\"lang-\">mssql -s <<your_NLB_IP_or_DNS>> -u <<rds_username>> -p <<rds_password>> -e\n</code></pre>\n<p>If you’re using an Amazon <a href=\"https://aws.amazon.com/rds/aurora/mysql-features/\" target=\"_blank\">Aurora MySQL-Compatible Edition</a> environment with this approach, then you can connect using the static IP address of the Network Load Balancer with the following command:</p>\n<pre><code class=\"lang-\">\nmysql -u '<<rds_username>>' -h '<<your_NLB_IP_or_DNS>>' -p<<rds_password>>\n</code></pre>\n<p>For an Amazon <a href=\"https://aws.amazon.com/rds/aurora/postgresql-features/\" target=\"_blank\">Aurora PostgreSQL-Compatible Edition </a> environment with this approach, you can connect using the static IP address of the Network Load Balancer with the following command:</p>\n<pre><code class=\"lang-\">psql -U <<rds_username>> -d <<database_name>> -h <<your_NLB_IP_or_DNS>> -p <<database_port>>\n</code></pre>\n<h4><a id=\"Implement_an_RDS_router_97\"></a><strong>Implement an RDS router</strong></h4>\n<p>A key component of this architecture is RDS router instances, which forward the Network Load Balancer traffic to the Amazon RDS IP address. The CloudFormation already implemented the RDS router and required integration with Network Load Balancer. To implement this router by yourself, you configure the router on Amazon EC2. The RDS router on Amazon EC2 forwards traffic from the Network Load Balancer to the Amazon RDS IP through the <code>iptables</code> command.</p>\n<p>You can configure routing through the DNAT command of <a href=\"https://en.wikipedia.org/wiki/Iptables\" target=\"_blank\">iptables</a> so that the incoming traffic in the RDS router on Amazon EC2 is forwarded to the Amazon RDS IP address. To identify the Amazon RDS IP address, you can use the <code>nslookup</code> command toward the DNS of Amazon RDS. I used <code> RDS_CONNECTION_IP</code>environment variable for the Amazon RDS IP address in the upcoming command. For example, see the following code (using Amazon RDS for MySQL):</p>\n<pre><code class=\"lang-\">iptables -t nat -A PREROUTING -i eth0 -p tcp --dport 3306 -j DNAT --to $RDS_CONNECTION_IP:3306\n</code></pre>\n<p>You can connect to other databases, such as Oracle, PostgreSQL, SQL Server, and Aurora, as shown in the following code:</p>\n<pre><code class=\"lang-\"># For Oracle\niptables -t nat -A PREROUTING -i eth0 -p tcp --dport 1521 -j DNAT --to $RDS_CONNECTION_IP:1521\n# For PostgreSQL\niptables -t nat -A PREROUTING -i eth0 -p tcp --dport 5432 -j DNAT --to $RDS_CONNECTION_IP:5432\n# For MS SQL Server\niptables -t nat -A PREROUTING -i eth0 -p tcp --dport 1433 -j DNAT --to $RDS_CONNECTION_IP:1433\n# For Aurora MySQL\niptables -t nat -A PREROUTING -i eth0 -p tcp --dport 3306 -j DNAT --to $RDS_CONNECTION_IP:3306\n# For Aurora PostgreSQL\niptables -t nat -A PREROUTING -i eth0 -p tcp --dport 5432 -j DNAT --to $RDS_CONNECTION_IP:5432\n\n</code></pre>\n<h4><a id=\"Integrate_a_Network_Load_Balancer_with_an_RDS_router_124\"></a><strong>Integrate a Network Load Balancer with an RDS router</strong></h4>\n<p>Because the RDS router is configured on Amazon EC2, you can configure the router as the target instance of the Network Load Balancer. You can send traffic by specifying the RDS router in each Availability Zone as the target group for a Network Load Balancer.</p>\n<p>However, if you configure Network Load Balancer health checks in a standard way, then an issue may arise during a health check. In the case of a specific database management system, when traffic that only checks for port open status without performing a normal database connection, such as a Network Load Balancer health check, the client IP may be blocked. The following is an example client IP blocking message because of health check traffic when your Network Load Balancer tries to connect to Amazon RDS for MySQL:</p>\n<pre><code class=\"lang-\">ERROR 1129 (HY000): Host '10.0.1.14' is blocked because of many connection errors; unblock with 'mysqladmin flush-hosts'\n</code></pre>\n<p>To address this issue when performing a Network Load Balancer health check, you should implement a separate health check port which should be different from the Amazon RDS port. You can implement this function through the <a href=\"https://docs.aws.amazon.com/elasticloadbalancing/latest/network/create-target-group.html\" target=\"_blank\">health check port override feature of the Network Load Balancer</a>. In the CloudFormation stack provided earlier, this health check override port was configured using port 15000.</p>\n<p>One consideration of choosing Amazon EC2 is that every <a href=\"https://aws.amazon.com/ec2/instance-types/\" target=\"_blank\">Amazon EC2 instance type</a> has <a href=\"https://docs.aws.amazon.com/AWSEC2/latest/UserGuide/ec2-instance-network-bandwidth.html\" target=\"_blank\">its own network bandwidth limit</a>. Therefore, you must consider your required amount of network traffic when choosing an Amazon EC2 instance type.</p>\n<h4><a id=\"Update_iptables_138\"></a><strong>Update iptables</strong></h4>\n<p>The IP address of Amazon RDS may change due to various events in Amazon RDS. To see the current value of the IP address, you must look up the DNS of Amazon RDS. In the RDS router on Amazon EC2, the <code>iptables DNAT</code> command forwards the incoming Network Load Balancer traffic to the Amazon RDS IP address. If the IP address changes due to Amazon RDS events, then you must run DNS lookup to find the latest IP address and rerun the <code>iptables DNAT</code> command to forward incoming Network Load Balancer traffic to the new IP address.</p>\n<p>There are two possible ways to automate this procedure:</p>\n<ul>\n<li>The first method is to periodically run the <code>iptables DNAT</code> command through the Linux <code>crontab</code> command by looking up the DNS of Amazon RDS.</li>\n<li>The second method is to use <a href=\"http://aws.amazon.com/lambda\" target=\"_blank\">Amazon Web Services Lambda</a> to run an <code>iptables DNAT</code> command whenever an Amazon RDS event occurs.</li>\n</ul>\n<p>The CloudFormation stack provided earlier periodically updates <code>iptables</code> using the Linux <code>crontab</code><br />\ncommand. The shorter the <code>crontab</code> run cycle is, the shorter the <code>iptables</code> update cycle can be.</p>\n<h4><a id=\"Limitations_of_Network_Load_Balancer_timeout_150\"></a><strong>Limitations of Network Load Balancer timeout</strong></h4>\n<p>The Network Load Balancer provides the advantage of using a static IP. However, you have the limitation of idle timeout when using a Network Load Balancer. If no packets are sent for 350 seconds after making a connection through the Network Load Balancer, then the connection is disconnected. Therefore, if the valid database connection time is less than 350 seconds, it’s okay to use a Network Load Balancer. Also, when a client connects using Network Load Balancer, it is recommended to apply the keepalive timeout of the client to 350 seconds or less. By doing that, the client can quickly process the connection timeout before the Network Load Balancer timeout occurs. If a database job requires idle time more than 350 seconds because of long running queries, then consider another method where you directly connect to the IP address of the RDS router on Amazon EC2. When connecting with the RDS router on Amazon EC2, the database connection can be maintained for more than 350 seconds because it’s not restricted by the Network Load Balancer idle timeout. However, when connecting to the RDS router on Amazon EC2, there is a disadvantage: if the router fails, then the application with direct connection with the router might have a problem connecting to Amazon RDS. The following diagram illustrates these idle timeout options.</p>\n<p><img src=\"https://dev-media.amazoncloud.cn/08eeecfb304b4b808997c66a08418158_image.png\" alt=\"image.png\" /></p>\n<h4><a id=\"How_to_keep_track_of_client_IP_addresses_157\"></a><strong>How to keep track of client IP addresses</strong></h4>\n<p>When your client application connects to Amazon RDS using the architecture configured with the CloudFormation stack provided, Amazon RDS can only track the IP address of the RDS router on Amazon EC2 other than your client application. This is because when the traffic that has passed through the RDS router on Amazon EC2 connects to Amazon RDS, it connects using the IP address of the RDS router on Amazon EC2.</p>\n<p>To check which IP address is used to connect to Amazon RDS, you can test by accessing RDS from the client. The command below was tested with the client IP address configured as <code>10.1.1.92</code> and the IP address of the RDS router on Amazon EC2 configured as <code>10.1.1.41</code>. Run the following command:</p>\n<pre><code class=\"lang-\">[ec2-user@ip-10-1-1-92 ~]$ mysql -u '<<rds_username>>' -h '<<your_NLB_IP_or_DNS>>' -p<<rds_password>> -e"SELECT SUBSTRING_INDEX(USER(), '@', -1) AS ip;"\n+-----------+\n| ip |\n+-----------+\n| 10.1.1.41 |\n+-----------+\n[ec2-user@ip-10-1-1-92 ~]$\n</code></pre>\n<p>As you can see, the connected IP address is the IP address of the RDS router on Amazon EC2.</p>\n<p>If you want the RDS router on Amazon EC2 to deliver the original client IP as is, then you can remove the <code>masquerade</code> command from the <code>iptables</code> commands in the router. However, this may cause routing problems because return packets with the return traffic can’t find the original client again. If you’re required to track the original client IP address, then you can avoid the routing problem by configuring only one RDS router on Amazon EC2. Furthermore, you should set the route table of the RDS subnet to use <a href=\"https://aws.amazon.com/blogs/aws/inspect-subnet-to-subnet-traffic-with-amazon-vpc-more-specific-routing/\" target=\"_blank\">more specific routings</a>, which the return traffic from the RDS subnet should go through using an RDS router. Even if the client traffic originates from another Availability Zone, the return traffic must go through one RDS router on Amazon EC2. This is the only way to avoid this routing problem.</p>\n<p>This CloudFormation <a href=\"https://aws-blogs-artifacts-public.s3.amazonaws.com/artifacts/DBBLOG-1990/nlb-rds-router-no-masquerade.yaml\" target=\"_blank\">stack</a> collects the original client IP address of your applications. You can simulate how to collect the client IP address by downloading and implementing this CloudFormation stack. When you’re configuring the stack parameters, you can change the SSH key name to your own key name. Also, you should fill <code>MyPcIpAddress</code>, <code>RdsMasterUserPassword</code> and <code>RdsMasterUsername</code> as you did for the previous CloudFormation template. For the rest of the settings, use the default settings.</p>\n<p>The following diagram illustrates this workaround.</p>\n<p><img src=\"https://dev-media.amazoncloud.cn/6ab9a3c61bd0488db50c879043ee8bcb_image.png\" alt=\"image.png\" /></p>\n<p>After you deploy the CloudFormation stack, you can try to connect to Amazon RDS through the Network Load Balancer. To check the original client IP address from the Amazon RDS connection, use the following command:</p>\n<pre><code class=\"lang-\">[ec2-user@ip-10-1-1-204 ~]$ mysql -u '<<rds_username>>' -h '<<your_NLB_IP_or_DNS>>' -p<<rds_password>> -e"SELECT SUBSTRING_INDEX(USER(), '@', -1) AS ip;"\n+------------+\n| ip |\n+------------+\n| 10.1.1.204 |\n+------------+\n[ec2-user@ip-10-1-1-204 ~]$\n</code></pre>\n<p>Because this architecture uses only one RDS router on Amazon EC2, you can’t connect Amazon RDS in the case of router failure on Amazon EC2 in Availability Zone 1. If the RDS router in Availability Zone 1 fails, then you must use the router in Availability Zone 2. Also, in this case, you must update the route table of the RDS subnet to use the RDS router in Availability Zone 2. If necessary, you can use <a href=\"https://aws.amazon.com/lambda/\" target=\"_blank\">Amazon Web Services Lambda</a> to automate updating the route table of the RDS subnet. The following diagram explains what to change in the case of RDS router failure on Amazon EC2 in Availability Zone 1.</p>\n<p><img src=\"https://dev-media.amazoncloud.cn/4976b4a05e17409db477591abfa0ae96_image.png\" alt=\"image.png\" /></p>\n<p>I created a Lambda function that automatically updates the route tables of the RDS subnet in the preceding CloudFormation stack when the RDS router in Availability Zone 1 fails. You can simulate an automatic routing update of the Lambda function with the following steps:</p>\n<ol>\n<li>On the CloudFormation console, navigate to the Outputs tab for the stack.</li>\n<li>Locate the RdsRouterVmAz1 key and corresponding value.</li>\n<li>Connect to RdsRouterVmAz1 using the Amazon EC2 connection string from the preceding value:</li>\n</ol>\n<pre><code class=\"lang-\">ssh -A ec2-user@<<your-rdsRouter-ip-address>> ## RdsRouterVmAz1\n</code></pre>\n<ol start=\"4\">\n<li>Drop packets towards health check port using the following command:</li>\n</ol>\n<pre><code class=\"lang-\">sudo iptables -A INPUT -p tcp --dport 15000 -j DROP\n</code></pre>\n<ul>\n<li>\n<p>This triggers the Lambda function to update the route tables of the RDS subnet.</p>\n</li>\n<li>\n<p>Now you can connect to the bastion host and check if communication with Amazon RDS is possible.</p>\n</li>\n</ul>\n<ol start=\"5\">\n<li>\n<p>On the CloudFormation console, navigate to the <strong>Outputs</strong> tab for the stack.</p>\n</li>\n<li>\n<p>Find the <code>BastionClientAz1</code> key and corresponding value.</p>\n</li>\n<li>\n<p>Connect to <code>BastionClientAz1</code> using the Amazon EC2 connection string from the preceding value:</p>\n</li>\n</ol>\n<pre><code class=\"lang-\">ssh -A ec2-user@<<your-bastion-ip-address>> ## BastionClientAz1\n</code></pre>\n<ol start=\"8\">\n<li>Try to connect to Amazon RDS using the following command:</li>\n</ol>\n<pre><code class=\"lang-\"> mysql -u '<<rds_username>>' -h '<<your_NLB_IP_or_DNS>>' -p<<rds_password>> -e"SELECT SUBSTRING_INDEX(USER(), '@', -1) AS ip;"\n</code></pre>\n<p>As shown in the following output, the IP address of the bastion host is collected even when the RDS router in Availability Zone 1 fails:</p>\n<pre><code class=\"lang-\">[ec2-user@ip-10-1-1-204 ~]$ mysql -u '<<rds_username>>' -h '<<your_NLB_IP_or_DNS>>' -p<<rds_password>> -e"SELECT SUBSTRING_INDEX(USER(), '@', -1) AS ip;"\n+------------+\n| ip |\n+------------+\n| 10.1.1.204 |\n+------------+\n[ec2-user@ip-10-1-1-204 ~]$\n</code></pre>\n<p>This Lambda function is configured to run once per minute. Therefore, it may take 2–3 minutes for the route tables to be updated in the case of a failure of the RDS router in Availability Zone 1. You can check what happens in the function when the failure occurs through the Lambda function execution logs in <a href=\"http://aws.amazon.com/cloudwatch\" target=\"_blank\">Amazon CloudWatch Logs</a>.</p>\n<h4><a id=\"Clean_up_246\"></a><strong>Clean up</strong></h4>\n<p>As I mentioned earlier, you might incur costs because not all of the resources are under the Amazon Web Services Free Tier. To avoid ongoing charges, <a href=\"https://docs.aws.amazon.com/AWSCloudFormation/latest/UserGuide/cfn-console-delete-stack.html\" target=\"_blank\">delete the resources</a> you created as part of this post.</p>\n<h4><a id=\"Conclusion_250\"></a><strong>Conclusion</strong></h4>\n<p>In this post, I explained how to connect to Amazon RDS using a static IP provided by a Network Load Balancer. You might be concerned about the situation where you need the additional Amazon EC2 when implementing this architecture. When using Amazon RDS, you may use a large number of databases. Therefore, you can configure and use a Network Load Balancer plus RDS router architecture for multiple databases. By doing so, you can construct the architecture with minimal costs while also meeting the static IP requirements. The static IP feature of Amazon Network Load Balancer provides a solution to the non-changing IP requirements that occurs when connecting on-premises to Amazon Web Services Cloud.</p>\n<p>You can refer to <a href=\"https://docs.aws.amazon.com/elasticloadbalancing/latest/network/network-load-balancers.html\" target=\"_blank\">Network Load Balancers documentation</a> for additional details about the feature of static IP of Amazon Network Load Balancer.</p>\n<h4><a id=\"About_the_Author_256\"></a><strong>About the Author</strong></h4>\n<p><img src=\"https://dev-media.amazoncloud.cn/e05bcf75fa164e6d9ce467b5d2591f82_image.png\" alt=\"image.png\" /></p>\n<p><strong>Byeong-eok Kang</strong> is a Solutions Architect at Amazon Web Services. He specializes in databases and has a deep understanding of the finance industry. Outside of work, he likes riding his bike and playing with his cat.</p>\n"}
How to use Amazon RDS and Amazon Aurora with a static IP address
海外精选

海外精选的内容汇集了全球优质的亚马逊云科技相关技术内容。同时,内容中提到的“AWS”
是 “Amazon Web Services” 的缩写,在此网站不作为商标展示。

 0
0 0
0亚马逊云科技解决方案 基于行业客户应用场景及技术领域的解决方案
联系亚马逊云科技专家
亚马逊云科技解决方案
基于行业客户应用场景及技术领域的解决方案
联系专家

0
目录

 分享
分享 点赞
点赞 收藏
收藏 目录
目录立即注册,开启您的免费套餐
立即关注

亚马逊云开发者
公众号

User Group
公众号

亚马逊云科技
官方小程序
“AWS” 是 “Amazon Web Services” 的缩写,在此网站不作为商标展示。
立即关注
亚马逊云开发者
公众号
User Group
公众号
亚马逊云科技
官方小程序
“AWS” 是 “Amazon Web Services” 的缩写,在此网站不作为商标展示。
关于我们 
更多资源
开发者工具
更多支持
立即关注
亚马逊云开发者
公众号
User Group
公众号
亚马逊云科技
官方小程序
“AWS” 是 “Amazon Web Services” 的缩写,在此网站不作为商标展示。
