{"value":"Database administrators and developers traditionally schedule scripts to run against databases using the system cron on the host where the database is running or using database schedulers, resulting in a tight coupling with the batch scripts and the database. Many Oracle database applications use files stored in a shared file system volume that is mounted on both the application and Oracle database server to load data into the database. As a managed database service, [Amazon Relational Database Service](http://aws.amazon.com/rds) ([Amazon RDS](https://aws.amazon.com/cn/rds/?trk=cndc-detail)) doesn’t provide access to the underlying infrastructure, so if you migrate such workloads, you must re-architect these jobs and ingestion pipelines.\n\nTo avoid the tightly coupled batch scheduling with database architecture, you can use Amazon Web Services native solutions for batch scheduling as described in this post. This allows you to take advantage of fully managed [Amazon RDS](https://aws.amazon.com/cn/rds/?trk=cndc-detail) offerings like [Amazon RDS for Oracle](https://aws.amazon.com/rds/oracle/) to reduce database management overhead and operational risk. After you decouple the batch scheduling, to reduce the dependency on database file storage, you can use [Amazon S3 Integration with Amazon RDS](https://docs.aws.amazon.com/AmazonRDS/latest/UserGuide/oracle-s3-integration.html) as an alternative to shared file systems to easily, efficiently, and securely transfer data between [Amazon RDS](https://aws.amazon.com/cn/rds/?trk=cndc-detail) and [Amazon Simple Storage Service](http://aws.amazon.com/s3) ([Amazon S3](https://aws.amazon.com/cn/s3/?trk=cndc-detail)).\n\nIn this post, we present a solution that provides extensibility and portability across databases by parameterizing your batch requirements and scale without additional development efforts. You can use this solution to run various SQL scripts, shell or bash scripts, [Amazon Web Services Command Line Interface](http://aws.amazon.com/cli) (Amazon Web Services CLI) commands, or scripts built using programming languages such as Python, PySpark, Scala, or Java. This solution can help developers and scheduling teams decouple batch scheduling from your database and reuse it across different use cases. One additional benefit of this solution is the reusability of the script—you can have jobs that run across multiple databases, for example a tablespace utilization job.\n\n### **Solution overview**\n\nThe following diagram illustrates the solution architecture.\n\n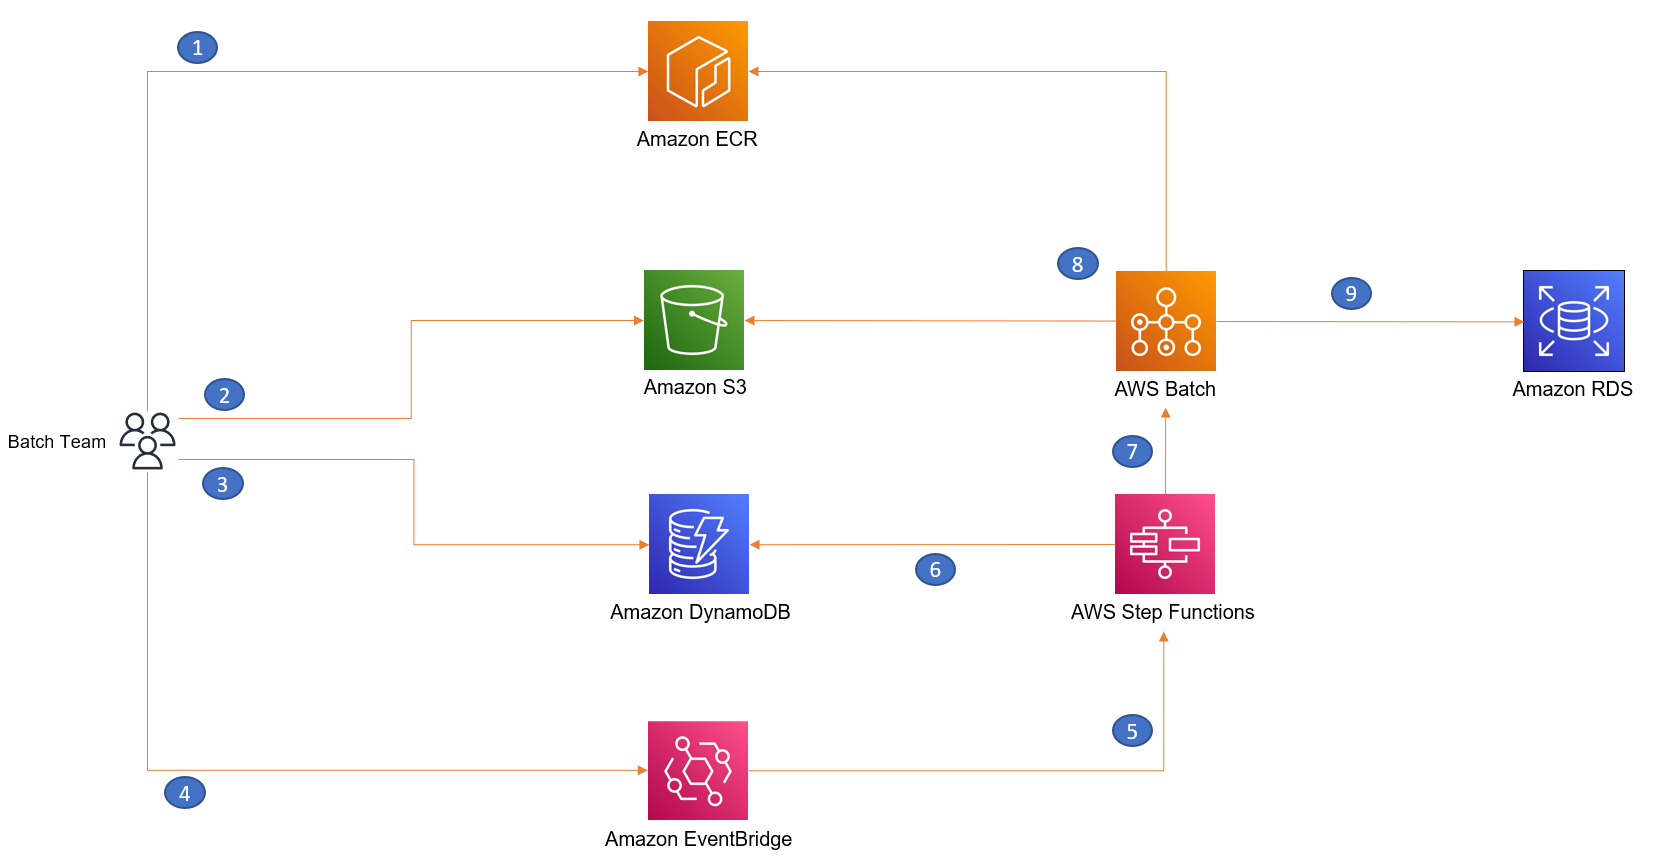\n\nYou can create reusable container images specific to your batch script and keep those images in [Amazon Elastic Container Registry](https://aws.amazon.com/ecr/) (Amazon ECR). Amazon ECR helps you store, share, and deploy your container software anywhere. You can upload SQL (or other kind of) batch scripts to an S3 bucket. To make the solution parameterized and reusable for different use cases, you can keep the input parameters and metadata (for example, the location of the batch script you uploaded to [Amazon S3](https://aws.amazon.com/cn/s3/?trk=cndc-detail)) in [Amazon DynamoDB](https://aws.amazon.com/dynamodb/). [Amazon EventBridge](https://aws.amazon.com/eventbridge/) invokes [Amazon Web Services Step Functions](https://aws.amazon.com/step-functions/), a low-code, visual workflow service that you can use to orchestrate [Amazon Web Services Batch](https://aws.amazon.com/batch/) jobs. Amazon Web Services Batch uses the container image stored in Amazon ECR. Step Functions fetches the metadata stored in a [DynamoDB](https://aws.amazon.com/dynamodb/) table to initiate an Amazon Web Services Batch job and run the batch script against the target RDS database instance.\n\nThe walkthrough consists of the following high-level steps:\n\n1. Store [Amazon RDS](https://aws.amazon.com/cn/rds/?trk=cndc-detail) credentials in [Amazon Web Services Secrets Manager](https://aws.amazon.com/secrets-manager/).\n2. Clone the [GitHub repository](https://github.com/aws-samples/awsnative-batchscript-orchestration) with the sample codes to your [Amazon Web Services Cloud9](https://aws.amazon.com/cloud9/) instance.\n3. Create an S3 bucket and upload the batch script.\n4. Create a Docker image to run the batch script against the database.\n5. Build, tag, and push the Docker image to Amazon ECR.\n6. Set up the Amazon Web Services Batch environment and Amazon Web Services Batch job definition.\n7. Orchestrate running the Amazon Web Services Batch job via Step Functions.\n8. Set up an EventBridge schedule to invoke the Step Functions state machine.\n9. \nThe steps in this post are intended to provide general guidance, rather than specific procedures. Alternatively, you can past the sections walking through these manual steps to the section **Deploy the solution using a** [CloudFormation template](https://github.com/aws-samples/awsnative-batchscript-orchestration/blob/main/Cloudformation/rds-batch-scheduler.yaml) to simplify the setup through Amazon Web Services CloudFormation.\n\n### **Overview of Amazon Web Services Batch**\n\nAmazon Web Services Batch enables developers, scientists, and engineers to run hundreds of thousands of batch computing jobs on Amazon Web Services. Amazon Web Services Batch dynamically provisions the optimal quantity and type of compute resources based on the CPU and memory requirements of your batch jobs.\n\nWith Amazon Web Services Batch, you don’t need to install and manage batch computing software or servers that you use to run your jobs, allowing you to focus on analyzing results and solving problems. For more information, watch the video How [Amazon Web Services Batch Works](https://www.youtube.com/watch?v=T4aAWrGHmxQ).\n\n### **Prerequisites**\n\nBefore you get started, complete the following prerequisites:\n\n- Have your [Amazon Virtual Private Cloud ](http://aws.amazon.com/vpc)([Amazon VPC](https://aws.amazon.com/cn/vpc/?trk=cndc-detail)) ready. Refer to the [Amazon Web Services CloudFormation VPC template](https://docs.aws.amazon.com/codebuild/latest/userguide/cloudformation-vpc-template.html) to quickly build one.\n- Have your RDS instance created in the VPC above and have your database credentials handy.\n- Have your [Amazon Web Services Cloud9](https://aws.amazon.com/cloud9/) instance ready in the VPC above. You can select a VPC using the **Network settings (advanced)** while creating the Amazon Web Services Cloud9 instance.\n\n### **Costs**\n\nAmazon Web Services services used in this post may result some usage charges. Refer to [Amazon Web Services Pricing](https://aws.amazon.com/pricing/) page to review the cost of those services used in this post.\n\n### **Store [Amazon RDS](https://aws.amazon.com/cn/rds/?trk=cndc-detail) credentials in Secrets Manager**\n\nTo store your [Amazon RDS](https://aws.amazon.com/cn/rds/?trk=cndc-detail) credentials, complete the following steps:\n\n1. On the [Amazon RDS](https://aws.amazon.com/cn/rds/?trk=cndc-detail) console, choose **Databases** in the navigation pane.\n2. Choose your database and on the **Connectivity & security** tab, capture the database endpoint URL and port.\n3. On the **Secrets** Manager console, choose Secrets in the navigation pane.\n4. Store a new secret as **Other type of secret** to store all the database login details as key-value pairs. Use the secret name as ```rds-secret```.\n\nIf you use a different name, update the sample batch script with the correct name.\n\n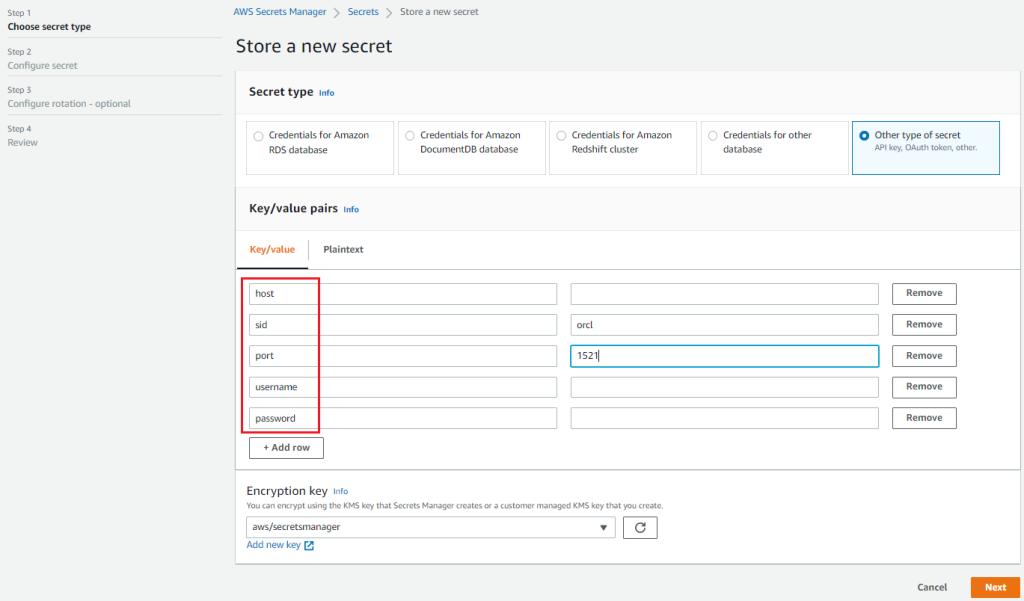\n\nInstead of storing the database credentials as the secret type **Other type of secret**, you have the option to choose **Credentials for [Amazon RDS](https://aws.amazon.com/cn/rds/?trk=cndc-detail) database** or **Credentials for other database**. You can update the file ```rds_batch_sql1.sh```that is referred to in the section **Create an S3 bucket and upload the batch script** based on your selection and refer to the [SecretManager CLI commands](https://docs.aws.amazon.com/cli/latest/reference/secretsmanager/). By using the secret type **Other type of secret**, we’re trying to keep the solution to be more generic. For example, you can use it for databases installed on an [Amazon Elastic Compute Cloud](http://aws.amazon.com/ec2) (Amazon EC2) instance or have a different port number or SID than the default ones.\n\n### **Clone the GitHub repository to Amazon Web ServicesCloud9**\n\nIn this step, you clone the GitHub repository with the sample scripts that you can use.\n\n1. Set up your Amazon Web Services Cloud9 instance within the same VPC as your RDS instance.\n2. Run the git clone command from the Amazon Web Services Cloud9 terminal:\n\n```\\ngit clone https://github.com/aws-samples/awsnative-batchscript-orchestration.git\\n```\n### **Create an S3 bucket and upload the batch script**\n\nIn this step, you create an S3 bucket and upload our sample batch SQL script.\n\n1. On the [Amazon S3](https://aws.amazon.com/cn/s3/?trk=cndc-detail) console, choose **Create bucket**.\n2. Name the bucket; for example, ```rdsbatch-123-useast1```.\n3. Select your Region; for example, US East (N. Virginia) ```us-east-1```.\n4. Choose **Create bucket**.\nYou can change the default settings.\n5. Go to your Amazon Web Services Cloud9 instance.\n6. Change the directory to the Step1 folder of the GitHub repo you cloned:\n\n```\\ncd /home/ec2-user/environment/awsnative-batchscript-orchestration/Step1\\n```\n7. Review the sample script script ```rds_batch_sql1.sh```that you can run against the [Amazon RDS](https://aws.amazon.com/cn/rds/?trk=cndc-detail) database.\nIf you change the order of secret key-value pairs while storing the [Amazon RDS](https://aws.amazon.com/cn/rds/?trk=cndc-detail) credentials in Secrets Manager, adjust the print variable numbers in the shell script accordingly to get the right string. In the example code, the first string to be extracted is the host name, and the last is the password. If you change the name of the secret key to something other than ```rds-secret```, update the new name in the script. Also check the **Region** used in the ```aws secretsmanager get-secret-value```command. Update it according to your Region.\n\n```\\naws secretsmanager get-secret-value --secret-id <rds-secret value name> --query SecretString --output text --region <region>\\n```\nIf you get any errors, check the Troubleshooting section.\n\n8. To upload your Amazon Web Services Batch files to your [Amazon S3](https://aws.amazon.com/cn/s3/?trk=cndc-detail) bucket, run the following command from your Amazon Web Services Cloud9 instance:\n\n```\\naws s3 cp rds_batch_sql1.sh s3://<name of your bucket>/\\n```\nIf you’re using a Windows machine to drag and drop the file to [Amazon S3](https://aws.amazon.com/cn/s3/?trk=cndc-detail) using the browser, it may result in some issues running the Windows shell files on a Unix/Linux Docker image. Therefore, you should upload the script from a Unix/Linux instance (Amazon Web Services Cloud9 in this case), using the Amazon Web Services CLI ```s3 cp```option.\n\n9. Copy the [Amazon S3](https://aws.amazon.com/cn/s3/?trk=cndc-detail) URI of the uploaded script (for example, ```s3://rdsbatch-123-useast1/rds_batch_sql1.sh```) for future use.\n\n### **Create a Docker image to run the batch script against the database**\n\nIn this step, you create a Docker image that you can use as a runtime environment to run the SQL script.\n\nTo create a [Docker](https://en.wikipedia.org/wiki/Docker_(software)) image that downloads and runs the SQL script against the database, complete the following steps:\n\n1. Go to your Amazon Web Services Cloud9 instance.\n2. Change the directory to the Step2 folder of the GitHub repo you cloned:\n\n```\\ncd /home/ec2-user/environment/awsnative-batchscript-orchestration/Step2\\n```\n3. Edit the Dockerfile to use the right S3 bucket and object name, using the [Amazon S3](https://aws.amazon.com/cn/s3/?trk=cndc-detail) URI copied in the previous section (for example, ```s3://rdsbatch-123-useast1/rds_batch_sql1.sh```). This [Docker image](https://docs.oracle.com/en/operating-systems/oracle-linux/docker/) performs the following actions:\n\n- Installs the [Oracle SQL*Plus client](https://www.oracle.com/database/technologies/instant-client/linux-x86-64-downloads.html)\n- Installs [Python](https://en.wikipedia.org/wiki/Python_(programming_language)) and [pip](https://en.wikipedia.org/wiki/Pip_(package_manager))\n- Installs the Amazon Web Services CLI and which\n- Copies ```fetch_and_run_s3script.sh```to the Docker image directory ```/usr/local/bin/```\n- Invokes```/usr/local/bin/fetch_and_run_s3script.sh```when Docker starts\n\nThe script ```fetch_and_run_s3script.sh```is a shell script that uses the Amazon Web Services CLI to copy the Amazon Web Services Batch file to the container and run it.\nYou use oraclelinux:8-slim [Oracle Linux Docker build](https://hub.docker.com/_/oraclelinux) that is publicly available. If you prefer, you can download your preferred image from the Oracle site by logging in using Oracle your account.\n\n4. Build the Docker image:\n\n```\\ndocker build -t myrdsbatch .\\n```\nFor more information about Docker, see [What is Docker](https://aws.amazon.com/docker/)? For instructions on Creating a container image for use on [Amazon ECS](https://aws.amazon.com/cn/ecs/?trk=cndc-detail), see [Creating a container image for use on Amazon ECS\\n](https://docs.aws.amazon.com/AmazonECS/latest/developerguide/create-container-image.html)\n5. Run the Docker image:\n\n```\\ndocker run myrdsbatch\\n```\nFor a successful run, you should see the date printed as part of the output. If you get any errors, check the **Troubleshooting** section.\n\n6. Change the Docker image and comment out or remove the line that contains ```ENV BATCH_FILE_S3_URL```.\n\n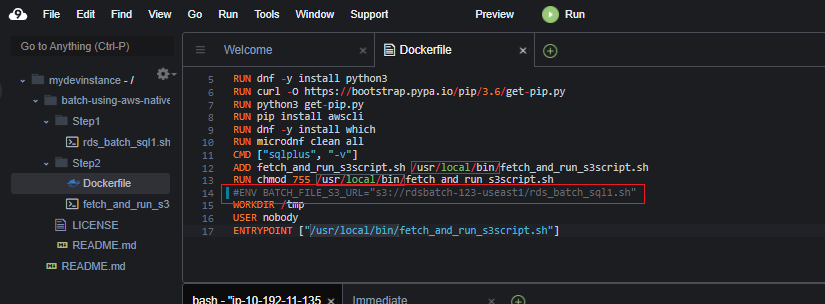\n\n7. Update the Docker image:\n\n```\\ndocker build -t myrdsbatch .\\n```\nNow you have the final version of the Docker image tested and ready to be uploaded to Amazon ECR, because Amazon Web Services Batch requires the Docker image to be available in Amazon ECR.\n\n### **Build, tag, and push the Docker image to Amazon ECR**\n\nTo build, tag and push Docker image to Amazon ECR, follow these steps:\n\n1. On the Amazon ECR console, create an Amazon ECR private repository (for this post, we call it ```myrdsbatch```).\n2. Select the repository and choose **View push commands** to run those from the Amazon Web Services Cloud9 instance.\n\n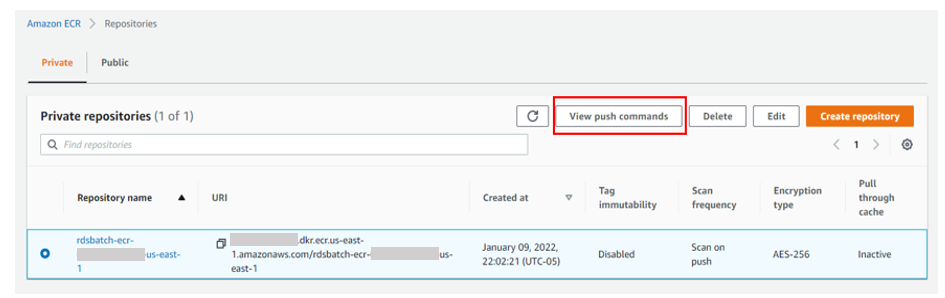\n\n3. Retrieve an authentication token and authenticate your Docker client to your registry and run it.\nIf you receive an error using the Amazon Web Services CLI, make sure that you have the latest version of the Amazon Web Services CLI and Docker installed.\n4. Build your Docker image.\n5. Tag your image.\n6. Push the image to your Amazon ECR repository.\nThe following screenshot shows that the image is pushed to Amazon ECR successfully.\n\n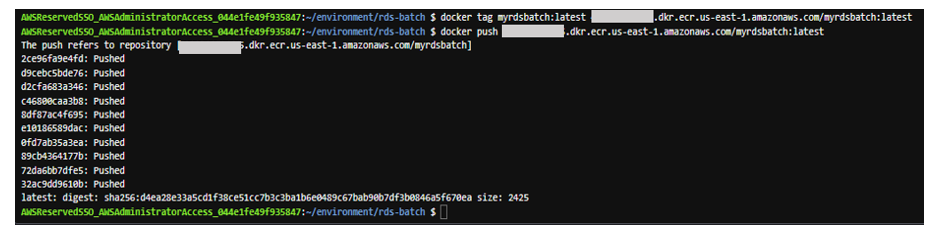\n\n7. Open the Amazon ECR image and capture the URI (for example, ```xxxxxx.dkr.ecr.us-east-1.amazonaws.com/myrdsbatch:latest```).\n\n### **Set up the Amazon Web Services Batch environment and Amazon Web Services Batch job definition**\n\nIn this step, you set up an Amazon Web Services Batch environment that you can use to run the database and SQL scripts. For more information, see [Getting Started with Amazon Web Services Batch](https://docs.aws.amazon.com/batch/latest/userguide/Batch_GetStarted.html).\n\n1. On the Amazon Web Services Batch console, choose **Compute environment** and then choose **Create**.\n2. Select **Compute environment type** as **Managed**.\n3. Enter a name for the environment, for example ```test-batch```.\n4. Select the following instance configuration options:\n- On-Demand (you have options to use [Amazon Web Services Fargate](https://aws.amazon.com/fargate) and Spot)\n- Minimum vCPUs: 4\n- Maximum vCPUs: 48\n- DesiredvCpus: 12\n5. Under **Networking**, select the VPC settings to use your VPC and subnets, and Security group.\n6. Create the compute environment.\n7. In the navigation pane, choose **Job queues** and then choose **Create**.\n8. Enter a name for the job queue, for example ```rds-batch-1```.\n9. Select the compute environment you just created (```test-batch```).\n10. Create the job queue.\n11. In the navigation pane, choose **Job definitions** and then choose **Create**.\n12. Set **Job Type** as **Single-Node**.\n13. Enter a name for the job definition, for example ```rds-batch-job-def-1```.\n14. Set the **Platform type** as **EC2**.\n15. Choose an execution role.\n\nRefer to the **Troubleshooting** section regarding role permissions to learn more about the permissions needed for the role.\n\n16. For the job configuration image, enter the Amazon ECR image URI you copied earlier (```xxx.dkr.ecr.us-east-1.amazonaws.com/myrdsbatch:latest```).\n17. Empty the **Command** field.\n18. Enable **Job role configuration** and select your execution role.\n19. Create the job definition.\n20. On the Amazon Web Services Batch console, choose **Jobs** and then **Submit job**.\n21. Enter a name for the job, for example ```myrds-test-job1```.\n22. For **Job definition**, choose the job definition you created (```rds-batch-job-def-1:<version#>```).\n23. For **Job queue**, choose the job queue you created (rds-batch-1).\n24. Enable **Environment variables configuration**.\n25. Add the ```BATCH_FILE_S3_URL```parameter with the S3 URI as a key-value pair.\n\n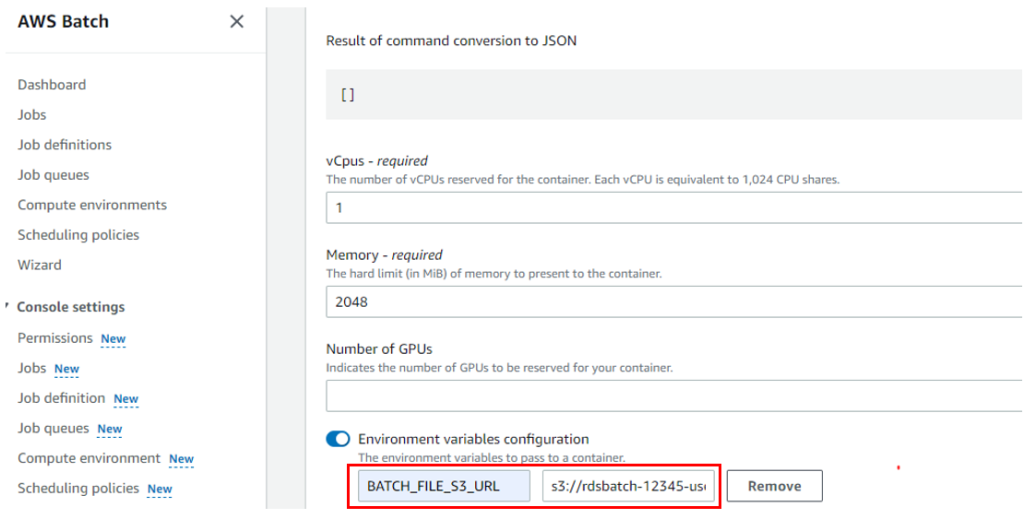\n\n26. Choose **Submit job**.\n27. Under **Jobs**, choose the job ID link to see the job Status. You can view the CloudWatch logs to make sure the job completed successfully.\n\nRefer to the Troubleshooting section regarding how to monitor Amazon Web Services Batch jobs, and fix failures or errors.\n\n### **Orchestrate the Amazon Web Services Batch job run via Step Functions**\n\nIn this step, you orchestrate your Amazon Web Services Batch job using Step Functions. Step Functions is a serverless function orchestrator that makes it easy to sequence [Amazon Web Services Lambda](http://aws.amazon.com/lambda) functions and multiple Amazon Web Services services into business-critical applications.\n\nIn this example, you use three inputs to invoke an Amazon Web Services Batch job: the S3 URI of your batch (SQL) script, the Amazon Web Services Batch job definition, and Amazon Web Services Batch queue ARN. You can save those values in a DynamoDB table for different scripts, and you have the option to add additional parameters such as CPU or memory if you want. The Step Functions state machine can connect to DynamoDB and use those parameters to invoke Amazon Web Services Batch jobs.\n\n1. On the [Amazon DynamoDB](https://aws.amazon.com/cn/dynamodb/?trk=cndc-detail) console, in the navigation pane on the left side of the console, choose Dashboard. On the right side of the console, choose Create Table.\n2. Enter the table details as follows:\n- For the table name, enter ```rds-batch```.\n- For the partition key, enter ```JobName```.\n- Leave Default settings selected.\n3. Click on **Create table** to create the table.\n4. On the [Amazon DynamoDB](https://aws.amazon.com/cn/dynamodb/?trk=cndc-detail) console, in the navigation pane on the left side of the console, choose **Tables**. In the table list, choose the ```rds-batch```table.\n\nYou can refer [Create a table](https://docs.aws.amazon.com/amazondynamodb/latest/developerguide/getting-started-step-1.html) to know how to create a DynamoDB table.\n\n5. Select **Explore table items**.\n6. In the Items view, choose **Create item**.\n7. For Attribute ```JobName```enter value as Test123.\n8. Choose **Add new attribute**, and then choose **String**. Name the field JobDefinition and paste the JobDefinition value of the Amazon Web Services Batch job created in the previous section.\n9. Repeat this process to create JobQueue and ScriptLocation fields of type String and enter the values for those fields.\n- JobName – The test job name, for example ```Test123```\n- JobDefinition – The Amazon Web Services Batch job definition ARN\n- JobQueue – The Amazon Web Services Batch job queue ARN\n- ScriptLocation – The ```S3 URI```of the sample batch script\n\nYou can refer [Write data to a table using the console or Amazon Web Services CLI](https://docs.aws.amazon.com/amazondynamodb/latest/developerguide/getting-started-step-2.html) to know how to write data to a DynamoDB table.\n\n10. Create two more items in your DynamoDB table with deferent job names, for example ```Test124```and ```Test125```, but keep the rest of the values the same.\n\n\n\nIf you select one item from the table, you have an option to duplicate the item by changing the job name. After you create all three entries, the table items look like the following screenshot.\n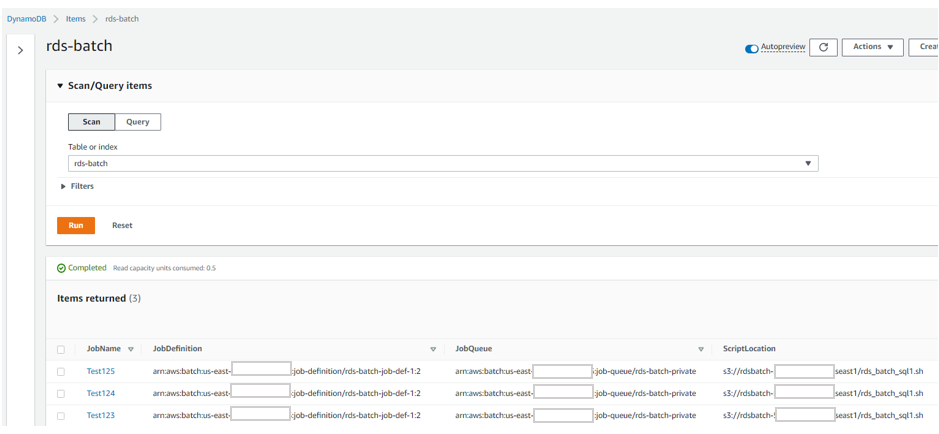\n\nNext, you create a Step Functions state machine to orchestrate running the Amazon Web Services Batch job. You can use the sample state machine code [state-machine-sample2.json](https://github.com/aws-samples/awsnative-batchscript-orchestration/blob/main/Step3/state-machine-sample2.json), which extracts the Amazon Web Services Batch job container parameters from the ```rds-batch```DynamoDB table and runs three Amazon Web Services Batch jobs (```Test123, Test124, and Test125```).\n\nIn case of any failures, the state machine can notify an [Amazon Simple Notification Service](https://aws.amazon.com/cn/sns/?trk=cndc-detail) ([Amazon SNS](https://aws.amazon.com/cn/sns/?trk=cndc-detail)) topic. So let’s create an SNS topic.\n\n11. On the [Amazon SNS](https://aws.amazon.com/cn/sns/?trk=cndc-detail) console, choose **Topics** and then choose **Create topic**.\n12. Set **Standard** as **Type**.\n13. Name the topic ```Batch-Notify```and create the topic.\n14. Go to Amazon Web Services Cloud9 instance and change the directory to the ```Step3```folder of the GitHub repo you cloned.\n15. Copy the contents of ```state-machine-sample2.json```or download it using the option you get when you right-click on the file explorer in Amazon Web Services Cloud9.\n16. On the Step Functions console, choose **State Machines** and then choose **Create state machine**.\n17. Select **Design your Workflow visually** and choose **Next**.\n18. Choose **Import** to import the state machine definition file.\n19. Select the state named ```SNS Publish```.\n20. On the right side, you have options under **API Parameters** to re-select the newly created SNS topic ARN from the drop down.\n21. Check the **API Parameters** values for **Batch: Submit Job** states where you get the Amazon Web Services Batch job input from DynamoDB.\n22. Go through the prompts to save the state machine.\n\n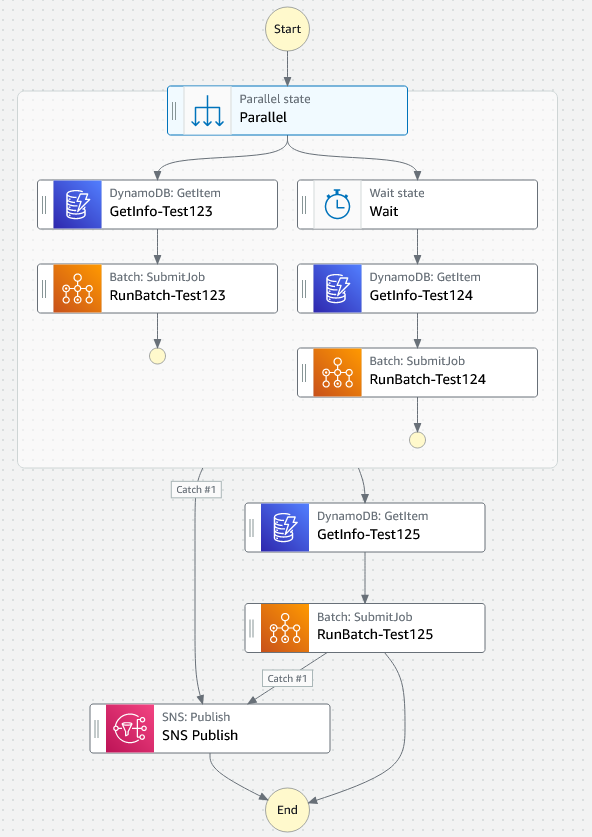\n\nRefer to [Getting started with Amazon Web Services Step Functions](https://docs.aws.amazon.com/step-functions/latest/dg/getting-started.html) and [Manage Amazon Web Services Batch with Step Functions](https://docs.aws.amazon.com/step-functions/latest/dg/connect-batch.html) for more details.\n\n23. Test the state machine by choosing **Start execution** to run it manually.\n\n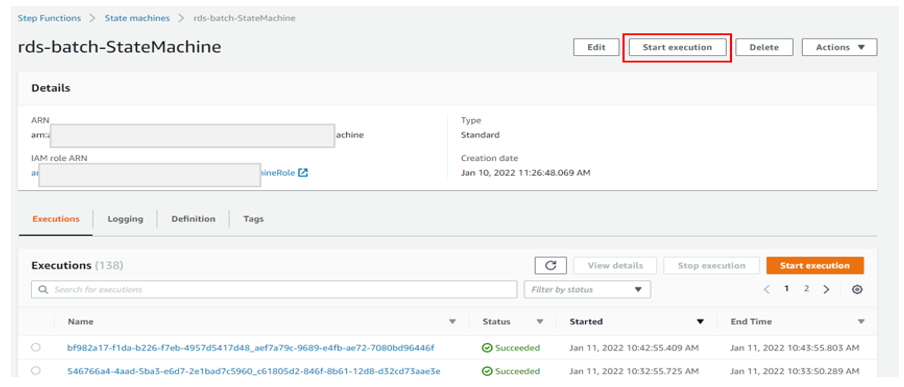\n\nYou can check the run details and monitor the Amazon Web Services Batch logs via [Amazon CloudWatch](http://aws.amazon.com/cloudwatch).\n\nIf you get any errors, refer to the **Troubleshooting** section regarding errors to see how to fix those issues.\n\n### **Set up an EventBridge schedule to invoke the Step Functions state machine**\n\nTo set up an EventBridge schedule to run your state machine, complete the following steps:\n\n1. On the [Amazon EventBridge](https://aws.amazon.com/cn/eventbridge/?trk=cndc-detail) console, choose **Rules**.\n2. Choose **Create a new rule**.\n3. Enter a name (for example, ```rds-batch-Daily10AM```) and a description.\n4. For the pattern, choose **Schedule**, and choose either a fixed rate or cron schedule.\nTo know more about EventBridge scheduling, check [Creating an Amazon EventBridge rule that runs on a schedule](https://docs.aws.amazon.com/eventbridge/latest/userguide/eb-create-rule-schedule.html).\n5. Under **Target**, choose **Step Functions state machine** and choose the state machine you created.\n6. You can create a new role or use an existing role. Go through the prompts and create the EventBridge rule.\n7. Wait for the event to run and monitor the run details of the state machine and Amazon Web Services Batch job.\n\n### **Deploy the solution using a CloudFormation template**\n\nYou can use the CloudFormation template provided in this post to simplify the setup.\n\n1. Run the ```git clone```command from your Amazon Web Services Cloud9 instance to clone the GitHub repository:\n```\\ngit clone https://github.com/aws-samples/awsnative-batchscript-orchestration.git\\n```\n2.Change the working directory to the CloudFormation folder of the GitHub repo you cloned: \n\n```\\ncd /home/ec2-user/environment/awsnative-batchscript-orchestration/Cloudformation\\n```\n3. Run the CloudFormation script using the following Amazon Web Services CLI command by passing your parameter values:\n\n```\\nAmazon Web Services cloudformation create-stack --stack-name rds-batch-cloudformation --template-body file://rds-batch-scheduler.yaml --parameters ParameterKey=RDSUsername,ParameterValue=<RDS User Name> ParameterKey=RDSPassword,ParameterValue=<RDS Password> ParameterKey=RDSHostName,ParameterValue=<RDS Host Name> ParameterKey=RDSSecretName,ParameterValue=<rds-secret key name that you want to create> ParameterKey=VPC,ParameterValue=<VPC ID for creating Batch Instances> \\n\\tParameterKey=Subnet,ParameterValue=<Subnet ID for creating Batch Instances> ParameterKey=RDSSecurityGroup,ParameterValue=<Existing RDS database Security group ID> --capabilities CAPABILITY_NAMED_IAM\\n```\n\nThis template creates the following resources:\n\n- A Secrets Manager key\n- An S3 bucket\n- A DynamoDB table\n- An Amazon ECR repository\n- Amazon Web Services Batch resources: the compute environment, queue, and job definition\n- An SNS topic to notify of Amazon Web Services Batch job failures\n- A Step Functions state machine\n- A CloudWatch Events rule\n- A Amazon Web Services KMS key\n- Roles and permissions associated to these resources\n\nReview the sample script ```rds_batch_sql1.sh```kept under the same directory. This will be the batch script that you run against the [Amazon RDS](https://aws.amazon.com/cn/rds/?trk=cndc-detail) database.\n\n4. To upload your Amazon Web Services Batch files to your S3 bucket, run the following command from your Amazon Web Services Cloud9 instance and copy the [Amazon S3](https://aws.amazon.com/cn/s3/?trk=cndc-detail) URI of the uploaded script (for example, ```s3://rdsbatch-123-useast1/rds_batch_sql1.sh```) for future use:\n\n```\\naws s3 cp rds_batch_sql1.sh s3://<name of your bucket>/\\n```\n5. Get the ```push```commands from Amazon ECR created by the CloudFormation script and run the push commands from your Amazon Web Services Cloud9 instance working directory (```cd Cloudformation```) to upload the Docker image to Amazon ECR.\nThe script ```fetch_and_run_s3script.sh```is a shell script that uses the Amazon Web Services CLI to copy the Amazon Web Services Batch file to the container and run the file.\n\n\n\nThe next step is to update DynamoDB with the Amazon Web Services Batch parameters.\n6. Open the JSON file named ```dynamodb_items.json```under the same working directory and replace the job definition, job queue, and batch script file location in the JSON file. You can find the job definition and job queue from Resources tab of your CloudFormation Stack executed.\n\nYou can create different SQL scripts, upload them to [Amazon S3](https://aws.amazon.com/cn/s3/?trk=cndc-detail), and change the script location S3 URI for jobs in the DynamoDB table.\n\n7. Use Amazon Web Services Cloud9 to create items in DynamoDB using the following script and verify the items in the DynamoDB table:\n\n```\\naws dynamodb batch-write-item --request-items file://dynamodb_items.json\\n```\n8. On the **EventBridge** console, choose **Rules**.\n9. Edit the rule ```rds-batch-every10minutes```and enable it.\n\nYou can monitor the scheduled run via the Step Functions state machine, Amazon Web Services Batch monitoring, or the CloudWatch logs for the Amazon Web Services Batch jobs. If you encounter failures such as ```Unable to locate credentials```or ```TNS:Connect timeout occurred```, check the **Troubleshooting** section regarding script errors.\n\n### **Clean up**\n\nTo clean up your resources, complete the following steps:\n\n1. Empty the S3 bucket using the Amazon Web Services Cloud9 instance:\n```\\naws s3 rm s3://<s3 bucket name> --recursive\\n```\n2. Empty the Amazon ECR repository using the Amazon Web Services Cloud9 instance:\n```\\naws ecr batch-delete-image --repository-name <ECR Repository Name> --image-ids imageTag=latest\\n```\n\n3. On the CloudFormation console, delete the stacks that you created using the template ```rds-batch-scheduler.yaml```.\n\n### **Troubleshooting**\n\nIn this section, we offer tips regarding SQL script errors, checking the Amazon Web Services Batch job status, and Amazon Web Services Batch role permissions.\n\n#### **Failures**\n\nIf you get the error ```Unable to locate credentials```, it means that your instance doesn’t have access to Secrets Manager. In that case, go to your Amazon Web Services Cloud9 EC2 instance or Amazon Web Services Batch compute instance, and on the **Actions** menu, choose **Modify IAM** role to update the [Amazon Web Services Identity and Access Management](http://aws.amazon.com/iam) (IAM) role to one with access to Secrets Manager to use the secret.\n\n\n\nIf you get the error ```TNS:Connect timeout occurred```, it means the instance can’t reach the RDS instance. In that case, change the security group of [Amazon RDS](https://aws.amazon.com/cn/rds/?trk=cndc-detail) to have traffic from the your instance security group flow through ```port 1521```.\n\n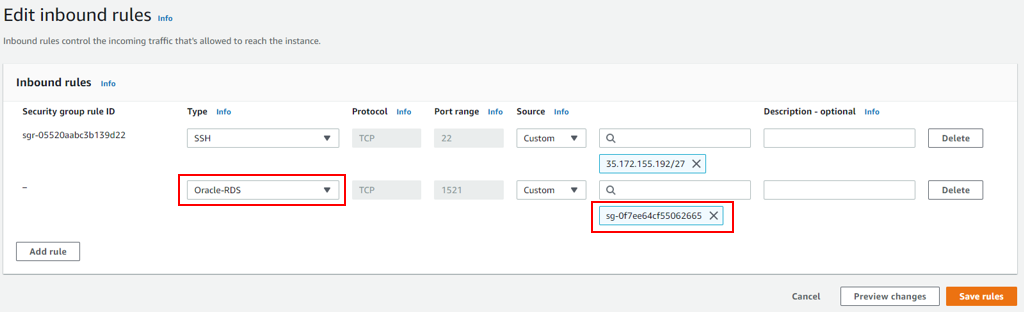\n\nIf you get the error \n```An error occurred (403) when calling the HeadObject operation: Forbidden - Failed to download S3 script,```\n it means that the docker runtime can’t access the S3 object uploaded. In that case, add list and read permission on S3 bucket and object to your role, check [Bucket Policy Examples](https://docs.aws.amazon.com/AmazonS3/latest/userguide/example-bucket-policies.html).\n\nIf you get the error \n```An error occurred (AccessDeniedException) when calling the GetSecretValue operation: User: arn:aws:sts::xxxx:assumed-role/yyyy/i-abcd1234 is not authorized to perform: secretsmanager:GetSecretValue on resource: rds-secret because no identity-based policy allows the secretsmanager:GetSecretValue action, ```\nit means that the docker runtime can’t access the Secret Manager secret created. In that case, add read permission on Secret Manager secret to your role, check [IAM policy examples for secrets in Amazon Web Services Secrets Manager](https://docs.aws.amazon.com/mediaconnect/latest/ug/iam-policy-examples-asm-secrets.html).\n\n#### **Amazon Web Services Batch job status**\n\nThe following screenshot shows the successful completion of the job.\n\n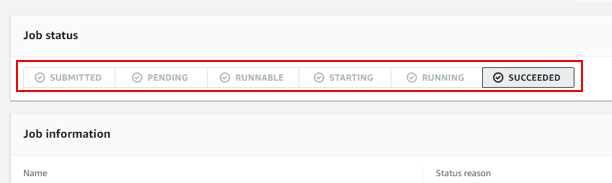\n\nYou can validate the jobs using the CloudWatch logs that Amazon Web Services Batch produced. The following screenshot shows the job details on the Amazon Web Services Batch console. The details contain the CloudWatch logs for the job, the SQL script run against the database, and the date.\n\n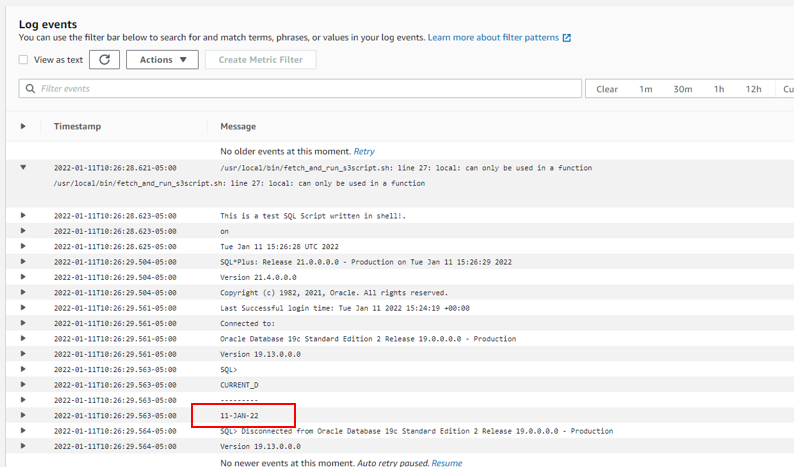\n\n#### **Amazon Web Services Batch execution role permissions**\n\nYour Amazon Web Services Batch execution role needs the following settings and permissions:\n\n- **Trusted entities** – ```ecs-tasks.amazonaws.com```\n- **Policies** – ```AmazonEC2ContainerServiceRole, AWSBatchServiceRole, CloudWatchEventsFullAccess, AmazonEC2ContainerRegistryReadOnly```\n\nTo grant access to the S3 bucket and object, check how to set up [S3 bucket policy](https://docs.aws.amazon.com/AmazonS3/latest/userguide/example-bucket-policies.html). To grant access to the Secret Manager secret, check [IAM policy examples for secrets in Amazon Web Services Secrets Manager](https://docs.aws.amazon.com/mediaconnect/latest/ug/iam-policy-examples-asm-secrets.html). Also, you can create an [inline policy](https://docs.aws.amazon.com/IAM/latest/UserGuide/access_policies_managed-vs-inline.html#inline-policies) for your role using the sample JSON policy given below:\n\n```\\n{\\n \\"Version\\": \\"2012-10-17\\",\\n \\"Statement\\": [\\n {\\n \\"Sid\\": \\"secretmanageraccess\\",\\n \\"Effect\\": \\"Allow\\",\\n \\"Action\\": [\\n \\"secretsmanager:Get*\\",\\n \\"secretsmanager:List*\\"\\n ],\\n \\"Resource\\": \\"arn:aws:secretsmanager:<region>:<account id>:secret:<secret id>\\n },\\n {\\n \\"Sid\\": \\"s3access\\",\\n \\"Effect\\": \\"Allow\\",\\n \\"Action\\": [\\n \\"s3:Get*\\",\\n \\"s3:List*\\"\\n ],\\n \\"Resource\\": [\\"arn:aws:s3:::<s3 bucket name>\\",\\n\\t\\t\\t\\"arn:aws:s3:::<s3 bucket name>/*\\"]\\n } \\n ]\\n}\\n```\n\nIf you made any changes to the settings and notice if the Batch Job is stuck is ```RUNNABLE```state, see [Why is my Amazon Web Services Batch job stuck in RUNNABLE status?](https://aws.amazon.com/premiumsupport/knowledge-center/batch-job-stuck-runnable-status/)\n\n#### **Additional references**\n\n- The post [Using Amazon Web Services CloudFormation to Create and Manage Amazon Web Services Batch Resources](https://aws.amazon.com/blogs/compute/using-aws-cloudformation-to-create-and-manage-aws-batch-resources/) highlights the [native resources](http://docs.aws.amazon.com/AWSCloudFormation/latest/UserGuide/aws-template-resource-type-ref.html) supported in Amazon Web Services CloudFormation and demonstrates how to create Amazon Web Services Batch compute environments using Amazon Web Services CloudFormation.\n- The post [Scheduling and running Amazon RDS jobs with Amazon Web Services Batch and Amazon CloudWatch rules](https://aws.amazon.com/blogs/database/scheduling-and-running-amazon-rds-jobs-with-aws-batch-and-amazon-cloudwatch-rules/) demonstrates how to use Amazon Web Services Batch and CloudWatch rules to dynamically provision resources and schedule and run functions or stored procedures on a PostgreSQL database.\n- The post [Creating a Simple “Fetch & Run” Amazon Web Services Batch Job](https://aws.amazon.com/blogs/compute/creating-a-simple-fetch-and-run-aws-batch-job/) walks you through the steps to create and run a simple fetch and run job in Amazon Web Services Batch.\n\n### **Conclusion**\n\nIn this post, we demonstrated how you can use EventBridge, Step Functions, and Amazon Web Services Batch to schedule and orchestrate your batch scripts.\n\nYou can use this solution to run database and SQL scripts, bash scripts, Python scripts, and Amazon Web Services service-specific tasks using the Amazon Web Services CLI. You can also extend the solution to run scripts built using programming languages such as PySpark, Scala, or Java. Additionally, you can enable alerting using CloudWatch Logs and [Amazon SNS](https://aws.amazon.com/cn/sns/?trk=cndc-detail), and enable monitoring using CloudWatch Logs, [Amazon S3](https://aws.amazon.com/cn/s3/?trk=cndc-detail), [Amazon Athena](http://aws.amazon.com/athena), and [Amazon QuickSight](https://aws.amazon.com/quicksight).\n\nIf you have questions or suggestions, leave a comment.\n\n#### **About the Authors**\n\nhttps://d2908q01vomqb2.cloudfront.net/887309d048beef83ad3eabf2a79a64a389ab1c9f/2022/07/15/dilinjo-1.jpg\n\n**Dilin Joy** is a Partner Solutions Architect at Amazon Web Services. He works with a leading Global System Integrator (GSI) to provide architectural guidance and support them in building strategic industry solutions on Amazon Web Services.\n\n\n\n\n**Roshin Babu** is a Data Analytics Specialist Solutions Architect with Amazon Web Services. He works with the Sales Specialists team supporting Amazon Web Services Public Sector customers.","render":"<p>Database administrators and developers traditionally schedule scripts to run against databases using the system cron on the host where the database is running or using database schedulers, resulting in a tight coupling with the batch scripts and the database. Many Oracle database applications use files stored in a shared file system volume that is mounted on both the application and Oracle database server to load data into the database. As a managed database service, <a href=\\"http://aws.amazon.com/rds\\" target=\\"_blank\\">Amazon Relational Database Service</a> ([Amazon RDS](https://aws.amazon.com/cn/rds/?trk=cndc-detail)) doesn’t provide access to the underlying infrastructure, so if you migrate such workloads, you must re-architect these jobs and ingestion pipelines.</p>\\n<p>To avoid the tightly coupled batch scheduling with database architecture, you can use Amazon Web Services native solutions for batch scheduling as described in this post. This allows you to take advantage of fully managed Amazon RDS offerings like <a href=\\"https://aws.amazon.com/rds/oracle/\\" target=\\"_blank\\">Amazon RDS for Oracle</a> to reduce database management overhead and operational risk. After you decouple the batch scheduling, to reduce the dependency on database file storage, you can use <a href=\\"https://docs.aws.amazon.com/AmazonRDS/latest/UserGuide/oracle-s3-integration.html\\" target=\\"_blank\\">Amazon S3 Integration with Amazon RDS</a> as an alternative to shared file systems to easily, efficiently, and securely transfer data between [Amazon RDS](https://aws.amazon.com/cn/rds/?trk=cndc-detail) and <a href=\\"http://aws.amazon.com/s3\\" target=\\"_blank\\">Amazon Simple Storage Service</a> ([Amazon S3](https://aws.amazon.com/cn/s3/?trk=cndc-detail)).</p>\\n<p>In this post, we present a solution that provides extensibility and portability across databases by parameterizing your batch requirements and scale without additional development efforts. You can use this solution to run various SQL scripts, shell or bash scripts, <a href=\\"http://aws.amazon.com/cli\\" target=\\"_blank\\">Amazon Web Services Command Line Interface</a> (Amazon Web Services CLI) commands, or scripts built using programming languages such as Python, PySpark, Scala, or Java. This solution can help developers and scheduling teams decouple batch scheduling from your database and reuse it across different use cases. One additional benefit of this solution is the reusability of the script—you can have jobs that run across multiple databases, for example a tablespace utilization job.</p>\\n<h3><a id=\\"Solution_overview_6\\"></a><strong>Solution overview</strong></h3>\\n<p>The following diagram illustrates the solution architecture.</p>\n<p><img src=\\"https://dev-media.amazoncloud.cn/66d63ba87e1c4319abd9e59beccaaad3_image.png\\" alt=\\"image.png\\" /></p>\n<p>You can create reusable container images specific to your batch script and keep those images in <a href=\\"https://aws.amazon.com/ecr/\\" target=\\"_blank\\">Amazon Elastic Container Registry</a> (Amazon ECR). Amazon ECR helps you store, share, and deploy your container software anywhere. You can upload SQL (or other kind of) batch scripts to an S3 bucket. To make the solution parameterized and reusable for different use cases, you can keep the input parameters and metadata (for example, the location of the batch script you uploaded to [Amazon S3](https://aws.amazon.com/cn/s3/?trk=cndc-detail)) in <a href=\\"https://aws.amazon.com/dynamodb/\\" target=\\"_blank\\">Amazon DynamoDB</a>. <a href=\\"https://aws.amazon.com/eventbridge/\\" target=\\"_blank\\">Amazon EventBridge</a> invokes <a href=\\"https://aws.amazon.com/step-functions/\\" target=\\"_blank\\">Amazon Web Services Step Functions</a>, a low-code, visual workflow service that you can use to orchestrate <a href=\\"https://aws.amazon.com/batch/\\" target=\\"_blank\\">Amazon Web Services Batch</a> jobs. Amazon Web Services Batch uses the container image stored in Amazon ECR. Step Functions fetches the metadata stored in a <a href=\\"https://aws.amazon.com/dynamodb/\\" target=\\"_blank\\">DynamoDB</a> table to initiate an Amazon Web Services Batch job and run the batch script against the target RDS database instance.</p>\\n<p>The walkthrough consists of the following high-level steps:</p>\n<ol>\\n<li>Store Amazon RDS credentials in <a href=\\"https://aws.amazon.com/secrets-manager/\\" target=\\"_blank\\">Amazon Web Services Secrets Manager</a>.</li>\\n<li>Clone the <a href=\\"https://github.com/aws-samples/awsnative-batchscript-orchestration\\" target=\\"_blank\\">GitHub repository</a> with the sample codes to your <a href=\\"https://aws.amazon.com/cloud9/\\" target=\\"_blank\\">Amazon Web Services Cloud9</a> instance.</li>\\n<li>Create an S3 bucket and upload the batch script.</li>\n<li>Create a Docker image to run the batch script against the database.</li>\n<li>Build, tag, and push the Docker image to Amazon ECR.</li>\n<li>Set up the Amazon Web Services Batch environment and Amazon Web Services Batch job definition.</li>\n<li>Orchestrate running the Amazon Web Services Batch job via Step Functions.</li>\n<li>Set up an EventBridge schedule to invoke the Step Functions state machine.</li>\n<li></li>\n</ol>\\n<p>The steps in this post are intended to provide general guidance, rather than specific procedures. Alternatively, you can past the sections walking through these manual steps to the section <strong>Deploy the solution using a</strong> <a href=\\"https://github.com/aws-samples/awsnative-batchscript-orchestration/blob/main/Cloudformation/rds-batch-scheduler.yaml\\" target=\\"_blank\\">CloudFormation template</a> to simplify the setup through Amazon Web Services CloudFormation.</p>\\n<h3><a id=\\"Overview_of_Amazon_Web_Services_Batch_27\\"></a><strong>Overview of Amazon Web Services Batch</strong></h3>\\n<p>Amazon Web Services Batch enables developers, scientists, and engineers to run hundreds of thousands of batch computing jobs on Amazon Web Services. Amazon Web Services Batch dynamically provisions the optimal quantity and type of compute resources based on the CPU and memory requirements of your batch jobs.</p>\n<p>With Amazon Web Services Batch, you don’t need to install and manage batch computing software or servers that you use to run your jobs, allowing you to focus on analyzing results and solving problems. For more information, watch the video How <a href=\\"https://www.youtube.com/watch?v=T4aAWrGHmxQ\\" target=\\"_blank\\">Amazon Web Services Batch Works</a>.</p>\\n<h3><a id=\\"Prerequisites_33\\"></a><strong>Prerequisites</strong></h3>\\n<p>Before you get started, complete the following prerequisites:</p>\n<ul>\\n<li>Have your <a href=\\"http://aws.amazon.com/vpc\\" target=\\"_blank\\">Amazon Virtual Private Cloud </a>([Amazon VPC](https://aws.amazon.com/cn/vpc/?trk=cndc-detail)) ready. Refer to the <a href=\\"https://docs.aws.amazon.com/codebuild/latest/userguide/cloudformation-vpc-template.html\\" target=\\"_blank\\">Amazon Web Services CloudFormation VPC template</a> to quickly build one.</li>\\n<li>Have your RDS instance created in the VPC above and have your database credentials handy.</li>\n<li>Have your <a href=\\"https://aws.amazon.com/cloud9/\\" target=\\"_blank\\">Amazon Web Services Cloud9</a> instance ready in the VPC above. You can select a VPC using the <strong>Network settings (advanced)</strong> while creating the Amazon Web Services Cloud9 instance.</li>\\n</ul>\n<h3><a id=\\"Costs_41\\"></a><strong>Costs</strong></h3>\\n<p>Amazon Web Services services used in this post may result some usage charges. Refer to <a href=\\"https://aws.amazon.com/pricing/\\" target=\\"_blank\\">Amazon Web Services Pricing</a> page to review the cost of those services used in this post.</p>\\n<h3><a id=\\"Store_Amazon_RDS_credentials_in_Secrets_Manager_45\\"></a><strong>Store Amazon RDS credentials in Secrets Manager</strong></h3>\\n<p>To store your Amazon RDS credentials, complete the following steps:</p>\n<ol>\\n<li>On the Amazon RDS console, choose <strong>Databases</strong> in the navigation pane.</li>\\n<li>Choose your database and on the <strong>Connectivity & security</strong> tab, capture the database endpoint URL and port.</li>\\n<li>On the <strong>Secrets</strong> Manager console, choose Secrets in the navigation pane.</li>\\n<li>Store a new secret as <strong>Other type of secret</strong> to store all the database login details as key-value pairs. Use the secret name as <code>rds-secret</code>.</li>\\n</ol>\n<p>If you use a different name, update the sample batch script with the correct name.</p>\n<p><img src=\\"https://dev-media.amazoncloud.cn/be8d36255f3d4197a0cad189da05ebd8_image.png\\" alt=\\"image.png\\" /></p>\n<p>Instead of storing the database credentials as the secret type <strong>Other type of secret</strong>, you have the option to choose <strong>Credentials for Amazon RDS database</strong> or <strong>Credentials for other database</strong>. You can update the file <code>rds_batch_sql1.sh</code>that is referred to in the section <strong>Create an S3 bucket and upload the batch script</strong> based on your selection and refer to the <a href=\\"https://docs.aws.amazon.com/cli/latest/reference/secretsmanager/\\" target=\\"_blank\\">SecretManager CLI commands</a>. By using the secret type <strong>Other type of secret</strong>, we’re trying to keep the solution to be more generic. For example, you can use it for databases installed on an <a href=\\"http://aws.amazon.com/ec2\\" target=\\"_blank\\">Amazon Elastic Compute Cloud</a> (Amazon EC2) instance or have a different port number or SID than the default ones.</p>\\n<h3><a id=\\"Clone_the_GitHub_repository_to_Amazon_Web_ServicesCloud9_60\\"></a><strong>Clone the GitHub repository to Amazon Web ServicesCloud9</strong></h3>\\n<p>In this step, you clone the GitHub repository with the sample scripts that you can use.</p>\n<ol>\\n<li>Set up your Amazon Web Services Cloud9 instance within the same VPC as your RDS instance.</li>\n<li>Run the git clone command from the Amazon Web Services Cloud9 terminal:</li>\n</ol>\\n<pre><code class=\\"lang-\\">git clone https://github.com/aws-samples/awsnative-batchscript-orchestration.git\\n</code></pre>\\n<h3><a id=\\"Create_an_S3_bucket_and_upload_the_batch_script_70\\"></a><strong>Create an S3 bucket and upload the batch script</strong></h3>\\n<p>In this step, you create an S3 bucket and upload our sample batch SQL script.</p>\n<ol>\\n<li>On the Amazon S3 console, choose <strong>Create bucket</strong>.</li>\\n<li>Name the bucket; for example, <code>rdsbatch-123-useast1</code>.</li>\\n<li>Select your Region; for example, US East (N. Virginia) <code>us-east-1</code>.</li>\\n<li>Choose <strong>Create bucket</strong>.<br />\\nYou can change the default settings.</li>\n<li>Go to your Amazon Web Services Cloud9 instance.</li>\n<li>Change the directory to the Step1 folder of the GitHub repo you cloned:</li>\n</ol>\\n<pre><code class=\\"lang-\\">cd /home/ec2-user/environment/awsnative-batchscript-orchestration/Step1\\n</code></pre>\\n<ol start=\\"7\\">\\n<li>Review the sample script script <code>rds_batch_sql1.sh</code>that you can run against the [Amazon RDS](https://aws.amazon.com/cn/rds/?trk=cndc-detail) database.<br />\\nIf you change the order of secret key-value pairs while storing the Amazon RDS credentials in Secrets Manager, adjust the print variable numbers in the shell script accordingly to get the right string. In the example code, the first string to be extracted is the host name, and the last is the password. If you change the name of the secret key to something other than <code>rds-secret</code>, update the new name in the script. Also check the <strong>Region</strong> used in the <code>aws secretsmanager get-secret-value</code>command. Update it according to your Region.</li>\\n</ol>\n<pre><code class=\\"lang-\\">aws secretsmanager get-secret-value --secret-id <rds-secret value name> --query SecretString --output text --region <region>\\n</code></pre>\\n<p>If you get any errors, check the Troubleshooting section.</p>\n<ol start=\\"8\\">\\n<li>To upload your Amazon Web Services Batch files to your Amazon S3 bucket, run the following command from your Amazon Web Services Cloud9 instance:</li>\n</ol>\\n<pre><code class=\\"lang-\\">aws s3 cp rds_batch_sql1.sh s3://<name of your bucket>/\\n</code></pre>\\n<p>If you’re using a Windows machine to drag and drop the file to Amazon S3 using the browser, it may result in some issues running the Windows shell files on a Unix/Linux Docker image. Therefore, you should upload the script from a Unix/Linux instance (Amazon Web Services Cloud9 in this case), using the Amazon Web Services CLI <code>s3 cp</code>option.</p>\\n<ol start=\\"9\\">\\n<li>Copy the Amazon S3 URI of the uploaded script (for example, <code>s3://rdsbatch-123-useast1/rds_batch_sql1.sh</code>) for future use.</li>\\n</ol>\n<h3><a id=\\"Create_a_Docker_image_to_run_the_batch_script_against_the_database_102\\"></a><strong>Create a Docker image to run the batch script against the database</strong></h3>\\n<p>In this step, you create a Docker image that you can use as a runtime environment to run the SQL script.</p>\n<p>To create a <a href=\\"https://en.wikipedia.org/wiki/Docker_(software)\\" target=\\"_blank\\">Docker</a> image that downloads and runs the SQL script against the database, complete the following steps:</p>\\n<ol>\\n<li>Go to your Amazon Web Services Cloud9 instance.</li>\n<li>Change the directory to the Step2 folder of the GitHub repo you cloned:</li>\n</ol>\\n<pre><code class=\\"lang-\\">cd /home/ec2-user/environment/awsnative-batchscript-orchestration/Step2\\n</code></pre>\\n<ol start=\\"3\\">\\n<li>Edit the Dockerfile to use the right S3 bucket and object name, using the Amazon S3 URI copied in the previous section (for example, <code>s3://rdsbatch-123-useast1/rds_batch_sql1.sh</code>). This <a href=\\"https://docs.oracle.com/en/operating-systems/oracle-linux/docker/\\" target=\\"_blank\\">Docker image</a> performs the following actions:</li>\\n</ol>\n<ul>\\n<li>Installs the <a href=\\"https://www.oracle.com/database/technologies/instant-client/linux-x86-64-downloads.html\\" target=\\"_blank\\">Oracle SQL*Plus client</a></li>\\n<li>Installs <a href=\\"https://en.wikipedia.org/wiki/Python_(programming_language)\\" target=\\"_blank\\">Python</a> and <a href=\\"https://en.wikipedia.org/wiki/Pip_(package_manager)\\" target=\\"_blank\\">pip</a></li>\\n<li>Installs the Amazon Web Services CLI and which</li>\n<li>Copies <code>fetch_and_run_s3script.sh</code>to the Docker image directory <code>/usr/local/bin/</code></li>\\n<li>Invokes<code>/usr/local/bin/fetch_and_run_s3script.sh</code>when Docker starts</li>\\n</ul>\n<p>The script <code>fetch_and_run_s3script.sh</code>is a shell script that uses the Amazon Web Services CLI to copy the Amazon Web Services Batch file to the container and run it.<br />\\nYou use oraclelinux:8-slim <a href=\\"https://hub.docker.com/_/oraclelinux\\" target=\\"_blank\\">Oracle Linux Docker build</a> that is publicly available. If you prefer, you can download your preferred image from the Oracle site by logging in using Oracle your account.</p>\\n<ol start=\\"4\\">\\n<li>Build the Docker image:</li>\n</ol>\\n<pre><code class=\\"lang-\\">docker build -t myrdsbatch .\\n</code></pre>\\n<p>For more information about Docker, see <a href=\\"https://aws.amazon.com/docker/\\" target=\\"_blank\\">What is Docker</a>? For instructions on Creating a container image for use on [Amazon ECS](https://aws.amazon.com/cn/ecs/?trk=cndc-detail), see <a href=\\"https://docs.aws.amazon.com/AmazonECS/latest/developerguide/create-container-image.html\\" target=\\"_blank\\">Creating a container image for use on Amazon ECS<br />\\n</a><br />\\n5. Run the Docker image:</p>\n<pre><code class=\\"lang-\\">docker run myrdsbatch\\n</code></pre>\\n<p>For a successful run, you should see the date printed as part of the output. If you get any errors, check the <strong>Troubleshooting</strong> section.</p>\\n<ol start=\\"6\\">\\n<li>Change the Docker image and comment out or remove the line that contains <code>ENV BATCH_FILE_S3_URL</code>.</li>\\n</ol>\n<p><img src=\\"https://dev-media.amazoncloud.cn/9ee4cc03cbfd4cbaa507c10a5fc2fcd7_image.png\\" alt=\\"image.png\\" /></p>\n<ol start=\\"7\\">\\n<li>Update the Docker image:</li>\n</ol>\\n<pre><code class=\\"lang-\\">docker build -t myrdsbatch .\\n</code></pre>\\n<p>Now you have the final version of the Docker image tested and ready to be uploaded to Amazon ECR, because Amazon Web Services Batch requires the Docker image to be available in Amazon ECR.</p>\n<h3><a id=\\"Build_tag_and_push_the_Docker_image_to_Amazon_ECR_150\\"></a><strong>Build, tag, and push the Docker image to Amazon ECR</strong></h3>\\n<p>To build, tag and push Docker image to Amazon ECR, follow these steps:</p>\n<ol>\\n<li>On the Amazon ECR console, create an Amazon ECR private repository (for this post, we call it <code>myrdsbatch</code>).</li>\\n<li>Select the repository and choose <strong>View push commands</strong> to run those from the Amazon Web Services Cloud9 instance.</li>\\n</ol>\n<p><img src=\\"https://dev-media.amazoncloud.cn/7795111743ee47a4b174b3c2864029f3_image.png\\" alt=\\"image.png\\" /></p>\n<ol start=\\"3\\">\\n<li>Retrieve an authentication token and authenticate your Docker client to your registry and run it.<br />\\nIf you receive an error using the Amazon Web Services CLI, make sure that you have the latest version of the Amazon Web Services CLI and Docker installed.</li>\n<li>Build your Docker image.</li>\n<li>Tag your image.</li>\n<li>Push the image to your Amazon ECR repository.<br />\\nThe following screenshot shows that the image is pushed to Amazon ECR successfully.</li>\n</ol>\\n<p><img src=\\"https://dev-media.amazoncloud.cn/48751d25aecc4582aef03a3a9e5c2605_image.png\\" alt=\\"image.png\\" /></p>\n<ol start=\\"7\\">\\n<li>Open the Amazon ECR image and capture the URI (for example, <code>xxxxxx.dkr.ecr.us-east-1.amazonaws.com/myrdsbatch:latest</code>).</li>\\n</ol>\n<h3><a id=\\"Set_up_the_Amazon_Web_Services_Batch_environment_and_Amazon_Web_Services_Batch_job_definition_170\\"></a><strong>Set up the Amazon Web Services Batch environment and Amazon Web Services Batch job definition</strong></h3>\\n<p>In this step, you set up an Amazon Web Services Batch environment that you can use to run the database and SQL scripts. For more information, see <a href=\\"https://docs.aws.amazon.com/batch/latest/userguide/Batch_GetStarted.html\\" target=\\"_blank\\">Getting Started with Amazon Web Services Batch</a>.</p>\\n<ol>\\n<li>On the Amazon Web Services Batch console, choose <strong>Compute environment</strong> and then choose <strong>Create</strong>.</li>\\n<li>Select <strong>Compute environment type</strong> as <strong>Managed</strong>.</li>\\n<li>Enter a name for the environment, for example <code>test-batch</code>.</li>\\n<li>Select the following instance configuration options:</li>\n</ol>\\n<ul>\\n<li>On-Demand (you have options to use <a href=\\"https://aws.amazon.com/fargate\\" target=\\"_blank\\">Amazon Web Services Fargate</a> and Spot)</li>\\n<li>Minimum vCPUs: 4</li>\n<li>Maximum vCPUs: 48</li>\n<li>DesiredvCpus: 12</li>\n</ul>\\n<ol start=\\"5\\">\\n<li>Under <strong>Networking</strong>, select the VPC settings to use your VPC and subnets, and Security group.</li>\\n<li>Create the compute environment.</li>\n<li>In the navigation pane, choose <strong>Job queues</strong> and then choose <strong>Create</strong>.</li>\\n<li>Enter a name for the job queue, for example <code>rds-batch-1</code>.</li>\\n<li>Select the compute environment you just created (<code>test-batch</code>).</li>\\n<li>Create the job queue.</li>\n<li>In the navigation pane, choose <strong>Job definitions</strong> and then choose <strong>Create</strong>.</li>\\n<li>Set <strong>Job Type</strong> as <strong>Single-Node</strong>.</li>\\n<li>Enter a name for the job definition, for example <code>rds-batch-job-def-1</code>.</li>\\n<li>Set the <strong>Platform type</strong> as <strong>EC2</strong>.</li>\\n<li>Choose an execution role.</li>\n</ol>\\n<p>Refer to the <strong>Troubleshooting</strong> section regarding role permissions to learn more about the permissions needed for the role.</p>\\n<ol start=\\"16\\">\\n<li>For the job configuration image, enter the Amazon ECR image URI you copied earlier (<code>xxx.dkr.ecr.us-east-1.amazonaws.com/myrdsbatch:latest</code>).</li>\\n<li>Empty the <strong>Command</strong> field.</li>\\n<li>Enable <strong>Job role configuration</strong> and select your execution role.</li>\\n<li>Create the job definition.</li>\n<li>On the Amazon Web Services Batch console, choose <strong>Jobs</strong> and then <strong>Submit job</strong>.</li>\\n<li>Enter a name for the job, for example <code>myrds-test-job1</code>.</li>\\n<li>For <strong>Job definition</strong>, choose the job definition you created (<code>rds-batch-job-def-1:<version#></code>).</li>\\n<li>For <strong>Job queue</strong>, choose the job queue you created (rds-batch-1).</li>\\n<li>Enable <strong>Environment variables configuration</strong>.</li>\\n<li>Add the <code>BATCH_FILE_S3_URL</code>parameter with the S3 URI as a key-value pair.</li>\\n</ol>\n<p><img src=\\"https://dev-media.amazoncloud.cn/ef22656d5a1f4afeb9cfc8ce846c953c_image.png\\" alt=\\"image.png\\" /></p>\n<ol start=\\"26\\">\\n<li>Choose <strong>Submit job</strong>.</li>\\n<li>Under <strong>Jobs</strong>, choose the job ID link to see the job Status. You can view the CloudWatch logs to make sure the job completed successfully.</li>\\n</ol>\n<p>Refer to the Troubleshooting section regarding how to monitor Amazon Web Services Batch jobs, and fix failures or errors.</p>\n<h3><a id=\\"Orchestrate_the_Amazon_Web_Services_Batch_job_run_via_Step_Functions_214\\"></a><strong>Orchestrate the Amazon Web Services Batch job run via Step Functions</strong></h3>\\n<p>In this step, you orchestrate your Amazon Web Services Batch job using Step Functions. Step Functions is a serverless function orchestrator that makes it easy to sequence <a href=\\"http://aws.amazon.com/lambda\\" target=\\"_blank\\">Amazon Web Services Lambda</a> functions and multiple Amazon Web Services services into business-critical applications.</p>\\n<p>In this example, you use three inputs to invoke an Amazon Web Services Batch job: the S3 URI of your batch (SQL) script, the Amazon Web Services Batch job definition, and Amazon Web Services Batch queue ARN. You can save those values in a DynamoDB table for different scripts, and you have the option to add additional parameters such as CPU or memory if you want. The Step Functions state machine can connect to DynamoDB and use those parameters to invoke Amazon Web Services Batch jobs.</p>\n<ol>\\n<li>On the Amazon DynamoDB console, in the navigation pane on the left side of the console, choose Dashboard. On the right side of the console, choose Create Table.</li>\n<li>Enter the table details as follows:</li>\n</ol>\\n<ul>\\n<li>For the table name, enter <code>rds-batch</code>.</li>\\n<li>For the partition key, enter <code>JobName</code>.</li>\\n<li>Leave Default settings selected.</li>\n</ul>\\n<ol start=\\"3\\">\\n<li>Click on <strong>Create table</strong> to create the table.</li>\\n<li>On the Amazon DynamoDB console, in the navigation pane on the left side of the console, choose <strong>Tables</strong>. In the table list, choose the <code>rds-batch</code>table.</li>\\n</ol>\n<p>You can refer <a href=\\"https://docs.aws.amazon.com/amazondynamodb/latest/developerguide/getting-started-step-1.html\\" target=\\"_blank\\">Create a table</a> to know how to create a DynamoDB table.</p>\\n<ol start=\\"5\\">\\n<li>Select <strong>Explore table items</strong>.</li>\\n<li>In the Items view, choose <strong>Create item</strong>.</li>\\n<li>For Attribute <code>JobName</code>enter value as Test123.</li>\\n<li>Choose <strong>Add new attribute</strong>, and then choose <strong>String</strong>. Name the field JobDefinition and paste the JobDefinition value of the Amazon Web Services Batch job created in the previous section.</li>\\n<li>Repeat this process to create JobQueue and ScriptLocation fields of type String and enter the values for those fields.</li>\n</ol>\\n<ul>\\n<li>JobName – The test job name, for example <code>Test123</code></li>\\n<li>JobDefinition – The Amazon Web Services Batch job definition ARN</li>\n<li>JobQueue – The Amazon Web Services Batch job queue ARN</li>\n<li>ScriptLocation – The <code>S3 URI</code>of the sample batch script</li>\\n</ul>\n<p>You can refer <a href=\\"https://docs.aws.amazon.com/amazondynamodb/latest/developerguide/getting-started-step-2.html\\" target=\\"_blank\\">Write data to a table using the console or Amazon Web Services CLI</a> to know how to write data to a DynamoDB table.</p>\\n<ol start=\\"10\\">\\n<li>Create two more items in your DynamoDB table with deferent job names, for example <code>Test124</code>and <code>Test125</code>, but keep the rest of the values the same.</li>\\n</ol>\n<p><img src=\\"https://dev-media.amazoncloud.cn/7717e28f5d8742f6908aac8171922935_image.png\\" alt=\\"image.png\\" /></p>\n<p>If you select one item from the table, you have an option to duplicate the item by changing the job name. After you create all three entries, the table items look like the following screenshot.<br />\\n<img src=\\"https://dev-media.amazoncloud.cn/871902f2ae234c47afd9288cd5e21294_image.png\\" alt=\\"image.png\\" /></p>\n<p>Next, you create a Step Functions state machine to orchestrate running the Amazon Web Services Batch job. You can use the sample state machine code <a href=\\"https://github.com/aws-samples/awsnative-batchscript-orchestration/blob/main/Step3/state-machine-sample2.json\\" target=\\"_blank\\">state-machine-sample2.json</a>, which extracts the Amazon Web Services Batch job container parameters from the <code>rds-batch</code>DynamoDB table and runs three Amazon Web Services Batch jobs (<code>Test123, Test124, and Test125</code>).</p>\\n<p>In case of any failures, the state machine can notify an Amazon Simple Notification Service (Amazon SNS) topic. So let’s create an SNS topic.</p>\n<ol start=\\"11\\">\\n<li>On the Amazon SNS console, choose <strong>Topics</strong> and then choose <strong>Create topic</strong>.</li>\\n<li>Set <strong>Standard</strong> as <strong>Type</strong>.</li>\\n<li>Name the topic <code>Batch-Notify</code>and create the topic.</li>\\n<li>Go to Amazon Web Services Cloud9 instance and change the directory to the <code>Step3</code>folder of the GitHub repo you cloned.</li>\\n<li>Copy the contents of <code>state-machine-sample2.json</code>or download it using the option you get when you right-click on the file explorer in Amazon Web Services Cloud9.</li>\\n<li>On the Step Functions console, choose <strong>State Machines</strong> and then choose <strong>Create state machine</strong>.</li>\\n<li>Select <strong>Design your Workflow visually</strong> and choose <strong>Next</strong>.</li>\\n<li>Choose <strong>Import</strong> to import the state machine definition file.</li>\\n<li>Select the state named <code>SNS Publish</code>.</li>\\n<li>On the right side, you have options under <strong>API Parameters</strong> to re-select the newly created SNS topic ARN from the drop down.</li>\\n<li>Check the <strong>API Parameters</strong> values for <strong>Batch: Submit Job</strong> states where you get the Amazon Web Services Batch job input from DynamoDB.</li>\\n<li>Go through the prompts to save the state machine.</li>\n</ol>\\n<p><img src=\\"https://dev-media.amazoncloud.cn/21ce397db011440688e77bc2f4dd4107_image.png\\" alt=\\"image.png\\" /></p>\n<p>Refer to <a href=\\"https://docs.aws.amazon.com/step-functions/latest/dg/getting-started.html\\" target=\\"_blank\\">Getting started with Amazon Web Services Step Functions</a> and <a href=\\"https://docs.aws.amazon.com/step-functions/latest/dg/connect-batch.html\\" target=\\"_blank\\">Manage Amazon Web Services Batch with Step Functions</a> for more details.</p>\\n<ol start=\\"23\\">\\n<li>Test the state machine by choosing <strong>Start execution</strong> to run it manually.</li>\\n</ol>\n<p><img src=\\"https://dev-media.amazoncloud.cn/48af378be2084d2da0e8f0f45f6042ef_image.png\\" alt=\\"image.png\\" /></p>\n<p>You can check the run details and monitor the Amazon Web Services Batch logs via <a href=\\"http://aws.amazon.com/cloudwatch\\" target=\\"_blank\\">Amazon CloudWatch</a>.</p>\\n<p>If you get any errors, refer to the <strong>Troubleshooting</strong> section regarding errors to see how to fix those issues.</p>\\n<h3><a id=\\"Set_up_an_EventBridge_schedule_to_invoke_the_Step_Functions_state_machine_278\\"></a><strong>Set up an EventBridge schedule to invoke the Step Functions state machine</strong></h3>\\n<p>To set up an EventBridge schedule to run your state machine, complete the following steps:</p>\n<ol>\\n<li>On the Amazon EventBridge console, choose <strong>Rules</strong>.</li>\\n<li>Choose <strong>Create a new rule</strong>.</li>\\n<li>Enter a name (for example, <code>rds-batch-Daily10AM</code>) and a description.</li>\\n<li>For the pattern, choose <strong>Schedule</strong>, and choose either a fixed rate or cron schedule.<br />\\nTo know more about EventBridge scheduling, check <a href=\\"https://docs.aws.amazon.com/eventbridge/latest/userguide/eb-create-rule-schedule.html\\" target=\\"_blank\\">Creating an Amazon EventBridge rule that runs on a schedule</a>.</li>\\n<li>Under <strong>Target</strong>, choose <strong>Step Functions state machine</strong> and choose the state machine you created.</li>\\n<li>You can create a new role or use an existing role. Go through the prompts and create the EventBridge rule.</li>\n<li>Wait for the event to run and monitor the run details of the state machine and Amazon Web Services Batch job.</li>\n</ol>\\n<h3><a id=\\"Deploy_the_solution_using_a_CloudFormation_template_291\\"></a><strong>Deploy the solution using a CloudFormation template</strong></h3>\\n<p>You can use the CloudFormation template provided in this post to simplify the setup.</p>\n<ol>\\n<li>Run the <code>git clone</code>command from your Amazon Web Services Cloud9 instance to clone the GitHub repository:</li>\\n</ol>\n<pre><code class=\\"lang-\\">git clone https://github.com/aws-samples/awsnative-batchscript-orchestration.git\\n</code></pre>\\n<p>2.Change the working directory to the CloudFormation folder of the GitHub repo you cloned:</p>\n<pre><code class=\\"lang-\\">cd /home/ec2-user/environment/awsnative-batchscript-orchestration/Cloudformation\\n</code></pre>\\n<ol start=\\"3\\">\\n<li>Run the CloudFormation script using the following Amazon Web Services CLI command by passing your parameter values:</li>\n</ol>\\n<pre><code class=\\"lang-\\">Amazon Web Services cloudformation create-stack --stack-name rds-batch-cloudformation --template-body file://rds-batch-scheduler.yaml --parameters ParameterKey=RDSUsername,ParameterValue=<RDS User Name> ParameterKey=RDSPassword,ParameterValue=<RDS Password> ParameterKey=RDSHostName,ParameterValue=<RDS Host Name> ParameterKey=RDSSecretName,ParameterValue=<rds-secret key name that you want to create> ParameterKey=VPC,ParameterValue=<VPC ID for creating Batch Instances> \\n\\tParameterKey=Subnet,ParameterValue=<Subnet ID for creating Batch Instances> ParameterKey=RDSSecurityGroup,ParameterValue=<Existing RDS database Security group ID> --capabilities CAPABILITY_NAMED_IAM\\n</code></pre>\\n<p>This template creates the following resources:</p>\n<ul>\\n<li>A Secrets Manager key</li>\n<li>An S3 bucket</li>\n<li>A DynamoDB table</li>\n<li>An Amazon ECR repository</li>\n<li>Amazon Web Services Batch resources: the compute environment, queue, and job definition</li>\n<li>An SNS topic to notify of Amazon Web Services Batch job failures</li>\n<li>A Step Functions state machine</li>\n<li>A CloudWatch Events rule</li>\n<li>A Amazon Web Services KMS key</li>\n<li>Roles and permissions associated to these resources</li>\n</ul>\\n<p>Review the sample script <code>rds_batch_sql1.sh</code>kept under the same directory. This will be the batch script that you run against the [Amazon RDS](https://aws.amazon.com/cn/rds/?trk=cndc-detail) database.</p>\\n<ol start=\\"4\\">\\n<li>To upload your Amazon Web Services Batch files to your S3 bucket, run the following command from your Amazon Web Services Cloud9 instance and copy the Amazon S3 URI of the uploaded script (for example, <code>s3://rdsbatch-123-useast1/rds_batch_sql1.sh</code>) for future use:</li>\\n</ol>\n<pre><code class=\\"lang-\\">aws s3 cp rds_batch_sql1.sh s3://<name of your bucket>/\\n</code></pre>\\n<ol start=\\"5\\">\\n<li>Get the <code>push</code>commands from Amazon ECR created by the CloudFormation script and run the push commands from your Amazon Web Services Cloud9 instance working directory (<code>cd Cloudformation</code>) to upload the Docker image to Amazon ECR.<br />\\nThe script <code>fetch_and_run_s3script.sh</code>is a shell script that uses the Amazon Web Services CLI to copy the Amazon Web Services Batch file to the container and run the file.</li>\\n</ol>\n<p><img src=\\"https://dev-media.amazoncloud.cn/6972b2a9e6e84224987444eab115fa10_image.png\\" alt=\\"image.png\\" /></p>\n<p>The next step is to update DynamoDB with the Amazon Web Services Batch parameters.<br />\\n6. Open the JSON file named <code>dynamodb_items.json</code>under the same working directory and replace the job definition, job queue, and batch script file location in the JSON file. You can find the job definition and job queue from Resources tab of your CloudFormation Stack executed.</p>\\n<p>You can create different SQL scripts, upload them to Amazon S3, and change the script location S3 URI for jobs in the DynamoDB table.</p>\n<ol start=\\"7\\">\\n<li>Use Amazon Web Services Cloud9 to create items in DynamoDB using the following script and verify the items in the DynamoDB table:</li>\n</ol>\\n<pre><code class=\\"lang-\\">aws dynamodb batch-write-item --request-items file://dynamodb_items.json\\n</code></pre>\\n<ol start=\\"8\\">\\n<li>On the <strong>EventBridge</strong> console, choose <strong>Rules</strong>.</li>\\n<li>Edit the rule <code>rds-batch-every10minutes</code>and enable it.</li>\\n</ol>\n<p>You can monitor the scheduled run via the Step Functions state machine, Amazon Web Services Batch monitoring, or the CloudWatch logs for the Amazon Web Services Batch jobs. If you encounter failures such as <code>Unable to locate credentials</code>or <code>TNS:Connect timeout occurred</code>, check the <strong>Troubleshooting</strong> section regarding script errors.</p>\\n<h3><a id=\\"Clean_up_351\\"></a><strong>Clean up</strong></h3>\\n<p>To clean up your resources, complete the following steps:</p>\n<ol>\\n<li>Empty the S3 bucket using the Amazon Web Services Cloud9 instance:</li>\n</ol>\\n<pre><code class=\\"lang-\\">aws s3 rm s3://<s3 bucket name> --recursive\\n</code></pre>\\n<ol start=\\"2\\">\\n<li>Empty the Amazon ECR repository using the Amazon Web Services Cloud9 instance:</li>\n</ol>\\n<pre><code class=\\"lang-\\">aws ecr batch-delete-image --repository-name <ECR Repository Name> --image-ids imageTag=latest\\n</code></pre>\\n<ol start=\\"3\\">\\n<li>On the CloudFormation console, delete the stacks that you created using the template <code>rds-batch-scheduler.yaml</code>.</li>\\n</ol>\n<h3><a id=\\"Troubleshooting_366\\"></a><strong>Troubleshooting</strong></h3>\\n<p>In this section, we offer tips regarding SQL script errors, checking the Amazon Web Services Batch job status, and Amazon Web Services Batch role permissions.</p>\n<h4><a id=\\"Failures_370\\"></a><strong>Failures</strong></h4>\\n<p>If you get the error <code>Unable to locate credentials</code>, it means that your instance doesn’t have access to Secrets Manager. In that case, go to your Amazon Web Services Cloud9 EC2 instance or Amazon Web Services Batch compute instance, and on the <strong>Actions</strong> menu, choose <strong>Modify IAM</strong> role to update the <a href=\\"http://aws.amazon.com/iam\\" target=\\"_blank\\">Amazon Web Services Identity and Access Management</a> (IAM) role to one with access to Secrets Manager to use the secret.</p>\\n<p><img src=\\"https://dev-media.amazoncloud.cn/6d37a9c8328043f9b1701ff84436c2b5_image.png\\" alt=\\"image.png\\" /></p>\n<p>If you get the error <code>TNS:Connect timeout occurred</code>, it means the instance can’t reach the RDS instance. In that case, change the security group of [Amazon RDS](https://aws.amazon.com/cn/rds/?trk=cndc-detail) to have traffic from the your instance security group flow through <code>port 1521</code>.</p>\\n<p><img src=\\"https://dev-media.amazoncloud.cn/f52146b0937a4e55b4a3d8d49d2d87d1_image.png\\" alt=\\"image.png\\" /></p>\n<p>If you get the error<br />\\n<code>An error occurred (403) when calling the HeadObject operation: Forbidden - Failed to download S3 script,</code><br />\\nit means that the docker runtime can’t access the S3 object uploaded. In that case, add list and read permission on S3 bucket and object to your role, check <a href=\\"https://docs.aws.amazon.com/AmazonS3/latest/userguide/example-bucket-policies.html\\" target=\\"_blank\\">Bucket Policy Examples</a>.</p>\\n<p>If you get the error<br />\\n<code>An error occurred (AccessDeniedException) when calling the GetSecretValue operation: User: arn:aws:sts::xxxx:assumed-role/yyyy/i-abcd1234 is not authorized to perform: secretsmanager:GetSecretValue on resource: rds-secret because no identity-based policy allows the secretsmanager:GetSecretValue action, </code><br />\\nit means that the docker runtime can’t access the Secret Manager secret created. In that case, add read permission on Secret Manager secret to your role, check <a href=\\"https://docs.aws.amazon.com/mediaconnect/latest/ug/iam-policy-examples-asm-secrets.html\\" target=\\"_blank\\">IAM policy examples for secrets in Amazon Web Services Secrets Manager</a>.</p>\\n<h4><a id=\\"Amazon_Web_Services_Batch_job_status_388\\"></a><strong>Amazon Web Services Batch job status</strong></h4>\\n<p>The following screenshot shows the successful completion of the job.</p>\n<p><img src=\\"https://dev-media.amazoncloud.cn/28351e51f52b48dd968b6582841ae113_image.png\\" alt=\\"image.png\\" /></p>\n<p>You can validate the jobs using the CloudWatch logs that Amazon Web Services Batch produced. The following screenshot shows the job details on the Amazon Web Services Batch console. The details contain the CloudWatch logs for the job, the SQL script run against the database, and the date.</p>\n<p><img src=\\"https://dev-media.amazoncloud.cn/6347ca1a40074312bdadc0e9012c864e_image.png\\" alt=\\"image.png\\" /></p>\n<h4><a id=\\"Amazon_Web_Services_Batch_execution_role_permissions_398\\"></a><strong>Amazon Web Services Batch execution role permissions</strong></h4>\\n<p>Your Amazon Web Services Batch execution role needs the following settings and permissions:</p>\n<ul>\\n<li><strong>Trusted entities</strong> – <code>ecs-tasks.amazonaws.com</code></li>\\n<li><strong>Policies</strong> – <code>AmazonEC2ContainerServiceRole, AWSBatchServiceRole, CloudWatchEventsFullAccess, AmazonEC2ContainerRegistryReadOnly</code></li>\\n</ul>\n<p>To grant access to the S3 bucket and object, check how to set up <a href=\\"https://docs.aws.amazon.com/AmazonS3/latest/userguide/example-bucket-policies.html\\" target=\\"_blank\\">S3 bucket policy</a>. To grant access to the Secret Manager secret, check <a href=\\"https://docs.aws.amazon.com/mediaconnect/latest/ug/iam-policy-examples-asm-secrets.html\\" target=\\"_blank\\">IAM policy examples for secrets in Amazon Web Services Secrets Manager</a>. Also, you can create an <a href=\\"https://docs.aws.amazon.com/IAM/latest/UserGuide/access_policies_managed-vs-inline.html#inline-policies\\" target=\\"_blank\\">inline policy</a> for your role using the sample JSON policy given below:</p>\\n<pre><code class=\\"lang-\\">{\\n "Version": "2012-10-17",\\n "Statement": [\\n {\\n "Sid": "secretmanageraccess",\\n "Effect": "Allow",\\n "Action": [\\n "secretsmanager:Get*",\\n "secretsmanager:List*"\\n ],\\n "Resource": "arn:aws:secretsmanager:<region>:<account id>:secret:<secret id>\\n },\\n {\\n "Sid": "s3access",\\n "Effect": "Allow",\\n "Action": [\\n "s3:Get*",\\n "s3:List*"\\n ],\\n "Resource": ["arn:aws:s3:::<s3 bucket name>",\\n\\t\\t\\t"arn:aws:s3:::<s3 bucket name>/*"]\\n } \\n ]\\n}\\n</code></pre>\\n<p>If you made any changes to the settings and notice if the Batch Job is stuck is <code>RUNNABLE</code>state, see <a href=\\"https://aws.amazon.com/premiumsupport/knowledge-center/batch-job-stuck-runnable-status/\\" target=\\"_blank\\">Why is my Amazon Web Services Batch job stuck in RUNNABLE status?</a></p>\\n<h4><a id=\\"Additional_references_436\\"></a><strong>Additional references</strong></h4>\\n<ul>\\n<li>The post <a href=\\"https://aws.amazon.com/blogs/compute/using-aws-cloudformation-to-create-and-manage-aws-batch-resources/\\" target=\\"_blank\\">Using Amazon Web Services CloudFormation to Create and Manage Amazon Web Services Batch Resources</a> highlights the <a href=\\"http://docs.aws.amazon.com/AWSCloudFormation/latest/UserGuide/aws-template-resource-type-ref.html\\" target=\\"_blank\\">native resources</a> supported in Amazon Web Services CloudFormation and demonstrates how to create Amazon Web Services Batch compute environments using Amazon Web Services CloudFormation.</li>\\n<li>The post <a href=\\"https://aws.amazon.com/blogs/database/scheduling-and-running-amazon-rds-jobs-with-aws-batch-and-amazon-cloudwatch-rules/\\" target=\\"_blank\\">Scheduling and running Amazon RDS jobs with Amazon Web Services Batch and Amazon CloudWatch rules</a> demonstrates how to use Amazon Web Services Batch and CloudWatch rules to dynamically provision resources and schedule and run functions or stored procedures on a PostgreSQL database.</li>\\n<li>The post <a href=\\"https://aws.amazon.com/blogs/compute/creating-a-simple-fetch-and-run-aws-batch-job/\\" target=\\"_blank\\">Creating a Simple “Fetch & Run” Amazon Web Services Batch Job</a> walks you through the steps to create and run a simple fetch and run job in Amazon Web Services Batch.</li>\\n</ul>\n<h3><a id=\\"Conclusion_442\\"></a><strong>Conclusion</strong></h3>\\n<p>In this post, we demonstrated how you can use EventBridge, Step Functions, and Amazon Web Services Batch to schedule and orchestrate your batch scripts.</p>\n<p>You can use this solution to run database and SQL scripts, bash scripts, Python scripts, and Amazon Web Services service-specific tasks using the Amazon Web Services CLI. You can also extend the solution to run scripts built using programming languages such as PySpark, Scala, or Java. Additionally, you can enable alerting using CloudWatch Logs and Amazon SNS, and enable monitoring using CloudWatch Logs, Amazon S3, <a href=\\"http://aws.amazon.com/athena\\" target=\\"_blank\\">Amazon Athena</a>, and <a href=\\"https://aws.amazon.com/quicksight\\" target=\\"_blank\\">Amazon QuickSight</a>.</p>\\n<p>If you have questions or suggestions, leave a comment.</p>\n<h4><a id=\\"About_the_Authors_450\\"></a><strong>About the Authors</strong></h4>\\n<p>https://d2908q01vomqb2.cloudfront.net/887309d048beef83ad3eabf2a79a64a389ab1c9f/2022/07/15/dilinjo-1.jpg</p>\n<p><strong>Dilin Joy</strong> is a Partner Solutions Architect at Amazon Web Services. He works with a leading Global System Integrator (GSI) to provide architectural guidance and support them in building strategic industry solutions on Amazon Web Services.</p>\\n<p><img src=\\"https://dev-media.amazoncloud.cn/bb68b0e006a34a9a8176c7695f138cfc_image.png\\" alt=\\"image.png\\" /></p>\n<p><strong>Roshin Babu</strong> is a Data Analytics Specialist Solutions Architect with Amazon Web Services. He works with the Sales Specialists team supporting Amazon Web Services Public Sector customers.</p>\n"}
Replace self-managed database scheduler batch jobs using Amazon native solutions
海外精选

海外精选的内容汇集了全球优质的亚马逊云科技相关技术内容。同时,内容中提到的“AWS”
是 “Amazon Web Services” 的缩写,在此网站不作为商标展示。

 0
0 0
0亚马逊云科技解决方案 基于行业客户应用场景及技术领域的解决方案
联系亚马逊云科技专家
亚马逊云科技解决方案
基于行业客户应用场景及技术领域的解决方案
联系专家

0
目录

 分享
分享 点赞
点赞 收藏
收藏 目录
目录立即注册,开启您的免费套餐
立即关注

亚马逊云开发者
公众号

User Group
公众号

亚马逊云科技
官方小程序
“AWS” 是 “Amazon Web Services” 的缩写,在此网站不作为商标展示。
立即关注
亚马逊云开发者
公众号
User Group
公众号
亚马逊云科技
官方小程序
“AWS” 是 “Amazon Web Services” 的缩写,在此网站不作为商标展示。
关于我们 
更多资源
开发者工具
更多支持
立即关注
亚马逊云开发者
公众号
User Group
公众号
亚马逊云科技
官方小程序
“AWS” 是 “Amazon Web Services” 的缩写,在此网站不作为商标展示。
