{"value":"[Gitlab CI](https://docs.gitlab.com/ee/ci/) is a tool utilized by many enterprises to automate their Continuous integration, continuous delivery and deployment (CI/CD) process. A Gitlab CI/CD pipeline consists of two major components: A ```\n.gitlab-ci.yml``` file describing a pipeline’s jobs, and a [Gitlab Runner](https://docs.gitlab.com/runner/), an application that executes the pipeline jobs.\n\nSetting up the Gitlab Runner is a time-consuming process. It involves provisioning the necessary infrastructure, installing the necessary software to run pipeline workloads, and configuring the runner. For enterprises running hundreds of pipelines across multiple environments, it is essential to automate the Gitlab Runner deployment process so as to be deployed quickly in a repeatable, consistent manner.\n\nThis post will guide you through utilizing Infrastructure-as-Code (IaC) to automate Gitlab Runner deployment and administrative tasks on [Amazon EC2](https://aws.amazon.com/ec2/). With IaC, you can quickly and consistently deploy the entire Gitlab Runner architecture by running a script. You can track and manage changes efficiently. And, you can enforce guardrails and best practices via code. The solution presented here also offers autoscaling so that you save costs by terminating resources when not in use. You will learn:\n\n- How to deploy Gitlab Runner quickly and consistently across multiple AWS accounts.\n- How to enforce guardrails and best practices on the Gitlab Runner through IaC.\n- How to autoscale Gitlab Runner based on workloads to ensure best performance and save costs.\n\nThis post comes from a DevOps engineer perspective, and assumes that the engineer is familiar with the practices and tools of IaC and CI/CD.\n\n### **Overview of the solution**\nThe following diagram displays the solution architecture. We use [AWS CloudFormation](https://aws.amazon.com/cloudformation/) to describe the infrastructure that is hosting the Gitlab Runner. The main steps are as follows:\n\n1. The user runs a deploy script in order to deploy the CloudFormation template. The template is parameterized, and the parameters are defined in a properties file. The properties file specifies the infrastructure configuration, as well as the environment in which to deploy the template.\n2. The deploy script calls CloudFormation CreateStack API to create a Gitlab Runner stack in the specified environment.\n3. During stack creation, an EC2 autoscaling group is created with the desired number of EC2 instances. Each instance is launched via a launch template, which is created with values from the properties file. An IAM role is created and attached to the EC2 instance. The role contains permissions required for the Gitlab Runner to execute pipeline jobs. A lifecycle hook is attached to the autoscaling group on instance termination events. This ensures graceful instance termination.\n4. During instance launch, CloudFormation uses a cfn-init helper script to install and configure the Gitlab Runner:\n a.cfn-init installs the Gitlab Runner software on the EC2 instance.\n b.cfn-init configures the Gitlab Runner as a docker executor using a pre-defined docker image in the Gitlab Container Registry. The docker executor implementation lets the Gitlab Runner run each build in a separate and isolated container. The docker image contains the software required to run the pipeline workloads, thereby eliminating the need to install these packages during each build.\nc. cfn-init registers the Gitlab Runner to Gitlab projects specified in the properties file, so that these projects can utilize the Gitlab Runner to run pipelines.\n\n5. The user may repeat the same steps to deploy Gitlab Runner into another environment.\n\n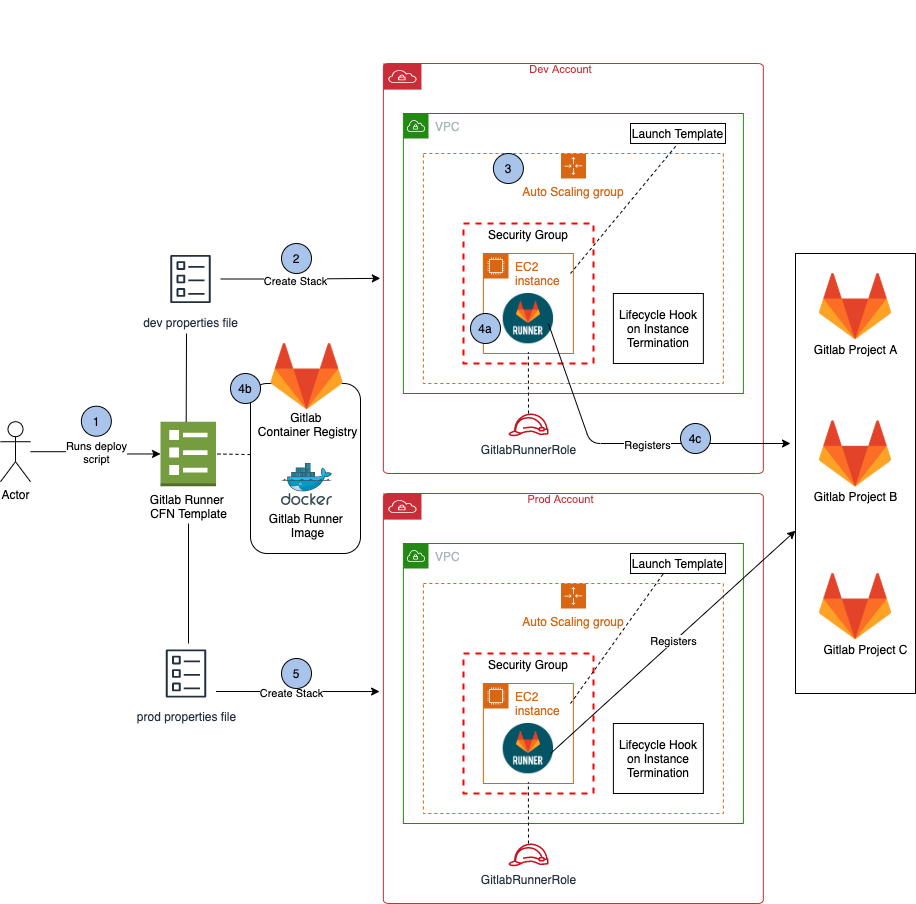\n\n### **Walkthrough**\nThis walkthrough will demonstrate how to deploy the Gitlab Runner, and how easy it is to conduct Gitlab Runner administrative tasks via this architecture. We will walk through the following tasks:\n\n- Build a docker executor image for the Gitlab Runner.\n- Deploy the Gitlab Runner stack.\n- Update the Gitlab Runner.\n- Terminate the Gitlab Runner.\n- Add/Remove Gitlab projects from the Gitlab Runner.\n- Autoscale the Gitlab Runner based on workloads.\n\nThe code in this post is available at [https://github.com/aws-samples/amazon-ec2-gitlab-runner.git](https://github.com/aws-samples/amazon-ec2-gitlab-runner.git)\n\n#### **Prerequisites**\nFor this walkthrough, you need the following:\n\n- A Gitlab account (all tiers including Gitlab Free self-managed, Gitlab Free SaaS, and higher tiers). This demo uses gitlab.com free tire.\n- A Gitlab Container Registry.\n- A [Git client](https://git-scm.com/downloads) to clone the source code provided.\n- An [AWS account](https://signin.aws.amazon.com/signin?redirect_uri=https%3A%2F%2Fportal.aws.amazon.com%2Fbilling%2Fsignup%2Fresume&client_id=signup) with local credentials properly configured (typically under ```~/.aws/credentials``` ).\n- The latest version of the AWS CLI. For more information, see [Installing, updating, and uninstalling the AWS CLI](https://docs.aws.amazon.com/cli/latest/userguide/cli-chap-install.html).\n- Docker is installed and running on the localhost/laptop.\n- Nodejs and npm installed on the localhost/laptop.\n- A VPC with 2 private subnets and that is connected to the internet via NAT gateway allowing outbound traffic.\n- The following [IAM](https://aws.amazon.com/iam/) service-linked role created in the AWS account: AWSServiceRoleForAutoScaling\n- An [Amazon S3](https://aws.amazon.com/s3/) bucket for storing Lambda deployment packages.\n- Familiarity with Git, Gitlab CI/CD, Docker, EC2, CloudFormation and [Amazon CloudWatch](https://aws.amazon.com/cloudwatch/).\n\n#### **Build a docker executor image for the Gitlab Runner**\nThe Gitlab Runner in this solution is implemented as docker executor. The Docker executor connects to Docker Engine and runs each build in a separate and isolated container via a predefined docker image. The first step in deploying the Gitlab Runner is building a docker executor image. We provided a simple Dockerfile in order to build this image. You may customize the Dockerfile to install your own requirements.\n\n#### **To build a docker image using the sample Dockerfile:**\n1. Create a directory where we will store our demo code. From your terminal run:\n\n```\nmkdir demo-repos && cd demo-repos\n```\n\n2. Clone the source code repository found in the following location:\n\n```\ngit clone https://github.com/aws-samples/amazon-ec2-gitlab-runner.git\n```\n\n3. Create a new project on your Gitlab server. Name the project any name you like.\n4. Clone your newly created repo to your laptop. Ignore the warning about cloning an empty repository.\n\n```\ngit clone <your-repo-url>\n```\n\n5. Copy the demo repo files into your newly created repo on your laptop, and push it to your Gitlab repository. You may customize the Dockerfile before pushing it to Gitlab.\n\n```\ncp -r amazon-ec2-gitlab-runner/* <your-repo-dir>\ncd <your-repo-dir>\ngit add .\ngit commit -m “Initial commit”\ngit push\n```\n\n6. On the Gitlab console, go to your repository’s Package & Registries -> Container Registry. Follow the instructions provided on the Container Registry page in order to build and push a docker image to your repository’s container registry.\n\n#### **Deploy the Gitlab Runner stack**\nOnce the docker executor image has been pushed to the Gitlab Container Registry, we can deploy the Gitlab Runner. The Gitlab Runner infrastructure is described in the Cloudformation template gitlab-runner.yaml. Its configuration is stored in a properties file called sample-runner.properties. A launch template is created with the values in the properties file. Then it is used to launch instances. This architecture lets you deploy Gitlab Runner to as many environments as you like by utilizing the configurations provided in the appropriate properties files.\n\nDuring the provisioning process, utilize a [cfn-init](https://docs.aws.amazon.com/AWSCloudFormation/latest/UserGuide/cfn-init.html) helper script to run a series of commands to install and configure the Gitlab Runner.\n\n```\n commands:\n 01InstallDocker:\n command: sudo yum -y install docker\n 02StartDocker:\n command: sudo service docker start\n 03DownloadGitlabRunner:\n command: sudo wget -O /usr/bin/gitlab-runner https://gitlab-runner-downloads.s3.amazonaws.com/latest/binaries/gitlab-runner-linux-amd64\n 04ChmodGitlabRunner:\n command: sudo chmod a+x /usr/bin/gitlab-runner\n 05AddUser:\n command: sudo useradd --comment 'GitLab Runner' --create-home gitlab-runner --shell /bin/bash\n 06InstallGitlabRunner:\n command: sudo gitlab-runner install --user=gitlab-runner --working-directory=/home/gitlab-runner\n 07SetRegion:\n command: !Sub 'aws configure set default.region ${AWS::Region}'\n 08ConfigureDockerExecutor:\n command: !Sub \n - |\n for GitlabGroupToken in `aws ssm get-parameters --names /${AWS::StackName}/ci-tokens --query 'Parameters[0].Value' | sed -e \"s/\\\"//g\" | sed \"s/,/ /g\"`;do\n sudo gitlab-runner register \\\n --non-interactive \\\n --url \"${GitlabServerURL}\" \\\n --registration-token $GitlabGroupToken \\\n --executor \"docker\" \\\n --docker-image \"${DockerImagePath}\" \\\n --description \"Gitlab Runner with Docker Executor\" \\\n --locked=\"${isLOCKED}\" --access-level \"${ACCESS}\" \\\n --docker-volumes \"/var/run/docker.sock:/var/run/docker.sock\" \\\n --tag-list \"${RunnerEnvironment}-${RunnerVersion}-docker\"\n done\n - isLOCKED: !FindInMap [GitlabRunnerRegisterOptionsMap, !Ref RunnerEnvironment, isLOCKED]\n ACCESS: !FindInMap [GitlabRunnerRegisterOptionsMap, !Ref RunnerEnvironment, ACCESS] \n 09StartGitlabRunner:\n command: sudo gitlab-runner start\n```\n\nThe helper script ensures that the Gitlab Runner setup is consistent and repeatable for each deployment. If a configuration change is required, users simply update the configuration steps and redeploy the stack. Furthermore, all changes are tracked in Git, which allows for versioning of the Gitlab Runner.\n\n#### ***To deploy the Gitlab Runner stack:***\n1. Obtain the runner registration tokens of the Gitlab projects that you want registered to the Gitlab Runner. Obtain the token by selecting the project’s Settings > CI/CD and expand the Runners section.\n2. Update the sample-runner.properties file parameters according to your own environment. Refer to the gitlab-runner.yaml file for a description of these parameters. Rename the file if you like. You may also create an additional properties file for deploying into other environments.\n3. Run the deploy script to deploy the runner:\n\n```\ncd <your-repo-dir>\n./deploy-runner.sh <properties-file> <region> <aws-profile> <stack-name> \n```\n<properties-file> is the name of the properties file.\n\n<region> is the region where you want to deploy the stack.\n\n<aws-profile> is the name of the CLI profile you set up in the prerequisites section.\n\n<stack-name> is the name you chose for the CloudFormation stack.\n\nFor example:\n\n```\n./deploy-runner.sh sample-runner.properties us-east-1 dev amazon-ec2-gitlab-runner-demo\n```\n\nAfter the stack is deployed successfully, you will see the Gitlab Runner autoscaling group created in the EC2 console:\n\n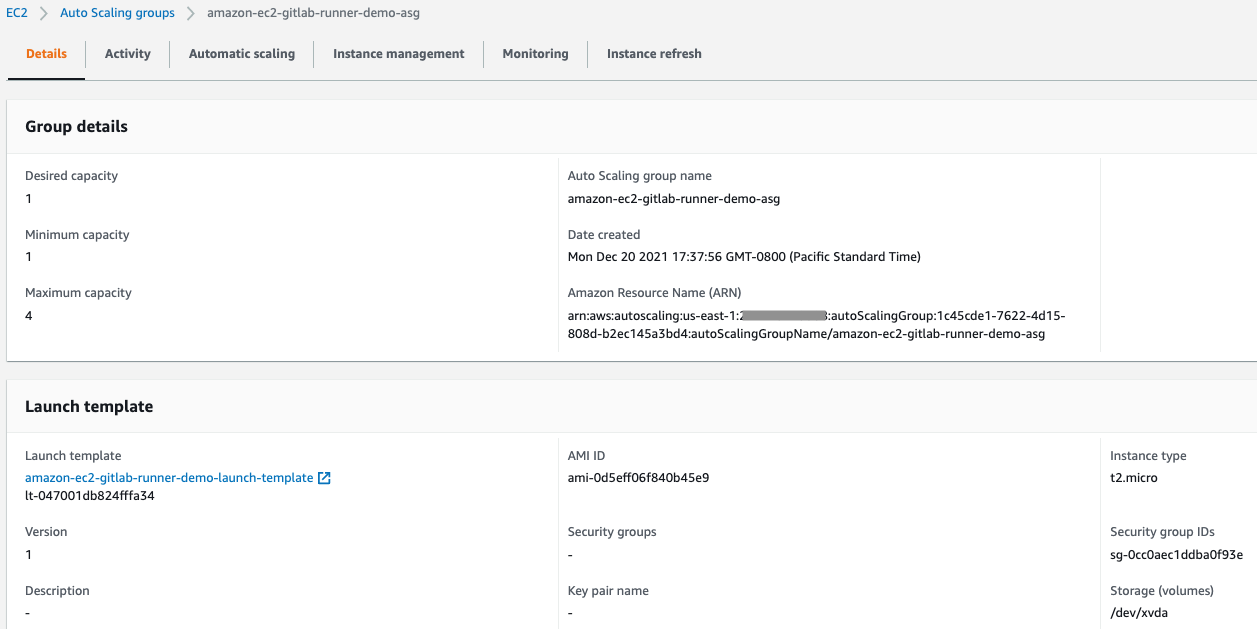\n\nUnder your Gitlab project Settings > CICD > Runners > Available specific runners, you will see the fully configured Gitlab Runner. The green circle indicates that the Gitlab Runner is ready for use.\n\n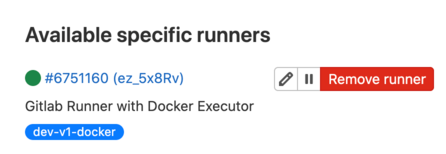\n\n### **Updating the Gitlab Runner**\nThere are times when you would want to update the Gitlab Runner. For example, updating the instance VolumeSize in order to resolve a disk space issue, or updating the AMI ID when a new AMI becomes available.\n\nUtilizing the properties file and launch template makes it easy to update the Gitlab Runner. Simply update the Gitlab Runner configuration parameters in the properties file. Then, run the deploy script to udpate the Gitlab Runner stack. To ensure that the changes take effect immediately (e.g., existing instances are replaced by new instances with the new configuration), we utilize an AutoscalingRollingUpdate update policy to automatically update the instances in the autoscaling group.\n\n```\nUpdatePolicy:\n AutoScalingRollingUpdate:\n MinInstancesInService: !Ref MinInstancesInService\n MaxBatchSize: !Ref MaxBatchSize\n PauseTime: \"PT5M\"\n WaitOnResourceSignals: true\n SuspendProcesses:\n - HealthCheck\n - ReplaceUnhealthy\n - AZRebalance\n - AlarmNotification\n - ScheduledActions\n```\n\nThe policy tells CloudFormation that when changes are detected in the launch template, update the instances in batch size of MaxBatchSize, while keeping a number of instances (specified in MinInstanceInService) in service during the update.\n\nBelow is an example of updating the Gitlab Runner instance type.\n\n#### **To update the instance type of the runner instance:**\n1. Update the “InstanceType” parameter in the properties file.\n\n ```InstanceType=t2.medium```\n\n\n2. Run the deploy-runner.sh script to update the CloudFormation stack:\n\n```\ncd <your-repo-dir>\n./deploy-runner.sh <properties-file> <region> <aws-profile> <stack-name>\n```\n\nIn the CloudFormation console, you will see that the launch template is updated first, then a rolling update is initiated. The instance type update requires a replacement of the original instance, so a temporary instance was launched and put in service. Then, the temporary instance was terminated when the new instance was launched successfully.\n\n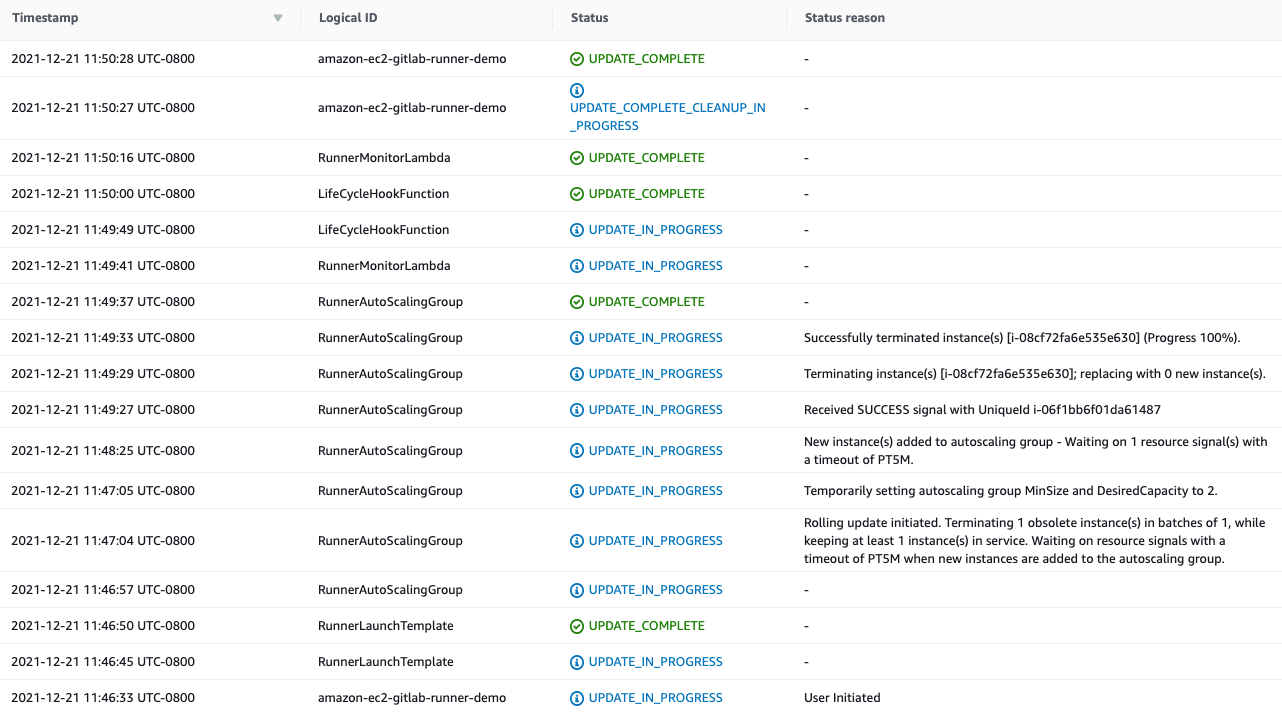\n\nAfter the update is complete, you will see that on the Gitlab project’s console, the old Gitlab Runner, ez_5x8Rv, is replaced by the new Gitlab Runner, N1_UQ7yc.\n\n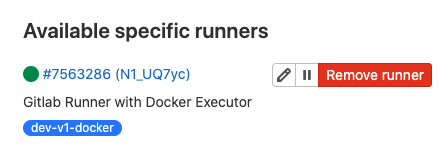\n\n### **Terminate the Gitlab Runner**\nThere are times when an autoscaling group instance must be terminated. For example, during an autoscaling scale-in event, or when the instance is being replaced by a new instance during a stack update, as seen previously. When terminating an instance, you must ensure that the Gitlab Runner finishes executing any running jobs before the instance is terminated, otherwise your environment could be left in an inconsistent state. Also, we want to ensure that the terminated Gitlab Runner is removed from the Gitlab project. We utilize an autoscaling lifecycle hook to achieve these goals.\n\nThe lifecycle hook works like this: A CloudWatch event rule actively listens for the EC2 Instance-terminate events. When one is detected, the event rule triggers a Lambda function. The Lambda function calls SSM Run Command to run a series of commands on the EC2 instances, via a SSM Document. The commands include stopping the Gitlab Runner gracefully when all running jobs are finished, de-registering the runner from Gitlab projects, and signaling the autoscaling group to terminate the instance.\n\n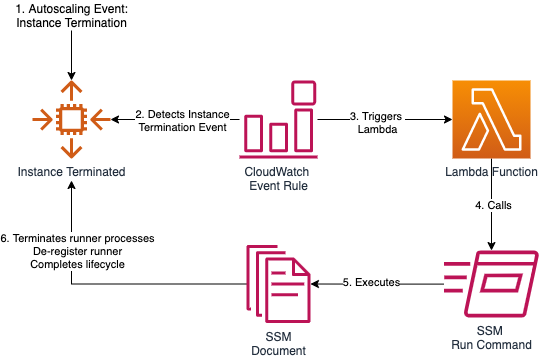\n\nThere are also times when you want to terminate an instance manually. For example, when an instance is suspected to not be functioning properly. To terminate an instance from the Gitlab Runner autoscaling group, use the following command:\n\n```\naws autoscaling terminate-instance-in-auto-scaling-group \\\n --instance-id=\"${InstanceId}\" \\\n --no-should-decrement-desired-capacity \\\n --region=\"${region}\" \\\n --profile=\"${profile}\"\n```\n\nThe above command terminates the instance. The lifecycle hook ensures that the cleanup steps are conducted properly, and the autoscaling group launches another new instance to replace the old one.\n\nNote that if you terminate the instance by using the “ec2 terminate-instance” command, then the autoscaling lifecycle hook actions will not be triggered.\n\n### **Add/Remove Gitlab projects from the Gitlab Runner**\nAs new projects are added to your enterprise, you may want to register them to the Gitlab Runner, so that those projects can utilize the Gitlab Runner to run pipelines. On the other hand, you would want to remove the Gitlab Runner from a project if it no longer wants to utilize the Gitlab Runner, or if it qualifies to utilize the Gitlab Runner. For example, if a project is no longer allowed to deploy to an environment configured by the Gitlab Runner. Our architecture offers a simple way to add and remove projects from the Gitlab Runner. To add new projects to the Gitlab Runner, update the RunnerRegistrationTokens parameter in the properties file, and then rerun the deploy script to update the Gitlab Runner stack.\n\n#### ***To add new projects to the Gitlab Runner:***\nUpdate the RunnerRegistrationTokens parameter in the properties file. For example:\n\n```\nRunnerRegistrationTokens=ps8RjBSruy1sdRdP2nZX,XbtZNv4yxysbYhqvjEkC\n```\n2. Update the Gitlab Runner stack. This updates the SSM parameter which stores the tokens.\n\n```\ncd <your-repo-dir>\n./deploy-runner.sh <properties-file> <region> <aws-profile> <stack-name>\n```\n\n3. Relaunch the instances in the Gitlab Runner autoscaling group. The new instances will use the new RunnerRegistrationTokens value. Run the following command to relaunch the instances:\n\n```\n./cycle-runner.sh <runner-autoscaling-group-name> <region> <optional-aws-profile>\n```\n\nTo remove projects from the Gitlab Runner, follow the steps described above, with just one difference. Instead of adding new tokens to the RunnerRegistrationTokens parameter, remove the token(s) of the project that you want to dissociate from the runner.\n\n### **Autoscale the runner based on custom performance metrics**\nEach Gitlab Runner can be configured to handle a fixed number of [concurrent jobs](https://docs.gitlab.com/runner/configuration/advanced-configuration.html). Once this capacity is reached for every runner, any new jobs will be in a Queued/Waiting status until the current jobs complete, which would be a poor experience for our team. Setting the number of concurrent jobs too high on our runners would also result in a poor experience, because all jobs leverage the same CPU, memory, and storage in order to conduct the builds.\n\nIn this solution, we utilize a scheduled Lambda function that runs every minute in order to inspect the number of jobs running on every runner, leveraging the [Prometheus Metrics](https://docs.gitlab.com/ee/administration/monitoring/prometheus/gitlab_metrics.html#gitlab-prometheus-metrics) endpoint that the runners expose. If we approach the concurrent build limit of the group, then we increase the Autoscaling Group size so that it can take on more work. As the number of concurrent jobs decreases, then the scheduled Lambda function will scale the Autoscaling Group back in an effort to minimize cost. The Scaling-Up operation will ignore the Autoscaling Group’s cooldown period, which will help ensure that our team is not waiting on a new instance, whereas the Scale-Down operation will obey the group’s cooldown period.\n\nHere is the logical sequence diagram for the work:\n\n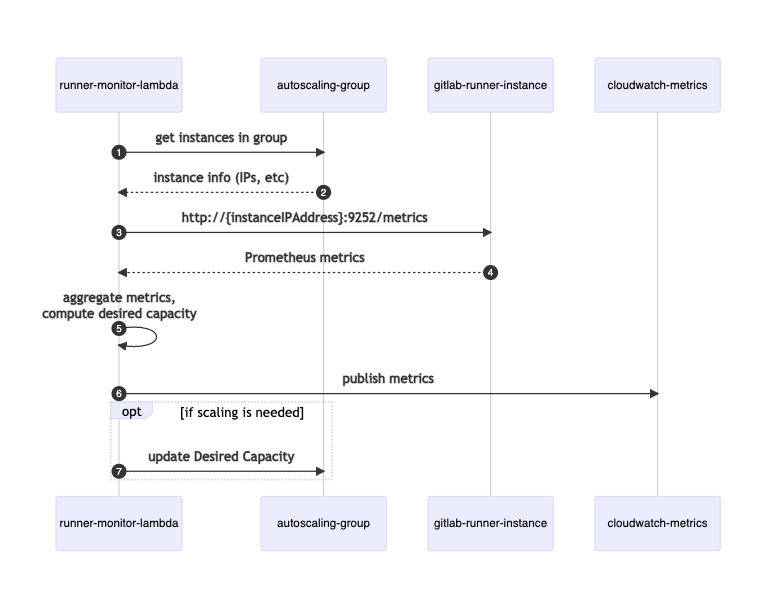\n\nFor operational monitoring, the Lambda function also publishes custom CloudWatch Metrics for the count of active jobs, along with the target and actual capacities of the Autoscaling group. We can utilize this information to validate that the system is working properly and determine if we need to modify any of our autoscaling parameters.\n\n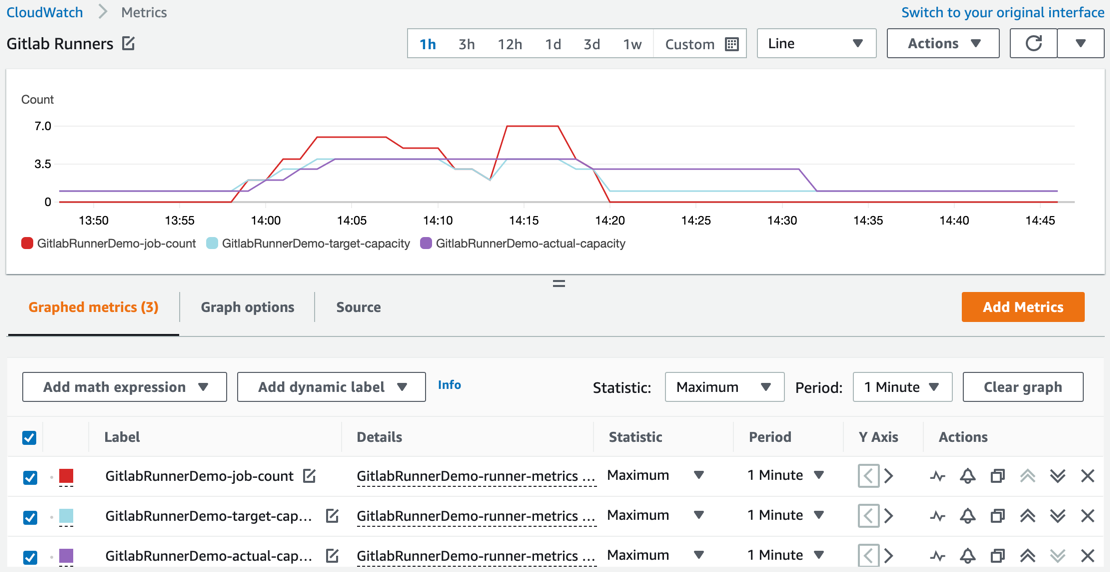\n\nCongratulations! You have completed the walkthrough. Take some time to review the resources you have deployed, and practice the various runner administrative tasks that we have covered in this post.\n\n### **Troubleshooting**\nProblem: I deployed the CloudFormation template, but no runner is listed in my repository.\n\nPossible Cause: Errors have been encountered during cfn-init, causing runner registration to fail. Connect to your runner EC2 instance, and check /var/log/cfn-*.log files.\n\n### **Cleaning up**\nTo avoid incurring future charges, delete every resource provisioned in this demo by deleting the CloudFormation stack created in the “Deploy the Gitlab Runner stack” section.\n\n### **Conclusion**\nThis article demonstrated how to utilize IaC to efficiently conduct various administrative tasks associated with a Gitlab Runner. We deployed Gitlab Runner consistently and quickly across multiple accounts. We utilized IaC to enforce guardrails and best practices, such as tracking Gitlab Runner configuration changes, terminating the Gitlab Runner gracefully, and autoscaling the Gitlab Runner to ensure best performance and minimum cost. We walked through the deploying, updating, autoscaling, and terminating of the Gitlab Runner. We also saw how easy it was to clean up the entire Gitlab Runner architecture by simply deleting a CloudFormation stack.\n\n#### **About the authors**\n\n\n\n#### **Sylvia Qi**\n\nSylvia is a Senior DevOps Architect focusing on architecting and automating DevOps processes, helping customers through their DevOps transformation journey. In her spare time, she enjoys biking, swimming, yoga, and photography.\n\n\n\n#### **Sebastian Carreras**\n\nSebastian is a Senior Cloud Application Architect with AWS Professional Services. He leverages his breadth of experience to deliver bespoke solutions to satisfy the visions of his customer. In his free time, he really enjoys doing laundry. Really.\n","render":"<p><a href=\"https://docs.gitlab.com/ee/ci/\" target=\"_blank\">Gitlab CI</a> is a tool utilized by many enterprises to automate their Continuous integration, continuous delivery and deployment (CI/CD) process. A Gitlab CI/CD pipeline consists of two major components: A <code> .gitlab-ci.yml</code> file describing a pipeline’s jobs, and a <a href=\"https://docs.gitlab.com/runner/\" target=\"_blank\">Gitlab Runner</a>, an application that executes the pipeline jobs.</p>\n<p>Setting up the Gitlab Runner is a time-consuming process. It involves provisioning the necessary infrastructure, installing the necessary software to run pipeline workloads, and configuring the runner. For enterprises running hundreds of pipelines across multiple environments, it is essential to automate the Gitlab Runner deployment process so as to be deployed quickly in a repeatable, consistent manner.</p>\n<p>This post will guide you through utilizing Infrastructure-as-Code (IaC) to automate Gitlab Runner deployment and administrative tasks on <a href=\"https://aws.amazon.com/ec2/\" target=\"_blank\">Amazon EC2</a>. With IaC, you can quickly and consistently deploy the entire Gitlab Runner architecture by running a script. You can track and manage changes efficiently. And, you can enforce guardrails and best practices via code. The solution presented here also offers autoscaling so that you save costs by terminating resources when not in use. You will learn:</p>\n<ul>\n<li>How to deploy Gitlab Runner quickly and consistently across multiple AWS accounts.</li>\n<li>How to enforce guardrails and best practices on the Gitlab Runner through IaC.</li>\n<li>How to autoscale Gitlab Runner based on workloads to ensure best performance and save costs.</li>\n</ul>\n<p>This post comes from a DevOps engineer perspective, and assumes that the engineer is familiar with the practices and tools of IaC and CI/CD.</p>\n<h3><a id=\"Overview_of_the_solution_13\"></a><strong>Overview of the solution</strong></h3>\n<p>The following diagram displays the solution architecture. We use <a href=\"https://aws.amazon.com/cloudformation/\" target=\"_blank\">AWS CloudFormation</a> to describe the infrastructure that is hosting the Gitlab Runner. The main steps are as follows:</p>\n<ol>\n<li>\n<p>The user runs a deploy script in order to deploy the CloudFormation template. The template is parameterized, and the parameters are defined in a properties file. The properties file specifies the infrastructure configuration, as well as the environment in which to deploy the template.</p>\n</li>\n<li>\n<p>The deploy script calls CloudFormation CreateStack API to create a Gitlab Runner stack in the specified environment.</p>\n</li>\n<li>\n<p>During stack creation, an EC2 autoscaling group is created with the desired number of EC2 instances. Each instance is launched via a launch template, which is created with values from the properties file. An IAM role is created and attached to the EC2 instance. The role contains permissions required for the Gitlab Runner to execute pipeline jobs. A lifecycle hook is attached to the autoscaling group on instance termination events. This ensures graceful instance termination.</p>\n</li>\n<li>\n<p>During instance launch, CloudFormation uses a cfn-init helper script to install and configure the Gitlab Runner:<br />\na.cfn-init installs the Gitlab Runner software on the EC2 instance.<br />\nb.cfn-init configures the Gitlab Runner as a docker executor using a pre-defined docker image in the Gitlab Container Registry. The docker executor implementation lets the Gitlab Runner run each build in a separate and isolated container. The docker image contains the software required to run the pipeline workloads, thereby eliminating the need to install these packages during each build.<br />\nc. cfn-init registers the Gitlab Runner to Gitlab projects specified in the properties file, so that these projects can utilize the Gitlab Runner to run pipelines.</p>\n</li>\n<li>\n<p>The user may repeat the same steps to deploy Gitlab Runner into another environment.</p>\n</li>\n</ol>\n<p><img src=\"https://dev-media.amazoncloud.cn/c4a2c28906544be99bc3631006d2428c_image.png\" alt=\"image.png\" /></p>\n<h3><a id=\"Walkthrough_28\"></a><strong>Walkthrough</strong></h3>\n<p>This walkthrough will demonstrate how to deploy the Gitlab Runner, and how easy it is to conduct Gitlab Runner administrative tasks via this architecture. We will walk through the following tasks:</p>\n<ul>\n<li>Build a docker executor image for the Gitlab Runner.</li>\n<li>Deploy the Gitlab Runner stack.</li>\n<li>Update the Gitlab Runner.</li>\n<li>Terminate the Gitlab Runner.</li>\n<li>Add/Remove Gitlab projects from the Gitlab Runner.</li>\n<li>Autoscale the Gitlab Runner based on workloads.</li>\n</ul>\n<p>The code in this post is available at <a href=\"https://github.com/aws-samples/amazon-ec2-gitlab-runner.git\" target=\"_blank\">https://github.com/aws-samples/amazon-ec2-gitlab-runner.git</a></p>\n<h4><a id=\"Prerequisites_40\"></a><strong>Prerequisites</strong></h4>\n<p>For this walkthrough, you need the following:</p>\n<ul>\n<li>A Gitlab account (all tiers including Gitlab Free self-managed, Gitlab Free SaaS, and higher tiers). This demo uses gitlab.com free tire.</li>\n<li>A Gitlab Container Registry.</li>\n<li>A <a href=\"https://git-scm.com/downloads\" target=\"_blank\">Git client</a> to clone the source code provided.</li>\n<li>An <a href=\"https://signin.aws.amazon.com/signin?redirect_uri=https%3A%2F%2Fportal.aws.amazon.com%2Fbilling%2Fsignup%2Fresume&client_id=signup\" target=\"_blank\">AWS account</a> with local credentials properly configured (typically under <code>~/.aws/credentials</code> ).</li>\n<li>The latest version of the AWS CLI. For more information, see <a href=\"https://docs.aws.amazon.com/cli/latest/userguide/cli-chap-install.html\" target=\"_blank\">Installing, updating, and uninstalling the AWS CLI</a>.</li>\n<li>Docker is installed and running on the localhost/laptop.</li>\n<li>Nodejs and npm installed on the localhost/laptop.</li>\n<li>A VPC with 2 private subnets and that is connected to the internet via NAT gateway allowing outbound traffic.</li>\n<li>The following <a href=\"https://aws.amazon.com/iam/\" target=\"_blank\">IAM</a> service-linked role created in the AWS account: AWSServiceRoleForAutoScaling</li>\n<li>An <a href=\"https://aws.amazon.com/s3/\" target=\"_blank\">Amazon S3</a> bucket for storing Lambda deployment packages.</li>\n<li>Familiarity with Git, Gitlab CI/CD, Docker, EC2, CloudFormation and <a href=\"https://aws.amazon.com/cloudwatch/\" target=\"_blank\">Amazon CloudWatch</a>.</li>\n</ul>\n<h4><a id=\"Build_a_docker_executor_image_for_the_Gitlab_Runner_55\"></a><strong>Build a docker executor image for the Gitlab Runner</strong></h4>\n<p>The Gitlab Runner in this solution is implemented as docker executor. The Docker executor connects to Docker Engine and runs each build in a separate and isolated container via a predefined docker image. The first step in deploying the Gitlab Runner is building a docker executor image. We provided a simple Dockerfile in order to build this image. You may customize the Dockerfile to install your own requirements.</p>\n<h4><a id=\"To_build_a_docker_image_using_the_sample_Dockerfile_58\"></a><strong>To build a docker image using the sample Dockerfile:</strong></h4>\n<ol>\n<li>Create a directory where we will store our demo code. From your terminal run:</li>\n</ol>\n<pre><code class=\"lang-\">mkdir demo-repos && cd demo-repos\n</code></pre>\n<ol start=\"2\">\n<li>Clone the source code repository found in the following location:</li>\n</ol>\n<pre><code class=\"lang-\">git clone https://github.com/aws-samples/amazon-ec2-gitlab-runner.git\n</code></pre>\n<ol start=\"3\">\n<li>Create a new project on your Gitlab server. Name the project any name you like.</li>\n<li>Clone your newly created repo to your laptop. Ignore the warning about cloning an empty repository.</li>\n</ol>\n<pre><code class=\"lang-\">git clone <your-repo-url>\n</code></pre>\n<ol start=\"5\">\n<li>Copy the demo repo files into your newly created repo on your laptop, and push it to your Gitlab repository. You may customize the Dockerfile before pushing it to Gitlab.</li>\n</ol>\n<pre><code class=\"lang-\">cp -r amazon-ec2-gitlab-runner/* <your-repo-dir>\ncd <your-repo-dir>\ngit add .\ngit commit -m “Initial commit”\ngit push\n</code></pre>\n<ol start=\"6\">\n<li>On the Gitlab console, go to your repository’s Package & Registries -> Container Registry. Follow the instructions provided on the Container Registry page in order to build and push a docker image to your repository’s container registry.</li>\n</ol>\n<h4><a id=\"Deploy_the_Gitlab_Runner_stack_90\"></a><strong>Deploy the Gitlab Runner stack</strong></h4>\n<p>Once the docker executor image has been pushed to the Gitlab Container Registry, we can deploy the Gitlab Runner. The Gitlab Runner infrastructure is described in the Cloudformation template gitlab-runner.yaml. Its configuration is stored in a properties file called sample-runner.properties. A launch template is created with the values in the properties file. Then it is used to launch instances. This architecture lets you deploy Gitlab Runner to as many environments as you like by utilizing the configurations provided in the appropriate properties files.</p>\n<p>During the provisioning process, utilize a <a href=\"https://docs.aws.amazon.com/AWSCloudFormation/latest/UserGuide/cfn-init.html\" target=\"_blank\">cfn-init</a> helper script to run a series of commands to install and configure the Gitlab Runner.</p>\n<pre><code class=\"lang-\"> commands:\n 01InstallDocker:\n command: sudo yum -y install docker\n 02StartDocker:\n command: sudo service docker start\n 03DownloadGitlabRunner:\n command: sudo wget -O /usr/bin/gitlab-runner https://gitlab-runner-downloads.s3.amazonaws.com/latest/binaries/gitlab-runner-linux-amd64\n 04ChmodGitlabRunner:\n command: sudo chmod a+x /usr/bin/gitlab-runner\n 05AddUser:\n command: sudo useradd --comment 'GitLab Runner' --create-home gitlab-runner --shell /bin/bash\n 06InstallGitlabRunner:\n command: sudo gitlab-runner install --user=gitlab-runner --working-directory=/home/gitlab-runner\n 07SetRegion:\n command: !Sub 'aws configure set default.region ${AWS::Region}'\n 08ConfigureDockerExecutor:\n command: !Sub \n - |\n for GitlabGroupToken in `aws ssm get-parameters --names /${AWS::StackName}/ci-tokens --query 'Parameters[0].Value' | sed -e "s/\\"//g" | sed "s/,/ /g"`;do\n sudo gitlab-runner register \\\n --non-interactive \\\n --url "${GitlabServerURL}" \\\n --registration-token $GitlabGroupToken \\\n --executor "docker" \\\n --docker-image "${DockerImagePath}" \\\n --description "Gitlab Runner with Docker Executor" \\\n --locked="${isLOCKED}" --access-level "${ACCESS}" \\\n --docker-volumes "/var/run/docker.sock:/var/run/docker.sock" \\\n --tag-list "${RunnerEnvironment}-${RunnerVersion}-docker"\n done\n - isLOCKED: !FindInMap [GitlabRunnerRegisterOptionsMap, !Ref RunnerEnvironment, isLOCKED]\n ACCESS: !FindInMap [GitlabRunnerRegisterOptionsMap, !Ref RunnerEnvironment, ACCESS] \n 09StartGitlabRunner:\n command: sudo gitlab-runner start\n</code></pre>\n<p>The helper script ensures that the Gitlab Runner setup is consistent and repeatable for each deployment. If a configuration change is required, users simply update the configuration steps and redeploy the stack. Furthermore, all changes are tracked in Git, which allows for versioning of the Gitlab Runner.</p>\n<h4><a id=\"To_deploy_the_Gitlab_Runner_stack_134\"></a><em><strong>To deploy the Gitlab Runner stack:</strong></em></h4>\n<ol>\n<li>Obtain the runner registration tokens of the Gitlab projects that you want registered to the Gitlab Runner. Obtain the token by selecting the project’s Settings > CI/CD and expand the Runners section.</li>\n<li>Update the sample-runner.properties file parameters according to your own environment. Refer to the gitlab-runner.yaml file for a description of these parameters. Rename the file if you like. You may also create an additional properties file for deploying into other environments.</li>\n<li>Run the deploy script to deploy the runner:</li>\n</ol>\n<pre><code class=\"lang-\">cd <your-repo-dir>\n./deploy-runner.sh <properties-file> <region> <aws-profile> <stack-name> \n</code></pre>\n<p><properties-file> is the name of the properties file.</p>\n<p><region> is the region where you want to deploy the stack.</p>\n<p><aws-profile> is the name of the CLI profile you set up in the prerequisites section.</p>\n<p><stack-name> is the name you chose for the CloudFormation stack.</p>\n<p>For example:</p>\n<pre><code class=\"lang-\">./deploy-runner.sh sample-runner.properties us-east-1 dev amazon-ec2-gitlab-runner-demo\n</code></pre>\n<p>After the stack is deployed successfully, you will see the Gitlab Runner autoscaling group created in the EC2 console:</p>\n<p><img src=\"https://dev-media.amazoncloud.cn/bbb454c42e994062989e63359216bc38_image.png\" alt=\"image.png\" /></p>\n<p>Under your Gitlab project Settings > CICD > Runners > Available specific runners, you will see the fully configured Gitlab Runner. The green circle indicates that the Gitlab Runner is ready for use.</p>\n<p><img src=\"https://dev-media.amazoncloud.cn/b572ddad308d428e85197afa1f843456_image.png\" alt=\"image.png\" /></p>\n<h3><a id=\"Updating_the_Gitlab_Runner_165\"></a><strong>Updating the Gitlab Runner</strong></h3>\n<p>There are times when you would want to update the Gitlab Runner. For example, updating the instance VolumeSize in order to resolve a disk space issue, or updating the AMI ID when a new AMI becomes available.</p>\n<p>Utilizing the properties file and launch template makes it easy to update the Gitlab Runner. Simply update the Gitlab Runner configuration parameters in the properties file. Then, run the deploy script to udpate the Gitlab Runner stack. To ensure that the changes take effect immediately (e.g., existing instances are replaced by new instances with the new configuration), we utilize an AutoscalingRollingUpdate update policy to automatically update the instances in the autoscaling group.</p>\n<pre><code class=\"lang-\">UpdatePolicy:\n AutoScalingRollingUpdate:\n MinInstancesInService: !Ref MinInstancesInService\n MaxBatchSize: !Ref MaxBatchSize\n PauseTime: "PT5M"\n WaitOnResourceSignals: true\n SuspendProcesses:\n - HealthCheck\n - ReplaceUnhealthy\n - AZRebalance\n - AlarmNotification\n - ScheduledActions\n</code></pre>\n<p>The policy tells CloudFormation that when changes are detected in the launch template, update the instances in batch size of MaxBatchSize, while keeping a number of instances (specified in MinInstanceInService) in service during the update.</p>\n<p>Below is an example of updating the Gitlab Runner instance type.</p>\n<h4><a id=\"To_update_the_instance_type_of_the_runner_instance_189\"></a><strong>To update the instance type of the runner instance:</strong></h4>\n<ol>\n<li>Update the “InstanceType” parameter in the properties file.</li>\n</ol>\n<p><code>InstanceType=t2.medium</code></p>\n<ol start=\"2\">\n<li>Run the deploy-runner.sh script to update the CloudFormation stack:</li>\n</ol>\n<pre><code class=\"lang-\">cd <your-repo-dir>\n./deploy-runner.sh <properties-file> <region> <aws-profile> <stack-name>\n</code></pre>\n<p>In the CloudFormation console, you will see that the launch template is updated first, then a rolling update is initiated. The instance type update requires a replacement of the original instance, so a temporary instance was launched and put in service. Then, the temporary instance was terminated when the new instance was launched successfully.</p>\n<p><img src=\"https://dev-media.amazoncloud.cn/2ca96e51acc04dd3a50b5237db3c972f_image.png\" alt=\"image.png\" /></p>\n<p>After the update is complete, you will see that on the Gitlab project’s console, the old Gitlab Runner, ez_5x8Rv, is replaced by the new Gitlab Runner, N1_UQ7yc.</p>\n<p><img src=\"https://dev-media.amazoncloud.cn/4a76d4349404431a9b5d20dc36542daf_image.png\" alt=\"image.png\" /></p>\n<h3><a id=\"Terminate_the_Gitlab_Runner_210\"></a><strong>Terminate the Gitlab Runner</strong></h3>\n<p>There are times when an autoscaling group instance must be terminated. For example, during an autoscaling scale-in event, or when the instance is being replaced by a new instance during a stack update, as seen previously. When terminating an instance, you must ensure that the Gitlab Runner finishes executing any running jobs before the instance is terminated, otherwise your environment could be left in an inconsistent state. Also, we want to ensure that the terminated Gitlab Runner is removed from the Gitlab project. We utilize an autoscaling lifecycle hook to achieve these goals.</p>\n<p>The lifecycle hook works like this: A CloudWatch event rule actively listens for the EC2 Instance-terminate events. When one is detected, the event rule triggers a Lambda function. The Lambda function calls SSM Run Command to run a series of commands on the EC2 instances, via a SSM Document. The commands include stopping the Gitlab Runner gracefully when all running jobs are finished, de-registering the runner from Gitlab projects, and signaling the autoscaling group to terminate the instance.</p>\n<p><img src=\"https://dev-media.amazoncloud.cn/9b0db8c182d245ff82d39c41af44c51b_image.png\" alt=\"image.png\" /></p>\n<p>There are also times when you want to terminate an instance manually. For example, when an instance is suspected to not be functioning properly. To terminate an instance from the Gitlab Runner autoscaling group, use the following command:</p>\n<pre><code class=\"lang-\">aws autoscaling terminate-instance-in-auto-scaling-group \\\n --instance-id="${InstanceId}" \\\n --no-should-decrement-desired-capacity \\\n --region="${region}" \\\n --profile="${profile}"\n</code></pre>\n<p>The above command terminates the instance. The lifecycle hook ensures that the cleanup steps are conducted properly, and the autoscaling group launches another new instance to replace the old one.</p>\n<p>Note that if you terminate the instance by using the “ec2 terminate-instance” command, then the autoscaling lifecycle hook actions will not be triggered.</p>\n<h3><a id=\"AddRemove_Gitlab_projects_from_the_Gitlab_Runner_231\"></a><strong>Add/Remove Gitlab projects from the Gitlab Runner</strong></h3>\n<p>As new projects are added to your enterprise, you may want to register them to the Gitlab Runner, so that those projects can utilize the Gitlab Runner to run pipelines. On the other hand, you would want to remove the Gitlab Runner from a project if it no longer wants to utilize the Gitlab Runner, or if it qualifies to utilize the Gitlab Runner. For example, if a project is no longer allowed to deploy to an environment configured by the Gitlab Runner. Our architecture offers a simple way to add and remove projects from the Gitlab Runner. To add new projects to the Gitlab Runner, update the RunnerRegistrationTokens parameter in the properties file, and then rerun the deploy script to update the Gitlab Runner stack.</p>\n<h4><a id=\"To_add_new_projects_to_the_Gitlab_Runner_234\"></a><em><strong>To add new projects to the Gitlab Runner:</strong></em></h4>\n<p>Update the RunnerRegistrationTokens parameter in the properties file. For example:</p>\n<pre><code class=\"lang-\">RunnerRegistrationTokens=ps8RjBSruy1sdRdP2nZX,XbtZNv4yxysbYhqvjEkC\n</code></pre>\n<ol start=\"2\">\n<li>Update the Gitlab Runner stack. This updates the SSM parameter which stores the tokens.</li>\n</ol>\n<pre><code class=\"lang-\">cd <your-repo-dir>\n./deploy-runner.sh <properties-file> <region> <aws-profile> <stack-name>\n</code></pre>\n<ol start=\"3\">\n<li>Relaunch the instances in the Gitlab Runner autoscaling group. The new instances will use the new RunnerRegistrationTokens value. Run the following command to relaunch the instances:</li>\n</ol>\n<pre><code class=\"lang-\">./cycle-runner.sh <runner-autoscaling-group-name> <region> <optional-aws-profile>\n</code></pre>\n<p>To remove projects from the Gitlab Runner, follow the steps described above, with just one difference. Instead of adding new tokens to the RunnerRegistrationTokens parameter, remove the token(s) of the project that you want to dissociate from the runner.</p>\n<h3><a id=\"Autoscale_the_runner_based_on_custom_performance_metrics_255\"></a><strong>Autoscale the runner based on custom performance metrics</strong></h3>\n<p>Each Gitlab Runner can be configured to handle a fixed number of <a href=\"https://docs.gitlab.com/runner/configuration/advanced-configuration.html\" target=\"_blank\">concurrent jobs</a>. Once this capacity is reached for every runner, any new jobs will be in a Queued/Waiting status until the current jobs complete, which would be a poor experience for our team. Setting the number of concurrent jobs too high on our runners would also result in a poor experience, because all jobs leverage the same CPU, memory, and storage in order to conduct the builds.</p>\n<p>In this solution, we utilize a scheduled Lambda function that runs every minute in order to inspect the number of jobs running on every runner, leveraging the <a href=\"https://docs.gitlab.com/ee/administration/monitoring/prometheus/gitlab_metrics.html#gitlab-prometheus-metrics\" target=\"_blank\">Prometheus Metrics</a> endpoint that the runners expose. If we approach the concurrent build limit of the group, then we increase the Autoscaling Group size so that it can take on more work. As the number of concurrent jobs decreases, then the scheduled Lambda function will scale the Autoscaling Group back in an effort to minimize cost. The Scaling-Up operation will ignore the Autoscaling Group’s cooldown period, which will help ensure that our team is not waiting on a new instance, whereas the Scale-Down operation will obey the group’s cooldown period.</p>\n<p>Here is the logical sequence diagram for the work:</p>\n<p><img src=\"https://dev-media.amazoncloud.cn/22b701d8b03648d5b59afe08591e4928_image.png\" alt=\"image.png\" /></p>\n<p>For operational monitoring, the Lambda function also publishes custom CloudWatch Metrics for the count of active jobs, along with the target and actual capacities of the Autoscaling group. We can utilize this information to validate that the system is working properly and determine if we need to modify any of our autoscaling parameters.</p>\n<p><img src=\"https://dev-media.amazoncloud.cn/6e41474e0b9040f19b7dc1c16b7c21ef_image.png\" alt=\"image.png\" /></p>\n<p>Congratulations! You have completed the walkthrough. Take some time to review the resources you have deployed, and practice the various runner administrative tasks that we have covered in this post.</p>\n<h3><a id=\"Troubleshooting_270\"></a><strong>Troubleshooting</strong></h3>\n<p>Problem: I deployed the CloudFormation template, but no runner is listed in my repository.</p>\n<p>Possible Cause: Errors have been encountered during cfn-init, causing runner registration to fail. Connect to your runner EC2 instance, and check /var/log/cfn-*.log files.</p>\n<h3><a id=\"Cleaning_up_275\"></a><strong>Cleaning up</strong></h3>\n<p>To avoid incurring future charges, delete every resource provisioned in this demo by deleting the CloudFormation stack created in the “Deploy the Gitlab Runner stack” section.</p>\n<h3><a id=\"Conclusion_278\"></a><strong>Conclusion</strong></h3>\n<p>This article demonstrated how to utilize IaC to efficiently conduct various administrative tasks associated with a Gitlab Runner. We deployed Gitlab Runner consistently and quickly across multiple accounts. We utilized IaC to enforce guardrails and best practices, such as tracking Gitlab Runner configuration changes, terminating the Gitlab Runner gracefully, and autoscaling the Gitlab Runner to ensure best performance and minimum cost. We walked through the deploying, updating, autoscaling, and terminating of the Gitlab Runner. We also saw how easy it was to clean up the entire Gitlab Runner architecture by simply deleting a CloudFormation stack.</p>\n<h4><a id=\"About_the_authors_281\"></a><strong>About the authors</strong></h4>\n<p><img src=\"https://dev-media.amazoncloud.cn/0bab9aea6334476bafd14d707e49ef1a_image.png\" alt=\"image.png\" /></p>\n<h4><a id=\"Sylvia_Qi_285\"></a><strong>Sylvia Qi</strong></h4>\n<p>Sylvia is a Senior DevOps Architect focusing on architecting and automating DevOps processes, helping customers through their DevOps transformation journey. In her spare time, she enjoys biking, swimming, yoga, and photography.</p>\n<p><img src=\"https://dev-media.amazoncloud.cn/4871fedcd162450aa8e70f5aa0fea867_image.png\" alt=\"image.png\" /></p>\n<h4><a id=\"Sebastian_Carreras_291\"></a><strong>Sebastian Carreras</strong></h4>\n<p>Sebastian is a Senior Cloud Application Architect with AWS Professional Services. He leverages his breadth of experience to deliver bespoke solutions to satisfy the visions of his customer. In his free time, he really enjoys doing laundry. Really.</p>\n"}
立即关注

亚马逊云开发者
公众号

User Group
公众号

亚马逊云科技
官方小程序
“AWS” 是 “Amazon Web Services” 的缩写,在此网站不作为商标展示。
立即关注

亚马逊云开发者
公众号

User Group
公众号

亚马逊云科技
官方小程序
“AWS” 是 “Amazon Web Services” 的缩写,在此网站不作为商标展示。
立即关注

亚马逊云开发者
公众号

User Group
公众号

亚马逊云科技
官方小程序
“AWS” 是 “Amazon Web Services” 的缩写,在此网站不作为商标展示。


