{"value":"<section class=\"blog-post-content\" property=\"articleBody\"> \n <p><a href=\"https://aws.amazon.com/quicksight\" target=\"_blank\" rel=\"noopener noreferrer\">Amazon QuickSight</a> is a scalable, serverless, embeddable, machine learning (ML)-powered business intelligence (BI) service built for the cloud that supports identity federation in both Standard and Enterprise editions. Organizations are working towards centralizing their identity and access strategy across all of their applications, including on-premises, third-party, and applications on AWS. Many organizations use <a href=\"https://www.google.com/aclk?sa=l&ai=DChcSEwjxu8us6972AhX6bG8EHadvCq4YABAAGgJqZg&sig=AOD64_2R5UVp_8UEu5Z1Ba7Iahd_Ut1GCw&q&adurl&ved=2ahUKEwihm8Os6972AhXVHM0KHV1pBWsQ0Qx6BAgEEAE\" target=\"_blank\" rel=\"noopener noreferrer\">Google Workspace</a> to control and manage user authentication and authorization centrally. You can enable federation to QuickSight accounts without needing to create and manage users. This authorizes users to access QuickSight assets—analyses, dashboards, folders, and datasets—through centrally managed Google Workspace Identities.</p> \n <p>In this post, we go through the steps to configure federated single sign-on (SSO) between a Google Workspace instance and QuickSight account. We demonstrate registering an SSO application in Google Workspace, and map QuickSight roles (admin, author, and reader) to Google Workspace Identities. These QuickSight roles represent three different personas supported in QuickSight. Administrators can publish the QuickSight app in a Google Workspace Dashboard to enable users to SSO to QuickSight using their Google Workspace credentials.</p> \n\n### **Solution overview** \n <p>In your organization, the portal is typically a function of your identity provider (IdP), which handles the exchange of trust between your organization and QuickSight.</p> \n <p>On the <a href=\"https://workspace.google.com/dashboard\" target=\"_blank\" rel=\"noopener noreferrer\">Google Workspace Dashboard</a>, you can review a list of apps. This post shows you how to configure the custom app for AWS.</p> \n\n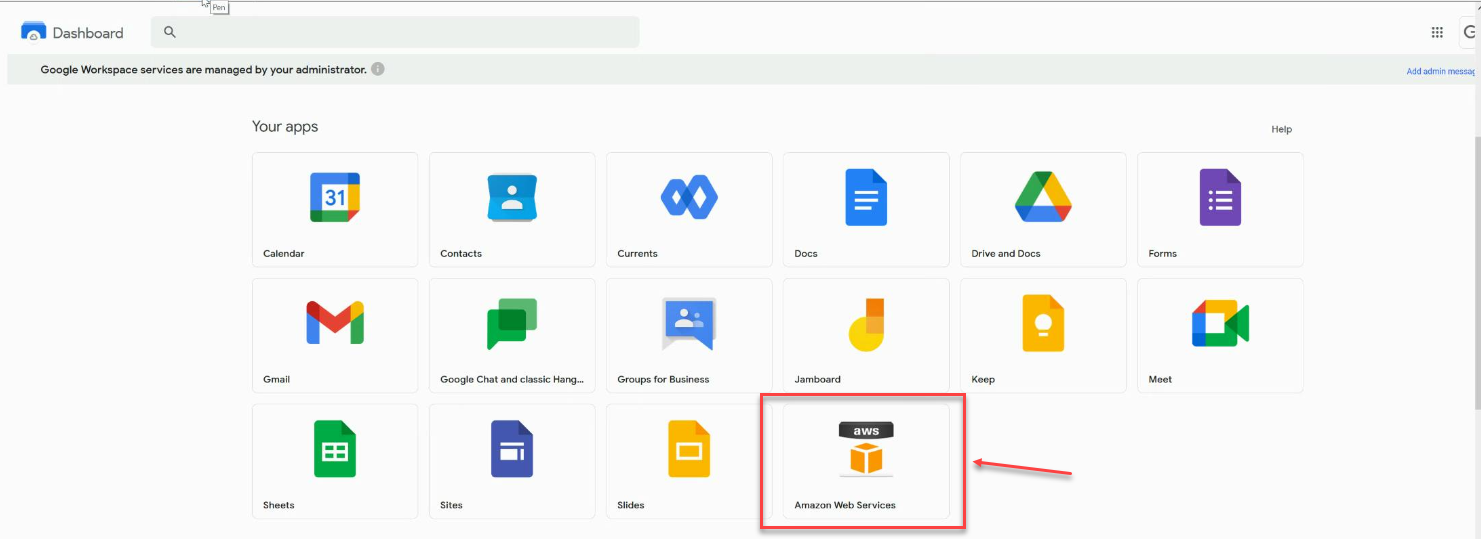\n<p>The user flow consists of the following steps:</p> \n <ol> \n <li>The user logs in to your organization’s portal and chooses the option to go to the QuickSight console.</li> \n <li>The portal verifies the user’s identity in your organization.</li> \n <li>The portal generates a SAML authentication response that includes assertions that identify the user and include attributes about the user. The portal sends this response to the client browser. Although not discussed here, you can also configure your IdP to include a SAML assertion attribute called <a href=\"https://docs.aws.amazon.com/IAM/latest/UserGuide/id_roles_providers_create_saml_assertions.html%22%20/l%20%22saml_role-session-duration\" target=\"_blank\" rel=\"noopener noreferrer\">SessionDuration</a> that specifies how long the console session is valid.</li> \n <li>The client browser is redirected to the AWS single sign-on endpoint and posts the SAML assertion.</li> \n <li>The endpoint requests temporary security credentials on behalf of the user, and creates a QuickSight sign-in URL that uses those credentials.</li> \n <li>AWS sends the sign-in URL back to the client as a redirect.</li> \n <li>The client browser is redirected to the QuickSight console. If the SAML authentication response includes attributes that map to multiple <a href=\"https://aws.amazon.com/iam/\" target=\"_blank\" rel=\"noopener noreferrer\">AWS Identity and Access Management</a> (IAM) roles, the user is first prompted to select the role for accessing the console.</li> \n </ol> \n <p>The following diagram illustrates the solution architecture.</p> \n\n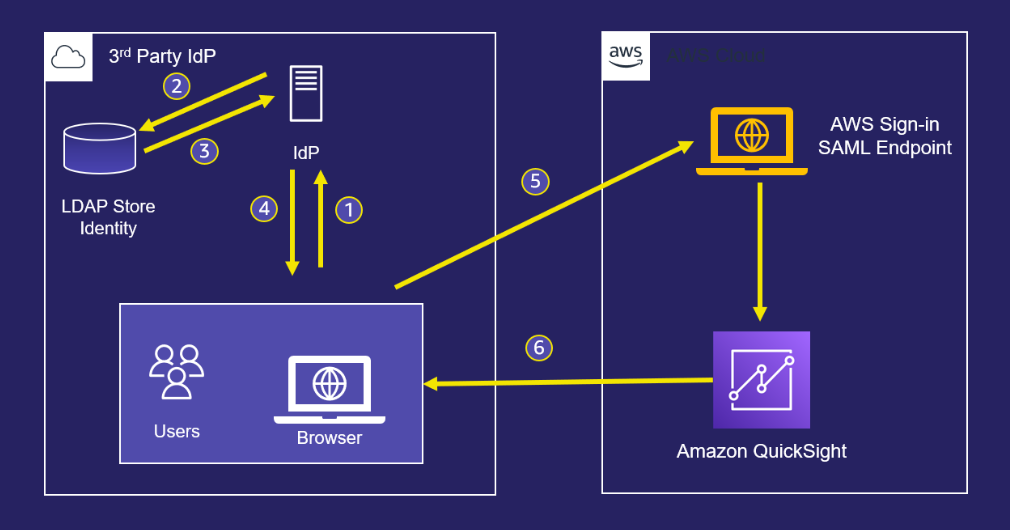\n \n<p>The following are the high-level steps to set up federated single sign-on access via Google Workspace:</p>\n \n<ol> \n <li>Download the Google IdP information.</li> \n <li>Create an IAM IdP with Google as SAML IdP.</li> \n <li>Configure IAM policies for QuickSight roles.</li> \n <li>Configure IAM QuickSight roles for federated users.</li> \n <li>Create a custom user attribute in Google Workspace.</li> \n <li>Add the AWS SAML attributes to your Google Workspace user profile.</li> \n <li>Set up the AWS SAML app in Google Workspace.</li> \n <li>Grant access to users in Google Workspace.</li> \n <li>Verify federated access to your QuickSight instance.</li> \n </ol>\n \n <p>Detailed procedures for each of these steps comprise the remainder of this post.</p> \n\n### **Prerequisites**\n\n<p>For this walkthrough, you should have the following prerequisites:</p> \n\n<ul> \n <li>A <a href=\"https://workspace.google.com/pricing.html?ga_lang=en\" target=\"_blank\" rel=\"noopener noreferrer\">Google Workspace</a> subscription</li> \n <li>An <a href=\"https://signin.aws.amazon.com/signin?redirect_uri=https%3A%2F%2Fportal.aws.amazon.com%2Fbilling%2Fsignup%2Fresume&client_id=signup\" target=\"_blank\" rel=\"noopener noreferrer\">AWS account</a> with QuickSight subscription</li> \n <li>Basic understanding of QuickSight roles—admin, author, and reader</li> \n <li>Basic understanding of IAM and privileges required to create an IAM identity provider, roles, policies, and users</li> \n </ul>\n\n\n### **Download the Google IdP information** \n\n<p>First, let’s get the SAML metadata that contains essential information to enable your AWS account to authenticate the IdP and locate the necessary communication endpoint locations. Complete the following steps:</p> \n <ol> \n <li>Log in to the <a href=\"https://admin.google.com/AdminHome\" target=\"_blank\" rel=\"noopener noreferrer\">Google Workspace Admin console</a>.</li> \n <li>On the Admin console home page, under <strong>Security </strong>in the navigation pane, choose <strong>Authentication </strong>and <strong>SSO with SAML applications</strong>.</li> \n <li>Under <strong>IdP metadata</strong>, choose <strong>Download Metadata</strong>.<br> <a href=\"https://d2908q01vomqb2.cloudfront.net/b6692ea5df920cad691c20319a6fffd7a4a766b8/2022/05/16/BDB-2221-image005.png\">\n\n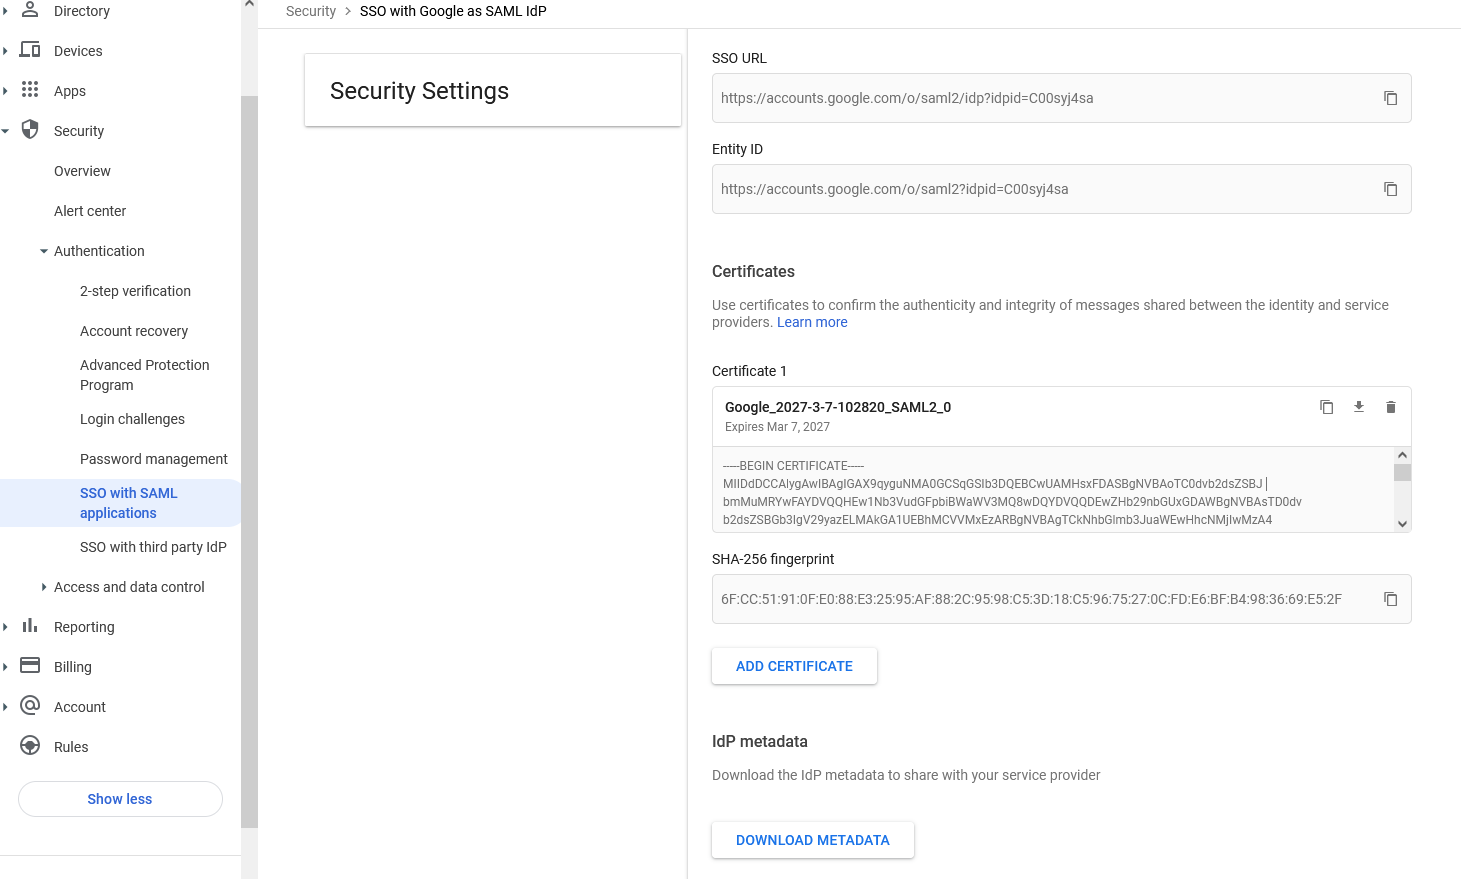</a></li> \n </ol> \n\n### **Create an IAM IdP with Google as SAML IdP**\n\n<p>You now configure Azure AD as your SAML IdP via the IAM console. Complete the following steps:</p> \n <ol> \n <li>On the IAM console, choose <strong>Identity providers</strong> in the navigation pane.</li> \n <li>Choose <strong>Add provider</strong>.</li> \n <li>For <strong>Configure provider</strong>, select <strong>SAML</strong>.</li> \n <li>For <strong>Provider name</strong>, enter a name for the IdP (such as <code>Google</code>).</li> \n <li>For <strong>Metadata document</strong>, choose <strong>Choose file</strong> and specify the SAML metadata document that you downloaded.</li> \n <li>Choose <strong>Add provider</strong>.<br> <a href=\"https://d2908q01vomqb2.cloudfront.net/b6692ea5df920cad691c20319a6fffd7a4a766b8/2022/05/16/BDB-2221-image007.png\">\n\n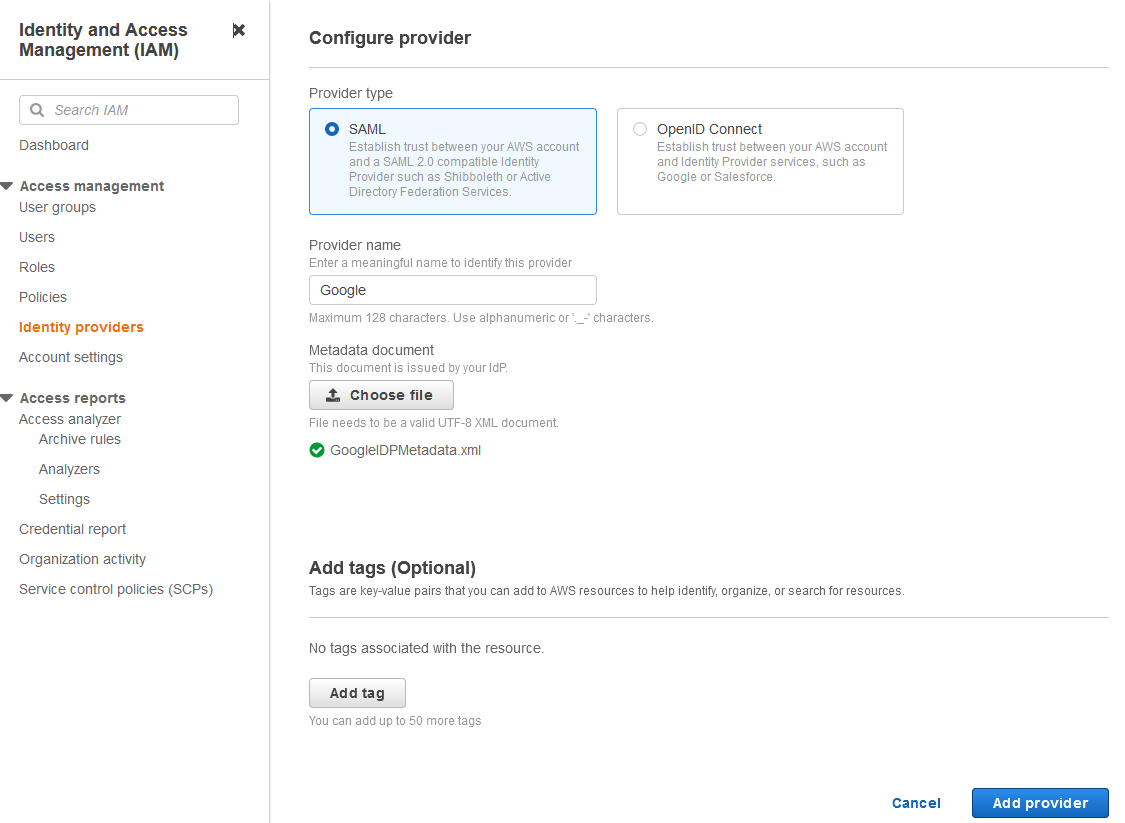</a></li> \n<li>Document the <a href=\"https://docs.aws.amazon.com/general/latest/gr/aws-arns-and-namespaces.html\" target=\"_blank\" rel=\"noopener noreferrer\">Amazon Resource Name (ARN)</a> by viewing the IdP you just created.</li> \n </ol> \n <p>The ARN should looks similar to <code>arn:aws:iam::<YOURACCOUNTNUMBER>:saml-provider/Google</code>. We need this ARN to configure claim rules later in this post.</p> \n\n### **Configure IAM policies for QuickSight roles** \n\n<p>In this step, we create three IAM policies for different role permissions in QuickSight:</p> \n <ul> \n <li><code>QuickSight-Federated-Admin</code></li> \n <li><code>QuickSight-Federated-Author</code></li> \n <li><code>QuickSight-Federated-Reader</code></li> \n </ul> \n <p>Use the following steps to set up the <code>QuickSight-Federated-Admin</code> policy<strong>. </strong>This policy grants admin privileges in QuickSight to the federated user:</p> \n <ol> \n <li>On the IAM console, choose <strong>Policies</strong>.</li> \n <li>Choose <strong>Create policy</strong>.</li> \n <li>Choose <strong>JSON</strong> and replace the existing text with the following code: \n <div class=\"hide-language\"> \n <div class=\"code-toolbar\"><pre class=\" language-code\"><code class=\" language-code\">{\n “Version”: “2012-10-17”,\n “Statement”: [\n {\n “Effect”: “Allow”,\n “Action”: “quicksight:CreateAdmin”,\n “Resource”: “*”\n }\n ]\n}</code></pre><div class=\"toolbar\"><div class=\"toolbar-item\"><span>Code</span></div></div></div> \n </div> </li> \n <li>Choose <strong>Review policy</strong>.</li> \n <li>For <strong>Name</strong>, enter <code>QuickSight-Federated-Admin</code>.</li> \n <li>Choose <strong>Create policy</strong>.</li> \n <li>Repeat these steps to create <code>QuickSight-Federated-Author</code>, and use the following policy to grant author privileges in QuickSight to the federated user: \n <div class=\"hide-language\"> \n <div class=\"code-toolbar\"><pre class=\" language-code\"><code class=\" language-code\">{\n “Version”: “2012-10-17”,\n “Statement”: [\n {\n “Effect”: “Allow”,\n “Action”: “quicksight:CreateUser”,\n “Resource”: “*”\n }\n ]\n}</code></pre><div class=\"toolbar\"><div class=\"toolbar-item\"><span>Code</span></div></div></div> \n </div> </li> \n <li>Repeat the steps to create <code>QuickSight-Federated-Reader</code>, and use the following policy to grant reader privileges in QuickSight to the federated user: \n <div class=\"hide-language\"> \n <div class=\"code-toolbar\"><pre class=\" language-code\"><code class=\" language-code\">{\n “Version”: \"2012-10-17\",\n \"Statement\": [\n {\n \"Effect\": \"Allow\",\n \"Action\": \"quicksight:CreateReader\",\n \"Resource\": \"*\"\n }\n ]\n}</code></pre><div class=\"toolbar\"><div class=\"toolbar-item\"><span>Code</span></div></div></div> \n </div> </li> \n </ol> \n\n### **Configure IAM QuickSight roles for federated users**\n\n<p>Next, create the roles that Google IdP users assume when federating into QuickSight. The following steps set up the admin role:</p> \n <ol> \n <li>On the IAM console, choose <strong>Roles </strong>in the navigation pane.</li> \n <li>Choose <strong>Create role</strong>.</li> \n <li>For <strong>Trusted entity type</strong>, choose <strong>SAML 2.0 federation</strong>.</li> \n <li>For <strong>SAML provider</strong>, choose the provider you created earlier (<code>Google</code>).</li> \n <li>For <strong>Attribute</strong>, choose <strong>SAML:aud</strong>.</li> \n <li>For <strong>Value</strong>, enter <code>https://signin.aws.amazon.com/saml</code>.</li> \n <li>Choose <strong>Next</strong>.<br> <a href=\"https://d2908q01vomqb2.cloudfront.net/b6692ea5df920cad691c20319a6fffd7a4a766b8/2022/05/16/BDB-2221-image009.png\">\n\n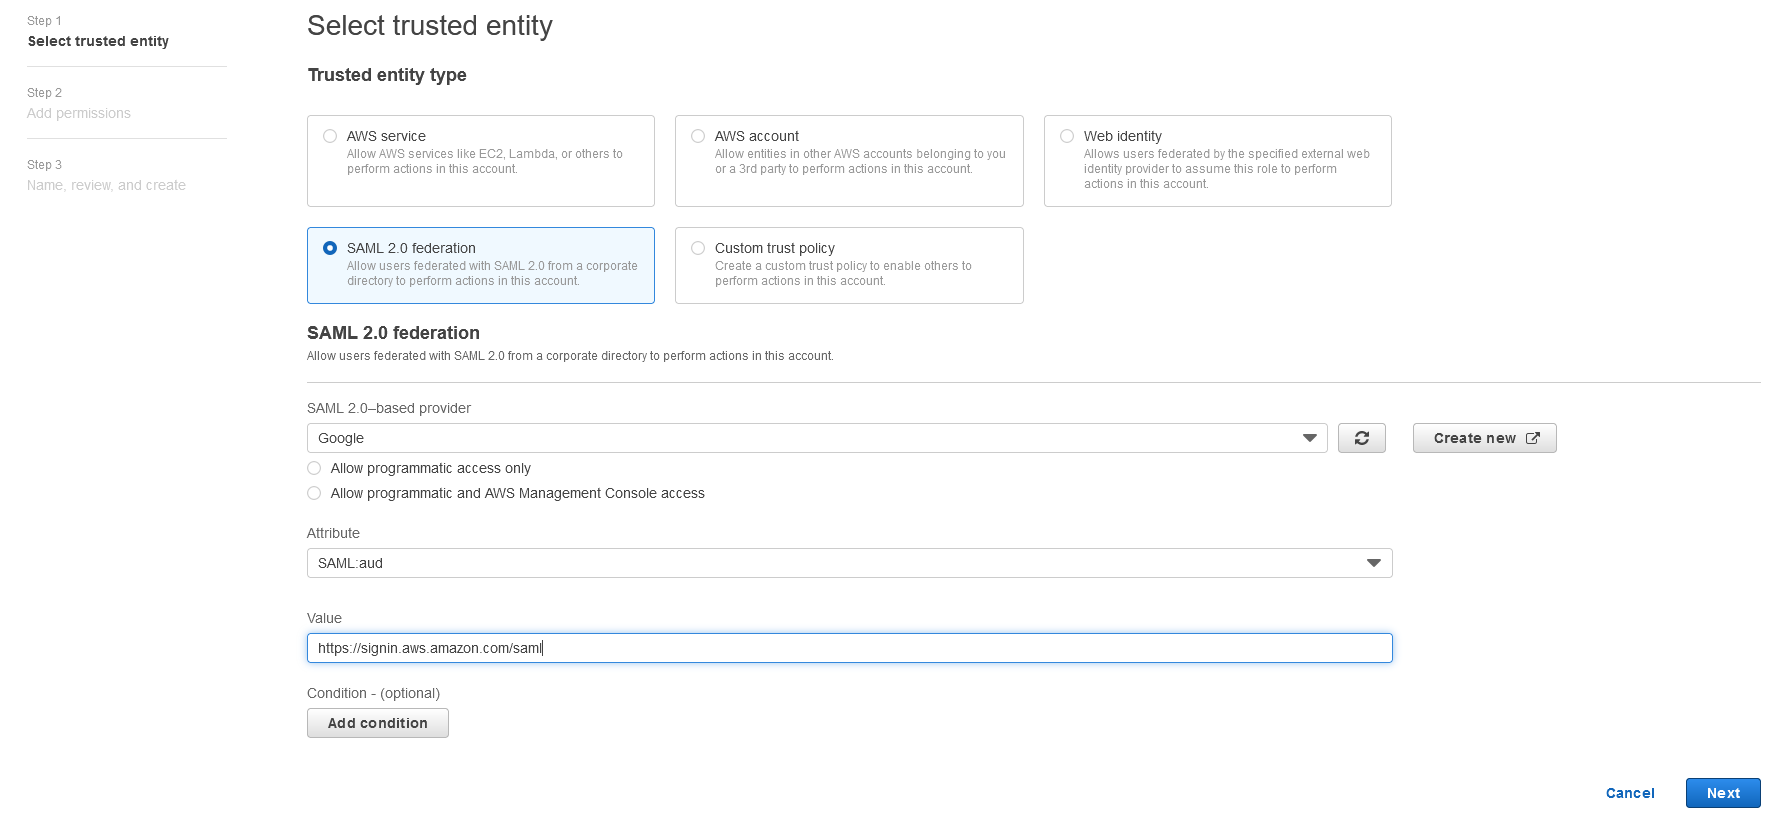</a></li> \n<li>On the <strong>Add permissions</strong> page, select the <code>QuickSight-Federated-Admin</code> IAM policy you created earlier.</li> \n<li>Choose <strong>Next</strong>.<br> <a href=\"https://d2908q01vomqb2.cloudfront.net/b6692ea5df920cad691c20319a6fffd7a4a766b8/2022/05/16/BDB-2221-image011.png\">\n\n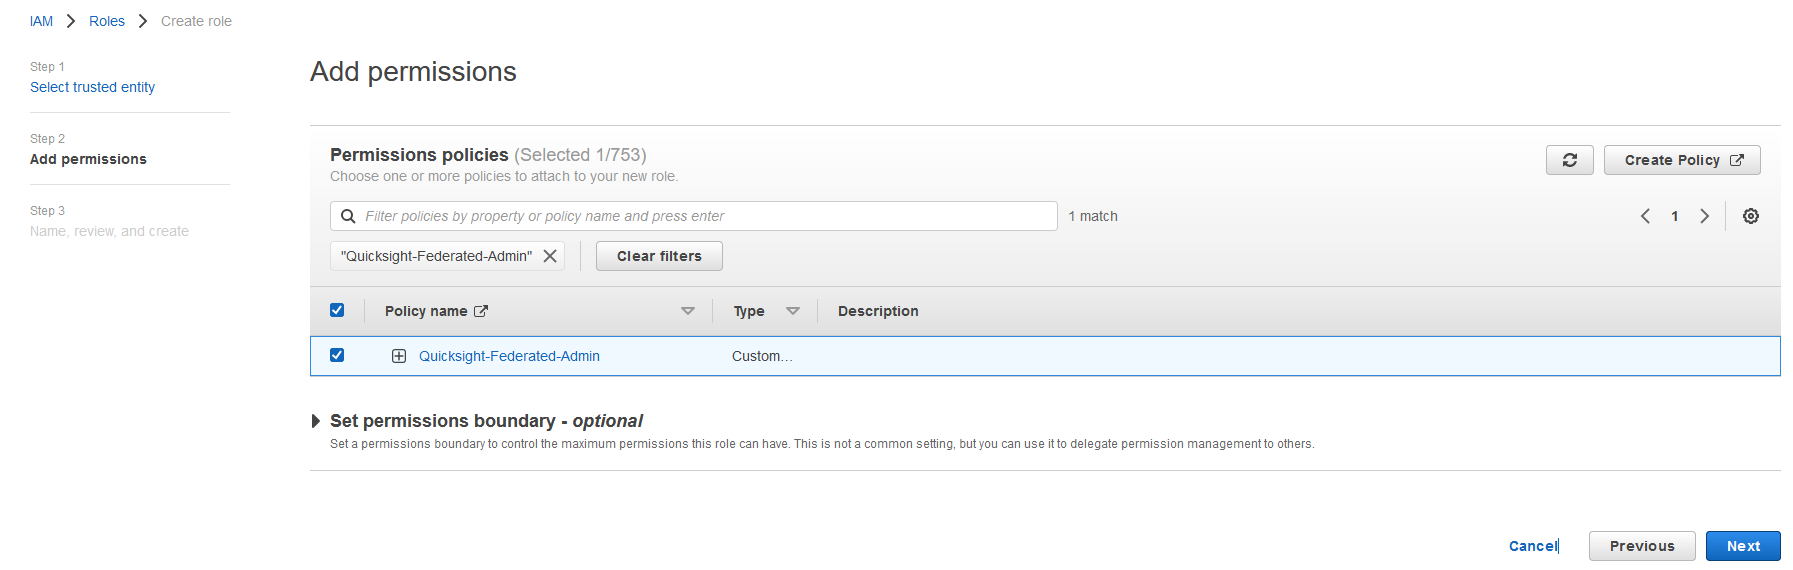</a></li> \n<li>For <strong>Role name</strong>, enter <code>QuickSight-Admin-Role</code>.</li> \n<li>For <strong>Role description</strong>, enter a description.</li> \n<li>Choose <strong>Create role</strong>.<br> <a href=\"https://d2908q01vomqb2.cloudfront.net/b6692ea5df920cad691c20319a6fffd7a4a766b8/2022/05/16/BDB-2221-image013.png\">\n\n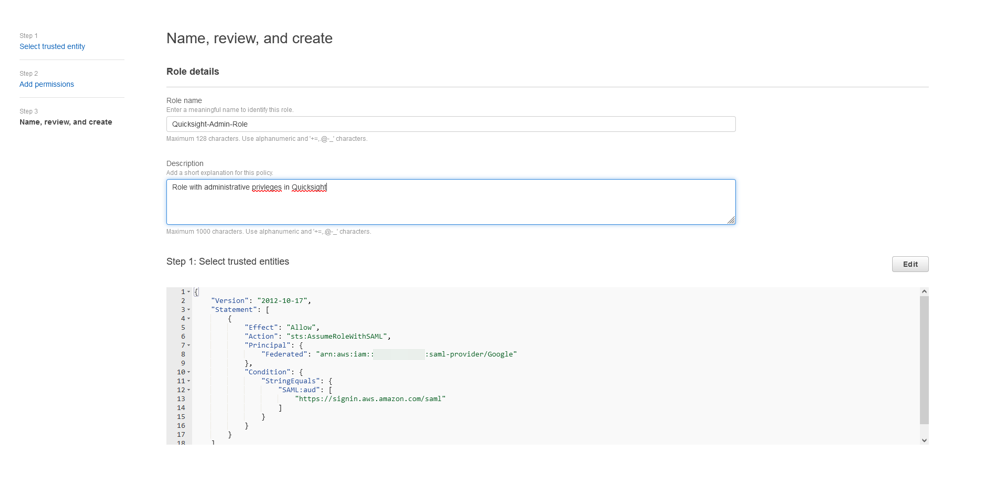</a></li> \n<li>On the IAM console, in the navigation pane, choose <strong>Roles</strong>.</li> \n<li>Choose the <code>QuickSight-Admin-Role</code> role you created to open the role’s properties.</li> \n<li>On the <strong>Trust relationships</strong> tab, choose <strong>Edit trust relationship</strong>.</li> \n<li>Under <strong>Trusted entities</strong>, verify that the IdP you created is listed.</li> \n<li>Under <code>Condition</code>, verify that <code>SAML:aud</code> with a value of <code>https://signin.aws.amazon.com/saml</code> is present.</li> \n <li>Repeat these steps to create author and reader roles and attach the appropriate policies: \n <ol type=\"a\"> \n <li>For <code>QuickSight-Author-Role</code>, use the policy <code>QuickSight-Federated-Author</code>.</li> \n <li>For <code>QuickSight-Reader-Role</code>, use the policy <code>QuickSight-Federated-Reader</code>.<br> <a href=\"https://d2908q01vomqb2.cloudfront.net/b6692ea5df920cad691c20319a6fffd7a4a766b8/2022/05/16/BDB-2221-image015.png\">\n\n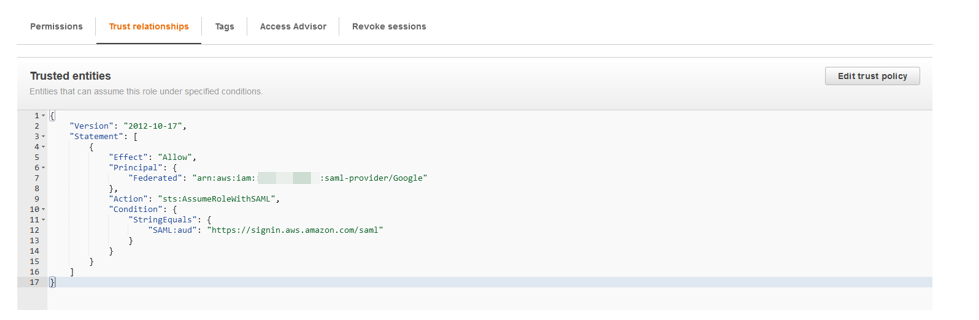</a></li> \n</ol> </li> \n<li>Navigate to the newly created roles and note the ARNs for them.</li> \n</ol> \n<p>We use these ARNs to configure claims rules later in this post. They are in the following format:</p> \n<ul> \n<li><code>arn:aws:iam:: <YOURACCOUNTNUMBER>:role/QuickSight-Admin-Role</code></li> \n <li><code>arn:aws:iam:: <YOURACCOUNTNUMBER>:role/QuickSight-Author-Role</code></li> \n <li><code>arn:aws:iam:: <YOURACCOUNTNUMBER>:role/QuickSight-Reader-Role</code></li> \n </ul> \n\n### **Create a custom user attribute in Google Workspace**\n\n<p>Now let’s create a custom user attribute in your Google Workspace. This allows us to add the SAML attributes that the <a href=\"http://aws.amazon.com/console\" target=\"_blank\" rel=\"noopener noreferrer\">AWS Management Console</a> expects in order to allow a SAML-based authentication.</p> \n <ol> \n <li>Log in to <a href=\"https://admin.google.com/\" target=\"_blank\" rel=\"noopener noreferrer\">Google Admin console</a> with admin credentials.</li> \n <li>Under <strong>Directory</strong>, choose <strong>Users</strong>.</li> \n <li>On the <strong>More options </strong>menu, choose <strong>Manage custom attributes</strong>.<br> <a href=\"https://d2908q01vomqb2.cloudfront.net/b6692ea5df920cad691c20319a6fffd7a4a766b8/2022/05/16/BDB-2221-image017.png\">\n\n</a></li> \n<li>Choose <strong>Add Custom Attribute</strong>.</li> \n<li>For <strong>Select type of trusted entity</strong>, choose <strong>SAML 2.0 federation</strong>.</li> \n<li>Configure the custom attribute as follows: \n<ol type=\"a\"> \n<li><strong>Category</strong>: Amazon</li> \n<li><strong>Description</strong>: Amazon Custom Attributes</li> \n</ol> </li> \n<li>For <strong>Custom fields</strong>, enter the following: \n<ol type=\"a\"> \n<li><strong>Name</strong>: <code>Role</code></li> \n<li><strong>Info type</strong>: Text</li> \n<li><strong>Visibility</strong>: Visible to user and admin</li> \n<li><strong>No. of values</strong>: Multi-value</li> \n</ol> </li> \n<li>Choose <strong>Add</strong>.</li> \n</ol> \n<p>The new category appears on the <strong>Manage user attributes</strong> page.</p> \n<p><a href=\"https://d2908q01vomqb2.cloudfront.net/b6692ea5df920cad691c20319a6fffd7a4a766b8/2022/05/16/BDB-2221-image019.png\">\n\n</a></p> \n\n### **Add the AWS SAML attributes to the Google Workspace user profile**\n\n<p>Now that we have configured a custom user attribute, let’s add the SAML attributes that we noted earlier to the Google Workspace user profile.</p> \n<ol> \n<li>While logged in to the <a href=\"https://admin.google.com/\" target=\"_blank\" rel=\"noopener noreferrer\">Google Admin console</a> with admin credentials, navigate to the <strong>Users </strong>page.</li> \n<li>In the <strong>Users</strong> list, find the user. If you need help, see <a href=\"https://support.google.com/a/answer/33324\" target=\"_blank\" rel=\"noopener noreferrer\">Find a user account.</a></li> \n <li>Choose the user’s name to open their account page.</li> \n <li>Choose <strong>User information</strong>.</li> \n <li>Choose custom attribute you recently created, named Amazon.</li> \n <li>Add a value to this custom attribute noted earlier in the following format: <code><AWS Role ARN></code>,<code><AWS provider/IdP ARN></code>.</li> \n <li>Choose <strong>Save</strong>.<br> <a href=\"https://d2908q01vomqb2.cloudfront.net/b6692ea5df920cad691c20319a6fffd7a4a766b8/2022/05/16/BDB-2221-image021.png\">\n\n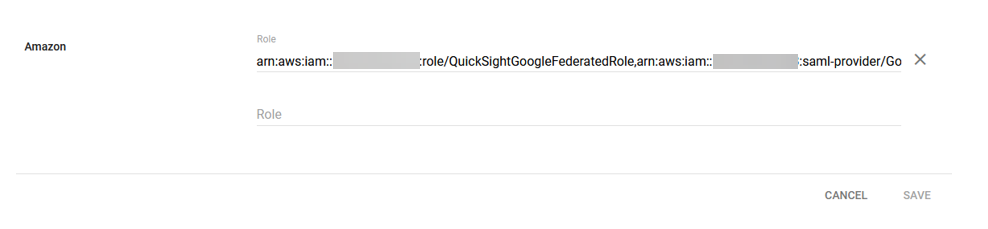</a></li> \n </ol> \n\n### **Set up the AWS SAML app in Google Workspace** \n<p>Now that we have everything in place, we’re ready to create a SAML app within our Google Workspace account and provide the QuickSight instance starting URL. This provides the entry point for Google Workspace users to SSO into the QuickSight instance.</p> \n <ol> \n <li>While logged in to Google Admin console with admin credentials, under <strong>Apps</strong>, choose <strong>Web and mobile apps</strong>.</li> \n <li>Choose <strong>Add App</strong>, and <strong>Search for apps</strong>.</li> \n <li>Enter <code>Amazon Web Services</code> in the search field.</li> \n <li>In the search results, hover over the Amazon Web Services SAML app and choose <strong>Select</strong>.<br> <a href=\"https://d2908q01vomqb2.cloudfront.net/b6692ea5df920cad691c20319a6fffd7a4a766b8/2022/05/16/BDB-2221-image023.png\">\n\n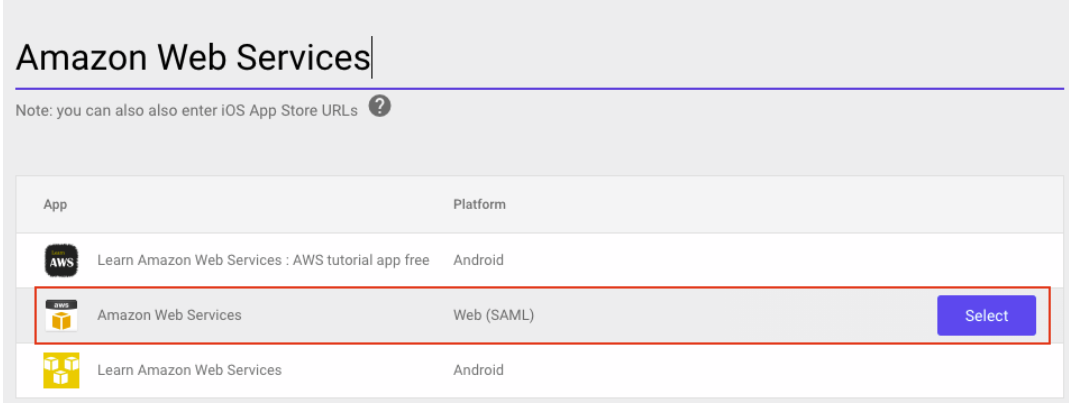</a></li> \n<li>On the<strong> Google Identity Provider</strong> details page, choose <strong>Continue</strong>.</li> \n<li>On the <strong>Service provider details</strong> page, the <strong>ACS URL</strong> and <strong>Entity ID</strong> values for Amazon Web Services are configured by default.</li> \n<li>For <strong>Start URL</strong>, enter <code>https://quicksight.aws.amazon.com</code>.<br> <a href=\"https://d2908q01vomqb2.cloudfront.net/b6692ea5df920cad691c20319a6fffd7a4a766b8/2022/05/16/BDB-2221-image025.png\">\n\n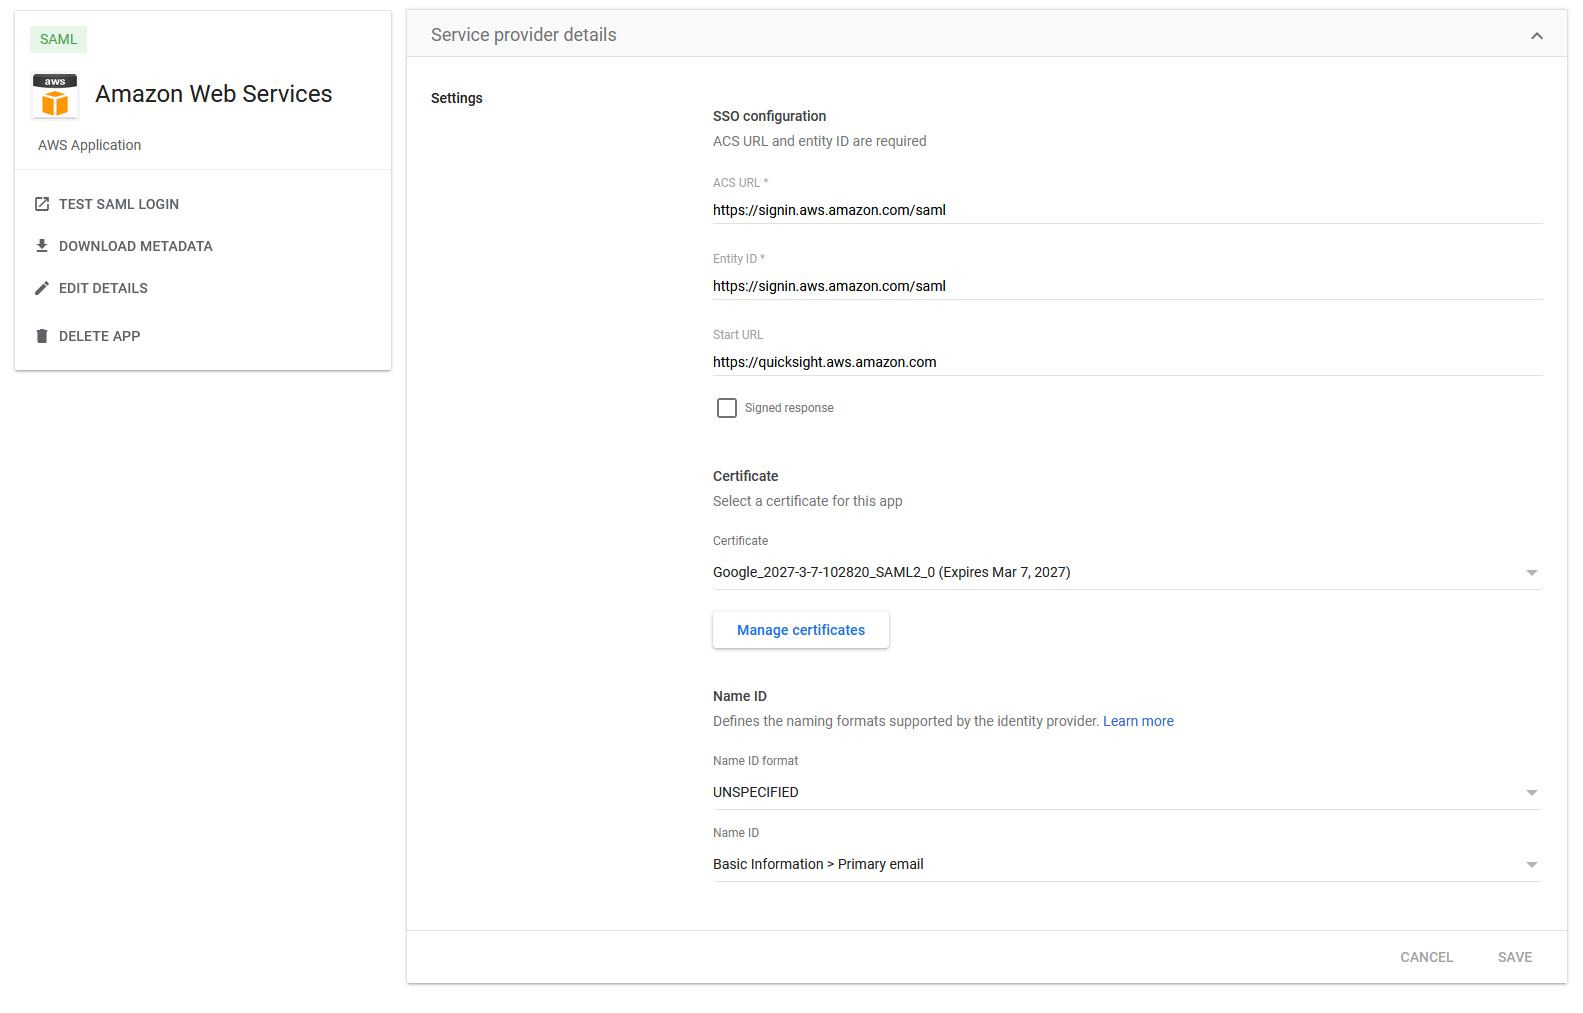</a></li> \n<li>On the <strong>Attribute Mapping</strong> page, choose the <strong>Select field</strong> menu and map the following Google directory attributes to their corresponding Amazon Web Services attributes:<br> \n <table border=\"1px\"> \n <tbody> \n <tr> \n <td>Google Directory Attribute</td> \n <td>Amazon Web Services Attribute</td> \n </tr> \n <tr> \n <td>Basic Information > Primary Email</td> \n <td>https://aws.amazon.com/SAML/Attributes/RoleSessionName</td> \n </tr> \n <tr> \n <td>Amazon > Role</td> \n <td>https://aws.amazon.com/SAML/Attributes/Role</td> \n </tr> \n </tbody> \n </table> <p><a href=\"https://d2908q01vomqb2.cloudfront.net/b6692ea5df920cad691c20319a6fffd7a4a766b8/2022/05/16/BDB-2221-image027.png\">\n\n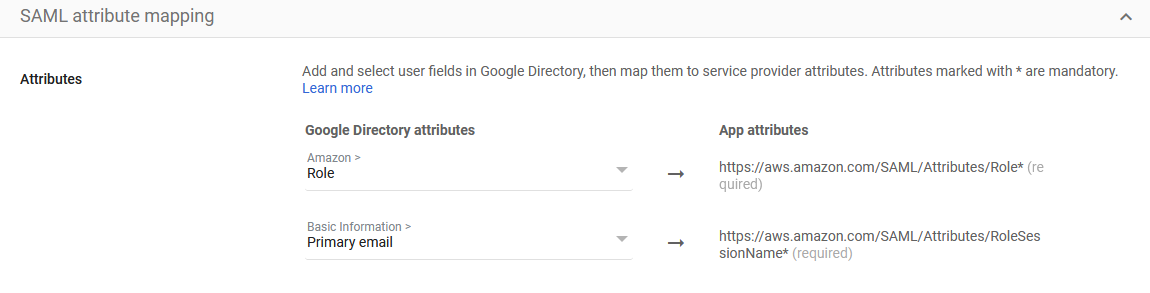</a></p></li> \n</ol> \n<ol start=\"9\"> \n9. Choose Finish.</strong>\n</ol> \n\n### **Grant access to users in Google Workspace** \n\n<p>When the SAML app is created in Google workspace, it’s turned off by default. This means for users logged in to their Google Workspace account, the SAML app isn’t visible to them. We now enable the AWS SAML app to your Google Workspace users.</p> \n <ol> \n <li>While logged in to the Google Admin console with admin credentials, navigate to the <strong>Web and mobile apps </strong>page.</li> \n <li>Choose <strong>Amazon Web Services.<br> <a href=\"https://d2908q01vomqb2.cloudfront.net/b6692ea5df920cad691c20319a6fffd7a4a766b8/2022/05/16/BDB-2221-image029.png\">\n\n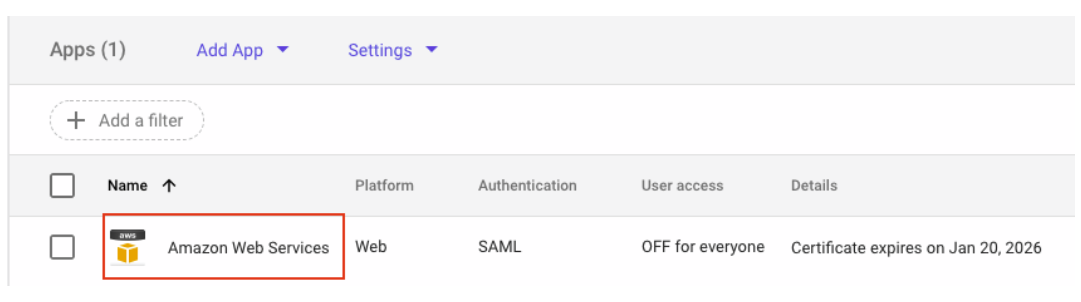</a><br> </strong></li> \n<li>Choose <strong>User access</strong>.<br> <a href=\"https://d2908q01vomqb2.cloudfront.net/b6692ea5df920cad691c20319a6fffd7a4a766b8/2022/05/16/BDB-2221-image031.png\">\n\n</a></li> \n<li>To turn on a service for everyone in your organization, choose <strong>ON for everyone</strong>.</li> \n <li>Choose <strong>Save</strong>.</li> \n </ol> \n <p>If you don’t want to activate this application for all users, you can alternatively grant access to a subset of users by using <a href=\"https://support.google.com/a/answer/182537?hl=en\" target=\"_blank\" rel=\"noopener noreferrer\">Google Workspace organizational units</a>.</p> \n\n### **Verify federated access to the QuickSight instance**\n \n<p>To test your SAML 2.0-based authentication with QuickSight for users in your existing IDP (Google Workspace), complete the following steps:</p> \n <ol> \n <li>Open a new browser session, for example, using Chrome, in a new incognito window.</li> \n <li>Log in to your Google Workspace account (for the purpose of this demo, we use the Google Workspace admin account).</li> \n <li>Choose<strong> Amazon Web Services</strong> from the list of Google apps.<br> <a href=\"https://d2908q01vomqb2.cloudfront.net/b6692ea5df920cad691c20319a6fffd7a4a766b8/2022/05/16/BDB-2221-image033.png\">\n\n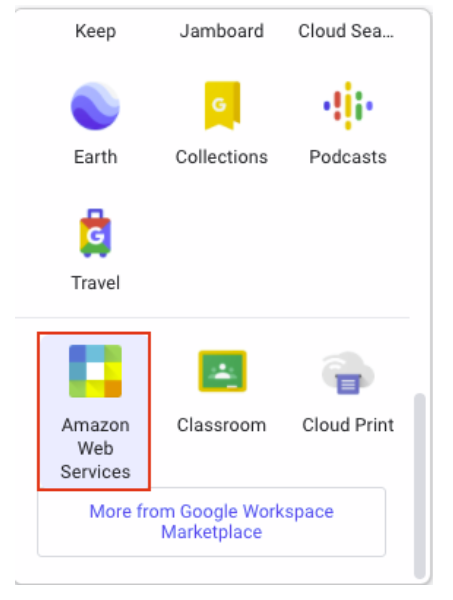</a></li> \n </ol> \n\n### **Conclusion**\n\n<p>This post provided a step-by-step guide for configuring Google Workspace as your IdP, and using IAM roles to enable SSO to QuickSight. Now your users have a seamless sign-in experience to QuickSight and have the appropriate level of access related to their role.</p> \n <p>Although this post demonstrated the integration of IAM and Google Workspace, you can replicate this solution using your choice of SAML 2.0 IdPs. For other supported federation options, see <a href=\"https://docs.aws.amazon.com/quicksight/latest/user/external-identity-providers.html\" target=\"_blank\" rel=\"noopener noreferrer\">Using identity federation and single sign-on (SSO) with Amazon QuickSight</a>.</p> \n <p>To get answers to your questions related to QuickSight, refer to the <a href=\"https://community.amazonquicksight.com/\" target=\"_blank\" rel=\"noopener noreferrer\">QuickSight Community</a>.</p> \n <p>If you have any questions or feedback, please leave a comment.</p> \n <hr> \n\n#### **About the Authors**\n\n \n<p style=\"clear: both\"><strong>Sriharsh Adari</strong> is a Senior Solutions Architect at Amazon Web Services (AWS), where he helps customers work backwards from business outcomes to develop innovative solutions on AWS. Over the years, he has helped multiple customers on data platform transformations across industry verticals. His core area of expertise include Technology Strategy, Data Analytics, and Data Science. In his spare time, he enjoys playing sports, binge-watching TV shows, and playing Tabla.</p> \n\n\n<p style=\"clear: both\"><strong>Srikanth Baheti</strong> is a Specialized World Wide Sr. Solution Architect for Amazon QuickSight. He started his career as a consultant and worked for multiple private and government organizations. Later he worked for PerkinElmer Health and Sciences & eResearch Technology Inc, where he was responsible for designing and developing high traffic web applications, highly scalable and maintainable data pipelines for reporting platforms using AWS services and Serverless computing.</p> \n \n","render":"<section> \n <p><a href=\"https://aws.amazon.com/quicksight\" target=\"_blank\">Amazon QuickSight</a> is a scalable, serverless, embeddable, machine learning (ML)-powered business intelligence (BI) service built for the cloud that supports identity federation in both Standard and Enterprise editions. Organizations are working towards centralizing their identity and access strategy across all of their applications, including on-premises, third-party, and applications on AWS. Many organizations use <a href=\"https://www.google.com/aclk?sa=l&ai=DChcSEwjxu8us6972AhX6bG8EHadvCq4YABAAGgJqZg&sig=AOD64_2R5UVp_8UEu5Z1Ba7Iahd_Ut1GCw&q&adurl&ved=2ahUKEwihm8Os6972AhXVHM0KHV1pBWsQ0Qx6BAgEEAE\" target=\"_blank\">Google Workspace</a> to control and manage user authentication and authorization centrally. You can enable federation to QuickSight accounts without needing to create and manage users. This authorizes users to access QuickSight assets—analyses, dashboards, folders, and datasets—through centrally managed Google Workspace Identities.</p> \n <p>In this post, we go through the steps to configure federated single sign-on (SSO) between a Google Workspace instance and QuickSight account. We demonstrate registering an SSO application in Google Workspace, and map QuickSight roles (admin, author, and reader) to Google Workspace Identities. These QuickSight roles represent three different personas supported in QuickSight. Administrators can publish the QuickSight app in a Google Workspace Dashboard to enable users to SSO to QuickSight using their Google Workspace credentials.</p> \n<h3><a id=\"Solution_overview_4\"></a><strong>Solution overview</strong></h3>\n <p>In your organization, the portal is typically a function of your identity provider (IdP), which handles the exchange of trust between your organization and QuickSight.</p> \n <p>On the <a href=\"https://workspace.google.com/dashboard\" target=\"_blank\">Google Workspace Dashboard</a>, you can review a list of apps. This post shows you how to configure the custom app for AWS.</p> \n<p><img src=\"https://dev-media.amazoncloud.cn/4f176ea89e264d06bbdd24da6aea6167_image.png\" alt=\"image.png\" /></p>\n<p>The user flow consists of the following steps:</p> \n <ol> \n <li>The user logs in to your organization’s portal and chooses the option to go to the QuickSight console.</li> \n <li>The portal verifies the user’s identity in your organization.</li> \n <li>The portal generates a SAML authentication response that includes assertions that identify the user and include attributes about the user. The portal sends this response to the client browser. Although not discussed here, you can also configure your IdP to include a SAML assertion attribute called <a href=\"https://docs.aws.amazon.com/IAM/latest/UserGuide/id_roles_providers_create_saml_assertions.html%22%20/l%20%22saml_role-session-duration\" target=\"_blank\">SessionDuration</a> that specifies how long the console session is valid.</li> \n <li>The client browser is redirected to the AWS single sign-on endpoint and posts the SAML assertion.</li> \n <li>The endpoint requests temporary security credentials on behalf of the user, and creates a QuickSight sign-in URL that uses those credentials.</li> \n <li>AWS sends the sign-in URL back to the client as a redirect.</li> \n <li>The client browser is redirected to the QuickSight console. If the SAML authentication response includes attributes that map to multiple <a href=\"https://aws.amazon.com/iam/\" target=\"_blank\">AWS Identity and Access Management</a> (IAM) roles, the user is first prompted to select the role for accessing the console.</li> \n </ol> \n <p>The following diagram illustrates the solution architecture.</p> \n<p><img src=\"https://dev-media.amazoncloud.cn/88a0184cc66d43c68f126614a769577f_image.png\" alt=\"image.png\" /></p>\n<p>The following are the high-level steps to set up federated single sign-on access via Google Workspace:</p>\n<ol> \n <li>Download the Google IdP information.</li> \n <li>Create an IAM IdP with Google as SAML IdP.</li> \n <li>Configure IAM policies for QuickSight roles.</li> \n <li>Configure IAM QuickSight roles for federated users.</li> \n <li>Create a custom user attribute in Google Workspace.</li> \n <li>Add the AWS SAML attributes to your Google Workspace user profile.</li> \n <li>Set up the AWS SAML app in Google Workspace.</li> \n <li>Grant access to users in Google Workspace.</li> \n <li>Verify federated access to your QuickSight instance.</li> \n </ol>\n<pre><code> <p>Detailed procedures for each of these steps comprise the remainder of this post.</p> \n</code></pre>\n<h3><a id=\"Prerequisites_39\"></a><strong>Prerequisites</strong></h3>\n<p>For this walkthrough, you should have the following prerequisites:</p> \n<ul> \n <li>A <a href=\"https://workspace.google.com/pricing.html?ga_lang=en\" target=\"_blank\">Google Workspace</a> subscription</li> \n <li>An <a href=\"https://signin.aws.amazon.com/signin?redirect_uri=https%3A%2F%2Fportal.aws.amazon.com%2Fbilling%2Fsignup%2Fresume&client_id=signup\" target=\"_blank\">AWS account</a> with QuickSight subscription</li> \n <li>Basic understanding of QuickSight roles—admin, author, and reader</li> \n <li>Basic understanding of IAM and privileges required to create an IAM identity provider, roles, policies, and users</li> \n </ul>\n<h3><a id=\"Download_the_Google_IdP_information_51\"></a><strong>Download the Google IdP information</strong></h3>\n<p>First, let’s get the SAML metadata that contains essential information to enable your AWS account to authenticate the IdP and locate the necessary communication endpoint locations. Complete the following steps:</p> \n <ol> \n <li>Log in to the <a href=\"https://admin.google.com/AdminHome\" target=\"_blank\">Google Workspace Admin console</a>.</li> \n <li>On the Admin console home page, under <strong>Security </strong>in the navigation pane, choose <strong>Authentication </strong>and <strong>SSO with SAML applications</strong>.</li> \n <li>Under <strong>IdP metadata</strong>, choose <strong>Download Metadata</strong>.<br> <a href=\"https://d2908q01vomqb2.cloudfront.net/b6692ea5df920cad691c20319a6fffd7a4a766b8/2022/05/16/BDB-2221-image005.png\">\n<p><img src=\"https://dev-media.amazoncloud.cn/5c3516f9ec1c43f8ab5192db5a95063e_image.png\" alt=\"image.png\" /></a></li><br />\n</ol></p>\n<h3><a id=\"Create_an_IAM_IdP_with_Google_as_SAML_IdP_62\"></a><strong>Create an IAM IdP with Google as SAML IdP</strong></h3>\n<p>You now configure Azure AD as your SAML IdP via the IAM console. Complete the following steps:</p> \n <ol> \n <li>On the IAM console, choose <strong>Identity providers</strong> in the navigation pane.</li> \n <li>Choose <strong>Add provider</strong>.</li> \n <li>For <strong>Configure provider</strong>, select <strong>SAML</strong>.</li> \n <li>For <strong>Provider name</strong>, enter a name for the IdP (such as <code>Google</code>).</li> \n <li>For <strong>Metadata document</strong>, choose <strong>Choose file</strong> and specify the SAML metadata document that you downloaded.</li> \n <li>Choose <strong>Add provider</strong>.<br> <a href=\"https://d2908q01vomqb2.cloudfront.net/b6692ea5df920cad691c20319a6fffd7a4a766b8/2022/05/16/BDB-2221-image007.png\">\n<p><img src=\"https://dev-media.amazoncloud.cn/cd4854759ae14f4a9c10e3a39ef1843c_image.png\" alt=\"image.png\" /></a></li></p>\n<li>Document the <a href=\"https://docs.aws.amazon.com/general/latest/gr/aws-arns-and-namespaces.html\" target=\"_blank\">Amazon Resource Name (ARN)</a> by viewing the IdP you just created.</li> \n </ol> \n <p>The ARN should looks similar to <code>arn:aws:iam::<YOURACCOUNTNUMBER>:saml-provider/Google</code>. We need this ARN to configure claim rules later in this post.</p> \n<h3><a id=\"Configure_IAM_policies_for_QuickSight_roles_78\"></a><strong>Configure IAM policies for QuickSight roles</strong></h3>\n<p>In this step, we create three IAM policies for different role permissions in QuickSight:</p> \n <ul> \n <li><code>QuickSight-Federated-Admin</code></li> \n <li><code>QuickSight-Federated-Author</code></li> \n <li><code>QuickSight-Federated-Reader</code></li> \n </ul> \n <p>Use the following steps to set up the <code>QuickSight-Federated-Admin</code> policy<strong>. </strong>This policy grants admin privileges in QuickSight to the federated user:</p> \n <ol> \n <li>On the IAM console, choose <strong>Policies</strong>.</li> \n <li>Choose <strong>Create policy</strong>.</li> \n <li>Choose <strong>JSON</strong> and replace the existing text with the following code: \n <div> \n <div><pre><code>{\n “Version”: “2012-10-17”,\n “Statement”: [\n {\n “Effect”: “Allow”,\n “Action”: “quicksight:CreateAdmin”,\n “Resource”: “*”\n }\n ]\n}</code></pre><div><div><span>Code</span></div></div></div> \n </div> </li> \n <li>Choose <strong>Review policy</strong>.</li> \n <li>For <strong>Name</strong>, enter <code>QuickSight-Federated-Admin</code>.</li> \n <li>Choose <strong>Create policy</strong>.</li> \n <li>Repeat these steps to create <code>QuickSight-Federated-Author</code>, and use the following policy to grant author privileges in QuickSight to the federated user: \n <div> \n <div><pre><code>{\n “Version”: “2012-10-17”,\n “Statement”: [\n {\n “Effect”: “Allow”,\n “Action”: “quicksight:CreateUser”,\n “Resource”: “*”\n }\n ]\n}</code></pre><div><div><span>Code</span></div></div></div> \n </div> </li> \n <li>Repeat the steps to create <code>QuickSight-Federated-Reader</code>, and use the following policy to grant reader privileges in QuickSight to the federated user: \n <div> \n <div><pre><code>{\n “Version”: \"2012-10-17\",\n \"Statement\": [\n {\n \"Effect\": \"Allow\",\n \"Action\": \"quicksight:CreateReader\",\n \"Resource\": \"*\"\n }\n ]\n}</code></pre><div><div><span>Code</span></div></div></div> \n </div> </li> \n </ol> \n<h3><a id=\"Configure_IAM_QuickSight_roles_for_federated_users_134\"></a><strong>Configure IAM QuickSight roles for federated users</strong></h3>\n<p>Next, create the roles that Google IdP users assume when federating into QuickSight. The following steps set up the admin role:</p> \n <ol> \n <li>On the IAM console, choose <strong>Roles </strong>in the navigation pane.</li> \n <li>Choose <strong>Create role</strong>.</li> \n <li>For <strong>Trusted entity type</strong>, choose <strong>SAML 2.0 federation</strong>.</li> \n <li>For <strong>SAML provider</strong>, choose the provider you created earlier (<code>Google</code>).</li> \n <li>For <strong>Attribute</strong>, choose <strong>SAML:aud</strong>.</li> \n <li>For <strong>Value</strong>, enter <code>https://signin.aws.amazon.com/saml</code>.</li> \n <li>Choose <strong>Next</strong>.<br> <a href=\"https://d2908q01vomqb2.cloudfront.net/b6692ea5df920cad691c20319a6fffd7a4a766b8/2022/05/16/BDB-2221-image009.png\">\n<p><img src=\"https://dev-media.amazoncloud.cn/b71054e6c77a4413856c085f655a40e9_image.png\" alt=\"image.png\" /></a></li></p>\n<li>On the <strong>Add permissions</strong> page, select the <code>QuickSight-Federated-Admin</code> IAM policy you created earlier.</li> \n<li>Choose <strong>Next</strong>.<br> <a href=\"https://d2908q01vomqb2.cloudfront.net/b6692ea5df920cad691c20319a6fffd7a4a766b8/2022/05/16/BDB-2221-image011.png\">\n<p><img src=\"https://dev-media.amazoncloud.cn/f58a275e5f894bcaa6058454358752df_image.png\" alt=\"image.png\" /></a></li></p>\n<li>For <strong>Role name</strong>, enter <code>QuickSight-Admin-Role</code>.</li> \n<li>For <strong>Role description</strong>, enter a description.</li> \n<li>Choose <strong>Create role</strong>.<br> <a href=\"https://d2908q01vomqb2.cloudfront.net/b6692ea5df920cad691c20319a6fffd7a4a766b8/2022/05/16/BDB-2221-image013.png\">\n<p><img src=\"https://dev-media.amazoncloud.cn/853afc0338de48a5aa6ba8d8f8eadbd8_image.png\" alt=\"image.png\" /></a></li></p>\n<li>On the IAM console, in the navigation pane, choose <strong>Roles</strong>.</li> \n<li>Choose the <code>QuickSight-Admin-Role</code> role you created to open the role’s properties.</li> \n<li>On the <strong>Trust relationships</strong> tab, choose <strong>Edit trust relationship</strong>.</li> \n<li>Under <strong>Trusted entities</strong>, verify that the IdP you created is listed.</li> \n<li>Under <code>Condition</code>, verify that <code>SAML:aud</code> with a value of <code>https://signin.aws.amazon.com/saml</code> is present.</li> \n <li>Repeat these steps to create author and reader roles and attach the appropriate policies: \n <ol> \n <li>For <code>QuickSight-Author-Role</code>, use the policy <code>QuickSight-Federated-Author</code>.</li> \n <li>For <code>QuickSight-Reader-Role</code>, use the policy <code>QuickSight-Federated-Reader</code>.<br> <a href=\"https://d2908q01vomqb2.cloudfront.net/b6692ea5df920cad691c20319a6fffd7a4a766b8/2022/05/16/BDB-2221-image015.png\">\n<p><img src=\"https://dev-media.amazoncloud.cn/9ac1a45bc92f4670b4bd9b47696b6734_image.png\" alt=\"image.png\" /></a></li></p>\n</ol> </li> \n<li>Navigate to the newly created roles and note the ARNs for them.</li> \n</ol> \n<p>We use these ARNs to configure claims rules later in this post. They are in the following format:</p> \n<ul> \n<li><code>arn:aws:iam:: <YOURACCOUNTNUMBER>:role/QuickSight-Admin-Role</code></li> \n <li><code>arn:aws:iam:: <YOURACCOUNTNUMBER>:role/QuickSight-Author-Role</code></li> \n <li><code>arn:aws:iam:: <YOURACCOUNTNUMBER>:role/QuickSight-Reader-Role</code></li> \n </ul> \n<h3><a id=\"Create_a_custom_user_attribute_in_Google_Workspace_177\"></a><strong>Create a custom user attribute in Google Workspace</strong></h3>\n<p>Now let’s create a custom user attribute in your Google Workspace. This allows us to add the SAML attributes that the <a href=\"http://aws.amazon.com/console\" target=\"_blank\">AWS Management Console</a> expects in order to allow a SAML-based authentication.</p> \n <ol> \n <li>Log in to <a href=\"https://admin.google.com/\" target=\"_blank\">Google Admin console</a> with admin credentials.</li> \n <li>Under <strong>Directory</strong>, choose <strong>Users</strong>.</li> \n <li>On the <strong>More options </strong>menu, choose <strong>Manage custom attributes</strong>.<br> <a href=\"https://d2908q01vomqb2.cloudfront.net/b6692ea5df920cad691c20319a6fffd7a4a766b8/2022/05/16/BDB-2221-image017.png\">\n<p><img src=\"https://dev-media.amazoncloud.cn/c01c486c1e0d462c8e7efda41045075d_image.png\" alt=\"image.png\" /></a></li></p>\n<li>Choose <strong>Add Custom Attribute</strong>.</li> \n<li>For <strong>Select type of trusted entity</strong>, choose <strong>SAML 2.0 federation</strong>.</li> \n<li>Configure the custom attribute as follows: \n<ol> \n<li><strong>Category</strong>: Amazon</li> \n<li><strong>Description</strong>: Amazon Custom Attributes</li> \n</ol> </li> \n<li>For <strong>Custom fields</strong>, enter the following: \n<ol> \n<li><strong>Name</strong>: <code>Role</code></li> \n<li><strong>Info type</strong>: Text</li> \n<li><strong>Visibility</strong>: Visible to user and admin</li> \n<li><strong>No. of values</strong>: Multi-value</li> \n</ol> </li> \n<li>Choose <strong>Add</strong>.</li> \n</ol> \n<p>The new category appears on the <strong>Manage user attributes</strong> page.</p> \n<p><a href=\"https://d2908q01vomqb2.cloudfront.net/b6692ea5df920cad691c20319a6fffd7a4a766b8/2022/05/16/BDB-2221-image019.png\">\n<p><img src=\"https://dev-media.amazoncloud.cn/2860ecf9b4414358b7e977eb7c9894b5_image.png\" alt=\"image.png\" /></a></p></p>\n<h3><a id=\"Add_the_AWS_SAML_attributes_to_the_Google_Workspace_user_profile_207\"></a><strong>Add the AWS SAML attributes to the Google Workspace user profile</strong></h3>\n<p>Now that we have configured a custom user attribute, let’s add the SAML attributes that we noted earlier to the Google Workspace user profile.</p> \n<ol> \n<li>While logged in to the <a href=\"https://admin.google.com/\" target=\"_blank\">Google Admin console</a> with admin credentials, navigate to the <strong>Users </strong>page.</li> \n<li>In the <strong>Users</strong> list, find the user. If you need help, see <a href=\"https://support.google.com/a/answer/33324\" target=\"_blank\">Find a user account.</a></li> \n <li>Choose the user’s name to open their account page.</li> \n <li>Choose <strong>User information</strong>.</li> \n <li>Choose custom attribute you recently created, named Amazon.</li> \n <li>Add a value to this custom attribute noted earlier in the following format: <code><AWS Role ARN></code>,<code><AWS provider/IdP ARN></code>.</li> \n <li>Choose <strong>Save</strong>.<br> <a href=\"https://d2908q01vomqb2.cloudfront.net/b6692ea5df920cad691c20319a6fffd7a4a766b8/2022/05/16/BDB-2221-image021.png\">\n<p><img src=\"https://dev-media.amazoncloud.cn/b7f16ca7cfa343dd9d1fb071aa7e3b29_image.png\" alt=\"image.png\" /></a></li><br />\n</ol></p>\n<h3><a id=\"Set_up_the_AWS_SAML_app_in_Google_Workspace_222\"></a><strong>Set up the AWS SAML app in Google Workspace</strong></h3>\n<p>Now that we have everything in place, we’re ready to create a SAML app within our Google Workspace account and provide the QuickSight instance starting URL. This provides the entry point for Google Workspace users to SSO into the QuickSight instance.</p> \n <ol> \n <li>While logged in to Google Admin console with admin credentials, under <strong>Apps</strong>, choose <strong>Web and mobile apps</strong>.</li> \n <li>Choose <strong>Add App</strong>, and <strong>Search for apps</strong>.</li> \n <li>Enter <code>Amazon Web Services</code> in the search field.</li> \n <li>In the search results, hover over the Amazon Web Services SAML app and choose <strong>Select</strong>.<br> <a href=\"https://d2908q01vomqb2.cloudfront.net/b6692ea5df920cad691c20319a6fffd7a4a766b8/2022/05/16/BDB-2221-image023.png\">\n<p><img src=\"https://dev-media.amazoncloud.cn/d821edc63bf340a38ade463ab8972af7_image.png\" alt=\"image.png\" /></a></li></p>\n<li>On the<strong> Google Identity Provider</strong> details page, choose <strong>Continue</strong>.</li> \n<li>On the <strong>Service provider details</strong> page, the <strong>ACS URL</strong> and <strong>Entity ID</strong> values for Amazon Web Services are configured by default.</li> \n<li>For <strong>Start URL</strong>, enter <code>https://quicksight.aws.amazon.com</code>.<br> <a href=\"https://d2908q01vomqb2.cloudfront.net/b6692ea5df920cad691c20319a6fffd7a4a766b8/2022/05/16/BDB-2221-image025.png\">\n<p><img src=\"https://dev-media.amazoncloud.cn/c59c8d0324f742bfb88c9f8d5bff6931_image.png\" alt=\"image.png\" /></a></li></p>\n<li>On the <strong>Attribute Mapping</strong> page, choose the <strong>Select field</strong> menu and map the following Google directory attributes to their corresponding Amazon Web Services attributes:<br> \n <table border=\"1px\"> \n <tbody> \n <tr> \n <td>Google Directory Attribute</td> \n <td>Amazon Web Services Attribute</td> \n </tr> \n <tr> \n <td>Basic Information > Primary Email</td> \n <td>https://aws.amazon.com/SAML/Attributes/RoleSessionName</td> \n </tr> \n <tr> \n <td>Amazon > Role</td> \n <td>https://aws.amazon.com/SAML/Attributes/Role</td> \n </tr> \n </tbody> \n </table> <p><a href=\"https://d2908q01vomqb2.cloudfront.net/b6692ea5df920cad691c20319a6fffd7a4a766b8/2022/05/16/BDB-2221-image027.png\">\n<p><img src=\"https://dev-media.amazoncloud.cn/d031b98e1f644c56982d342b89e41823_image.png\" alt=\"image.png\" /></a></p></li></p>\n</ol> \n<ol> \n9. Choose Finish.</strong>\n</ol> \n<h3><a id=\"Grant_access_to_users_in_Google_Workspace_260\"></a><strong>Grant access to users in Google Workspace</strong></h3>\n<p>When the SAML app is created in Google workspace, it’s turned off by default. This means for users logged in to their Google Workspace account, the SAML app isn’t visible to them. We now enable the AWS SAML app to your Google Workspace users.</p> \n <ol> \n <li>While logged in to the Google Admin console with admin credentials, navigate to the <strong>Web and mobile apps </strong>page.</li> \n <li>Choose <strong>Amazon Web Services.<br> <a href=\"https://d2908q01vomqb2.cloudfront.net/b6692ea5df920cad691c20319a6fffd7a4a766b8/2022/05/16/BDB-2221-image029.png\">\n<p><img src=\"https://dev-media.amazoncloud.cn/038273d92dbc404da7c7399cfddcb334_image.png\" alt=\"image.png\" /></a><br> </strong></li></p>\n<li>Choose <strong>User access</strong>.<br> <a href=\"https://d2908q01vomqb2.cloudfront.net/b6692ea5df920cad691c20319a6fffd7a4a766b8/2022/05/16/BDB-2221-image031.png\">\n<p><img src=\"https://dev-media.amazoncloud.cn/fa51a33c0778438f92817ac262894be7_image.png\" alt=\"image.png\" /></a></li></p>\n<li>To turn on a service for everyone in your organization, choose <strong>ON for everyone</strong>.</li> \n <li>Choose <strong>Save</strong>.</li> \n </ol> \n <p>If you don’t want to activate this application for all users, you can alternatively grant access to a subset of users by using <a href=\"https://support.google.com/a/answer/182537?hl=en\" target=\"_blank\">Google Workspace organizational units</a>.</p> \n<h3><a id=\"Verify_federated_access_to_the_QuickSight_instance_276\"></a><strong>Verify federated access to the QuickSight instance</strong></h3>\n<p>To test your SAML 2.0-based authentication with QuickSight for users in your existing IDP (Google Workspace), complete the following steps:</p> \n <ol> \n <li>Open a new browser session, for example, using Chrome, in a new incognito window.</li> \n <li>Log in to your Google Workspace account (for the purpose of this demo, we use the Google Workspace admin account).</li> \n <li>Choose<strong> Amazon Web Services</strong> from the list of Google apps.<br> <a href=\"https://d2908q01vomqb2.cloudfront.net/b6692ea5df920cad691c20319a6fffd7a4a766b8/2022/05/16/BDB-2221-image033.png\">\n<p><img src=\"https://dev-media.amazoncloud.cn/0de9f6de05ee45eb9a5d66b4f40d569b_image.png\" alt=\"image.png\" /></a></li><br />\n</ol></p>\n<h3><a id=\"Conclusion_287\"></a><strong>Conclusion</strong></h3>\n<p>This post provided a step-by-step guide for configuring Google Workspace as your IdP, and using IAM roles to enable SSO to QuickSight. Now your users have a seamless sign-in experience to QuickSight and have the appropriate level of access related to their role.</p> \n <p>Although this post demonstrated the integration of IAM and Google Workspace, you can replicate this solution using your choice of SAML 2.0 IdPs. For other supported federation options, see <a href=\"https://docs.aws.amazon.com/quicksight/latest/user/external-identity-providers.html\" target=\"_blank\">Using identity federation and single sign-on (SSO) with Amazon QuickSight</a>.</p> \n <p>To get answers to your questions related to QuickSight, refer to the <a href=\"https://community.amazonquicksight.com/\" target=\"_blank\">QuickSight Community</a>.</p> \n <p>If you have any questions or feedback, please leave a comment.</p> \n <hr> \n<h4><a id=\"About_the_Authors_295\"></a><strong>About the Authors</strong></h4>\n<p><img src=\"https://dev-media.amazoncloud.cn/3c616c6a49f64beab935e3e411728026_image.png\" alt=\"image.png\" /></p>\n<p><strong>Sriharsh Adari</strong> is a Senior Solutions Architect at Amazon Web Services (AWS), where he helps customers work backwards from business outcomes to develop innovative solutions on AWS. Over the years, he has helped multiple customers on data platform transformations across industry verticals. His core area of expertise include Technology Strategy, Data Analytics, and Data Science. In his spare time, he enjoys playing sports, binge-watching TV shows, and playing Tabla.</p> \n<p><img src=\"https://dev-media.amazoncloud.cn/8ba20eebefe247b2bc114e1a4aad6ca3_image.png\" alt=\"image.png\" /></p>\n<p><strong>Srikanth Baheti</strong> is a Specialized World Wide Sr. Solution Architect for Amazon QuickSight. He started his career as a consultant and worked for multiple private and government organizations. Later he worked for PerkinElmer Health and Sciences & eResearch Technology Inc, where he was responsible for designing and developing high traffic web applications, highly scalable and maintainable data pipelines for reporting platforms using AWS services and Serverless computing.</p> \n"}
Enable Amazon QuickSight federation with Google Workspace
海外精选

海外精选的内容汇集了全球优质的亚马逊云科技相关技术内容。同时,内容中提到的“AWS”
是 “Amazon Web Services” 的缩写,在此网站不作为商标展示。

 0
0 0
0亚马逊云科技解决方案 基于行业客户应用场景及技术领域的解决方案
联系亚马逊云科技专家
亚马逊云科技解决方案
基于行业客户应用场景及技术领域的解决方案
联系专家

0
目录

 分享
分享 点赞
点赞 收藏
收藏 目录
目录立即注册,开启您的免费套餐
立即关注

亚马逊云开发者
公众号

User Group
公众号

亚马逊云科技
官方小程序
“AWS” 是 “Amazon Web Services” 的缩写,在此网站不作为商标展示。
立即关注
亚马逊云开发者
公众号
User Group
公众号
亚马逊云科技
官方小程序
“AWS” 是 “Amazon Web Services” 的缩写,在此网站不作为商标展示。
关于我们 
更多资源
开发者工具
更多支持
立即关注
亚马逊云开发者
公众号
User Group
公众号
亚马逊云科技
官方小程序
“AWS” 是 “Amazon Web Services” 的缩写,在此网站不作为商标展示。
