{"value":"Enterprises are migrating their Microsoft SQL Server workloads to AWS fully managed database services like [Amazon Relational Database Service (Amazon RDS) for SQL Server](https://aws.amazon.com/cn/rds/sqlserver/), which makes it easy to set up, operate, and scale SQL Server deployment in the cloud. There are a few native Microsoft SQL Server tools available if you want to migrate your SQL Server databases from on-premises or [Amazon Elastic Compute Cloud](https://aws.amazon.com/cn/ec2/) (Amazon EC2) SQL Server to Amazon RDS for SQL Server. [SQL Server native backup and restore](https://aws.amazon.com/cn/blogs/database/migrating-sql-server-to-amazon-rds-using-native-backup-and-restore/) is one of the easiest ways. If your migration requires low Recovery Time objective (RTO) and Recovery Point Objective (RPO), then you can use [SQL Server replication with Amazon RDS for SQL Server as a subscriber.](https://aws.amazon.com/cn/blogs/database/part-3-migrating-to-amazon-rds-for-sql-server-using-transactional-replication-with-native-backup-and-restore/) If you want to migrate the SQL Server databases along with the users and minimize the outage window during the cutover, then consider using log shipping.\n\nIn this post, we walk you through the process of migrating your SQL Server databases to Amazon RDS using the native log shipping and PowerShell scripts.\n\n### **Solution overview**\n\nThis solution involves running custom scripts and setting up log shipping to send transaction log backups from your on-premises or Amazon EC2 SQL Server primary instance, to an Amazon RDS for SQL Server standby instance. The transaction log backups are then applied to the databases on the standby instance. After that, you can perform the cutover and redirect application connections to the new databases.\n\nThis solution can be deployed in any [SQL Server versions that are supported](https://docs.aws.amazon.com/AmazonRDS/latest/UserGuide/CHAP_SQLServer.html#SQLServer.Concepts.General.VersionSupport) in Amazon RDS for SQL Server.\n\nThe following diagram illustrates our solution architecture.\n\n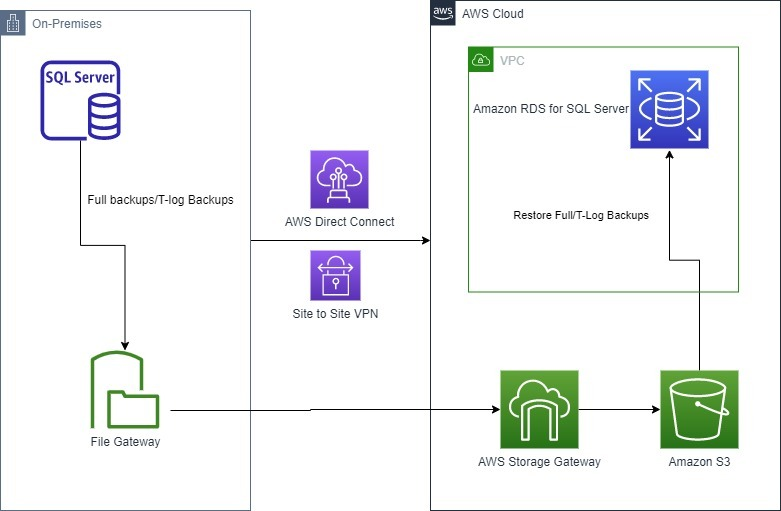\n\nTo set up the log synchronization between the primary instance to the standby instance, you must complete the following steps:\n\n1. Set up log shipping on your on-premises or Amazon EC2 SQL Server instance.\n2. Configure the Amazon RDS for SQL Server instance for native backup and restore.\n3. Set up a restore job on the Amazon RDS for SQL Server instance.\n\n### **Prerequisites**\n\nBefore you get started, make sure you have the following prerequisites:\n\n- On-premises or Amazon EC2 SQL Server instance\n- [Amazon RDS for SQL Server](https://docs.aws.amazon.com/AmazonRDS/latest/UserGuide/USER_CreateDBInstance.html) instance\n- Access to the [AWS Management Console](https://aws.amazon.com/cn/console/)\n- SQL Server Management Studio (SSMS)\n- An [Amazon Simple Storage Service](https://aws.amazon.com/cn/s3/) (Amazon S3) bucket\n- SQL credentials to connect to Amazon RDS stored in [AWS Secrets Manager](https://aws.amazon.com/cn/secrets-manager/)\n- An [AWS Identity and Access Management](https://aws.amazon.com/cn/iam/) (IAM) role to access the S3 bucket and secret\n- [AWS Storage Gateway](https://aws.amazon.com/cn/storagegateway/) for [file storage](https://aws.amazon.com/cn/blogs/database/storing-sql-server-backups-in-amazon-s3-using-aws-storage-gateway/)\n\nThe cost components associated with deploying this solution include Amazon RDS for SQL Server instance, database storage, Amazon S3 Bucket, AWS Secrets Manager and AWS Storage Gateway. You can estimate the cost using the [AWS Pricing Calculator.](https://calculator.aws/#/)\n\n### **Set up log shipping**\n\nFirst connect to your on-premises or Amazon EC2 SQL Server primary instance. Then use SQL Server Management Studio (SSMS) to check the database recovery mode for all the databases you want to include for log shipping.\n\n1. Make sure the database is set to [full recovery model.](https://docs.microsoft.com/en-us/sql/relational-databases/backup-restore/recovery-models-sql-server?view=sql-server-ver15)\n\t```\n\tUSE [master]\n\tGO\n\tALTER DATABASE [mydatabase] SET RECOVERY FULL WITH NO_WAIT\n\tGO\n\t```\n2. Download the scripts for this solution from the [GitHub repository](https://github.com/aws-samples/aws-log-shipping-from-onprem-ec2-to-rds-sql-server) and copy them to a local disk location in the primary SQL Server.\nThe repo contains the following files:\n\t- ConfigFile.txt\n\t- Logshipping_Full_Backup.ps1\n\t- Logshipping_Restore.ps1\n\t- Full_Backup_Job.sql\n\t- Restore_Job.sql\n3. Create the folder ```C:\\LogshippingScripts\\``` and save all these files with the same name in that location.\nNote: If you change the file names or file locations, you must also update the file locations in the PowerShell and SQL scripts.\n4. Provide input parameters in the config file.\nThe full backup and restore method uses PowerShell scripts, which use the input parameters from the config file.\n Open ConfigFile.txt and update the details of your environment as follows and save it.\n\n\t- **primarySqlServer** – The source SQL Server name with its port number.\n\t- **primaryServerBackupFolder** – The Storage Gateway shared drive location for primary backups files.\n\t- **secondarySqlServer** – The RDS for SQL Server endpoint with port number.\n\t- **databases** – The databases for this configuration with comma-separated values.\n\t- **s3BucketName** – The S3 bucket that has the backup files.\n\t- **s3BackupFolder** – The S3 folder that stores the backups.\n\t- **awsSecretName** – The Secrets Manager secret name that has the account information to connect to Amazon RDS.\n\t- **awsRegion** – The AWS Region of the secrets.\n\t- **restoreJobLogfile** – The log file location to save the restore job run details.\n\t- **backupLogFile** – The log file location to save the backup job run details.\n\t- **timeoutinSeconds** – The timeout interval in seconds. If the restore doesn’t complete within this interval, the scripts time out. You can check the restore status in the logs, and the task status in Amazon RDS. The default value is 600. If you’re restoring larger files, set this to a higher value.\n\t- **verifyIntervalSeconds** –The interval in which the script verifies the status of each task before its timeout. The default value is 30.\n\nThe following is a sample config file:\n\n\t\n\t{\n \"primarySqlServer\":\"EC2AMA,1433\",\n \"primaryServerBackupFolder”:\"X:\\LogShippingBackup\\\",\n \"secondarySqlServer”:\"test.cbfnzqwozz4n.us-east-1.rds.amazonaws.com,1433\",\n \"databases”: [\"LogshipTest_1\",\"LogshipTest_2\"],\n \"s3BucketName”: \"migratesqltest\",\n \"s3BackupFolder” :\"DB_Logship\",\n \"awsSecretName\" :\"LogshipCred\",\n \"awsRegion\" :\"us-east-2\",\n \"restoreJobLogfile\" :\"C:\\Restore\\Logship_Log\",\n \"backupLogFile\" : C:\\Backup\\Logship_Log\",\n \"timeoutinSeconds\" :600,\n \"verifyIntervalSeconds\" :30\n\t}\n\t\nIf the files are saved in ```C:\\LogshippingScripts\\``` with the same names, you can skip the next two steps. Otherwise, update the file locations as shown.\n\n5. To update ```Logshipping_Full_Backup.ps1```, edit the PowerShell script and provide the config file location that you used earlier (line 4) and save the file.\n\n\n\n6. Open ```Full_Backup_Job.sql``` and provide the full backup PowerShell file location (line 11) and save the file.\n\n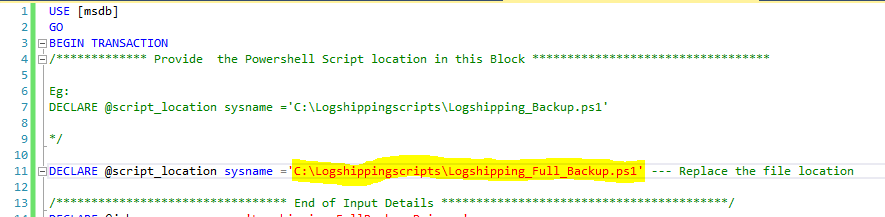\n\nYou are now ready to create your full backup job. For this post, we take a full backup of the database to Amazon S3 using Storage Gateway. For more information, refer to Store SQL Server backups in Amazon S3 using AWS Storage Gateway. To automate the full backup of all databases using PowerShell, you run the Full_Backup_Job.sql script on your source SQL Server instance as in the following step.\n7. Connect to the primary SQL server instance in SSMS, open a new query window, and run the ```Full_Backup_Job.sql``` file.\nThe script creates a full backup job called ```Logshipping_FullBackup_Primary```.\n8. Run the job to create a full backup for all the databases provided in the config file.\n9. Right-click on the database in SSMS and go to the database properties and make sure **Enable this as primary database in log shipping configuration** is selected.\n\n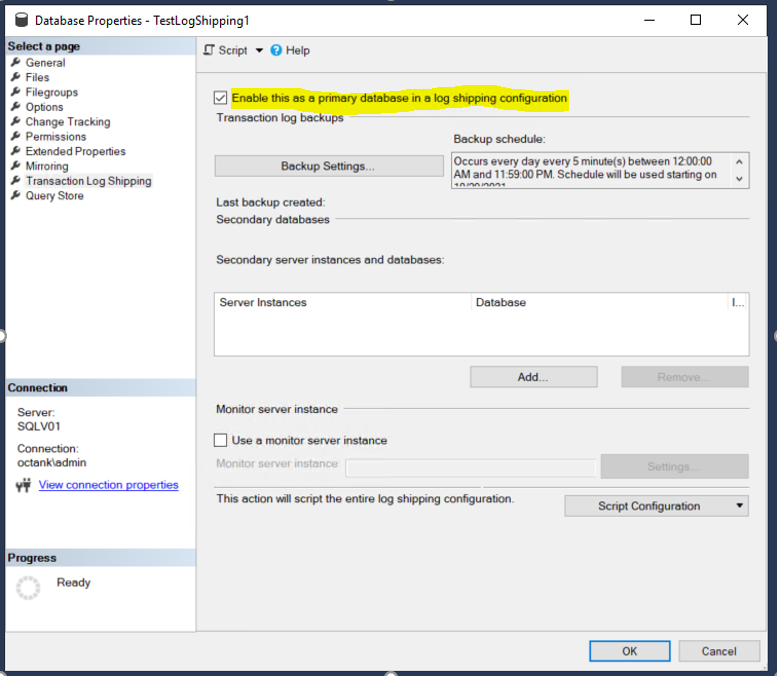\n\n10. Configure your backup settings and add the Storage Gateway’s file share path as the **Network path for backup folder** and **local path to the folder**. For this post, ```testlogshipping``` is the S3 bucket used by Storage Gateway and ```LogShippingBackup``` is the folder within the S3 bucket that stores the log files.\n11. Set the interval of the SQL Server log backup schedule. For this post, we set it to 15 minutes.\n\n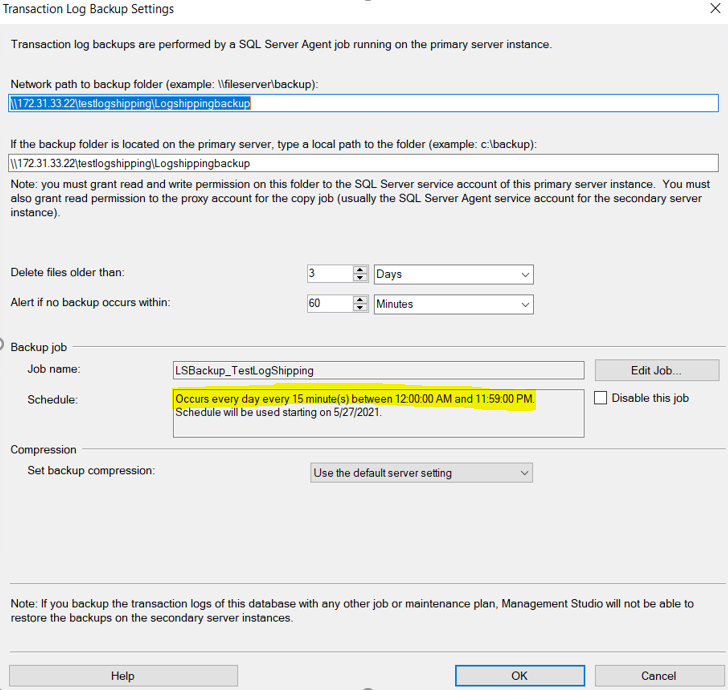\n\n12. Click OK to save the log shipping backup configuration settings.\n\n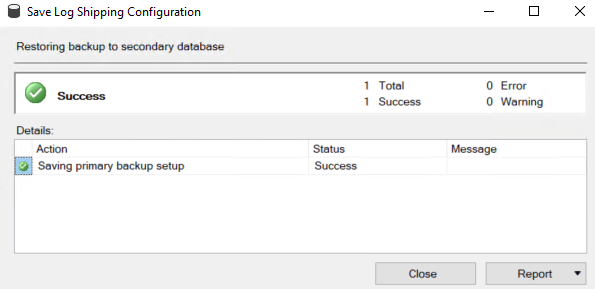\n\n13. Repeat steps 9-13 to enable log shipping for all user databases that you want to restore to Amazon RDS for SQL Server.\n14. Verify that the SQL Server jobs are created for log shipping by checking under SQL Server Agent jobs in SSMS.\n15. Open the folder location for the Storage Gateway file share and verify the files are created successfully.\n\n\n\n### **Configure Amazon RDS for SQL Server for native backup and restore**\n\nTo perform native restores on Amazon RDS, we must add an option group that has the ```SQLSERVER_BACKUP_RESTORE``` option on the Amazon RDS database instance.\n\n1. On the Amazon RDS console, choose **Option Groups** in the navigation pane.\n2. Choose **Create group**.\n3. Enter the name, description, engine, and engine version of your server.\n4. Choose **Create**.\n5. Select the option group that you created, then choose **Add Option**.\n6. Choose **SQLSERVER_BACKUP_RESTORE**.\n7. Associate the option group with the DB instance by choosing **Databases** in the navigation pane, then choose the instance to back up.\n8. Choose **Actions**, then choose **Modify**.\n9. Under **Database Options**, choose the option group that you created, then choose **Apply Immediately** and **Continue**.\n10. Review the information, then choose **Modify DB Instance**.\n\nThis option group modification [has no downtime](https://docs.aws.amazon.com/AmazonRDS/latest/UserGuide/Overview.DBInstance.Modifying.html#USER_ModifyInstance.Settings) because it doesn’t require an instance reboot.\n\n### **Set up an Amazon RDS for SQL Server restore job**\n\nSo far you have configured the backup that takes continuous transaction log backups to Amazon S3. Also, the Amazon RDS instance is configured for native backup and restore. Now you can set up the restore process to initialize the database and apply log backups continuously.\n\nThe restore method uses a PowerShell script on the primary instance to verify whether or not the database already exists in the secondary database instance. If it is not present, the script scans through the backup files in Amazon S3 and restores the full backup. It then scans through the backup log history system views in the primary database and identifies the transaction log backup files that must be restored, in the order based on the log sequence number and the backup time. It then checks if the files are available in Amazon S3 and restores those files to the database in the Amazon RDS instance with no recovery.\n\nTo set up the restore job, you must have the following prerequisites:\n\n- Network connectivity established between the source instances to the AWS environment.\n- A login with minimum database restore permissions in Amazon RDS for SQL Server and credentials stored in Secrets Manager. For more information, refer to [Create and manage secrets with AWS Secrets Manager.](https://docs.aws.amazon.com/secretsmanager/latest/userguide/managing-secrets.html)\n- An IAM role with permissions to access the S3 bucket where the backups are stored and to retrieve the credentials of the secret stored in Secrets Manager. For a sample policy statement, see [Bucket policy examples.](https://docs.aws.amazon.com/AmazonS3/latest/userguide/example-bucket-policies.html)\n\t - The role must be attached to the EC2 instance by modifying the instance. For your on-premises SQL server, you can associate an IAM service role using [AWS Systems Manager.](https://aws.amazon.com/cn/systems-manager/)\n- Ensure the account that you use to run the SQL Agent job has permissions to assume the role that is configured in on-premises or Amazon EC2 SQL Server.\n- The same account should have also read/write access on the backup folder and log file location folder.\n- The full backup needs to be created with the database name. For example, if the database name is ```TestLogshipping```, the full backup needs to be ```TestLogshipping.Bak```.\n- The transactional log backup file should be prefixed with the database name. For example, if the database name is ```TestLogshipping```, the transaction log backup file should be ```TestLogshipping_xxxxxx.trn```.\n\nPerform the following steps to set up the restore in the secondary server.\n\nIf the scripts are not saved in the ``C:\\LogshippingScripts\\``` location, update the file location details in the restore scripts.\n\nUpdate the ```Logshipping_Restore.ps1``` script with the config file location (line 4).\n\n\n\nUpdate the ```Restore_Job.sql``` script with the ```Logshipping_restore``` file location (line 11).\n\n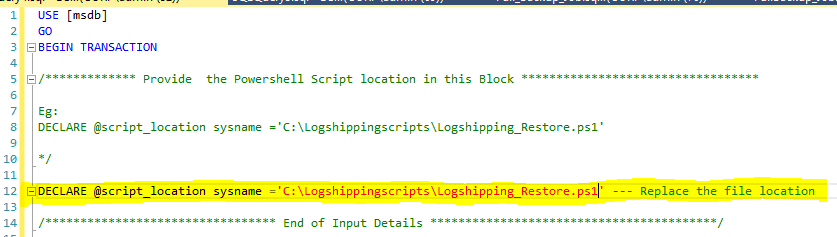\n\nTo create the restore job, connect to the primary SQL Server instance, open a new query window, and run the ```Restore_Job.sql``` file. It creates a restore job called ```Logshipping_RDS_Secondary_Restore```. The job is configured to run every 15 minutes. The job runs the PowerShell script ```Logshipping_Restore.ps1``` with the input parameters from the config file. It restores the full backup with no recovery in the RDS instance for the given databases in the initial run and applies successive log backups every 15 minutes. You can edit the schedule under the SQL Server job properties and run in intervals that best suit your RTO and RPO requirements.\n\n### **Validation and troubleshooting**\n\nThe job generates a log file in the location ```restoreJobLogfile```, which is specified in the config file. The log file has details about the restore, any runtime errors, and references that you can check in the Amazon RDS instance.\n\nFor any further troubleshooting on the restore, run the following command on the RDS instance:\n\n```\nexec msdb.dbo.rds_task_status @db_name =’DatabaseName’\n```\n\nThe output includes details of the restore tasks for a specific database.\n\n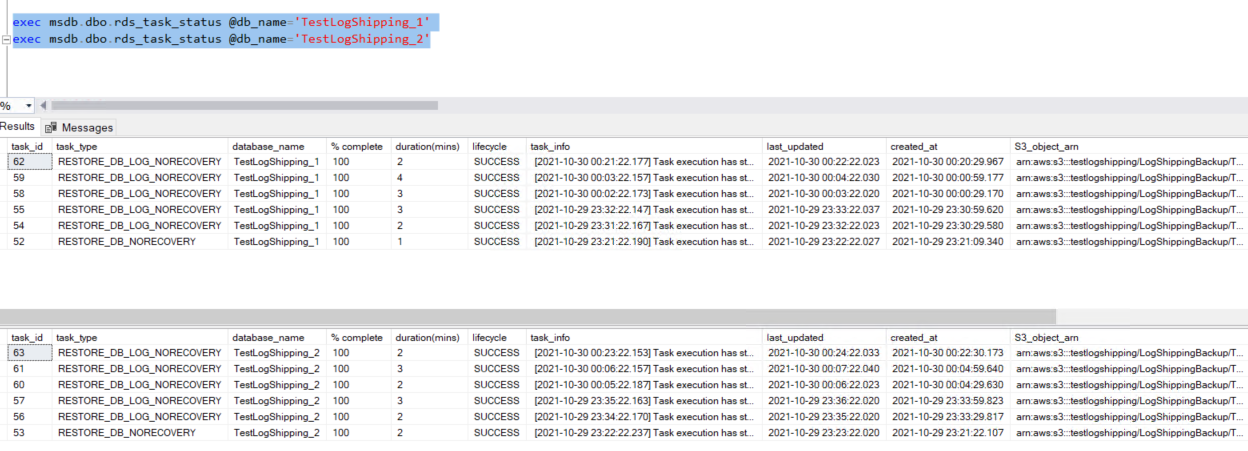\n\n### **Cutover**\n\nTo complete the cutover, follow these steps:\n\n1. Find an approved outage window for the application and stop the application.\n2. Open SSMS and connect to the primary SQL Server instance.\n3. Wait for the last transaction log backup to complete, or you can run it manually at the primary SQL Server instance, and then [disable the log shipping job.](https://docs.microsoft.com/en-us/sql/ssms/agent/disable-or-enable-a-job?view=sql-server-ver15)\n4. Open SSMS and connect to the secondary SQL Server instance.\n5. Open a **New Query** window and run the following command at the secondary SQL Server instance after replacing the database name and name of last transaction backup file:\n\n\t```\n\texec msdb.dbo.rds_restore_log \n\t@restore_db_name='TestLogShipping_1', \n\t@s3_arn_to_restore_from='arn:aws:s3:::testlogshipping/LogShippingBackup/TestLogShipping_xxxx.trn, @with_norecovery=0\n\n\texec msdb.dbo.rds_restore_log \n\t@restore_db_name='TestLogShipping_2', \n\t@s3_arn_to_restore_from='arn:aws:s3:::testlogshipping/LogShippingBackup/TestLogShipping_xxxx. trn, @with_norecovery=0\n\t```\n\n\n6. Check the status again using the same stored procedure\n\n\t```\n\texec msdb.dbo.rds_task_status @db_name =’DatabaseName’\n\t```\n\n\n7. Run the following command [finalizes the restore](https://docs.aws.amazon.com/AmazonRDS/latest/UserGuide/SQLServer.Procedural.Importing.html#SQLServer.Procedural.Importing.Native.Finish.Restore) and brings the databases online:\n\n\t```\n\texec msdb.dbo.rds_finish_restore @db_name='database_name';\n\t```\n\n\n8. [Transfer](https://docs.microsoft.com/en-us/troubleshoot/sql/security/transfer-logins-passwords-between-instances) the logins and passwords from the primary SQL Server instance to the secondary SQL Server instance.\n9. [Enable](https://aws.amazon.com/cn/blogs/database/best-practices-for-converting-a-single-az-amazon-rds-instance-to-a-multi-az-instance/) Multi-AZ for your production workload to meet your high availability requirements.\n10. Start your application after updating the connection string in your application with the RDS for SQL Server instance endpoint.\n\nTo recover the database, whenever you are ready for final restore, you can restore the last database log file using the script from Step 5, with the ```with_norecovery=1```parameter.\n\n### **Cleanup**\n\nTo remove all the AWS resources created while testing this solution and avoid future charges, complete the following steps:\n\n1. Sign in to the console.\n2. Choose the Region where your EC2 instance and RDS for SQL Server instances reside.\n3. On the Amazon RDS console, choose **Databases.**\n4. Select the RDS for SQL Server instances.\n5. On the **Actions** menu, choose **Delete**.\n6. On the Amazon EC2 console, choose **Instances**.\n7. Select the EC2 instance.\n8. On the **Instance state** menu, choose Terminate **instance**.\n9. On the Amazon S3 console, select the bucket.\n10. On the menu, choose **Delete**.\n11. On the AWS Console ,delete the [file storage](https://docs.aws.amazon.com/filegateway/latest/files3/remove-file-share.html) and [storage gateway](https://docs.aws.amazon.com/filegateway/latest/files3/deleting-gateway-common.html).\n\nIf you have deployed this solution on existing primary and secondary SQL Server instances, to remove only custom log shipping, disable the job for log shipping on the primary SQL Server instance and then delete the backup files from the S3 bucket.\n\n### **Summary**\n\nIn this post, you learned how to deploy and configure native SQL Server log shipping to synchronize data from on-premises or Amazon EC2 SQL Server to Amazon RDS for SQL Server.\n\nIn this solution, Storage Gateway is used as a backup destination for the primary SQL Server instance. With Storage Gateway, you can take advantage of the virtually unlimited, cost-effective, and durable storage that Amazon S3 provides, making it available to SQL Server for backups, without having to change your backup and restore workflows. Finally, a PowerShell script is used to automate your log shipping and restore SQL Server logs from Amazon S3.\n\nTo learn more about using a file gateway for SQL Server backups, check out the webinar [Storage Gateway Deep Dive – New SMB Support & SQL Server Backup Demo](https://aws.amazon.com/cn/storagegateway/developer-resources/webinar-6-2018-storage-gateway-deep-dive-smb/) (24:07–32:42).\n\nTo learn more about the solution in this post, see [Migrating SQL Server to Amazon RDS using native backup and restore.](https://aws.amazon.com/cn/blogs/database/migrating-sql-server-to-amazon-rds-using-native-backup-and-restore/)\n\nTo learn more about automate your SQL Server migration to Amazon RDS for SQL Server using custom log shipping using TSQL, check out [Automate on-premises or Amazon EC2 SQL Server to Amazon RDS for SQL Server migration using custom log shipping.](https://aws.amazon.com/cn/blogs/database/automate-on-premises-or-amazon-ec2-sql-server-to-amazon-rds-for-sql-server-migration-using-custom-log-shipping/)\n\n#### **About the Authors**\n\n\n\n**Yogi Barot** is Microsoft Specialist Senior Solution Architect at AWS, she has 22 years of experience working with different Microsoft technologies, her specialty is in SQL Server and different database technologies. Yogi has in depth AWS knowledge and expertise in running Microsoft workload on AWS.\n\n\n\n**Gopakumar Gopalakrishna Pillai** is a Database consultant at AWS. He has 15 years of experience working with different database technologies. He helps several customers in their cloud adoption journey by providing optimal database solutions in the cloud.\n","render":"<p>Enterprises are migrating their Microsoft SQL Server workloads to AWS fully managed database services like <a href=\"https://aws.amazon.com/cn/rds/sqlserver/\" target=\"_blank\">Amazon Relational Database Service (Amazon RDS) for SQL Server</a>, which makes it easy to set up, operate, and scale SQL Server deployment in the cloud. There are a few native Microsoft SQL Server tools available if you want to migrate your SQL Server databases from on-premises or <a href=\"https://aws.amazon.com/cn/ec2/\" target=\"_blank\">Amazon Elastic Compute Cloud</a> (Amazon EC2) SQL Server to Amazon RDS for SQL Server. <a href=\"https://aws.amazon.com/cn/blogs/database/migrating-sql-server-to-amazon-rds-using-native-backup-and-restore/\" target=\"_blank\">SQL Server native backup and restore</a> is one of the easiest ways. If your migration requires low Recovery Time objective (RTO) and Recovery Point Objective (RPO), then you can use <a href=\"https://aws.amazon.com/cn/blogs/database/part-3-migrating-to-amazon-rds-for-sql-server-using-transactional-replication-with-native-backup-and-restore/\" target=\"_blank\">SQL Server replication with Amazon RDS for SQL Server as a subscriber.</a> If you want to migrate the SQL Server databases along with the users and minimize the outage window during the cutover, then consider using log shipping.</p>\n<p>In this post, we walk you through the process of migrating your SQL Server databases to Amazon RDS using the native log shipping and PowerShell scripts.</p>\n<h3><a id=\"Solution_overview_4\"></a><strong>Solution overview</strong></h3>\n<p>This solution involves running custom scripts and setting up log shipping to send transaction log backups from your on-premises or Amazon EC2 SQL Server primary instance, to an Amazon RDS for SQL Server standby instance. The transaction log backups are then applied to the databases on the standby instance. After that, you can perform the cutover and redirect application connections to the new databases.</p>\n<p>This solution can be deployed in any <a href=\"https://docs.aws.amazon.com/AmazonRDS/latest/UserGuide/CHAP_SQLServer.html#SQLServer.Concepts.General.VersionSupport\" target=\"_blank\">SQL Server versions that are supported</a> in Amazon RDS for SQL Server.</p>\n<p>The following diagram illustrates our solution architecture.</p>\n<p><img src=\"https://dev-media.amazoncloud.cn/a0f6a5016a5047a790f425c2bf8d449d_image.png\" alt=\"image.png\" /></p>\n<p>To set up the log synchronization between the primary instance to the standby instance, you must complete the following steps:</p>\n<ol>\n<li>Set up log shipping on your on-premises or Amazon EC2 SQL Server instance.</li>\n<li>Configure the Amazon RDS for SQL Server instance for native backup and restore.</li>\n<li>Set up a restore job on the Amazon RDS for SQL Server instance.</li>\n</ol>\n<h3><a id=\"Prerequisites_20\"></a><strong>Prerequisites</strong></h3>\n<p>Before you get started, make sure you have the following prerequisites:</p>\n<ul>\n<li>On-premises or Amazon EC2 SQL Server instance</li>\n<li><a href=\"https://docs.aws.amazon.com/AmazonRDS/latest/UserGuide/USER_CreateDBInstance.html\" target=\"_blank\">Amazon RDS for SQL Server</a> instance</li>\n<li>Access to the <a href=\"https://aws.amazon.com/cn/console/\" target=\"_blank\">AWS Management Console</a></li>\n<li>SQL Server Management Studio (SSMS)</li>\n<li>An <a href=\"https://aws.amazon.com/cn/s3/\" target=\"_blank\">Amazon Simple Storage Service</a> (Amazon S3) bucket</li>\n<li>SQL credentials to connect to Amazon RDS stored in <a href=\"https://aws.amazon.com/cn/secrets-manager/\" target=\"_blank\">AWS Secrets Manager</a></li>\n<li>An <a href=\"https://aws.amazon.com/cn/iam/\" target=\"_blank\">AWS Identity and Access Management</a> (IAM) role to access the S3 bucket and secret</li>\n<li><a href=\"https://aws.amazon.com/cn/storagegateway/\" target=\"_blank\">AWS Storage Gateway</a> for <a href=\"https://aws.amazon.com/cn/blogs/database/storing-sql-server-backups-in-amazon-s3-using-aws-storage-gateway/\" target=\"_blank\">file storage</a></li>\n</ul>\n<p>The cost components associated with deploying this solution include Amazon RDS for SQL Server instance, database storage, Amazon S3 Bucket, AWS Secrets Manager and AWS Storage Gateway. You can estimate the cost using the <a href=\"https://calculator.aws/#/\" target=\"_blank\">AWS Pricing Calculator.</a></p>\n<h3><a id=\"Set_up_log_shipping_35\"></a><strong>Set up log shipping</strong></h3>\n<p>First connect to your on-premises or Amazon EC2 SQL Server primary instance. Then use SQL Server Management Studio (SSMS) to check the database recovery mode for all the databases you want to include for log shipping.</p>\n<ol>\n<li>\n<p>Make sure the database is set to <a href=\"https://docs.microsoft.com/en-us/sql/relational-databases/backup-restore/recovery-models-sql-server?view=sql-server-ver15\" target=\"_blank\">full recovery model.</a></p>\n<pre><code class=\"lang-\">USE [master]\nGO\nALTER DATABASE [mydatabase] SET RECOVERY FULL WITH NO_WAIT\nGO\n</code></pre>\n</li>\n<li>\n<p>Download the scripts for this solution from the <a href=\"https://github.com/aws-samples/aws-log-shipping-from-onprem-ec2-to-rds-sql-server\" target=\"_blank\">GitHub repository</a> and copy them to a local disk location in the primary SQL Server.<br />\nThe repo contains the following files:</p>\n<ul>\n<li>ConfigFile.txt</li>\n<li>Logshipping_Full_Backup.ps1</li>\n<li>Logshipping_Restore.ps1</li>\n<li>Full_Backup_Job.sql</li>\n<li>Restore_Job.sql</li>\n</ul>\n</li>\n<li>\n<p>Create the folder <code>C:\\LogshippingScripts\\</code> and save all these files with the same name in that location.<br />\nNote: If you change the file names or file locations, you must also update the file locations in the PowerShell and SQL scripts.</p>\n</li>\n<li>\n<p>Provide input parameters in the config file.<br />\nThe full backup and restore method uses PowerShell scripts, which use the input parameters from the config file.<br />\nOpen ConfigFile.txt and update the details of your environment as follows and save it.</p>\n<ul>\n<li><strong>primarySqlServer</strong> – The source SQL Server name with its port number.</li>\n<li><strong>primaryServerBackupFolder</strong> – The Storage Gateway shared drive location for primary backups files.</li>\n<li><strong>secondarySqlServer</strong> – The RDS for SQL Server endpoint with port number.</li>\n<li><strong>databases</strong> – The databases for this configuration with comma-separated values.</li>\n<li><strong>s3BucketName</strong> – The S3 bucket that has the backup files.</li>\n<li><strong>s3BackupFolder</strong> – The S3 folder that stores the backups.</li>\n<li><strong>awsSecretName</strong> – The Secrets Manager secret name that has the account information to connect to Amazon RDS.</li>\n<li><strong>awsRegion</strong> – The AWS Region of the secrets.</li>\n<li><strong>restoreJobLogfile</strong> – The log file location to save the restore job run details.</li>\n<li><strong>backupLogFile</strong> – The log file location to save the backup job run details.</li>\n<li><strong>timeoutinSeconds</strong> – The timeout interval in seconds. If the restore doesn’t complete within this interval, the scripts time out. You can check the restore status in the logs, and the task status in Amazon RDS. The default value is 600. If you’re restoring larger files, set this to a higher value.</li>\n<li><strong>verifyIntervalSeconds</strong> –The interval in which the script verifies the status of each task before its timeout. The default value is 30.</li>\n</ul>\n</li>\n</ol>\n<p>The following is a sample config file:</p>\n<pre><code>{\n"primarySqlServer":"EC2AMA,1433",\n"primaryServerBackupFolder”:"X:\\LogShippingBackup\\",\n"secondarySqlServer”:"test.cbfnzqwozz4n.us-east-1.rds.amazonaws.com,1433",\n"databases”: ["LogshipTest_1","LogshipTest_2"],\n"s3BucketName”: "migratesqltest",\n"s3BackupFolder” :"DB_Logship",\n"awsSecretName" :"LogshipCred",\n"awsRegion" :"us-east-2",\n"restoreJobLogfile" :"C:\\Restore\\Logship_Log",\n"backupLogFile" : C:\\Backup\\Logship_Log",\n"timeoutinSeconds" :600,\n"verifyIntervalSeconds" :30\n}\n</code></pre>\n<p>If the files are saved in <code>C:\\LogshippingScripts\\</code> with the same names, you can skip the next two steps. Otherwise, update the file locations as shown.</p>\n<ol start=\"5\">\n<li>To update <code>Logshipping_Full_Backup.ps1</code>, edit the PowerShell script and provide the config file location that you used earlier (line 4) and save the file.</li>\n</ol>\n<p><img src=\"https://dev-media.amazoncloud.cn/e170d80af6294018a57d362e7fbeed1e_image.png\" alt=\"image.png\" /></p>\n<ol start=\"6\">\n<li>Open <code>Full_Backup_Job.sql</code> and provide the full backup PowerShell file location (line 11) and save the file.</li>\n</ol>\n<p><img src=\"https://dev-media.amazoncloud.cn/9936cf3a3ff8498da4f1b63d47cf4814_image.png\" alt=\"image.png\" /></p>\n<p>You are now ready to create your full backup job. For this post, we take a full backup of the database to Amazon S3 using Storage Gateway. For more information, refer to Store SQL Server backups in Amazon S3 using AWS Storage Gateway. To automate the full backup of all databases using PowerShell, you run the Full_Backup_Job.sql script on your source SQL Server instance as in the following step.<br />\n7. Connect to the primary SQL server instance in SSMS, open a new query window, and run the <code>Full_Backup_Job.sql</code> file.<br />\nThe script creates a full backup job called <code>Logshipping_FullBackup_Primary</code>.<br />\n8. Run the job to create a full backup for all the databases provided in the config file.<br />\n9. Right-click on the database in SSMS and go to the database properties and make sure <strong>Enable this as primary database in log shipping configuration</strong> is selected.</p>\n<p><img src=\"https://dev-media.amazoncloud.cn/44beceea7c984c17b3f2d05bf54b8d4d_image.png\" alt=\"image.png\" /></p>\n<ol start=\"10\">\n<li>Configure your backup settings and add the Storage Gateway’s file share path as the <strong>Network path for backup folder</strong> and <strong>local path to the folder</strong>. For this post, <code>testlogshipping</code> is the S3 bucket used by Storage Gateway and <code>LogShippingBackup</code> is the folder within the S3 bucket that stores the log files.</li>\n<li>Set the interval of the SQL Server log backup schedule. For this post, we set it to 15 minutes.</li>\n</ol>\n<p><img src=\"https://dev-media.amazoncloud.cn/0a6e771d933744c09a264ad9987424c9_image.png\" alt=\"image.png\" /></p>\n<ol start=\"12\">\n<li>Click OK to save the log shipping backup configuration settings.</li>\n</ol>\n<p><img src=\"https://dev-media.amazoncloud.cn/05e10cf5ec4a45bf94ae6143d4490c13_image.png\" alt=\"image.png\" /></p>\n<ol start=\"13\">\n<li>Repeat steps 9-13 to enable log shipping for all user databases that you want to restore to Amazon RDS for SQL Server.</li>\n<li>Verify that the SQL Server jobs are created for log shipping by checking under SQL Server Agent jobs in SSMS.</li>\n<li>Open the folder location for the Storage Gateway file share and verify the files are created successfully.</li>\n</ol>\n<p><img src=\"https://dev-media.amazoncloud.cn/7ecf83ef07104294abbda3617f005209_image.png\" alt=\"image.png\" /></p>\n<h3><a id=\"Configure_Amazon_RDS_for_SQL_Server_for_native_backup_and_restore_123\"></a><strong>Configure Amazon RDS for SQL Server for native backup and restore</strong></h3>\n<p>To perform native restores on Amazon RDS, we must add an option group that has the <code>SQLSERVER_BACKUP_RESTORE</code> option on the Amazon RDS database instance.</p>\n<ol>\n<li>On the Amazon RDS console, choose <strong>Option Groups</strong> in the navigation pane.</li>\n<li>Choose <strong>Create group</strong>.</li>\n<li>Enter the name, description, engine, and engine version of your server.</li>\n<li>Choose <strong>Create</strong>.</li>\n<li>Select the option group that you created, then choose <strong>Add Option</strong>.</li>\n<li>Choose <strong>SQLSERVER_BACKUP_RESTORE</strong>.</li>\n<li>Associate the option group with the DB instance by choosing <strong>Databases</strong> in the navigation pane, then choose the instance to back up.</li>\n<li>Choose <strong>Actions</strong>, then choose <strong>Modify</strong>.</li>\n<li>Under <strong>Database Options</strong>, choose the option group that you created, then choose <strong>Apply Immediately</strong> and <strong>Continue</strong>.</li>\n<li>Review the information, then choose <strong>Modify DB Instance</strong>.</li>\n</ol>\n<p>This option group modification <a href=\"https://docs.aws.amazon.com/AmazonRDS/latest/UserGuide/Overview.DBInstance.Modifying.html#USER_ModifyInstance.Settings\" target=\"_blank\">has no downtime</a> because it doesn’t require an instance reboot.</p>\n<h3><a id=\"Set_up_an_Amazon_RDS_for_SQL_Server_restore_job_140\"></a><strong>Set up an Amazon RDS for SQL Server restore job</strong></h3>\n<p>So far you have configured the backup that takes continuous transaction log backups to Amazon S3. Also, the Amazon RDS instance is configured for native backup and restore. Now you can set up the restore process to initialize the database and apply log backups continuously.</p>\n<p>The restore method uses a PowerShell script on the primary instance to verify whether or not the database already exists in the secondary database instance. If it is not present, the script scans through the backup files in Amazon S3 and restores the full backup. It then scans through the backup log history system views in the primary database and identifies the transaction log backup files that must be restored, in the order based on the log sequence number and the backup time. It then checks if the files are available in Amazon S3 and restores those files to the database in the Amazon RDS instance with no recovery.</p>\n<p>To set up the restore job, you must have the following prerequisites:</p>\n<ul>\n<li>Network connectivity established between the source instances to the AWS environment.</li>\n<li>A login with minimum database restore permissions in Amazon RDS for SQL Server and credentials stored in Secrets Manager. For more information, refer to <a href=\"https://docs.aws.amazon.com/secretsmanager/latest/userguide/managing-secrets.html\" target=\"_blank\">Create and manage secrets with AWS Secrets Manager.</a></li>\n<li>An IAM role with permissions to access the S3 bucket where the backups are stored and to retrieve the credentials of the secret stored in Secrets Manager. For a sample policy statement, see <a href=\"https://docs.aws.amazon.com/AmazonS3/latest/userguide/example-bucket-policies.html\" target=\"_blank\">Bucket policy examples.</a>\n<ul>\n<li>The role must be attached to the EC2 instance by modifying the instance. For your on-premises SQL server, you can associate an IAM service role using <a href=\"https://aws.amazon.com/cn/systems-manager/\" target=\"_blank\">AWS Systems Manager.</a></li>\n</ul>\n</li>\n<li>Ensure the account that you use to run the SQL Agent job has permissions to assume the role that is configured in on-premises or Amazon EC2 SQL Server.</li>\n<li>The same account should have also read/write access on the backup folder and log file location folder.</li>\n<li>The full backup needs to be created with the database name. For example, if the database name is <code>TestLogshipping</code>, the full backup needs to be <code>TestLogshipping.Bak</code>.</li>\n<li>The transactional log backup file should be prefixed with the database name. For example, if the database name is <code>TestLogshipping</code>, the transaction log backup file should be <code>TestLogshipping_xxxxxx.trn</code>.</li>\n</ul>\n<p>Perform the following steps to set up the restore in the secondary server.</p>\n<p>If the scripts are not saved in the ``C:\\LogshippingScripts``` location, update the file location details in the restore scripts.</p>\n<p>Update the <code>Logshipping_Restore.ps1</code> script with the config file location (line 4).</p>\n<p><img src=\"https://dev-media.amazoncloud.cn/c5e7a588809f4bd6bd5a1583ca25dd1d_image.png\" alt=\"image.png\" /></p>\n<p>Update the <code>Restore_Job.sql</code> script with the <code>Logshipping_restore</code> file location (line 11).</p>\n<p><img src=\"https://dev-media.amazoncloud.cn/8b740fc52cb347218bd6b86238a00a05_image.png\" alt=\"image.png\" /></p>\n<p>To create the restore job, connect to the primary SQL Server instance, open a new query window, and run the <code>Restore_Job.sql</code> file. It creates a restore job called <code>Logshipping_RDS_Secondary_Restore</code>. The job is configured to run every 15 minutes. The job runs the PowerShell script <code>Logshipping_Restore.ps1</code> with the input parameters from the config file. It restores the full backup with no recovery in the RDS instance for the given databases in the initial run and applies successive log backups every 15 minutes. You can edit the schedule under the SQL Server job properties and run in intervals that best suit your RTO and RPO requirements.</p>\n<h3><a id=\"Validation_and_troubleshooting_171\"></a><strong>Validation and troubleshooting</strong></h3>\n<p>The job generates a log file in the location <code>restoreJobLogfile</code>, which is specified in the config file. The log file has details about the restore, any runtime errors, and references that you can check in the Amazon RDS instance.</p>\n<p>For any further troubleshooting on the restore, run the following command on the RDS instance:</p>\n<pre><code class=\"lang-\">exec msdb.dbo.rds_task_status @db_name =’DatabaseName’\n</code></pre>\n<p>The output includes details of the restore tasks for a specific database.</p>\n<p><img src=\"https://dev-media.amazoncloud.cn/a1c1e386bc5440a1ae3840bc35c91104_image.png\" alt=\"image.png\" /></p>\n<h3><a id=\"Cutover_185\"></a><strong>Cutover</strong></h3>\n<p>To complete the cutover, follow these steps:</p>\n<ol>\n<li>\n<p>Find an approved outage window for the application and stop the application.</p>\n</li>\n<li>\n<p>Open SSMS and connect to the primary SQL Server instance.</p>\n</li>\n<li>\n<p>Wait for the last transaction log backup to complete, or you can run it manually at the primary SQL Server instance, and then <a href=\"https://docs.microsoft.com/en-us/sql/ssms/agent/disable-or-enable-a-job?view=sql-server-ver15\" target=\"_blank\">disable the log shipping job.</a></p>\n</li>\n<li>\n<p>Open SSMS and connect to the secondary SQL Server instance.</p>\n</li>\n<li>\n<p>Open a <strong>New Query</strong> window and run the following command at the secondary SQL Server instance after replacing the database name and name of last transaction backup file:</p>\n<pre><code class=\"lang-\">exec msdb.dbo.rds_restore_log \n@restore_db_name='TestLogShipping_1', \n@s3_arn_to_restore_from='arn:aws:s3:::testlogshipping/LogShippingBackup/TestLogShipping_xxxx.trn, @with_norecovery=0\n\nexec msdb.dbo.rds_restore_log \n@restore_db_name='TestLogShipping_2', \n@s3_arn_to_restore_from='arn:aws:s3:::testlogshipping/LogShippingBackup/TestLogShipping_xxxx. trn, @with_norecovery=0\n</code></pre>\n</li>\n<li>\n<p>Check the status again using the same stored procedure</p>\n<pre><code class=\"lang-\">exec msdb.dbo.rds_task_status @db_name =’DatabaseName’\n</code></pre>\n</li>\n<li>\n<p>Run the following command <a href=\"https://docs.aws.amazon.com/AmazonRDS/latest/UserGuide/SQLServer.Procedural.Importing.html#SQLServer.Procedural.Importing.Native.Finish.Restore\" target=\"_blank\">finalizes the restore</a> and brings the databases online:</p>\n<pre><code class=\"lang-\">exec msdb.dbo.rds_finish_restore @db_name='database_name';\n</code></pre>\n</li>\n<li>\n<p><a href=\"https://docs.microsoft.com/en-us/troubleshoot/sql/security/transfer-logins-passwords-between-instances\" target=\"_blank\">Transfer</a> the logins and passwords from the primary SQL Server instance to the secondary SQL Server instance.</p>\n</li>\n<li>\n<p><a href=\"https://aws.amazon.com/cn/blogs/database/best-practices-for-converting-a-single-az-amazon-rds-instance-to-a-multi-az-instance/\" target=\"_blank\">Enable</a> Multi-AZ for your production workload to meet your high availability requirements.</p>\n</li>\n<li>\n<p>Start your application after updating the connection string in your application with the RDS for SQL Server instance endpoint.</p>\n</li>\n</ol>\n<p>To recover the database, whenever you are ready for final restore, you can restore the last database log file using the script from Step 5, with the <code>with_norecovery=1</code>parameter.</p>\n<h3><a id=\"Cleanup_226\"></a><strong>Cleanup</strong></h3>\n<p>To remove all the AWS resources created while testing this solution and avoid future charges, complete the following steps:</p>\n<ol>\n<li>Sign in to the console.</li>\n<li>Choose the Region where your EC2 instance and RDS for SQL Server instances reside.</li>\n<li>On the Amazon RDS console, choose <strong>Databases.</strong></li>\n<li>Select the RDS for SQL Server instances.</li>\n<li>On the <strong>Actions</strong> menu, choose <strong>Delete</strong>.</li>\n<li>On the Amazon EC2 console, choose <strong>Instances</strong>.</li>\n<li>Select the EC2 instance.</li>\n<li>On the <strong>Instance state</strong> menu, choose Terminate <strong>instance</strong>.</li>\n<li>On the Amazon S3 console, select the bucket.</li>\n<li>On the menu, choose <strong>Delete</strong>.</li>\n<li>On the AWS Console ,delete the <a href=\"https://docs.aws.amazon.com/filegateway/latest/files3/remove-file-share.html\" target=\"_blank\">file storage</a> and <a href=\"https://docs.aws.amazon.com/filegateway/latest/files3/deleting-gateway-common.html\" target=\"_blank\">storage gateway</a>.</li>\n</ol>\n<p>If you have deployed this solution on existing primary and secondary SQL Server instances, to remove only custom log shipping, disable the job for log shipping on the primary SQL Server instance and then delete the backup files from the S3 bucket.</p>\n<h3><a id=\"Summary_244\"></a><strong>Summary</strong></h3>\n<p>In this post, you learned how to deploy and configure native SQL Server log shipping to synchronize data from on-premises or Amazon EC2 SQL Server to Amazon RDS for SQL Server.</p>\n<p>In this solution, Storage Gateway is used as a backup destination for the primary SQL Server instance. With Storage Gateway, you can take advantage of the virtually unlimited, cost-effective, and durable storage that Amazon S3 provides, making it available to SQL Server for backups, without having to change your backup and restore workflows. Finally, a PowerShell script is used to automate your log shipping and restore SQL Server logs from Amazon S3.</p>\n<p>To learn more about using a file gateway for SQL Server backups, check out the webinar <a href=\"https://aws.amazon.com/cn/storagegateway/developer-resources/webinar-6-2018-storage-gateway-deep-dive-smb/\" target=\"_blank\">Storage Gateway Deep Dive – New SMB Support & SQL Server Backup Demo</a> (24:07–32:42).</p>\n<p>To learn more about the solution in this post, see <a href=\"https://aws.amazon.com/cn/blogs/database/migrating-sql-server-to-amazon-rds-using-native-backup-and-restore/\" target=\"_blank\">Migrating SQL Server to Amazon RDS using native backup and restore.</a></p>\n<p>To learn more about automate your SQL Server migration to Amazon RDS for SQL Server using custom log shipping using TSQL, check out <a href=\"https://aws.amazon.com/cn/blogs/database/automate-on-premises-or-amazon-ec2-sql-server-to-amazon-rds-for-sql-server-migration-using-custom-log-shipping/\" target=\"_blank\">Automate on-premises or Amazon EC2 SQL Server to Amazon RDS for SQL Server migration using custom log shipping.</a></p>\n<h4><a id=\"About_the_Authors_256\"></a><strong>About the Authors</strong></h4>\n<p><img src=\"https://dev-media.amazoncloud.cn/7161c25433bf438ab491dc0f8f544289_image.png\" alt=\"image.png\" /></p>\n<p><strong>Yogi Barot</strong> is Microsoft Specialist Senior Solution Architect at AWS, she has 22 years of experience working with different Microsoft technologies, her specialty is in SQL Server and different database technologies. Yogi has in depth AWS knowledge and expertise in running Microsoft workload on AWS.</p>\n<p><img src=\"https://dev-media.amazoncloud.cn/7965b06ffde8409d8c2af54fe3537121_image.png\" alt=\"image.png\" /></p>\n<p><strong>Gopakumar Gopalakrishna Pillai</strong> is a Database consultant at AWS. He has 15 years of experience working with different database technologies. He helps several customers in their cloud adoption journey by providing optimal database solutions in the cloud.</p>\n"}
Use native SQL Server log shipping and PowerShell scripts to synchronize data to Amazon RDS for SQL Server
海外精选

海外精选的内容汇集了全球优质的亚马逊云科技相关技术内容。同时,内容中提到的“AWS”
是 “Amazon Web Services” 的缩写,在此网站不作为商标展示。

 0
0 0
0亚马逊云科技解决方案 基于行业客户应用场景及技术领域的解决方案
联系亚马逊云科技专家
亚马逊云科技解决方案
基于行业客户应用场景及技术领域的解决方案
联系专家

0
目录

 分享
分享 点赞
点赞 收藏
收藏 目录
目录立即注册,开启您的免费套餐
立即关注

亚马逊云开发者
公众号

User Group
公众号

亚马逊云科技
官方小程序
“AWS” 是 “Amazon Web Services” 的缩写,在此网站不作为商标展示。
立即关注
亚马逊云开发者
公众号
User Group
公众号
亚马逊云科技
官方小程序
“AWS” 是 “Amazon Web Services” 的缩写,在此网站不作为商标展示。
关于我们 
更多资源
开发者工具
更多支持
立即关注
亚马逊云开发者
公众号
User Group
公众号
亚马逊云科技
官方小程序
“AWS” 是 “Amazon Web Services” 的缩写,在此网站不作为商标展示。
