{"value":"Applying various transformations to images at scale is an easily parallelized and scaled task. As a Computer Vision research team at Amazon, we occasionally find that the amount of image data we are dealing with can’t be effectively computed on a single machine, but also isn’t large enough to justify running a large and potentially costly [AWS Elastic Map Reduce (EMR)](https://aws.amazon.com/emr/) job. This is when we can utilize [AWS Batch](https://aws.amazon.com/batch/) as our main computing environment, as well as [Cloud Development Kit (CDK)](https://aws.amazon.com/cdk/) to provision the necessary infrastructure in order to solve our task.\n\nIn Computer Vision, we often need to represent images in a more concise and uniform way. Working with standard image files would be challenging, as they can vary in resolution or are otherwise too large in terms of dimensionality to be provided directly to our models. For that reason, the common practice for deep learning approaches is to translate high-dimensional information representations, such as images, into vectors that encode most (if not all) information present in them — in other words, to create *vector embeddings*.\n\nThis post will demonstrate how we utilize the AWS Batch platform to solve a common task in many Computer Vision projects — calculating vector embeddings from a set of images so as to allow for scaling.\n\n### **Architecture Overview**\n\n\n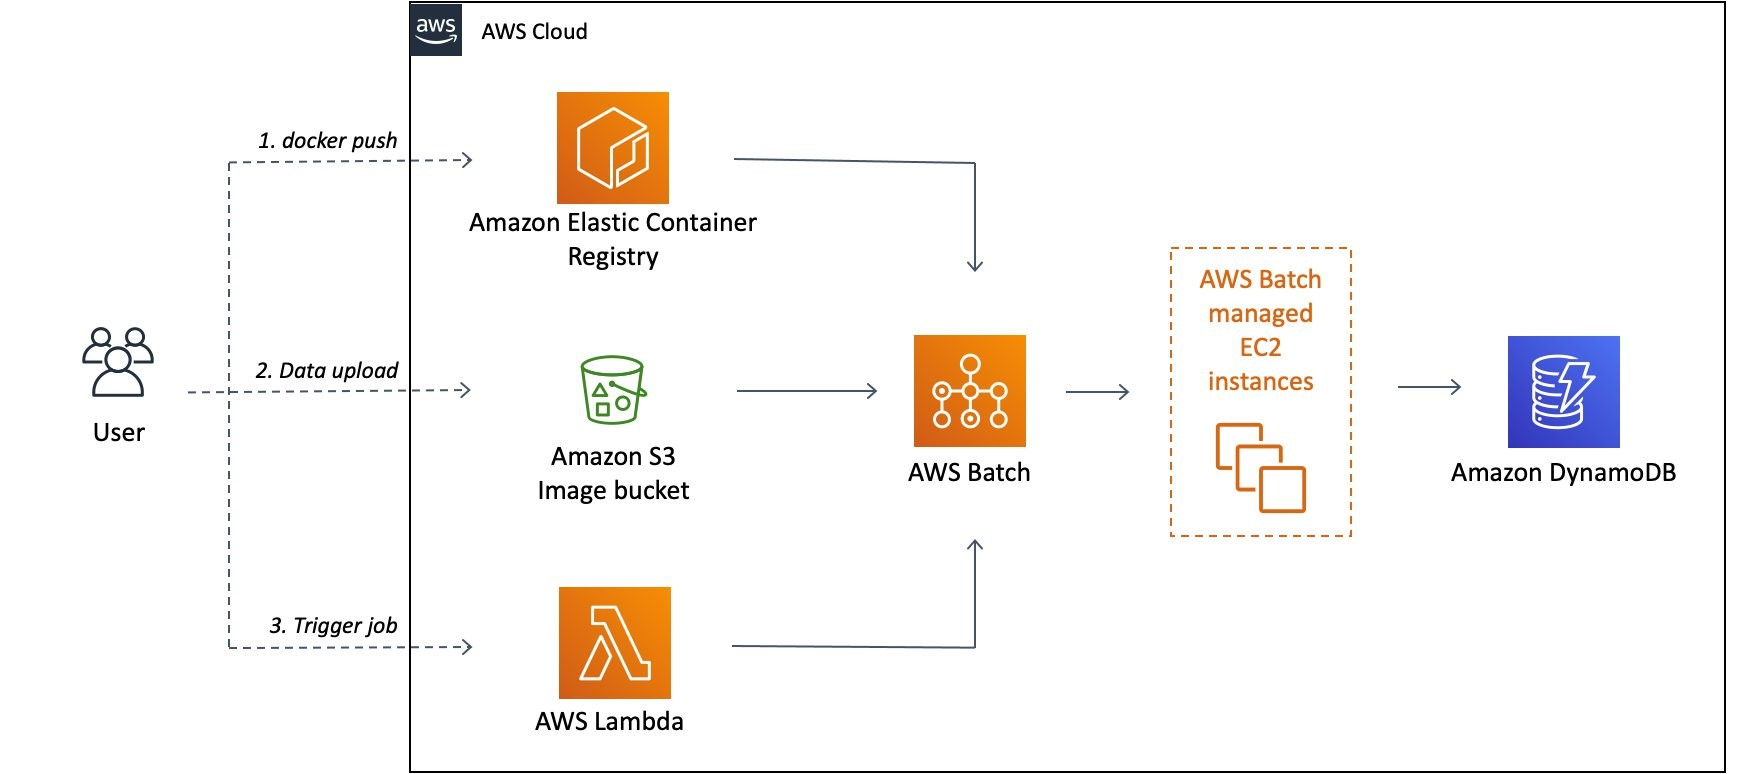\n\n*Figure 1: High-level architectural diagram explaining the major solution components.*\n\nAs seen in Figure 1, AWS Batch will pull the docker image containing our code onto provisioned hosts and start the docker containers. Our sample code, referenced in this post, will then read the resources from S3, conduct the vectorization, and write the results as entries in the DynamoDB Table.\n\nIn order to run our image vectorization task, we will utilize the following AWS cloud components:\n\n- **Amazon ECR** — Elastic Container Registry is a Docker image repository from which our batch instances will pull the job images;\n- **S3** — Amazon Simple Storage Service will act as our image source from which our batch jobs will read the image;\n- **Amazon DynamoDB** — NoSQL database in which we will write the resulting vectors and other metadata;\n- **AWS Lambda** — Serverless compute environment which will conduct some pre-processing and, ultimately, trigger the batch job execution; and\n- **AWS Batch** — Scalable computing environment powering our models as [embarrassingly parallel](https://en.wikipedia.org/wiki/Embarrassingly_parallel) tasks running as AWS Batch jobs.\n\nTo translate an image to a vector, we can utilize a pre-trained model architecture, such as *AlexNet, ResNet, VGG,* or more recent ones, like ResNeXt and Vision Transformers. These model architectures are available in most of the popular deep learning frameworks, and they can be further modified and extended depending on our project requirements. For this post, we will utilize a pre-trained ResNet18 model from [MxNet](https://mxnet.apache.org/). We will output an intermediate layer of the model, which will result in a 512 dimensional representation, or, in other words, a 512 dimensional vector embedding.\n\n### **Deployment using Cloud Development Kit (CDK)**\nIn recent years, the idea of provisioning cloud infrastructure components using popular programming languages was popularized under the term of *infrastructure as code* (IaC). Instead of writing a file in the YAML/JSON/XML format, which would define every cloud component we want to provision, we might want to define those components trough a popular programming language.\n\nAs part of this post, we will demonstrate how easy it is to provision infrastructure on AWS cloud by using Cloud Development Kit (CDK). The CDK code included in the exercise is written in Python and defines all of the relevant exercise components.\n\n### **Hands-on exercise**\n#### **1. Deploying the infrastructure with AWS CDK**\nFor this exercise, we have provided a sample batch job project that is available on Github ([link](https://github.com/aws-samples/aws-cdk-deep-learning-image-vector-embeddings-at-scale-using-aws-batch)). By using that code, you should have every component required to do this exercise, so make sure that you have the source on your machine. The root of your sample project local copy should contain the following files:\n```\nbatch_job_cdk - CDK stack code of this batch job project\nsrc_batch_job - source code for performing the image vectorization\nsrc_lambda - source code for the lambda function which will trigger the batch job execution\napp.py - entry point for the CDK tool\ncdk.json - config file specifying the entry point for CDK\nrequirements.txt - list of python dependencies for CDK \nREADME.md \n```\n1. Make sure you have installed and correctly configured the [AWS CLI](https://aws.amazon.com/cli/) and [AWS CDK](https://aws.amazon.com/cdk/) in your environment. Refer to the [CDK documentation](https://docs.aws.amazon.com/cdk/latest/guide/environments.html) for more information, as well as the [CDK getting started guide](https://docs.aws.amazon.com/cdk/latest/guide/getting_started.html).\n2. Set the ```CDK_DEPLOY_ACCOUNT``` and ```CDK_DEPLOY_REGION``` environmental variables, as described in the project ```README.md```.\n3. Go to the sample project root and install the CDK python dependencies by running ```pip install -r requirements.txt```.\n4. Install and configure [Docker](https://www.docker.com/) in your environment.\n5. If you have multiple AWS CLI profiles, utilize the ```--profile``` option to specify which profile to use for deployment. Otherwise, simply run ```cdk deploy``` and deploy the infrastructure to your AWS account set in step 1.\n\n**NOTE**: Before deploying, make sure that you are familiar with the restrictions and limitations of the AWS services we are using in this post. For example, if you choose to set an S3 bucket name in the [CDK Bucket construct](https://docs.aws.amazon.com/cdk/api/latest/python/aws_cdk.aws_s3/Bucket.html), you must avoid [naming conflicts](https://docs.aws.amazon.com/AmazonS3/latest/userguide/BucketRestrictions.html) that might cause deployment errors.\n\nThe CDK tool will now trigger our docker image build, provision the necessary AWS infrastructure (i.e., S3 Bucket, DynamoDB table, roles and permissions), and, upon completion, upload the docker image to a newly created repository on [Amazon Elastic Container Registry (ECR)](https://aws.amazon.com/ecr/).\n#### **2. Upload data to S3**\n\n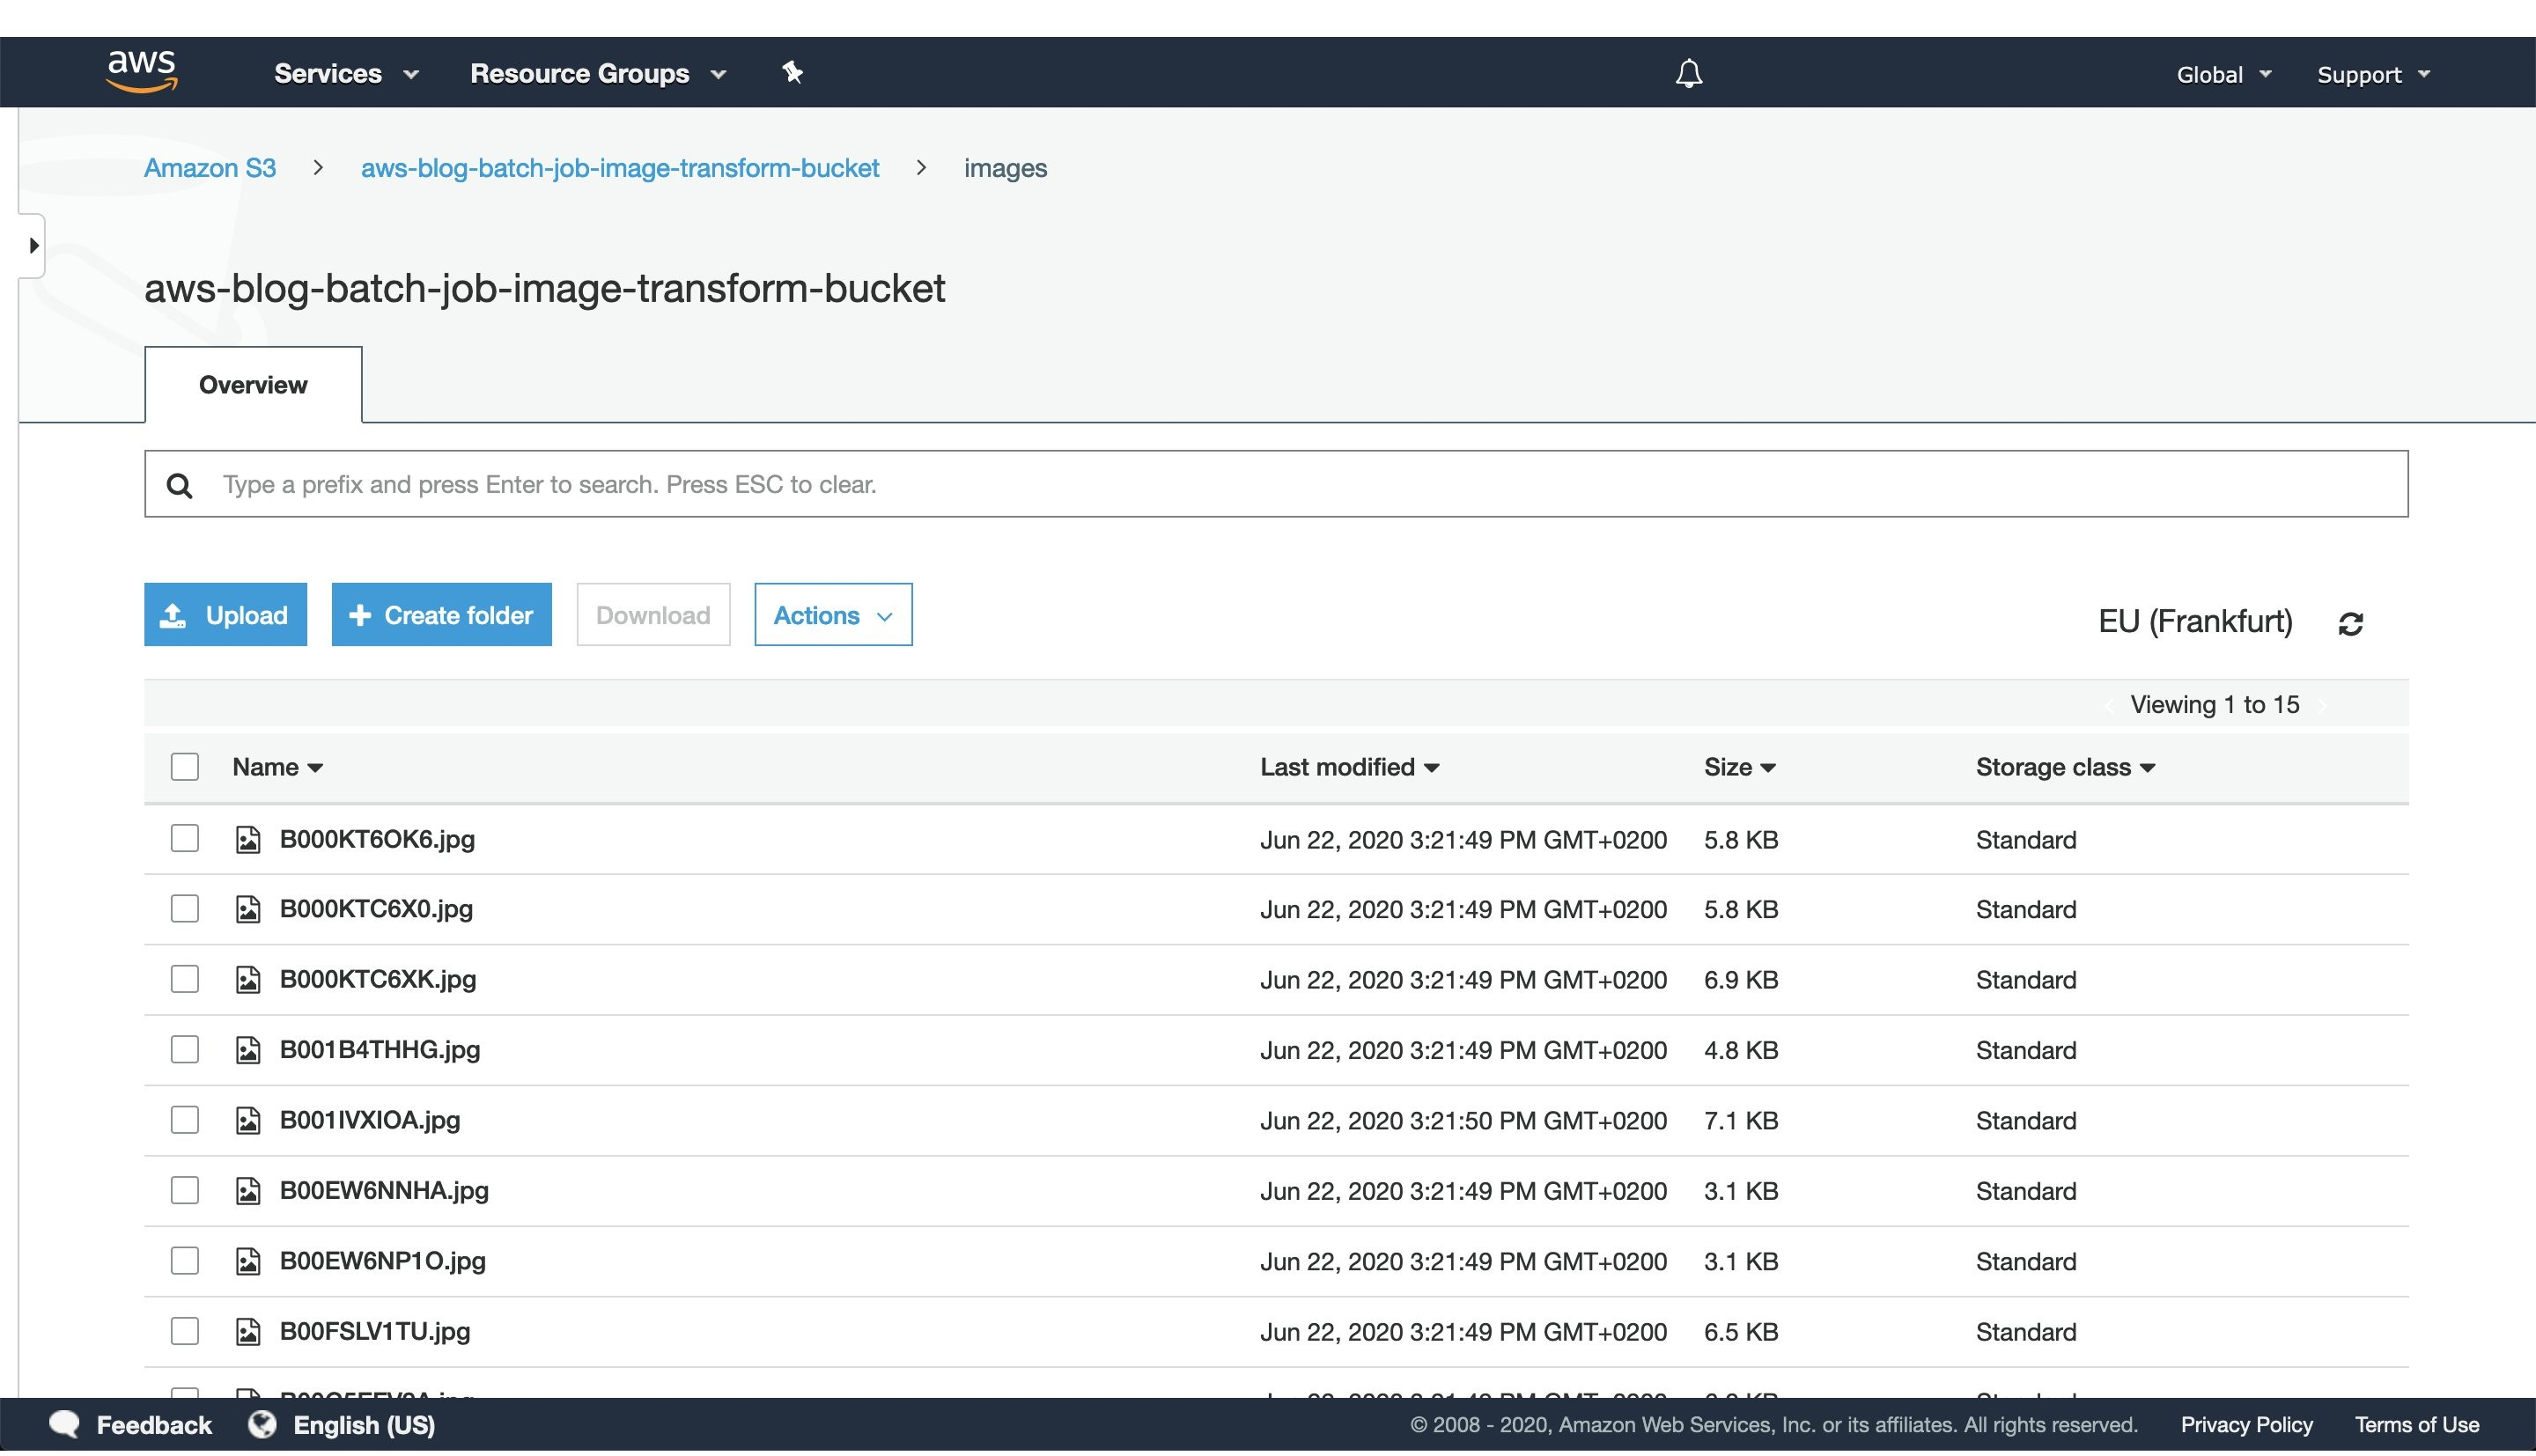\n\n*Figure 2: S3 console window with uploaded images to the `images` directory.*\n\nAfter CDK has successfully finished deploying, head to the S3 console screen and upload images you want to process to a path in the S3 bucket. For this exercise, we’ve added every image to the `images` directory, as seen in Figure 2.\n\nFor larger datasets, utilize the [AWS CLI](https://aws.amazon.com/cli/) tool to sync your local directory with the S3 bucket. In that case, consider enabling the ‘Transfer acceleration’ option of your S3 bucket for faster data transfers. However, this will incur an additional fee.\n#### **3. Trigger batch job execution**\nOnce CDK has completed provisioning our infrastructure and we’ve uploaded the image data we want to process, open the newly created AWS Lambda in the AWS console screen in order to trigger the batch job execution.\n\nTo do this, create a test event with the following JSON body:\n```\n{\n\"Paths\": [\n \"images\"\n ]\n}\n```\nThe JSON body that we provide as input to the AWS Lambda function defines a list of paths to directories in the S3 buckets containing images. Having the ability to dynamically provide paths to directories with images in S3, lets us combine multiple data sources into a single AWS Batch job execution. Furthermore, if we decide in the future to put an API Gateway in front of the Lambda, you could pass every parameter of the batch job with a simple HTTP method call.\n\nIn this example, we specified just one path to the `images` directory in the S3 bucket, which we populated with images in the previous step.\n\n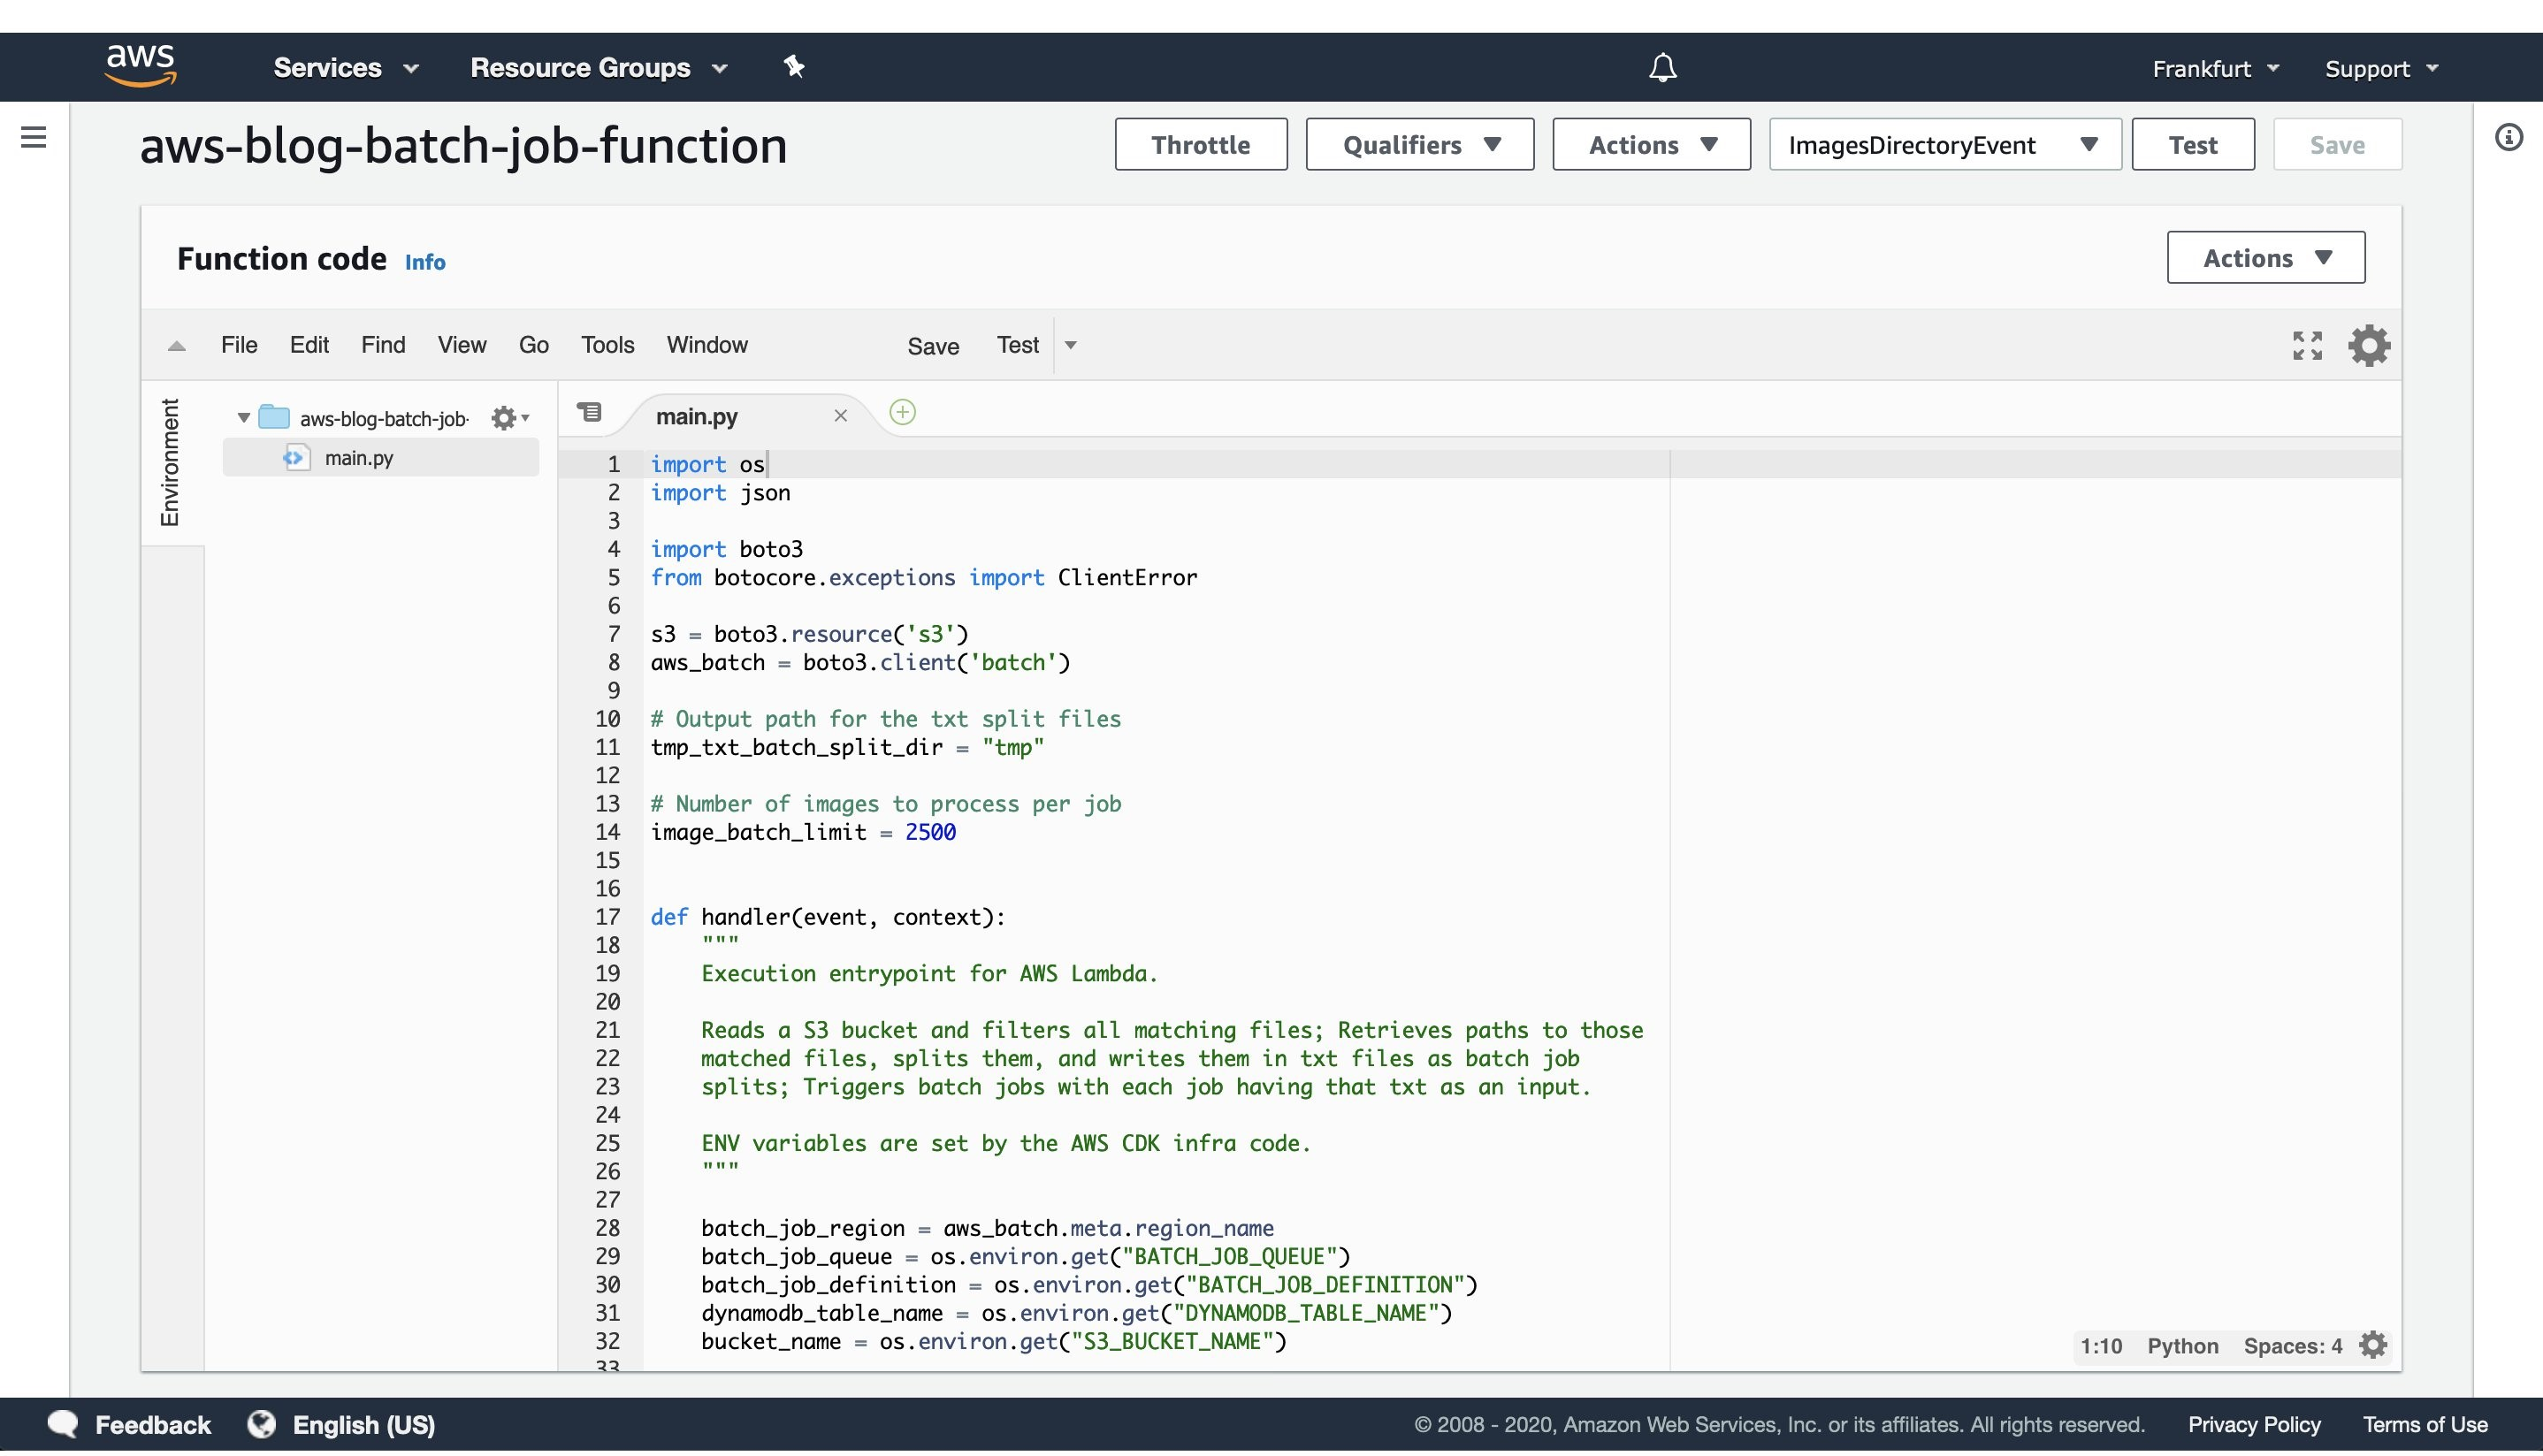\n\n***Figure 3***: *AWS Lambda console screen of the function that triggers batch job execution. Modify the batch size by modifying the `image_batch_limit` variable. The value of this variable will depend on your particular use-case, computation type, image sizes, as well as processing time requirements.*\n\nThe python code will list every path under the ```images``` S3 path, batch them into batches of desired size, and finally save the paths to batches as txt files under ```tmp``` S3 path. Each path to a txt files in S3 will be passed as an input to a batch jobs.\n\nSelect the newly created event, and then trigger the Lambda function execution. The AWS Lambda function will submit the AWS Batch jobs to the provisioned AWS Batch compute environment.\n\n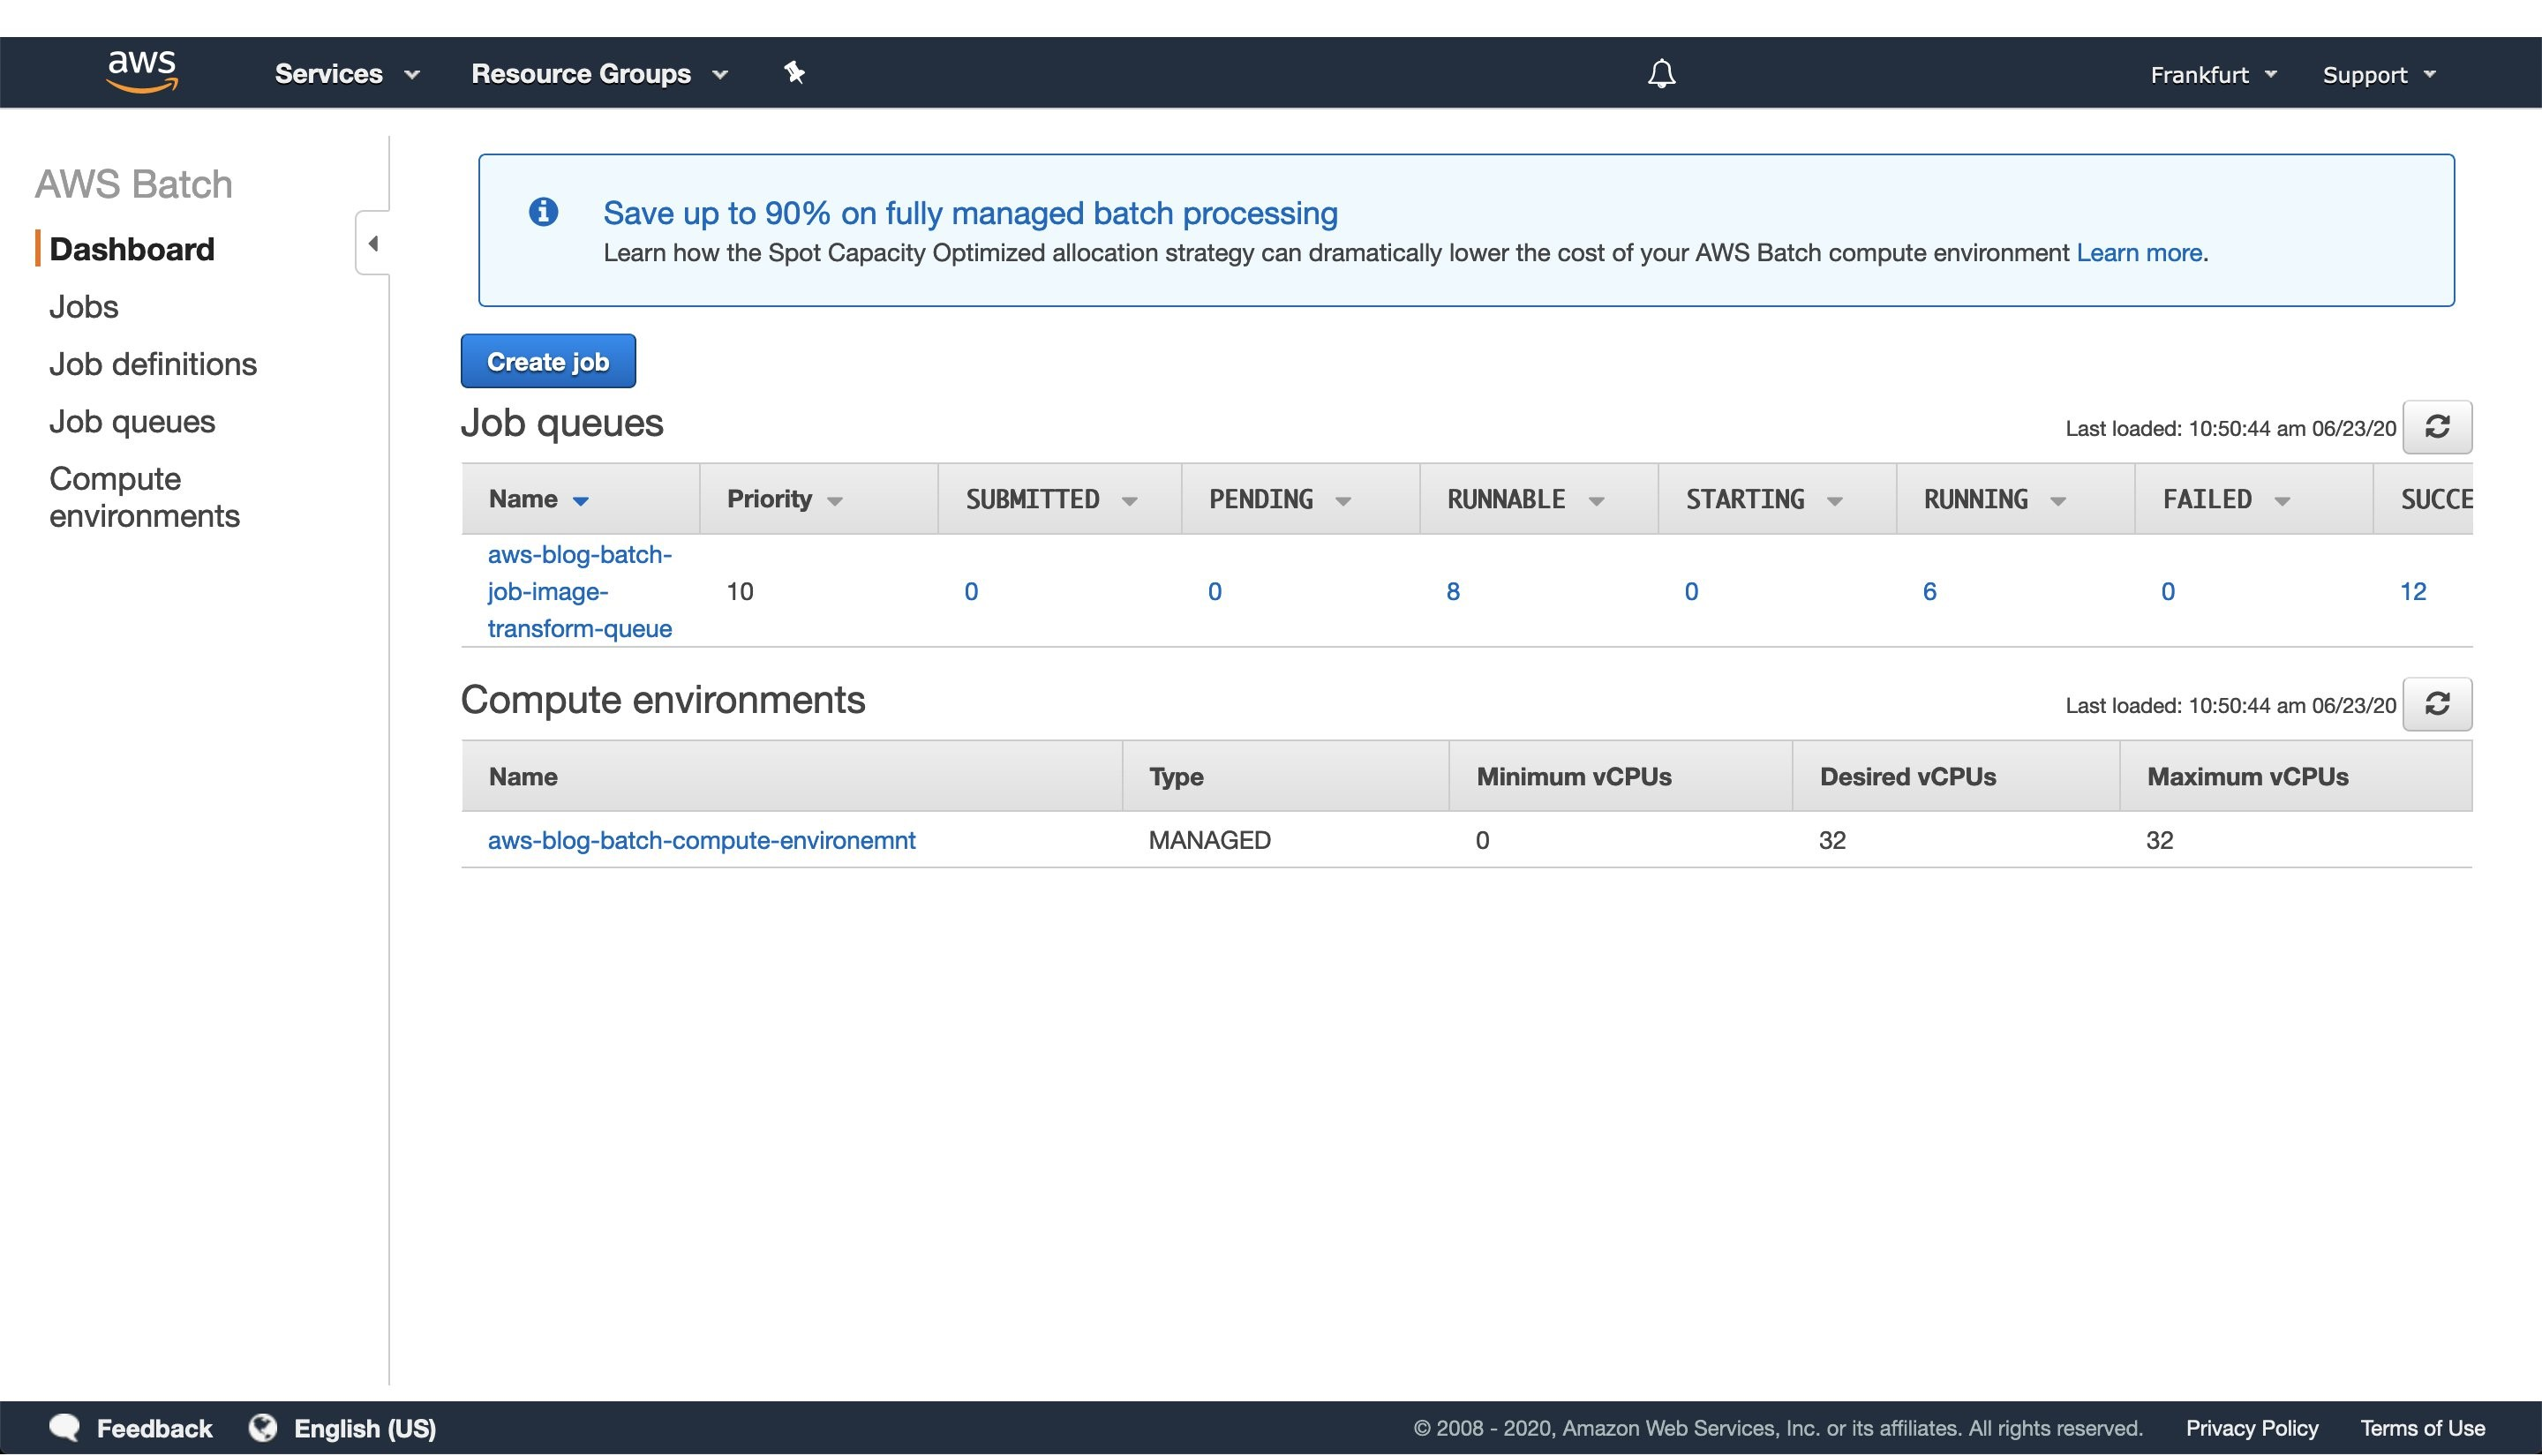\n\n***Figure 4**: Screenshot of a running AWS Batch job that creates feature vectors from images and stores them to DynamoDB.*\n\nOnce the AWS Lambda execution finishes its execution, we can monitor the AWS Batch jobs being processed on the AWS console screen, as seen in Figure 4. Wait until every job has finished successfully.\n\n#### **4. View results in DynamoDB**\n\n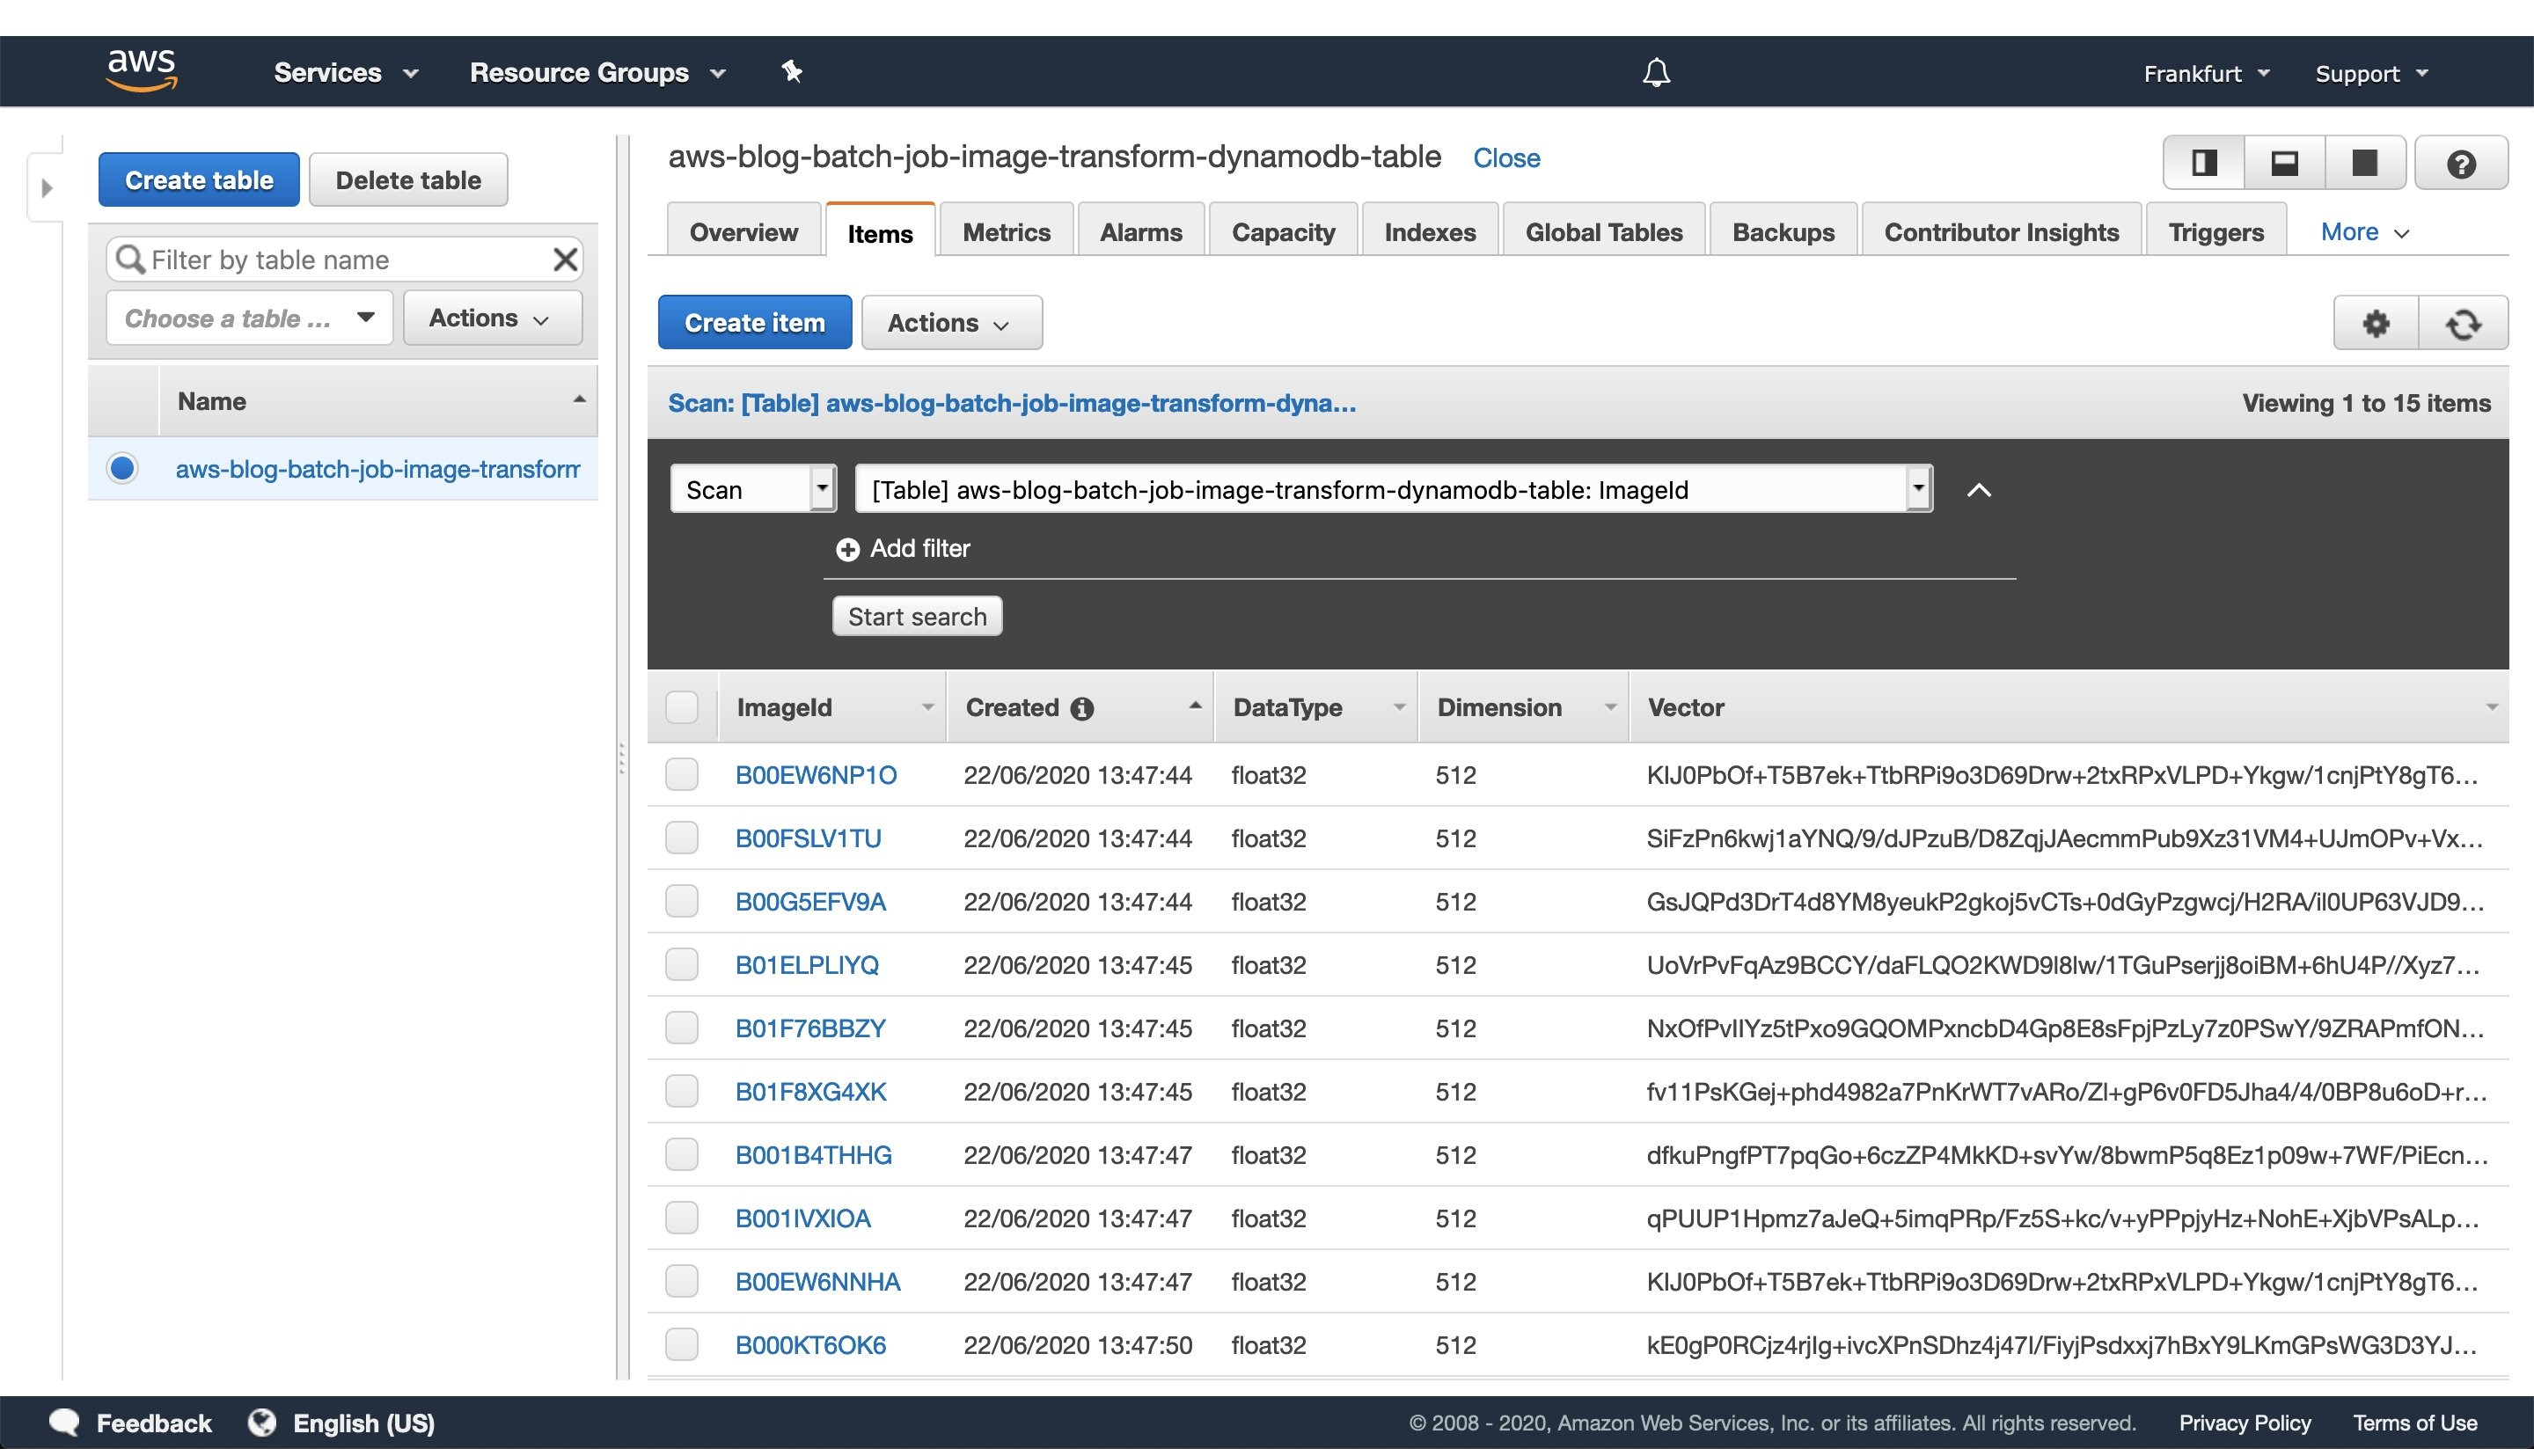\n\n***Figure 5**: Image vectorization results stored for each image as a entry in the DynamoDB table.*\n\nOnce every batch job is successfully finished, go to the DynamoDB AWS cloud console and see the feature vectors stored as strings obtained from the numpy [tostring](https://numpy.org/doc/stable/reference/generated/numpy.ndarray.tostring.html) method, as well as other data we stored in the table.\n\nWhen you are ready to access the vectors in one of your projects, utilize the code snippet provided here:\n\n```\n#!/usr/bin/env python3\n\nimport numpy as np\nimport boto3\n\ndef vector_from(item):\n '''\n Parameters\n ----------\n item : DynamoDB response item object\n '''\n vector = np.frombuffer(item['Vector'].value, dtype=item['DataType'])\n assert len(vector) == item['Dimension']\n return vector\n\ndef vectors_from_dydb(dynamodb, table_name, image_ids):\n '''\n Parameters\n ----------\n dynamodb : DynamoDB client\n table_name : Name of the DynamoDB table\n image_ids : List of id's to query the DynamoDB table for\n '''\n\n response = dynamodb.batch_get_item(\n RequestItems={table_name: {'Keys': [{'ImageId': val} for val in image_ids]}},\n ReturnConsumedCapacity='TOTAL'\n )\n\n query_vectors = [vector_from(item) for item in response['Responses'][table_name]]\n query_image_ids = [item['ImageId'] for item in response['Responses'][table_name]]\n\n return zip(query_vectors, query_image_ids)\n \ndef process_entry(vector, image_id):\n '''\n NOTE - Add your code here.\n '''\n pass\n\ndef main():\n '''\n Reads vectors from the batch job DynamoDB table containing the vectorization results.\n '''\n dynamodb = boto3.resource('dynamodb', region_name='eu-central-1')\n table_name = 'aws-blog-batch-job-image-transform-dynamodb-table'\n\n image_ids = ['B000KT6OK6', 'B000KTC6X0', 'B000KTC6XK', 'B001B4THHG']\n\n for vector, image_id in vectors_from_dydb(dynamodb, table_name, image_ids):\n process_entry(vector, image_id)\n\nif __name__ == \"__main__\":\n main()\n```\nThis code snippet will utilize the [boto3](https://boto3.amazonaws.com/v1/documentation/api/latest/index.html) client to access the results stored in the DynamoDB table. Make sure to update the code variables, as well as to modify this implementation to one that fits your use-case.\n\n#### **5. Tear down the infrastructure using CDK**\nTo finish off the exercise, we will tear down the infrastructure that we have provisioned. Since we are using CDK, this is very simple — go to the project root directory and run:\n```\ncdk destroy\n```\nAfter a confirmation prompt, the infrastructure tear-down should be underway. If you want to follow the process in more detail, then go to the CloudFormation console view and monitor the process from there.\n\n**NOTE**: The S3 Bucket, ECR image, and DynamoDB table resource will not be deleted, since the current CDK code defaults to RETAIN behavior in order to prevent the deletion of data we stored there. Once you are sure that you don’t need them, remove those remaining resources manually or modify the CDK code for desired behavior.\n### **Conclusion**\nIn this post we solved an [embarrassingly parallel](https://en.wikipedia.org/wiki/Embarrassingly_parallel) job of creating vector embeddings from images using AWS batch. We provisioned the infrastructure using Python CDK, uploaded sample images, submitted AWS batch job for execution, read the results from the DynamoDB table, and, finally, destroyed the AWS cloud resources we’ve provisioned at the beginning.\n\nAWS Batch serves as a good compute environment for various jobs. For this one in particular, we can scale the processing to more compute resources with minimal or no modifications to our deep learning models and supporting code. On the other hand, it lets us potentially reduce costs by utilizing smaller compute resources and longer execution times.\n\nThe code serves as a good point for beginning to experiment more with AWS batch in a Deep Leaning/Machine Learning setup. You could extend it to utilize EC2 instances with GPUs instead of CPUs, utilize Spot instances instead of on-demand ones, utilize AWS Step Functions to automate process orchestration, utilize Amazon SQS as a mechanism to distribute the workload, as well as move the lambda job submission to another compute resource, or pretty much tailor your project for anything else you might need AWS Batch to do.\n\nAnd that brings us to the conclusion of this post. Thanks for reading, and feel free to leave a comment below if you have any questions. Also, if you enjoyed reading this post, make sure to share it with your friends and colleagues!\n#### **About the author**\n\n\n\n**Filip Saina**\nFilip is a Software Development Engineer at Amazon working in a Computer Vision team. He works with researchers and engineers across Amazon to develop and deploy Computer Vision algorithms and ML models into production systems. Besides day-to-day coding, his responsibilities also include architecting and implementing distributed systems in AWS cloud for scalable ML applications.","render":"<p>Applying various transformations to images at scale is an easily parallelized and scaled task. As a Computer Vision research team at Amazon, we occasionally find that the amount of image data we are dealing with can’t be effectively computed on a single machine, but also isn’t large enough to justify running a large and potentially costly <a href=\"https://aws.amazon.com/emr/\" target=\"_blank\">AWS Elastic Map Reduce (EMR)</a> job. This is when we can utilize <a href=\"https://aws.amazon.com/batch/\" target=\"_blank\">AWS Batch</a> as our main computing environment, as well as <a href=\"https://aws.amazon.com/cdk/\" target=\"_blank\">Cloud Development Kit (CDK)</a> to provision the necessary infrastructure in order to solve our task.</p>\n<p>In Computer Vision, we often need to represent images in a more concise and uniform way. Working with standard image files would be challenging, as they can vary in resolution or are otherwise too large in terms of dimensionality to be provided directly to our models. For that reason, the common practice for deep learning approaches is to translate high-dimensional information representations, such as images, into vectors that encode most (if not all) information present in them — in other words, to create <em>vector embeddings</em>.</p>\n<p>This post will demonstrate how we utilize the AWS Batch platform to solve a common task in many Computer Vision projects — calculating vector embeddings from a set of images so as to allow for scaling.</p>\n<h3><a id=\"Architecture_Overview_6\"></a><strong>Architecture Overview</strong></h3>\n<p><img src=\"https://dev-media.amazoncloud.cn/55829d8a39f147beae58d855e3fc70fc_image.png\" alt=\"image.png\" /></p>\n<p><em>Figure 1: High-level architectural diagram explaining the major solution components.</em></p>\n<p>As seen in Figure 1, AWS Batch will pull the docker image containing our code onto provisioned hosts and start the docker containers. Our sample code, referenced in this post, will then read the resources from S3, conduct the vectorization, and write the results as entries in the DynamoDB Table.</p>\n<p>In order to run our image vectorization task, we will utilize the following AWS cloud components:</p>\n<ul>\n<li><strong>Amazon ECR</strong> — Elastic Container Registry is a Docker image repository from which our batch instances will pull the job images;</li>\n<li><strong>S3</strong> — Amazon Simple Storage Service will act as our image source from which our batch jobs will read the image;</li>\n<li><strong>Amazon DynamoDB</strong> — NoSQL database in which we will write the resulting vectors and other metadata;</li>\n<li><strong>AWS Lambda</strong> — Serverless compute environment which will conduct some pre-processing and, ultimately, trigger the batch job execution; and</li>\n<li><strong>AWS Batch</strong> — Scalable computing environment powering our models as <a href=\"https://en.wikipedia.org/wiki/Embarrassingly_parallel\" target=\"_blank\">embarrassingly parallel</a> tasks running as AWS Batch jobs.</li>\n</ul>\n<p>To translate an image to a vector, we can utilize a pre-trained model architecture, such as <em>AlexNet, ResNet, VGG,</em> or more recent ones, like ResNeXt and Vision Transformers. These model architectures are available in most of the popular deep learning frameworks, and they can be further modified and extended depending on our project requirements. For this post, we will utilize a pre-trained ResNet18 model from <a href=\"https://mxnet.apache.org/\" target=\"_blank\">MxNet</a>. We will output an intermediate layer of the model, which will result in a 512 dimensional representation, or, in other words, a 512 dimensional vector embedding.</p>\n<h3><a id=\"Deployment_using_Cloud_Development_Kit_CDK_25\"></a><strong>Deployment using Cloud Development Kit (CDK)</strong></h3>\n<p>In recent years, the idea of provisioning cloud infrastructure components using popular programming languages was popularized under the term of <em>infrastructure as code</em> (IaC). Instead of writing a file in the YAML/JSON/XML format, which would define every cloud component we want to provision, we might want to define those components trough a popular programming language.</p>\n<p>As part of this post, we will demonstrate how easy it is to provision infrastructure on AWS cloud by using Cloud Development Kit (CDK). The CDK code included in the exercise is written in Python and defines all of the relevant exercise components.</p>\n<h3><a id=\"Handson_exercise_30\"></a><strong>Hands-on exercise</strong></h3>\n<h4><a id=\"1_Deploying_the_infrastructure_with_AWS_CDK_31\"></a><strong>1. Deploying the infrastructure with AWS CDK</strong></h4>\n<p>For this exercise, we have provided a sample batch job project that is available on Github (<a href=\"https://github.com/aws-samples/aws-cdk-deep-learning-image-vector-embeddings-at-scale-using-aws-batch\" target=\"_blank\">link</a>). By using that code, you should have every component required to do this exercise, so make sure that you have the source on your machine. The root of your sample project local copy should contain the following files:</p>\n<pre><code class=\"lang-\">batch_job_cdk - CDK stack code of this batch job project\nsrc_batch_job - source code for performing the image vectorization\nsrc_lambda - source code for the lambda function which will trigger the batch job execution\napp.py - entry point for the CDK tool\ncdk.json - config file specifying the entry point for CDK\nrequirements.txt - list of python dependencies for CDK \nREADME.md \n</code></pre>\n<ol>\n<li>Make sure you have installed and correctly configured the <a href=\"https://aws.amazon.com/cli/\" target=\"_blank\">AWS CLI</a> and <a href=\"https://aws.amazon.com/cdk/\" target=\"_blank\">AWS CDK</a> in your environment. Refer to the <a href=\"https://docs.aws.amazon.com/cdk/latest/guide/environments.html\" target=\"_blank\">CDK documentation</a> for more information, as well as the <a href=\"https://docs.aws.amazon.com/cdk/latest/guide/getting_started.html\" target=\"_blank\">CDK getting started guide</a>.</li>\n<li>Set the <code>CDK_DEPLOY_ACCOUNT</code> and <code>CDK_DEPLOY_REGION</code> environmental variables, as described in the project <code>README.md</code>.</li>\n<li>Go to the sample project root and install the CDK python dependencies by running <code>pip install -r requirements.txt</code>.</li>\n<li>Install and configure <a href=\"https://www.docker.com/\" target=\"_blank\">Docker</a> in your environment.</li>\n<li>If you have multiple AWS CLI profiles, utilize the <code>--profile</code> option to specify which profile to use for deployment. Otherwise, simply run <code>cdk deploy</code> and deploy the infrastructure to your AWS account set in step 1.</li>\n</ol>\n<p><strong>NOTE</strong>: Before deploying, make sure that you are familiar with the restrictions and limitations of the AWS services we are using in this post. For example, if you choose to set an S3 bucket name in the <a href=\"https://docs.aws.amazon.com/cdk/api/latest/python/aws_cdk.aws_s3/Bucket.html\" target=\"_blank\">CDK Bucket construct</a>, you must avoid <a href=\"https://docs.aws.amazon.com/AmazonS3/latest/userguide/BucketRestrictions.html\" target=\"_blank\">naming conflicts</a> that might cause deployment errors.</p>\n<p>The CDK tool will now trigger our docker image build, provision the necessary AWS infrastructure (i.e., S3 Bucket, DynamoDB table, roles and permissions), and, upon completion, upload the docker image to a newly created repository on <a href=\"https://aws.amazon.com/ecr/\" target=\"_blank\">Amazon Elastic Container Registry (ECR)</a>.</p>\n<h4><a id=\"2_Upload_data_to_S3_51\"></a><strong>2. Upload data to S3</strong></h4>\n<p><img src=\"https://dev-media.amazoncloud.cn/156a32785d944b8bb6305c8d27097fc2_image.png\" alt=\"image.png\" /></p>\n<p><em>Figure 2: S3 console window with uploaded images to the <code>images</code> directory.</em></p>\n<p>After CDK has successfully finished deploying, head to the S3 console screen and upload images you want to process to a path in the S3 bucket. For this exercise, we’ve added every image to the <code>images</code> directory, as seen in Figure 2.</p>\n<p>For larger datasets, utilize the <a href=\"https://aws.amazon.com/cli/\" target=\"_blank\">AWS CLI</a> tool to sync your local directory with the S3 bucket. In that case, consider enabling the ‘Transfer acceleration’ option of your S3 bucket for faster data transfers. However, this will incur an additional fee.</p>\n<h4><a id=\"3_Trigger_batch_job_execution_60\"></a><strong>3. Trigger batch job execution</strong></h4>\n<p>Once CDK has completed provisioning our infrastructure and we’ve uploaded the image data we want to process, open the newly created AWS Lambda in the AWS console screen in order to trigger the batch job execution.</p>\n<p>To do this, create a test event with the following JSON body:</p>\n<pre><code class=\"lang-\">{\n"Paths": [\n "images"\n ]\n}\n</code></pre>\n<p>The JSON body that we provide as input to the AWS Lambda function defines a list of paths to directories in the S3 buckets containing images. Having the ability to dynamically provide paths to directories with images in S3, lets us combine multiple data sources into a single AWS Batch job execution. Furthermore, if we decide in the future to put an API Gateway in front of the Lambda, you could pass every parameter of the batch job with a simple HTTP method call.</p>\n<p>In this example, we specified just one path to the <code>images</code> directory in the S3 bucket, which we populated with images in the previous step.</p>\n<p><img src=\"https://dev-media.amazoncloud.cn/5de5a49ea340498993662c6d96cfa42d_image.png\" alt=\"image.png\" /></p>\n<p><em><strong>Figure 3</strong></em>: <em>AWS Lambda console screen of the function that triggers batch job execution. Modify the batch size by modifying the <code>image_batch_limit</code> variable. The value of this variable will depend on your particular use-case, computation type, image sizes, as well as processing time requirements.</em></p>\n<p>The python code will list every path under the <code>images</code> S3 path, batch them into batches of desired size, and finally save the paths to batches as txt files under <code>tmp</code> S3 path. Each path to a txt files in S3 will be passed as an input to a batch jobs.</p>\n<p>Select the newly created event, and then trigger the Lambda function execution. The AWS Lambda function will submit the AWS Batch jobs to the provisioned AWS Batch compute environment.</p>\n<p><img src=\"https://dev-media.amazoncloud.cn/bfbb52f406b246459a46b3bd9ed84303_image.png\" alt=\"image.png\" /></p>\n<p><em><strong>Figure 4</strong>: Screenshot of a running AWS Batch job that creates feature vectors from images and stores them to DynamoDB.</em></p>\n<p>Once the AWS Lambda execution finishes its execution, we can monitor the AWS Batch jobs being processed on the AWS console screen, as seen in Figure 4. Wait until every job has finished successfully.</p>\n<h4><a id=\"4_View_results_in_DynamoDB_89\"></a><strong>4. View results in DynamoDB</strong></h4>\n<p><img src=\"https://dev-media.amazoncloud.cn/1d6f838c76fb46f8b17308c878ca59e4_image.png\" alt=\"image.png\" /></p>\n<p><em><strong>Figure 5</strong>: Image vectorization results stored for each image as a entry in the DynamoDB table.</em></p>\n<p>Once every batch job is successfully finished, go to the DynamoDB AWS cloud console and see the feature vectors stored as strings obtained from the numpy <a href=\"https://numpy.org/doc/stable/reference/generated/numpy.ndarray.tostring.html\" target=\"_blank\">tostring</a> method, as well as other data we stored in the table.</p>\n<p>When you are ready to access the vectors in one of your projects, utilize the code snippet provided here:</p>\n<pre><code class=\"lang-\">#!/usr/bin/env python3\n\nimport numpy as np\nimport boto3\n\ndef vector_from(item):\n '''\n Parameters\n ----------\n item : DynamoDB response item object\n '''\n vector = np.frombuffer(item['Vector'].value, dtype=item['DataType'])\n assert len(vector) == item['Dimension']\n return vector\n\ndef vectors_from_dydb(dynamodb, table_name, image_ids):\n '''\n Parameters\n ----------\n dynamodb : DynamoDB client\n table_name : Name of the DynamoDB table\n image_ids : List of id's to query the DynamoDB table for\n '''\n\n response = dynamodb.batch_get_item(\n RequestItems={table_name: {'Keys': [{'ImageId': val} for val in image_ids]}},\n ReturnConsumedCapacity='TOTAL'\n )\n\n query_vectors = [vector_from(item) for item in response['Responses'][table_name]]\n query_image_ids = [item['ImageId'] for item in response['Responses'][table_name]]\n\n return zip(query_vectors, query_image_ids)\n \ndef process_entry(vector, image_id):\n '''\n NOTE - Add your code here.\n '''\n pass\n\ndef main():\n '''\n Reads vectors from the batch job DynamoDB table containing the vectorization results.\n '''\n dynamodb = boto3.resource('dynamodb', region_name='eu-central-1')\n table_name = 'aws-blog-batch-job-image-transform-dynamodb-table'\n\n image_ids = ['B000KT6OK6', 'B000KTC6X0', 'B000KTC6XK', 'B001B4THHG']\n\n for vector, image_id in vectors_from_dydb(dynamodb, table_name, image_ids):\n process_entry(vector, image_id)\n\nif __name__ == "__main__":\n main()\n</code></pre>\n<p>This code snippet will utilize the <a href=\"https://boto3.amazonaws.com/v1/documentation/api/latest/index.html\" target=\"_blank\">boto3</a> client to access the results stored in the DynamoDB table. Make sure to update the code variables, as well as to modify this implementation to one that fits your use-case.</p>\n<h4><a id=\"5_Tear_down_the_infrastructure_using_CDK_157\"></a><strong>5. Tear down the infrastructure using CDK</strong></h4>\n<p>To finish off the exercise, we will tear down the infrastructure that we have provisioned. Since we are using CDK, this is very simple — go to the project root directory and run:</p>\n<pre><code class=\"lang-\">cdk destroy\n</code></pre>\n<p>After a confirmation prompt, the infrastructure tear-down should be underway. If you want to follow the process in more detail, then go to the CloudFormation console view and monitor the process from there.</p>\n<p><strong>NOTE</strong>: The S3 Bucket, ECR image, and DynamoDB table resource will not be deleted, since the current CDK code defaults to RETAIN behavior in order to prevent the deletion of data we stored there. Once you are sure that you don’t need them, remove those remaining resources manually or modify the CDK code for desired behavior.</p>\n<h3><a id=\"Conclusion_165\"></a><strong>Conclusion</strong></h3>\n<p>In this post we solved an <a href=\"https://en.wikipedia.org/wiki/Embarrassingly_parallel\" target=\"_blank\">embarrassingly parallel</a> job of creating vector embeddings from images using AWS batch. We provisioned the infrastructure using Python CDK, uploaded sample images, submitted AWS batch job for execution, read the results from the DynamoDB table, and, finally, destroyed the AWS cloud resources we’ve provisioned at the beginning.</p>\n<p>AWS Batch serves as a good compute environment for various jobs. For this one in particular, we can scale the processing to more compute resources with minimal or no modifications to our deep learning models and supporting code. On the other hand, it lets us potentially reduce costs by utilizing smaller compute resources and longer execution times.</p>\n<p>The code serves as a good point for beginning to experiment more with AWS batch in a Deep Leaning/Machine Learning setup. You could extend it to utilize EC2 instances with GPUs instead of CPUs, utilize Spot instances instead of on-demand ones, utilize AWS Step Functions to automate process orchestration, utilize Amazon SQS as a mechanism to distribute the workload, as well as move the lambda job submission to another compute resource, or pretty much tailor your project for anything else you might need AWS Batch to do.</p>\n<p>And that brings us to the conclusion of this post. Thanks for reading, and feel free to leave a comment below if you have any questions. Also, if you enjoyed reading this post, make sure to share it with your friends and colleagues!</p>\n<h4><a id=\"About_the_author_173\"></a><strong>About the author</strong></h4>\n<p><img src=\"https://dev-media.amazoncloud.cn/5e05931c9ad14690bd69a375dacd3da2_image.png\" alt=\"image.png\" /></p>\n<p><strong>Filip Saina</strong><br />\nFilip is a Software Development Engineer at Amazon working in a Computer Vision team. He works with researchers and engineers across Amazon to develop and deploy Computer Vision algorithms and ML models into production systems. Besides day-to-day coding, his responsibilities also include architecting and implementing distributed systems in AWS cloud for scalable ML applications.</p>\n"}
Deep learning image vector embeddings at scale using Amazon Batch and CDK
海外精选

海外精选的内容汇集了全球优质的亚马逊云科技相关技术内容。同时,内容中提到的“AWS”
是 “Amazon Web Services” 的缩写,在此网站不作为商标展示。

 0
0 0
0亚马逊云科技解决方案 基于行业客户应用场景及技术领域的解决方案
联系亚马逊云科技专家
亚马逊云科技解决方案
基于行业客户应用场景及技术领域的解决方案
联系专家

0
目录

 分享
分享 点赞
点赞 收藏
收藏 目录
目录立即注册,开启您的免费套餐
立即关注

亚马逊云开发者
公众号

User Group
公众号

亚马逊云科技
官方小程序
“AWS” 是 “Amazon Web Services” 的缩写,在此网站不作为商标展示。
立即关注
亚马逊云开发者
公众号
User Group
公众号
亚马逊云科技
官方小程序
“AWS” 是 “Amazon Web Services” 的缩写,在此网站不作为商标展示。
关于我们 
更多资源
开发者工具
更多支持
立即关注
亚马逊云开发者
公众号
User Group
公众号
亚马逊云科技
官方小程序
“AWS” 是 “Amazon Web Services” 的缩写,在此网站不作为商标展示。
