{"value":"Automating the management of the compute resources associated with your [Amazon Neptune](https://aws.amazon.com/neptune/) database cluster can save you time and money. The most significant cost when running Neptune for your graph workloads are the compute resources in the database cluster. If you’re also using associated resources such as [Amazon SageMaker](https://aws.amazon.com/sagemaker/) notebook instances, which you can use to write queries that run against your graph database, these add to your workload cost. Additionally, with the introduction of [Amazon Neptune auto-scaling](https://docs.aws.amazon.com/neptune/latest/userguide/manage-console-autoscaling.html), where your Neptune database cluster now has the ability to automatically add additional read replicas to meet your workload requirements, costs can potentially grow over time.\n\nA recommended approach is that you stop any resources that you aren’t using, however it can often be difficult to identify which resources should be stopped. If you’re running your graph workload across multiple environments such as development, QA, and production, using automation can help you save additional time and money, and improve your carbon footprint.\n\nOne way of doing this is to use [resource tags](https://docs.aws.amazon.com/general/latest/gr/aws_tagging.html). Tags help identify associated resources by means of a key-value pair that can group them together. For example, tagging all resources associated to a specific environment can help automated tasks be able to identify resources and, if necessary, stop them to reduce cost. [Tagging resources](https://docs.aws.amazon.com/general/latest/gr/aws_tagging.html) is an AWS best practice, and can be used to as part of a [wider tagging strategy](https://docs.aws.amazon.com/general/latest/gr/aws_tagging.html#tag-best-practices), for example to help group resource costs in [AWS Cost Explorer](https://aws.amazon.com/aws-cost-management/aws-cost-explorer/).\n\nYou can use scheduled tasks that run at specific times of the day to automate the stopping and starting of resources. The task can query all Neptune resources based on a specific set of tags. Automation gives better control over which Neptune resources are included within the process, and you can also use it to provide a mechanism for notifying specific teams of when their resources have been updated.\n\nIn this post, we show you how to create a serverless, event-driven solution to manage your Neptune database cluster and associated resources. First, we add tags to the resources you want to manage as part of the workflow, for example your Neptune database cluster and SageMaker notebooks. Then we create a workflow to automatically stop or start the resources based on a scheduled trigger. Finally, we publish messages containing information about the modified resources to an [Amazon Simple Notification Service](http://aws.amazon.com/sns) (Amazon SNS) topic, which is received as an email.\n\n### **Overview of solution**\n\nCreating an event-driven, serverless workflow to automate the steps of stopping or starting your resources includes the following steps:\n\n1. Create two [Amazon EventBridge](https://aws.amazon.com/eventbridge/) rules to run on a schedule: one to stop the resources, and the other to start them.\n2. Use Amazon SNS to receive EventBridge rule notifications and pass them on to [AWS Lambda](http://aws.amazon.com/lambda) functions.\n3. Write a stop function and a start function using Lambda, which are invoked depending on whether the workflow is to stop the resources or start them.\n\nDepending on the timing of the scheduled stop and start triggers, for example, 17H00 (stop) and 08H00 (start), you may need to run this solution in your account for at least 24 hours to see the effects. The approximate cost of provisioning this solution in the N. Virginia (us-east-1) Region is as follows:\n\n- Without the example Neptune environment (including database cluster, instance, and notebook) the cost is less than $1 per day\n- With the example Neptune environment (including database cluster, instance, and notebook), the cost is less than $4 per day\n\nThe easiest way to follow along with this post is to use the provided [AWS CloudFormation](http://aws.amazon.com/cloudformation) template. This template creates the necessary EventBridge rules, SNS topics, Lambda functions, and [AWS Identity and Access Management](http://aws.amazon.com/iam) (IAM) roles and policies that form the foundation of the solution. The template also creates the required [AWS Systems Manager Parameter Store](https://docs.aws.amazon.com/systems-manager/latest/userguide/systems-manager-parameter-store.html) parameters based on input given during the stack creation. In addition, you can create a Neptune database instance for testing purposes. The following diagram illustrates the architecture for the stack.\n\n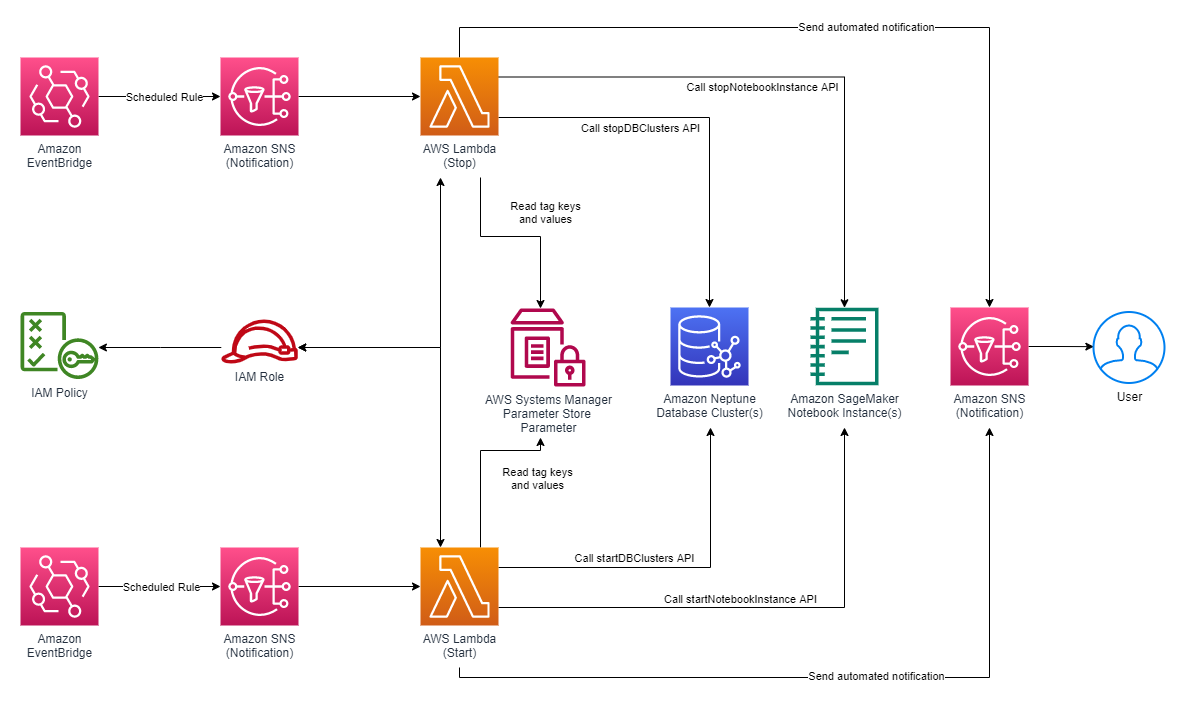\n\n### **Prerequisites**\n\nFor this walkthrough, you should have the following prerequisites:\n\n- An AWS account.\n- A Neptune database cluster and optionally a SageMaker notebook. The accompanying CloudFormation template can provision this for you if required.\n- Optionally, at least one Neptune database cluster tagged using the tag key and one of the tag values provided during stack creation.\n- Optionally, at least one SageMaker notebook instance tagged using the tag key and one of the tag values provided during stack creation.\n\n### **Provision your resources with AWS CloudFormation**\n\nTo deploy the CloudFormation template, complete the following steps:\n\n1. On the AWS CloudFormation console, choose **Create stack**.\n2. Choose **With new resources (standard)**.\n3. Download the CloudFormation template locally to your machine. Choose **Upload a template**, then choose **Choose file** and choose the template you downloaded. Alternatively, select **Amazon S3 URL** and copy and paste the following link to the CloudFormation template into the text box:\n```\nhttps://aws-blogs-artifacts-public.s3.amazonaws.com/artifacts/DBBLOG-1998/Neptune_Db_Cluster_Scheduled_Start_Stop_CFn_Template.yml\n```\n4. Choose **Next**.\n5. For **Stack name**, enter a stack name of your choosing.\n\n\n\n6. In the **Parameters** section, provide the following values:\na. For **CreateExampleNeptuneEnvironment**, choose **Yes** to create a Neptune database cluster tagged with the specified tag values; otherwise, choose **No**.\nb. For **NotificationEmailAddress**, enter an email address to receive stop and start notifications.\nc. For **StartScheduleExpression**, enter a [valid CRON](https://docs.aws.amazon.com/AmazonCloudWatch/latest/events/ScheduledEvents.html#CronExpressions) schedule expression for starting resources.\nd. For **StopScheduleExpression**, enter a [valid CRON](https://docs.aws.amazon.com/AmazonCloudWatch/latest/events/ScheduledEvents.html#CronExpressions) schedule expression for stopping resources.\ne. For **TagKey**, enter the tag key used to identify resources to stop and start.\nf. For **TagValues**, enter a comma-separated list of values that have been populated for the tag key.\n\nThe following screenshot is an example configuration that will run the start process at 08:00, and the stop process at 20:00, Monday to Friday, on any day of the month, during any month, in any year. This will be applied to Neptune resources that have a resource tag named **Environment** with a value of **Dev, development, dev** or **DEV**.\n\n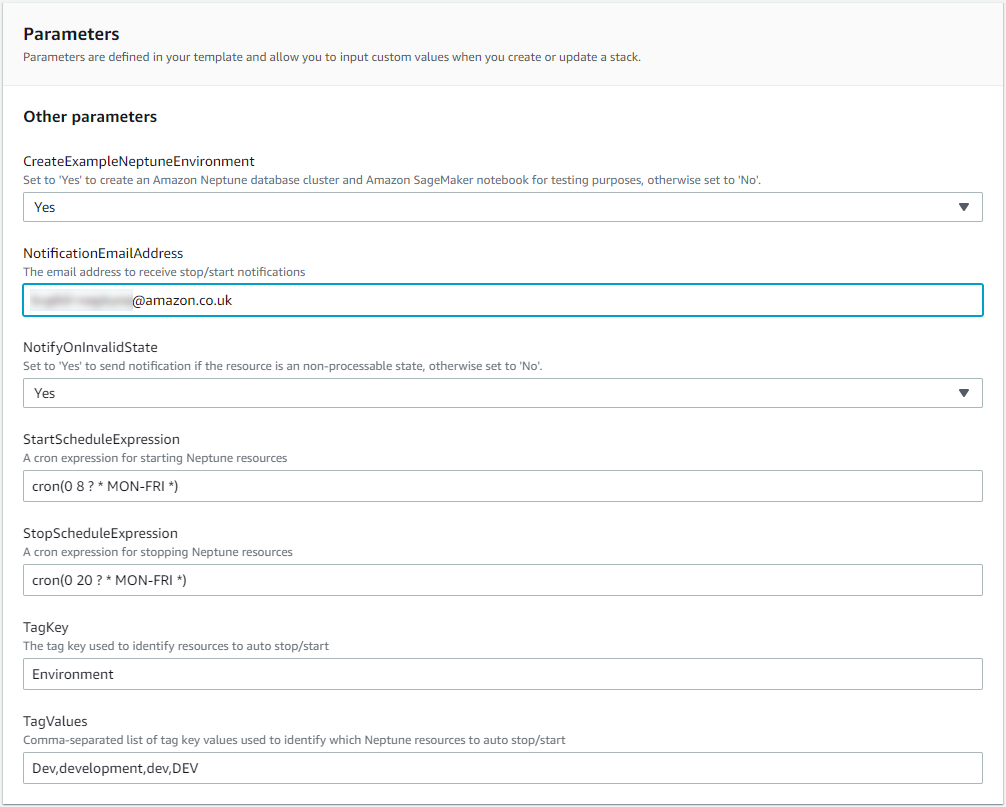\n\n7. Choose **Next**.\n8. Continue through the remaining sections.\n9. Read and select the check boxes in the **Capabilities** section.\n10. Choose **Create stack**.\n\nThe stack takes approximately 5 minutes to complete. You will receive an email to the address specified in the \n```\nNotificationEmailAddress\n```\nparameter requiring you to confirm your subscription to the newly created SNS topic. You need to do this prior to being able to receive notifications generated by the solution.\n\n### **EventBridge rule CRON schedules**\n\nThis solution uses EventBridge to act as the initiator for the event-driven workflow. You create two rules—one for the stop workflow, and one for the start workflow—both of which include a specific CRON schedule. For example, the CRON schedule for the stop workflow is as follows.\n\n\n\nThe preceding schedule expression states the rule runs only at 17:00 on Monday to Friday, on any day of the month, during any month, in any year.\n\nSimilarly, the CRON schedule for the start workflow is as follows.\n\n\n\nThis schedule expression states the rule runs only at 08:00 on Monday to Friday, on any day of the month, during any month, in any year. The combination of both rules result in any affected Neptune database cluster and associated resources only running during the period of 08:00 to 17:00, Monday to Friday.\n\nFor more information about CRON statements, refer to [Schedule Expressions for Rules](https://docs.aws.amazon.com/AmazonCloudWatch/latest/events/ScheduledEvents.html).\n\n### **Create targets for the scheduled events**\n\nAfter you create the EventBridge rules, you need to provide at least one target to receive the notification event from each rule. In this case, we use Amazon SNS to receive the event and invoke further downstream services. Amazon SNS is included in this design to provide a decoupled mechanism for processing events. After an event is received by Amazon SNS, we invoke a Lambda function, passing it the details of the event.\n\n\n\n### **Store reusable parameters**\n\nEach of the Lambda resources in the design performs a single function: to identify Neptune and SageMaker notebook instances within the same account that have been tagged with a specific tag key, and either stop or start it. We use Parameter Store parameters to store the tag key and the comma-separated list of tag values that are used to identify these resources. Doing so provides a centralized, cost-effective, and secure repository that enables both functions to work using the same data, and any updates are viewed by both. From a security perspective, the Lambda functions are assigned a single role that permits only a narrow set of actions pertaining to Neptune, SageMaker, Amazon SNS, and [AWS Systems Manager.](https://aws.amazon.com/systems-manager/)\n\n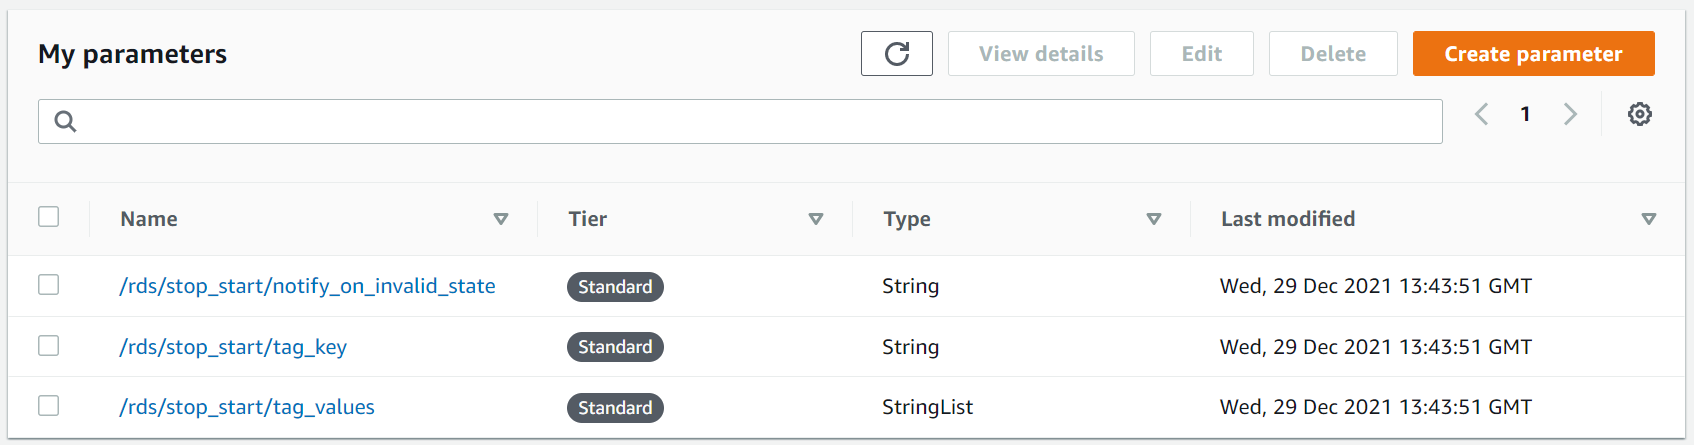\n\n### **Apply resource tags in your own environment**\n\nAfter you deploy the solution, you can apply the tag key and one of the tag values specified in the CloudFormation template to your resources. This causes the tagged resources to be included in the automated process. When applying the resource tag to your Neptune database, you need only apply the resource tag to your Neptune cluster, rather than the writer instance, as shown in the following screenshot.\n\n\n\n### **Send post-action notifications**\n\nAfter each Lambda function has finished either stopping or starting identified resources, it publishes a message to a separate SNS topic, which is then sent to the email address specified in the CloudFormation deployment. Included in this message is the name of each resource that has been modified. The following screenshot illustrates an example notification email.\n\n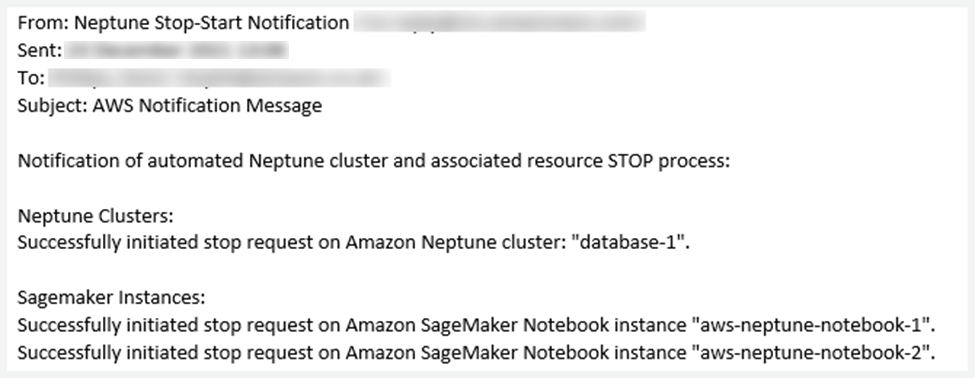\n\n### **Clean up**\n\nWhen you’re done automatically stopping and starting your resources, you can visit the AWS CloudFormation console and [delete the stack](https://docs.aws.amazon.com/AWSCloudFormation/latest/UserGuide/cfn-console-delete-stack.html) that we created. This removes all the resources that we created as part of this solution.\n\nIf you created your own Neptune database cluster or SageMaker notebooks, you need to manually delete them to avoid additional cost.\n\n### **Conclusion**\n\nIn this post, we demonstrated how to create an automated serverless workflow that runs at scheduled instances to stop or start Neptune database clusters and associated SageMaker notebook instances using tags applied to these resources. Stopping these resources during periods where they’re not required can reduce cost and improve your carbon footprint. In addition, because the solution is event-driven and serverless, there are no instances to manage.\n\nYou can use the solution in this post as a foundation, and then extend it to include additional services that you want to stop and start as part of your Neptune environment.\n\nFurthermore, you can run multiple instances of this solution in your account to monitor for different resource tag keys, such as cost center, owner, or workload values.\n\nWe encourage you to try out this solution in your AWS account where you’re running your Neptune resources. If you have any feedback, please leave a comment below.\n\n#### **About the author**\n\n\n\n**Kevin Phillips** is a Neptune Specialist Solutions Architect working in the UK at Amazon Web Services. He has 18 years of development and solutions architectural experience, which he uses to help support and guide customers.","render":"<p>Automating the management of the compute resources associated with your <a href=\"https://aws.amazon.com/neptune/\" target=\"_blank\">Amazon Neptune</a> database cluster can save you time and money. The most significant cost when running Neptune for your graph workloads are the compute resources in the database cluster. If you’re also using associated resources such as <a href=\"https://aws.amazon.com/sagemaker/\" target=\"_blank\">Amazon SageMaker</a> notebook instances, which you can use to write queries that run against your graph database, these add to your workload cost. Additionally, with the introduction of <a href=\"https://docs.aws.amazon.com/neptune/latest/userguide/manage-console-autoscaling.html\" target=\"_blank\">Amazon Neptune auto-scaling</a>, where your Neptune database cluster now has the ability to automatically add additional read replicas to meet your workload requirements, costs can potentially grow over time.</p>\n<p>A recommended approach is that you stop any resources that you aren’t using, however it can often be difficult to identify which resources should be stopped. If you’re running your graph workload across multiple environments such as development, QA, and production, using automation can help you save additional time and money, and improve your carbon footprint.</p>\n<p>One way of doing this is to use <a href=\"https://docs.aws.amazon.com/general/latest/gr/aws_tagging.html\" target=\"_blank\">resource tags</a>. Tags help identify associated resources by means of a key-value pair that can group them together. For example, tagging all resources associated to a specific environment can help automated tasks be able to identify resources and, if necessary, stop them to reduce cost. <a href=\"https://docs.aws.amazon.com/general/latest/gr/aws_tagging.html\" target=\"_blank\">Tagging resources</a> is an AWS best practice, and can be used to as part of a <a href=\"https://docs.aws.amazon.com/general/latest/gr/aws_tagging.html#tag-best-practices\" target=\"_blank\">wider tagging strategy</a>, for example to help group resource costs in <a href=\"https://aws.amazon.com/aws-cost-management/aws-cost-explorer/\" target=\"_blank\">AWS Cost Explorer</a>.</p>\n<p>You can use scheduled tasks that run at specific times of the day to automate the stopping and starting of resources. The task can query all Neptune resources based on a specific set of tags. Automation gives better control over which Neptune resources are included within the process, and you can also use it to provide a mechanism for notifying specific teams of when their resources have been updated.</p>\n<p>In this post, we show you how to create a serverless, event-driven solution to manage your Neptune database cluster and associated resources. First, we add tags to the resources you want to manage as part of the workflow, for example your Neptune database cluster and SageMaker notebooks. Then we create a workflow to automatically stop or start the resources based on a scheduled trigger. Finally, we publish messages containing information about the modified resources to an <a href=\"http://aws.amazon.com/sns\" target=\"_blank\">Amazon Simple Notification Service</a> (Amazon SNS) topic, which is received as an email.</p>\n<h3><a id=\"Overview_of_solution_10\"></a><strong>Overview of solution</strong></h3>\n<p>Creating an event-driven, serverless workflow to automate the steps of stopping or starting your resources includes the following steps:</p>\n<ol>\n<li>Create two <a href=\"https://aws.amazon.com/eventbridge/\" target=\"_blank\">Amazon EventBridge</a> rules to run on a schedule: one to stop the resources, and the other to start them.</li>\n<li>Use Amazon SNS to receive EventBridge rule notifications and pass them on to <a href=\"http://aws.amazon.com/lambda\" target=\"_blank\">AWS Lambda</a> functions.</li>\n<li>Write a stop function and a start function using Lambda, which are invoked depending on whether the workflow is to stop the resources or start them.</li>\n</ol>\n<p>Depending on the timing of the scheduled stop and start triggers, for example, 17H00 (stop) and 08H00 (start), you may need to run this solution in your account for at least 24 hours to see the effects. The approximate cost of provisioning this solution in the N. Virginia (us-east-1) Region is as follows:</p>\n<ul>\n<li>Without the example Neptune environment (including database cluster, instance, and notebook) the cost is less than $1 per day</li>\n<li>With the example Neptune environment (including database cluster, instance, and notebook), the cost is less than $4 per day</li>\n</ul>\n<p>The easiest way to follow along with this post is to use the provided <a href=\"http://aws.amazon.com/cloudformation\" target=\"_blank\">AWS CloudFormation</a> template. This template creates the necessary EventBridge rules, SNS topics, Lambda functions, and <a href=\"http://aws.amazon.com/iam\" target=\"_blank\">AWS Identity and Access Management</a> (IAM) roles and policies that form the foundation of the solution. The template also creates the required <a href=\"https://docs.aws.amazon.com/systems-manager/latest/userguide/systems-manager-parameter-store.html\" target=\"_blank\">AWS Systems Manager Parameter Store</a> parameters based on input given during the stack creation. In addition, you can create a Neptune database instance for testing purposes. The following diagram illustrates the architecture for the stack.</p>\n<p><img src=\"https://dev-media.amazoncloud.cn/f824f60dcca64aa7b85cedc49a36452f_image.png\" alt=\"image.png\" /></p>\n<h3><a id=\"Prerequisites_27\"></a><strong>Prerequisites</strong></h3>\n<p>For this walkthrough, you should have the following prerequisites:</p>\n<ul>\n<li>An AWS account.</li>\n<li>A Neptune database cluster and optionally a SageMaker notebook. The accompanying CloudFormation template can provision this for you if required.</li>\n<li>Optionally, at least one Neptune database cluster tagged using the tag key and one of the tag values provided during stack creation.</li>\n<li>Optionally, at least one SageMaker notebook instance tagged using the tag key and one of the tag values provided during stack creation.</li>\n</ul>\n<h3><a id=\"Provision_your_resources_with_AWS_CloudFormation_36\"></a><strong>Provision your resources with AWS CloudFormation</strong></h3>\n<p>To deploy the CloudFormation template, complete the following steps:</p>\n<ol>\n<li>On the AWS CloudFormation console, choose <strong>Create stack</strong>.</li>\n<li>Choose <strong>With new resources (standard)</strong>.</li>\n<li>Download the CloudFormation template locally to your machine. Choose <strong>Upload a template</strong>, then choose <strong>Choose file</strong> and choose the template you downloaded. Alternatively, select <strong>Amazon S3 URL</strong> and copy and paste the following link to the CloudFormation template into the text box:</li>\n</ol>\n<pre><code class=\"lang-\">https://aws-blogs-artifacts-public.s3.amazonaws.com/artifacts/DBBLOG-1998/Neptune_Db_Cluster_Scheduled_Start_Stop_CFn_Template.yml\n</code></pre>\n<ol start=\"4\">\n<li>Choose <strong>Next</strong>.</li>\n<li>For <strong>Stack name</strong>, enter a stack name of your choosing.</li>\n</ol>\n<p><img src=\"https://dev-media.amazoncloud.cn/c87323f41f4247a6a731cb889ed09498_image.png\" alt=\"image.png\" /></p>\n<ol start=\"6\">\n<li>In the <strong>Parameters</strong> section, provide the following values:<br />\na. For <strong>CreateExampleNeptuneEnvironment</strong>, choose <strong>Yes</strong> to create a Neptune database cluster tagged with the specified tag values; otherwise, choose <strong>No</strong>.<br />\nb. For <strong>NotificationEmailAddress</strong>, enter an email address to receive stop and start notifications.<br />\nc. For <strong>StartScheduleExpression</strong>, enter a <a href=\"https://docs.aws.amazon.com/AmazonCloudWatch/latest/events/ScheduledEvents.html#CronExpressions\" target=\"_blank\">valid CRON</a> schedule expression for starting resources.<br />\nd. For <strong>StopScheduleExpression</strong>, enter a <a href=\"https://docs.aws.amazon.com/AmazonCloudWatch/latest/events/ScheduledEvents.html#CronExpressions\" target=\"_blank\">valid CRON</a> schedule expression for stopping resources.<br />\ne. For <strong>TagKey</strong>, enter the tag key used to identify resources to stop and start.<br />\nf. For <strong>TagValues</strong>, enter a comma-separated list of values that have been populated for the tag key.</li>\n</ol>\n<p>The following screenshot is an example configuration that will run the start process at 08:00, and the stop process at 20:00, Monday to Friday, on any day of the month, during any month, in any year. This will be applied to Neptune resources that have a resource tag named <strong>Environment</strong> with a value of <strong>Dev, development, dev</strong> or <strong>DEV</strong>.</p>\n<p><img src=\"https://dev-media.amazoncloud.cn/d6730f86460d44639fdede2c38e4ae04_image.png\" alt=\"image.png\" /></p>\n<ol start=\"7\">\n<li>Choose <strong>Next</strong>.</li>\n<li>Continue through the remaining sections.</li>\n<li>Read and select the check boxes in the <strong>Capabilities</strong> section.</li>\n<li>Choose <strong>Create stack</strong>.</li>\n</ol>\n<p>The stack takes approximately 5 minutes to complete. You will receive an email to the address specified in the</p>\n<pre><code class=\"lang-\">NotificationEmailAddress\n</code></pre>\n<p>parameter requiring you to confirm your subscription to the newly created SNS topic. You need to do this prior to being able to receive notifications generated by the solution.</p>\n<h3><a id=\"EventBridge_rule_CRON_schedules_74\"></a><strong>EventBridge rule CRON schedules</strong></h3>\n<p>This solution uses EventBridge to act as the initiator for the event-driven workflow. You create two rules—one for the stop workflow, and one for the start workflow—both of which include a specific CRON schedule. For example, the CRON schedule for the stop workflow is as follows.</p>\n<p><img src=\"https://dev-media.amazoncloud.cn/71a6c5d86f3e4dc5896debb9c8d43507_image.png\" alt=\"image.png\" /></p>\n<p>The preceding schedule expression states the rule runs only at 17:00 on Monday to Friday, on any day of the month, during any month, in any year.</p>\n<p>Similarly, the CRON schedule for the start workflow is as follows.</p>\n<p><img src=\"https://dev-media.amazoncloud.cn/e37e42adb04c43df9d0654f3d1174baa_image.png\" alt=\"image.png\" /></p>\n<p>This schedule expression states the rule runs only at 08:00 on Monday to Friday, on any day of the month, during any month, in any year. The combination of both rules result in any affected Neptune database cluster and associated resources only running during the period of 08:00 to 17:00, Monday to Friday.</p>\n<p>For more information about CRON statements, refer to <a href=\"https://docs.aws.amazon.com/AmazonCloudWatch/latest/events/ScheduledEvents.html\" target=\"_blank\">Schedule Expressions for Rules</a>.</p>\n<h3><a id=\"Create_targets_for_the_scheduled_events_90\"></a><strong>Create targets for the scheduled events</strong></h3>\n<p>After you create the EventBridge rules, you need to provide at least one target to receive the notification event from each rule. In this case, we use Amazon SNS to receive the event and invoke further downstream services. Amazon SNS is included in this design to provide a decoupled mechanism for processing events. After an event is received by Amazon SNS, we invoke a Lambda function, passing it the details of the event.</p>\n<p><img src=\"https://dev-media.amazoncloud.cn/0e559464f2ef426d8d6b7fdc846b7ae8_image.png\" alt=\"image.png\" /></p>\n<h3><a id=\"Store_reusable_parameters_96\"></a><strong>Store reusable parameters</strong></h3>\n<p>Each of the Lambda resources in the design performs a single function: to identify Neptune and SageMaker notebook instances within the same account that have been tagged with a specific tag key, and either stop or start it. We use Parameter Store parameters to store the tag key and the comma-separated list of tag values that are used to identify these resources. Doing so provides a centralized, cost-effective, and secure repository that enables both functions to work using the same data, and any updates are viewed by both. From a security perspective, the Lambda functions are assigned a single role that permits only a narrow set of actions pertaining to Neptune, SageMaker, Amazon SNS, and <a href=\"https://aws.amazon.com/systems-manager/\" target=\"_blank\">AWS Systems Manager.</a></p>\n<p><img src=\"https://dev-media.amazoncloud.cn/7fddbfdbc6574100b50195264c9e10d3_image.png\" alt=\"image.png\" /></p>\n<h3><a id=\"Apply_resource_tags_in_your_own_environment_102\"></a><strong>Apply resource tags in your own environment</strong></h3>\n<p>After you deploy the solution, you can apply the tag key and one of the tag values specified in the CloudFormation template to your resources. This causes the tagged resources to be included in the automated process. When applying the resource tag to your Neptune database, you need only apply the resource tag to your Neptune cluster, rather than the writer instance, as shown in the following screenshot.</p>\n<p><img src=\"https://dev-media.amazoncloud.cn/a053a81e2dca4d6b8668f0cdeb332de8_image.png\" alt=\"image.png\" /></p>\n<h3><a id=\"Send_postaction_notifications_108\"></a><strong>Send post-action notifications</strong></h3>\n<p>After each Lambda function has finished either stopping or starting identified resources, it publishes a message to a separate SNS topic, which is then sent to the email address specified in the CloudFormation deployment. Included in this message is the name of each resource that has been modified. The following screenshot illustrates an example notification email.</p>\n<p><img src=\"https://dev-media.amazoncloud.cn/f3d33303b5c248f38ad63dba199c60fb_image.png\" alt=\"image.png\" /></p>\n<h3><a id=\"Clean_up_114\"></a><strong>Clean up</strong></h3>\n<p>When you’re done automatically stopping and starting your resources, you can visit the AWS CloudFormation console and <a href=\"https://docs.aws.amazon.com/AWSCloudFormation/latest/UserGuide/cfn-console-delete-stack.html\" target=\"_blank\">delete the stack</a> that we created. This removes all the resources that we created as part of this solution.</p>\n<p>If you created your own Neptune database cluster or SageMaker notebooks, you need to manually delete them to avoid additional cost.</p>\n<h3><a id=\"Conclusion_120\"></a><strong>Conclusion</strong></h3>\n<p>In this post, we demonstrated how to create an automated serverless workflow that runs at scheduled instances to stop or start Neptune database clusters and associated SageMaker notebook instances using tags applied to these resources. Stopping these resources during periods where they’re not required can reduce cost and improve your carbon footprint. In addition, because the solution is event-driven and serverless, there are no instances to manage.</p>\n<p>You can use the solution in this post as a foundation, and then extend it to include additional services that you want to stop and start as part of your Neptune environment.</p>\n<p>Furthermore, you can run multiple instances of this solution in your account to monitor for different resource tag keys, such as cost center, owner, or workload values.</p>\n<p>We encourage you to try out this solution in your AWS account where you’re running your Neptune resources. If you have any feedback, please leave a comment below.</p>\n<h4><a id=\"About_the_author_130\"></a><strong>About the author</strong></h4>\n<p><img src=\"https://dev-media.amazoncloud.cn/cead0a38963b4afca20f6434fe0b5aa2_image.png\" alt=\"image.png\" /></p>\n<p><strong>Kevin Phillips</strong> is a Neptune Specialist Solutions Architect working in the UK at Amazon Web Services. He has 18 years of development and solutions architectural experience, which he uses to help support and guide customers.</p>\n"}
Automate the stopping and starting of Amazon Neptune environment resources using resource tags
海外精选

海外精选的内容汇集了全球优质的亚马逊云科技相关技术内容。同时,内容中提到的“AWS”
是 “Amazon Web Services” 的缩写,在此网站不作为商标展示。

 0
0 0
0亚马逊云科技解决方案 基于行业客户应用场景及技术领域的解决方案
联系亚马逊云科技专家
亚马逊云科技解决方案
基于行业客户应用场景及技术领域的解决方案
联系专家

0
目录

 分享
分享 点赞
点赞 收藏
收藏 目录
目录立即注册,开启您的免费套餐
立即关注

亚马逊云开发者
公众号

User Group
公众号

亚马逊云科技
官方小程序
“AWS” 是 “Amazon Web Services” 的缩写,在此网站不作为商标展示。
立即关注
亚马逊云开发者
公众号
User Group
公众号
亚马逊云科技
官方小程序
“AWS” 是 “Amazon Web Services” 的缩写,在此网站不作为商标展示。
关于我们 
更多资源
开发者工具
更多支持
立即关注
亚马逊云开发者
公众号
User Group
公众号
亚马逊云科技
官方小程序
“AWS” 是 “Amazon Web Services” 的缩写,在此网站不作为商标展示。
