{"value":"This post was co-authored by Vadym Dolin, Data Architect at [SumUp](https://sumup.com/). In their own words, SumUp is a leading financial technology company, operating across 35 markets on three continents. SumUp helps small businesses be successful by enabling them to accept card payments in-store, in-app, and online, in a simple, secure, and cost-effective way. Today, SumUp card readers and other financial products are used by more than 4 million merchants around the world.\n\nThe SumUp Engineering team is committed to developing convenient, impactful, and secure financial products for merchants. To fulfill this vision, SumUp is increasingly investing in artificial intelligence and machine learning (ML). The internal ML platform in SumUp enables teams to seamlessly build, deploy, and operate ML solutions at scale.\n\nOne of the central elements of SumUp’s ML platform is the online feature store. It allows multiple ML models to retrieve feature vectors with single-digit millisecond latency, and enables application of AI for latency-critical use cases. The platform processes hundreds of transactions every second, with volume spikes during peak hours, and has steady growth that doubles the number of transactions every year. Because of this, the ML platform requires its low-latency feature store to be also highly reliable and scalable.\n\nIn this post, we show how SumUp built a millisecond-latency feature store. We also discuss the architectural considerations when setting up this solution so it can scale to serve multiple use cases, and present results showcasing the setups performance.\n\n\n#### **Overview of solution**\n\n\nTo train ML models, we need historical data. During this phase, data scientists experiment with different features to test which ones produce the best model. From a platform perspective, we need to support bulk read and write operations. Read latency isn’t critical at this stage because the data is read into training jobs. After the models are trained and moved to production for real-time inference, we have the following requirements for the platform change: we need to support low-latency reads and use only the latest features data.\n\nTo fulfill these needs, SumUp built a feature store consisting of offline and online data stores. These were optimized for the requirements as described in the following table.\n\n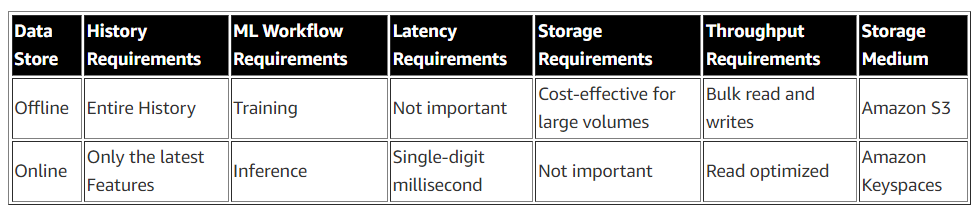\n\n[Amazon Keyspaces (for Apache Cassandra)](https://aws.amazon.com/cn/keyspaces/) is a serverless, scalable, and managed Apache Cassandra–compatible database service. It is built for consistent, single-digit-millisecond response times at scale. SumUp uses Amazon Keyspaces as a key-value pair store, and these features make it suitable for their online feature store. [Delta Lake](https://delta.io/) is an [open-source storage layer](https://github.com/delta-io/delta) that supports ACID transactions and is fully compatible with Apache Spark, making it highly performant at bulk read and write operations. You can store Delta Lake tables on [Amazon Simple Storage Service](https://aws.amazon.com/cn/s3/) (Amazon S3), which makes it a good fit for the offline feature store. Data scientists can use this stack to train models against the offline feature store (Delta Lake). When the trained models are moved to production, we switch to using the online feature store (Amazon Keyspaces), which offers the latest features set, scalable reads, and much lower latency.\n\nAnother important consideration is that we write a single feature job to populate both feature stores. Otherwise, SumUp would have to maintain two sets of code or pipelines for each feature creation job. We use [Amazon EMR](https://aws.amazon.com/cn/emr/) and create the features using PySpark DataFrames. The same DataFrame is written to both Delta Lake and Amazon Keyspaces, which eliminates the hurdle of having separate pipelines.\n\n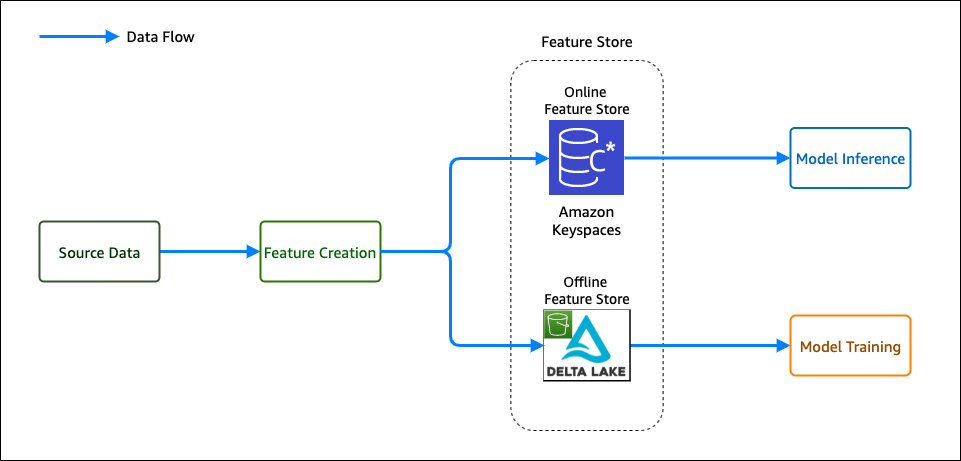\n\nFinally, SumUp wanted to utilize managed services. It was important to SumUp that data scientists and data engineers focus their efforts on building and deploying ML models. SumUp had experimented with managing their own Cassandra cluster, and found it difficult to scale because it required specialized expertise. Amazon Keyspaces offered scalability without management and maintenance overhead. For running Spark workloads, we decided to use Amazon EMR. Amazon EMR makes it easy to provision new clusters and automatically or manually add and remove capacity as needed. You can also define a [custom policy for auto scaling the cluster](https://docs.aws.amazon.com/emr/latest/ManagementGuide/emr-automatic-scaling.html) to suit your needs. Amazon EMR version 6.0.0 and above supports Spark version 3.0.0, which is compatible with Delta Lake.\n\nIt took SumUp 3 months from testing out Amazon Web Services services to building a production-grade feature store capable of serving ML models. In this post we share a simplified version of the stack, consisting of the following components:\n\n- **S3 bucket A** – Stores the raw data\n- **EMR cluster** – For running PySpark jobs for populating the feature store\n- **Amazon Keyspaces feature_store** – Stores the online features table\n- **S3 Bucket B** – Stores the Delta Lake table for offline features\n- **IAM role feature_creator** – For running the feature job with the appropriate permissions\n- **Notebook instance** – For running the feature engineering code\n\nWe use a simplified version of the setup to make it easy to follow the code examples. SumUp data scientists use Jupyter notebooks for exploratory analysis of the data. Feature engineering jobs are deployed using an [Amazon Web Services Step Functions](https://aws.amazon.com/cn/step-functions/?step-functions.sort-by=item.additionalFields.postDateTime&step-functions.sort-order=desc) state machine, which consists of an [Amazon Web Services Lambda](https://aws.amazon.com/cn/lambda/) function that submits a PySpark job to the EMR cluster.\n\nThe following diagram illustrates our simplified architecture.\n\n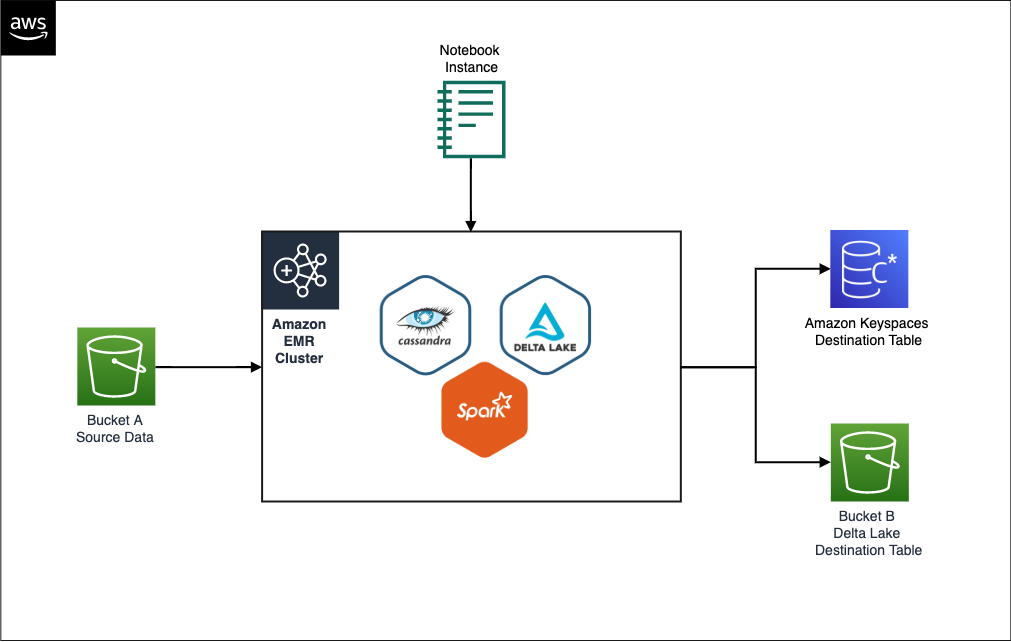\n\n\n#### **Prerequisites**\n\n\nTo follow the solution, you need certain access rights and [Amazon Web Services Identity and Access Management](https://aws.amazon.com/cn/iam/) (IAM) privileges:\n\n- An IAM user with [Amazon Web Services Command Line Interface](https://aws.amazon.com/cn/cli/) (Amazon Web Services CLI) access to an Amazon Web Services account\n- IAM privileges to do the following:\n\t- Generate Amazon Keyspaces credentials\n\t- Create a keyspace and table\n\t- Create an S3 bucket\n\t- Create an EMR cluster\n\t- IAM Get Role\n\n\n#### **Set up the dataset**\n\n\nWe start by cloning the project [git repository](https://github.com/aws-samples/amazon-keyspaces-emr-featurestore-kit.git), which contains the dataset we need to place in bucket A. We use a synthetic dataset, under ```Data/daily_dataset.csv```. This dataset consists of energy meter readings for households. The file contains information like the number of measures, minimum, maximum, mean, median, sum, and std for each household on a daily basis. To create an S3 bucket (if you don’t already have one) and upload the data file, follow these steps:\n\n1. Clone the project repository locally by running the shell command:\n\n```\ngit clone https://github.com/aws-samples/amazon-keyspaces-emr-featurestore-kit.git\n```\n\n2. On the Amazon S3 console, choose **Create bucket**.\n3. Give the bucket a name. For this post, we use ```featurestore-blogpost-bucket-xxxxxxxxxx``` (it’s helpful to append the account number to the bucket name to ensure the name is unique for common prefixes).\n4. Choose the Region you’re working in.\n It’s important that you create all resources in the same Region for this post.\n5. Public access is blocked by default, and we recommend that you keep it that way.\n6. Disable bucket versioning and encryption (we don’t need it for this post).\n7. Choose **Create bucket**.\n8. After the bucket is created, choose the bucket name and drag the folders ```Dataset``` and ```EMR``` into the bucket.\n\n\n#### **Set up Amazon Keyspaces**\n\n\nWe need to generate credentials for Amazon Keyspaces, which we use to connect with the service. The steps for generating the credentials are as follows:\n\n1. On the IAM console, choose **Users** in the navigation pane.\n2. Choose an IAM user you want to generate credentials for.\n3. On the **Security credentials** tab, under **Credentials for Amazon Keyspaces (for Apache Cassandra)**, choose **Generate Credentials**.\nA pop-up appears with the credentials, and an option to download the credentials. We recommend downloading a copy because you won’t be able to view the credentials again.We also need to create a table in Amazon Keyspaces to store our feature data. We have shared the schema for the keyspace and table in the GitHub project files ```Keyspaces/keyspace.cql``` and```Keyspaces/Table_Schema.cql```.\n4. On the Amazon Keyspaces console, choose **CQL editor** in the navigation pane.\n5. Enter the contents of the file ```Keyspaces/Keyspace.cql``` in the editor and choose **Run command**.\n6. Clear the contents of the editor, enter the contents of ```Keyspaces/Table_Schema.cql```, and choose Run command.\n\nTable creation is an asynchronous process, and you’re notified if the table is successfully created. You can also view it by choosing **Tables** in the navigation pane.\n\n\n#### **Set up an EMR cluster**\n\n\n\nNext, we set up an EMR cluster so we can run PySpark code to generate features. First, we need to set up a trust store password. A truststore file contains the Application Server’s trusted certificates, including public keys for other entities, this file is generated by the provided script and we need to provide a password for protecting this file. Amazon Keyspaces provides encryption in transit and at rest to protect and secure data transmission and storage, and uses Transport Layer Security (TLS) to help secure connections with clients. To connect to Amazon Keyspaces using TLS, we need to download an Amazon digital certificate and configure the Python driver to use TLS. This certificate is stored in a trust store; when we retrieve it, we need to provide the correct password.\n\n1. In the file ```EMR/emr_bootstrap_script.sh```, update the following line to a password you want to use:\n\n ```\n # Create a JKS keystore from the certificate\n PASS={your_truststore_password_here}\n ```\n \n2. To point the bootstrap script to the one we uploaded to Amazon S3, update the following line to reflect the S3 bucket we created earlier:\n \n ```\n # Copy the Cassandra Connector config\n aws s3 cp s3://{your-s3-bucket}/EMR/app.config /home/hadoop/app.config\n ```\n\n3. To update the app.config file to reflect the correct trust store password, in the file ```EMR/app.config```, update the value for ```truststore-password``` to the value you set earlier:\n\n ```\n {\n ssl-engine-factory {\n class = DefaultSslEngineFactory\n truststore-path = \"/home/hadoop/.certs/cassandra_keystore.jks\"\n truststore-password = \"{your_password_here}\"\n }\n }\n ```\n \n4. In the file ```EMR/app.config```, update the following lines to reflect the Region and the user name and password generated earlier:\n \n ```\n contact-points = [\"cassandra.<your-region>.amazonaws.com:9142\"]\n load-balancing-policy.local-datacenter = <your-region>\n ..\n auth-provider {\n class = PlainTextAuthProvider\n username = \"{your-keyspace-username}\"\n password = \"{your-keyspace-password}\"\n }\n ```\n\nWe need to create default instance roles, which are needed to run the EMR cluster.\n\n5. Update the contents S3 bucket created in the pre-requisite section by dragging the EMR folder into the bucket again.\n6. To create the default roles, run the [create-default-roles](https://awscli.amazonaws.com/v2/documentation/api/latest/reference/emr/create-default-roles.html) command:\n\n```\naws emr create-default-roles\n```\n\nNext, we create an EMR cluster. The following code snippet is an Amazon Web Services CLI command that has Hadoop, Spark 3.0, Livy and JupyterHub installed. This also runs the bootstrapping script on the cluster to set up the connection to Amazon Keyspaces.\n\n7. Create the cluster with the following code. Provide the subnet ID to start a Jupyter notebook instance associated with this cluster, the S3 bucket you created earlier, and the Region you’re working in. You can provide the default Subnet, and to find this navigate to VPC>Subnets and copy the default subnet id.\n\n```\naws emr create-cluster --termination-protected --applications Name=Hadoop Name=Spark Name=Livy Name=Hive Name=JupyterHub --tags 'creator=feature-store-blogpost' --ec2-attributes '{\"InstanceProfile\":\"EMR_EC2_DefaultRole\",\"SubnetId\":\"your-subnet-id\"}' --service-role EMR_DefaultRole --release-label emr-6.1.0 --log-uri 's3n://{your-s3-bucket}/elasticmapreduce/' --name 'emr_feature_store' --instance-groups '[{\"InstanceCount\":1,\"EbsConfiguration\":{\"EbsBlockDeviceConfigs\":[{\"VolumeSpecification\":{\"SizeInGB\":32,\"VolumeType\":\"gp2\"},\"VolumesPerInstance\":2}]},\"InstanceGroupType\":\"CORE\",\"InstanceType\":\"m5.xlarge\",\"Name\":\"Core - 2\"},{\"InstanceCount\":1,\"EbsConfiguration\":{\"EbsBlockDeviceConfigs\":[{\"VolumeSpecification\":{\"SizeInGB\":32,\"VolumeType\":\"gp2\"},\"VolumesPerInstance\":2}]},\"InstanceGroupType\":\"MASTER\",\"InstanceType\":\"m5.xlarge\",\"Name\":\"Master - 1\"}]' --bootstrap-actions '[{\"Path\":\"s3://{your-s3-bucket HERE}/EMR/emr_bootstrap_script.sh\",\"Name\":\"Execute_bootstarp_script\"}]' --scale-down-behavior TERMINATE_AT_TASK_COMPLETION --region your-region\n```\n\nLastly, we create an EMR notebook instance to run the PySpark notebook Feature Creation and ```loading-notebook.ipynb``` (included in the repo).\n\n8. On the Amazon EMR console, choose **Notebooks** in the navigation pane.\n9. Choose **Create** **notebook**.\n10. Give the notebook a name and choose the cluster ```emr_feature_store```.\n11. Optionally, configure the additional settings.\n12. Choose **Create notebook**.It can take a few minutes before the notebook instance is up and running.\n13. When the notebook is ready, select the notebook and choose either **Open** **JupyterLab** or **Open** **Jupyter**.\n14. In the notebook instance import, open the notebook ```Feature Creation and loading-notebook.ipynb``` (included in the repo) and change the kernel to **PySpark**.\n15. Follow the instructions in the notebook and run the cells one by one to read the data from Amazon S3, create features, and write these to Delta Lake and Amazon Keyspaces.\n\n\n#### **Performance testing**\n\n\nTo test throughput for our online feature store, we run a simulation on the features we created. We simulate approximately 40,000 requests per second. Each request queries data for a specific key (an ID in our feature table). The process tasks do the following:\n\n- Initialize a connection to Amazon Keyspaces\n- Generate a random ID to query the data\n- Generate a CQL statement:\n\n```\nSELECT * FROM feature_store.energy_data_features WHERE id=[list_of_ids[random_index between 0-5559]];\n```\n\n- Start a timer\n- Send the request to Amazon Keyspaces\n- Stop the timer when the response from Amazon Keyspaces is received\n\nTo run the simulation, we start 245 parallel Amazon Web Services Fargate tasks running on [Amazon Elastic Container Service](https://aws.amazon.com/cn/ecs/) (Amazon ECS). Each task runs a Python script that makes 1 million requests to Amazon Keyspaces. Because our dataset only contains 5,560 unique IDs, we generate 1 million random numbers between 0–5560 at the start of the simulation and query the ID for each request. To run the simulation, we included the code in the folder ```Simulation```. You can run the simulation in a SageMaker notebook instance by completing the following steps:\n\n1. On the Amazon SageMaker console, create a SageMaker notebook instance (or use an existing one).You can choose an **ml.t3.large** instance.\n2. Let SageMaker create an execution role for you if you don’t have one.\n3. Open the SageMaker notebook and choose **Upload**.\n4. Upload the Simulation folder from the repository. Alternatively, open a terminal window on the notebook instance and clone the repository ```https://github.com/aws-samples/amazon-keyspaces-emr-featurestore-kit.git```.\n5. Follow the instructions and run the steps and cells in the ```Simulation/ECS_Simulation.ipynb``` notebook.\n6. On the Amazon ECS console, choose the cluster you provisioned with the notebook and choose the **Tasks** tab to monitor the tasks.\n\nEach task writes the latency figures to a file and moves this to an S3 location. When the simulation ends, we collect all the data to get aggregated stats and plot charts.\n\nIn our setup, we set the capacity mode for Amazon Keyspaces to Provisioned RCU (read capacity units) at 40000 (fixed). After we start the simulation, the RCU rise close to 40000. After we start the simulation, the RCU (read capacity units) rise close to 40000, and the simulation takes around an hour to finish, as illustrated in the following visualization.\n\n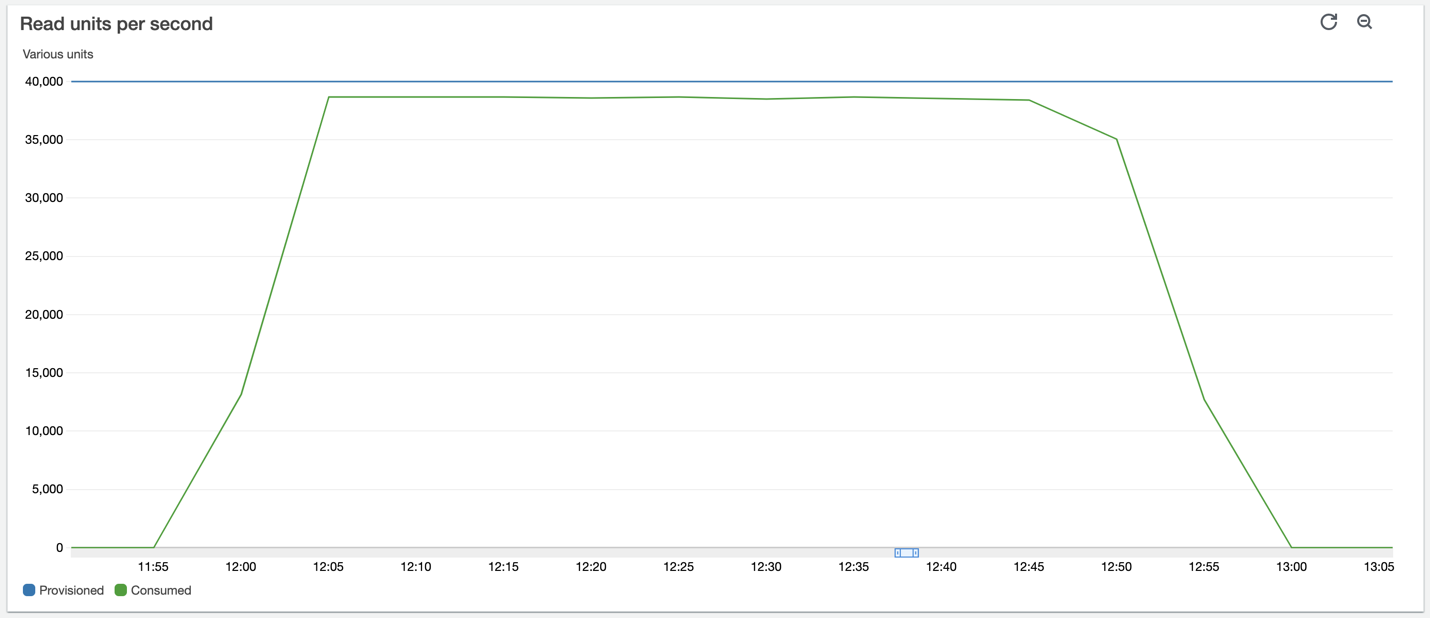\n\nThe first analysis we present is the latency distribution for the 245 million requests made during the simulation. Here the 99% percentile falls inside single-digit millisecond latency, as we would expect.\n\n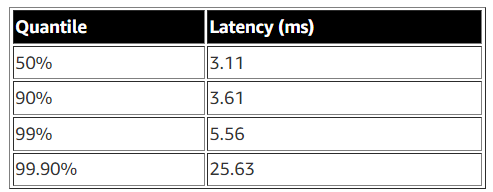\n\nFor the second analysis, we present the following time series charts for latency. The chart at the bottom shows the raw latency figures from all the 245 workers. The chart above that plots the average and minimum latency across all workers grouped over 1-second intervals. Here we can see both the minimum and the average latency throughout the simulation stays below 10 milliseconds. The third chart from the bottom plots maximum latency across all workers grouped over 1-second intervals. This chart shows occasional spikes in latency but nothing consistent we need to worry about. The top two charts are latency distributions; the one on the left plots all the data, and the one on the right plots the 99.9% percentile. Due to the presence of some outliers, the chart on the left shows a peak close to zero and a very tailed distribution. After we remove these outliers, we can see in the chart on the right that 99.9% of requests are completed in less than 5.5 milliseconds. This is a great result, considering we sent 245 million requests.\n\n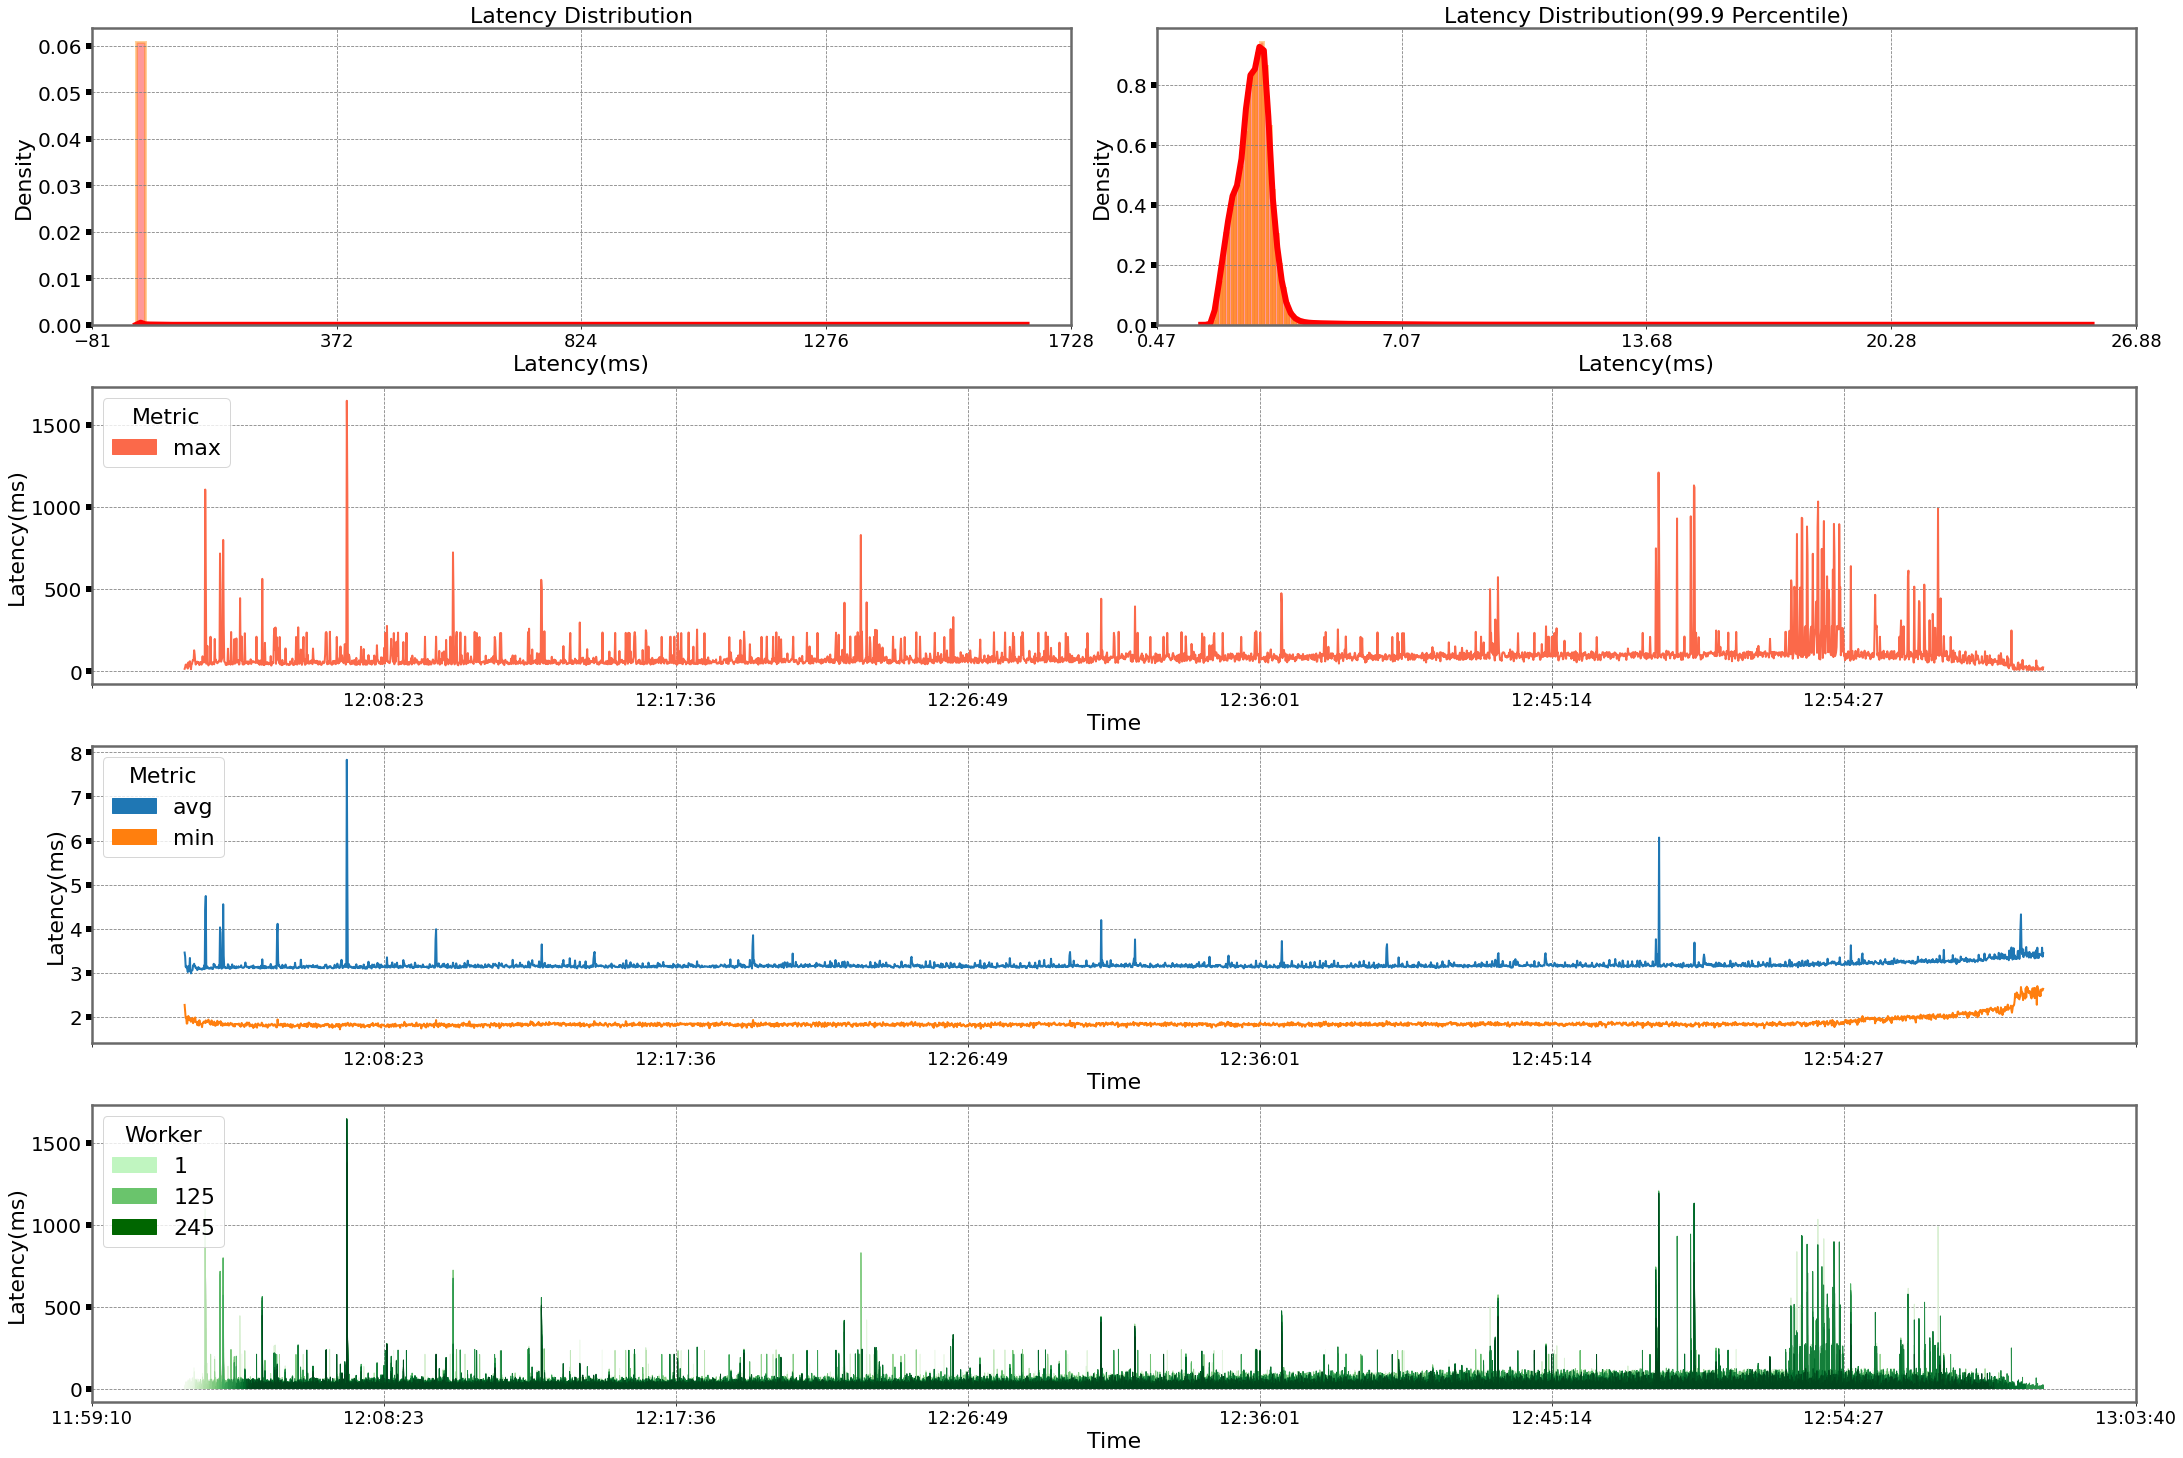\n\n\n#### **Cleanup**\n\n\nSome of the resources we created in this blogpost would incur costs if left running. Remember to terminate the EMR cluster, empty the S3 bucket and delete it, delete the Amazon KeySpaces table. Also delete the SageMaker and Amazon EMR notebooks. The Amazon ECS cluster is billed on tasks and would not incur any additional costs.\n\n\n#### **Conclusion**\n\n\nAmazon EMR, Amazon S3, and Amazon Keyspaces provide a flexible and scalable development experience for feature engineering. EMR clusters are easy to manage, and teams can share environments without compromising compute and storage capabilities. EMR bootstrapping makes it easy to install and test out new tools and quickly spin up environments to test out new ideas. Having the feature store split into offline and online store simplifies model training and deployment, and provides performance benefits.\n\nIn our testing, Amazon Keyspaces was able to handle peak throughput read requests within our desired requirement of single digit latency. It’s also worth mentioning that we found the on-demand mode to adapt to the usage pattern and an improvement in read/write latency a couple of days from when it was switched on.\n\nAnother important consideration to make for latency-sensitive queries is row length. In our testing, tables with lower row length had lower read latency. Therefore, it’s more efficient to split the data into multiple tables and make asynchronous calls to retrieve it from multiple tables.\n\nWe encourage you to explore adding security features and adopting security best practices according to your needs and potential company standards.\n\nIf you found this post useful, check out [Loading data into Amazon Keyspaces with cqlsh](https://aws.amazon.com/cn/blogs/database/loading-data-into-amazon-mcs-with-cqlsh/) for tips on how to tune Amazon Keyspaces, and [Orchestrate Apache Spark applications using Amazon Web Services Step Functions and Apache Livy](https://aws.amazon.com/cn/blogs/big-data/orchestrate-apache-spark-applications-using-aws-step-functions-and-apache-livy/) on how to build and deploy PySpark jobs.\n\n\n#### **About the authors**\n\n\n\n\n**Shaheer Mansoor** is a Data Scientist at Amazon Web Services. His focus is on building machine learning platforms that can host AI solutions at scale. His interest areas are ML Ops, Feature Stores, Model Hosting and Model Monitoring.\n\n\n\n**Vadym Dolinin** is a Machine Learning Architect in SumUp. He works with several teams on crafting the ML platform, which enables data scientists to build, deploy, and operate machine learning solutions in SumUp. Vadym has 13 years of experience in the domains of data engineering, analytics, BI, and ML.\n\n\n\n**Oliver Zollikofer** is a Data Scientist at Amazon Web Services. He enables global enterprise customers to build and deploy machine learning models, as well as architect related cloud solutions.\n\n\n\n\n\n\n\n\n\n\n\n\n","render":"<p>This post was co-authored by Vadym Dolin, Data Architect at <a href=\"https://sumup.com/\" target=\"_blank\">SumUp</a>. In their own words, SumUp is a leading financial technology company, operating across 35 markets on three continents. SumUp helps small businesses be successful by enabling them to accept card payments in-store, in-app, and online, in a simple, secure, and cost-effective way. Today, SumUp card readers and other financial products are used by more than 4 million merchants around the world.</p>\n<p>The SumUp Engineering team is committed to developing convenient, impactful, and secure financial products for merchants. To fulfill this vision, SumUp is increasingly investing in artificial intelligence and machine learning (ML). The internal ML platform in SumUp enables teams to seamlessly build, deploy, and operate ML solutions at scale.</p>\n<p>One of the central elements of SumUp’s ML platform is the online feature store. It allows multiple ML models to retrieve feature vectors with single-digit millisecond latency, and enables application of AI for latency-critical use cases. The platform processes hundreds of transactions every second, with volume spikes during peak hours, and has steady growth that doubles the number of transactions every year. Because of this, the ML platform requires its low-latency feature store to be also highly reliable and scalable.</p>\n<p>In this post, we show how SumUp built a millisecond-latency feature store. We also discuss the architectural considerations when setting up this solution so it can scale to serve multiple use cases, and present results showcasing the setups performance.</p>\n<h4><a id=\"Overview_of_solution_9\"></a><strong>Overview of solution</strong></h4>\n<p>To train ML models, we need historical data. During this phase, data scientists experiment with different features to test which ones produce the best model. From a platform perspective, we need to support bulk read and write operations. Read latency isn’t critical at this stage because the data is read into training jobs. After the models are trained and moved to production for real-time inference, we have the following requirements for the platform change: we need to support low-latency reads and use only the latest features data.</p>\n<p>To fulfill these needs, SumUp built a feature store consisting of offline and online data stores. These were optimized for the requirements as described in the following table.</p>\n<p><img src=\"https://dev-media.amazoncloud.cn/b6fb2cf190e2411e880d2ceb626aaff3_image.png\" alt=\"image.png\" /></p>\n<p><a href=\"https://aws.amazon.com/cn/keyspaces/\" target=\"_blank\">Amazon Keyspaces (for Apache Cassandra)</a> is a serverless, scalable, and managed Apache Cassandra–compatible database service. It is built for consistent, single-digit-millisecond response times at scale. SumUp uses Amazon Keyspaces as a key-value pair store, and these features make it suitable for their online feature store. <a href=\"https://delta.io/\" target=\"_blank\">Delta Lake</a> is an <a href=\"https://github.com/delta-io/delta\" target=\"_blank\">open-source storage layer</a> that supports ACID transactions and is fully compatible with Apache Spark, making it highly performant at bulk read and write operations. You can store Delta Lake tables on <a href=\"https://aws.amazon.com/cn/s3/\" target=\"_blank\">Amazon Simple Storage Service</a> (Amazon S3), which makes it a good fit for the offline feature store. Data scientists can use this stack to train models against the offline feature store (Delta Lake). When the trained models are moved to production, we switch to using the online feature store (Amazon Keyspaces), which offers the latest features set, scalable reads, and much lower latency.</p>\n<p>Another important consideration is that we write a single feature job to populate both feature stores. Otherwise, SumUp would have to maintain two sets of code or pipelines for each feature creation job. We use <a href=\"https://aws.amazon.com/cn/emr/\" target=\"_blank\">Amazon EMR</a> and create the features using PySpark DataFrames. The same DataFrame is written to both Delta Lake and Amazon Keyspaces, which eliminates the hurdle of having separate pipelines.</p>\n<p><img src=\"https://dev-media.amazoncloud.cn/63840572c8924b01a1b868c2da83e4f6_image.png\" alt=\"image.png\" /></p>\n<p>Finally, SumUp wanted to utilize managed services. It was important to SumUp that data scientists and data engineers focus their efforts on building and deploying ML models. SumUp had experimented with managing their own Cassandra cluster, and found it difficult to scale because it required specialized expertise. Amazon Keyspaces offered scalability without management and maintenance overhead. For running Spark workloads, we decided to use Amazon EMR. Amazon EMR makes it easy to provision new clusters and automatically or manually add and remove capacity as needed. You can also define a <a href=\"https://docs.aws.amazon.com/emr/latest/ManagementGuide/emr-automatic-scaling.html\" target=\"_blank\">custom policy for auto scaling the cluster</a> to suit your needs. Amazon EMR version 6.0.0 and above supports Spark version 3.0.0, which is compatible with Delta Lake.</p>\n<p>It took SumUp 3 months from testing out Amazon Web Services services to building a production-grade feature store capable of serving ML models. In this post we share a simplified version of the stack, consisting of the following components:</p>\n<ul>\n<li><strong>S3 bucket A</strong> – Stores the raw data</li>\n<li><strong>EMR cluster</strong> – For running PySpark jobs for populating the feature store</li>\n<li><strong>Amazon Keyspaces feature_store</strong> – Stores the online features table</li>\n<li><strong>S3 Bucket B</strong> – Stores the Delta Lake table for offline features</li>\n<li><strong>IAM role feature_creator</strong> – For running the feature job with the appropriate permissions</li>\n<li><strong>Notebook instance</strong> – For running the feature engineering code</li>\n</ul>\n<p>We use a simplified version of the setup to make it easy to follow the code examples. SumUp data scientists use Jupyter notebooks for exploratory analysis of the data. Feature engineering jobs are deployed using an <a href=\"https://aws.amazon.com/cn/step-functions/?step-functions.sort-by=item.additionalFields.postDateTime&step-functions.sort-order=desc\" target=\"_blank\">Amazon Web Services Step Functions</a> state machine, which consists of an <a href=\"https://aws.amazon.com/cn/lambda/\" target=\"_blank\">Amazon Web Services Lambda</a> function that submits a PySpark job to the EMR cluster.</p>\n<p>The following diagram illustrates our simplified architecture.</p>\n<p><img src=\"https://dev-media.amazoncloud.cn/0749200527034bcfb983f47f55361a40_image.png\" alt=\"image.png\" /></p>\n<h4><a id=\"Prerequisites_42\"></a><strong>Prerequisites</strong></h4>\n<p>To follow the solution, you need certain access rights and <a href=\"https://aws.amazon.com/cn/iam/\" target=\"_blank\">Amazon Web Services Identity and Access Management</a> (IAM) privileges:</p>\n<ul>\n<li>An IAM user with <a href=\"https://aws.amazon.com/cn/cli/\" target=\"_blank\">Amazon Web Services Command Line Interface</a> (Amazon Web Services CLI) access to an Amazon Web Services account</li>\n<li>IAM privileges to do the following:\n<ul>\n<li>Generate Amazon Keyspaces credentials</li>\n<li>Create a keyspace and table</li>\n<li>Create an S3 bucket</li>\n<li>Create an EMR cluster</li>\n<li>IAM Get Role</li>\n</ul>\n</li>\n</ul>\n<h4><a id=\"Set_up_the_dataset_56\"></a><strong>Set up the dataset</strong></h4>\n<p>We start by cloning the project <a href=\"https://github.com/aws-samples/amazon-keyspaces-emr-featurestore-kit.git\" target=\"_blank\">git repository</a>, which contains the dataset we need to place in bucket A. We use a synthetic dataset, under <code>Data/daily_dataset.csv</code>. This dataset consists of energy meter readings for households. The file contains information like the number of measures, minimum, maximum, mean, median, sum, and std for each household on a daily basis. To create an S3 bucket (if you don’t already have one) and upload the data file, follow these steps:</p>\n<ol>\n<li>Clone the project repository locally by running the shell command:</li>\n</ol>\n<pre><code class=\"lang-\">git clone https://github.com/aws-samples/amazon-keyspaces-emr-featurestore-kit.git\n</code></pre>\n<ol start=\"2\">\n<li>On the Amazon S3 console, choose <strong>Create bucket</strong>.</li>\n<li>Give the bucket a name. For this post, we use <code>featurestore-blogpost-bucket-xxxxxxxxxx</code> (it’s helpful to append the account number to the bucket name to ensure the name is unique for common prefixes).</li>\n<li>Choose the Region you’re working in.<br />\nIt’s important that you create all resources in the same Region for this post.</li>\n<li>Public access is blocked by default, and we recommend that you keep it that way.</li>\n<li>Disable bucket versioning and encryption (we don’t need it for this post).</li>\n<li>Choose <strong>Create bucket</strong>.</li>\n<li>After the bucket is created, choose the bucket name and drag the folders <code>Dataset</code> and <code>EMR</code> into the bucket.</li>\n</ol>\n<h4><a id=\"Set_up_Amazon_Keyspaces_77\"></a><strong>Set up Amazon Keyspaces</strong></h4>\n<p>We need to generate credentials for Amazon Keyspaces, which we use to connect with the service. The steps for generating the credentials are as follows:</p>\n<ol>\n<li>On the IAM console, choose <strong>Users</strong> in the navigation pane.</li>\n<li>Choose an IAM user you want to generate credentials for.</li>\n<li>On the <strong>Security credentials</strong> tab, under <strong>Credentials for Amazon Keyspaces (for Apache Cassandra)</strong>, choose <strong>Generate Credentials</strong>.<br />\nA pop-up appears with the credentials, and an option to download the credentials. We recommend downloading a copy because you won’t be able to view the credentials again.We also need to create a table in Amazon Keyspaces to store our feature data. We have shared the schema for the keyspace and table in the GitHub project files <code>Keyspaces/keyspace.cql</code> and<code>Keyspaces/Table_Schema.cql</code>.</li>\n<li>On the Amazon Keyspaces console, choose <strong>CQL editor</strong> in the navigation pane.</li>\n<li>Enter the contents of the file <code>Keyspaces/Keyspace.cql</code> in the editor and choose <strong>Run command</strong>.</li>\n<li>Clear the contents of the editor, enter the contents of <code>Keyspaces/Table_Schema.cql</code>, and choose Run command.</li>\n</ol>\n<p>Table creation is an asynchronous process, and you’re notified if the table is successfully created. You can also view it by choosing <strong>Tables</strong> in the navigation pane.</p>\n<h4><a id=\"Set_up_an_EMR_cluster_93\"></a><strong>Set up an EMR cluster</strong></h4>\n<p>Next, we set up an EMR cluster so we can run PySpark code to generate features. First, we need to set up a trust store password. A truststore file contains the Application Server’s trusted certificates, including public keys for other entities, this file is generated by the provided script and we need to provide a password for protecting this file. Amazon Keyspaces provides encryption in transit and at rest to protect and secure data transmission and storage, and uses Transport Layer Security (TLS) to help secure connections with clients. To connect to Amazon Keyspaces using TLS, we need to download an Amazon digital certificate and configure the Python driver to use TLS. This certificate is stored in a trust store; when we retrieve it, we need to provide the correct password.</p>\n<ol>\n<li>In the file <code>EMR/emr_bootstrap_script.sh</code>, update the following line to a password you want to use:</li>\n</ol>\n<pre><code class=\"lang-\"># Create a JKS keystore from the certificate\nPASS={your_truststore_password_here}\n</code></pre>\n<ol start=\"2\">\n<li>To point the bootstrap script to the one we uploaded to Amazon S3, update the following line to reflect the S3 bucket we created earlier:</li>\n</ol>\n<pre><code class=\"lang-\"># Copy the Cassandra Connector config\naws s3 cp s3://{your-s3-bucket}/EMR/app.config /home/hadoop/app.config\n</code></pre>\n<ol start=\"3\">\n<li>To update the app.config file to reflect the correct trust store password, in the file <code>EMR/app.config</code>, update the value for <code>truststore-password</code> to the value you set earlier:</li>\n</ol>\n<pre><code class=\"lang-\">{\n ssl-engine-factory {\n class = DefaultSslEngineFactory\n truststore-path = "/home/hadoop/.certs/cassandra_keystore.jks"\n truststore-password = "{your_password_here}"\n }\n}\n</code></pre>\n<ol start=\"4\">\n<li>In the file <code>EMR/app.config</code>, update the following lines to reflect the Region and the user name and password generated earlier:</li>\n</ol>\n<pre><code class=\"lang-\">contact-points = ["cassandra.<your-region>.amazonaws.com:9142"]\nload-balancing-policy.local-datacenter = <your-region>\n..\nauth-provider {\n class = PlainTextAuthProvider\n username = "{your-keyspace-username}"\n password = "{your-keyspace-password}"\n}\n</code></pre>\n<p>We need to create default instance roles, which are needed to run the EMR cluster.</p>\n<ol start=\"5\">\n<li>Update the contents S3 bucket created in the pre-requisite section by dragging the EMR folder into the bucket again.</li>\n<li>To create the default roles, run the <a href=\"https://awscli.amazonaws.com/v2/documentation/api/latest/reference/emr/create-default-roles.html\" target=\"_blank\">create-default-roles</a> command:</li>\n</ol>\n<pre><code class=\"lang-\">aws emr create-default-roles\n</code></pre>\n<p>Next, we create an EMR cluster. The following code snippet is an Amazon Web Services CLI command that has Hadoop, Spark 3.0, Livy and JupyterHub installed. This also runs the bootstrapping script on the cluster to set up the connection to Amazon Keyspaces.</p>\n<ol start=\"7\">\n<li>Create the cluster with the following code. Provide the subnet ID to start a Jupyter notebook instance associated with this cluster, the S3 bucket you created earlier, and the Region you’re working in. You can provide the default Subnet, and to find this navigate to VPC>Subnets and copy the default subnet id.</li>\n</ol>\n<pre><code class=\"lang-\">aws emr create-cluster --termination-protected --applications Name=Hadoop Name=Spark Name=Livy Name=Hive Name=JupyterHub --tags 'creator=feature-store-blogpost' --ec2-attributes '{"InstanceProfile":"EMR_EC2_DefaultRole","SubnetId":"your-subnet-id"}' --service-role EMR_DefaultRole --release-label emr-6.1.0 --log-uri 's3n://{your-s3-bucket}/elasticmapreduce/' --name 'emr_feature_store' --instance-groups '[{"InstanceCount":1,"EbsConfiguration":{"EbsBlockDeviceConfigs":[{"VolumeSpecification":{"SizeInGB":32,"VolumeType":"gp2"},"VolumesPerInstance":2}]},"InstanceGroupType":"CORE","InstanceType":"m5.xlarge","Name":"Core - 2"},{"InstanceCount":1,"EbsConfiguration":{"EbsBlockDeviceConfigs":[{"VolumeSpecification":{"SizeInGB":32,"VolumeType":"gp2"},"VolumesPerInstance":2}]},"InstanceGroupType":"MASTER","InstanceType":"m5.xlarge","Name":"Master - 1"}]' --bootstrap-actions '[{"Path":"s3://{your-s3-bucket HERE}/EMR/emr_bootstrap_script.sh","Name":"Execute_bootstarp_script"}]' --scale-down-behavior TERMINATE_AT_TASK_COMPLETION --region your-region\n</code></pre>\n<p>Lastly, we create an EMR notebook instance to run the PySpark notebook Feature Creation and <code>loading-notebook.ipynb</code> (included in the repo).</p>\n<ol start=\"8\">\n<li>On the Amazon EMR console, choose <strong>Notebooks</strong> in the navigation pane.</li>\n<li>Choose <strong>Create</strong> <strong>notebook</strong>.</li>\n<li>Give the notebook a name and choose the cluster <code>emr_feature_store</code>.</li>\n<li>Optionally, configure the additional settings.</li>\n<li>Choose <strong>Create notebook</strong>.It can take a few minutes before the notebook instance is up and running.</li>\n<li>When the notebook is ready, select the notebook and choose either <strong>Open</strong> <strong>JupyterLab</strong> or <strong>Open</strong> <strong>Jupyter</strong>.</li>\n<li>In the notebook instance import, open the notebook <code>Feature Creation and loading-notebook.ipynb</code> (included in the repo) and change the kernel to <strong>PySpark</strong>.</li>\n<li>Follow the instructions in the notebook and run the cells one by one to read the data from Amazon S3, create features, and write these to Delta Lake and Amazon Keyspaces.</li>\n</ol>\n<h4><a id=\"Performance_testing_167\"></a><strong>Performance testing</strong></h4>\n<p>To test throughput for our online feature store, we run a simulation on the features we created. We simulate approximately 40,000 requests per second. Each request queries data for a specific key (an ID in our feature table). The process tasks do the following:</p>\n<ul>\n<li>Initialize a connection to Amazon Keyspaces</li>\n<li>Generate a random ID to query the data</li>\n<li>Generate a CQL statement:</li>\n</ul>\n<pre><code class=\"lang-\">SELECT * FROM feature_store.energy_data_features WHERE id=[list_of_ids[random_index between 0-5559]];\n</code></pre>\n<ul>\n<li>Start a timer</li>\n<li>Send the request to Amazon Keyspaces</li>\n<li>Stop the timer when the response from Amazon Keyspaces is received</li>\n</ul>\n<p>To run the simulation, we start 245 parallel Amazon Web Services Fargate tasks running on <a href=\"https://aws.amazon.com/cn/ecs/\" target=\"_blank\">Amazon Elastic Container Service</a> (Amazon ECS). Each task runs a Python script that makes 1 million requests to Amazon Keyspaces. Because our dataset only contains 5,560 unique IDs, we generate 1 million random numbers between 0–5560 at the start of the simulation and query the ID for each request. To run the simulation, we included the code in the folder <code>Simulation</code>. You can run the simulation in a SageMaker notebook instance by completing the following steps:</p>\n<ol>\n<li>On the Amazon SageMaker console, create a SageMaker notebook instance (or use an existing one).You can choose an <strong>ml.t3.large</strong> instance.</li>\n<li>Let SageMaker create an execution role for you if you don’t have one.</li>\n<li>Open the SageMaker notebook and choose <strong>Upload</strong>.</li>\n<li>Upload the Simulation folder from the repository. Alternatively, open a terminal window on the notebook instance and clone the repository <code>https://github.com/aws-samples/amazon-keyspaces-emr-featurestore-kit.git</code>.</li>\n<li>Follow the instructions and run the steps and cells in the <code>Simulation/ECS_Simulation.ipynb</code> notebook.</li>\n<li>On the Amazon ECS console, choose the cluster you provisioned with the notebook and choose the <strong>Tasks</strong> tab to monitor the tasks.</li>\n</ol>\n<p>Each task writes the latency figures to a file and moves this to an S3 location. When the simulation ends, we collect all the data to get aggregated stats and plot charts.</p>\n<p>In our setup, we set the capacity mode for Amazon Keyspaces to Provisioned RCU (read capacity units) at 40000 (fixed). After we start the simulation, the RCU rise close to 40000. After we start the simulation, the RCU (read capacity units) rise close to 40000, and the simulation takes around an hour to finish, as illustrated in the following visualization.</p>\n<p><img src=\"https://dev-media.amazoncloud.cn/484e20e1a46a4b058b74efb5866377d7_image.png\" alt=\"image.png\" /></p>\n<p>The first analysis we present is the latency distribution for the 245 million requests made during the simulation. Here the 99% percentile falls inside single-digit millisecond latency, as we would expect.</p>\n<p><img src=\"https://dev-media.amazoncloud.cn/627017538748478b985f1afbf1be1cd2_image.png\" alt=\"image.png\" /></p>\n<p>For the second analysis, we present the following time series charts for latency. The chart at the bottom shows the raw latency figures from all the 245 workers. The chart above that plots the average and minimum latency across all workers grouped over 1-second intervals. Here we can see both the minimum and the average latency throughout the simulation stays below 10 milliseconds. The third chart from the bottom plots maximum latency across all workers grouped over 1-second intervals. This chart shows occasional spikes in latency but nothing consistent we need to worry about. The top two charts are latency distributions; the one on the left plots all the data, and the one on the right plots the 99.9% percentile. Due to the presence of some outliers, the chart on the left shows a peak close to zero and a very tailed distribution. After we remove these outliers, we can see in the chart on the right that 99.9% of requests are completed in less than 5.5 milliseconds. This is a great result, considering we sent 245 million requests.</p>\n<p><img src=\"https://dev-media.amazoncloud.cn/f25f2d0f12134d2c9e52c1764a75ab7f_image.png\" alt=\"image.png\" /></p>\n<h4><a id=\"Cleanup_208\"></a><strong>Cleanup</strong></h4>\n<p>Some of the resources we created in this blogpost would incur costs if left running. Remember to terminate the EMR cluster, empty the S3 bucket and delete it, delete the Amazon KeySpaces table. Also delete the SageMaker and Amazon EMR notebooks. The Amazon ECS cluster is billed on tasks and would not incur any additional costs.</p>\n<h4><a id=\"Conclusion_214\"></a><strong>Conclusion</strong></h4>\n<p>Amazon EMR, Amazon S3, and Amazon Keyspaces provide a flexible and scalable development experience for feature engineering. EMR clusters are easy to manage, and teams can share environments without compromising compute and storage capabilities. EMR bootstrapping makes it easy to install and test out new tools and quickly spin up environments to test out new ideas. Having the feature store split into offline and online store simplifies model training and deployment, and provides performance benefits.</p>\n<p>In our testing, Amazon Keyspaces was able to handle peak throughput read requests within our desired requirement of single digit latency. It’s also worth mentioning that we found the on-demand mode to adapt to the usage pattern and an improvement in read/write latency a couple of days from when it was switched on.</p>\n<p>Another important consideration to make for latency-sensitive queries is row length. In our testing, tables with lower row length had lower read latency. Therefore, it’s more efficient to split the data into multiple tables and make asynchronous calls to retrieve it from multiple tables.</p>\n<p>We encourage you to explore adding security features and adopting security best practices according to your needs and potential company standards.</p>\n<p>If you found this post useful, check out <a href=\"https://aws.amazon.com/cn/blogs/database/loading-data-into-amazon-mcs-with-cqlsh/\" target=\"_blank\">Loading data into Amazon Keyspaces with cqlsh</a> for tips on how to tune Amazon Keyspaces, and <a href=\"https://aws.amazon.com/cn/blogs/big-data/orchestrate-apache-spark-applications-using-aws-step-functions-and-apache-livy/\" target=\"_blank\">Orchestrate Apache Spark applications using Amazon Web Services Step Functions and Apache Livy</a> on how to build and deploy PySpark jobs.</p>\n<h4><a id=\"About_the_authors_228\"></a><strong>About the authors</strong></h4>\n<p><img src=\"https://dev-media.amazoncloud.cn/c6926c5798e049d696cb88714c9907ba_image.png\" alt=\"image.png\" /></p>\n<p><strong>Shaheer Mansoor</strong> is a Data Scientist at Amazon Web Services. His focus is on building machine learning platforms that can host AI solutions at scale. His interest areas are ML Ops, Feature Stores, Model Hosting and Model Monitoring.</p>\n<p><img src=\"https://dev-media.amazoncloud.cn/7093e16d59d543509d95869048241775_image.png\" alt=\"image.png\" /></p>\n<p><strong>Vadym Dolinin</strong> is a Machine Learning Architect in SumUp. He works with several teams on crafting the ML platform, which enables data scientists to build, deploy, and operate machine learning solutions in SumUp. Vadym has 13 years of experience in the domains of data engineering, analytics, BI, and ML.</p>\n<p><img src=\"https://dev-media.amazoncloud.cn/8a2d114a41c1462b9a99eb1dad7f9bb4_image.png\" alt=\"image.png\" /></p>\n<p><strong>Oliver Zollikofer</strong> is a Data Scientist at Amazon Web Services. He enables global enterprise customers to build and deploy machine learning models, as well as architect related cloud solutions.</p>\n"}
How SumUp built a low-latency feature store using Amazon EMR and Amazon Keyspaces
海外精选

海外精选的内容汇集了全球优质的亚马逊云科技相关技术内容。同时,内容中提到的“AWS”
是 “Amazon Web Services” 的缩写,在此网站不作为商标展示。

 0
0 0
0亚马逊云科技解决方案 基于行业客户应用场景及技术领域的解决方案
联系亚马逊云科技专家
亚马逊云科技解决方案
基于行业客户应用场景及技术领域的解决方案
联系专家

0
目录

 分享
分享 点赞
点赞 收藏
收藏 目录
目录立即注册,开启您的免费套餐
立即关注

亚马逊云开发者
公众号

User Group
公众号

亚马逊云科技
官方小程序
“AWS” 是 “Amazon Web Services” 的缩写,在此网站不作为商标展示。
立即关注
亚马逊云开发者
公众号
User Group
公众号
亚马逊云科技
官方小程序
“AWS” 是 “Amazon Web Services” 的缩写,在此网站不作为商标展示。
关于我们 
更多资源
开发者工具
更多支持
立即关注
亚马逊云开发者
公众号
User Group
公众号
亚马逊云科技
官方小程序
“AWS” 是 “Amazon Web Services” 的缩写,在此网站不作为商标展示。
