{"value":"In the post [Data preparation using Amazon Redshift with Amazon Web Services Glue DataBrew](https://aws.amazon.com/cn/blogs/big-data/data-preparation-using-amazon-redshift-with-aws-glue-databrew/), we saw how to create an Amazon Web Services Glue DataBrew job using a JDBC connection for Amazon Redshift. In this post, we show you how to create a DataBrew profile job and a recipe job using an Amazon Redshift connection with custom SQL.\n\nDataBrew is a visual data preparation tool that can help you simplify your extract, transform, and load (ETL) process. You can now define a dataset from Amazon Redshift by applying custom SQL statements. Applying a custom SQL statement to a large source table allows you to select, join, and filter the data before cleaning, normalizing, and transforming it in a DataBrew project. Filtering and joining the data from your data source and only bringing in the data you want to transform simplifies the ETL process.\n\nIn this post, we demonstrate how to use custom SQL queries to define your Amazon Redshift datasets in DataBrew.\n\n\n#### **Solution overview**\n\n\nTo implement this solution, you complete the following high-level steps:\n\n1. Create an Amazon Redshift connection.\n2. Create your dataset and use SQL queries to define your Amazon Redshift source datasets.\n3. Create a DataBrew profile job to profile the source data.\n4. Create a DataBrew project and recipe job to transform the data and load it to Amazon Simple Storage Service (Amazon S3).\n\nThe following diagram illustrates the architecture for our solution.\n\n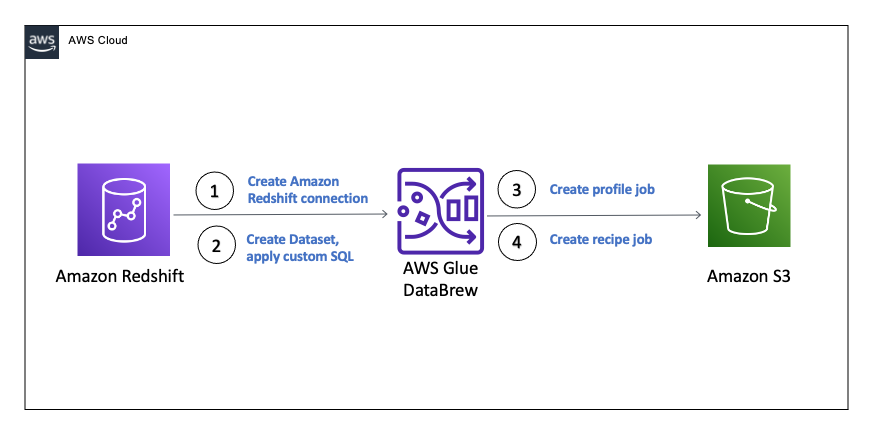\n\n\n\n#### **Prerequisites**\n\n\nTo use this solution, complete the following prerequisite steps:\n\n1. Have an Amazon Web Services account.\n2. [Create an Amazon Redshift cluster](https://docs.aws.amazon.com/redshift/latest/gsg/rs-gsg-launch-sample-cluster.html) in a private subnet within a VPC as a security best practice.\n3. Because DataBrew commands require that the cluster has access to Amazon S3, make sure you create a [gateway VPC endpoint to Amazon S3](https://docs.aws.amazon.com/vpc/latest/privatelink/gateway-endpoints.html). The gateway endpoint provides reliable connectivity to Amazon S3 without requiring an internet gateway or NAT device from your VPC.\n4. Enable the [enhanced VPC routing](https://docs.aws.amazon.com/redshift/latest/mgmt/enhanced-vpc-routing.html) in the Amazon Redshift cluster. Enhanced VPC routing forces all Amazon Redshift commands to use the connectivity to the gateway VPC endpoint to Amazon S3 in the same Amazon Web Services Region as your cluster.\n5. Create a database and tables, and load the sample data in the Amazon Redshift cluster.\n6. Prepare a SQL query to extract the source dataset. You use this SQL query later in this post to create an Amazon Redshift source dataset in DataBrew.\n7. Create an S3 bucket to store data from the profile and recipe jobs. The DataBrew connection temporarily stores intermediate data in Amazon S3.\n8. For our use case, we use a mock dataset. You can download the DDL and data files from [GitHub](https://github.com/aws-samples/use-sql-queries-in-glue-databrew).\n\n\n#### **Security best practices**\n\n\nConsider the following best practices in order to mitigate security threats:\n\n- Review the [shared responsibility model](https://docs.aws.amazon.com/databrew/latest/dg/security.html) when using DataBrew.\n- Restrict network access for inbound and outbound traffic to least privilege. Take advantage of the routing traffic within the VPC by using an Amazon S3 gateway endpoint and enhanced VPC routing in Amazon Redshift.\n- Enable the lifecycle policy in Amazon S3 to retain only necessary data, and delete unnecessary data.\n- Enable Amazon S3 versioning and cross-Region replication for critical datasets to protect against accidental deletes.\n- Enable server-side encryption using Amazon Web Services KMS ([SSE-KMS](https://docs.aws.amazon.com/AmazonS3/latest/userguide/UsingKMSEncryption.html)) or Amazon S3 ([SSE-S3](https://docs.aws.amazon.com/AmazonS3/latest/userguide/UsingServerSideEncryption.html)).\n- DataBrew uses Amazon CloudWatch for logging, so you should update your log retention period to retain logs for the appropriate length of time.\n\n\n#### **Create an Amazon Redshift connection**\n\n\nIn this section, you create a connection in DataBrew to connect to your Amazon Redshift cluster.\n\n1. On the DataBrew console, choose **Datasets** in the navigation pane.\n2. On the **Connections** tab, choose **Create connection**.\n\n\n\n3. For **Connection name**, enter a name, such as order-db-connection.\n4. For **Connection type**, select **Amazon Redshift**.\n5. Under **Connection access**, provide the Amazon Redshift cluster name, database name, database user, and database password.\n6. Choose **Create connection**.\n\n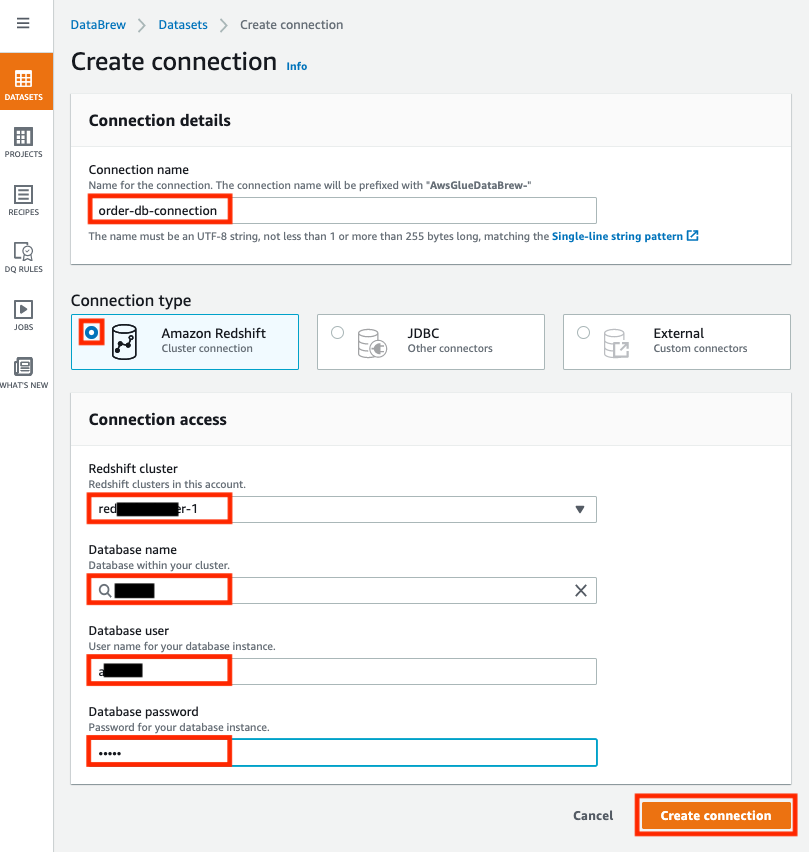\n\n\n#### **Create your dataset by applying a custom SQL statement to filter the source data**\n\nIn this section, you create a Amazon Redshift connection, add your custom SQL statement, and validate it. You can also validate your SQL statement directly in your Amazon Redshift cluster by using the [Amazon Redshift query editor v2](https://docs.aws.amazon.com/redshift/latest/mgmt/query-editor-v2.html). The purpose of validating the SQL statement is to help you avoid failure in loading your dataset into a project or job. Also, checking the query runtime ensures that it runs in under 3 minutes, avoiding timeouts during project loading. To analyze and improve query performance in Amazon Redshift, see [Tuning query performance](https://docs.aws.amazon.com/redshift/latest/dg/c-optimizing-query-performance.html).\n\n1. On the DataBrew console, choose **Datasets** in the navigation pane.\n2. On the **Datasets** tab, choose **Connect new dataset**.\n\n\n\n3. For **Dataset name**, enter a name, such as ```order-data```.\n4. In the left pane, choose **Amazon Redshift** under **Database connections**.\n5. Add your Amazon Redshift connection and select **Enter custom SQL**.\n6. Enter the SQL query and choose **Validate SQL**.\n\n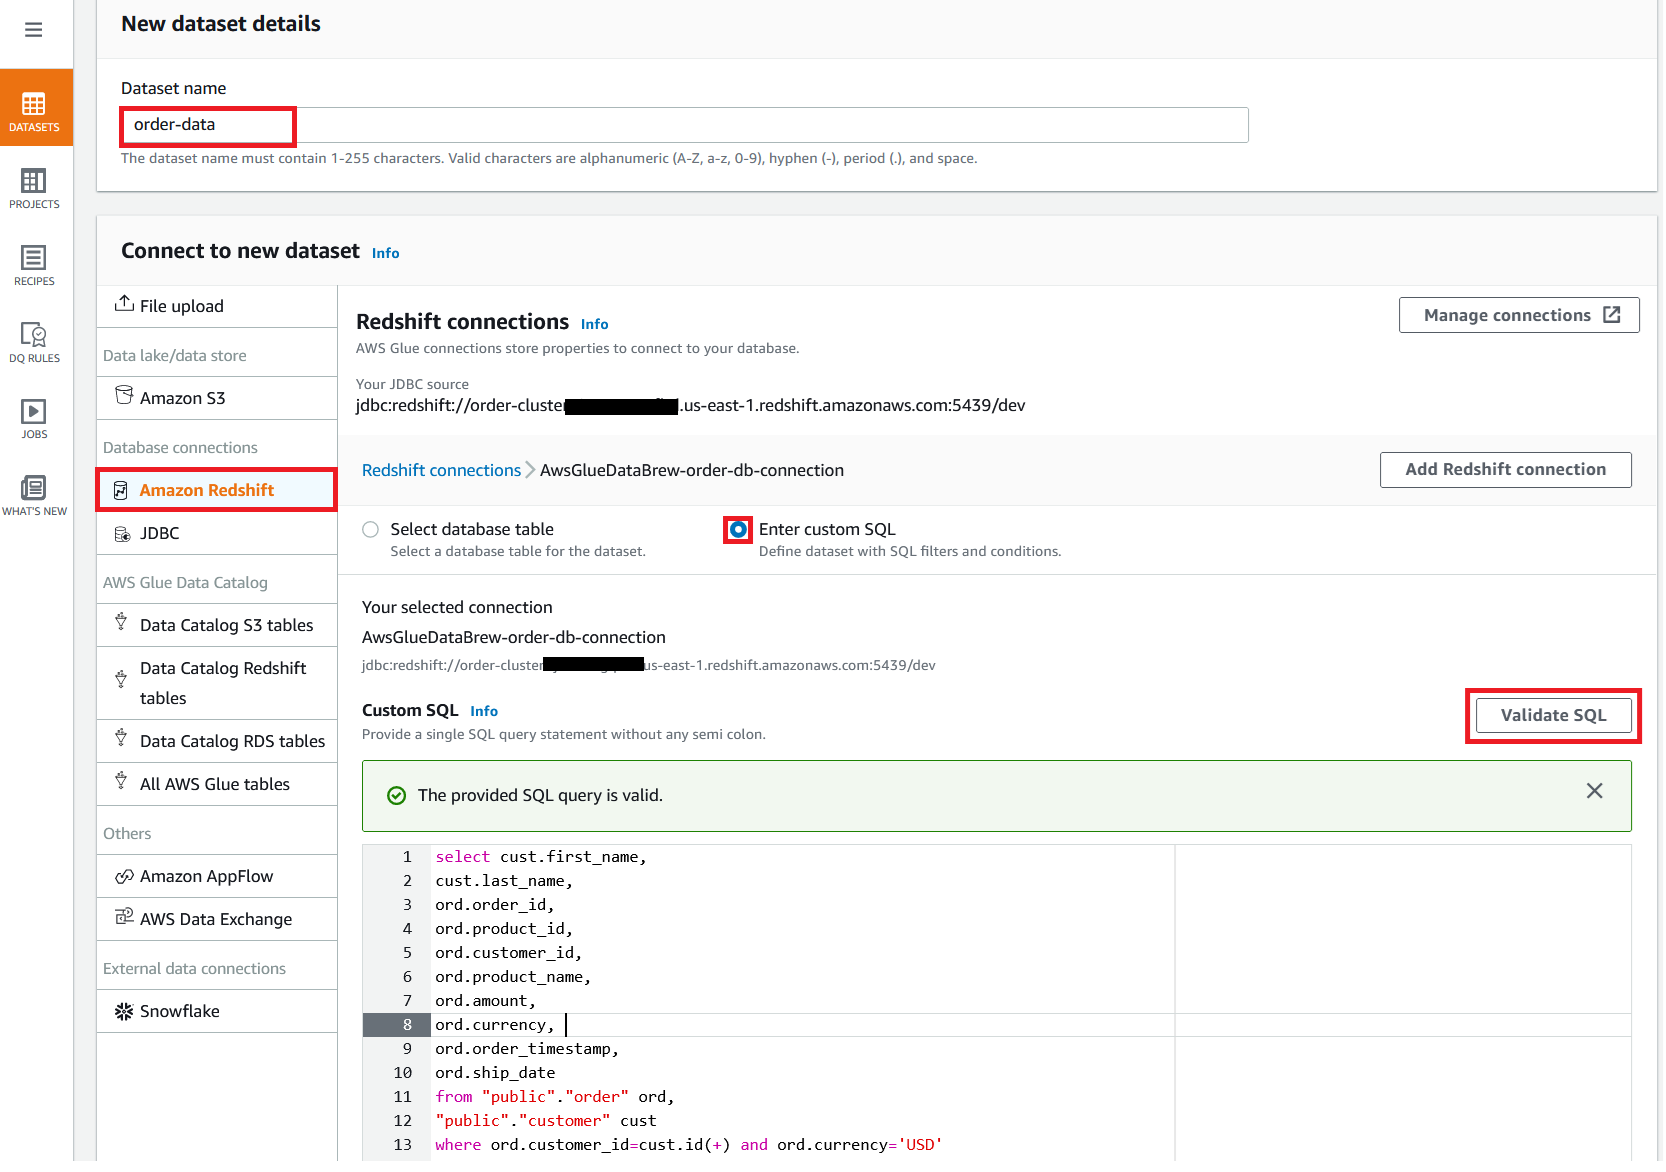\n\n7. Under **Additional configurations**, for **Enter S3 destination**, provide an S3 destination to temporarily store the intermediate results.\n8. Choose **Create dataset**.\n\n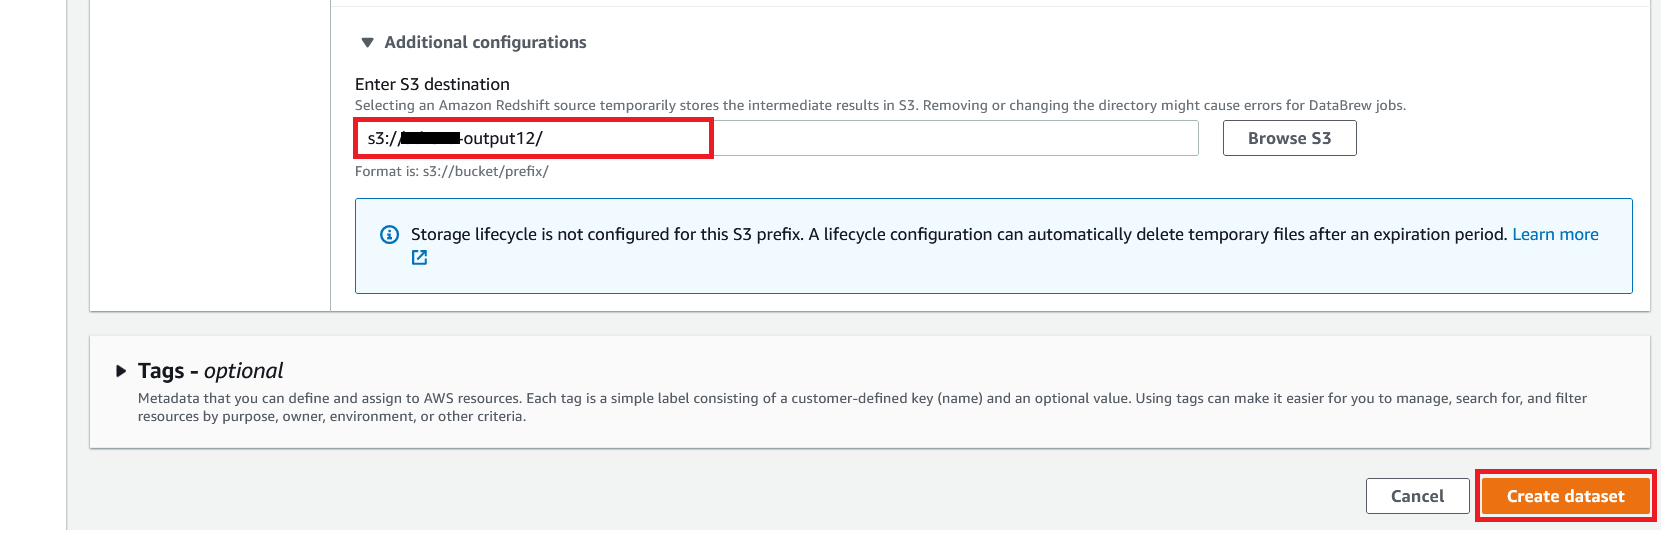\n\n\n#### **Create a DataBrew profile job**\n\n\nIn this section, you use the newly created Amazon Redshift dataset to create a profile job. Data profiling helps you understand your dataset and plan the data preparation steps needed in running your recipe jobs.\n\n1. On the DataBrew console, choose **Jobs** in the navigation pane.\n2. On the **Profile jobs** tab, choose **Create job**.\n\n\n\n3. For **Job name**, enter a name, such as ```order-data-profile-job```.\n4. For **Job type**¸ select **Create a profile job**.\n5. Under **Job input**, choose **Browse datasets** and choose the dataset you created earlier (```order-data```).\n\n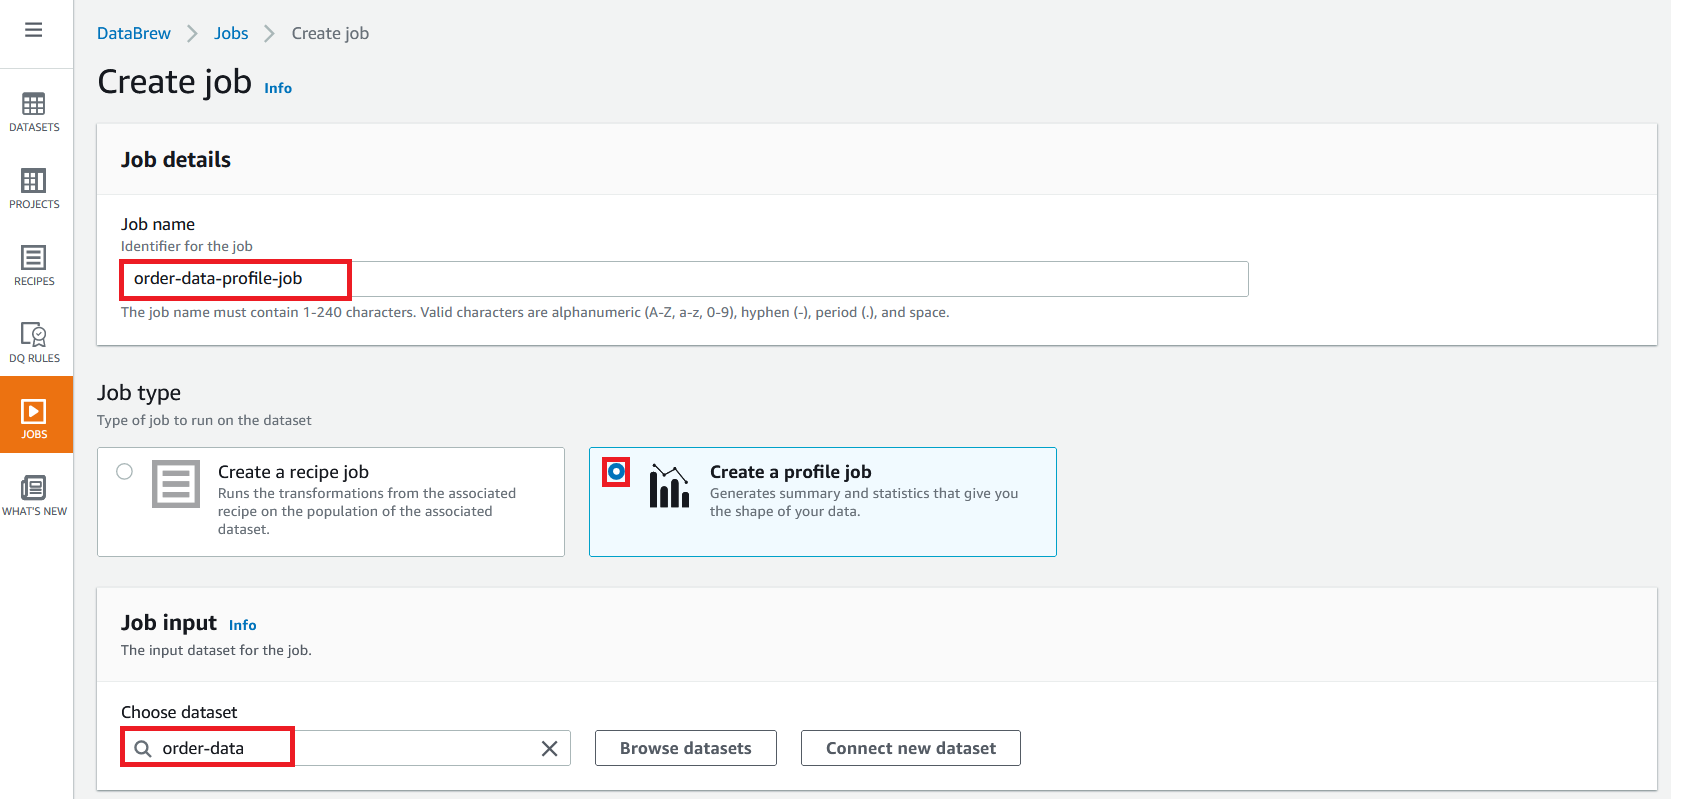\n\n6. For **Data sample**, select **Full dataset**.\n7. Under **Job output settings**¸ for **S3 location**, enter the S3 bucket for the job output files.\n\n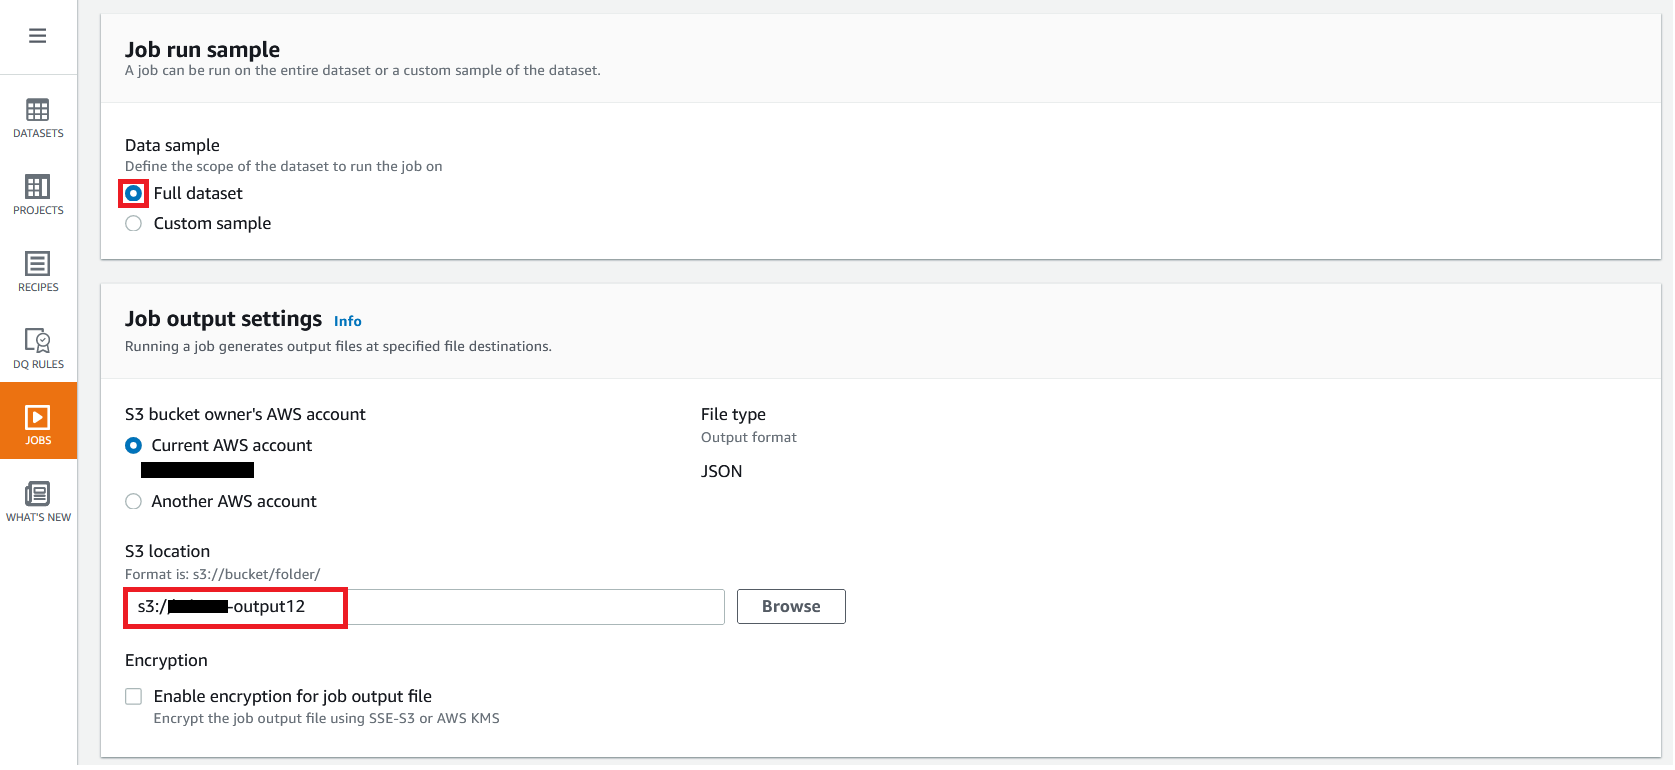\n\n8. For Role name, choose an [Amazon Web Services Identity and Access Management](https://aws.amazon.com/cn/iam/) (IAM) role with permission for DataBrew to connect to the data on your behalf. For more information, refer to [Adding an IAM role with data resource permissions](https://docs.aws.amazon.com/databrew/latest/dg/setting-up-iam-role-to-use-in-databrew.html).\n9. Choose **Create and run job**.\n\n\n\nCheck the status of your profile job. A profile output file is created and stored in Amazon S3 upon completion. You can choose **View data profile** to see more information.\n\n\n\nIn addition to an output file, DataBrew also provides visualizations. On the **Dataset profile overview** tab, you can see data visualizations that can help you understand your data better. Next, you can see detailed statistics about your data on the **Column statistics** tab, illustrated with graphics and charts. You can define data quality rules on the **Data quality rules** tab, and then see the results from the data quality ruleset that applies to this dataset.\n\nFor example, in the following screenshot, the amount column has 2% missing values, as shown on the **Column statistics** tab. You can provide rules that avoid triggering a recipe job in case of an anomaly. You can also notify the source teams to handle or acknowledge the missing values. DataBrew users can also add steps in the recipe job to handle the anomalies and missing values.\n\n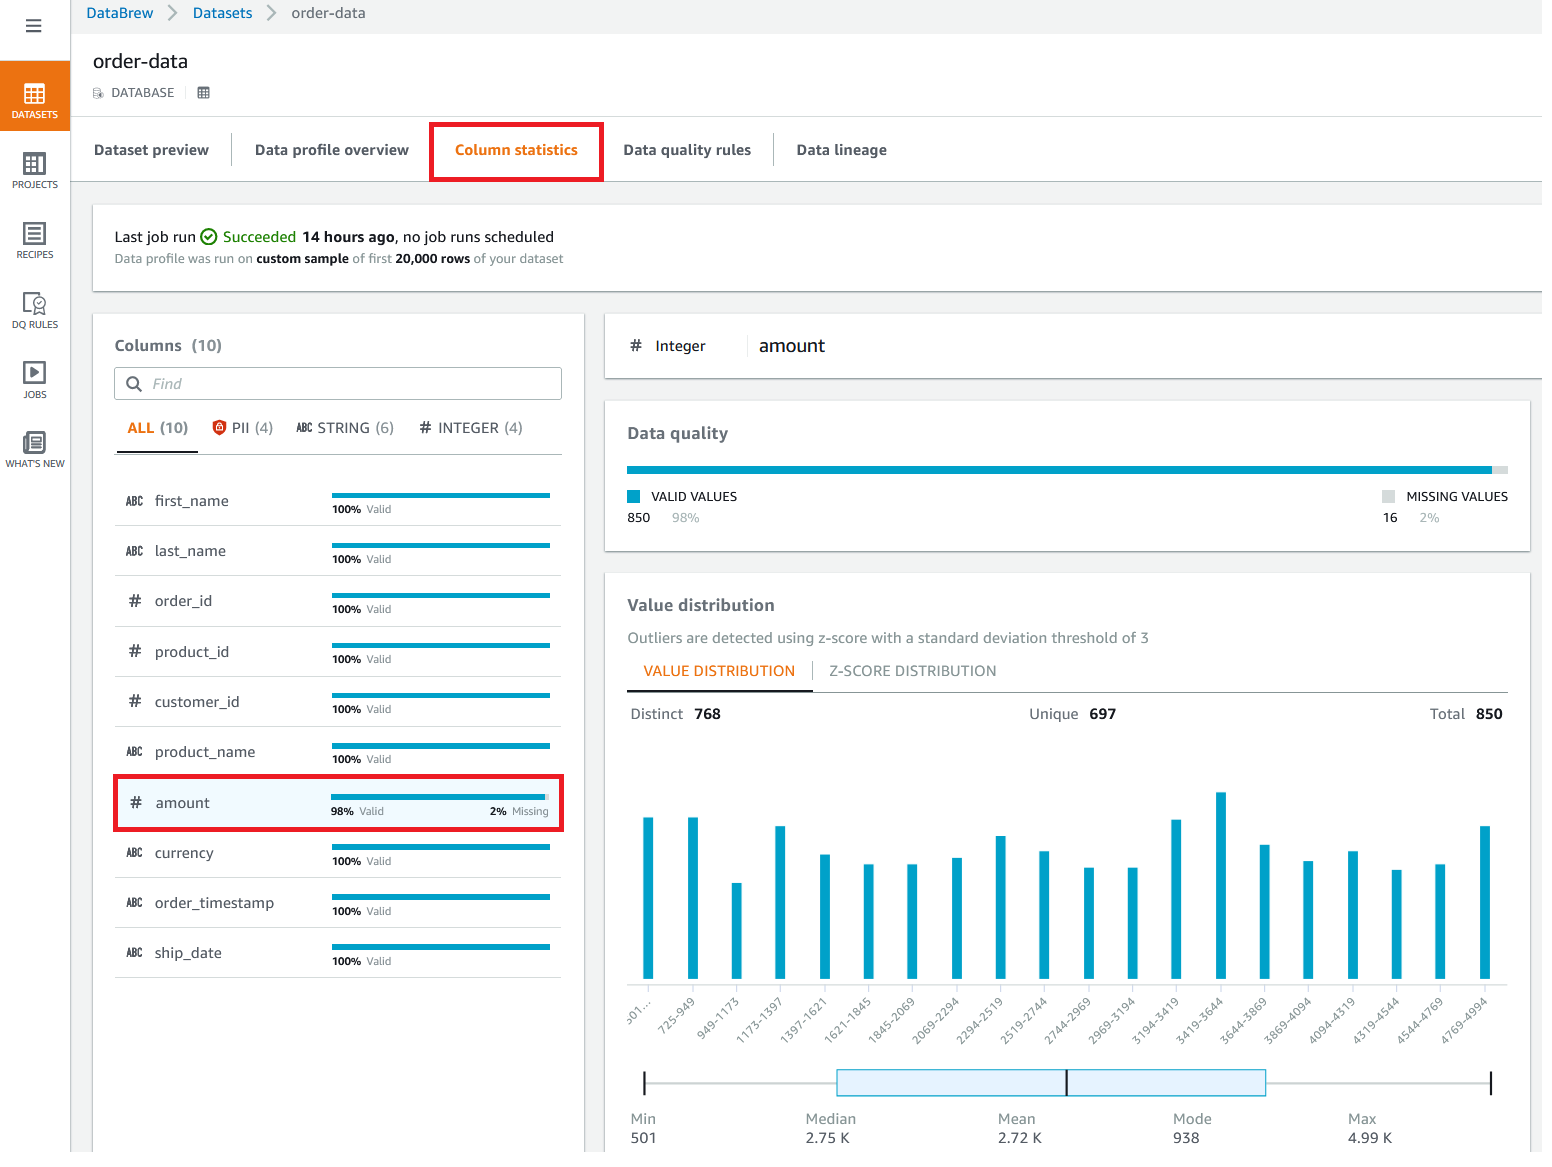\n\n\n#### **Create a DataBrew project and recipe job**\n\n\nIn this section, you start analyzing and transforming your Amazon Redshift dataset in a DataBrew project. The custom SQL statement runs in Amazon Redshift when the project is loaded. Databrew performs read-only access to your source data.\n\n\n**Create a project**\n\n\nTo create your project, complete the following steps:\n\n1. On the DataBrew console, choose **Projects** in the navigation pane.\n2. Choose **Create project**.\n\n\n\n3. For **Project name**, enter a name, such as ```order-data-proj```.\n4. Under **Recipe details**¸ choose **Create new recipe** and enter a recipe name, such as ```order-data-proj-recipe```.\n\n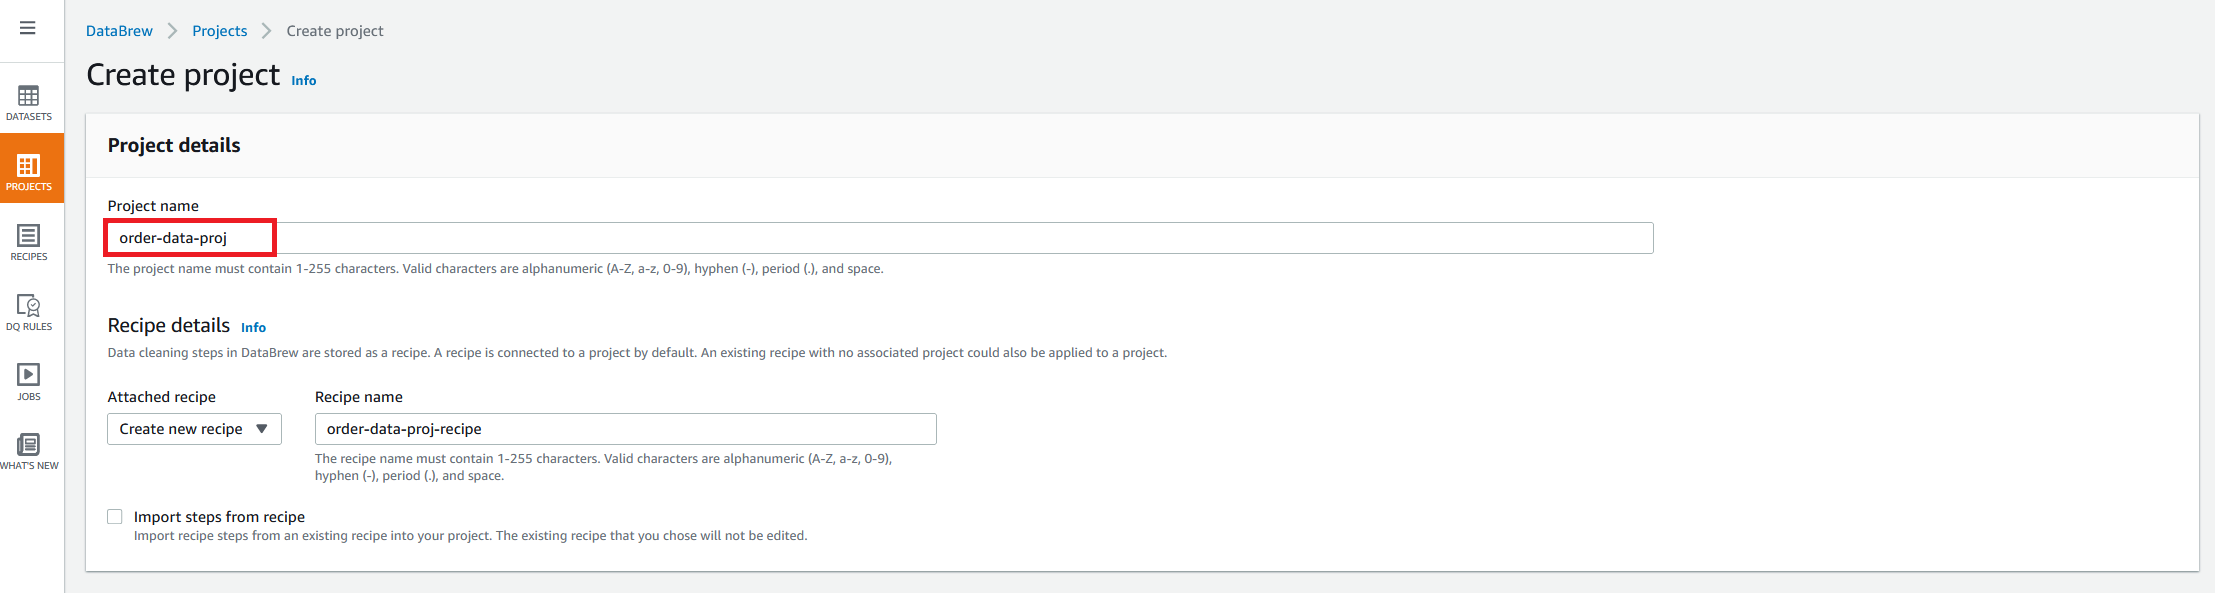\n\n5. For **Select a dataset**, select **My datasets**.\n6. Select the dataset you created earlier (```order-data```).\n7. Under **Permissions**, for **Role name**, choose your DataBrew role.\n8. Choose **Create project**.\n\n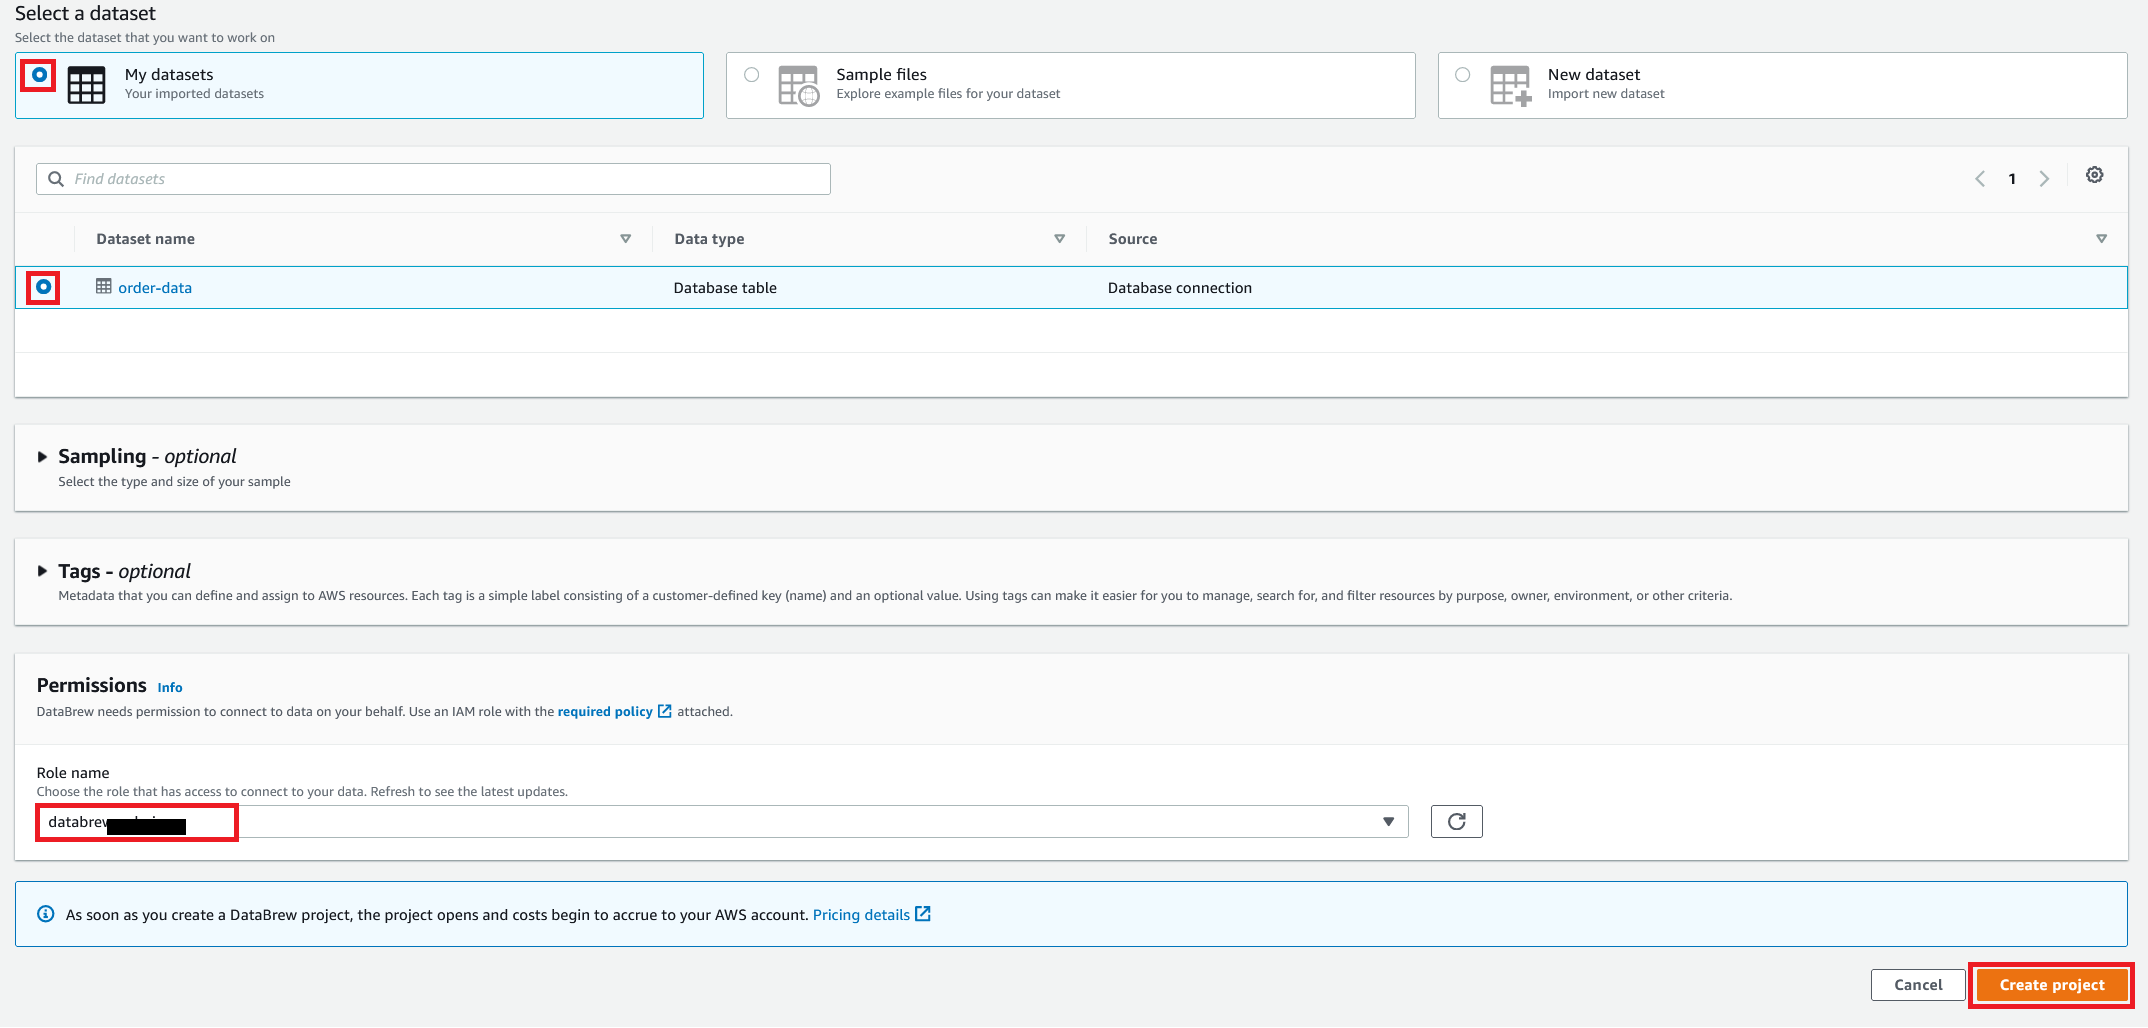\n\nDataBrew starts a session, constructs a DataFrame, extracts sample data, infers basic statistics, and displays the sample data in a grid view. You can add steps to build a transformation recipe. As of this writing, DataBrew offers over 350 transformations, with more on the way.\n\nFor our example use case, Company ABC has set a target to ship all orders within 7 days after the order date (internal SLA). They want a list of orders that didn’t meet the 7-day SLA for additional investigation. The following sample recipe contains steps to handle the missing values, filter the values by amount, change the date format, calculate the date difference, and filter the values by shipping days. The detailed steps are as follows:\n\nFill missing values with ```0``` for the amount column.\nFilter values by amount greater than ```0```.\nChange the format of ```order_timestamp``` to align with ```ship_date```.\nCreate a new column called ```days_for_shipping``` using the ```dateTime``` function ```DATEDIFF``` to show the difference between ```order_timestamp``` and ```ship_date``` in days.\nFilter the values by ```days_for_shipping``` greater than ```7```.\n\n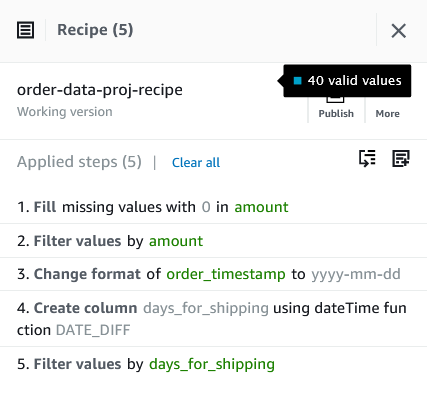\n\n\n#### **Create a recipe job**\n\n\nTo create your DataBrew recipe job, complete the following steps:\n\n1. On the DataBrew console, choose **Jobs** in the navigation pane.\n2. Choose **Create job**.\n3. For **Job name**¸ enter a name, such as ```SHIPPING-SLA-MISS```.\n4. Under **Job output settings**, configure your Amazon S3 output settings.\n5. For **S3 location**, enter the location of your output bucket.\n\n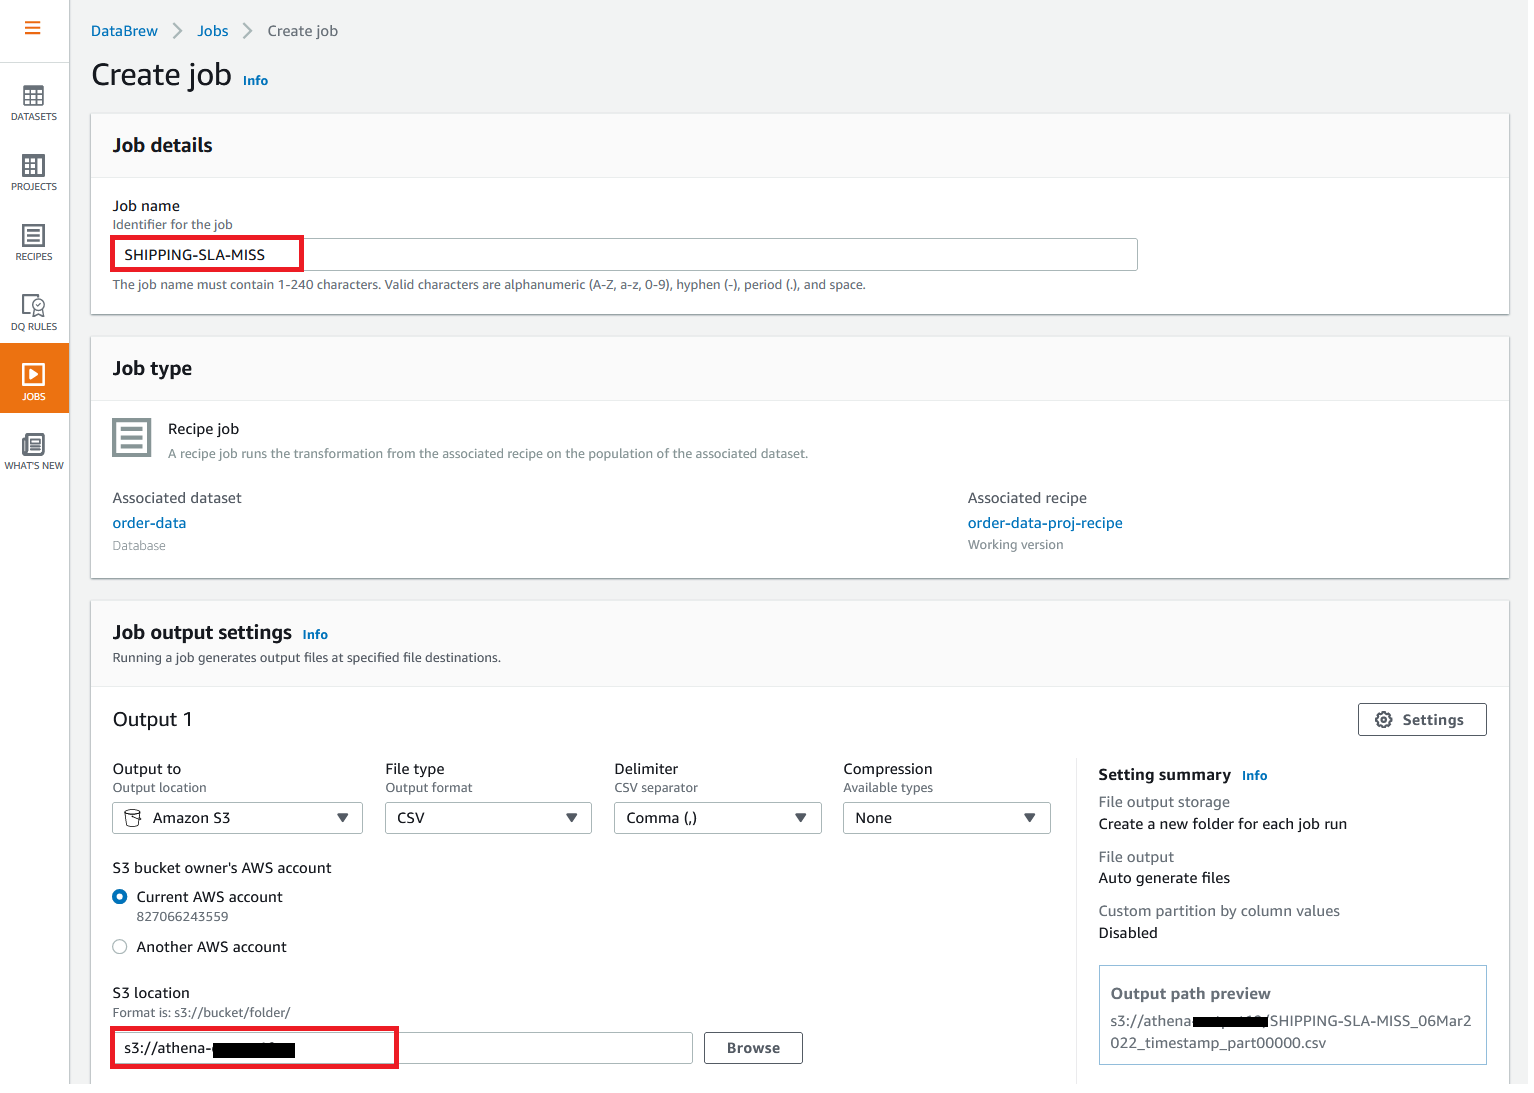\n\n6. For **Role name**, choose the IAM role that contains permissions for DataBrew to connect on your behalf.\n7. Choose **Create and run job**.\n\n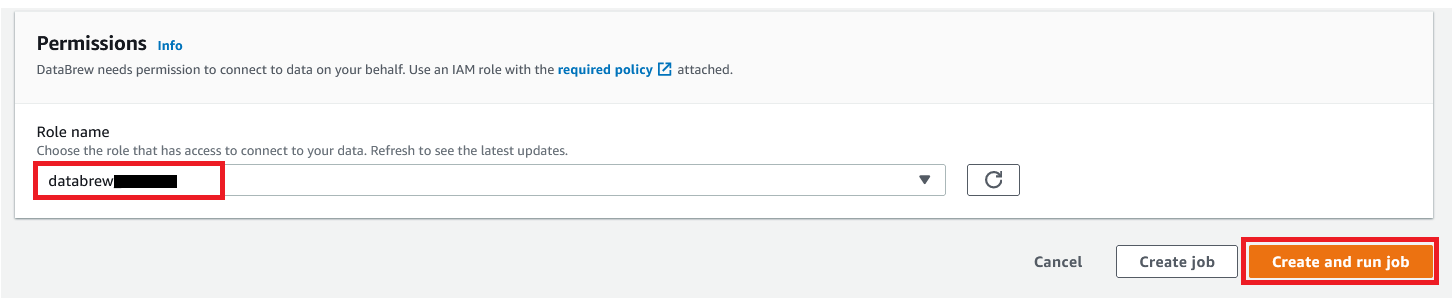\n\nYou can check the status of your job on the **Jobs** page.\n\n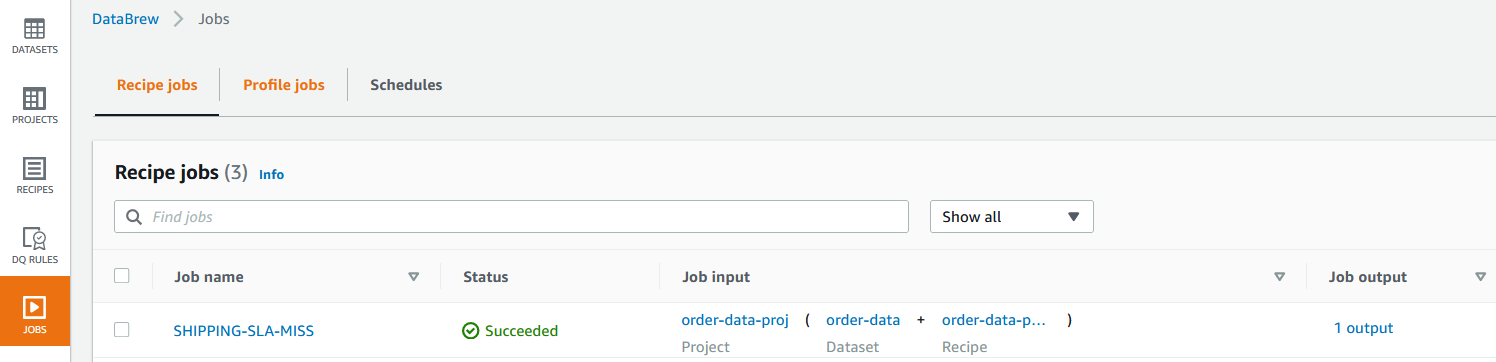\n\nThe output file is in Amazon S3 as specified, and your data transformation is now complete.\n\n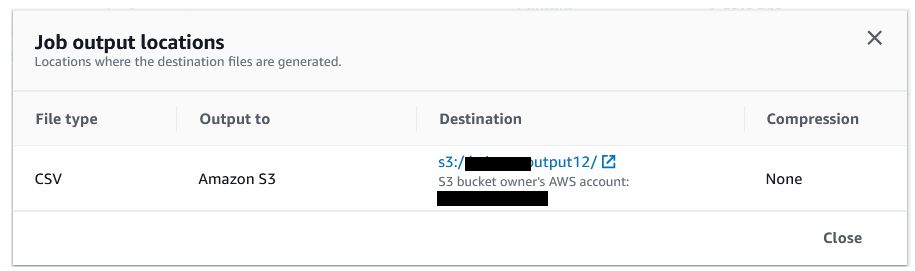\n\n\n#### **Clean up**\n\n\nTo avoid incurring future charges, we recommend deleting the resources you created during this walkthrough.\n\n\n#### **Conclusion**\n\n\nIn this post, we walked through applying custom SQL statements to an Amazon Redshift data source in your dataset, which you can use in profiling and transformation jobs. You can now focus on building your data transformation steps knowing that you’re working on only the needed data.\n\nTo learn more about the various supported data sources for DataBrew, see [Connecting to data with Amazon Web Services Glue DataBrew](https://docs.aws.amazon.com/databrew/latest/dg/datasets.html).\n\n\n#### **About the authors**\n\n\n\n\n**Suraj Shivananda** is a Solutions Architect at Amazon Web Services. He has over a decade of experience in Software Engineering, Data and Analytics, DevOps specifically for data solutions, automating and optimizing cloud based solutions. He’s a trusted technical advisor and helps customers build Well Architected solutions on the Amazon Web Services platform.\n\n\n\n**Marie Yap** is a Principal Solutions Architect for Amazon Web Services based in Hawaii. In this role, she helps various organizations begin their journey to the cloud. She also specializes in analytics and modern data architectures.\n\n\n\n**Dhiraj Thakur** is a Solutions Architect with Amazon Web Services. He works with Amazon Web Services customers and partners to provide guidance on enterprise cloud adoption, migration, and strategy. He is passionate about technology and enjoys building and experimenting in the analytics and AI/ML space.","render":"<p>In the post <a href=\"https://aws.amazon.com/cn/blogs/big-data/data-preparation-using-amazon-redshift-with-aws-glue-databrew/\" target=\"_blank\">Data preparation using Amazon Redshift with Amazon Web Services Glue DataBrew</a>, we saw how to create an Amazon Web Services Glue DataBrew job using a JDBC connection for Amazon Redshift. In this post, we show you how to create a DataBrew profile job and a recipe job using an Amazon Redshift connection with custom SQL.</p>\n<p>DataBrew is a visual data preparation tool that can help you simplify your extract, transform, and load (ETL) process. You can now define a dataset from Amazon Redshift by applying custom SQL statements. Applying a custom SQL statement to a large source table allows you to select, join, and filter the data before cleaning, normalizing, and transforming it in a DataBrew project. Filtering and joining the data from your data source and only bringing in the data you want to transform simplifies the ETL process.</p>\n<p>In this post, we demonstrate how to use custom SQL queries to define your Amazon Redshift datasets in DataBrew.</p>\n<h4><a id=\"Solution_overview_7\"></a><strong>Solution overview</strong></h4>\n<p>To implement this solution, you complete the following high-level steps:</p>\n<ol>\n<li>Create an Amazon Redshift connection.</li>\n<li>Create your dataset and use SQL queries to define your Amazon Redshift source datasets.</li>\n<li>Create a DataBrew profile job to profile the source data.</li>\n<li>Create a DataBrew project and recipe job to transform the data and load it to Amazon Simple Storage Service (Amazon S3).</li>\n</ol>\n<p>The following diagram illustrates the architecture for our solution.</p>\n<p><img src=\"https://dev-media.amazoncloud.cn/2ff235d3cebe48a18b270d186730e571_image.png\" alt=\"image.png\" /></p>\n<h4><a id=\"Prerequisites_23\"></a><strong>Prerequisites</strong></h4>\n<p>To use this solution, complete the following prerequisite steps:</p>\n<ol>\n<li>Have an Amazon Web Services account.</li>\n<li><a href=\"https://docs.aws.amazon.com/redshift/latest/gsg/rs-gsg-launch-sample-cluster.html\" target=\"_blank\">Create an Amazon Redshift cluster</a> in a private subnet within a VPC as a security best practice.</li>\n<li>Because DataBrew commands require that the cluster has access to Amazon S3, make sure you create a <a href=\"https://docs.aws.amazon.com/vpc/latest/privatelink/gateway-endpoints.html\" target=\"_blank\">gateway VPC endpoint to Amazon S3</a>. The gateway endpoint provides reliable connectivity to Amazon S3 without requiring an internet gateway or NAT device from your VPC.</li>\n<li>Enable the <a href=\"https://docs.aws.amazon.com/redshift/latest/mgmt/enhanced-vpc-routing.html\" target=\"_blank\">enhanced VPC routing</a> in the Amazon Redshift cluster. Enhanced VPC routing forces all Amazon Redshift commands to use the connectivity to the gateway VPC endpoint to Amazon S3 in the same Amazon Web Services Region as your cluster.</li>\n<li>Create a database and tables, and load the sample data in the Amazon Redshift cluster.</li>\n<li>Prepare a SQL query to extract the source dataset. You use this SQL query later in this post to create an Amazon Redshift source dataset in DataBrew.</li>\n<li>Create an S3 bucket to store data from the profile and recipe jobs. The DataBrew connection temporarily stores intermediate data in Amazon S3.</li>\n<li>For our use case, we use a mock dataset. You can download the DDL and data files from <a href=\"https://github.com/aws-samples/use-sql-queries-in-glue-databrew\" target=\"_blank\">GitHub</a>.</li>\n</ol>\n<h4><a id=\"Security_best_practices_38\"></a><strong>Security best practices</strong></h4>\n<p>Consider the following best practices in order to mitigate security threats:</p>\n<ul>\n<li>Review the <a href=\"https://docs.aws.amazon.com/databrew/latest/dg/security.html\" target=\"_blank\">shared responsibility model</a> when using DataBrew.</li>\n<li>Restrict network access for inbound and outbound traffic to least privilege. Take advantage of the routing traffic within the VPC by using an Amazon S3 gateway endpoint and enhanced VPC routing in Amazon Redshift.</li>\n<li>Enable the lifecycle policy in Amazon S3 to retain only necessary data, and delete unnecessary data.</li>\n<li>Enable Amazon S3 versioning and cross-Region replication for critical datasets to protect against accidental deletes.</li>\n<li>Enable server-side encryption using Amazon Web Services KMS (<a href=\"https://docs.aws.amazon.com/AmazonS3/latest/userguide/UsingKMSEncryption.html\" target=\"_blank\">SSE-KMS</a>) or Amazon S3 (<a href=\"https://docs.aws.amazon.com/AmazonS3/latest/userguide/UsingServerSideEncryption.html\" target=\"_blank\">SSE-S3</a>).</li>\n<li>DataBrew uses Amazon CloudWatch for logging, so you should update your log retention period to retain logs for the appropriate length of time.</li>\n</ul>\n<h4><a id=\"Create_an_Amazon_Redshift_connection_51\"></a><strong>Create an Amazon Redshift connection</strong></h4>\n<p>In this section, you create a connection in DataBrew to connect to your Amazon Redshift cluster.</p>\n<ol>\n<li>On the DataBrew console, choose <strong>Datasets</strong> in the navigation pane.</li>\n<li>On the <strong>Connections</strong> tab, choose <strong>Create connection</strong>.</li>\n</ol>\n<p><img src=\"https://dev-media.amazoncloud.cn/fd6c31fdc92f455eb914a054e31a515d_image.png\" alt=\"image.png\" /></p>\n<ol start=\"3\">\n<li>For <strong>Connection name</strong>, enter a name, such as order-db-connection.</li>\n<li>For <strong>Connection type</strong>, select <strong>Amazon Redshift</strong>.</li>\n<li>Under <strong>Connection access</strong>, provide the Amazon Redshift cluster name, database name, database user, and database password.</li>\n<li>Choose <strong>Create connection</strong>.</li>\n</ol>\n<p><img src=\"https://dev-media.amazoncloud.cn/c706d2da8bc543c48819be771af6f58a_image.png\" alt=\"image.png\" /></p>\n<h4><a id=\"Create_your_dataset_by_applying_a_custom_SQL_statement_to_filter_the_source_data_69\"></a><strong>Create your dataset by applying a custom SQL statement to filter the source data</strong></h4>\n<p>In this section, you create a Amazon Redshift connection, add your custom SQL statement, and validate it. You can also validate your SQL statement directly in your Amazon Redshift cluster by using the <a href=\"https://docs.aws.amazon.com/redshift/latest/mgmt/query-editor-v2.html\" target=\"_blank\">Amazon Redshift query editor v2</a>. The purpose of validating the SQL statement is to help you avoid failure in loading your dataset into a project or job. Also, checking the query runtime ensures that it runs in under 3 minutes, avoiding timeouts during project loading. To analyze and improve query performance in Amazon Redshift, see <a href=\"https://docs.aws.amazon.com/redshift/latest/dg/c-optimizing-query-performance.html\" target=\"_blank\">Tuning query performance</a>.</p>\n<ol>\n<li>On the DataBrew console, choose <strong>Datasets</strong> in the navigation pane.</li>\n<li>On the <strong>Datasets</strong> tab, choose <strong>Connect new dataset</strong>.</li>\n</ol>\n<p><img src=\"https://dev-media.amazoncloud.cn/faed0a4c754340f5b071359d26aa589a_image.png\" alt=\"image.png\" /></p>\n<ol start=\"3\">\n<li>For <strong>Dataset name</strong>, enter a name, such as <code>order-data</code>.</li>\n<li>In the left pane, choose <strong>Amazon Redshift</strong> under <strong>Database connections</strong>.</li>\n<li>Add your Amazon Redshift connection and select <strong>Enter custom SQL</strong>.</li>\n<li>Enter the SQL query and choose <strong>Validate SQL</strong>.</li>\n</ol>\n<p><img src=\"https://dev-media.amazoncloud.cn/a1284e45bf6348ffbeb71a971afe6a7a_image.png\" alt=\"image.png\" /></p>\n<ol start=\"7\">\n<li>Under <strong>Additional configurations</strong>, for <strong>Enter S3 destination</strong>, provide an S3 destination to temporarily store the intermediate results.</li>\n<li>Choose <strong>Create dataset</strong>.</li>\n</ol>\n<p><img src=\"https://dev-media.amazoncloud.cn/1f27519edce342b9ab9f542edb68bde2_image.png\" alt=\"image.png\" /></p>\n<h4><a id=\"Create_a_DataBrew_profile_job_91\"></a><strong>Create a DataBrew profile job</strong></h4>\n<p>In this section, you use the newly created Amazon Redshift dataset to create a profile job. Data profiling helps you understand your dataset and plan the data preparation steps needed in running your recipe jobs.</p>\n<ol>\n<li>On the DataBrew console, choose <strong>Jobs</strong> in the navigation pane.</li>\n<li>On the <strong>Profile jobs</strong> tab, choose <strong>Create job</strong>.</li>\n</ol>\n<p><img src=\"https://dev-media.amazoncloud.cn/91073ee2609e4461a93287206b80bd6c_image.png\" alt=\"image.png\" /></p>\n<ol start=\"3\">\n<li>For <strong>Job name</strong>, enter a name, such as <code>order-data-profile-job</code>.</li>\n<li>For <strong>Job type</strong>¸ select <strong>Create a profile job</strong>.</li>\n<li>Under <strong>Job input</strong>, choose <strong>Browse datasets</strong> and choose the dataset you created earlier (<code>order-data</code>).</li>\n</ol>\n<p><img src=\"https://dev-media.amazoncloud.cn/306efd48622943e18d85947d408d6898_image.png\" alt=\"image.png\" /></p>\n<ol start=\"6\">\n<li>For <strong>Data sample</strong>, select <strong>Full dataset</strong>.</li>\n<li>Under <strong>Job output settings</strong>¸ for <strong>S3 location</strong>, enter the S3 bucket for the job output files.</li>\n</ol>\n<p><img src=\"https://dev-media.amazoncloud.cn/54ea88ba4c834f7994f4d34b1510a01a_image.png\" alt=\"image.png\" /></p>\n<ol start=\"8\">\n<li>For Role name, choose an <a href=\"https://aws.amazon.com/cn/iam/\" target=\"_blank\">Amazon Web Services Identity and Access Management</a> (IAM) role with permission for DataBrew to connect to the data on your behalf. For more information, refer to <a href=\"https://docs.aws.amazon.com/databrew/latest/dg/setting-up-iam-role-to-use-in-databrew.html\" target=\"_blank\">Adding an IAM role with data resource permissions</a>.</li>\n<li>Choose <strong>Create and run job</strong>.</li>\n</ol>\n<p><img src=\"https://dev-media.amazoncloud.cn/a0b764badd6049a881f567e04e0ce976_image.png\" alt=\"image.png\" /></p>\n<p>Check the status of your profile job. A profile output file is created and stored in Amazon S3 upon completion. You can choose <strong>View data profile</strong> to see more information.</p>\n<p><img src=\"https://dev-media.amazoncloud.cn/62034a6dd1a04815a85c34f416d15055_image.png\" alt=\"image.png\" /></p>\n<p>In addition to an output file, DataBrew also provides visualizations. On the <strong>Dataset profile overview</strong> tab, you can see data visualizations that can help you understand your data better. Next, you can see detailed statistics about your data on the <strong>Column statistics</strong> tab, illustrated with graphics and charts. You can define data quality rules on the <strong>Data quality rules</strong> tab, and then see the results from the data quality ruleset that applies to this dataset.</p>\n<p>For example, in the following screenshot, the amount column has 2% missing values, as shown on the <strong>Column statistics</strong> tab. You can provide rules that avoid triggering a recipe job in case of an anomaly. You can also notify the source teams to handle or acknowledge the missing values. DataBrew users can also add steps in the recipe job to handle the anomalies and missing values.</p>\n<p><img src=\"https://dev-media.amazoncloud.cn/ec97a29b8b9f4eab97ddde4893e038f4_image.png\" alt=\"image.png\" /></p>\n<h4><a id=\"Create_a_DataBrew_project_and_recipe_job_128\"></a><strong>Create a DataBrew project and recipe job</strong></h4>\n<p>In this section, you start analyzing and transforming your Amazon Redshift dataset in a DataBrew project. The custom SQL statement runs in Amazon Redshift when the project is loaded. Databrew performs read-only access to your source data.</p>\n<p><strong>Create a project</strong></p>\n<p>To create your project, complete the following steps:</p>\n<ol>\n<li>On the DataBrew console, choose <strong>Projects</strong> in the navigation pane.</li>\n<li>Choose <strong>Create project</strong>.</li>\n</ol>\n<p><img src=\"https://dev-media.amazoncloud.cn/5d5c516a90934dd896de7f8aa1cc1f78_image.png\" alt=\"image.png\" /></p>\n<ol start=\"3\">\n<li>For <strong>Project name</strong>, enter a name, such as <code>order-data-proj</code>.</li>\n<li>Under <strong>Recipe details</strong>¸ choose <strong>Create new recipe</strong> and enter a recipe name, such as <code>order-data-proj-recipe</code>.</li>\n</ol>\n<p><img src=\"https://dev-media.amazoncloud.cn/95b0e7ad52af47be9b2a7199a6c53085_image.png\" alt=\"image.png\" /></p>\n<ol start=\"5\">\n<li>For <strong>Select a dataset</strong>, select <strong>My datasets</strong>.</li>\n<li>Select the dataset you created earlier (<code>order-data</code>).</li>\n<li>Under <strong>Permissions</strong>, for <strong>Role name</strong>, choose your DataBrew role.</li>\n<li>Choose <strong>Create project</strong>.</li>\n</ol>\n<p><img src=\"https://dev-media.amazoncloud.cn/8b9bcbe3205b40eaa370d95b03617b63_image.png\" alt=\"image.png\" /></p>\n<p>DataBrew starts a session, constructs a DataFrame, extracts sample data, infers basic statistics, and displays the sample data in a grid view. You can add steps to build a transformation recipe. As of this writing, DataBrew offers over 350 transformations, with more on the way.</p>\n<p>For our example use case, Company ABC has set a target to ship all orders within 7 days after the order date (internal SLA). They want a list of orders that didn’t meet the 7-day SLA for additional investigation. The following sample recipe contains steps to handle the missing values, filter the values by amount, change the date format, calculate the date difference, and filter the values by shipping days. The detailed steps are as follows:</p>\n<p>Fill missing values with <code>0</code> for the amount column.<br />\nFilter values by amount greater than <code>0</code>.<br />\nChange the format of <code>order_timestamp</code> to align with <code>ship_date</code>.<br />\nCreate a new column called <code>days_for_shipping</code> using the <code>dateTime</code> function <code>DATEDIFF</code> to show the difference between <code>order_timestamp</code> and <code>ship_date</code> in days.<br />\nFilter the values by <code>days_for_shipping</code> greater than <code>7</code>.</p>\n<p><img src=\"https://dev-media.amazoncloud.cn/84299fe40c784f9c989b502a8b360d9d_image.png\" alt=\"image.png\" /></p>\n<h4><a id=\"Create_a_recipe_job_169\"></a><strong>Create a recipe job</strong></h4>\n<p>To create your DataBrew recipe job, complete the following steps:</p>\n<ol>\n<li>On the DataBrew console, choose <strong>Jobs</strong> in the navigation pane.</li>\n<li>Choose <strong>Create job</strong>.</li>\n<li>For <strong>Job name</strong>¸ enter a name, such as <code>SHIPPING-SLA-MISS</code>.</li>\n<li>Under <strong>Job output settings</strong>, configure your Amazon S3 output settings.</li>\n<li>For <strong>S3 location</strong>, enter the location of your output bucket.</li>\n</ol>\n<p><img src=\"https://dev-media.amazoncloud.cn/d2cda0b0cb934633a1b56c56bc798187_image.png\" alt=\"image.png\" /></p>\n<ol start=\"6\">\n<li>For <strong>Role name</strong>, choose the IAM role that contains permissions for DataBrew to connect on your behalf.</li>\n<li>Choose <strong>Create and run job</strong>.</li>\n</ol>\n<p><img src=\"https://dev-media.amazoncloud.cn/58a98a70268642338e2e203b5e436056_image.png\" alt=\"image.png\" /></p>\n<p>You can check the status of your job on the <strong>Jobs</strong> page.</p>\n<p><img src=\"https://dev-media.amazoncloud.cn/dc135d78b750491cb88f145a6d59ae72_image.png\" alt=\"image.png\" /></p>\n<p>The output file is in Amazon S3 as specified, and your data transformation is now complete.</p>\n<p><img src=\"https://dev-media.amazoncloud.cn/2d9fbbf950b443f6867a26fddccc9f6e_image.png\" alt=\"image.png\" /></p>\n<h4><a id=\"Clean_up_196\"></a><strong>Clean up</strong></h4>\n<p>To avoid incurring future charges, we recommend deleting the resources you created during this walkthrough.</p>\n<h4><a id=\"Conclusion_202\"></a><strong>Conclusion</strong></h4>\n<p>In this post, we walked through applying custom SQL statements to an Amazon Redshift data source in your dataset, which you can use in profiling and transformation jobs. You can now focus on building your data transformation steps knowing that you’re working on only the needed data.</p>\n<p>To learn more about the various supported data sources for DataBrew, see <a href=\"https://docs.aws.amazon.com/databrew/latest/dg/datasets.html\" target=\"_blank\">Connecting to data with Amazon Web Services Glue DataBrew</a>.</p>\n<h4><a id=\"About_the_authors_210\"></a><strong>About the authors</strong></h4>\n<p><img src=\"https://dev-media.amazoncloud.cn/735cd75952a4483daac6008436b750fe_image.png\" alt=\"image.png\" /></p>\n<p><strong>Suraj Shivananda</strong> is a Solutions Architect at Amazon Web Services. He has over a decade of experience in Software Engineering, Data and Analytics, DevOps specifically for data solutions, automating and optimizing cloud based solutions. He’s a trusted technical advisor and helps customers build Well Architected solutions on the Amazon Web Services platform.</p>\n<p><img src=\"https://dev-media.amazoncloud.cn/718d5a2b554e4e6ea441688cdf37bedf_image.png\" alt=\"image.png\" /></p>\n<p><strong>Marie Yap</strong> is a Principal Solutions Architect for Amazon Web Services based in Hawaii. In this role, she helps various organizations begin their journey to the cloud. She also specializes in analytics and modern data architectures.</p>\n<p><img src=\"https://dev-media.amazoncloud.cn/33ec3c921e5c4e2a8367da0b1e8ce30f_image.png\" alt=\"image.png\" /></p>\n<p><strong>Dhiraj Thakur</strong> is a Solutions Architect with Amazon Web Services. He works with Amazon Web Services customers and partners to provide guidance on enterprise cloud adoption, migration, and strategy. He is passionate about technology and enjoys building and experimenting in the analytics and AI/ML space.</p>\n"}
Use SQL queries to define Amazon Redshift datasets in Amazon Glue DataBrew
海外精选

海外精选的内容汇集了全球优质的亚马逊云科技相关技术内容。同时,内容中提到的“AWS”
是 “Amazon Web Services” 的缩写,在此网站不作为商标展示。

 0
0 0
0亚马逊云科技解决方案 基于行业客户应用场景及技术领域的解决方案
联系亚马逊云科技专家
亚马逊云科技解决方案
基于行业客户应用场景及技术领域的解决方案
联系专家

0
目录

 分享
分享 点赞
点赞 收藏
收藏 目录
目录立即注册,开启您的免费套餐
立即关注

亚马逊云开发者
公众号

User Group
公众号

亚马逊云科技
官方小程序
“AWS” 是 “Amazon Web Services” 的缩写,在此网站不作为商标展示。
立即关注
亚马逊云开发者
公众号
User Group
公众号
亚马逊云科技
官方小程序
“AWS” 是 “Amazon Web Services” 的缩写,在此网站不作为商标展示。
关于我们 
更多资源
开发者工具
更多支持
立即关注
亚马逊云开发者
公众号
User Group
公众号
亚马逊云科技
官方小程序
“AWS” 是 “Amazon Web Services” 的缩写,在此网站不作为商标展示。
