{"value":"由于 github 访问不太稳定,觉得将博客迁移到 Amazon 上。可以借助 Amazon 存储的功能。\n\n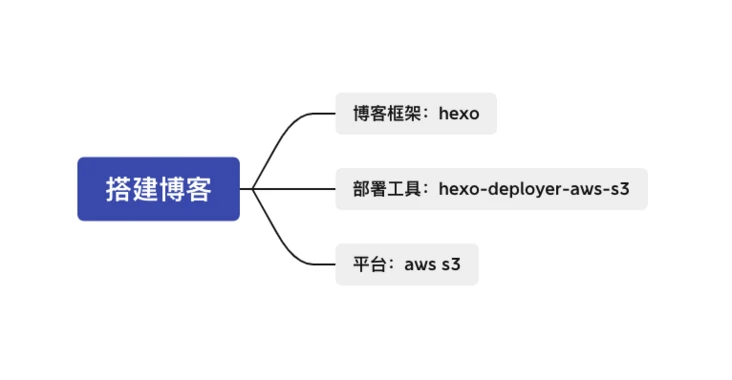\n\n- 为什么选择 hexo\n- 生成页面速度快\n- 支持 markdown\n- 一键部署\n- 超强的扩展性\n- 海量的插件\n\n#### **创建博客**\n```\n# 安装\nnpm install hexo-cli -g\n\n# 创建博客\nhexo init myblog\ncd myblog\nnpm install\n\n# 本地运行\nhexo server\n```\n\n这短短的几步,博客便创建成功了。\n\n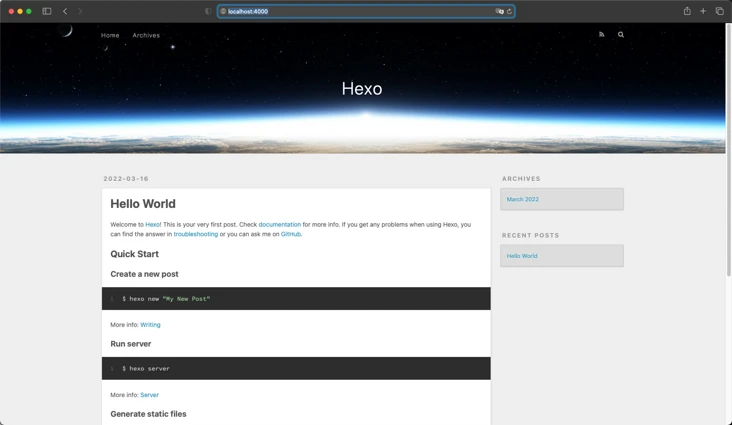\n\n### **安装部署工具**\n```\n# 安装\nnpm install hexo-deployer-Amazon Web Services-s3 --save-dev\n```\n\n```\n# 将部署配置放入 _config.yml\ndeploy:\n type: Amazon Web Services-s3 # 插件的名字\n region: us-east-1 # 存储桶所在区域\n bucket: my-bucket # 存储桶名字\n```\n\n### **Amazon 使用指南**\n注册地址:[https://aws.amazon.com/cn/free/?trk=92861c17-b0b0-4e0a-9f78-8d60bc5e2fe2&sc_channel=ba&all-free-tier.sort-by=item.additionalFields.SortRank&all-free-tier.sort-order=asc&awsf.Free%20Tier%20Types=*all&awsf.Free%20Tier%20Categories=*all](https://aws.amazon.com/cn/free/?trk=92861c17-b0b0-4e0a-9f78-8d60bc5e2fe2&sc_channel=ba&all-free-tier.sort-by=item.additionalFields.SortRank&all-free-tier.sort-order=asc&awsf.Free%20Tier%20Types=*all&awsf.Free%20Tier%20Categories=*all)\n实操文档:[https://aws.amazon.com/cn/getting-started/hands-on/how-to-host-static-website-on-cloud/?trk=ed0d7922-914e-49cb-8a1d-d714e5133565&sc_channel=ba](https://aws.amazon.com/cn/getting-started/hands-on/how-to-host-static-website-on-cloud/?trk=ed0d7922-914e-49cb-8a1d-d714e5133565&sc_channel=ba)\n### **Amazon 存储介绍**\nS3 是一种对象存储服务,提供行业领先的可扩展性、数据可用性、安全性和性能。首年使用会有 5 GB 的免费存储空空间。\n\n接下来,就需要我们在 Amazon 上创建存储。\n\n### **创建存储桶**\n\n\n\n保存后\n\n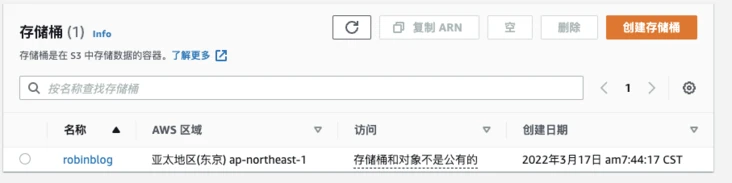\n\n此时,更新 deploy 配置\n\n```\n# 将部署配置放入 _config.yml\ndeploy:\n type: Amazon Web Services-s3 # 插件的名字\n region: ap-northeast-1 # 存储桶所在区域\n bucket: robinblog # 存储桶名字\n```\n\n### **凭证**\n凭证的作用是为了获得 Amazon s3 存储的控制权限,便于部署静态网站。进入[官方文档](https://docs.aws.amazon.com/zh_cn/sdk-for-javascript/v2/developer-guide/configuring-the-jssdk.html),需要生成凭证、配置策略、配置凭证。\n\n#### **生成凭证**\n1. 登录 Amazon Management Console,单击 [https://signin.aws.amazon.com/signin?redirect_uri=https%3A%2F%2Fus-east-1.console.aws.amazon.com%2Fiam%2F%3Fregion%3Dus-east-1%26state%3DhashArgs%2523%26isauthcode%3Dtrue&client_id=arn%3Aaws%3Aiam%3A%3A015428540659%3Auser%2Fiam&forceMobileApp=0&code_challenge=ywtenoQY-KbddCLWkKCBfLRXaU6GykgCu0F63fnSfYY&code_challenge_method=SHA-256](https://signin.aws.amazon.com/signin?redirect_uri=https%3A%2F%2Fus-east-1.console.aws.amazon.com%2Fiam%2F%3Fregion%3Dus-east-1%26state%3DhashArgs%2523%26isauthcode%3Dtrue&client_id=arn%3Aaws%3Aiam%3A%3A015428540659%3Auser%2Fiam&forceMobileApp=0&code_challenge=ywtenoQY-KbddCLWkKCBfLRXaU6GykgCu0F63fnSfYY&code_challenge_method=SHA-256) 打开 IAM 控制台。\n2. 在导航窗格中,选择 Users (用户)。\n3. 选择要为其创建访问密钥的用户的名称,然后选择 Security credentials (安全凭证) 选项卡。\n4. 在 Access keys(访问密钥) 部分,选择 Create access key (创建访问密钥)。\n5. 要查看新访问密钥对,请选择 Show (显示)。关闭此对话框后,您将无法再次访问该秘密访问密钥。您的凭证与下面类似:\n\n- 访问密钥 ID:AKIAIOSFODNN7EXAMPLE\n- 秘密访问密钥:wJalrXUtnFEMI/K7MDENG/bPxRfiCYEXAMPLEKEY\n5. 要下载密钥对,请选择 Download .csv file (下载 .csv 文件)。将密钥存储在安全位置。关闭此对话框后,您将无法再次访问该秘密访问密钥。\n6. 下载 .csv 文件之后,选择 Close (关闭)。在创建访问密钥时,预设情况下,密钥对处于活动状态,并且您可以立即使用此密钥对。\n7. 凭证生成后,还必须拥有执行所需 IAM 操作的权限。具体配置流程,请参阅 IAM 用户指南中的[访问 IAM 资源所需的权限](https://docs.aws.amazon.com/IAM/latest/UserGuide/access_permissions-required.html),下面是我配置的相关策略\n\n### **配置策略**\n```\n{\n \"Version\": \"2012-10-17\",\n \"Statement\": [\n {\n \"Sid\": \"VisualEditor0\",\n \"Effect\": \"Allow\",\n \"Action\": [\n \"s3:*\",\n \"s3-object-lambda:*\"\n ],\n \"Resource\": \"*\"\n }\n ]\n}\n```\n\n### **配置凭证**\n亚马逊云科技提供多种配置凭证的方式\n\n1. 从加载 Amazon Identity and Access Management适用于 Amazon EC2 的 (IAM) 角色\n2. 从共享凭证文件 (~/.aws/credentials) 加载\n3. 从环境变量加载\n4. 从磁盘上的 JSON 文件加载\n5. JavaScript 开发工具包提供的其他 credential-provider 类\n\n我采取了方式2 ,从共享凭证文件 (~/.aws/credentials) 加载\n\n```\n[default]\naws_access_key_id = <YOUR_ACCESS_KEY_ID>\naws_secret_access_key = <YOUR_SECRET_ACCESS_KEY>\n```\n\n看文档发现,可以通过 Amazon Web Services CLI 配置凭证,安装操作官方文档很详细看这里,我们重点介绍下配置凭证的过程。\n\n首次安装成功,命令行执行 ```\nAmazon Web Services configure``` 配置如下:\n\n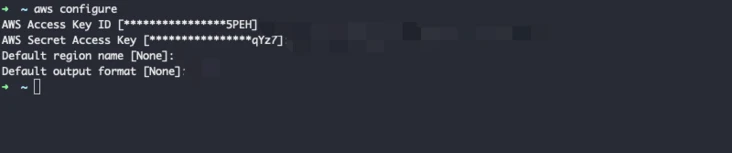\n\n配置成功后,同样会在 ```\n~/.aws/credentials``` 文件中创建对应的字段\n\n\n\n至此,配置完成。\n\n### **部署**\n```\n`# 构建\nnpm run build\n```\n\n\n```\n部署\nnpm run deploy`\n```\n\n\n发现报错,```\nThe bucket does not allow ACLs```,还需要在存储中开启```\n ACLs```\n\n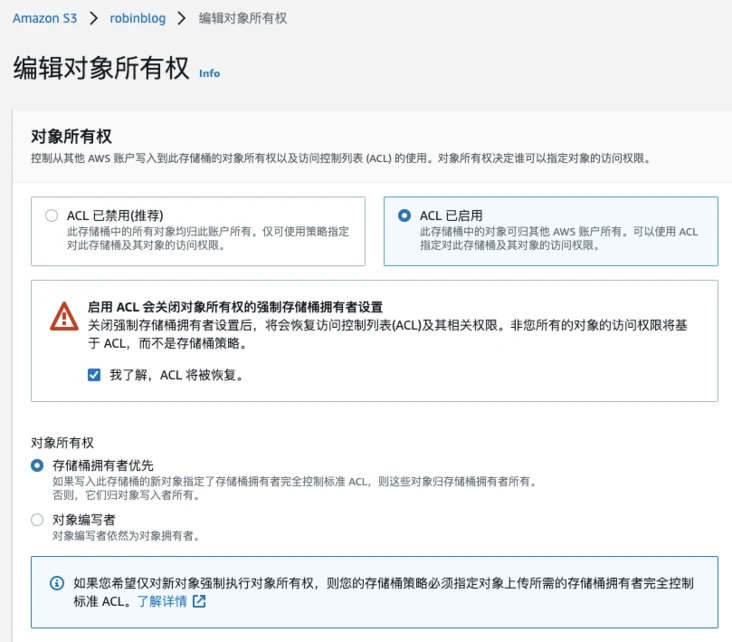\n\n接下来要关闭「阻止共有访问操作」\n\n\n\n再执行 ```\nnpm run deploy```,部署成功\n\n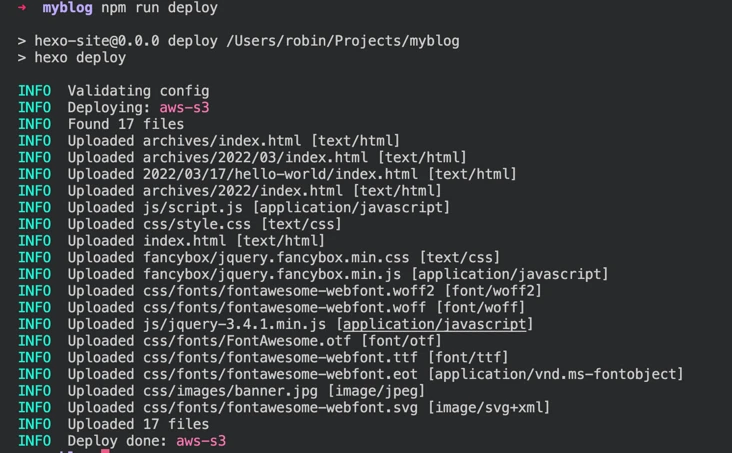\n\n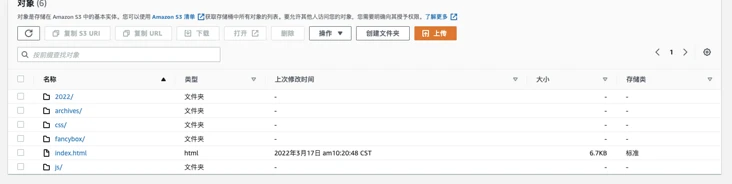\n\n### **访问配置**\n部署成功后,开启静态网站托管功能\n\n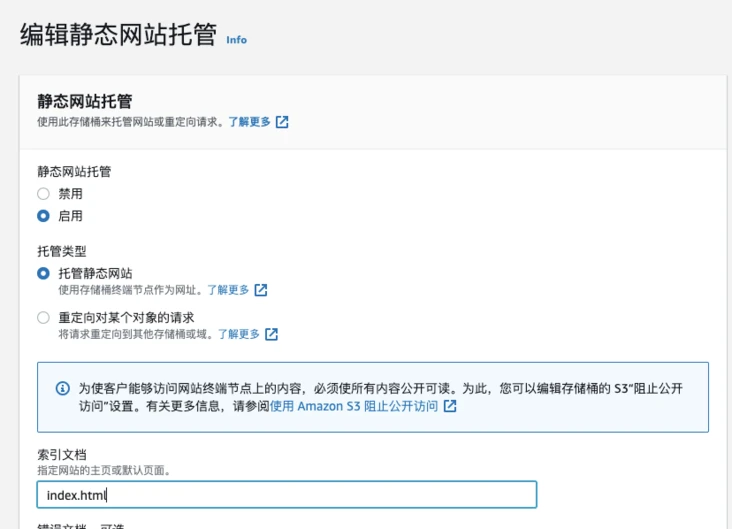\n\n访问域名 [http://robinblog.s3-website-ap-northeast-1.amazonaws.com/](http://robinblog.s3-website-a...) 成功\n\n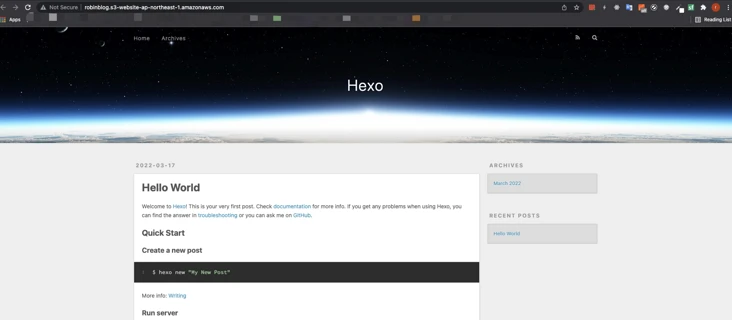\n\n### **总结**\n部署确实很方便,但文档还是不太完善,文档中提到「获取凭证」的操作,其中配置 IAM 操作权限也是关键步骤,在文档中确一笔带过,如下图:\n\n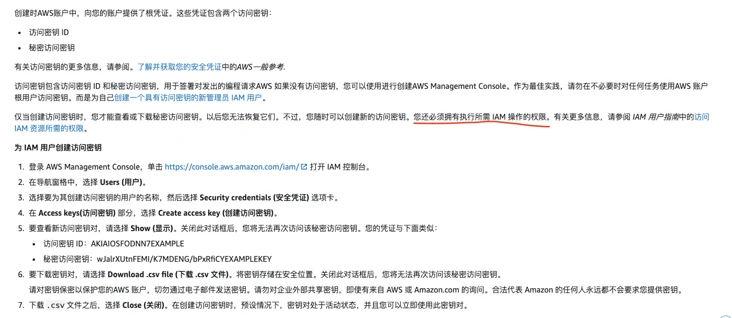\n\n在这块花费了不少时间。\n\n更多实操过程可参考 [https://aws.amazon.com/cn/getting-started/?nc2=h_ql_le_gs&trk=4601add5-b05e-40e5-86a4-84b8eec3a582&sc_channel=ba](https://aws.amazon.com/cn/getting-started/?nc2=h_ql_le_gs&trk=4601add5-b05e-40e5-86a4-84b8eec3a582&sc_channel=ba)\n\n","render":"<p>由于 github 访问不太稳定,觉得将博客迁移到 Amazon 上。可以借助 Amazon 存储的功能。</p>\n<p><img src=\"https://awsdevweb.s3.cn-north-1.amazonaws.com.cn/b8acf8dcc4e347989ed214458e5309ce_image.png\" alt=\"image.png\" /></p>\n<ul>\n<li>为什么选择 hexo</li>\n<li>生成页面速度快</li>\n<li>支持 markdown</li>\n<li>一键部署</li>\n<li>超强的扩展性</li>\n<li>海量的插件</li>\n</ul>\n<h4><a id=\"_11\"></a><strong>创建博客</strong></h4>\n<pre><code class=\"lang-\"># 安装\nnpm install hexo-cli -g\n\n# 创建博客\nhexo init myblog\ncd myblog\nnpm install\n\n# 本地运行\nhexo server\n</code></pre>\n<p>这短短的几步,博客便创建成功了。</p>\n<p><img src=\"https://awsdevweb.s3.cn-north-1.amazonaws.com.cn/5d2f159e05ce44ef913aeeb1bbd4315a_image.png\" alt=\"image.png\" /></p>\n<h3><a id=\"_29\"></a><strong>安装部署工具</strong></h3>\n<pre><code class=\"lang-\"># 安装\nnpm install hexo-deployer-Amazon Web Services-s3 --save-dev\n</code></pre>\n<pre><code class=\"lang-\"># 将部署配置放入 _config.yml\ndeploy:\n type: Amazon Web Services-s3 # 插件的名字\n region: us-east-1 # 存储桶所在区域\n bucket: my-bucket # 存储桶名字\n</code></pre>\n<h3><a id=\"Amazon__43\"></a><strong>Amazon 使用指南</strong></h3>\n<p>注册地址:<a href=\"https://aws.amazon.com/cn/free/?trk=92861c17-b0b0-4e0a-9f78-8d60bc5e2fe2&sc_channel=ba&all-free-tier.sort-by=item.additionalFields.SortRank&all-free-tier.sort-order=asc&awsf.Free%20Tier%20Types=*all&awsf.Free%20Tier%20Categories=*all\" target=\"_blank\">https://aws.amazon.com/cn/free/?trk=92861c17-b0b0-4e0a-9f78-8d60bc5e2fe2&sc_channel=ba&all-free-tier.sort-by=item.additionalFields.SortRank&all-free-tier.sort-order=asc&awsf.Free%20Tier%20Types=*all&awsf.Free%20Tier%20Categories=*all</a><br />\n实操文档:<a href=\"https://aws.amazon.com/cn/getting-started/hands-on/how-to-host-static-website-on-cloud/?trk=ed0d7922-914e-49cb-8a1d-d714e5133565&sc_channel=ba\" target=\"_blank\">https://aws.amazon.com/cn/getting-started/hands-on/how-to-host-static-website-on-cloud/?trk=ed0d7922-914e-49cb-8a1d-d714e5133565&sc_channel=ba</a></p>\n<h3><a id=\"Amazon__46\"></a><strong>Amazon 存储介绍</strong></h3>\n<p>S3 是一种对象存储服务,提供行业领先的可扩展性、数据可用性、安全性和性能。首年使用会有 5 GB 的免费存储空空间。</p>\n<p>接下来,就需要我们在 Amazon 上创建存储。</p>\n<h3><a id=\"_51\"></a><strong>创建存储桶</strong></h3>\n<p><img src=\"https://awsdevweb.s3.cn-north-1.amazonaws.com.cn/2ada38b569fb4744ba352e4c69354729_image.png\" alt=\"image.png\" /></p>\n<p>保存后</p>\n<p><img src=\"https://awsdevweb.s3.cn-north-1.amazonaws.com.cn/38bfb1ada6dd44048a0661ef97177071_image.png\" alt=\"image.png\" /></p>\n<p>此时,更新 deploy 配置</p>\n<pre><code class=\"lang-\"># 将部署配置放入 _config.yml\ndeploy:\n type: Amazon Web Services-s3 # 插件的名字\n region: ap-northeast-1 # 存储桶所在区域\n bucket: robinblog # 存储桶名字\n</code></pre>\n<h3><a id=\"_69\"></a><strong>凭证</strong></h3>\n<p>凭证的作用是为了获得 Amazon s3 存储的控制权限,便于部署静态网站。进入<a href=\"https://docs.aws.amazon.com/zh_cn/sdk-for-javascript/v2/developer-guide/configuring-the-jssdk.html\" target=\"_blank\">官方文档</a>,需要生成凭证、配置策略、配置凭证。</p>\n<h4><a id=\"_72\"></a><strong>生成凭证</strong></h4>\n<ol>\n<li>登录 Amazon Management Console,单击 <a href=\"https://signin.aws.amazon.com/signin?redirect_uri=https%3A%2F%2Fus-east-1.console.aws.amazon.com%2Fiam%2F%3Fregion%3Dus-east-1%26state%3DhashArgs%2523%26isauthcode%3Dtrue&client_id=arn%3Aaws%3Aiam%3A%3A015428540659%3Auser%2Fiam&forceMobileApp=0&code_challenge=ywtenoQY-KbddCLWkKCBfLRXaU6GykgCu0F63fnSfYY&code_challenge_method=SHA-256\" target=\"_blank\">https://signin.aws.amazon.com/signin?redirect_uri=https%3A%2F%2Fus-east-1.console.aws.amazon.com%2Fiam%2F%3Fregion%3Dus-east-1%26state%3DhashArgs%2523%26isauthcode%3Dtrue&client_id=arn%3Aaws%3Aiam%3A%3A015428540659%3Auser%2Fiam&forceMobileApp=0&code_challenge=ywtenoQY-KbddCLWkKCBfLRXaU6GykgCu0F63fnSfYY&code_challenge_method=SHA-256</a> 打开 IAM 控制台。</li>\n<li>在导航窗格中,选择 Users (用户)。</li>\n<li>选择要为其创建访问密钥的用户的名称,然后选择 Security credentials (安全凭证) 选项卡。</li>\n<li>在 Access keys(访问密钥) 部分,选择 Create access key (创建访问密钥)。</li>\n<li>要查看新访问密钥对,请选择 Show (显示)。关闭此对话框后,您将无法再次访问该秘密访问密钥。您的凭证与下面类似:</li>\n</ol>\n<ul>\n<li>访问密钥 ID:AKIAIOSFODNN7EXAMPLE</li>\n<li>秘密访问密钥:wJalrXUtnFEMI/K7MDENG/bPxRfiCYEXAMPLEKEY</li>\n</ul>\n<ol start=\"5\">\n<li>要下载密钥对,请选择 Download .csv file (下载 .csv 文件)。将密钥存储在安全位置。关闭此对话框后,您将无法再次访问该秘密访问密钥。</li>\n<li>下载 .csv 文件之后,选择 Close (关闭)。在创建访问密钥时,预设情况下,密钥对处于活动状态,并且您可以立即使用此密钥对。</li>\n<li>凭证生成后,还必须拥有执行所需 IAM 操作的权限。具体配置流程,请参阅 IAM 用户指南中的<a href=\"https://docs.aws.amazon.com/IAM/latest/UserGuide/access_permissions-required.html\" target=\"_blank\">访问 IAM 资源所需的权限</a>,下面是我配置的相关策略</li>\n</ol>\n<h3><a id=\"_85\"></a><strong>配置策略</strong></h3>\n<pre><code class=\"lang-\">{\n "Version": "2012-10-17",\n "Statement": [\n {\n "Sid": "VisualEditor0",\n "Effect": "Allow",\n "Action": [\n "s3:*",\n "s3-object-lambda:*"\n ],\n "Resource": "*"\n }\n ]\n}\n</code></pre>\n<h3><a id=\"_103\"></a><strong>配置凭证</strong></h3>\n<p>亚马逊云科技提供多种配置凭证的方式</p>\n<ol>\n<li>从加载 Amazon Identity and Access Management适用于 Amazon EC2 的 (IAM) 角色</li>\n<li>从共享凭证文件 (~/.aws/credentials) 加载</li>\n<li>从环境变量加载</li>\n<li>从磁盘上的 JSON 文件加载</li>\n<li>JavaScript 开发工具包提供的其他 credential-provider 类</li>\n</ol>\n<p>我采取了方式2 ,从共享凭证文件 (~/.aws/credentials) 加载</p>\n<pre><code class=\"lang-\">[default]\naws_access_key_id = <YOUR_ACCESS_KEY_ID>\naws_secret_access_key = <YOUR_SECRET_ACCESS_KEY>\n</code></pre>\n<p>看文档发现,可以通过 Amazon Web Services CLI 配置凭证,安装操作官方文档很详细看这里,我们重点介绍下配置凭证的过程。</p>\n<p>首次安装成功,命令行执行 <code> Amazon Web Services configure</code> 配置如下:</p>\n<p><img src=\"https://awsdevweb.s3.cn-north-1.amazonaws.com.cn/40f92c0e62f44e43a9b2096cde813c7d_image.png\" alt=\"image.png\" /></p>\n<p>配置成功后,同样会在 <code> ~/.aws/credentials</code> 文件中创建对应的字段</p>\n<p><img src=\"https://awsdevweb.s3.cn-north-1.amazonaws.com.cn/c96300ad0cbf412b894c75ec944086cb_image.png\" alt=\"image.png\" /></p>\n<p>至此,配置完成。</p>\n<h3><a id=\"_134\"></a><strong>部署</strong></h3>\n<pre><code class=\"lang-\">`# 构建\nnpm run build\n</code></pre>\n<pre><code class=\"lang-\">部署\nnpm run deploy`\n</code></pre>\n<p>发现报错,<code> The bucket does not allow ACLs</code>,还需要在存储中开启<code> ACLs</code></p>\n<p><img src=\"https://awsdevweb.s3.cn-north-1.amazonaws.com.cn/c33e646ab07d4e6fad284982d70316b5_image.png\" alt=\"image.png\" /></p>\n<p>接下来要关闭「阻止共有访问操作」</p>\n<p><img src=\"https://awsdevweb.s3.cn-north-1.amazonaws.com.cn/c39eb8a7820b4bdc9980e53333049a3e_image.png\" alt=\"image.png\" /></p>\n<p>再执行 <code> npm run deploy</code>,部署成功</p>\n<p><img src=\"https://awsdevweb.s3.cn-north-1.amazonaws.com.cn/593784436e38425ea7aff3093fc7b9c2_image.png\" alt=\"image.png\" /></p>\n<p><img src=\"https://awsdevweb.s3.cn-north-1.amazonaws.com.cn/a14d29555bfc4210b2a23bfa9c49aeab_image.png\" alt=\"image.png\" /></p>\n<h3><a id=\"_164\"></a><strong>访问配置</strong></h3>\n<p>部署成功后,开启静态网站托管功能</p>\n<p><img src=\"https://awsdevweb.s3.cn-north-1.amazonaws.com.cn/de6060abefb643fa80046b5f321b6f9c_image.png\" alt=\"image.png\" /></p>\n<p>访问域名 <a href=\"http://robinblog.s3-website-a...\" target=\"_blank\">http://robinblog.s3-website-ap-northeast-1.amazonaws.com/</a> 成功</p>\n<p><img src=\"https://awsdevweb.s3.cn-north-1.amazonaws.com.cn/af21ee15928f490780b2f6d5d246117e_image.png\" alt=\"image.png\" /></p>\n<h3><a id=\"_173\"></a><strong>总结</strong></h3>\n<p>部署确实很方便,但文档还是不太完善,文档中提到「获取凭证」的操作,其中配置 IAM 操作权限也是关键步骤,在文档中确一笔带过,如下图:</p>\n<p><img src=\"https://awsdevweb.s3.cn-north-1.amazonaws.com.cn/73cd31e5a34340fab9c663a37a638a2d_image.png\" alt=\"image.png\" /></p>\n<p>在这块花费了不少时间。</p>\n<p>更多实操过程可参考 <a href=\"https://aws.amazon.com/cn/getting-started/?nc2=h_ql_le_gs&trk=4601add5-b05e-40e5-86a4-84b8eec3a582&sc_channel=ba\" target=\"_blank\">https://aws.amazon.com/cn/getting-started/?nc2=h_ql_le_gs&trk=4601add5-b05e-40e5-86a4-84b8eec3a582&sc_channel=ba</a></p>\n<p><img src=\"https://awsdevweb.s3.cn-north-1.amazonaws.com.cn/f8b22d160f7f430faaa25e9ff1591dc8_Builder%20%E4%B8%93%E6%A0%8F1.jpg\" alt=\"Builder 专栏1.jpg\" /></p>\n"}
手把手教你搭建博客
GitHub
Amazon Simple Storage Service (S3)
Amazon EC2

 0
0 0
0 相关产品
相关产品
 相关产品
相关产品亚马逊云科技解决方案 基于行业客户应用场景及技术领域的解决方案
联系亚马逊云科技专家
亚马逊云科技解决方案
基于行业客户应用场景及技术领域的解决方案
联系专家

0
目录

 分享
分享 点赞
点赞 收藏
收藏 目录
目录立即注册,开启您的免费套餐
立即关注

亚马逊云开发者
公众号

User Group
公众号

亚马逊云科技
官方小程序
“AWS” 是 “Amazon Web Services” 的缩写,在此网站不作为商标展示。
立即关注
亚马逊云开发者
公众号
User Group
公众号
亚马逊云科技
官方小程序
“AWS” 是 “Amazon Web Services” 的缩写,在此网站不作为商标展示。
关于我们 
更多资源
开发者工具
更多支持
立即关注
亚马逊云开发者
公众号
User Group
公众号
亚马逊云科技
官方小程序
“AWS” 是 “Amazon Web Services” 的缩写,在此网站不作为商标展示。
